
This survey will take about 1 minute.
Your answers will help us to improve our website.
FF7 Rebirth
Chapter 11: The Long Shadow of Shinra Walkthrough
A walkthrough for Chapter 11: The Long Shadow of Shinra in Final Fantasy 7 Rebirth (FF7 Rebirth). Read on for a detailed guide of Chapter 11, including item locations, rewards, bosses, as well as useful tips like which of the 3 Nibelheim pipes to choose and how to throw boxes as Cait Sith!
| ◄ Previous Chapter | Next Chapter ▶ |
|---|---|
|
Chapter 10 Watcher of the Vale |
Chapter 12 A Golden Key |
List of Contents
Chapter 11: The Long Shadow of Shinra Walkthrough
| Chapter 11 Main Objectives | |
|---|---|
| 1 | Exploring Nibelheim |
| 2 |
Mt. Nibel and Nibelheim Reactor ┗ Boss Battle: Diabolic Variant |
| 3 | Shinra Mansion and Mako Research Facility ┗ Boss Battle: Yin and Yang |
| 4 | Shinra Mansion Boss Rush ┗ Boss Battle: Forgotten Specimen ┗ Boss Battle: Galian Beast ┗ Boss Battle: Roche |
Click on any of the links above to jump to the section!
Exploring Nibelheim Walkthrough
| Objectives | |
|---|---|
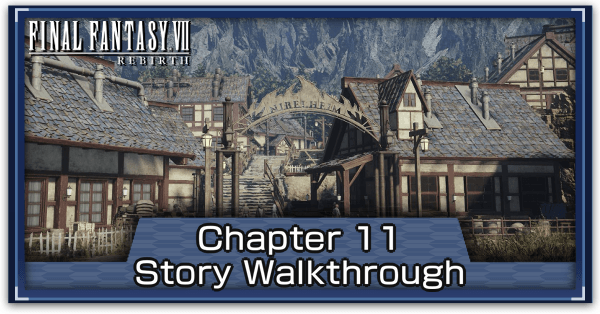
| 1 | 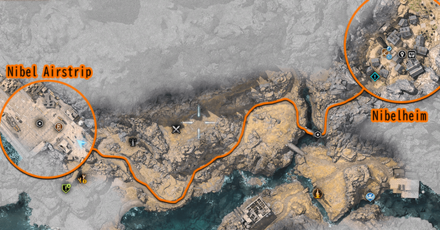 Destination: Nibelheim Chapter 11 begins with Cloud and the gang arriving at the Nibel Airstrip. To progress, start making your way towards the town of Nibelheim at the northeast corner of the region. |
| 2 | Once you reach Nibelheim, Cloud will be given the chance to seek out his companions. Look for them and start a conversation that affects your potential romance options for Chapter 12. ▶ Jump to Nibelheim Romance Dialogue Choices |
| 3 | After speaking to your companions, go up to the second floor of the Nidhogg Inn to start a cutscene. After it ends, go to the Town Hall and interact with Cait Sith. |
| 4 | When you're ready, meet up with everyone at the northeast exit of town. Parties will be fixed during the next section, so make sure to prep your equipment and materia setups for Cloud, Tifa, and Yuffie. Tip: You can buy weapons and armor for them at the General Store. There will also be a vending machine near the start of the climb where you can buy Materia. |
Refusing to Go to the Reactor Re-Enables Fast Travel and Exploration
Once you regroup with your party, Cloud will be asked if they should head to the mako reactor. Players who want to keep exploring the region can select No here to re-enable fast travel and exploration. To head to the reactor, simply go back to this location and say Yes.
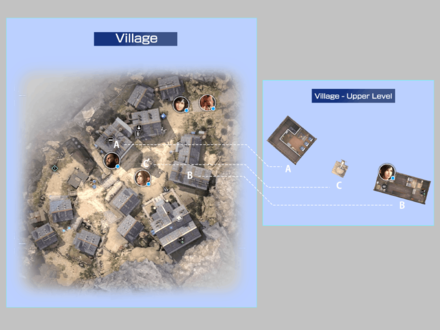
Speaking to Companions in Nibelheim Affects Cloud's Relationships
| Nibelheim Companion Locations | |
|---|---|
 |
|
| Tifa | On the second floor of her house (now the Treatment Center), inside her room (the room with the piano). |
| Aerith | At the water tower in the center of town, right next to where you start. |
| Barret | At the first floor of the Nidhogg Inn. Turn left as you enter to find him. |
| Yuffie | Next to the steps leading up to the northeast exit of Nibelheim. |
| Red XIII | Go up the steps from where Yuffie was to find Red XIII. |
Once you arrive at the newly rebuilt Nibelheim, the gang will split up. Seek out your companions and talk to them to progress Cloud's relationships and romance options. This is one of your last chances to influence the Chapter 12 Gold Saucer Date.
◎ - Best Answer, 〇 - Good Answer, △ - Bad Answer
| Character | Dialogue Choices | Results |
|---|---|---|
 Tifa Tifa |
Have I helped you get through it at all? | ◎ |
| Like it was fate. | 〇 | |
| I never knew that. | △ | |
 Aerith Aerith |
Sounds like something I’d do. | ◎ |
| What? No way. | 〇 | |
| That's not funny. | △ | |
 Barret Barret |
Hell yeah you’re right. Screw them. | ◎ |
| I wanna know why they put the robes here. | 〇 | |
| Not much we can do. | △ | |
 Yuffie Yuffie |
Yup. | ◎ |
| Come to think of it... nope. | 〇 | |
| Dunno. | △ | |
 Red XIII Red XIII |
This isn’t my hometown. | ◎ |
| I never liked that place either. | 〇 | |
| Yeah. Does kinda make you feel like shit. | △ |
Romance Guide: All Dialogue Choices
Mt. Nibel and Nibelheim Reactor Walkthrough
| Objectives | |
|---|---|
| 1 | Thankfully, you won't have to retrace your steps from Chapter 1. A new bridge was built that leads directly to Mt. Nibel. Head north until you reach the Gunnthra Bridge. Cross it to reach the foot of Mt. Nibel. |
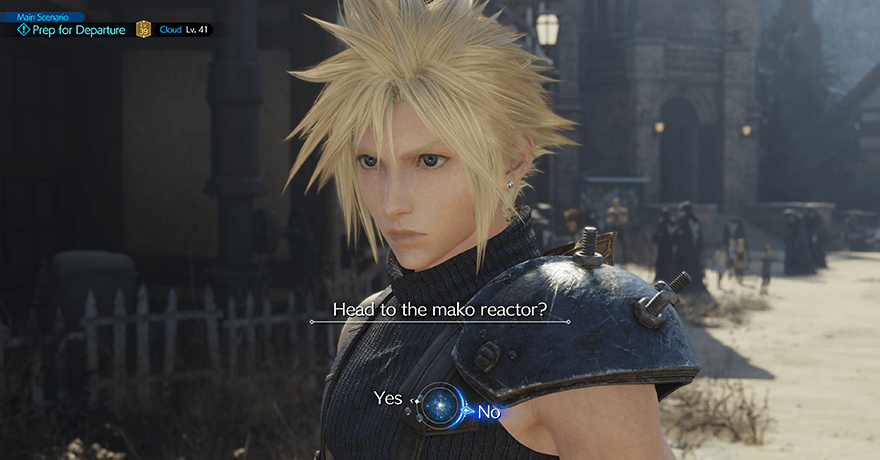
| 2 | After picking up the gloves, keep heading west, crossing over a pair of new rope bridges along the way. Midway through, a cutscene will play where Cloud remembers the events from Chapter 1. |
| 3 | Once Cloud recovers, cross the remainder of the bridge and defeat the Velociwing and 2 Insectoid Chimeras waiting for you on the other side. Tip: This area will have a bench, vending machine, and maghnata automat. Make use of them to prepare for the fights ahead. |
| 4 | 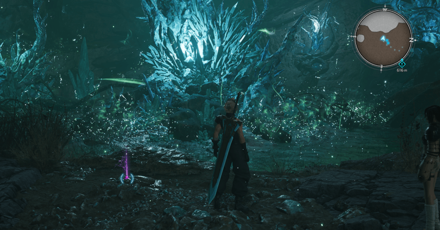 When ready, head inside the Gnipahellir Ravine. Defeat the Twin Brains before heading down to the Mako Spring from Chapter 1. Watch Cloud creepily parrot back Sephiroth's words from Chapter 1 before proceeding. |
| 5 | Retrace your steps from Chapter 1, heading north and up while fighting enemies along the way. Eventually you'll reach a broken wood platform preventing you from continuing. Wait for Yuffie to use her grappling hook in order to progress. |
| 6 | Climp the rope and follow the cliffside south. Defeat the Zu blocking your way in order to proceed. Tip: Zu enemies are weak to Wind damage. Use Wind spells or Tifa's Reverse Gale to pressure the Zu. |
| 7 | With the Zu defeated, continue making your way to the top. Eventually, you'll reach an area with two Screamers. Defeat the enemies before using the yellow ledges to climb your way to the top of the mountain.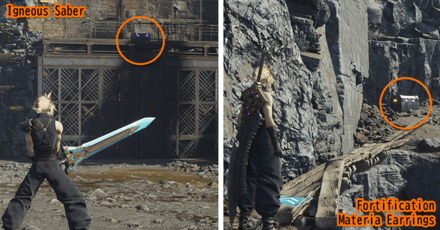 |
| 8 | Once you reach the North Summit, you will arrive at a crossroads. Head southeast first to collect some free materia from the ridge before backtracking and heading northeast. Defeat the Dragon waiting for you at the end to access the Mako Distribution Plant.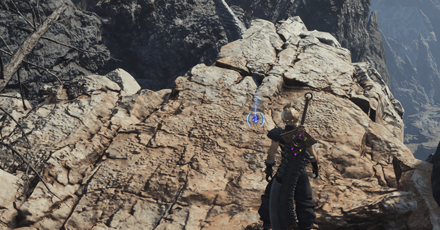 |
| 9 |  Inside the Mako Distribution Plant, you'll be tasked to reach the first floor. Choose between any of the three pipes and use it to go down; you should be able to reach the bottom without a problem. At the bottom, find a cart you can push, and place it next to the wooden fence. Climb on top of it, then climb over the fence. ▶ Which of the 3 Pipes Should You Choose? |
| 10 | After activating the switch to restore power, continue deeper into the Distrubution Plant. Take the elevator up to reach the entrance of the Nibel Reactor. |
| 11 | Upon reaching the steps of the reactor, a cutscene will play. After it ends, rest on the nearby bench and purchase items to prepare for the upcoming boss fight. |
| 12 | 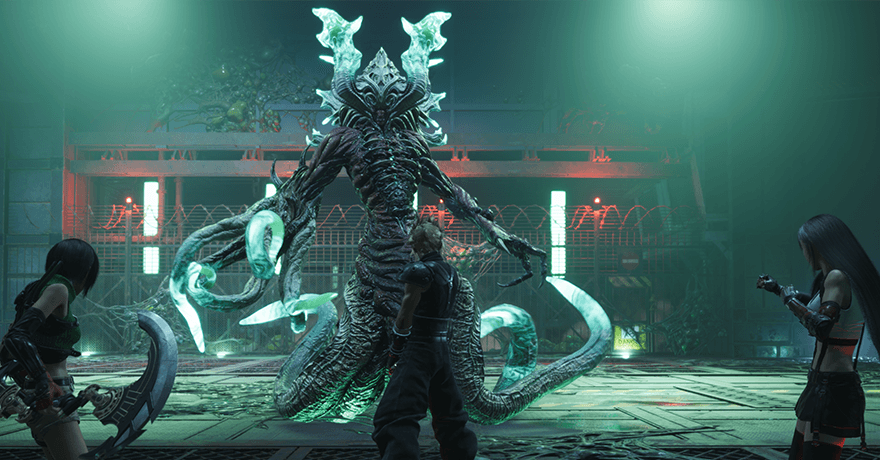 Once you're ready, head inside the reactor and take the elevator down. Defeat the Diabolic Variant boss waiting for you to reach the inner reactor. ┗ Recommended Party for Diabolic Variant ▶︎ How to Beat Diabolic Variant Tip: This boss is weak to Ice. Use Yuffie's Ice Ninjutsu or slotted Ice Materia to exploit the boss. |
| 13 |  After beating the boss, continue deeper into the reactor until you find the body of Murasaki. Watch the cutscene and Yuffie should hand you the key item, Murasaki's Employee ID Card. |
Which of the 3 Nibelheim Pipes Should You Choose?

The simplest answer is that any will do since you'll be able to re-activate the elevator on the first floor. This allows you to return to the top (fifth floor) and re-do the pipe slides as many times as you want in order to get all the rewards.
Most of the rewards in this section won't be worth the hassle. However, for those curious, here's everything you can earn in this section of the Mako Distribution Plant:
- Level 4: Southern platform will have a chest containing Cosmotite Ore as well as a few material pick-ups on the ground.
- Level 3: Will have a bunch of Shinra Boxes for you to break in order to get consumables as well as scattered material pickups.
- Level 2: Will contain two Screamers. Defeat them to access the chest that contains a Hi-Ether.
Shinra Mansion and Mako Research Facility Walkthrough
| Objectives | |
|---|---|
| 1 | After the boss fight, you'll swap back to playing as Cait Sith, Barret, and Aerith in Nibelheim's Town Hall. Start this segment by heading to the Shinra Mansion via the northeast exit of town. Tip: You'll spend most of the chapter with these characters, especially Cait Sith, so make sure you prepare their loadouts in advance. |
| 2 | Once inside the mansion, take the elevator down to the Underground Cavern. Hojo's AI will spot you and use a trapdoor to capture the squad, bringing you down into a new area called the Mako Research Facility. |
| 3 | During this segment, you'll be making use of Cait Sith's special abilities - rolling through ducts and throwing boxes with the moogle. Begin by rolling out of your cell. Next, use the Moogle to throw a box at the cell door switch, opening it and freeing Barret and Aerith. ▶ How to Throw Boxes Using Cait Sith |
| 4 | Once the gang is free, make your way down the hall, defeating any enemies you encounter along the way. |
| 5 | After you exit the tunnel into a well-lit room, interact with the terminal to call the elevator. It will stop due to the jutting pipe. Throw a box at the pipe to re-activate and ride the elevator to the top. Tip: Make sure to face the pipe so that you can pull the left stick all the way down the center of the semicircle. This allows you to make the strongest possible throw. |
| 6 | At the top, continue through the facility until you reach a large room with a locked cell door. Use Cait Sith to roll through the duct and reach the other side. Defeat the Bahba Velamyu and Black Bat to access the next throwing puzzle. |
| 7 |  The puzzle in this room requires you to pull a cushioned box beneath the Shinra Box chute in order to avoid breaking spawned boxes. It will be found in a side room that has a chest. |
| 8 | Once the cushioned box is set, simply spawn and pick up a Shinra Box. Throw it at the valve with a flashing red light to restore power and allow Barret and Aerith to rejoin you. |
| 9 | Again, continue through the facility until you reach a room with a Rictus and Black Bat. Defeat them to access the next throwing puzzle. |
| 10 | For this next throwing puzzle, you'll need to throw 2 Mako Accelerant Boxes into the rotating container with red lights. You won't be able to throw far enough when it stops, so make sure to lead your shots in order to get the boxes into the container at the right time. Note: After the first successful throw, the rotation speeds up. Adjust your aim accordingly to compensate. |
| 11 | Once you complete the puzzle, the next room should unlock. Head inside and defeat the enemies waiting for you. Then, use the elevator in the same room to reach Ventilation Control - 1F and defeat the enemies inside. Tip: After defeating the enemies in this room, rest up at the nearby bench and use the vending machines to prep for Cait Sith's solo segment. There will be 1700 Gil inside a nearby chest for you to collect as well. |
| 12 | 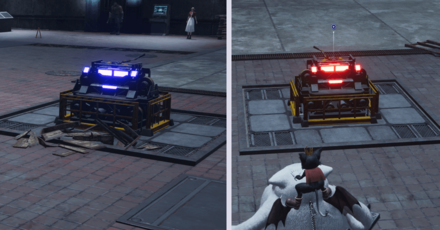 The key to this next segment will be the Switch that appears nearby. To begin, throw a Shinra Box at it to switch its lights to blue. This opens a blue duct on the southeast wall of the room that you can use to go up by one level. |
| 13 | Once you reach the second floor, defeat the 2 Black Bats to reach the next blue duct. Use it to reach the next level. |
| 14 |  At the 3rd Floor, you will encounter an Adjudicator enemy. Defeat it in order to proceed with the throwing puzzle. For this section, you'll need to throw a box down at the Switch on the 1st floor to open the red duct. |
| 15 | Go through the red duct in order to reach a new area called Material Storage. Deal with the 2 Adjudicators inside in order to access the next throwing puzzle. |
| 16 |  This next puzzle is pretty simple. Throw 3 Shinra Boxes onto Weight-Sensitive Elevator to bring it down to your level. Once your aboard, break the 3 boxes to allow the elevator to go up. Tip: When carrying boxes as Cait Sith, you can speed up your movement by holding down R2 (similar to sprinting while exploring). |
| 17 |  Before you do anything on this level, make sure you have a method for dealing Fire Damage. Once you do, interact with the terminal to summon the Yin and Yang mini-boss. ▶︎ How to Beat Yin and Yang Tip: Yang uses a lot of magic spells while Yin uses physical attacks. Use Fire Spells to deal damage. Once a head is neutralized, Yin and Yang will be pressured. |
| 18 | Once Yin and Yang are knocked out, Aerith and Barret will join you at the upper level. Use the elevator in the next room to reach Classified Equipment Storage. |
| 18a | 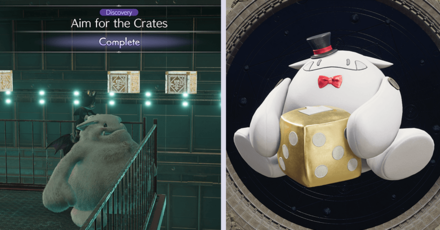 Aim for the Crates Midway through the elevator ride, a safety inspection will trigger. Hop aboard your moogle and complete the short minigame by throwing boxes at the ones on the conveyor belt. You will need to destroy 10 boxes. |
| 19 | After reaching Classified Equipment Storage, use the benches and vending machines to rest and resupply. The rest of the level will be a Boss Rush for the team. Prepare accordingly before leaving this room. |
| 20 |
 Passcode: 36-10-59-97 The southeast wall of this room will contain moveable crates. Move them to reveal the passcode: 36-10-59-97. Use the code to open the boss room's door. |
How to Throw Boxes Using Cait Sith
To throw boxes as far as possible, make sure you're directly facing your target and pulling back to the bottom-center of the semicircle. You can also turn off controller vibration to help with aiming.
| 1 | 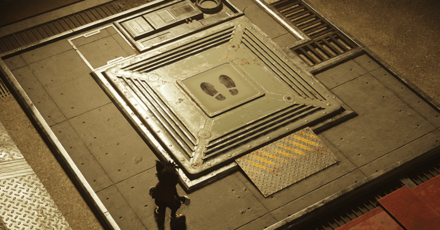 Spawn a Shinra Box using the platforms with feet symbols on them. |
|---|---|
| 2 | 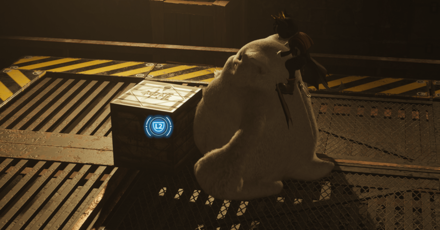 Spawn your moogle by pressing |
| 3 | Bring the box near the object you need to hit and wind up by holding R1. |
| 4 | While holding R1, pull back the Left Analog Stick to aim and change the strength of the throw. Hit Square to throw the object. |
How to Beat Adjudicators as Cait Sith
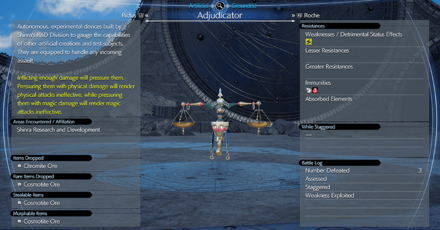
Adjudicators are a tricky enemy to fight since their resistances and immunities will alternate between Physical and Magical. The easiest way to deal with Adjudicators during this level is to use the Golden Megaphone and Lightning Materia combo.
| 1 | To open the fight, use Cait Sith's melee attacks to build up ATB and the stagger meter. |
|---|---|
| 2 | At 2 ATB charges, use Let's Ride to summon your moogle and Moogle Knuckle to apply pressure using Physical damage. |
| 3 | Once pressured, retreat and use ranged attacks to build up ATB since these are considered Magic attacks. |
| 4 | Once you have at least 1 ATB charge, cast Thundara to stagger the Adjudicator. Finish it off using more Moogle Knuckle casts while staggered. |
Shinra Manor Boss Rush Walkthrough
| Objectives | |
|---|---|
| 1 | 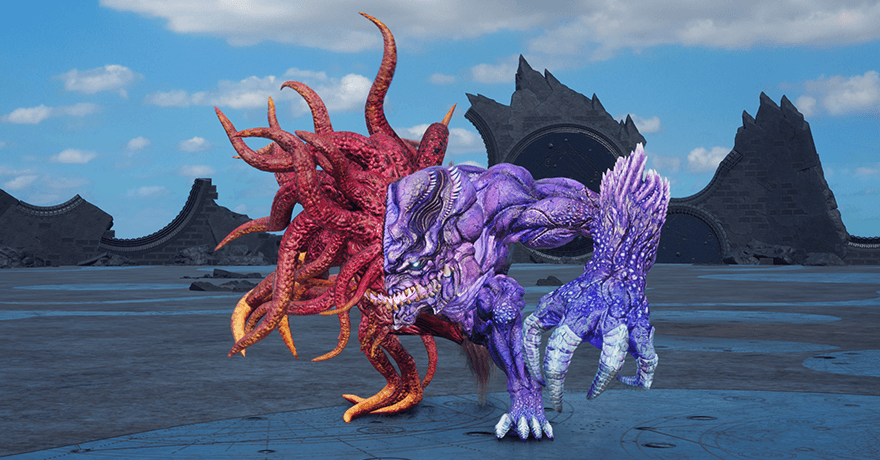 This next section starts with a monologue from Hojo's AI caretaker. Once its speech ends, you will fight the the first of three bosses called the Forgotten Specimen. ┗ Recommended Party for Forgotten Specimen ▶︎ How to Beat Forgotten Specimen Tip: The Forgotten Specimen will be similar to the Adjudicators you fought earlier in the level. Alternate between your party members to deal Physical and Magic damage whenever the boss uses Metamorphose. |
| 2 | After beating the Forgotten Specimen, head up to re-unite with the rest of the gang. Once the cutscene ends, Cait Sith will insist that you explore the lab further. During this segment, Cloud and Cait Sith are required to be in the active party. This gives you the chance to fill the last spot with a choice of your own in preparation for the Galian Beast boss fight. |
| 3 | 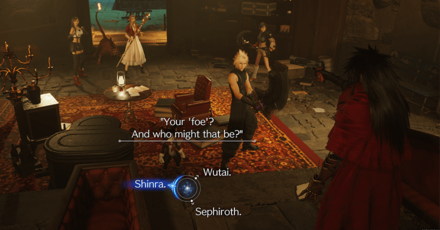 Once you have the final party member set, head on over into the door with a No Entry sign next to it. Go inside to meet Vincent Valentine for the first time. Note: It does not matter what you pick when he asks you who your foe is as it has no impact on the current story. Pick Shinra since it is the safest answer. |
| 4 | After meeting Vincent, head over to the now unlocked room. Once Cait Sith parks himself in front of the active terminal, enter the room on your right to trigger a cutscene that transitions to the next boss fight. |
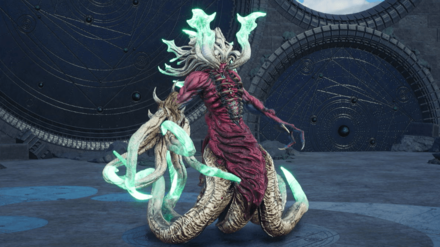
| 5 |  The cutscene ends with Vincent losing control of Chaos. Defeat the Galian Beast to calm him down. Inflicting enough damage to the Galian Beast will pressure it. ┗ Recommended Party for Galian Beast ▶︎ How to Beat Galian Beast |
| 6 | Beating the Galian Beast will unlock the elevator that allows you to return to Shinra Manor. Use it to return to the ground floor of the manor. |
| 7 | Outside the manor, another cutscene will trigger. Once it ends, rest at the bench and resupply at the vending machines to prepare for the final boss fight. When ready, leave the manor grounds. |
| 8 |  The last fight will be a 1-on-1 duel between Roche and Cloud. Roche will no longer have a Fire weakness in this fight. Deal damage to him after he uses a special attack in order to pressure him. ▶︎ How to Beat Roche |
| 9 | Beating Roche unlocks the Nibel region for exploration once again. Return to the Nibel Airstrip to link up with Cid. He'll take you back to Gold Saucer aboard the Tiny Bronco, ending Chapter 11. |
Chapter 11 Boss Strategy Guide
| Chapter 11 Bosses Guide | |
|---|---|
| Diabolic Variant | Yin and Yang |
| Forgotten Specimen | Galian Beast |
| Roche | |
How to Beat Diabolic Variant
| Diabolic Variant | |
|---|---|
 |
|
| Location | Chapter Unlocked |
| Nibelheim Reactor | The Long Shadow of Shinra |
| Weaknesses | Lesser Resistances |
|
|
None
|
| Greater Resistances | Immunities |
|
None
|
|
| Absorbed Elements | When Triggered |
|
None
|
None
|
| Pressure Conditions | |
| Destroying the tentacles on its right arm will pressure it. It will summon a clone once it has taken enough damage. | |
Found inside the Nibelheim Reactor
You will fight the Diabolic Variant inside the Nibelheim Reactor in the Nibel region during Chapter 11.
Fixed Party Setup and Roles
| Recommended Party Setup | |
|---|---|
 Cloud Cloud
|
・Punish the boss with strong abilities like Infinity's End and Braver once it's staggered. ・Pull out different combos once the enemy is pressured or staggered. |
 Yuffie Yuffie
|
・Damage the boss from a distance using Ice Ninjutsu ・Use Doppelganger to summon a copy to deal additional damage and heal |
 Tifa Tifa
|
・Use Unfettered Fury to stagger the boss quickly ・Punish the boss with powerful abilities like Focused Strike once it's staggered. |
Diabolic Variant Boss Fight Tips
- Use Ice to Exploit Weakness
- Focus on destroying its right arm to Pressure
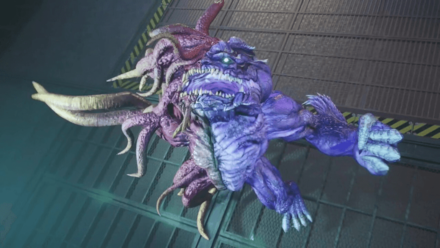
How to Beat Yin and Yang
| Yin and Yang | |
|---|---|
 |
|
| Location | Chapter Unlocked |
| Nibel Region | The Long Shadow of Shinra |
| Weaknesses | Lesser Resistances |
|
|
|
| Greater Resistances | Immunities |
|
None
|
|
| Absorbed Elements | When Triggered |
|
None
|
None
|
| Pressure Conditions | |
| Becomes pressured when either head is incapacitated, but the remaining head will go berserk. | |
Found inside the Mako Research Facility
You will fight the Yin and Yang inside the Mako Research Facility in the Nibel region during Chapter 11.
Yin and Yang Boss Fight Tips
- Use Fire to Exploit Weakness
- Equip Varvados to Increase Magic Defense
- Always Summon Moogle to Fight
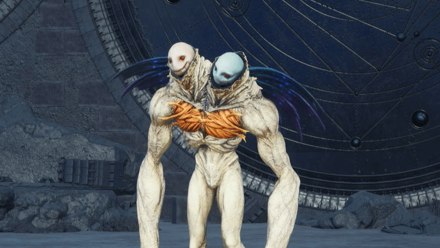
How to Beat Forgotten Specimen
| Forgotten Specimen | |
|---|---|
 |
|
| Location | Chapter Unlocked |
| Mako Research Facility, Shinra Manor | The Long Shadow of Shinra |
| Weaknesses | Lesser Resistances |
|
None
|
|
| Greater Resistances | Immunities |
|
None
|
|
| Absorbed Elements | When Triggered |
|
None
|
|
| Pressure Conditions | |
| Inflicting enough physical damage will make it resistant to physical attacks, while magic damage will make it resistant to magic attacks. Forcing it to switch resistances multiple times will pressure it. Physical damage will dispel Reflect, while magic damage will dispel Shield. | |
Found inside the Mako Research Facility
You will fight the Forgotten Specimen inside the Mako Research Facility in the Nibel region during Chapter 11.
Recommended Party Setup
| Recommended Party Setup | |
|---|---|
 Barret Barret
|
【Tank / Physical Damage】 ・Deal strong physical damage with Maximum Fury and Overcharge ・Build stagger with Focused Shot and Bonus Round ・Use healing items when unable to damage the boss ・Use Lifesaver to tank damage Recommended Level: 40 |
 Aerith Aerith
|
【Support / Magic Damage】 ・Main spellcaster and Magic damage dealer ・Focus on healing or buffs when unable to damage boss Recommended Level: 40 |
 Cait Sith Cait Sith
|
【All Rounder】 ・Can switch between magic and physical attacker ・Summon Moogle to fight and distract the boss Recommended Level: 40 |
Forgotten Specimen Boss Fight Tips
- Attack with the Opposite of the Boss's Resistance
- Check Immunity Before Attacking in 2nd Phase
How to Beat Forgotten Specimen
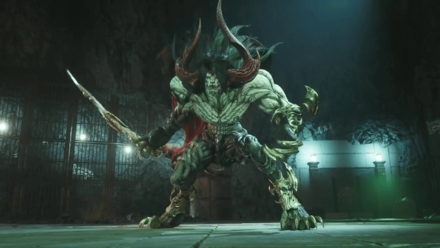
How to Beat Galian Beast
| Galian Beast | |
|---|---|
 |
|
| Location | Chapter Unlocked |
| Nibel Region | The Long Shadow of Shinra |
| Weaknesses | Lesser Resistances |
|
|
|
| Greater Resistances | Immunities |
| Absorbed Elements | When Triggered |
|
None
|
None
|
| Pressure Conditions | |
| Inflicting enough damage will pressure him. Making him flinch during Inner Turmoil or Chaotic Consumption will make him easier to pressure until he recovers. | |
Found inside the Mako Research Facility
You will fight the Galian Beast inside the Mako Research Facility in the Nibel region during Chapter 11.
Recommended Party Setup
| Recommended Party Setup | |
|---|---|
|
Cloud
|
【Damage Dealer / Punisher】 ・Use Firebolt Blade to deal Fire damage on Galian Beast ・Keep Galian Beast at bay while also dealing damage Recommended Level: 42 |
|
Barret
|
【Tank / Spellcaster】 ・Activate Lifesaver to tank damage ・Can be the spellcaster as he can charge ATB fast ・Use Focused Shot or Maximum Fury once the boss is staggered Recommended Level: 42 |
|
Cait Sith
|
【Support】 ・Summon Moogle to help out in battle ・Use Roll o' the Dice if Moogle is summoned and there is an ATB charge for random effects ・Only switch to him if Barret or Cloud are in trouble Recommended Level: 42 |
Galian Beast Boss Fight Tips
- Equip Star Pendant to Counter Poison
- Avoid Chaos Glaives When its HP is Below 60%
How to Beat Roche
| Roche (Chapter 11) | |
|---|---|
 |
|
| Location | Chapter Unlocked |
| Nibelheim | The Long Shadow of Shinra |
| Weaknesses | Lesser Resistances |
|
None
|
|
| Greater Resistances | Immunities |
|
None
|
|
| Absorbed Elements | When Triggered |
|
None
|
None
|
| Pressure Conditions | |
| Inflicting damage after he performs special attacks will pressure him. | |
Found Outside Shinra Manor
You will fight Roche outside the Shinra Manor in Nibelheim near the end of Chapter 11.
Roche Boss Fight Tips
- Use Long-Range Attacks and Continuous Dodging
- Hit Roche After He Uses Special Moves to Pressure
- Use Strong Abilities or Limit Break While Staggered
Chapter 11 Map and Obtainable Items
Maps
| List of Maps | ||
|---|---|---|
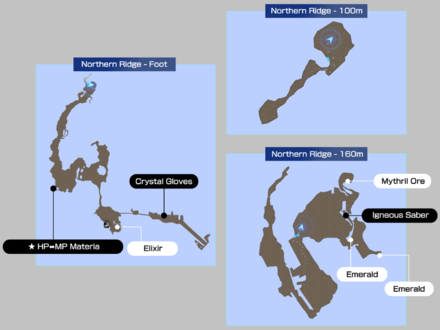
 Nibelheim Nibelheim |
 |
 |
 |
 |
 |
 |
- | - |
Obtainable Items
| Mt. Nibel | ||
|---|---|---|
| Crystal Gloves | Igneous Saber | |
| Fortification Materia Earrings | ||
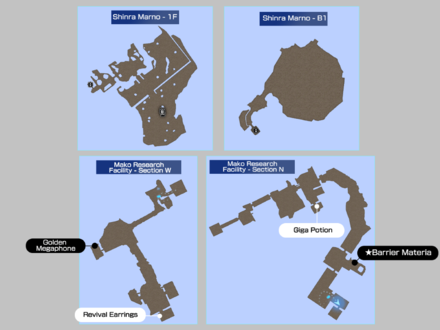
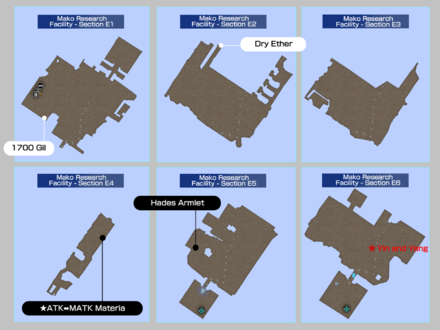
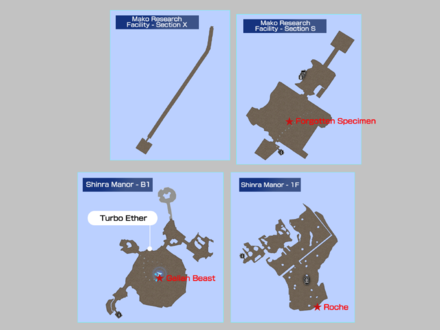
| Mako Research Facility | ||
| Golden Megaphone | Revival Earrings | Giga-Potion |
| Dry Ether | ||
| Hades Armlet | - | - |
This list does not include the items that you get from destroying the wooden crates.
Materia List and How to Get All Materia
FF7 Rebirth Related Guides
| All Story Chapters | |
|---|---|
| Chapter 1 | Fall of a Hero |
| Chapter 2 | A New Journey Begins |
| Chapter 3 | Deeper into Darkness |
| Chapter 4 | Dawn of a New Era |
| Chapter 5 | Blood in the Water |
| Chapter 6 | Fool's Paradise |
| Chapter 7 | Those Left Behind |
| Chapter 8 | All That Glitters |
| Chapter 9 | The Planet Stirs |
| Chapter 10 | Watcher of the Vale |
| Chapter 11 | The Long Shadow of Shinra |
| Chapter 12 | A Golden Key |
| Chapter 13 | Where Angels Fear to Tread |
| Chapter 14 | End of the World |
| How Long to Beat? Game Length | |
| Post-Game Content and How to Get 100% Clear | |
Author

Chapter 11: The Long Shadow of Shinra Walkthrough
Please participate in our site
improvement survey
02/2026
improvement survey
02/2026
Would you assist in
improving Game8's site?
improving Game8's site?

×
We are listening to our users' valuable opinions and discussing how to act on them.
The information collected through this survey will be used for the purpose of improving our services. In addition, the information will only be disclosed a part of a statistic in a format that will not allow identification of personal information.
Begin Survey
Not Now
×
Please rate each item regarding Game8.co's Advertisements.
Amount of Ads
Very Dissatisfied
Somewhat Dissatisfied
Fine
Somewhat Satisfied
Highly Satisfied
Placement of Ads
Timing of Ad Display
Ad Loading Speed
Safeness of Ads
Content of Ads
×
Please rate each item regarding Game8.co's Quality of Articles.
Amount of information
Very Dissatisfied
Somewhat Dissatisfied
Fine
Somewhat Satisfied
Highly Satisfied
Frequency of updates
Speed of new information
Accuracy of articles
Understandibility of articles
Readability of sentences
×
Please rate each item regarding Game8.co's Usability of the Site.
Ease of finding information
Very Dissatisfied
Somewhat Dissatisfied
Fine
Somewhat Satisfied
Highly Satisfied
Loading Speed
Use of Color
Font Size
Visibility of Images
Easy to Understand Layout
×
Please rate each item regarding Game8.co's Message Boards, Comments.
Ease of Writing
Very Dissatisfied
Somewhat Dissatisfied
Fine
Somewhat Satisfied
Highly Satisfied
Readability
Ease in Finding Information
Comment Quality
Comment Quantity
Admin Response
×
Please rate each item regarding Game8.co's Site's new design.
Please rate our site's new design
Very Dissatisfied
Somewhat Dissatisfied
Fine
Somewhat Satisfied
Highly Satisfied
Do you think that the website's design change makes the site easier to use?
Has the new design made it easier for you to find information on the site?
Has the new design improved the overall visual appeal of the site?
How would you rate your overall satisfaction with the new design of the site?
×
How likely are you to recommend Game8 to someone you know?
Very Unlikely
0
1
2
3
4
5
6
7
8
9
10
Very Likely
If you have other opinions regarding potential improvement to the website, please share them with us. We would appreciate your honest opinion.
Note: This is a free response section, so you can proceed without entering anything.
Note: Please be sure not to enter any kind of personal information into your response.
Note: Please be sure not to enter any kind of personal information into your response.
×
Thank You
×
Thank you for participating in our survey! Your answers will help us to improve the quality of our website and services.
We hope you continue to make use of Game8.
We hope you continue to make use of Game8.
Close
Rankings
- We could not find the message board you were looking for.
Gaming News
![MENACE Review [Early Access] | Menacing, But Only at the Start](https://img.game8.co/4406385/400fc86faf7e41a4a05455d432d4d303.png/show)


Popular Games

Genshin Impact Walkthrough & Guides Wiki
Arknights: Endfield Walkthrough & Guides Wiki
Umamusume: Pretty Derby Walkthrough & Guides Wiki
Pokemon TCG Pocket (PTCGP) Strategies & Guides Wiki
Wuthering Waves Walkthrough & Guides Wiki
Honkai: Star Rail Walkthrough & Guides Wiki
Zenless Zone Zero Walkthrough & Guides Wiki
Where Winds Meet Walkthrough & Guides Wiki
Clair Obscur: Expedition 33 Walkthrough & Guides Wiki
Pokemon Legends: Z-A Walkthrough & Guides Wiki


Recommended Games
Fire Emblem Heroes (FEH) Walkthrough & Guides Wiki
Diablo 4: Vessel of Hatred Walkthrough & Guides Wiki
Super Smash Bros. Ultimate Walkthrough & Guides Wiki
Yu-Gi-Oh! Master Duel Walkthrough & Guides Wiki
Pokemon Brilliant Diamond and Shining Pearl (BDSP) Walkthrough & Guides Wiki
Elden Ring Shadow of the Erdtree Walkthrough & Guides Wiki
Monster Hunter World Walkthrough & Guides Wiki
The Legend of Zelda: Tears of the Kingdom Walkthrough & Guides Wiki
Persona 3 Reload Walkthrough & Guides Wiki
Cyberpunk 2077: Ultimate Edition Walkthrough & Guides Wiki


All rights reserved
© SQUARE ENIX CO., LTD. All Rights Reserved.
CHARACTER DESIGN: TETSUYA NOMURA/ROBERTO FERRARI
LOGO ILLUSTRATION: © 1997 YOSHITAKA AMANO
The copyrights of videos of games used in our content and other intellectual property rights belong to the provider of the game.
The contents we provide on this site were created personally by members of the Game8 editorial department.
We refuse the right to reuse or repost content taken without our permission such as data or images to other sites.
Breaking the 10 boxes at the Materials Storage with Cait Sith and Moogle give: 5 Planet's Blessings, 99 Potions, 5 Planet's Favor, Ether, 5 Planet's Benison, 99 Mega Potions, 5 Planet's Splendor, Hi-Ether, 5 Ether Onions, and an Elixir.