Chapter 10: Watcher of the Vale Walkthrough
A walkthrough for Chapter 10: Watcher of the Vale in Final Fantasy 7 Rebirth (FF7 Rebirth). Read on for a detailed guide of Chapter 10, including item locations, rewards, bosses, as well as useful tips for completing this chapter!
| ◄ Previous Chapter | Next Chapter ▶ |
|---|---|
|
Chapter 9 The Planet Stirs |
Chapter 11 The Long Shadow of Shinra |
List of Contents
Chapter 10: Watcher of the Vale Walkthrough
| Chapter 10 Main Objectives | |
|---|---|
| 1 | Get to Cosmo Canyon |
| 2 |
The Trials of Gi ┗ Boss Battle: Gi Nattak |
Click on any of the links above to jump to the section!
Get to Cosmo Canyon Walkthrough
| Objectives | |
|---|---|
| 1 |  Homeward Bound Follow the path until you reach Kamaria's Ranch. Here, you'll unlock the Bonds of Trust side quest, and the Chocobo tracks will be revealed on the map where the Sky Chocobo is located. ▶ Bonds of Trust Walkthrough Note: The Sky Chocobo is not particularly useful for reaching Cosmo Canyon, and this step is not required, so you can skip this if you're planning to do all the side content later on. |
| 2 | 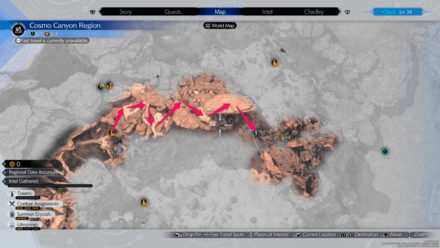 After optionally capturing the Chocobo, you can proceed directly to Cosmo Canyon by following the signs marked Cosmo Canyon. Note: You cannot fly to Cosmo Canyon even with the Sky Chocobo, so continue walking along the cliffs through the Celestory Cavern. Check the map above to see the path you'll take to reach Cosmo Canyon. |
| 3 | 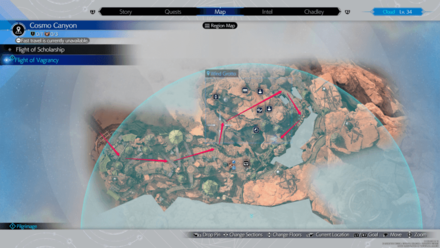 Welcome Back, Nanaki After reaching Cosmo Canyon, Red XIII will run off. Follow him to the location shown on the map above. |
| 4 | 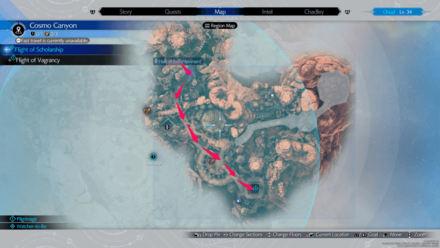 Pilgrimage Go towards the southernmost building in town and you'll see Red XIII go into it. Follow him inside and ride the elevator up. |
| 5 | After using the elevator, continue going up using the stairs to reach the Cosmo Observatory. |
| 5 | 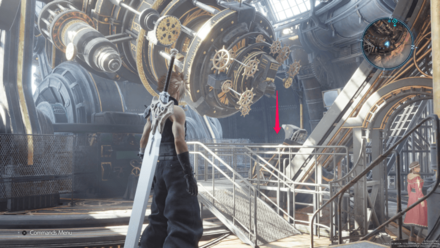 Gadgets and Gizmos Aplenty Upon entering the Cosmo Observatory, go up the stairs and interact with the Telescope on the Upper Level. Then, return to the Middle Level where you will hear a low rumble. Interact with the Planetary Phonograph to initiate another cutscene. Note: There are a couple of gadgets in each floor that you can interact. However, you only need to interact with the Telescope to progress the story. |
| 5 | A Planetological Review Follow Bugenhagen down the hall for a cutscene. After the cutscene ends, you will be able to leave the Cosmo Observatory. Tip: After exiting the Cosmo Observatory, follow the Assistant to the Observatory Treasury, where you can pick up several great items. Crystal Megaphone: One of the items you will find inside the treasury is a new weapon for Cait Sith. |
| 5 |  Higher Learning Take the elevator from the Flight of Awakening to the Flight of Scholarship. Then, turn right and continue along the path until an Assistant intercepts you and requests that you follow him. |
| 6 | 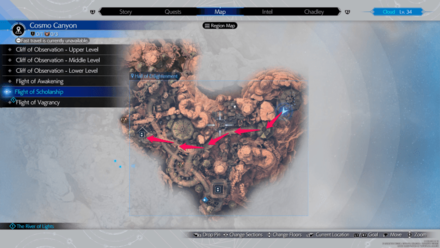 The River of Lights Head to the west side of the town and use the Torch Elevator to attend the ceremony. Talk to all the members of your party, except Cait Sith, to build your Relationship Level with each character. ┗ Jump to Chapter 10 Romance and Relationship Guide Tip: Make sure that you talk to Aerith last, and try not to get too close to her as it will trigger a cutscene and will prevent you from talking to the other members of the party. |
| 5 | Sage Advice Follow Bugenhagen to the sealed door and enter the Cave of Gi to begin the trials. |
Chapter 10 Romance and Relationship Guide
| Character | Dialogue Choices | Results |
|---|---|---|
 Aerith Aerith
|
Encourage her. Smile at her. Stop her. |
◎ 〇 △ |
 Barret Barret
|
No, we fight. Maybe you'll learn something. What do you wanna do? |
◎ 〇 △ |
 Tifa Tifa
|
You did good. I felt for you. Just gotta laugh it off. |
◎ 〇 △ |
 Red XIII Red XIII
|
I’ll lend an ear. Don't gimme that bullshit. Wasn't listening. |
◎ 〇 △ |
 Yuffie Yuffie
|
Pretty much. Why do you think that? Yeah, I totally agree... |
◎ 〇 △ |
◎ - Best Answer, 〇 - Good Answer, △ - Bad Answer
Romance and Relationship Guide
The Trials of Gi Walkthrough
| Objectives | |
|---|---|
| 1 | What Lies Beyond In the next part, you'll only have Red XIII and Barret. Fully equip them for the dungeon ahead. Tip: Magnify + Fire is a useful combination to Pressure the hordes of Stingers and other enemies in the dungeon that are weak to Fire. |
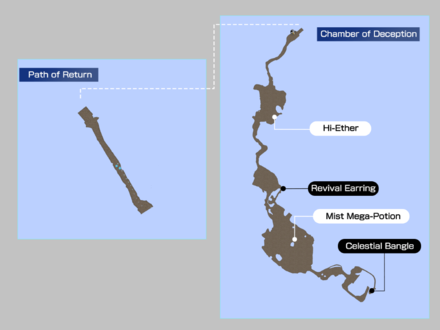
| 2 | 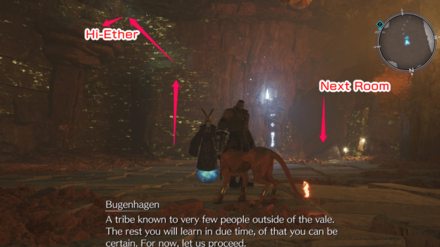 Let the Trials Begin Start moving forward until you reach an open area with a couple of Nidhoggs. After defeating them, Bugenhagen will tell you that you have the power to climb the glowing walls. Hi-Ether: You can test out this new ability by climbing on the wall to your left to open a chest that contains a Hi-Ether. |
| 2 | No Way Through? Advance through the dungeon until you reach a dead end with a stone door blocking the path. Use Red XIII's ability to climb up on the pillar behind you and cut the rope to open the path. |
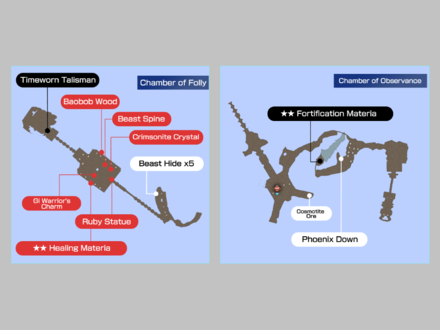
| 2 | Continue descending to the Chamber of Folly until you reach the Gi Statue. Tip: On your way down, there are two chests that you can grab that contain the Timeworn Talisman and the Celestial Bangle. |
| 3 | 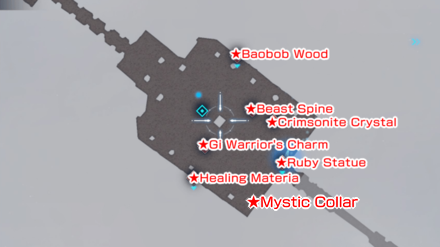 First Trial In this room, you need to find and bring the Ruby Statue to Bugenhagen. Hold L2 to carry items in your mouth and release them within the circle next to Bugenhagen to obtain them. This will summon a Gi Lancer that you need to defeat in order to progress. Mystic Collar: Before leaving the room, make sure to pick up Red XIII's weapon on the ledge near the Ruby Statue. Note: After defeating the Gi Lancer, you will still be able to pick up relics for Bugenhagen to collect. Make sure to bring all the relics in this room to obtain all the items. Tip: You can use potions on the Gi Lancer to deal damage and also apply pressure to it. |
| 4 | 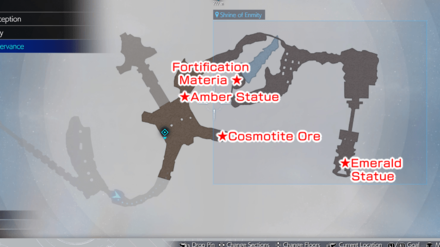 The Voice Within Continue moving forward to the Chamber of Observance while carrying the Ruby Statue. From here, you need to place the statues on the same colored altar to progress complete this section.
Note: On your way back after grabbing the Emerald Statue, you will have to fight another Gi Lancer, but this time, Barret won't be with you. |
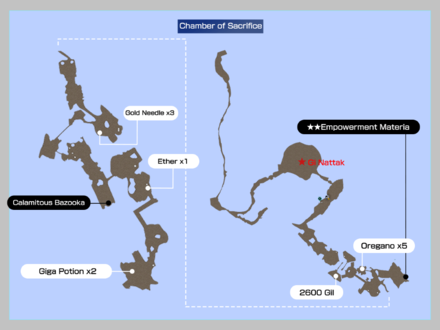
| 5 | To Thine Own Self Be True Once the Altar Door opens, proceed to the Chamber of Sacrifice where you will need to open three gates for the final trial. |
| 5 | 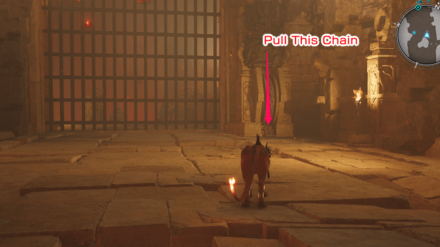 The First Gate Descend to the lower area of the Chamber of Sacrifice until you reach the First Gate. To open this gate, you simply need to pull the chain on the right side of the gate. Afterwards, you will have to fight a couple of Gi enemies. Calamitous Bazooka: Before pulling the chain, make sure to pick up the chest directly in front of the gate. |
| 5 | 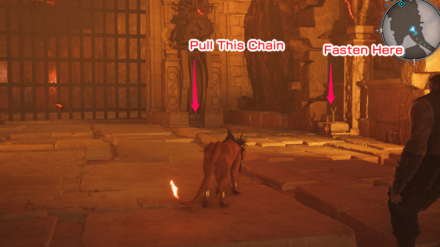 The Second Gate Take the stairs to your left to proceed towards the Second Gate. This time, the gate will not automatically lock. You need to pull it towards the hook to your right after fully opening the gate. |
| 5 | The Third Gate Continue moving forward up the stairs until you reach the Third Gate. From here, pull the first chain in front of you to open up a path that leads to the second chain to your right. Pull the second chain to get across the final gate. Pick up the hook on the left side of the gate and attach it on the slot to your right. After that, hook the final chain to complete the trials. |
| 6 | 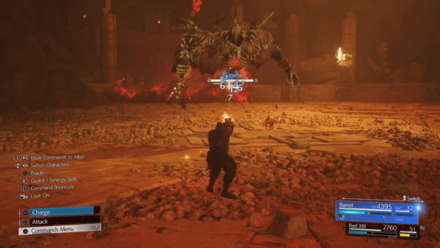 Continue to the end of the section until you reach a Rest Stop. Recover your HP and MP before proceeding to fight Gi Nattak. ┗ Recommended Party Roles for Gi Nattak ▶ How to Beat Gi Nattak Note: Near the end of the fight, Gi Nattak will inflict Doom on your party, which will cause Instant Death when the timers run out. |
| 7 | The Watcher's Verdict After defeating Gi Nattak, proceed to the next room to trigger a cutscene. Right after, you will be controlling Cloud, and you have to follow Gi Nattak to a small boat at the end of the narrow path. |
| 7 | You will have another interlude with Zack. Follow Biggs until you reach the empty lot, and then return home to complete this section. |
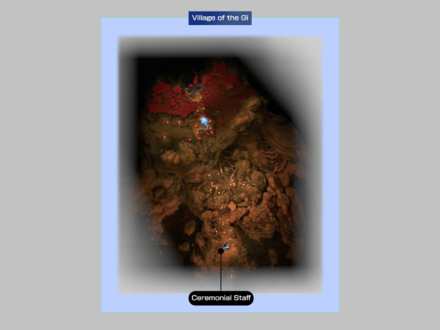
| 7 | Village of the Gi Chase after Yuffie through the village and defeat the enemies that you will encounter along the way until you reach the peak where you will be teleported out of the village. Ceremonial Staff: There is a chest near the Rest Stop at the village entrance that contains Aerith's weapon. |
| 8 | Looking Up Turn around and follow the assistant to the elevator to leave Cave of the Gi. |
| 8 | 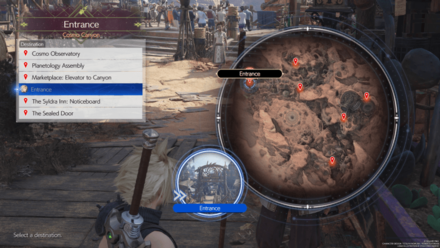 Uninvited Guests Fast-travel to the Cosmo Canyon entrance and approach the village guard to trigger a cutscene. Tip: You can Fast-travel to certain areas while in the Cosmo Canyon by speaking to the Guide and selecting your destination. |
| 8 |  The Wild, Blue Yonder Fast travel to the Cosmo Canyon Airstrip and use the telephone to call Cid. Then, board the Bronco Airlines to travel to the Nibel Region. Note: To travel to the Nibel Airstrip, you need to pay Cid 300 Gil. |
Chapter 10 Boss Strategy Guide
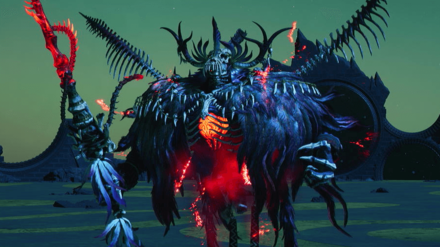
How to Beat Gi Nattak
| Gi Nattak | |
|---|---|
 |
|
| Location | Chapter Unlocked |
| Cosmo Canyon | Watcher of the Vale |
| Weaknesses | Lesser Resistances |
|
None
|
None
|
| Greater Resistances | Immunities |
| Absorbed Elements | When Triggered |
|
None
|
|
| Pressure Conditions | |
| Inflicting damage will pressure him. A curse will activate when the soul flames possess a statue. Staggering Gi Nattack will undo the curse. Doom will inflict instant death after a certain amount of time. | |
Found inside Cave of the Gi
You will fight Gi Nattak at the end of Cave of the Gi in the Cosmo Canyon region near the end of Chapter 10.
Recommended Party Roles
| Fixed Party Setup | |
|---|---|
|
Red XIII
|
・Charge Vengeance for more healing options ・Punish the boss with Sidewinder, Crescent Claw, or Stardust Ray once staggered. |
|
Barret
|
・Mostly focus on taking damage and healing ・Activate Lifesaver to tank damage and increase HP ・Can use Maximum Fury or Focused Shot once the boss is staggered for maximum damage |
Gi Nattak Boss Fight Tips
- Focus on defeating all the Soul Flames as soon as they are summoned.
- Move out of the way when Gi Nattak is using his HP Drain ability.
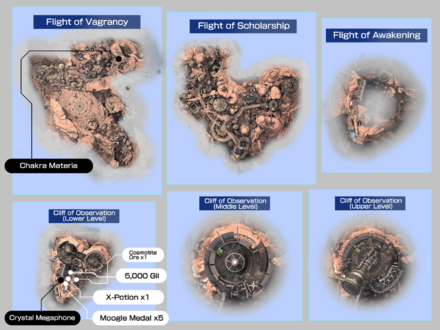
Chapter 10 Map and Obtainable Items
Maps
| List of Maps | ||
|---|---|---|
 Cosmo Canyon Cosmo Canyon |
 |
 |
 |
 |
- |
Obtainable Items
| Cliif of Observation - Lower Level | ||
|---|---|---|
| Moogle Medals x5 | 5,000 Gil | Crystal Megaphone |
| - | - | |
| Chamber of Deception | ||
| Hi-Ether x1 | Revival Earring | Mega Potion x1 |
| Celestial Bangle | - | - |
| Chamber of Folly | ||
| Timeworn Talisman | Gi Warrior's Charm | |
| Mystic Collar | - | - |
| Chamber of Observance | ||
| Cosmotite Ore | - | |
| Chamber of Sacrifice | ||
| Giga Potion x2 | Ether x1 | |
| Calamitous Bazooka | Gold Needle x3 | 2,600 Gil |
| Village of Gi | ||
| Ceremonial Staff | - | - |
This list does not include the items that you get from destroying the wooden crates.
Materia List and How to Get All Materia
FF7 Rebirth Related Guides

| All Story Chapters | |
|---|---|
| Chapter 1 | Fall of a Hero |
| Chapter 2 | A New Journey Begins |
| Chapter 3 | Deeper into Darkness |
| Chapter 4 | Dawn of a New Era |
| Chapter 5 | Blood in the Water |
| Chapter 6 | Fool's Paradise |
| Chapter 7 | Those Left Behind |
| Chapter 8 | All That Glitters |
| Chapter 9 | The Planet Stirs |
| Chapter 10 | Watcher of the Vale |
| Chapter 11 | The Long Shadow of Shinra |
| Chapter 12 | A Golden Key |
| Chapter 13 | Where Angels Fear to Tread |
| Chapter 14 | End of the World |
| How Long to Beat? Game Length | |
| Post-Game Content and How to Get 100% Clear | |
Comment
You forgot about the Mystic Collar weapon for Red XIII. It's in the Chamber w
Author

Chapter 10: Watcher of the Vale Walkthrough
Rankings
- We could not find the message board you were looking for.
Gaming News

![Star Savior Review [First Impressions] | Engaging, Entertaining, and Expensive](https://img.game8.co/4447603/8f500e9bf666bdb8adb1af478e9dfdbd.png/show)


Popular Games

Genshin Impact Walkthrough & Guides Wiki
Umamusume: Pretty Derby Walkthrough & Guides Wiki
Crimson Desert Walkthrough & Guides Wiki
Monster Hunter Stories 3: Twisted Reflection Walkthrough & Guides Wiki
Honkai: Star Rail Walkthrough & Guides Wiki
Pokemon Pokopia Walkthrough & Guides Wiki
The Seven Deadly Sins: Origin Walkthrough & Guides Wiki
Wuthering Waves Walkthrough & Guides Wiki
Zenless Zone Zero Walkthrough & Guides Wiki
Arknights: Endfield Walkthrough & Guides Wiki


Recommended Games
Fire Emblem Heroes (FEH) Walkthrough & Guides Wiki
Diablo 4: Vessel of Hatred Walkthrough & Guides Wiki
Cyberpunk 2077: Ultimate Edition Walkthrough & Guides Wiki
Yu-Gi-Oh! Master Duel Walkthrough & Guides Wiki
Super Smash Bros. Ultimate Walkthrough & Guides Wiki
Pokemon Brilliant Diamond and Shining Pearl (BDSP) Walkthrough & Guides Wiki
Elden Ring Shadow of the Erdtree Walkthrough & Guides Wiki
Monster Hunter World Walkthrough & Guides Wiki
The Legend of Zelda: Tears of the Kingdom Walkthrough & Guides Wiki
Persona 3 Reload Walkthrough & Guides Wiki


All rights reserved
© SQUARE ENIX CO., LTD. All Rights Reserved.
CHARACTER DESIGN: TETSUYA NOMURA/ROBERTO FERRARI
LOGO ILLUSTRATION: © 1997 YOSHITAKA AMANO
The copyrights of videos of games used in our content and other intellectual property rights belong to the provider of the game.
The contents we provide on this site were created personally by members of the Game8 editorial department.
We refuse the right to reuse or repost content taken without our permission such as data or images to other sites.
You forgot about the Mystic Collar weapon for Red XIII. It's in the Chamber where you give the relics to Bugenhagen. Climb the same wall you get the Healing Materia, and head towards the Ruby Statue.