Queen's Blood Best Cards
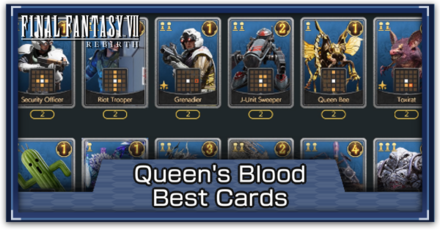
A list showing the best cards for Queen's Blood in Final Fantasy 7 Rebirth (FF7 Rebirth). Read on to see a list of all best Queen's Blood Cards and the best early to mid-game Queen's Blood Cards.
List of Contents
Queen's Blood Best Cards
| Jump Table | |
|---|---|
| Early Game (Chapters 2-5) | Mid Game (Chapters 6-10) |
| Late Game (Chapters 11-14) | |
Early Game (Chapter 2-5)
| List of Cards for Early Game | ||
|---|---|---|
 Security Officer Security Officer |
 Crystalline Crab Crystalline Crab |
 Cactuar Cactuar |
 J-unit Sweeper J-unit Sweeper |
 Quetzal Quetzal |
 Toxirat Toxirat |
 Titan Titan |
 Chocobo & Moogle Chocobo & Moogle |
 Fat Chocobo Fat Chocobo |
 Zemzelett Zemzelett |
 Capparwire Capparwire |
 Midgardsormr Midgardsormr |
 Ifrit Ifrit |
||
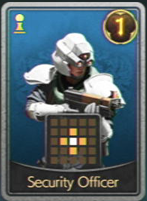
Security Officer
|
|
Card #1 | Security Officer |
|---|---|
| This card has no abilities. |
Security Officer is a strong filler to include in your early decks. To play optimally, play it in the center to both push the center lane and set up the other sidelanes with 2 pawns. Look to mulligan for this card during your first games!
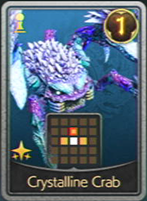
Crystalline Crab
|
|
Card #13 | Crystalline Crab |
|---|---|
| Raise the power of allied cards on affected tiles by 2 while this card is in play. |
Crystalline Crab is a great follow-up play for cards that are set up diagonally such as Quetzal and Toxirat since it lets you both push a lane and add a pawn before it. Furthermore, it provides a significant buff to the card above it which can secure the lane.
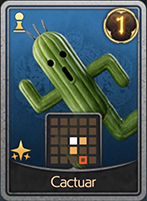
Cactuar
|
|
Card #12 | Cactuar |
|---|---|
| Raise the power of allied cards on affected tiles by 3 while this card is in play. |
Cactuar can win the bottom lane through its buff if you set it up in the topmost lane. To ensure the lane with Cactuar's ability, contest the bottom lane early and then play Cactuar!
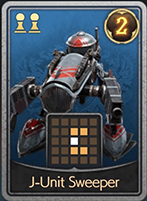
J-unit Sweeper
|
|
Card #4 | J-Unit Sweeper |
|---|---|
| This card has no abilities. |
As a 2-cost, J-unit Sweeper provides early lane pressure by pushing the bottom and top lane if you play cards that set up the mid lane. Play this in conjunction with Grasslands Wolf or Cactuar, optimally with Titan!
Quetzalcoatl
|
|
Card #14 | Quetzalcoatl |
|---|---|
| This card has no abilities. |
Quetzal is one of the earlier cards that set up diagonally. You can play this card in any lane and it will provide pawns to other lanes apart from the lane it is in. Setting up diagonally lets you set up the middle lane for cards that buff such as Crystalline Crab!
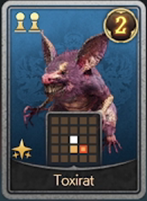
Toxirat
|
|
Card #6 | Toxirat |
|---|---|
| When played, lower the power of allied and enemy cards on affected tiles by 3. |
Toxirat is a key card for blight decks due to its pawn placement and ability to destroy cards. You can play this by setting up the top or mid lane with two pawns using cards such as Quetzal and Security Officer
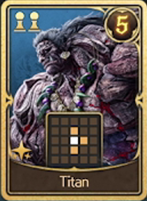
Titan
|
|
Card #98 | Titan |
|---|---|
| When played, raise position ranks by 2. |
Titan, for its cost, provides massive value by quickly setting up 2-3 pawns on the board depending on your starting card. Doing so will let you use cards such as J-unit Sweeper or Quetzalcoatl to secure the bottom and top lanes.
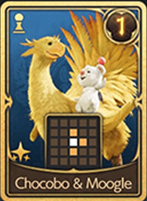
Chocobo & Moogle
|
|
Card #107 | Chocobo & Moogle |
|---|---|
| Raise power by 1 for each other ehanced allied card. |
Chocobo & Moogle, during this stage of the game, can set up three pawns and carry a single lane with 2-3 buffs from Cactuar or Crystalline Crab. Buffing cards are the meta during this Chapter, so having this card is a must! Running Mu becomes viable with this card!
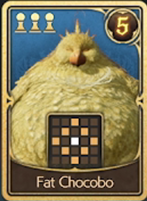
Fat Chocobo
|
|
Card #108 | Fat Chocobo |
|---|---|
| Creates a surfeit of positions around it when played. |
Fat Chocobo is a complicated card to play, but it lets you push your pawns early to the opponent's side of the field. You can easily set up three pawns for Fat Chocobo in the middle by playing Cactuar at the top lane while playing a Crystalline Crab at the bottom!
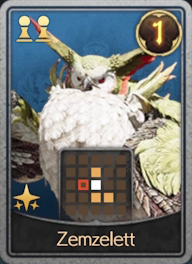
Zemzelett
|
|
Card #24 | Zemzelett |
|---|---|
| Raise the power of allied cards |
Zemzelett boosts Buff decks by increasing their ability to push three lanes and buffs more cards. This card will likely be played in the middle, which lets you save lost lanes by reclaiming pawns after establishing the middle lane.
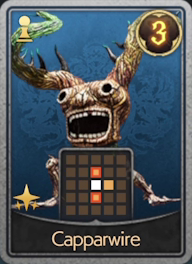
Capparwire
|
|
Card #26 | Capparwire |
|---|---|
| When played, lower the power of allied and enemy cards on affected tiles by 1. |
Capparwire, in most situations, is a better Security Officer due to having more power and the ability to add pawns to the top and bottom lanes. Capparwire is one of the main one-pawn starters of Blight decks and can sneakily blight opponents!
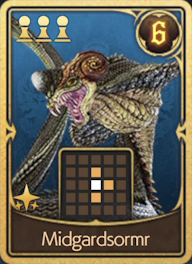
Midgardsormr
|
|
Card #113 | Midgardsormr |
|---|---|
| When allied and enemy cards are destroyed, raise this card's power by 1. |
As soon as you get Midgardsormr, Blight decks will feel like a proper deck during the game. Midgardsormr can single-handedly handle a lane with its scaling power with each destroyed card, which lets you dominate other lanes safely!
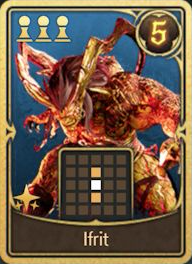
Ifrit
|
|
Card #95 | Ifrit |
|---|---|
| Raise power by 2 for each other enhanced allied card. |
Ifrit is considered the crowning jewel for Buff Decks due to its ability to scale throughout the duel with its ability similar to Chocobo & Moogle. Two or three buffs is enough to secure a lane with Ifrit, so position him properly!
Mid Game (Chapter 6-10)
| List of Cards for Mid Game | ||
|---|---|---|
 Spearhawk Spearhawk |
 Tonberry King Tonberry King |
 Cockatrice Cockatrice |
 Heatseeker Heatseeker |
 Chocobo Jockey Chocobo Jockey |
 Haunted Hotel Haunted Hotel |
 Thug Thug |
 Deathclaw Deathclaw |
 Grandhorn Grandhorn |
 J-Squad J-Squad |
 Bahamut Arisen Bahamut Arisen |
 Cavestalker Cavestalker |
 Insectoid Chimera Insectoid Chimera |
 Griffon Griffon |
 Maloceros Maloceros |
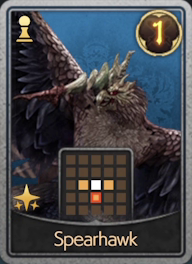
Spearhawk
|
|
Card #31 | Spearhawk |
|---|---|
| Raise the power of allied cards on affected tiles by 2 while this card is in play. |
Spearhawk is an upgrade to early buff decks when Chapter 6 rolls around. Spearhawk acts as a push card like Crystalline Crab but excels in the mid and top lane instead!
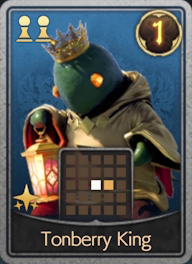
Tonberry King
|
|
Card #35 | Tonberry King |
|---|---|
| When allied cards are destroyed, raise this card's power by 2. |
Tonberry King is the centerpiece of a new archetype, self-destruction! Tonberry King scales by +2 power every time you destroy an allied card, which will be evident as you obtain Sacrifice cards!
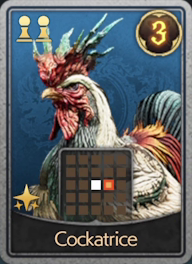
Cockatrice
|
|
Card #39 | Cockatrice |
|---|---|
| When played, destroy allied and enemy cards on affected tiles. |
Cockatrice is used in Destroy and Sacrifice decks due to its guaranteed to destroy ability. Cockatrice is also a push card since the card that is destroyed will be replaced by a pawn.
Heatseeker
|
|
Card #40 | Heatseeker |
|---|---|
| When destroyed, add Heatseeker Minion to your hand. |
Heatseeker is one of the earlier support cards for the self-destruct archetype! The goal of self-destruct decks is to establish board space first, which Heatseekeer can generate and provide fodder!
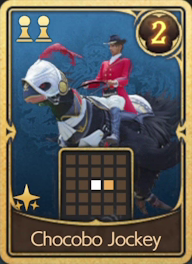
Chocobo Jockey
|
|
Card #135 | Chocobo Jockey |
|---|---|
| When you win the lane, receive a score bonus of 10. |
Chocobo Jockey is arguably the best card in the game due to its ability to grant +10 points to the winning lane the card is in. Just slam high-power cards like Titan in the same lane as Chocobo Jockey, and you should secure the duel even with one lane!
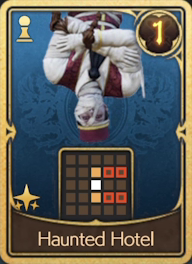
Haunted Hotel
|
|
Card #137 | Haunted Hotel |
|---|---|
| Raise the power of allied cards on affected tilles by 2 while this card is in play. |
Haunted Hotel is a buff deck's dream since it acts as a starter and a lane-wide buff. If Haunted Hotel is placed perfectly in the middle, it can give Ifrit or Chocobo & Moogle +4 points on play!
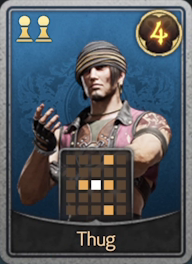
Thug
|
|
Card #42 | Thug |
|---|---|
| This card has no abilities. |
Thug lets you sneakily push either the top or bottom lane depending on its position. With its power, you can almost guarantee a lane while pushing an opposite lane.
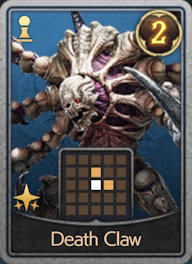
Death Claw
|
|
Card #43 | Death Claw |
|---|---|
| When enemy cards are destroyed, raise this card's power by 1. |
Death Claw acts like Chocobo & Moogle but for blight decks. Death Claw is a premium 1-pawn card that can push a lane above it and scale by one power each time you destroy an enemy card.
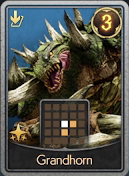
Grandhorn
|
|
Card #54 | Grandhorn |
|---|---|
| Destroy an allied card and replace it. |
Grandhorn is your first introduction to cards that replace cards on the board to place them, activating destroy effects. It becomes easy to push because as soon as your opponent eats up a pawn, you can replace the unit before it takes the pawn back!
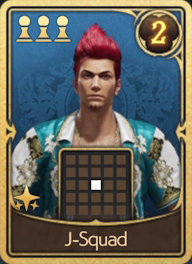
J-Squad
|
|
Card #134 | J-Squad |
|---|---|
| When played, spawn Hype Johnnys—cards that enhance while in play—in your empty positions. |
J-Squad is a strong addition to buff decks as he puts multiple copies of himself that enhances cards. Placing down this card can potentially buff majority of your board space, boosting Chocobo & Moogle to high levels.
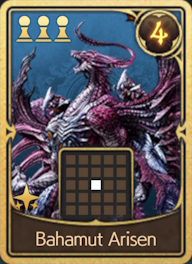
Bahamut Arisen
|
|
Card #105 | Bahamut Arisen |
|---|---|
| When played, spawn Elementals—cards that enhance when destroyed—in your empty positions. |
Bahamut Arisen boasts decent power and adds in Elementals, which are tokens that will buff all cards in its vicinity if its destroyed. With Self-destruct's gameplan of pushing their cards hard, you will have a surplus positions that Bahamut Arisen can fill with Elementals.
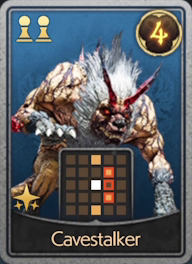
Cavestalker
|
|
Card #64 | Cavestalker |
|---|---|
| When first enfeebled, lower the power of enemy cards on affected tiles by 2. |
Chimera, according to its pawn placement, acts almost as Quetzalcoatl but designed exactly for Enfeeble decks. Cavestalker has strong push power and the ability to secure frontal pawn placements due to its Enfeeble effect.
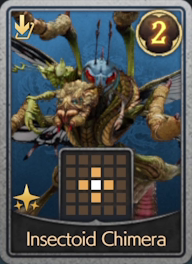
Insectoid Chimera
|
|
Card #51 | Insectoid Chimera |
|---|---|
| Destroy an allied card and replace it. |
Insectoid Chimera is the premium replacement card due to its pawn placements. This means that it can be used in decks that are not inherently synergistic due to its ability to regain lost pawns caused by overpushing.
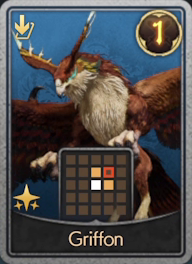
Griffon
|
|
Card #59 | Griffon |
|---|---|
| Replace an ally and raise the power of allied cards on affected tiles by the replaced ally's power. |
Griffon is the replacement card exclusively made for buff decks. Given that buff decks like establishing board space, Griffon can essentially negate the weakness of buff decks getting contested in a lane while providing a buff to an allied card.
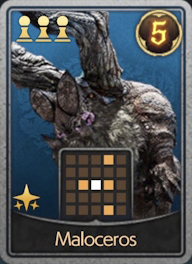
Maloceros
|
|
Card #53 | Maloceros |
|---|---|
| When you win the lane, receive a score bonus of 10. |
Maloceros shares the same effect as Chocobo Jockey, wherein it doubles down on winning lanes by adding +10 Power. With Maloceros and Chocobo Jockey, you can essentially pressure 2 lanes for that game-winning effect
Late Game (Chapter 11-14)
| List of Cards for Late Game | ||
|---|---|---|
 Disgorgon Disgorgon |
 Black Bat Black Bat |
 Rictus Rictus |
 Emerald Witch Emerald Witch |
 Shadowblood Queen Shadowblood Queen |
 Tifa Tifa |
 Cid Cid |
 Yuffie Yuffie |
 Anuran Suppressor Anuran Suppressor |
 Gi Nattak Gi Nattak |
 Bahamut Bahamut |
Tseng |
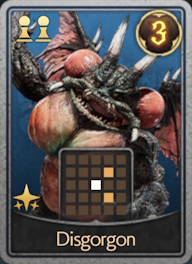
Disgorgon
|
|
Card #69 | Disgorgon |
|---|---|
| When played, raise position ranks by 2. |
Disgorgon is one of the best push cards since it enables early diagonal pushes with two-pawn cards and enables Enemy Destroy archetypes. When Disgorgon is played with Titan, it results in massive board space.
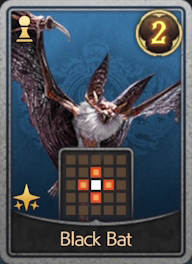
Black Bat
|
|
Card #72 | Black Bat |
|---|---|
| When played, lower the power of allied and enemy cards on affected tiles by 1. |
Black Bat alone acts as an enabler for a new playstyle of Queen's Blood, the self-enfeeble archetype. This card can enfeeble cards in a cross pattern by 1, safely activating their strong activation effects.
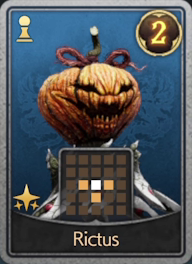
Rictus
|
|
Card #74 | Rictus |
|---|---|
| Raise power by 1 for each other enfeebled allied and enemy card. |
Rictus is the self-enfeeble archetype's scaling card. This card can grow to absurd levels, rivaling even three-pawn cards when perfectly set up!
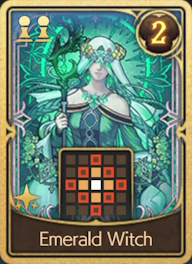
Emerald Witch
|
|
Card #144 | Emerald Witch |
|---|---|
| Raise the power of allied and enemy cards on affected tiles by 2 while this card is in play. |
Emerald Witch, emulated perfectly with her story, is a two-cost card that sets cross pawns and buffs a myriad of positions. She is the premium buff card since she also buffs enemies, letting cards such as Dio scale along.
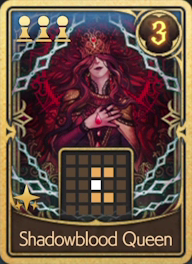
Shadowblood Queen
|
|
Card #145 | Shadowblood Queen |
|---|---|
| Raise power by 3 for each other enfeebled allied card and enemy card. |
Shadowblood Queen, the final boss, is the complete opposite of Emerald Witch and the crowning jewel of enfeeble decks. She selfishly scales as other cards are enfeebled on the board, possibly reaching ludicrous numbers.
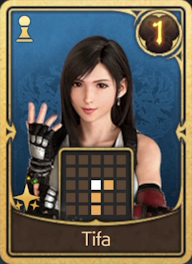
Tifa
|
|
Card #88 | Tifa |
|---|---|
| When you win the lane, receive a score bonus of 5. |
Tifa sets up all lower lanes with pawns while providing a 5-point bonus to a lane she is in if it is won. While she only receives a bonus of 5 points, her ability to set up other lanes makes decks that focus on one lane have more pawn pressure.
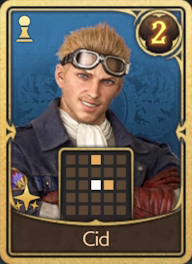
Cid
|
|
Card #93 | Cid |
|---|---|
| When played, add The Tiny Bronco to your hand. |
Cid, or specifically, The Tiny Bronco, is the strongest push card as it sets two pawns deep into the board. Tiny Bronco can make a total of 5 pawns that lead to set-ups for any decks relying on high-cost cards.
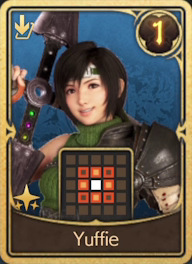
Yuffie
|
|
Card #91 | Yuffie |
|---|---|
| Replace an ally and lower the power of allied and enemy cards on affected tiles by the replaced ally's power. |
Yuffie is a strong support card for any enfeeble deck. Yuffie's effect enables self-enfeeble effects for low-power cards. For higher-power cards such as Jobberwock, it is essentially a board wipe.
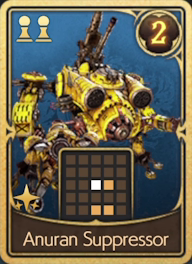
Anuran Suppressor
|
|
Card #120 | Anuran Suppressor |
|---|---|
| When enemy cards are destroyed, raise this card's power by 2. |
Anuran Suppressor is a better scaling card for Blight decks when compared to Midgardsormr. Anuran Suppressor not only costs less, it scales the same with two power with every destroy and sets up two bottom lane pawns for pushes.
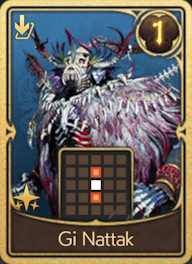
Gi Nattak
|
|
Card #123 | Gi Nattak |
|---|---|
| Replace an ally and raise the power of allied cards on affected tiles by the replaced ally's power. |
Gi Nattak is essentially a power distributor for decks that set up high power cards in the middle lane. When played in conjunction with cards such as Shadowblood Queen, 20 or more power will be distributed to both the bottom and top lanes.
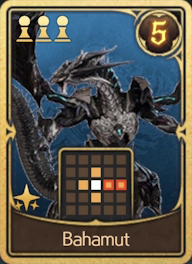
Bahamut
|
|
Card #104 | Bahamut |
|---|---|
| When played, lower the power of enemy cards on affected tiles by 5. |
Bahamut, when compared to destroy cards such as Barret and Dyne, is a more consistent card due to his pawn placement and range. Bahamut is optimally a 15-power card that wipes a lane and gives you pawns afterward.
Tseng
|
Card #131 | Tseng |
|---|---|
| The first time this card is enhanced, raise the power of allied cards on affected tiles by 4. |
Tseng makes activated buff decks more consistent as his pawn placement and buff are perfectly set up right in front of the opponent's space, making buff-activated effects that hinder enemy cards more reliable.
FF7 Rebirth Related Guides
Queen's Blood Card Locations and Guide
All Queen's Blood Guides
Comment
Author

Queen's Blood Best Cards
Rankings
- We could not find the message board you were looking for.
Gaming News
![Animal Crossing: New Horizons Review [Switch 2] | Needlessly Crossing Over to a New Generation](https://img.game8.co/4391759/47d0408b0b8a892e453a0b90f54beb8a.png/show)


Popular Games

Genshin Impact Walkthrough & Guides Wiki
Honkai: Star Rail Walkthrough & Guides Wiki
Arknights: Endfield Walkthrough & Guides Wiki
Umamusume: Pretty Derby Walkthrough & Guides Wiki
Wuthering Waves Walkthrough & Guides Wiki
Pokemon TCG Pocket (PTCGP) Strategies & Guides Wiki
Abyss Walkthrough & Guides Wiki
Zenless Zone Zero Walkthrough & Guides Wiki
Digimon Story: Time Stranger Walkthrough & Guides Wiki
Clair Obscur: Expedition 33 Walkthrough & Guides Wiki


Recommended Games
Fire Emblem Heroes (FEH) Walkthrough & Guides Wiki
Pokemon Brilliant Diamond and Shining Pearl (BDSP) Walkthrough & Guides Wiki
Diablo 4: Vessel of Hatred Walkthrough & Guides Wiki
Super Smash Bros. Ultimate Walkthrough & Guides Wiki
Yu-Gi-Oh! Master Duel Walkthrough & Guides Wiki
Elden Ring Shadow of the Erdtree Walkthrough & Guides Wiki
Monster Hunter World Walkthrough & Guides Wiki
The Legend of Zelda: Tears of the Kingdom Walkthrough & Guides Wiki
Persona 3 Reload Walkthrough & Guides Wiki
Cyberpunk 2077: Ultimate Edition Walkthrough & Guides Wiki


All rights reserved
© SQUARE ENIX CO., LTD. All Rights Reserved.
CHARACTER DESIGN: TETSUYA NOMURA/ROBERTO FERRARI
LOGO ILLUSTRATION: © 1997 YOSHITAKA AMANO
The copyrights of videos of games used in our content and other intellectual property rights belong to the provider of the game.
The contents we provide on this site were created personally by members of the Game8 editorial department.
We refuse the right to reuse or repost content taken without our permission such as data or images to other sites.