How to Beat Phoenix and Kujata: Shrine of the Moonbow

Phoenix and Kujata is an optional Phenomenon Intel boss found in Gilgamesh Island of Final Fantasy 7 Rebirth (FF7 Rebirth). Read on to learn how to beat Phoenix and Kujata, its weaknesses and resistances, a list of its moves and attack patterns, as well as tips and rewards for beating it.
| Gilgamesh Island Bosses | |||
|---|---|---|---|
| Bahamut and Titan | Phoenix and Kujata | Alexander and Odin | Gilgamesh |
List of Contents
Phoenix and Kujata Weaknesses and Stats
Phoenix
 |
|||
| Easy | Normal | Hard | |
|---|---|---|---|
| HP | 27272 | 38960 | - |
| Suggested Level | 65 | ||
Weakness and Resistances
| Weaknesses | Lesser Resistances | Greater Resistances |
|---|---|---|
None |
||
| Absorbed Elements | Immunities | |
Changes When Staggered
| Weakness / Effective | Resistance |
|---|---|
Kujata
 |
|||
| Easy | Normal | Hard | |
|---|---|---|---|
| HP | 43565 | 62236 | - |
| Suggested Level | 65 | ||
Weaknesses and Resistances
| Weaknesses | Lesser Resistances | Greater Resistances |
|---|---|---|
| None | ||
| Absorbed Elements | Immunities | |
| None | ||
Fire Form
| Weakness | Absorbed |
|---|---|
Ice Form
| Weakness | Absorbed |
|---|---|
Lightning Form
| Weakness | Absorbed |
|---|---|
Changes When Staggered
| Weakness / Effective | Resistance |
|---|---|
| None | None |
Dropped Items
| Phoenix and Kujata Rewards | |||||||||||
|---|---|---|---|---|---|---|---|---|---|---|---|
| Easy/Normal | Hard Mode | ||||||||||
|
・5 Party EXP |
TBD
|
||||||||||
| Items Dropped | Rare Items Dropped | ||||||||||
|
None
|
None
|
||||||||||
| Stealable Items | Morphable Items | ||||||||||
|
None
|
None
|
||||||||||
How to Pressure Phoenix and Kujata
How to Pressure Phoenix
|
|
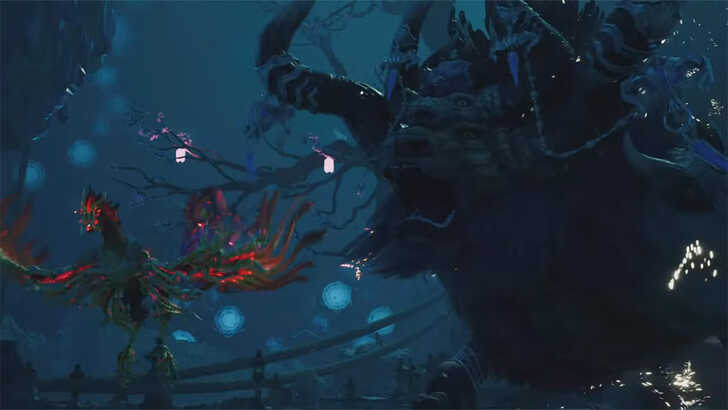
It will be impervious to damage while its creations are tethered to it. Inflicting enough damage while it is casting Empowering Flame will both interrupt and pressure it. If Empowering Flame is cast twice without interruption, it will follow up by using Rebirth Flame.
How to Pressure and Stagger Enemies
How to Pressure Kujata
|
|
It switches between fire, ice, and lightning alignments. Dealing a certain amount of damage by exploiting its elemental weakness will pressure it and remove its current affinity. If left unchecked, it will spawn a new elemental being; once it attunes to all three elements, it will unleash Tri-Disaster.
Phoenix and Kujata Best Party and Builds
Recommended Party Setup
| Recommended Party Setup | |
|---|---|
 Cloud Cloud
|
Sub DPS / Support ・ Versatile and Tanky which lets you do either magic attacks or recover party members ・ Gains ATB quickly to stagger enemies or help allies Recommended Level: 65 |
 Yuffie Yuffie
|
Main DPS / Support ・ Versatile DPS thanks to her Elemental Ninjutsu ・ Gains ATB quickly and safely, allowing her to deal damage or recover allies depending on the situation Recommended Level: 65 |
 Aerith Aerith
|
Magic DPS ・ Deals the strongest magic damage but has slow ATB charge ・ Spells and Attacks are strong enough to pressure or stagger the bosses Recommended Level: 65 |
Cloud will Deal the Most Damage while Staggered
Cloud's main role in this setup is to have him finish off bosses. This is because he deals the most amount of damage while the bosses are staggered. Utilize his strong combos like Prime Mode, Infinity's End, Braver to deal significant damage.
During the rest of the fight, he can act as a sub DPS and support to the party depending on the situation since he can gain ATB charges quickly.
Yuffie can Exploit Both Bosses' Weaknesses
Yuffie will be the main DPS of the fight since she can exploit both bosses' weaknesses thanks to her Elemental Ninjutsu. Combine that with her Doppleganger, and her damage output would significantly increase as she casts spells and uses abilities.
Aerith will Pressure the Bosses
Aerith can easily pressure both bosses since her spells will deal significantly more magic damage than Yuffie or Cloud. Make sure to have Arcane Ward and an ATB charge ready so that you can cast a spell when there is an opening.
Phoenix and Kujata Best Equipment and Materia to Use
Equipment and Materia for Cloud
|
Cloud
Sub DPS / Support |
|||||
| Weapon | Armor | ||||
|---|---|---|---|---|---|
| Igneous Saber | Hades Armlet | ||||
| Accessory | Summon Materia | ||||
| Speed Demon Keychain | Odin | ||||
| Weapon Materia | Armor Materia | ||||
|
|
|
||||
| Weapon Skills | |||||
|
|
|
||||
|
|
- | ||||
As Cloud takes on a Sub DPS and Support role, he will be focused on using Manaward from Barrier or Cura from Healing. He can also utilize items like Celeris and Mixed Potions since Item Master will raise any item's effectiveness.
Equipment and Materia for Yuffie
|
Yuffie
Main DPS / Support |
|||||
| Weapon | Armor | ||||
|---|---|---|---|---|---|
| Crescent Sickle | Enhanced Varvados Bracelet | ||||
| Accessory | Summon Materia | ||||
| Sorcerer's Earrings | Bahamut Arisen | ||||
| Weapon Materia | Armor Materia | ||||
|
|
|
||||
| Weapon Skills | |||||
|
|
|
||||
|
|
- | ||||
Having Fire and Ice linked to Elemental will be great with Yuffie to make all of her abilities deal some sort of elemental damage as you control her. It is also great to have ATB Assist and Skill Master to work together as you spam abilities and spells.
Equipment and Materia for Aerith
|
Aerith
Magic DPS |
|||||
| Weapon | Armor | ||||
|---|---|---|---|---|---|
| Timeless Rod | Enhanced Yggdrasill Armlet | ||||
| Accessory | Summon Materia | ||||
| Circlet | Phoenix | ||||
| Weapon Materia | Armor Materia | ||||
|
|
|
||||
| Weapon Skills | |||||
|
|
|
||||
|
|
- | ||||
Aerith will act as the Magic DPS of the group, so having Magic Focus and Synergy attached to her elemental spells would greatly increase her damage output.
It would also be good to have First Strike on her so that she can have enough ATB to put down her ward as soon as possible.
How to Beat Phoenix and Kujata
| Phoenix and Kujata Boss Fight Tips |
|---|
|
|
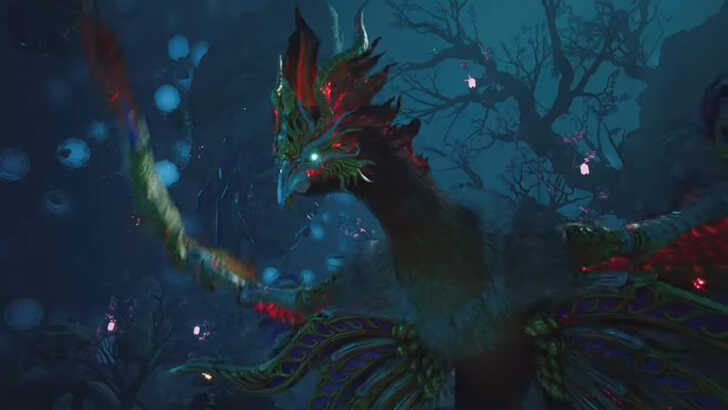
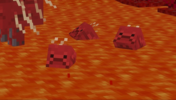
Defeat Kujata First
In this fight, Phoenix will be tethered to Kujata, as indicated by the red line connecting each other. This will make Phoenix take significantly reduced damage to any type of attack. With that, make sure to prioritize defeating Kujata first.
Exploit Kujata's Weaknesses with Strong Magic Attacks
| Kujata Form | Elemental Weakness |
|---|---|
|
|
|
|
|
|
|
|
|
Whenever Kujata changes elements, you can easily pressure it by attacking it with Magic spells with Aerith and Yuffie, instead of using their weapon abilities. Attack it with magic as soon as it changes elements so that you can prevent it from using Tri-Disaster.
The rest of the bosses moves will be identical to when you faced them individually in the Combat Simulator. You can refer to the previous boss fights for more details about each boss.
| Combat Simulator Boss Fights | |
|---|---|
 Phoenix Phoenix |
 Kujata Kujata |
Kujata will be Revived by Phoenix
After taking down Kujata the first time, it will be revived by Phoenix with its Rebirth Flame. Once it is revived, you will need to beat Kujata again, then you can kill Phoenix.
When Phoenix uses Rebirth Flame, it will deal significant damage to your party, so make sure to heal your party as soon as you take down Kujata.
Use Manaward to Reduce Damage Taken
If you have the Barrier materia equipped, make sure to utilize the Manaward spell on your team whenever you can. This will reduce a lot of the magic damage that both bosses do with their attacks.
Phoenix and Kujata Rewards and Details
Rewards
| Phoenix and Kujata Rewards | |||||||||||
|---|---|---|---|---|---|---|---|---|---|---|---|
| Easy/Normal | Hard Mode | ||||||||||
|
・5 Party EXP |
TBD
|
||||||||||
| Items Dropped | Rare Items Dropped | ||||||||||
|
None
|
None
|
||||||||||
| Stealable Items | Morphable Items | ||||||||||
|
None
|
None
|
||||||||||
Basic Information and Details
| Phoenix and Kujata | |
|---|---|
|
|
|
| Location | Chapter Unlocked |
| Gilgamesh Island | Chapter 12 |
| Species | Movement |
| Unreadable | Flying / Grounded |
| Details | |
|
This sacred bird of legend has completely transcended the concept of death, resurrecting itself when fallen and even brithing new life from the flames surrounding it. / The gargantuan manifestation of nature itself, this guardian of the forest can freely manipulate its elemental affinity. It will be impervious to damage while its creations are tethered to it. Inflicting enough damage while it is casting Empowering Flame will both interrupt and pressure it. / It switches between fire, ice, and lightning alignments. Dealing a certain amount of damage by exploiting its elemental weakness will pressure it and remove its current affinity. |
|
Phoenix and Kujata Location
How to Unlock
| Phoenix and Kujata Unlock Requirements |
|---|
|
1. Collect All Protorelics from the Six Different Regions 2. Get All Summon Materias from the Combat Simulator 3. Use the Tiny Bronco to Head to Gilgamesh Island
|
Unlocked After Collecting All Protorelics

To unlock the duo summon boss fights, you'll need to collect all of the Protorelics scattered across the six different regions. Once you've collected them, a new Phenomenon Intel will appear leading you straight to Gilgamesh Island.
You can easily track which Protorelics you're missing by checking your Intel progress on the World Map.
All Protorelic Locations (Phenomenon Intel)
Obtain All Summon Materia from the Combat Simulator
| Summon Boss Fight Guides | ||
|---|---|---|
| Titan | Phoenix | Alexander |
| Kujata | Bahamut Arisen | Odin |
Before going to Gilgamesh Island, you'll also need to collect all of the Summon Materia from the Combat Simulator. These are required to unlock three extra fights that you'll need to beat before being able to challenge Gilgamesh.
Combat Simulator Guide: How to Unlock and Win All Battles
Head to Gilgamesh Island

Once the island's been unlocked and you've obtained all Summon Materias, board the Tiny Bronco and sail to Gilgamesh Island to the north of Midgar. Once there, you will be instructed to defeat the duo summon bosses.
To unlock the ability to traverse the seas, you will need to progress to Chapter 12 where the Tiny Bronco will lose its wings and become a sea-faring vessel.
Chapter 12: A Golden Key Walkthrough
FF7 Rebirth Related Guides

Boss Fight Guide and List of All Bosses
Story Bosses
| All Major Story Bosses | |
|---|---|
| Chapter 1 | Materia Guardian |
| Chapter 2 | Midgardsormr |
| Chapter 3 |
Rude and Elena Mythril Golem |
| Chapter 4 |
Terror of the Deep Roche |
| Chapter 5 | Jenova Emergent |
| Chapter 6 | Grasptropod |
| Chapter 7 |
Custom Valkyrie Gigatrice |
| Chapter 8 |
Dyne Anuran Suppressor |
| Chapter 9 |
Specimen H1024 Crimson Mare Mk. II |
| Chapter 10 | Gi Nattak |
| Chapter 11 |
Diabolic Variant Yin and Yang Forgotten Specimen Galian Beast Roche |
| Chapter 12 |
Abzu Rude and Elena Rufus |
| Chapter 13 |
Red Dragon Ironclad Reno and Rude Tseng and Elena Moss-Grown Adamantoise Demon Gate |
| Chapter 14 |
Jenova Lifeclinger Sephiroth Reborn |
Optional Bosses
| Grasslands | |
|---|---|
| Summon | Titan |
| Classified Intel | Quetzalcoatl |
| Side Quests |
White Terror |
| Junon | |
| Summon | Phoenix |
| Classified Intel | Mindflayer |
| Side Quests |
White Mousse Hell Rider II Sandstorm Drake |
| Corel | |
| Summon | Alexander |
| Classified Intel | Tonberry King |
| Side Quests |
Dark Claw Joker |
| Minigame | Test 0 |
| Gongaga | |
| Summon | Kujata |
| Classified Intel | Great Malboro |
| Side Quests |
Levridon Mastodon Gorgon Mane Gigantoad |
| Cosmo Canyon | |
| Summon | Bahamut Arisen |
| Classified Intel | Jabberwock |
| Side Quests | Irasceros Gigaworm |
| Nibel | |
| Summon | Odin |
| Classified Intel | King Zu |
| Side Quests |
Queen Bee Dranabarga |
| Meridian Ocean | |
| Gilgamesh's Island |
Gilgamesh Titan and Bahamut Arisen Phoenix and Kujata Alexander and Odin |
| Pirate King's Treasure |
Ogre Raider Brineborn Demon Hueyacoatl Sea Dragon |
Author

How to Beat Phoenix and Kujata: Shrine of the Moonbow
Rankings
- We could not find the message board you were looking for.
Gaming News


Popular Games

Genshin Impact Walkthrough & Guides Wiki
Honkai: Star Rail Walkthrough & Guides Wiki
Arknights: Endfield Walkthrough & Guides Wiki
Umamusume: Pretty Derby Walkthrough & Guides Wiki
Wuthering Waves Walkthrough & Guides Wiki
Pokemon TCG Pocket (PTCGP) Strategies & Guides Wiki
Abyss Walkthrough & Guides Wiki
Zenless Zone Zero Walkthrough & Guides Wiki
Digimon Story: Time Stranger Walkthrough & Guides Wiki
Clair Obscur: Expedition 33 Walkthrough & Guides Wiki


Recommended Games
Fire Emblem Heroes (FEH) Walkthrough & Guides Wiki
Pokemon Brilliant Diamond and Shining Pearl (BDSP) Walkthrough & Guides Wiki
Diablo 4: Vessel of Hatred Walkthrough & Guides Wiki
Super Smash Bros. Ultimate Walkthrough & Guides Wiki
Yu-Gi-Oh! Master Duel Walkthrough & Guides Wiki
Elden Ring Shadow of the Erdtree Walkthrough & Guides Wiki
Monster Hunter World Walkthrough & Guides Wiki
The Legend of Zelda: Tears of the Kingdom Walkthrough & Guides Wiki
Persona 3 Reload Walkthrough & Guides Wiki
Cyberpunk 2077: Ultimate Edition Walkthrough & Guides Wiki


All rights reserved
© SQUARE ENIX CO., LTD. All Rights Reserved.
CHARACTER DESIGN: TETSUYA NOMURA/ROBERTO FERRARI
LOGO ILLUSTRATION: © 1997 YOSHITAKA AMANO
The copyrights of videos of games used in our content and other intellectual property rights belong to the provider of the game.
The contents we provide on this site were created personally by members of the Game8 editorial department.
We refuse the right to reuse or repost content taken without our permission such as data or images to other sites.
The guide says to kill kujata again after it gets revived, but that did not work for me. Phoenix kept using rebirth flame as soon as kujata died. I found it best to kill kujata once, then kill phoenix, and finally kill kujata again.