Hell Rider II (Hell Rider 2) Hard Mode Guide

Hell Rider II (Hell Rider 2) is a boss in the Beneath Still Waters side quest of Final Fantasy 7 Rebirth (FF7 Rebirth). Learn how to beat Hell Rider II (Hell Rider 2) in Hard Mode and normal difficulties, its weaknesses and resistances, and a list of its moves and attack patterns in this guide!
List of Contents
Hell Rider II (Hell Rider 2) Weaknesses and Stats
Stats
 |
|||
| Easy | Normal | Hard | |
|---|---|---|---|
| HP | ? | ? | 71703 |
Weakness and Resistances
| Weaknesses | Lesser Resistances | Greater Resistances |
|---|---|---|
|
|
|
|
| Absorbed Elements | Immunities | |
| None |
|
|
Changes When Staggered
| Weakness / Effective | Resistance |
|---|---|
|
|
None |
How to Pressure Hell Rider II (Hell Rider 2)
How to Pressure
|
|
If you are able to inflict enough damage by exploiting its Ice elemental weakness, the boss will be pressured allowing you to stagger him during the fight.
How to Pressure and Stagger Enemies
Hell Rider II (Hell Rider 2) Best Party and Builds
| This section is for players who are playing on Easy and Normal difficulties. To check out the best builds and tips for Hard Mode, jump to our Hard Mode Guide section, below! |
Recommended Party Setup
| Recommended Party Setup | |
|---|---|
 Cloud Cloud
|
【Physical DPS】 ・Main source of damage once Hell Rider II gets pressured. ・Physical Damage dealer when Reflect is up. |
 Yuffie Yuffie
|
【Elemental DPS / Stagger Buildup】 ・Mainly used to build pressure with Doppelganger and Ice Ninjutsu. ・Can safely deal damage from a distance. |
 Aerith Aerith
|
【Support】 ・Can easily pressure Hell Rider II with her Ice spells. ・Can focus on healing all allies using Pray and Limit Break. |
Best Materia to Use Against Hell Rider II (Hell Rider 2)
| Materia | Effect |
|---|---|
|
|
・Deal Ice Elemental Damage
・Best equipped on Yuffie or Aerith. |
|
|
・Heal all allies in battle when linked to Healing Materia.
・Best equipped on Aerith. |
|
|
・Heal a single ally in battle.
・Best equipped on Aerith. |
|
|
・Heal all allies in battle (alternative for Healing Materia if you do not have Magnify Materia).
・Best equipped on Aerith. |
|
|
・Removes any beneficial status effects on the enemy.
・Best equipped on Aerith. |
|
|
・Temporarily reduces the Physical and Magical Defense with Deprotect and Deshell.
・Best equipped on Yuffie. |
|
|
・Increase the HP of a character.
・Can be equipped to all characters. |
How to Beat Hell Rider II (Hell Rider 2)
| Hell Rider II Boss Fight Tips |
|---|
|
|
Dispel the Reflect Buff or Wait for Polarity Shift
During the second fight, the Hell Rider II will have Reflect and is immune to all Magical Damage. Immediately cast Dispel using a ★2 Suversion Materia to remove this buff and continue to stagger the Hell Rider II using Ice elemental attacks.
Alternatively, you can instead rely on using Phyiscal Damage with Cloud and pressure the boss to remove the buff or wait for the Hell Rider II to cast Polarity Shift, which will then change the Reflect buff into Barrier.
Move Away When Hell Rider II Uses Perdition
When the Hell Rider II uses Perdition, all nearby characters will be slowly pulled towards the boss, which then explodes, dealing massive damage to all party members within its range. You can spam Dodge to escape its range and wait for it to explode before continuing to attack the boss.
Pressure Hell Rider II with Ice Elemental Damage
Using the Chocoking's Cape and the ATB Boost Materia, you will be able to start the fight with two ATB bars. This will allow you to instantly use your Ice Materia at the very start to immediately apply pressure to Hell Rider II.
Additionally, you can cast Banishment as soon as it reaches Level 3 and the boss is staggered from spamming Blizzaga with ★3 Ice Materia. The Banishment's damage is based on Yuffie's affinity, which can be changed by using Elemental Ninjutsu.
Make sure that you are using Ice Ninjutsu to deal Ice damage with Banishment. You can learn the Banishment ability from the Crystalline Cross weapon. Maxing out its proficiency will allow you to use Banishment even when you have a different weapon equipped.
Crystalline Cross Abilities, Stats, and Skills
Change Affinity Using Ice Ninjutsu
You can use Yuffie and change your affinity to Ice using the Elemental Ninjutsu to consistently deal Ice damage and build up the stagger meter quickly.
Hell Rider II (Hell Rider 2) Hard Mode Guide
| Hell Rider II Hard Mode Tips |
|---|
| ★ Best Hard Mode Builds for Hell Rider II ★ |
|
|
Hell Rider II Hard Mode Builds
| The builds featured in this Hard Mode section are at Weapon Levels 7~8. If you find that you don't have enough Materia slots to complete the setup, consider getting all the possible Manuscripts on Normal, first. |
 Cloud Cloud Damage / Stagger Buildup | |||||
| Weapon | Armor | ||||
|---|---|---|---|---|---|
| Slipstream Saber | Valkyrian Bangle | ||||
| Accessory | Summon Materia | ||||
| Chocoking's Cape | Bahamut Arisen | ||||
| Weapon Materia | Armor Materia | ||||
| Weapon Skills | |||||
 Yuffie Yuffie Main Ice Caster / Support | |||||
| Weapon | Armor | ||||
|---|---|---|---|---|---|
| Fuma Shuriken | Cetran Bracer | ||||
| Accessory | Summon Materia | ||||
| Hermes Shoes | Odin | ||||
| Weapon Materia | Armor Materia | ||||
| Weapon Skills | |||||
 Aerith Aerith Secondary Spellcaster / Healer | |||||
| Weapon | Armor | ||||
|---|---|---|---|---|---|
| Gambanteinn | Cetran Armlet | ||||
| Accessory | Summon Materia | ||||
| Healing Carcanet | Phoenix | ||||
| Weapon Materia | Armor Materia | ||||
| Weapon Skills | |||||
Use Deshell to Improve Elemental Damage
To further increase your damage output with the Ice element, you can also equip an Enervation Materia to use Deshell on Hell Rider II, temporarily reducing their magic defense.
How to Get the Enervation Materia
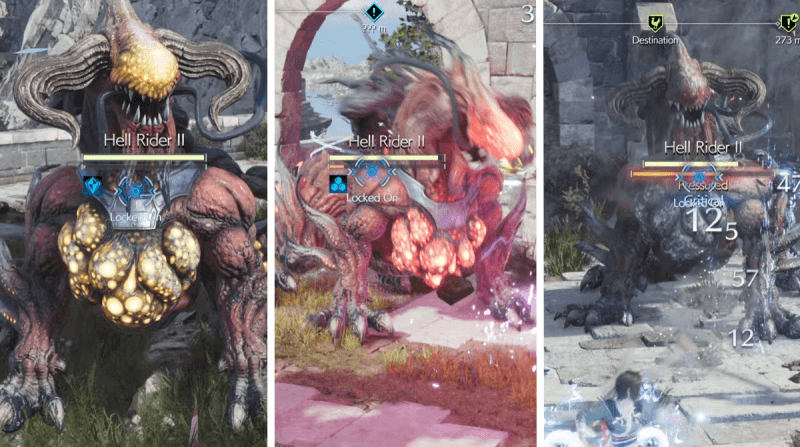
Check the Color of Hell Rider II's Chest and Head
 |
||
| Yellow Glow | Red Glow | No Glow |
|---|---|---|
| No Buffs | ||
You determine the buff on the Hell Rider II depending on the icon below the health bar or by looking at the color of its chest and head.
Battle Icons, Status Effects, and Ailments Explained
Summon Your Doppelganger As Soon As Possible
Use your first ATB bar to cast the Doppelganger, as it will copy any spell or ability that you cast with Yuffie. This will drastically help you build up the stagger meter. Additionally, you can easily bring other members of your party back to full health with Healing Materia because of the double cast from Doppelganger.
You will also be able to fill up your ATB gauge twice as fast because of your Doppelganger. Use this to your advantage and spam Ice elemental damage to build up stagger.
Learn Doppelganger From Bird of Prey
You can learn the Doppelganger ability from the Bird of Prey weapon. Maxing out its proficiency will allow you to use Doppelganger even when you have a different weapon equipped.
Bird of Prey Abilities, Stats, and Skills
Hell Rider II (Hell Rider 2) Rewards and Details
Rewards
| Hell Rider II Rewards | |||||||||||
|---|---|---|---|---|---|---|---|---|---|---|---|
| Easy/Normal | Hard Mode | ||||||||||
|
・50 Party EXP |
・10296 EXP ・12 AP ・1808 Gil |
||||||||||
| Items Dropped | Rare Items Dropped | ||||||||||
|
None
|
None
|
||||||||||
| Stealable Items | Morphable Items | ||||||||||
|
None
|
None
|
||||||||||
Drops Telluric Scriptures Vol. XIII on Hard Mode
You can obtain the Telluric Scriptures Vol. XIII Manuscript for Aerith by defeating the Hell Rider II on Hard Mode.
Basic Information and Details
| Hell Rider II | |
|---|---|
 |
|
| Location | Chapter Unlocked |
| Junon Region | Chapter 4 |
| Species | Movement |
| Artificial | Grounded |
| Details | |
|
An artificial monstrosity created by Shinra's R&D Division as part of horrific experiments meant to combine man and beast. It was being held in the underwarter reactor's research facility, but managed to escape. Inflicting enough damage by exploting its elemental weakness will pressure it. |
|
Hell Rider II (Hell Rider 2) Location and Side Quest
Encountered During the Beneath Still Waters Side Quest

You can encounter Hell Rider II during the Beneath Still Waters side quest. Hell Rider II will appear at the very beginning of the quest and you will have to defeat it again after chasing it to the mountain in Junon.
Beneath Still Waters Walkthrough
FF7 Rebirth Related Guides

Boss Fight Guide and List of All Bosses
Story Bosses
| All Major Story Bosses | |
|---|---|
| Chapter 1 | Materia Guardian |
| Chapter 2 | Midgardsormr |
| Chapter 3 |
Rude and Elena Mythril Golem |
| Chapter 4 |
Terror of the Deep Roche |
| Chapter 5 | Jenova Emergent |
| Chapter 6 | Grasptropod |
| Chapter 7 |
Custom Valkyrie Gigatrice |
| Chapter 8 |
Dyne Anuran Suppressor |
| Chapter 9 |
Specimen H1024 Crimson Mare Mk. II |
| Chapter 10 | Gi Nattak |
| Chapter 11 |
Diabolic Variant Yin and Yang Forgotten Specimen Galian Beast Roche |
| Chapter 12 |
Abzu Rude and Elena Rufus |
| Chapter 13 |
Red Dragon Ironclad Reno and Rude Tseng and Elena Moss-Grown Adamantoise Demon Gate |
| Chapter 14 |
Jenova Lifeclinger Sephiroth Reborn |
Optional Bosses
| Grasslands | |
|---|---|
| Summon | Titan |
| Classified Intel | Quetzalcoatl |
| Side Quests |
White Terror |
| Junon | |
| Summon | Phoenix |
| Classified Intel | Mindflayer |
| Side Quests |
White Mousse Hell Rider II Sandstorm Drake |
| Corel | |
| Summon | Alexander |
| Classified Intel | Tonberry King |
| Side Quests |
Dark Claw Joker |
| Minigame | Test 0 |
| Gongaga | |
| Summon | Kujata |
| Classified Intel | Great Malboro |
| Side Quests |
Levridon Mastodon Gorgon Mane Gigantoad |
| Cosmo Canyon | |
| Summon | Bahamut Arisen |
| Classified Intel | Jabberwock |
| Side Quests | Irasceros Gigaworm |
| Nibel | |
| Summon | Odin |
| Classified Intel | King Zu |
| Side Quests |
Queen Bee Dranabarga |
| Meridian Ocean | |
| Gilgamesh's Island |
Gilgamesh Titan and Bahamut Arisen Phoenix and Kujata Alexander and Odin |
| Pirate King's Treasure |
Ogre Raider Brineborn Demon Hueyacoatl Sea Dragon |
Comment
Author
Hell Rider II (Hell Rider 2) Hard Mode Guide
improvement survey
04/2026
improving Game8's site?

Your answers will help us to improve our website.
Note: Please be sure not to enter any kind of personal information into your response.

We hope you continue to make use of Game8.
Rankings
- We could not find the message board you were looking for.
Gaming News
Popular Games

Genshin Impact Walkthrough & Guides Wiki

Crimson Desert Walkthrough & Guides Wiki

Umamusume: Pretty Derby Walkthrough & Guides Wiki

Honkai: Star Rail Walkthrough & Guides Wiki

Monster Hunter Stories 3: Twisted Reflection Walkthrough & Guides Wiki

Wuthering Waves Walkthrough & Guides Wiki

The Seven Deadly Sins: Origin Walkthrough & Guides Wiki

Pokemon TCG Pocket (PTCGP) Strategies & Guides Wiki

Pokemon Pokopia Walkthrough & Guides Wiki

Zenless Zone Zero Walkthrough & Guides Wiki
Recommended Games

Monster Hunter World Walkthrough & Guides Wiki

Fire Emblem Heroes (FEH) Walkthrough & Guides Wiki

Pokemon Brilliant Diamond and Shining Pearl (BDSP) Walkthrough & Guides Wiki

Super Smash Bros. Ultimate Walkthrough & Guides Wiki

Diablo 4: Vessel of Hatred Walkthrough & Guides Wiki

Cyberpunk 2077: Ultimate Edition Walkthrough & Guides Wiki

Yu-Gi-Oh! Master Duel Walkthrough & Guides Wiki

Elden Ring Shadow of the Erdtree Walkthrough & Guides Wiki

The Legend of Zelda: Tears of the Kingdom Walkthrough & Guides Wiki

Persona 3 Reload Walkthrough & Guides Wiki
All rights reserved
© SQUARE ENIX CO., LTD. All Rights Reserved.
CHARACTER DESIGN: TETSUYA NOMURA/ROBERTO FERRARI
LOGO ILLUSTRATION: © 1997 YOSHITAKA AMANO
The copyrights of videos of games used in our content and other intellectual property rights belong to the provider of the game.
The contents we provide on this site were created personally by members of the Game8 editorial department.
We refuse the right to reuse or repost content taken without our permission such as data or images to other sites.


![Forza Horizon 6 Review [Preview] | Beautiful Roads With a Whole Lot of Oversteer](https://img.game8.co/4460981/a7254c24945c43fbdf6ad9bea52b5ce9.png/show)


![Forza Horizon 6 Review [Preview] | Beautiful Roads With a Whole Lot of Oversteer](https://img.game8.co/4460981/a7254c24945c43fbdf6ad9bea52b5ce9.png/thumb)


