Mindflayer Hard Mode Guide | Junon Classified Intel Boss
Mindflayer is a secret boss in Junon Region of Final Fantasy 7 Rebirth (FF7 Rebirth). Learn how to beat Mindflayer in Hard Mode and normal difficulties, its weaknesses and resistances, and a list of its moves and attack patterns in this guide!
List of Contents
Junon Classified Intel Boss Location
Location
| Map Location |  |
|---|---|
| Enlarged Map | 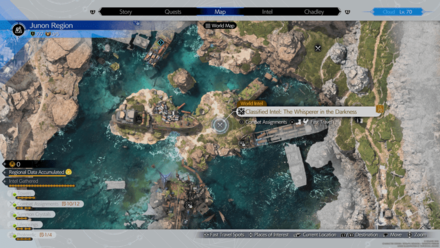 |
| In-Game Location | 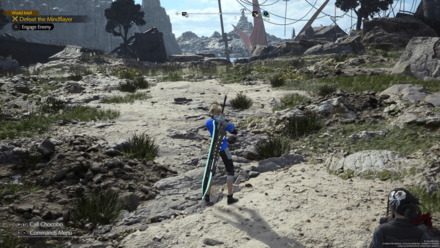 |
How to Unlock Quest
| Chapter | 4 - Dawn of a New Era |
|---|---|
| How to Unlock | Complete all of the Expedition Intels in the Junon Region |
| Rec. Level | Lv. 26 |
The Classified Intel Report: The Whisperer in the Darkness will be unlocked once you've analyzed the Lifesprings in all of the Expedition Intel Reportlocations in the Junon Region.
All Lifespring Locations (Expedition Intel)
Mindflayer Weaknesses and Stats
Stats
 |
|||
| Easy | Normal | Hard | |
|---|---|---|---|
| HP | 14599 | 20856 | 75118 |
Weakness and Resistances
| Weaknesses | Lesser Resistances | Greater Resistances |
|---|---|---|
| None | None | |
| Absorbed Elements | Immunities | |
| None | ||
Changes When Staggered
| Weakness / Effective | Resistance |
|---|---|
| None | None |
How to Pressure Mindflayer
How to Pressure
|
|
Landing synergy abilities will pressure it.
How to Pressure and Stagger Enemies
How to Beat Mindflayer (Normal)
| Mindflayer Boss Fight Tips |
|---|
|
|
Attack with Synergy Abilities
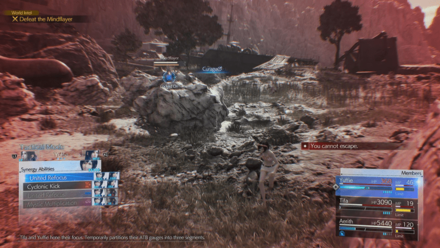
The only way to pressure the Mindflayer is by using Synergy Abilities on it. Cast Haste on your party or have the ATB Assist Materia equipped on the character you're mainly controlling to fill your other party members' ATB Gauges without having to directly control them.
Make Sure the Other Party Members are Using Their ATB Charges
Make sure that you're also issuing commands to your other party members so that they can use their ATB Charges and build up their Synergy Meter.
ATB Guide: How to Fill the ATB Gauge
Use a Physical Attacker like Cloud or Barret

It's recommended to have a physical damage dealer like Cloud or Barret as your source of damage since the Mindflayer resists Magic damage.
You can still use ranged magic attackers like Aerith or Yuffie to stay safely at range and apply pressure, but make sure that you immediately switch to a physical attacker like Cloud or Tifa once it gets staggered.
Use Rocks as Cover During Psychotic Break
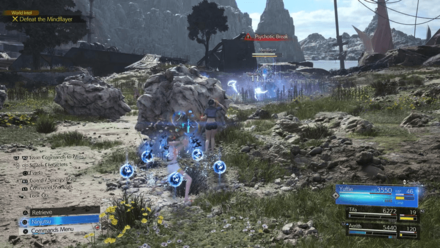
After the Mindflayer uses Telekinesis, it will follow up with a powerful move called Psychotic Break. Make sure that you stay behind one of the rocks that it threw at you otherwise you will take 9999 damage and get instantly knocked out.
Thankfully, the AI that's controlling your other party members will position them behind a rock when it uses this move, so you won't have to worry about them getting knocked out.
Mindflayer Moves and Attack Patterns
Abilities and Attack Patterns
| This section is under construction! Stay tuned for updates! |
Battle Icons, Status Effects, and Ailments Explained
Mindflayer Best Party and Builds
| This party setup is built for Hard Mode. If you don't have certain members, equipment, or Materia available, you could replace them with the closest alternative that you have available. |
Recommended Party Setup
| Recommended Party Setup | |
|---|---|
 Barret Barret
|
【Stagger Bot / Tank】 ・Rapidly charges his ATB Gauge. ・Bonus Round helps swiftly stagger. Recommended Level: 70 |
 Tifa Tifa
|
【Main DPS】 ・Heavily increases stagger damage. ・Also has Healing in case of emergencies. Recommended Level: 70 |
 Aerith Aerith
|
【Support】 ・Primarily used to buff the party. ・Save ATB for emergency healing. Recommended Level: 70 |
Barret Will Tank Attacks and Spam Abilities
Barret's main role on this team to rapidly fill his ATB so that he can spam his abilities. This in turn will boost your other party members' ATB Gauges, thanks to the ATB Assist Materia, allowing you to use as many Synergy Abilities as possible.
Do note that Barret is pretty slow, so it may be difficult to avoid the Mindflayer's unblockable attacks if you're not careful. Put some distance between you and the Mindflayer so you can see its next move and react appropriately.
Tifa Increases Damage Dealt During Stagger
Once the Mindflayer gets staggered, Tifa can use the combination of Rise and Fall, Omnistrike, and True Strike to massively increase the amount of damage it takes while staggered.
Make sure that you use your Limit Breaks before the stagger bar expires to maximize your damage output.
Aerith Casts Haste and Defensive Buffs
Aerith will want to prioritize casting Haste on your party before applying defensive buffs like Protect and Shell to minimize the damage everyone takes.
Alternatively, you could skip applying defensive buffs so that you can heal Barret if he takes too much damage from using Lifeward.
Mindflayer Best Materia to Use
Recommended Materia for Barret
| Weapon: Hi-Caliber Rifle |
Armor: Valkyrian Bangle |
|---|---|
|
|
|
| Summon: |
ATB Boost and Stagger are used to give Barret a boost to his ATB Gauge, so that he can continue to spam commands and proc ATB Assist to charge Tifa and Aerith's ATBs without needing to swap to them.
Precision Defense Focus helps you perfectly time your blocks while Steadfast Block helps reduce the damage if you don't time it perfectly.
For the flexible slots, HP, Vitality, and Spirit Up help increase Barret's tankiness, Assess is useful to check the boss' stats, and Revival, Chakra, and Prayer are great for emergency revives and healing.
Finally, Alexander is used to give Barret a balance boost to his HP and defenses.
Recommended Materia for Tifa
| Weapon: Kaiser Knuckles |
Armor: Enhanced Varvados Bracelet |
|---|---|
|
|
|
| Summon: |
ATB Stagger, Boost, and Skill Master are used so that Tifa can spam her abilities as much as possible as soon as Quetzalcoatl gets staggered.
Magnify linked to Healing is used in case no one else has ATB Chagres to heal the party, while Disempowerment and Enervation will debuff the boss and make the fight more manageable if they hit.
For the flexible slots, HP, Luck, and Strength Up are all generally good stat increases while Chakra will heal Tifa in a pinch without having to use MP.
Finally, Odin is used because it gives her the highest Attack boost out of all the available Summons.
Recommended Materia for Aerith
| Weapon: Ceremonial Staff |
Armor: Cetran Bracer |
|---|---|
|
|
|
| Summon: |
Time, Fortification, Barrier, and Empowerment are used so that Aerith can boost the party's ATB charge rate, defenses, and damage while HP Up and MP Up help her survive more hits and cast more spells respectively.
For the linked Materia, Magnify and Healing are used to heal the entire party in a pinch, Swiftcast and Revival to instantly revive a downed ally, and lastly Magic Efficiency and Reraise to cast Reraise on an ally at a lower MP cost.
Alternatively, you could swap Magnify with Magic Efficiency if you plan on absorbing damage with Barret's Lifeward.
Finally, Phoenix is used because it gives her the highest Magic boost out of all the available Summons.
Mindflayer Rewards and Details
Rewards
| Quetzalcoatl Rewards | |||||||||||
|---|---|---|---|---|---|---|---|---|---|---|---|
| Easy/Normal | Hard Mode | ||||||||||
|
・1680 EXP ・18 AP ・440 Gil |
・10010 EXP ・18 AP ・1995 Gil |
||||||||||
| Items Dropped | Rare Items Dropped | ||||||||||
| ・Mindflayer Crown | None | ||||||||||
| Stealable Items | Morphable Items | ||||||||||
| None | ・Mindflayer Crown | ||||||||||
| Hard Mode Exclusive Drops | |||||||||||
|
・Sharpshooter's Companion Vol. IX ・Vile Mindflayer Crown |
|||||||||||
Drops the Vile Mindflayer Crown on Hard
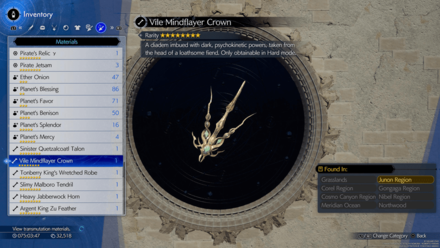
Beating Mindflayer on Hard Mode will award the player with a Vile Mindflayer Crown, which is required to craft the Genji Earrings accessory.
Genji Earrings Effects and How to Get
Basic Information and Details
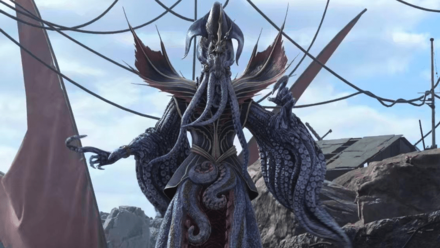
| Mindflayer | |
|---|---|
|
|
|
| Location | Chapter Unlocked |
| Junon Region | Chapter 4 |
| Species | Movement |
| Biological | Grounded |
| Details | |
|
A grotesque fiend that has taken up residence in one of Junon's inlets. It is capable of lifting even giant boulders with its preternatural psychokinetic skills. Using its tentacles, it siphons off the brains of anything that wanders into its domain. Landing synergy abilities will pressure it. |
|
FF7 Rebirth Related Guides

Boss Fight Guide and List of All Bosses
Story Bosses
| All Major Story Bosses | |
|---|---|
| Chapter 1 | Materia Guardian |
| Chapter 2 | Midgardsormr |
| Chapter 3 |
Rude and Elena Mythril Golem |
| Chapter 4 |
Terror of the Deep Roche |
| Chapter 5 | Jenova Emergent |
| Chapter 6 | Grasptropod |
| Chapter 7 |
Custom Valkyrie Gigatrice |
| Chapter 8 |
Dyne Anuran Suppressor |
| Chapter 9 |
Specimen H1024 Crimson Mare Mk. II |
| Chapter 10 | Gi Nattak |
| Chapter 11 |
Diabolic Variant Yin and Yang Forgotten Specimen Galian Beast Roche |
| Chapter 12 |
Abzu Rude and Elena Rufus |
| Chapter 13 |
Red Dragon Ironclad Reno and Rude Tseng and Elena Moss-Grown Adamantoise Demon Gate |
| Chapter 14 |
Jenova Lifeclinger Sephiroth Reborn |
Optional Bosses
| Grasslands | |
|---|---|
| Summon | Titan |
| Classified Intel | Quetzalcoatl |
| Side Quests |
White Terror |
| Junon | |
| Summon | Phoenix |
| Classified Intel | Mindflayer |
| Side Quests |
White Mousse Hell Rider II Sandstorm Drake |
| Corel | |
| Summon | Alexander |
| Classified Intel | Tonberry King |
| Side Quests |
Dark Claw Joker |
| Minigame | Test 0 |
| Gongaga | |
| Summon | Kujata |
| Classified Intel | Great Malboro |
| Side Quests |
Levridon Mastodon Gorgon Mane Gigantoad |
| Cosmo Canyon | |
| Summon | Bahamut Arisen |
| Classified Intel | Jabberwock |
| Side Quests | Irasceros Gigaworm |
| Nibel | |
| Summon | Odin |
| Classified Intel | King Zu |
| Side Quests |
Queen Bee Dranabarga |
| Meridian Ocean | |
| Gilgamesh's Island |
Gilgamesh Titan and Bahamut Arisen Phoenix and Kujata Alexander and Odin |
| Pirate King's Treasure |
Ogre Raider Brineborn Demon Hueyacoatl Sea Dragon |
Comment
Author

Mindflayer Hard Mode Guide | Junon Classified Intel Boss
Rankings
- We could not find the message board you were looking for.
Gaming News


Popular Games

Genshin Impact Walkthrough & Guides Wiki
Honkai: Star Rail Walkthrough & Guides Wiki
Arknights: Endfield Walkthrough & Guides Wiki
Umamusume: Pretty Derby Walkthrough & Guides Wiki
Wuthering Waves Walkthrough & Guides Wiki
Pokemon TCG Pocket (PTCGP) Strategies & Guides Wiki
Abyss Walkthrough & Guides Wiki
Zenless Zone Zero Walkthrough & Guides Wiki
Digimon Story: Time Stranger Walkthrough & Guides Wiki
Clair Obscur: Expedition 33 Walkthrough & Guides Wiki


Recommended Games
Fire Emblem Heroes (FEH) Walkthrough & Guides Wiki
Pokemon Brilliant Diamond and Shining Pearl (BDSP) Walkthrough & Guides Wiki
Diablo 4: Vessel of Hatred Walkthrough & Guides Wiki
Super Smash Bros. Ultimate Walkthrough & Guides Wiki
Yu-Gi-Oh! Master Duel Walkthrough & Guides Wiki
Elden Ring Shadow of the Erdtree Walkthrough & Guides Wiki
Monster Hunter World Walkthrough & Guides Wiki
The Legend of Zelda: Tears of the Kingdom Walkthrough & Guides Wiki
Persona 3 Reload Walkthrough & Guides Wiki
Cyberpunk 2077: Ultimate Edition Walkthrough & Guides Wiki


All rights reserved
© SQUARE ENIX CO., LTD. All Rights Reserved.
CHARACTER DESIGN: TETSUYA NOMURA/ROBERTO FERRARI
LOGO ILLUSTRATION: © 1997 YOSHITAKA AMANO
The copyrights of videos of games used in our content and other intellectual property rights belong to the provider of the game.
The contents we provide on this site were created personally by members of the Game8 editorial department.
We refuse the right to reuse or repost content taken without our permission such as data or images to other sites.