All Protorelic Locations (Phenomenon Intel)
Protorelics or Phenomenon Intel are a series of short quests tied to the secret Gilgamesh boss in Final Fantasy 7 Rebirth (FF7 Rebirth). Learn the locations of all Protorelics, their rewards and their related quests for each region.
List of Contents
All Protorelic Locations (Phenomenon Intel)
| All Protorelics Per Region | |||||
|---|---|---|---|---|---|
| Grasslands | Junon | Corel | |||
| Gongaga | Cosmo Canyon | Nibel | |||
| Meridian Ocean | |||||
All Grasslands Protorelics
| Phenomenon Intel | Recommended Level |
|---|---|
| Phenomenon Intel 1 | Level 17 |
| Phenomenon Intel 2 | Level 18 |
| Phenomenon Intel 3 | Level 18 |
| Phenomenon Intel 4 | Level 19 |
Grasslands Phenomenon Intel 1
| Steps to Complete Intel | |
|---|---|
| 1 | 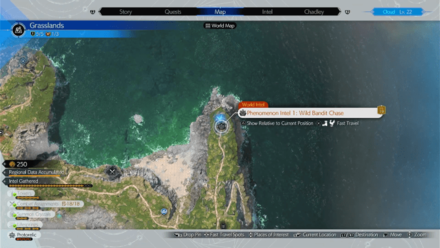 Head to the location on the map. |
| 2 | Enter the tower from a hole east of the fence. |
| 3 |  Defeat the bandits. |
Grasslands Phenomenon Intel 2
| Steps to Complete Intel | |
|---|---|
| 1 | 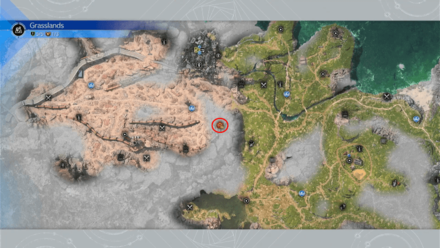 Head to the location on the map. |
| 2 | Use stealth to get around the enemies. Wait until no one is looking and move or dodge roll to the next obstruction. |
| 3 | After infiltrating the area, the bandits will enter the building. The door will be locked, so climb up the handrails outside and head for the roof to fight and defeat the bandits. |
Grasslands Phenomenon Intel 3
| Steps to Complete Intel | |
|---|---|
| 1 | 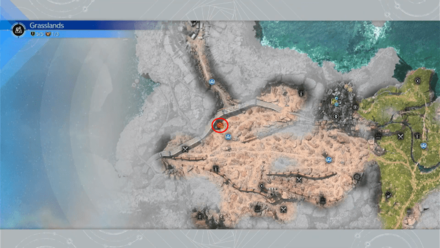 Head to the location on the map. |
| 2 |  Guess which bandit is holding the Protorelic. The correct answer is Burke on the left as indicated by a shining light. However, whether right or wrong won't matter and a fight will trigger after. |
| 3 | Ride a Chocobo and use them to find the key. |
Grasslands Phenomenon Intel 4
| Steps to Complete Intel | |
|---|---|
| 1 | 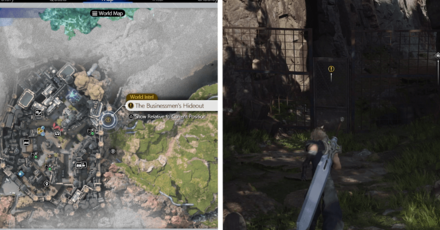 There will be a new World Intel on the map called The Businessmen's Hideout. Go north from the Kalm - Air-Raid Shelter fast travel point, and through the door. |
| 2 | 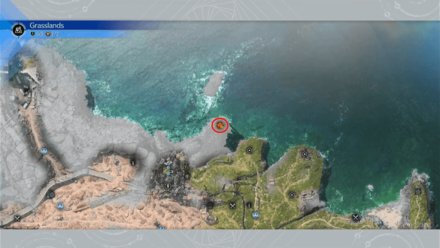 Continue north to the location on the map. |
| 3 | 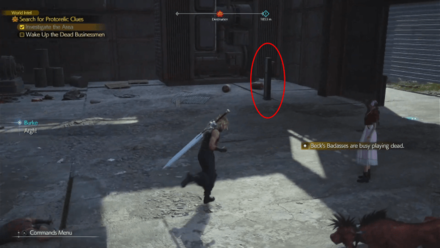 After entering the hideout, activate the lever on the right to drop the wooden box. |
| 4 | 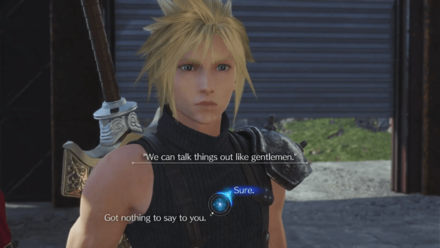 Choose whether you would like to negotiate with the bandits or not. However, the choice doesn't matter and a fight will ensue regardless. |
| 5 | 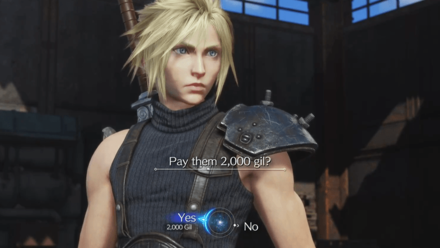 After the battle, purchase the Protorelic for 2,000 Gil from the bandits. |
Should You Pay 2,000 Gil to the Bandits?
All Junon Protorelics
| Phenomenon Intel | Recommended Level |
|---|---|
| Phenomenon Intel 1 | Level 0 (No Battle) |
| Phenomenon Intel 2 | Level 0 (No Battle) |
| Phenomenon Intel 3 | Level 0 (No Battle) |
| Phenomenon Intel 4 | Level 0 (No Battle) |
Junon Phenomenon Intel 1
| Steps to Complete Intel | |
|---|---|
| 1 | 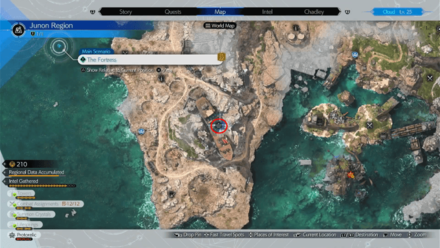 Head to the location on the map. |
| 2 | 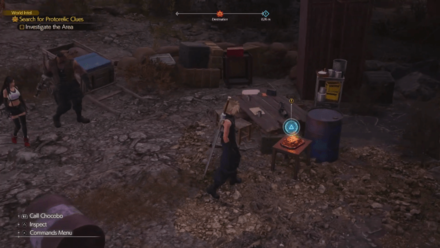 Find and activate the board game in the area. |
| 3 | 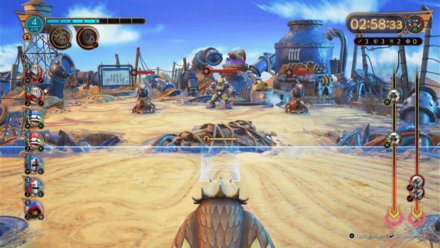 Play and win the Fort Condor Minigame. In the mini-game, units are deployed automatically, moving to attack the enemy's base. The goal is to defeat the enemy boss unit within a time limit. |
Junon Phenomenon Intel 2
| Steps to Complete Intel | |
|---|---|
| 1 | 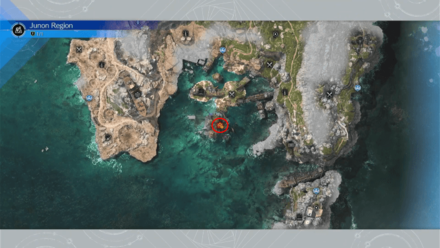 Head to the location on the map and initiate the Fort Condor Minigame. |
| 2 |  In the second Fort Condor, your opponent will have a new wolf-type unit, Archfiend. This unit rushes to the your base, so make sure to prioritize in defeating them when they are present. |
Junon Phenomenon Intel 3
| Steps to Complete Intel | |
|---|---|
| 1 | 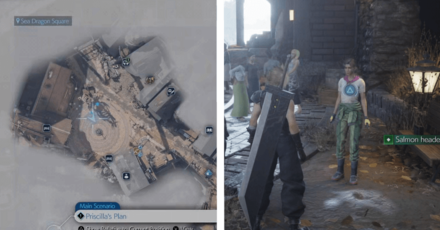 If you have not done so, complete the When Words Won't Do Side Quest to unlock the Crow's Nest. You will need to go through here to reach Junon Phenomenon Intel 3. |
| 2 | 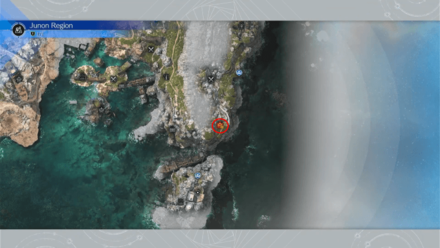 Leave the Crow's Nest from its south exit. Continue south to the location on the map and initiate the Fort Condor Minigame. |
| 3 | 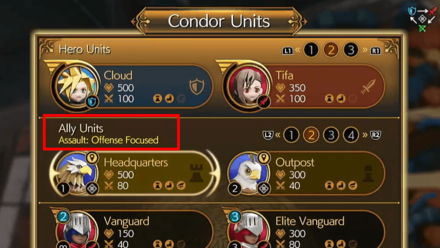 The third Fort Condor is difficult, so use the Assault: Offense Focused units. You can change units using the L2/R2 buttons. |
| 4 | 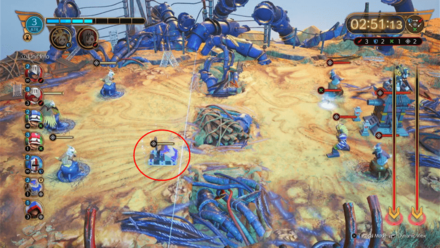 Place a Trebuchet when the battle begins to counteract the slow-moving, high-HP Warlord that will spawn on the right side. |
| 5 | 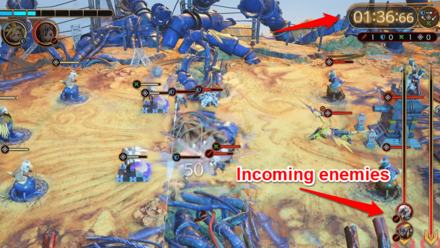 Deploy Cloud when two units spawn at 1:33 to instantly defeat them. |
| 6 | 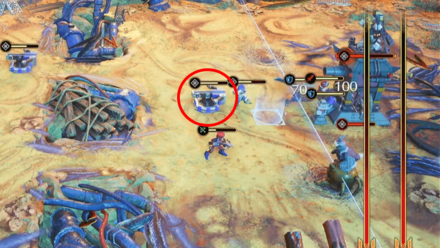 Once you are able to push the line, place a tower in front of the boss. |
| 7 | 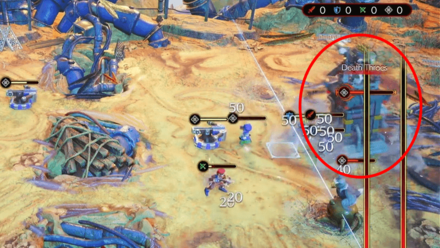 The boss unit Gilgacannon Tower will cause great damage to the surrounding area when its HP lowers to a specific point. Wait until this triggers before deploying a lot of units. |
| 8 | How to win third Fort Candor Minigame Video |
Junon Phenomenon Intel 4
| Steps to Complete Intel | |
|---|---|
| 1 | Head to the location on the map and initiate the Fort Condor Minigame. |
| 2 | 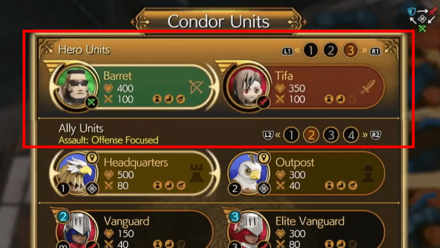 In the fourth Fort Condor, we recommend using Barret and Tifa as your heroes and the Assault: Offense Focused ally units. |
| 3 | How to win fourth Fort Candor Minigame Video |
All Corel Protorelics
| Phenomenon Intel | Recommended Level |
|---|---|
| Phenomenon Intel 1 | Level 30 |
| Phenomenon Intel 2 | Level 31 |
| Phenomenon Intel 3 | Level 45 |
| Phenomenon Intel 4 | Level 46 |
Corel Phenomenon Intel 1
| Steps to Complete Intel | |
|---|---|
| 1 | 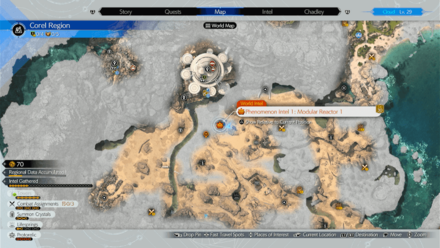 Head to the location on the map. |
| 2 | 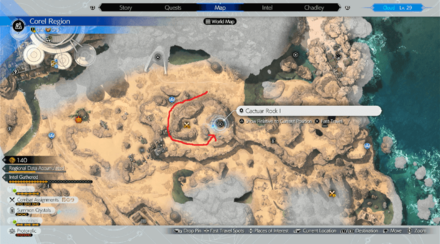 Use the Cactuar Statue by holding it up to locate the Cactuar Rock. |
| 3 | When you find the Cactuar Rock, hold up the Cactuar Statue in front of it to initiate a battle. |
| 4 | After the battle, examine the Cactuar Rock, then return to starting point and go through the door. |
| 5 | 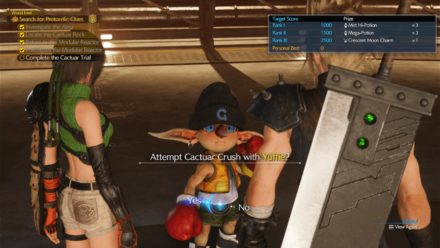 Clear the Cactuar Crush Minigame by reaching at least 1,000 points. |
| 6 | Video of how to clear the first Cactuar Crush Minigame |
Corel Phenomenon Intel 2
| Steps to Complete Intel | |
|---|---|
| 1 |  Head to the location on the map. |
| 2 | 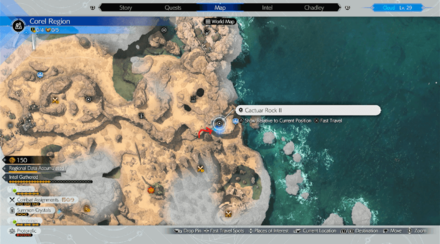 Use the Cactuar Statue by holding it up to locate the Cactuar Rock. |
| 3 | Climb the nearby wall to reach the Cactuar Rock. Hold up the Cactuar Statue in front of it to initate a battle. |
| 4 | After the battle, examine the Cactuar Rock, then return to starting point and go through the door. |
| 5 | Clear the Cactuar Crush Minigame by reaching at least 1,000 points. |
| 6 | Video of how to clear the second Cactuar Crush Minigame |
Corel Phenomenon Intel 3
| Steps to Complete Intel | |
|---|---|
| 1 | 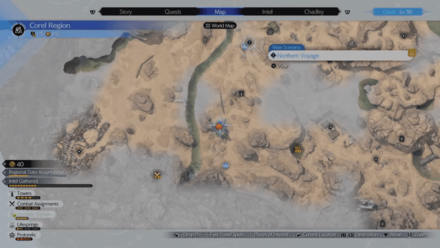 |
| 2 | 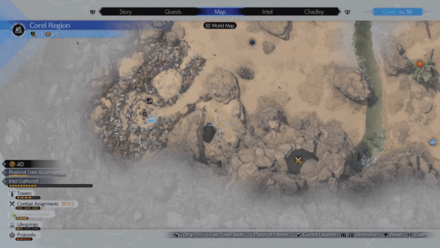 |
| 3 |  Go inside the cave and go down the yellow ledges. From there, you will see another set of ledges that you must climb in order to get to where the Cactuar Rock is. Go inside the cave and go down the yellow ledges. From there, you will see another set of ledges that you must climb in order to get to where the Cactuar Rock is. |
| 4 | 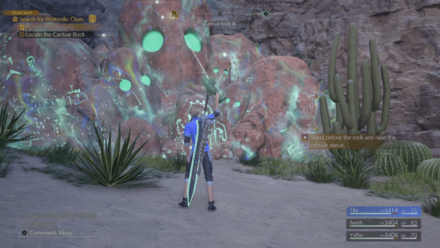 Go down from the top and raise the cactuar statue before the Cactuar Rock III. A battle with Gigantuar will ensue. After the battle interact again with the Cactuar Rock to unlock the door of the statue in the location of the Phenomenon Intel. Go down from the top and raise the cactuar statue before the Cactuar Rock III. A battle with Gigantuar will ensue. After the battle interact again with the Cactuar Rock to unlock the door of the statue in the location of the Phenomenon Intel. |
| 5 | Go back to the Phenomenon Intel and clear the Cactuar Crush Minigame with Yuffie by reaching at least 4000 points. |
Cactuar Crush Minigame Guide and Rewards
Corel Phenomenon Intel 4
| Steps to Complete Intel | |
|---|---|
| 1 | 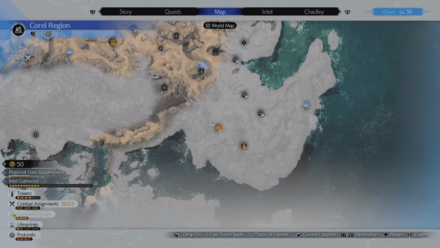 |
| 2 | 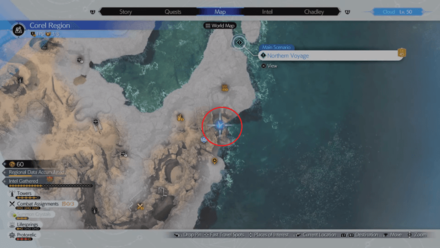 |
| 3 | 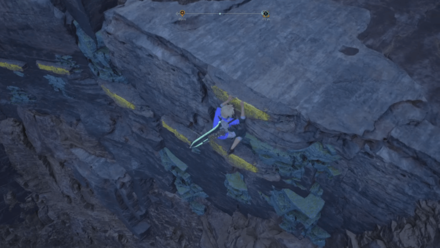 After arriving, climb the yellow-painted ledges to go to the top. After arriving, climb the yellow-painted ledges to go to the top. |
| 4 | 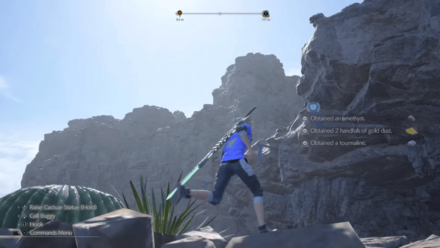 Once you reach the top, continue further and then use the Grappling Hook with the L2 button to get to the other side where the Cactuar Statue is. Once you reach the top, continue further and then use the Grappling Hook with the L2 button to get to the other side where the Cactuar Statue is. |
| 5 | 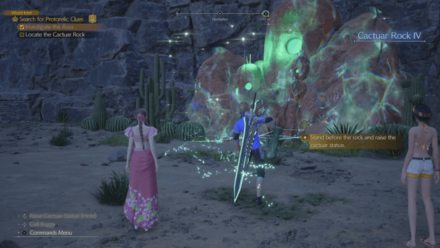 Raise the cactuar statue before Cactuar Rock IV. A battle with Gargantuar will ensue. After the battle interact again with the Cactuar Rock to unlock the door of the statue in the location of the Phenomenon Intel. Raise the cactuar statue before Cactuar Rock IV. A battle with Gargantuar will ensue. After the battle interact again with the Cactuar Rock to unlock the door of the statue in the location of the Phenomenon Intel. |
| 6 | Go back to the Phenomenon Intel and clear the Cactuar Crush Minigame with Aerith by reaching at least 2000 points. |
| 7 | After completing Cactuar Rush, you will have to fight Kid G. After completing this battle, you will unlock Cactuar Crush's Hard Mode and get the Kid G's Protorelic. |
Cactuar Crush Minigame Guide and Rewards
All Gongaga Protorelics
| Phenomenon Intel | Recommended Level |
|---|---|
| Phenomenon Intel 1 | Level 33 |
| Phenomenon Intel 2 | Level 34 |
| Phenomenon Intel 3 | Level 35 |
| Phenomenon Intel 4 | Level 42 |
Gongaga Phenomenon Intel 1
| Steps to Complete Intel | |
|---|---|
| 1 |  |
| 2 | 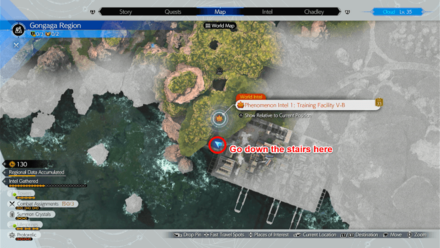 From the entrance, turn right until you see a fenced area. Enter this room and take the stairs down to reach the facility. |
| 3 |  Approach the button and begin the training exercise. This will initiate a battle that comes in 3 waves. |
| 4 | 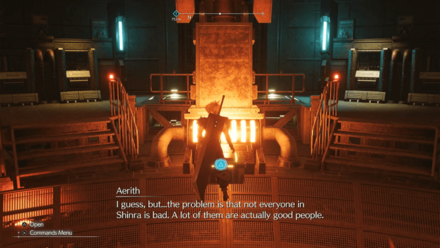 |
Gongaga Phenomenon Intel 2
| Steps to Complete Intel | |
|---|---|
| 1 | 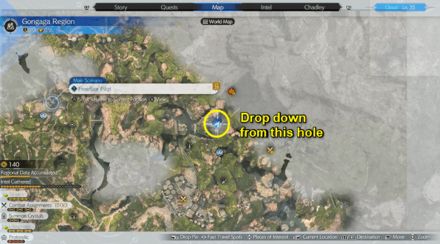 Start from Activation Intel 2 and head directly north. Climb up a slope to your right to find the hole with a rope leading down. Head down and enter the cave below to reach the facility. |
| 2 | 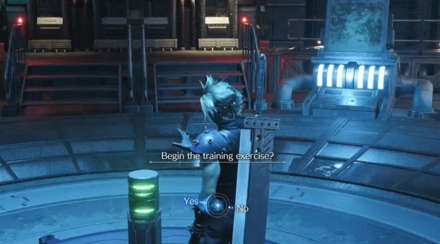 Approach the button and begin the training exercise. This will initiate a battle that comes in 3 waves. |
| 3 |  After winning the battle, open the chest in the back of the room which will contain 2 Hi-Ethers. |
Gongaga Phenomenon Intel 3
| Steps to Complete Intel | |
|---|---|
| 1 | 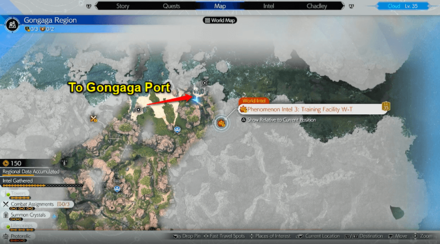 If you already have the Gongaga Port fast travel point unlocked, start from there and head south. Otherwise, follow the sandy path towards Gongaga Port and turn south after reaching the port. Bounce on the mushroom to reach the facility. |
| 2 |  Approach the button and begin the training exercise. This will initiate a battle that comes in 3 waves. |
| 3 | 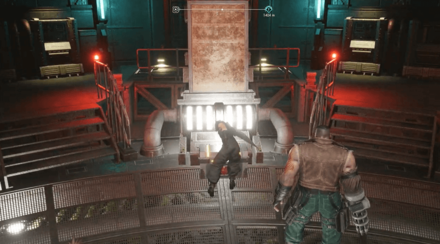 After winning the battle, open the chest in the back of the room which will contain 1 Eilxir. |
Gongaga Phenomenon Intel 4
| Steps to Complete Intel | |
|---|---|
| 1 | 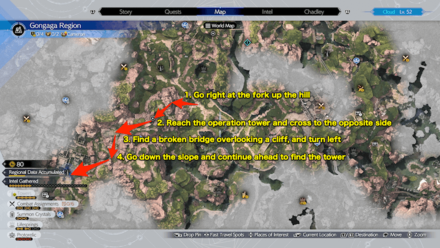 First, you'll need to reach Activation Intel 4 if you haven't yet, which can be difficult to find in itself. Follow the steps shown in the map guide above to find the tower. |
| 2 | 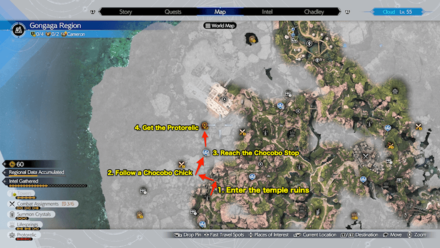 From Activation Intel 4, go north into a temple and turn left. Look right to find a door with a Chocobo Chick; follow it into a cavern and it will lead you to a Chocobo Stop. Go north from the Chocobo Stop to find Phenomenon Intel 4. |
| 3 |  Approach the button and begin the training exercise. This will initiate a battle that comes in 3 waves. |
| 4 | 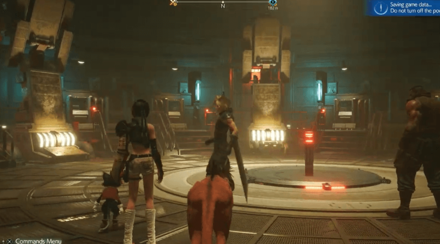 After winning the battle, open the chest in the back of the room which will contain 1 Prayer ★★★ Materia. |
All Cosmo Canyon Protorelics
| Phenomenon Intel | Recommended Level |
|---|---|
| Phenomenon Intel 1 | 0 (No battle) |
| Phenomenon Intel 2 | 0 (No battle) |
| Phenomenon Intel 3 | 0 (No battle) |
| Phenomenon Intel 4 | 0 (No battle) |
Cosmo Canyon Phenomenon Intel 1
| Steps to Complete Intel | |
|---|---|
| 1 | 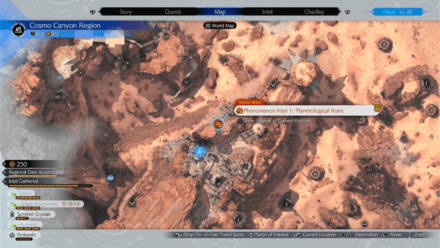 Head to the Gliding Range No.04 and glide left until you land on the lowest ground. Climb the slope on the left and turn right to reach the ruins. |
| 2 |
Play Gears and Gambits and defeat King Flan to proceed. |
Cosmo Canyon Phenomenon Intel 2
| Steps to Complete Intel | |
|---|---|
| 1 | 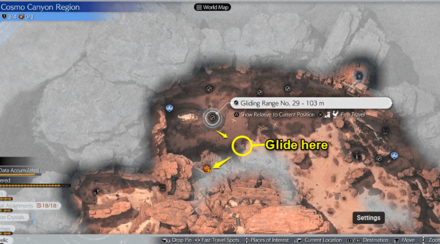 Head to the Gliding Range No. 29 and glide towards the turbine on the right to propel higher. Continue moving right to access the ruins. |
| 2 | 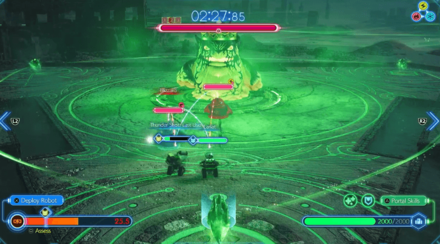
Play Gears and Gambits again and defeat the second King Flan to proceed. |
Cosmo Canyon Phenomenon Intel 3
| Steps to Complete Intel | |
|---|---|
| 1 | 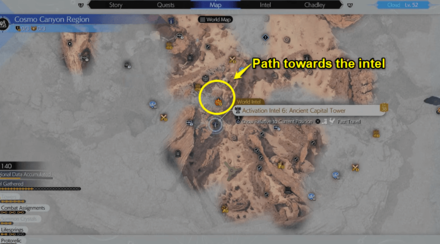 Fast travel to the Ancient Capitals Tower and walk towards the ruins. Find the sandy path to your right and climb up to see the Chocobos. Climb the wall from here to start the intel. |
| 2 | 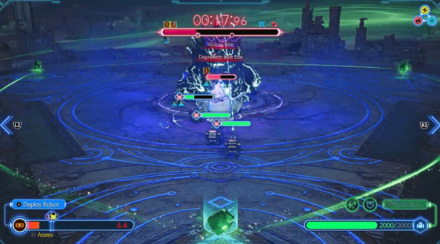
Play another set of Gears and Gambits and defeat the King Flan to proceed. |
Cosmo Canyon Phenomenon Intel 4
| Steps to Complete Intel | |
|---|---|
| 1 | 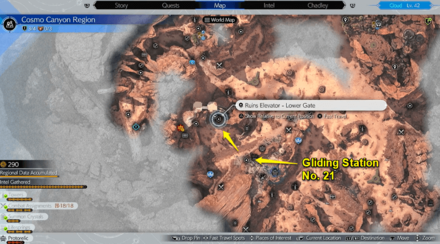 Head to the Gliding Range No. 21 and glide across the canyon.Upon landing, continue moving forward to reach the Ruins Elevator. On the next floor, climb up the stairs to reach the ruins. |
| 2 | 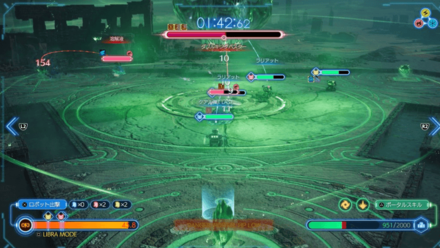
Play another set of Gears and Gambits and defeat the King Flan to proceed. |
All Nibel Protorelics
| Phenomenon Intel | Recommended Level |
|---|---|
| Phenomenon Intel 1 | Level 41 |
| Phenomenon Intel 2 | Level 41 |
| Phenomenon Intel 3 | Level 42 |
| Phenomenon Intel 4 | Level 45 |
Nibel Phenomenon Intel 1
| Steps to Complete Intel | |
|---|---|
| 1 | 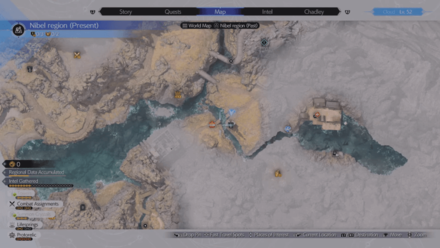 |
| 2 | 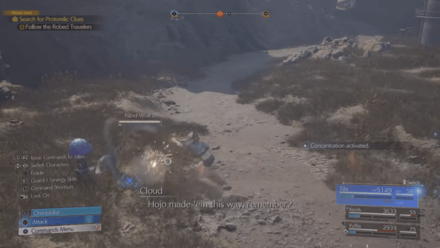 Follow them until you encounter monsters that will hinder the Robed Traveler's progress. Defeat the monsters so that the robed men can continue walking. Follow them until you encounter monsters that will hinder the Robed Traveler's progress. Defeat the monsters so that the robed men can continue walking. |
| 3 | 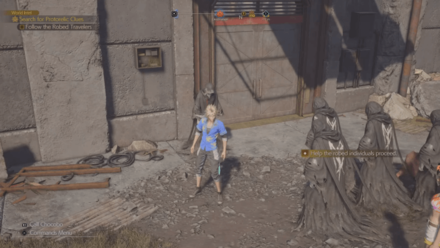 Keep following the Robed Travelers. Push them on the right direction if they keep straying from their path. They will eventually stop at the front of a Shinra facility. Open the door for them so they can continue. Keep following the Robed Travelers. Push them on the right direction if they keep straying from their path. They will eventually stop at the front of a Shinra facility. Open the door for them so they can continue.
|
| 4 |  You will need to fight Cavestalkers. Defeat them to complete the Phenomenon Intel. You will need to fight Cavestalkers. Defeat them to complete the Phenomenon Intel.
|
Nibel Phenomenon Intel 2
| Steps to Complete Intel | |
|---|---|
| 1 | 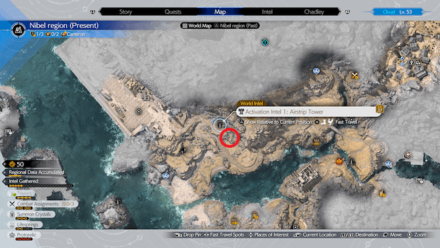 |
| 2 | 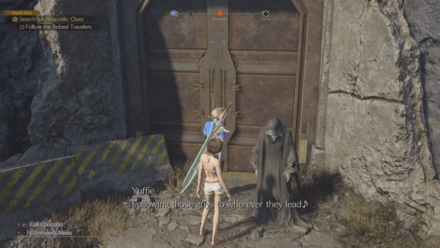 Follow the Robed Travelers until they stop at the front of a brown door. Interact with the door and then the party will decide to investigate the Submarine Dock.
 |
| 3 | 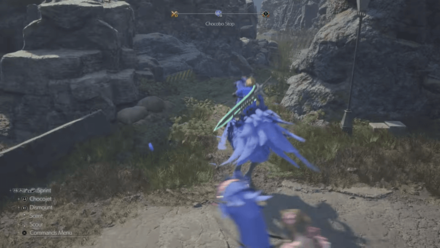 Call your Ocean Chocobo and ride it. Go to the left narrow path beside the building and use your Chocobo's Chocojet to travel across the ocean. Call your Ocean Chocobo and ride it. Go to the left narrow path beside the building and use your Chocobo's Chocojet to travel across the ocean.
|
| 4 | 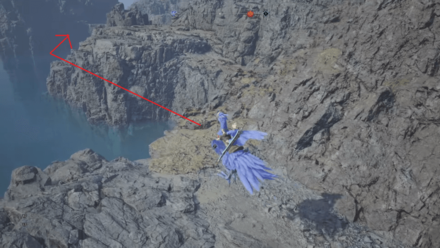 Glide and go to the right until you see a broken gate on the water. Enter the hole of the gate. Glide and go to the right until you see a broken gate on the water. Enter the hole of the gate.
|
| 5 |  Upon entering, fight the enemies and then proceed to the left door. Upon entering, fight the enemies and then proceed to the left door.
|
| 6 | Once inside the door, go to the left and then go down. There is an enemy at the end of the room which you may or may not fight. |
| 7 | 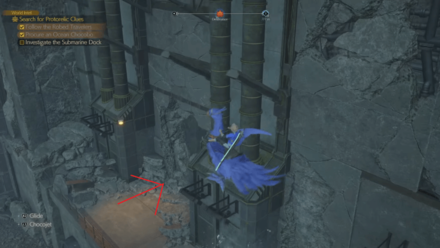 Look to the right of the room and you will see a massive hole. Use your Chocobo's Chocojet to go to where the hole is located. Enter the hole to proceed.
|
| 8 | 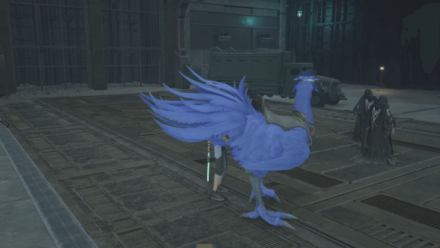 After entering the hole, use Chocojet to proceed to the right and then you will encounter the Robed Travelers again.
|
| 9 | 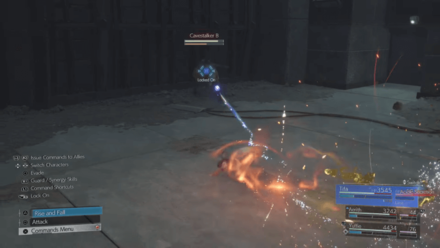 A cutscene will play and Cavestalkers will appear. Defeat them and the Phenomenon Intel will be completed. A cutscene will play and Cavestalkers will appear. Defeat them and the Phenomenon Intel will be completed.
|
Nibel Phenomenon Intel 3
| Steps to Complete Intel | |
|---|---|
| 1 | 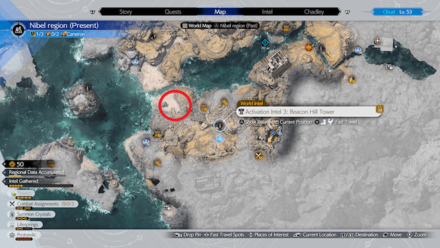 |
| 2 | 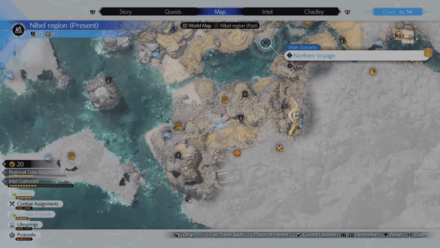 |
| 3 | 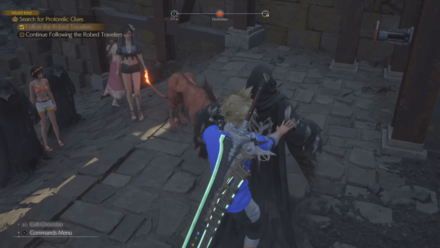 You will need to follow the Robed Travelers again until they stop at the front of a huge gate. Push one of the travelers near the valve and then open the gate by using the valve three times. You will need to follow the Robed Travelers again until they stop at the front of a huge gate. Push one of the travelers near the valve and then open the gate by using the valve three times.
|
| 4 | 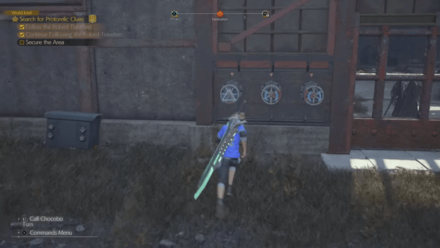 Go up the ramp then go down to fight an enemy. You will encounter another big gate with three valves this time. Your goal is to align the red part of the valve with the arrows. Go up the ramp then go down to fight an enemy. You will encounter another big gate with three valves this time. Your goal is to align the red part of the valve with the arrows.
|
| 5 | Interact with the left valve first. |
| 6 | Interact with the right valve after. |
| 7 | Interact with the middle valve. |
| 8 | Interact with the left valve again. |
| 9 | Finally, interact with the third valve until the red part of the valve aligns with the arrow. The gate will open afterwards where a battle will ensue. |
| 10 |  Defeat Sanguine Scourge and then the Phenomenon Intel will be completed. Defeat Sanguine Scourge and then the Phenomenon Intel will be completed.
|
Nibel Phenomenon Intel 4
| Steps to Complete Intel | |
|---|---|
| 1 | 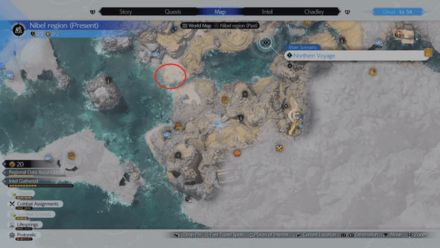 |
| 2 | 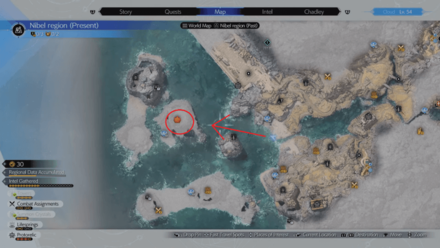 |
| 3 | 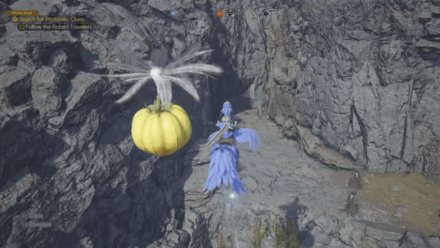 Once you arrive, there will be more Robed Travelers. Use the Ocean Chocobo's Chocojet again to go to the top.
 |
| 4 | Use the Ocean Chocobo's Chocojet again to propel yourself to the top of the island. |
| 5 | 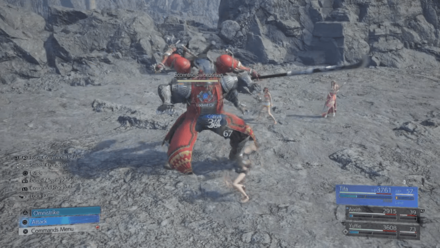 Once on the top, proceed forward until you see a bunch of Robed Travelers checking on a monster. A cutscene will play out and then you will have to defeat the Eccentric Swordsman.
Once defeated, you will finally complete the final Phenomenon Intel in Nibel Region. Once on the top, proceed forward until you see a bunch of Robed Travelers checking on a monster. A cutscene will play out and then you will have to defeat the Eccentric Swordsman.
Once defeated, you will finally complete the final Phenomenon Intel in Nibel Region.
|
All Meridian Ocean Protorelics
| Phenomenon Intel | Recommended Level |
|---|---|
| Gilgamesh Gardens | Level 70 |
| The Bladesman of Legend | Level 65 |
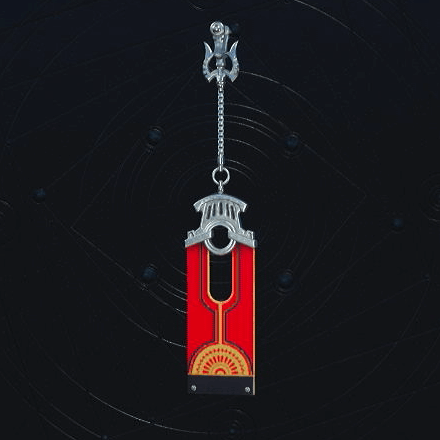
| The Genji Armaments | Level 65 |
| Shrine of the Full Moon | Level 65 |
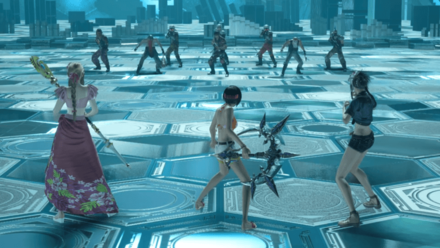
Phenomenon Intel 1: Gilgamesh Gardens
| Steps to Complete Intel | |
|---|---|
| 1 | Complete all previous Phenomenon Intel and Divine Intel, and obtain all Summon Entities in the Combat Simulator. |
| 2 | Hop aboard the Tiny Bronco and head towards Gilgamesh Island where Gilgamesh awaits. |
| 3 | To fight Gilgamesh, complete Phenomenon Intel 2, 3, and 4 first. You will need to finish Phenomenon Intel 1 last. |
| 4 | Defeat Gilgamesh and obtain the following rewards: ・ Summon Materia: Gilgamesh ★ ・ Genji Ring ・ Genji Earrings ・ Genji Gloves |
Some tips to help you against Gilgamesh is to make sure you have leveled up your characters to the recommended level. You can also utilize Perfect Blocks easier when Cloud is in his Punisher Mode. Make sure to also destroy Genji Shield to pressure him and deal strong damage when he is performing his ultimate move to interrupt it.
Phenomenon Intel 2: Shrine of the Hazy Moon
| Steps to Complete Intel | |
|---|---|
| 1 | Make sure to complete Titan's Divine Intel and Bahamut Arisen's Divine Intel. |
| 2 | Challenge the Tempering Trial and defeat both Titan and Bahamut Arisen simultaneously. |
During the fight, prioritize removing one of the Pulse shields surrounding the bosses to pressure them. Also, prevent Bahamut's Gigaflare by killing him or destroying his wings during Particle Charge. Although, it is recommended to kill Titan first if you can take him down quickly.
Titan and Bahamut Arisen Boss Guide
Phenomenon Intel 3: Shrine of the Moonbow
| Steps to Complete Intel | |
|---|---|
| 1 | Make sure to complete Phoenix's Divine Intel and Kujata's Divine Intel. |
| 2 | Challenge the Tempering Trial and defeat both Phoenix and Kujata simultaneously. |
For this fight, prioritize defeating Kujata first since Phoenix will be resistant to all attacks at the start. Although, be aware that you need to take down Kujata twice since he will be revived by Phoenix.
Phenomenon Intel 4: Shrine of the Full Moon
| Steps to Complete Intel | |
|---|---|
| 1 | Make sure to complete Alexander's Divine Intel and Odin's Divine Intel. |
| 2 | Challenge the Tempering Trial and defeat both Alexander and Odin simultaneously. |
To make the fight more tolerable, try to lure Odin away from Alexander so you have more space to work with. Then, when Odin disappears, focus on destroying Alexander's arms, and prioritize taking down Alexander first.
Protorelics Rewards
Unlock Gilgamesh Boss Fight

You will unlock a battle against Gilgamesh after completing all the Phenomenon Intels in all regions. This means that you have to complete 24 Phenomenon Intels before you can unlock Phenomenon Intel 1: Gilgamesh Gardens which will unlock on Meridian Ocean.
This Phenomenon Intel will give you the opportunity to fight Gilgamesh and unlock the Gilgamesh summon materia after winning against him.
How to Unlock and Beat Gilgamesh
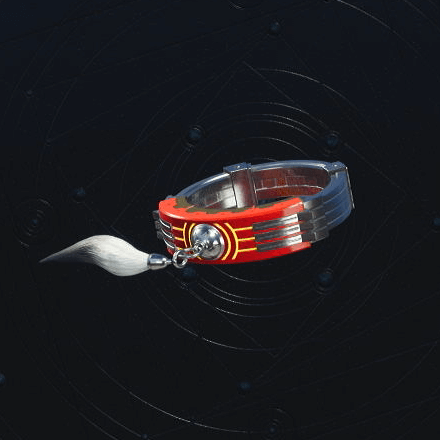
Obtain Transmuter Chips for Genji Equipment
| Accessory | Effect |
|---|---|
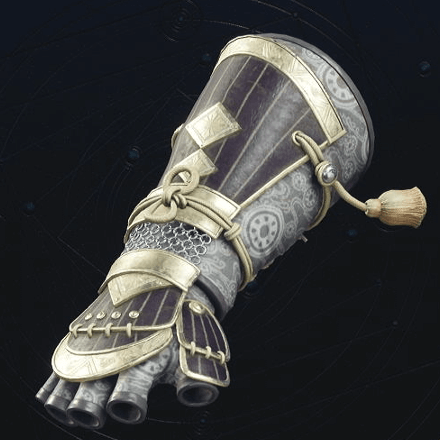 Genji Gloves Genji Gloves
|
Breaks the 9,999 damage limit. |
 Genji Earrings Genji Earrings
|
Increases damage dealt by 15% but also increases damage taken by 15%. |
 Genji Ring Genji Ring
|
Reduces damage taken by 15%, but also reduces damage dealt by 15% |
After completing all Phenomenon Intel and defeating Gilgamesh, you can obtain the transmuter chips for the Genji Earrings, Genji Ring, and Genji Gloves which allows you to craft them once you reach Craftsmanship Level 16.
Crafting Recipes and How to Increase Crafting Level
Unlock Brutal and Legendary Combat Simulator Fights
Additionally, you will unlock the Brutal and Legendary Combat Simulator fights after completing all Phenomenon Intel. Completing these combat simulators can reward you with various equipment and manuscripts for your party members.
Brutal and Legendary Combat Simulator Guide
Unlock Playstation Trophies by Collecting Protorelics
 Bronze Bronze
|
Founder’s Bonus |
|---|---|
| Obtain a protorelic in the grasslands. | |
|
Bronze
|
Fort Condor Commander |
| Obtain a protorelic in the Junon region. | |
|
Bronze
|
Cactuar Crusher |
| Obtain a protorelic in the Corel region. | |
|
Bronze
|
Honorary Turk |
| Obtain a protorelic in the Gongaga region. | |
|
Bronze
|
The Gambit Paid Off |
| Obtain a protorelic in the Cosmo Canyon region. | |
|
Bronze
|
Professional Handler |
| Obtain a protorelic in the Nibel region. | |
 Silver Silver
|
Bladesman of Legend |
| Defeat Gilgamesh. |
You can obtain 7 trophies from collecting Protorelics from Grasslands, Junon, Corel, Gongaga, Cosmo Canyon, and Nibel regions, along with a final for completing the Phenomenon Intel in the Meridian Ocean and defeating Gilgamesh.
Trophy List and Guide - How to Unlock All Trophies
What are Protorelics?
Mysterious Artifacts Obtained From Side Activities
| Region | Protorelic Quest |
|---|---|
| Grasslands | Defeat Enemies |
| Junon | Complete Fort Condor Minigame |
| Corel | Find the Cactuar Rock and Complete Cactuar Crush Minigame |
| Gongaga | Defeat Enemies |
| Cosmo Canyon | Play and win Gears and Gambits Minigame |
| Nibel | Follow the Robed Travelers and defeat enemies. |
Investigating Protorelics involves players engaging with different side stories and activities that differ between regions.
They are accomplished in order as the completion of a Protorelic quest is required to unlock the next.
FF7 Rebirth Related Guides

All World Intel Activities
| All Types of World Intel | ||
|---|---|---|
| - | ||
Author

All Protorelic Locations (Phenomenon Intel)
Rankings
- We could not find the message board you were looking for.
Gaming News
![Animal Crossing: New Horizons Review [Switch 2] | Needlessly Crossing Over to a New Generation](https://img.game8.co/4391759/47d0408b0b8a892e453a0b90f54beb8a.png/show)


Popular Games

Genshin Impact Walkthrough & Guides Wiki
Honkai: Star Rail Walkthrough & Guides Wiki
Arknights: Endfield Walkthrough & Guides Wiki
Umamusume: Pretty Derby Walkthrough & Guides Wiki
Wuthering Waves Walkthrough & Guides Wiki
Pokemon TCG Pocket (PTCGP) Strategies & Guides Wiki
Abyss Walkthrough & Guides Wiki
Zenless Zone Zero Walkthrough & Guides Wiki
Digimon Story: Time Stranger Walkthrough & Guides Wiki
Clair Obscur: Expedition 33 Walkthrough & Guides Wiki


Recommended Games
Fire Emblem Heroes (FEH) Walkthrough & Guides Wiki
Pokemon Brilliant Diamond and Shining Pearl (BDSP) Walkthrough & Guides Wiki
Diablo 4: Vessel of Hatred Walkthrough & Guides Wiki
Super Smash Bros. Ultimate Walkthrough & Guides Wiki
Yu-Gi-Oh! Master Duel Walkthrough & Guides Wiki
Elden Ring Shadow of the Erdtree Walkthrough & Guides Wiki
Monster Hunter World Walkthrough & Guides Wiki
The Legend of Zelda: Tears of the Kingdom Walkthrough & Guides Wiki
Persona 3 Reload Walkthrough & Guides Wiki
Cyberpunk 2077: Ultimate Edition Walkthrough & Guides Wiki


All rights reserved
© SQUARE ENIX CO., LTD. All Rights Reserved.
CHARACTER DESIGN: TETSUYA NOMURA/ROBERTO FERRARI
LOGO ILLUSTRATION: © 1997 YOSHITAKA AMANO
The copyrights of videos of games used in our content and other intellectual property rights belong to the provider of the game.
The contents we provide on this site were created personally by members of the Game8 editorial department.
We refuse the right to reuse or repost content taken without our permission such as data or images to other sites.
shitty guide very undetailed