How to Beat Brutal Challenge: Hellions' Intonement
This is a guide on how to beat Brutal Challenge: Hellions' Intonement in the Combat Simulator of Final Fantasy 7 Rebirth (FF7 Rebirth). Check out the unlock requirements and rewards, a list of enemies and bosses in each round, and the best party, equipment, and Materia to beat this challenge.
List of Contents
Best Party and Builds
| Best Party for Brutal Challenge: Hellions' Intonement | ||
|---|---|---|
 Yuffie Yuffie |
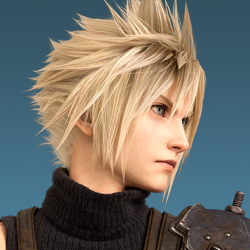
 Tifa Tifa |
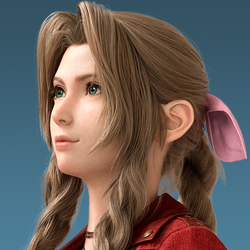 Aerith Aerith |
| Alternate Party Composition | ||
| The builds in this guide use equipment that are maxed out at Weapon Level 9. If you don't have enough Materia slots or the right Weapon Skills to complete a character setup, consider using a different weapon or collect all of the character's Manuscripts first. |
Yuffie Equipment and Materia
 Yuffie Yuffie
Magic DPS |
|||||
| Weapon | Armor | ||||
|---|---|---|---|---|---|
| Crescent Sickle | Cetran Bracer | ||||
| Accessory | Summon Materia | ||||
| Ribbon | Gilgamesh | ||||
| Weapon Materia | Armor Materia | ||||
|
|
|
||||
| Weapon Skills | |||||
|
|
|
||||
|
|
|
||||
Yuffie will be the Main DPS for this team thanks to her ability to target multiple different weaknesses with her Elemental Ninjutsus and the Fire and Ice plus Lightning and Wind Materias.
She also has other great abilities like Doppelganger to double cast spells and abilities and Banishment to deal massive elemental damage. When combined with her elemental prowess, Yuffie can easily take down the hordes of enemies in this Combat Simulator challenge.
Since Yuffie will be your main character, she will also hold the ATB Assist Materia to fill the other party member's ATB Gauges and Prayer since she will have her ATB full most of the time compared to the other two who would rather use Curaga's one ATB charge to heal.
Tifa Equipment and Materia
 Tifa Tifa
Physical DPS |
|||||
| Weapon | Armor | ||||
|---|---|---|---|---|---|
| Dragon Claws | Valkyrian Bangle | ||||
| Accessory | Summon Materia | ||||
| Enhanced Expeditionary Medal | Odin | ||||
| Weapon Materia | Armor Materia | ||||
|
|
|
||||
| Weapon Skills | |||||
|
|
|
||||
|
|
|
||||
You can substitute Tifa with a Sleek Saber Cloud if you prefer to use him as your Physical DPS.
Tifa will be your Secondary DPS on this team because she can heavily increase the Stagger Damage Bonus, helping you finish off an enemy before they can get back up again.
Healing and Revival are useful in case Aerith is preoccupied or doesn't have ATB charges while Limit Siphon lets her spam out her Level 3 Limit Break thanks to the Enhanced Expeditionary Medal.
Aerith Equipment and Materia
 Aerith Aerith
Support |
|||||
| Weapon | Armor | ||||
|---|---|---|---|---|---|
| Ceremonial Staff | Cetran Armlet | ||||
| Accessory | Summon Materia | ||||
| Enhanced Karmic Cowl | Phoenix | ||||
| Weapon Materia | Armor Materia | ||||
|
|
|
||||
| Weapon Skills | |||||
|
|
|
||||
|
|
|
||||
You can swap Aerith with Barret or Red XIII if you prefer your Support character to be tankier.
Aerith will be a traditional healer support with Curaga and Arise along with Resist and Esuna to deal with negative status effects. Whenever she doesn't need to cast a healing spell, she can buff the other party members with Barrier spells.
Try to save your ATB Charges for Prayer when you can so that you can save as much MP as you can in between rounds.
Alternate Party Composition
 Cloud Cloud Limit DPS | |||||
| Weapon | Armor | ||||
|---|---|---|---|---|---|
| Battle Cry | Cetran Bracer | ||||
| Accessory | Summon Materia | ||||
| Transference Module | Gilgamesh | ||||
| Weapon Materia | Armor Materia | ||||
| Weapon Skills | |||||
 Barret Barret Limit Generator | |||||
| Weapon | Armor | ||||
|---|---|---|---|---|---|
| Umbral Blade | Valkyrian Bangle | ||||
| Accessory | Summon Materia | ||||
| Enhanced Expeditionary Medal | Odin | ||||
| Weapon Materia | Armor Materia | ||||
| Weapon Skills | |||||
 Red XIII Red XIII Support | |||||
| Weapon | Armor | ||||
|---|---|---|---|---|---|
| Silver Collar | Cetran Armlet | ||||
| Accessory | Summon Materia | ||||
| Enhanced Draconic Ring | Bahamut Arisen | ||||
| Weapon Materia | Armor Materia | ||||
| Weapon Skills | |||||
This is an alternate tankier team composition that revolves around Barret and Red XIII filling up their Limit Gauges so that Cloud can use Limit Siphon to spam his Level 3 Limit Break. Prioritize playing safe and block attacks since this is a more defensive setup that relies on the party filling up their Limit.
Cloud will mainly be used to spam Limit Breaks, while using his regular Weapon Abilities like Braver and Focused Thrust while waiting for Barret and Red XIII to fill up their Limit Gauges.
Barret's the main character that you'll control since he can rapidly fill up his ATB to generate Limit with the Transference Module accessory and ATB Limit Weapon Skill. He will also fill up the other party member's ATB Gauges thanks to ATB Assist.
Red XIII will be supporting the party with his multitude of supportive Weapon Abilities, mainly Supernal Fervor, Watcher's Respite, and Watcher's Spirit. He'll also have Magnify-Barrier to cast defensive buffs and Magnify-Curaga in case his Vengeance Gauge is low.
Alternative Accessories
| Accessory | Effect |
|---|---|
 Safety Bit Safety Bit
|
Grants immunity to Instant Death. Grants Immunity to Stone and Petrify. |
 Enhanced Karmic Cowl Enhanced Karmic Cowl
|
Increases vitality and spirit by 50. Grants immunity to Slow and Instant Death. |
In the final round of this challenge, you will face against Tonberry King which can use instant-kill attacks and spawn Tonberries that can do the same. If you have difficulty surviving the final round, you can equip one of these accessories to at least one of your party members to ensure they will survive in this round.
How to Beat All Rounds
Round 1
| Jump to Round | |||||||||
|---|---|---|---|---|---|---|---|---|---|
| 1 | 2 | 3 | 4 | 5 | 6 | 7 | 8 | 9 | 10 |
| Enemies |
・Maloceros
・Fonadu |
||||||||
Focus down the Maloceros first with Yuffie's Fire attacks. If it starts to use Concentrate, a Doppelganger Fiery Banishment III should be enough to stop it and allow you to finish it off with Tifa.
Once that's been dealt with, you can swap to Wind attacks to target the Fonadu's weakness. Just make sure to evade Death from Above so you can put it under pressure and stagger it with Tifa's Focused Strikes.
Round 2
| Jump to Round | |||||||||
|---|---|---|---|---|---|---|---|---|---|
| 1 | 2 | 3 | 4 | 5 | 6 | 7 | 8 | 9 | 10 |
| Enemies |
・Modded Sweeper ・J-Unit Sweeper ・Deathwheel |
||||||||
Take down the Sweepers first with Yuffie's Lightning attacks so you don't have to deal with the two mechs running around spamming attacks.
Swap to any other Ninjutsu to cast a Doppelganger Banishment III to quickly kill off the Deathwheel. You should have used enough abilities to use these abilities.
Make sure to continuously dodge out of the way whenever any of the mechs use their missile attacks as they can deal heavy damage and put your party at a disadvantage.
Round 3
| Jump to Round | |||||||||
|---|---|---|---|---|---|---|---|---|---|
| 1 | 2 | 3 | 4 | 5 | 6 | 7 | 8 | 9 | 10 |
| Enemies |
・Yin & Yang ・Test 0 ・Adjudicator |
||||||||
Kill the Yin & Yang with Fire attacks from Yuffie first since it has the most threatening attacks out of the three enemies, then deal with Test 0 next since it is also weak to fire.
Finally, kill the Adjudicator last since it's the least threatening foe on the field. Be sure to swap between physical and magic attacks to keep your damage effective.
Round 4
| Jump to Round | |||||||||
|---|---|---|---|---|---|---|---|---|---|
| 1 | 2 | 3 | 4 | 5 | 6 | 7 | 8 | 9 | 10 |
| Enemies |
・Levrikon
・Ogre ・Zu |
||||||||
The Zu should be the first enemy that you deal with since its Tornado attack can be painful to deal with if you don't evade it or accidentally walk into it. Have Yuffie use Wind attacks on it to quickly take it down.
Once that's been dealt with, you can swap to Fire to quickly take down the Levrikon and Ogre. It's recommended to go for the Levrikon first before the Ogre since it's faster and more annoying to deal with.
You can also wait for Zu to use Tornado then use Firaga to turn the Zu's attack into a flame tornado that deals heavy damage to the other two enemies.
Round 5
| Jump to Round | |||||||||
|---|---|---|---|---|---|---|---|---|---|
| 1 | 2 | 3 | 4 | 5 | 6 | 7 | 8 | 9 | 10 |
| Enemies |
・White Terror ・White Mousse |
||||||||
Cast Manawall with Aerith as soon as the fight starts to minimize the damage of the White Terror's Earsplitting Howl. Make sure that this buff is always active so that your party doesn't get wiped when they block the attack.
From there, prioritize taking down White Terror first while blocking its attacks to pressure it. Save Tifa's ATB Charges so that you can spam Focused Strikes as soon as it gets pressured. You can also cast Stop on it before it uses Earsplitting Howl since it will allow you to stagger it before the move goes off.
Once the White Terror's dead, swap to Yuffie and hit the White Mousse with Fire Ninjutsu attacks. Once it becomes Fire Resistant, immediately cast Blizzara or Blizzaga on it to deal massive damage. Keep repeating this process and you'll move on to the next round in no time.
Round 6
| Jump to Round | |||||||||
|---|---|---|---|---|---|---|---|---|---|
| 1 | 2 | 3 | 4 | 5 | 6 | 7 | 8 | 9 | 10 |
| Enemies |
・Levridon ・Mastodon |
||||||||
Focus on killing the Levridon first with Yuffie's Ice attacks to prevent it from dealing massive damage with Electric Discharge. Remember to only cast Blizzard spells on it when it's standing still since it can easily dodge it while Amped Up.
After it's been dealt with, swap to Fire and the Mastodon should also go down not too long after. Just remember to have an ATB Charge saved up on Aerith for this fight in case you need to cast Curaga or Esuna on anyone.
Round 7
| Jump to Round | |||||||||
|---|---|---|---|---|---|---|---|---|---|
| 1 | 2 | 3 | 4 | 5 | 6 | 7 | 8 | 9 | 10 |
| Enemies |
・Landworm
・Duneworm |
||||||||
The only threatening thing about this fight is that both of these enemies can use Swallow on one character each, removing them from the party until they're spat back out. If you don't deal enough damage to force them to spit out a character, they'll eventually be automatically spat back out at 0 HP.
Make sure to prevent Yuffie from getting swallowed by swapping to a different character whenever they use Swallow since she's the one who can reliably and quickly take them down with her multiple Ice attacks. Thankfully, the AI always dodges the attack, so it's better to let the game do the dodging for you.
Round 8
| Jump to Round | |||||||||
|---|---|---|---|---|---|---|---|---|---|
| 1 | 2 | 3 | 4 | 5 | 6 | 7 | 8 | 9 | 10 |
| Enemies |
・Hecteyes ・Disgorgon |
||||||||
Go after the Disgorgon first with Yuffie's Ice attacks since the Hecteyes will have Reflect active for most of the fight. Once the Disgorgon's been dealt with, swap to Tifa and beat down the Hecteyes until it's dead.
Remember to swap back to Yuffie whenever Hecteyes uses Dispel Reflection to speed up the fight by hitting it with Fire, Ice, or Lightning spells while Reflect is down.
Round 9
| Jump to Round | |||||||||
|---|---|---|---|---|---|---|---|---|---|
| 1 | 2 | 3 | 4 | 5 | 6 | 7 | 8 | 9 | 10 |
| Enemies |
・Moss-Grown Adamantoise ・Floating Death |
||||||||
Prioritize killing the Adamantoise first with Yuffie's Fire attacks to prevent it from using its Homing Fireballs. When it gets most of its defensive buffs up, use Tifa to Dispel them so that it doesn't become difficult to take down.
Also, if ever the Adamantoise gets out of control, you can cast Stop with Aerith to prevent it from doing anything and allow you to pressure and stagger it.
Once that's been dealt with, swap to Lightning attacks to quickly take down the Floating Death.
Round 10
| Jump to Round | |||||||||
|---|---|---|---|---|---|---|---|---|---|
| 1 | 2 | 3 | 4 | 5 | 6 | 7 | 8 | 9 | 10 |
| Enemies |
・Tonberry King
・Joker |
||||||||
The Tonberry King is going to be the main threat for this fight since it can instantly kill a character and spawn Tonberries that do the same.
Make sure to always have Resist active on Tifa so that she doesn't get instantly killed by an attack. From there, either use Yuffie to attack safely at range, or swap to Tifa to spam her Unique Ability and pressure the Tonberry King by dodging its melee attacks.
Remember to stagger a regular Tonberry as soon as one spawns so that you can summon Gilgamesh or Odin as soon as possible.
After the Tonberry King's been defeated, you can use Yuffie's Wind attacks to easily take down the Joker and beat this Brutal Challenge.
Take this fight slowly and safely since this is the last and hardest round, and you'll have to start from the beginning if your party gets wiped.
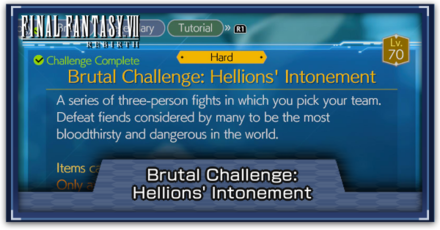
Brutal Challenge: Hellions' Intonement Unlock and Rewards
| Basic Information | |||||
|---|---|---|---|---|---|
|
Brutal Challenge: Hellions' Intonement A series of three-person fights in which you pick your team. Defeat fiends considered by many to be the most bloodthirsty and dangerous in the world ・Items cannot be used
・Only available on Hard difficulty |
|||||
| Level | 70 | Rounds | 10 | Team | 1-3 |
| Rewards | ・Magnify Materia ★ | ||||
| Unlock Requirements | |||||
|
・Complete Brutal Challenge: Unending Nightmare ・ Defeat the classified foe in the Corel region |
|||||
To unlock Brutal Challenge: Hellions' Intonement in the Combat Simulator, you will first need to beat Brutal Challenge: Unending Nightmare and defeat the Tonberry King in the Corel region. Once you've done these two things, you'll now be able to attempt this Combat Simulator challenge.
How to Beat Brutal Challenge: Unending Nightmare
Final Fantasy 7 Rebirth Related Guides

All Combat Simulator Battles and Rewards
All Combat Simulator Articles
| Combat Simulator Guides |
|---|
| Brutal and Legendary Combat Simulator Guide |
Biological Intel
| List of Biological Intel Missions | |
|---|---|
| Know Thine Enemy | Blinded by Light |
| Breath of Life | At Any Cost |
| Head Case | That's the Smell |
| Stony Stare | - |
Brutal Challenges
| List of Brutal Challenges | |
|---|---|
| Army of the Damned | Requiem for the Scorned |
| Unending Nightmare | Hellions' Intonement |
| The Seventh Seal | Rulers of the Outer Worlds |
Legendary Bouts
Comment
Please pay extra attention to the names of the materia, because there is no instance anywhere in either party format where a third magnify is used in their set up
Author

How to Beat Brutal Challenge: Hellions' Intonement
Rankings
- We could not find the message board you were looking for.
Gaming News
![Animal Crossing: New Horizons Review [Switch 2] | Needlessly Crossing Over to a New Generation](https://img.game8.co/4391759/47d0408b0b8a892e453a0b90f54beb8a.png/show)


Popular Games

Genshin Impact Walkthrough & Guides Wiki
Honkai: Star Rail Walkthrough & Guides Wiki
Arknights: Endfield Walkthrough & Guides Wiki
Umamusume: Pretty Derby Walkthrough & Guides Wiki
Wuthering Waves Walkthrough & Guides Wiki
Pokemon TCG Pocket (PTCGP) Strategies & Guides Wiki
Abyss Walkthrough & Guides Wiki
Zenless Zone Zero Walkthrough & Guides Wiki
Digimon Story: Time Stranger Walkthrough & Guides Wiki
Clair Obscur: Expedition 33 Walkthrough & Guides Wiki


Recommended Games
Fire Emblem Heroes (FEH) Walkthrough & Guides Wiki
Pokemon Brilliant Diamond and Shining Pearl (BDSP) Walkthrough & Guides Wiki
Diablo 4: Vessel of Hatred Walkthrough & Guides Wiki
Super Smash Bros. Ultimate Walkthrough & Guides Wiki
Yu-Gi-Oh! Master Duel Walkthrough & Guides Wiki
Elden Ring Shadow of the Erdtree Walkthrough & Guides Wiki
Monster Hunter World Walkthrough & Guides Wiki
The Legend of Zelda: Tears of the Kingdom Walkthrough & Guides Wiki
Persona 3 Reload Walkthrough & Guides Wiki
Cyberpunk 2077: Ultimate Edition Walkthrough & Guides Wiki


All rights reserved
© SQUARE ENIX CO., LTD. All Rights Reserved.
CHARACTER DESIGN: TETSUYA NOMURA/ROBERTO FERRARI
LOGO ILLUSTRATION: © 1997 YOSHITAKA AMANO
The copyrights of videos of games used in our content and other intellectual property rights belong to the provider of the game.
The contents we provide on this site were created personally by members of the Game8 editorial department.
We refuse the right to reuse or repost content taken without our permission such as data or images to other sites.
I believe either you either misread or it was a typo on the editors part at the time you saw this post