Custom Valkyrie Hard Mode Guide

Custom Valkyrie is a boss in Chapter 7: Those Left Behind of Final Fantasy 7 Rebirth (FF7 Rebirth). Learn how to beat Custom Valkyrie on Hard Mode and normal difficulties, its weaknesses and resistances, and a list of its moves and attack patterns in this guide!
List of Contents
Custom Valkyrie Weaknesses and Stats
Stats
 |
|||
| Easy | Normal | Hard | |
|---|---|---|---|
| HP | 25217 | 36024 | 129749 |
Weakness and Resistances
| Weaknesses | Lesser Resistances | Greater Resistances |
|---|---|---|
| None | ||
| Absorbed Elements | Immunities | |
| None | ||
Changes When Staggered
| Weakness / Effective | Resistance |
|---|---|
| None |
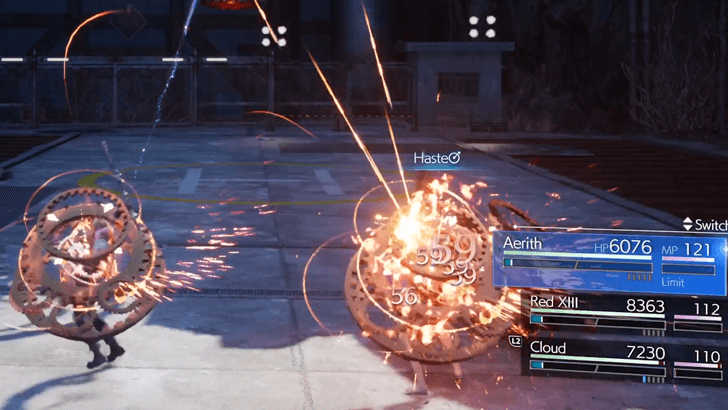
How to Pressure Custom Valkyrie
Deal Enough Damage Using Lighting or Wind Attacks
|
|
Custom Valkyrie can be Pressured if you deal enough elemental weakness damage to it. You can do this by using Lightning or Wind spells when attacking the boss. Equip Lightning and Wind Materia to gain access to both spell types on one character.
During the fight, Custom Valkyrie will occasionally go into Cooling Protocol, disabling it for a short period of time. Hitting it with Lightning or Wind attacks during Cooling Protocol will instantly Pressure it.
How to Pressure and Stagger Enemies
Custom Valkyrie Best Party and Builds
| This section is for players who are playing on Easy and Normal difficulties. To check out the best builds and tips for Hard Mode, jump to our Hard Mode Guide section, below! |
Fixed Party Setup
| Available Characters and Roles | |
|---|---|
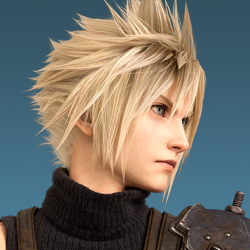 Cloud Cloud
|
・Can be used as the active character if Aerith has no ATB charges to spare for Lightning casts.
・Best utilized to generate ATB charges for Lightning casts throughout the fight. |
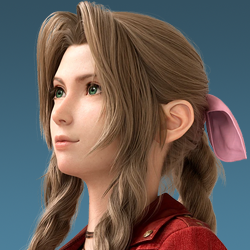 Aerith Aerith
|
・Can generate decent ATB so long as you have Radiant Ward unlocked from the Empress's Scepter. ・Can dodge attacks using Ward Shift but blocking is usually better. ・Arcane Ward offers amazing utility for spellcasting. |
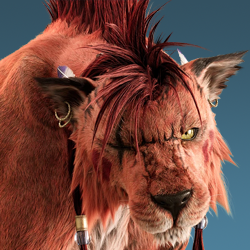 Red XIII Red XIII
|
・Best used as a support character for the party since melee is tricky against the flying Custom Valkyrie. |
Best Materia to Use
| Materia | Effect |
|---|---|
|
|
・Allows the user to cast both Lightning and Wind spells. Can be linked to a Level Boost to unlock stronger versions of the spells it can cast.
・Best equipped on Aerith since she has the highest Magic stat. ・Can be replaced with Lightning if you don't have this Materia yet. |
|
|
・Gain ATB faster with each block. Reduces damage taken while blocking, allowing you to tank moves like Aileron Roll.
・Can be equipped on all characters, as even uncontrolled characters block attacks. |
|
|
・Increase the HP of a character. Maxes out at +30% HP if multiple are equipped.
・Can be equipped on all characters. |
|
|
・Heal a single ally in battle.
・Best equipped on Cloud or Aerith. |
 Elemental and Fire Elemental and Fire |
・When linked and placed in your armor slot, the character will halve, prevent, or absorb Fire depending on the Elemental Materia's level.
・Can be obtained in Chapter 4 via Chadley's Combat Simulator. |
|
|
・Heal all allies in battle at the cost of 2 ATB. ・Best equipped on the character that can generate ATB quickly. |
|
・Automatically use items without consuming ATB after performing a number of actions.
・Best equipped on Red XIII. |
|
|
・Best equipped on Aerith to raise her Magic stat.
・All abilities cater towards survival (e.g., Arise, Reraise, and Rebirth Flame), making the fight easier for new players. |
|
|
・Equipped to raise the Defense stats of the character. Best used on Cloud or Red XIII. |
How to Beat Custom Valkyrie
| Custom Valkyrie Boss Fight Tips |
|---|
|
|
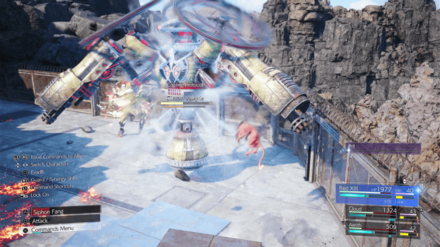
Use Lightning to Deal Damage and Pressure the Boss
Custom Valkyrie is weak against Lightning and Wind. However, since Wind spells have a short delay before hitting the target, it's better to use Lightning since its hits are much more accurate.
Use attacks that can inflict Lightning to deal a lot of damage to it. Remember, only damage that exploits its elemental weakness will count towards its Pressure condition.
Attack during Cooling Protocol
After unleashing numerous attacks, Custom Valkyrie will overheat and use Cooling Protocol to recover. While it's immobile, unleash Lightning or Wind attacks to exploit its weakness, Pressuring the boss in the process.
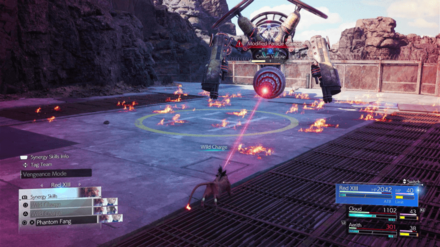
Avoid Burning Spots on the Ground
Most of Custom Valkyrie's fire attacks leave burning spots on the ground that inflict damage when you step on them. Avoid them as much as possible to preserve your characters' HP.
If you managed to grab the Elemental Materia back in Junon, you can link it to Fire and equip it to one of your character's armor slots. This allows you to halve, prevent, or absorb Fire damage depending on the Elemental Materia's level.
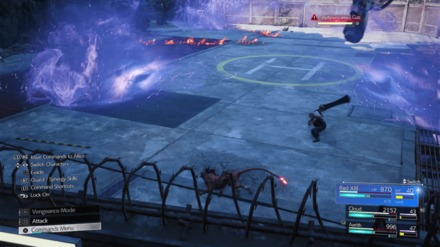
Evade the Particle Cannon at All Costs
Custom Valkyrie will start using its Modified Particle Cannon once you deal enough damage to push it into Phase 2. This attack can one-shot any of your party members, so make sure to dodge it whenever it appears.
To easily dodge the attack, switch over to Red XIII and get close to the boss. Spam side dodges until it finishes firing the Modified Particle Cannon (usually 3 shots total).
Block or Dodge Aileron Roll

Aileron Roll is another attack from Custom Valkyrie that can delete more than half of your character's HP if not dodged or blocked. You will have enough time to change direction or block it once the attack pops up on its head!
Move Away from its Antipersonnel Gas
The Antipersonnel Gas will put your characters to sleep on hit. Make sure to avoid getting hit by it by moving away once you see the attack prompt on its head.
You can equip your characters with Headband to make them immune to sleep. This accessory is available in the Vending Machine you find before the boss fight.
Defend Against Rotary Cannons Using Red XIII

Red XIII can build up his Vengeance gauge fast by blocking the Rotary Cannon's attack. If you can use his Sentinel Stance on time, it will fill his Vengeance gauge to almost full and avoid getting damaged.
Custom Valkyrie Hard Mode Guide
| Custom Valkyrie Hard Mode Tips |
|---|
| ★ Best Hard Mode Builds for Custom Valkyrie ★ |
|
|
Custom Valkyrie Best Hard Mode Builds
| The builds featured in this Hard Mode section are at Weapon Levels 7~8. If you find that you don't have enough Materia slots to complete the setup, consider getting all the possible Manuscripts on Normal, first. |
| Aerith DPS / Main Spellcaster | |||||
| Weapon | Armor | ||||
|---|---|---|---|---|---|
| Plumose Rod | Cetran Bracer | ||||
| Accessory | Summon Materia | ||||
| Circlet | Phoenix | ||||
| Weapon Materia | Armor Materia | ||||
| Weapon Skills | |||||
| Cloud Sub DPS / Support | |||||
| Weapon | Armor | ||||
|---|---|---|---|---|---|
| Igneous Saber | Cetran Armlet | ||||
| Accessory | Summon Materia | ||||
| Supernatural Wristguards | Odin | ||||
| Weapon Materia | Armor Materia | ||||
| Weapon Skills | |||||
| Red XIII Support | |||||
| Weapon | Armor | ||||
|---|---|---|---|---|---|
| Brisingamen | Hades Armlet | ||||
| Accessory | Summon Materia | ||||
| Enhanced Psychic's Charm | Kujata | ||||
| Weapon Materia | Armor Materia | ||||
| Weapon Skills | |||||
Set Up Aerith's Wards to Start the Fight
Since Cloud and Red XIII are melee fighters, hitting Custom Valkyrie and generating ATB will be tricky. So, for this fight, we'll be using Aerith as our primary character. To begin, set up a Radiant Ward and Arcane Ward at the start of the fight.
To get enough ATB for the wards, generate 1 ATB (via basic attacks), then use ATB Boost (L1 + R1) to double it to 2 charges. Once the wards up, your next ATB charge will be spent on Transcendence, after which you build back up to 2 ATB in order to cast Thundaga.
Use Cloud to Constantly Apply a Magnified Haste
Since Aerith struggles to build up ATB charges without Radiant Ward active, you can speed up the process by having Cloud cast a Magnified Haste spell at the start of battle courtesy of his First Strike Materia.
After the first caste of Haste, any succeeding Magnified Haste casts of the fight will be left to Red XIII. Cloud should only cast another Magnified Haste if Red XIII does not have the required ATB charges to re-cast the buff.
Use Elemental and Fire Materia to Heal Up

This fight hinges on Aerith and Cloud being able to deal damage without having to spend their ATB charges on heals. For this reason, we equip both their armor pieces with a linked Elemental and Fire Materia.
During the fight, this allows you to heal each time Custom Valkyrie uses Flame Jet or Firewheel. As an added bonus, these moves conjure fire trails that you can stand on for constant healing.
Use Thundaga and Transcendence II for Damage
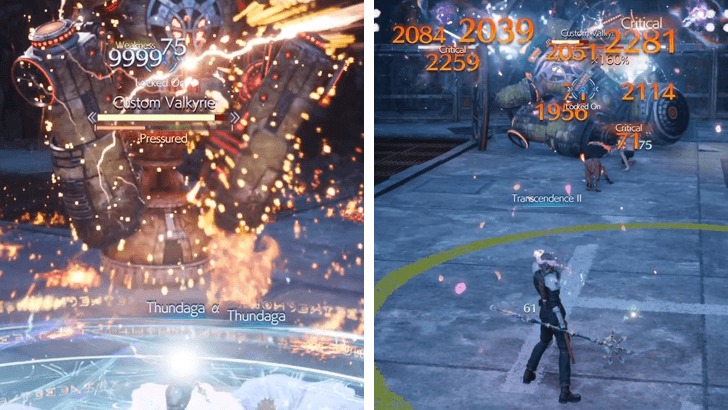
Your damage will come in the form of Thundagas (courtesy of Cloud and Aerith), as well as the occasional Transcendence II that Aerith can fire off during fight. During Phase 2, shift to exclusively using Thundaga on both since it deals the most damage with Arcane Ward active.
Remember, the key to the fight is ATB generation and pumping out as much damage as possible. Do not wait around for Cooling Protocol before making your move. Keep casting Thundaga as soon as you get 2 ATB on either Cloud or Aerith.
Block Aileron Roll to Avoid Getting One-Shot
Aside from the deadly Modified Particle Cannon in Phase 2, the only other move you really have to watch out for is Aileron Roll. Since Aerith is relatively squishy even with a maxed out HP Up, make sure you block when Custom Valkyrie uses this move to avoid getting one-shot.
Steadfast Block helps you tank the damage while also giving you a bit of ATB. Fortunately, Aileron Roll cannot target the same character twice. After Aerith gets hit, you should be relatively safe to heal up using the flames conjured by Custom Valkyrie.
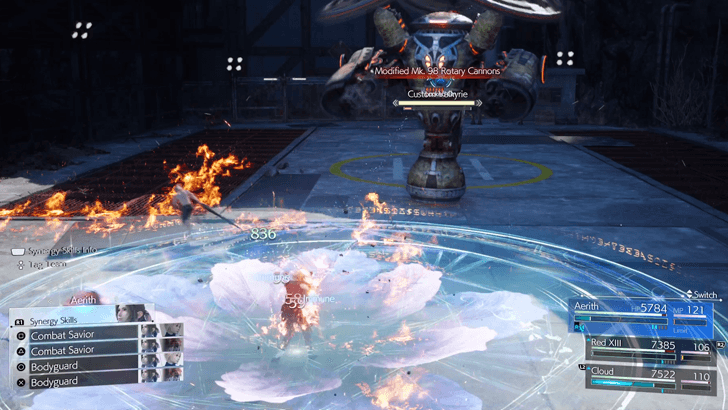
Use Red XIII to Dodge the Modified Particle Cannon
When Custom Valkyrie starts using its Modified Particle Cannon, you'll know you're in Phase 2. Given Aerith's rather sluggish dodge animation, it's best to switch over to Red XIII immediately and use him to dodge the rest of the cannon blasts.
To dodge the attacks, get close to Custom Valkyrie as Red XIII and start spamming side dodges until it fires off 3 Modified Particle Cannon blasts. After the third, switch back to Cloud and Aerith to resume ATB generation and Thundaga casts.
Radiant Ward Can Help You Nullify Damage in a Pinch
If you find yourself caught out of position during Modified Particle Cannon, simply cast a spell while standing on top of Radiant Ward before switching to a different character. This ensures that the spellcaster takes 0 damage and that Custom Valkyrie switches targets soon after.
Custom Valkyrie Rewards and Details
Rewards
| Custom Valkyrie Rewards | |||||||||||
|---|---|---|---|---|---|---|---|---|---|---|---|
| Easy/Normal | Hard Mode | ||||||||||
|
・1050 EXP ・50 Party EXP ・10 AP ・1050 Gil |
・6500 EXP ・30 AP ・3250 Gil ・The Art of Sword Play Vol. XI |
||||||||||
| Items Dropped | Rare Items Dropped | ||||||||||
|
None
|
None
|
||||||||||
| Stealable Items | Morphable Items | ||||||||||
|
None
|
None
|
||||||||||
Basic Information and Details
| Custom Valkyrie | |
|---|---|
|
|
|
| Location | Chapter Unlocked |
| Mt. Corel | Chapter 7 |
| Species | Movement |
| Mechanical | Flying |
| Details | |
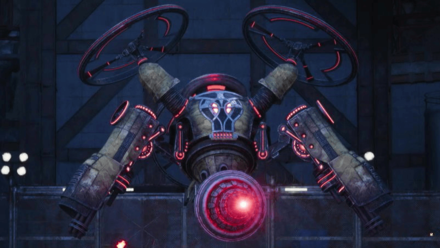
|
The modified version of the Valkyrie, a high-speed aerial weapon manufactured by Shinra's Advanced Weaponry Division. It has been newly equipped with flamethrowers, allowing it to transform the battlefield into a sea of flames. Inflicting enough damage by exploiting its elemental weakness will pressure it. While it is using Cooling Protocol, it will become easier to pressure. |
|
FF7 Rebirth Related Guides

Boss Fight Guide and List of All Bosses
Story Bosses
| All Major Story Bosses | |
|---|---|
| Chapter 1 | Materia Guardian |
| Chapter 2 | Midgardsormr |
| Chapter 3 |
Rude and Elena Mythril Golem |
| Chapter 4 |
Terror of the Deep Roche |
| Chapter 5 | Jenova Emergent |
| Chapter 6 | Grasptropod |
| Chapter 7 |
Custom Valkyrie Gigatrice |
| Chapter 8 |
Dyne Anuran Suppressor |
| Chapter 9 |
Specimen H1024 Crimson Mare Mk. II |
| Chapter 10 | Gi Nattak |
| Chapter 11 |
Diabolic Variant Yin and Yang Forgotten Specimen Galian Beast Roche |
| Chapter 12 |
Abzu Rude and Elena Rufus |
| Chapter 13 |
Red Dragon Ironclad Reno and Rude Tseng and Elena Moss-Grown Adamantoise Demon Gate |
| Chapter 14 |
Jenova Lifeclinger Sephiroth Reborn |
Optional Bosses
| Grasslands | |
|---|---|
| Summon | Titan |
| Classified Intel | Quetzalcoatl |
| Side Quests |
White Terror |
| Junon | |
| Summon | Phoenix |
| Classified Intel | Mindflayer |
| Side Quests |
White Mousse Hell Rider II Sandstorm Drake |
| Corel | |
| Summon | Alexander |
| Classified Intel | Tonberry King |
| Side Quests |
Dark Claw Joker |
| Minigame | Test 0 |
| Gongaga | |
| Summon | Kujata |
| Classified Intel | Great Malboro |
| Side Quests |
Levridon Mastodon Gorgon Mane Gigantoad |
| Cosmo Canyon | |
| Summon | Bahamut Arisen |
| Classified Intel | Jabberwock |
| Side Quests | Irasceros Gigaworm |
| Nibel | |
| Summon | Odin |
| Classified Intel | King Zu |
| Side Quests |
Queen Bee Dranabarga |
| Meridian Ocean | |
| Gilgamesh's Island |
Gilgamesh Titan and Bahamut Arisen Phoenix and Kujata Alexander and Odin |
| Pirate King's Treasure |
Ogre Raider Brineborn Demon Hueyacoatl Sea Dragon |
Comment
Author

Custom Valkyrie Hard Mode Guide
Rankings
- We could not find the message board you were looking for.
Gaming News
![Animal Crossing: New Horizons Review [Switch 2] | Needlessly Crossing Over to a New Generation](https://img.game8.co/4391759/47d0408b0b8a892e453a0b90f54beb8a.png/show)


Popular Games

Genshin Impact Walkthrough & Guides Wiki
Honkai: Star Rail Walkthrough & Guides Wiki
Arknights: Endfield Walkthrough & Guides Wiki
Umamusume: Pretty Derby Walkthrough & Guides Wiki
Wuthering Waves Walkthrough & Guides Wiki
Pokemon TCG Pocket (PTCGP) Strategies & Guides Wiki
Abyss Walkthrough & Guides Wiki
Zenless Zone Zero Walkthrough & Guides Wiki
Digimon Story: Time Stranger Walkthrough & Guides Wiki
Clair Obscur: Expedition 33 Walkthrough & Guides Wiki


Recommended Games
Fire Emblem Heroes (FEH) Walkthrough & Guides Wiki
Pokemon Brilliant Diamond and Shining Pearl (BDSP) Walkthrough & Guides Wiki
Diablo 4: Vessel of Hatred Walkthrough & Guides Wiki
Super Smash Bros. Ultimate Walkthrough & Guides Wiki
Yu-Gi-Oh! Master Duel Walkthrough & Guides Wiki
Elden Ring Shadow of the Erdtree Walkthrough & Guides Wiki
Monster Hunter World Walkthrough & Guides Wiki
The Legend of Zelda: Tears of the Kingdom Walkthrough & Guides Wiki
Persona 3 Reload Walkthrough & Guides Wiki
Cyberpunk 2077: Ultimate Edition Walkthrough & Guides Wiki


All rights reserved
© SQUARE ENIX CO., LTD. All Rights Reserved.
CHARACTER DESIGN: TETSUYA NOMURA/ROBERTO FERRARI
LOGO ILLUSTRATION: © 1997 YOSHITAKA AMANO
The copyrights of videos of games used in our content and other intellectual property rights belong to the provider of the game.
The contents we provide on this site were created personally by members of the Game8 editorial department.
We refuse the right to reuse or repost content taken without our permission such as data or images to other sites.