
This survey will take about 1 minute.
Your answers will help us to improve our website.
FF7 Rebirth
Chapter 8: All That Glitters Walkthrough
A walkthrough for Chapter 8: All That Glitters in Final Fantasy 7 Rebirth (FF7 Rebirth). Read on for a detailed guide of Chapter 8, including item locations, rewards, bosses, as well as useful tips for completing this chapter!
| ◄ Previous Chapter | Next Chapter ▶ |
|---|---|
|
Chapter 7 Those Left Behind |
Chapter 9 The Planet Stirs |
List of Contents
Chapter 8: All That Glitters Walkthrough
| Chapter 8 Main Objectives | |
|---|---|
| 1 | Explore the Gold Saucer |
| 2 |
Escape the Dustbowl ┗ Boss Battle: Dyne ┗ Boss Battle: Anuran Suppressor |
Click on any of the links above to jump to the section!
Explore the Gold Saucer Walkthrough
| Objectives | |
|---|---|
| 1 | Gilded Paradise Head downstairs, and go to the park entrance with the group. |
| 2 | After the cutscene, it will trigger a fight against Dio in a 3D Brawler Minigame. You can win or lose, but winning will improve your Relationship Level with Red XIII. ▶ 3D Brawler Minigame Guide |
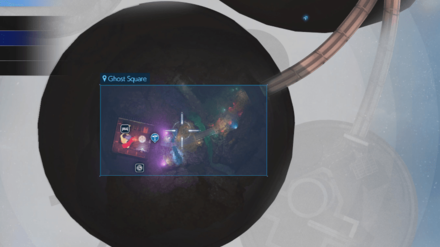
| 3 | Away from the Glitz and Glamour Go to Ghost Square with Barret, and there you will meet Cait Sith. |
| 4 | Rest Up After getting the Tonberry Suite, use the elevator to get to your room, and approach the bed to get some rest after Barret leaves the room. |
| 5 | 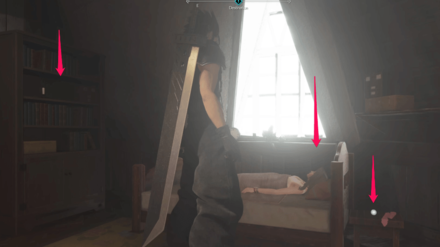 While Cloud is sleeping, it will start a short Interlude where you play as Zack. Interact with the objects in the room until the door on the left becomes visible, then go through it. Go downstairs and the Interlude will end. |
| 6 | A Visitor After you wake up and go through the door, the character who knocks on the door will be the one who you have the highest relationship value for. They will accompany you for the remainder of this section. Note: It is possible that no one will accompany you in this section if you do not have enough relationship value with anyone. ▶ Romance and Relationship Guide |
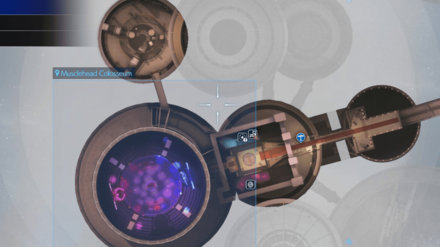
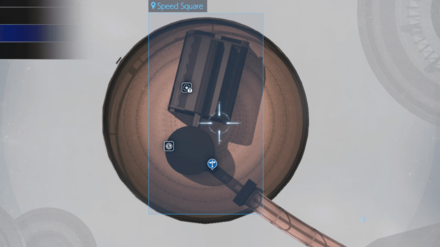
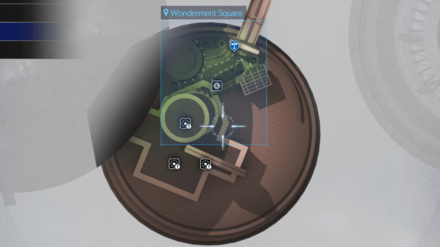
| 7 | 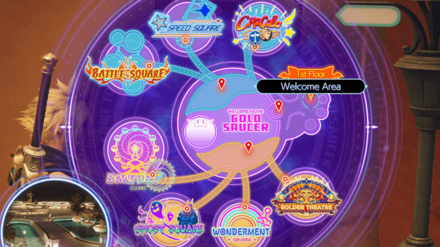 Paint the Town Red Go to each of the following areas and try the listed minigame. You don't have to win or get any specific score, so feel free to just try each game once and move on to the next section. 1F - Event Square - no minigame, just a cutscene 1F - Chocobo Square - can't do anything yet, so just talk to the NPC and leave 2F - Battle Square - Musclehead Colosseum Guide 3F - Speed Square - Galactic Saviors Guide 3F - Wonderment Square - G-Bike Guide |
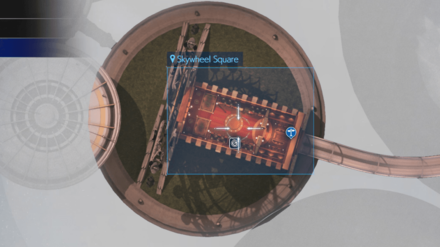
| 8 | After completing all of the above, go to 4F - Skywheel Square. |
| 9 | Tragedy Upon entering the Skywheel Square, Cait Sith will arrive, asking you to head to Battle Square - 2F. Use the Guide Moogle to fast travel there and proceed inside to look for Barret. ┗ How to Use Guide Moogle |
| 10 | Proof of Innocence Follow Cait Sith to the Service Entrance and use the elevator to reach Settlement - Ground Level. Continue moving forward until you reach Corel Prison. |
How to Use Guide Moogle
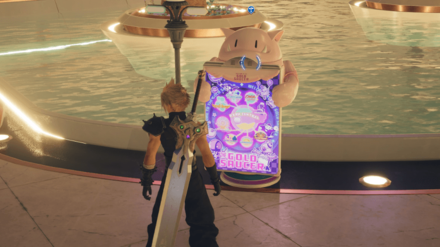
Guide Moogles are NPCs that you can interact with at the entrance of every square. They can help you fast travel anywhere in the Golden Saucer as long as you have already explored the area.
Escape the Dustbowl Walkthrough
| Objectives | |
|---|---|
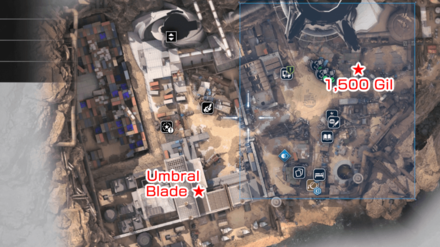
| 1 | Meeting Your Mount After the cutscene, head downstairs and follow Garth to the Makeshift Chocobotique nearby. Umbral Blade: On the first floor of the Solemnitude Manor, there is an Umbral Blade inside a chest near the exit. |
| 2 | 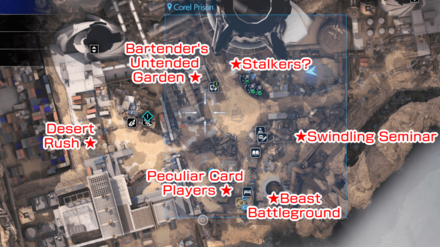 Gearing up for the Race You'll need to get a total of 3 Greens for Piko to compete in the Chocobo Race. There are 6 Greens available, and any extras can be used to purchase Chocobo Gear at the Tack Shop. Explanations of the events are given in the steps below.
|
| 2a | Desert Rush Break the boxes to get points. You'll have to break shock boxes to make the gear boxes vulnerable; note that the number of lightning bolts on the gear box shows how many shock boxes you need to break first. If the gear on the box is spinning, the gear box can be broken. ▶ Desert Rush Minigame Guide Tip: Hold the square button and release for a spinning slash that will break all boxes around you. Use Braver on the large boxes to break any number in a single hit. |
| 2b | 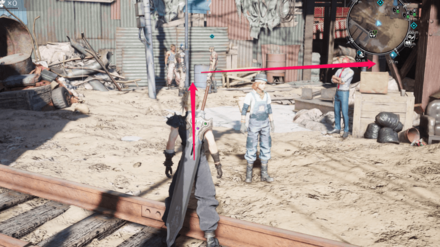 Stalkers? Find the three men standing near the notice board, then go into the nearby alley that leads to a house with a small opening. Pass through the small opening and you'll fight the three of them to receive the Greens uppon winning. |
| 2c | Swindling Seminar This mission requires you to choose who is telling the truth out of a group of five people. It also costs 500 gil to play, even if you get the right answer, so it's an easy way to get Greens but comes at a price. ┗ Jump to the Swindling Seminar Solution |
| 2d | Peculiar Card Players Go to the Queen's Blood card dealer on the map and you'll get the locations of three nearby Queen's Blood players. You'll need to defeat all three of them in a Queen's Blood match. ▶︎Best Queen's Blood Cards |
| 2e | Beast Battleground In this mission, you will have to fight alone in a series of rounds against a couple of enemies to win a reward. To obtain the Greens, you need to complete 3 rounds in this minigame. |
| 2f | The Bartender's Untended Garden Collect the Greens from the bartender's abandoned garden which will be stolen by a Cactuar, forcing you to chase it at the top of the cliff. ┗ Jump to the How to Find Cactuar Guide |
| 3 | Go back to Piko and give him the Greens you collected. After that, you can talk to Garth to start Chocobo Racing. |
| 4 | Chocobo Racing Follow Esther to the race track and meet Joe, where you can play the Racing Simulator. Tip: As you need to win the race to progress, be sure to practice beforehand so you don't waste time losing in the full race. |
| 5 | Finish in First Proceed to the next room and win the Chocobo Cup to progress the chapter. ┗ Jump to How to Win Chocobo Cup |
| 6 | 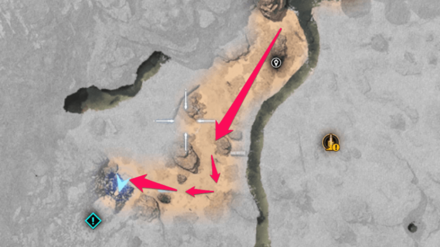 Slippery Sidewinder Continue moving forward and after exiting the cave, you will have to follow Gus's vulture to reach the Scrapyard. |
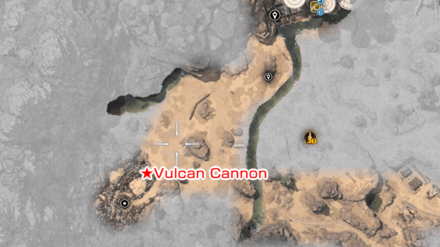
| 7 | When you reach the Scrapyard, continue moving forward until the rest of the party leaves, leaving only Barret. Vulcan Cannon: You will find the Vulcan Cannon inside a treasure chest at the entrance of the Scrapyard, after the sandstorm cutscene. |
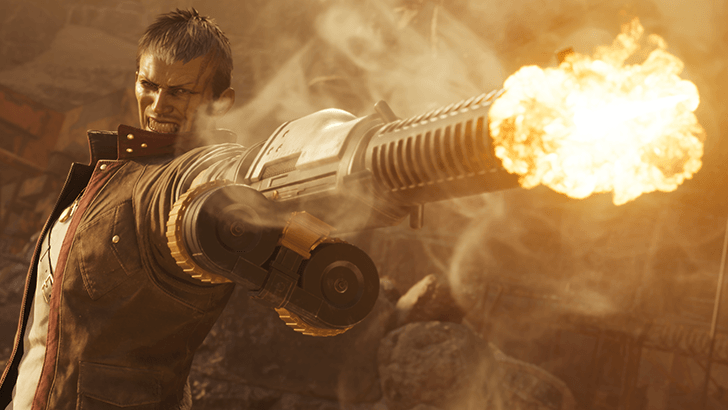
| 8 |  Prisoner As soon as you start playing as Barret, be sure to get ready as he'll be going into a boss fight with Dyne alone when he goes through the fence. ▶ How to Beat Dyne Tip: Dyne is weak to Fire, and can also be inflicted with Poison to wear him down. |
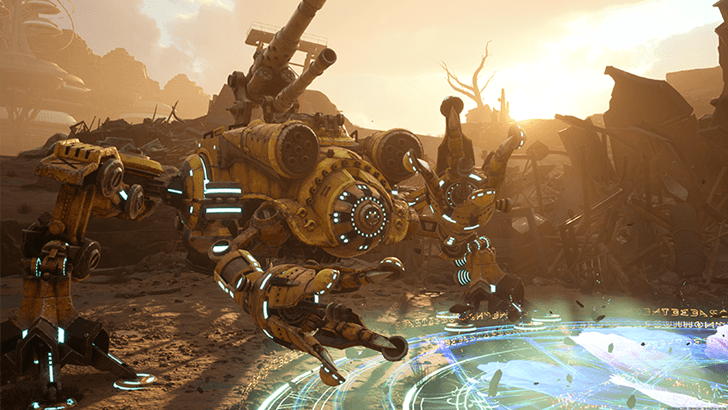
| 9 | 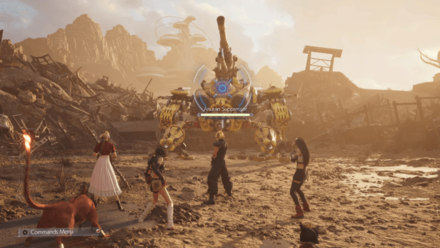 After a very short walk, you'll start another boss fight, this time against the Anuran Suppressor. Make sure to prepare the team's equipment in advance. ┗ Recommended Party for Anuran Suppressor ▶ How to Beat Anuran Suppressor Tip: Anuran Suppressor is weak to Lightning. |
| 10 | After the cutscene, another minigame sequence will begin, you'll control Barret shooting at Shinra vehicles from the back of an escape vehicle. You'll first fight bikers, then helicopters, then finally the Anuran Suppressor. Tip: Use the right stick to move the vehicle side to side to avoid targeted spots. Be sure to reload when no enemies are around even if you still have some bullets, so you'll always be ready to unload everything you've got. |
| 11 | You will once again be in another Interlude playing as Zack. Walk around the slums and talk to the residents until an explosion occurs. Go to the site of the explosion to end the chapter. |
Swindling Seminar Solution
The person is telling the truth if their statement aligns with the claims listed in the table below; otherwise, they are lying.
| Thirsty Usain | The Bail Jumper house specialty is called Sunshine and their drinks are watered down. |
|---|---|
| Knucklehead Toya | The weapon shop sells Elixirs and the store owner does not like loud noises. |
| Sloppy Shawn | Gus's autobiography, Mediations on the Outlaw Life, is in stock. |
| Squinty Rachel | Gus's place has the Stamp Graffiti and no Del Sol Cactuar Graffiti. |
| Blowhard Georgie | The rare monster is called the Test 0 and not Bug 0 or Type 0. |
How to Find Cactuar Guide
| How to Find Cactuar | |
|---|---|
| 1 | 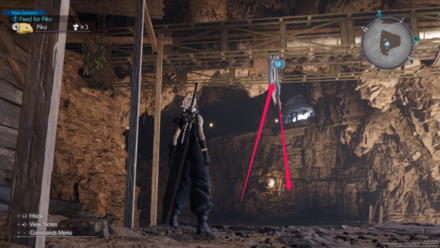 After the Cactuar steals the Greens from you, swing across the ledge using your Grappling Hook, and then climb up the wall. |
| 2 | 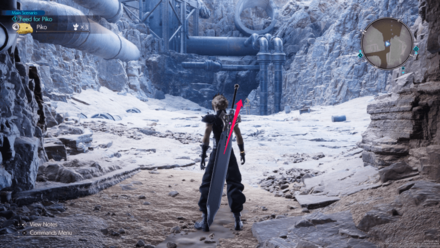 Continue following the path, and you will reach an open area with a Cyclone Drake. Behind that enemy, there is a small cave that will lead you to a cliff. |
| 3 | Swing across the cliff using your Grappling Hook, and then jump on the wall before going down to the platform. |
| 4 | From here, you will notice two tunnels on the west and east sides. Enter the west tunnel, and you will reach another open area with a couple of enemies. |
| 5 | 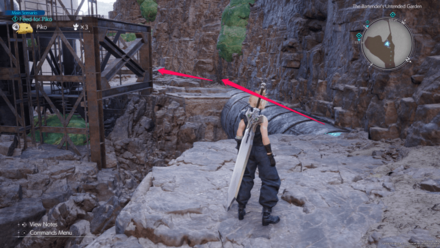 Continue past this area, turn left, and cross the narrow path. From here, you will see a couple of Cactuars. |
| 6 | 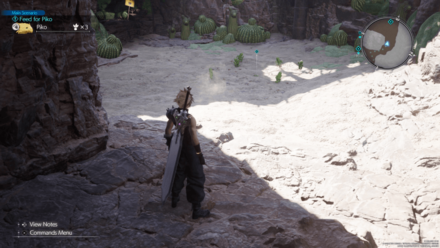 Defeat the Cactuars in the area to retrieve the Greens. |
How to Win Chocobo Cup
- Pick up the power-ups that you come across during the race. Try to prioritize getting the speed power-ups (Blue Balloon) to maintain high speed.
- Avoid hitting the rails or the other players, as they can reduce your speed.
- If you drift long enough, your Chocobo's talons will heat up, and you will automatically dash after letting go.
Chapter 8 Boss Strategy Guide
| Chapter 8 Bosses Guide | |
|---|---|
| Dyne | Anuran Suppressor |
How to Beat Dyne
| Dyne | |
|---|---|
 |
|
| Location | Chapter Unlocked |
| Scrapyard Prison Cell | All That Glitters |
| Weaknesses | Lesser Resistances |
|
|
None
|
| Greater Resistances | Immunities |
|
None
|
|
| Absorbed Elements | When Triggered |
|
None
|
|
| Pressure Conditions | |
| Inflicting enough damage will pressure him. When his HP is reduced, he will fuse with scrap metal to perform powerful attacks. During this time, he will be difficult to pressure. However, destroying a discrete part will interrupt his attacks and make him more susceptible to being staggered. | |
Found at the Scrapyard
You can find Dyne at the Scrapyard after escaping the Corel Prison near the end of Chapter 8.
Dyne Boss Fight Tips
- Exploit Dyne's weakness by using Fire
- Use the scrap piles as cover to hide against ranged attacks.
How to Beat Anuran Suppressor
| Anuran Suppressor | |
|---|---|
 |
|
| Location | Chapter Unlocked |
| Scrapyard Prison Cell | All That Glitters |
| Weaknesses | Lesser Resistances |
|
|
|
| Greater Resistances | Immunities |
|
None
|
|
| Absorbed Elements | When Triggered |
|
None
|
None
|
| Pressure Conditions | |
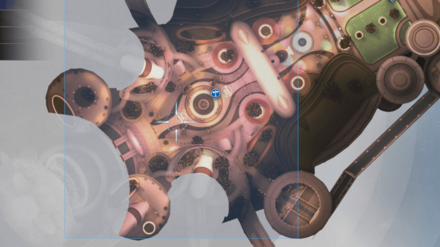
| Landing limit attacks or synergy abilities will flip it over. Attacking the cockpit while in this overturned state will deal significant damage. Landing several powerful offensive abilities while Palmer is taunting will pressure it. | |
Found at the Scrapyard
You can find the Anuran Suppressor at the Scrapyard after defeting Dyne in Chapter 8.
Recommended Party Setup and Roles
| Recommended Party Setup | |
|---|---|
 Cloud Cloud
|
【Punisher】 ・Main damage dealer after the boss is staggered or flipped over |
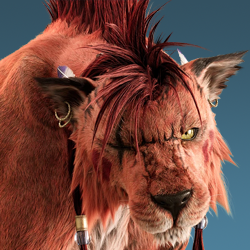 Red XIII Red XIII
|
【Tank / Support】 ・Best used as the active character to take the aggro ・Cast or use healing items for the team |
 Yuffie Yuffie
|
【Punisher / Support】 ・Can be the team's damage dealer and support ・Switch to her if the aggro needs to pull away from Red XIII |
Anuran Suppressor Boss Fight Tips
- Target Palmer During Neener, Neener
- Destroy the Legs in the Second Phase
- Use Limit Break or Synergy Ability to Flip it Over
Chapter 8 Map and Obtainable Items
Maps
| List of Maps | ||
|---|---|---|
 |
 |
 |
 |
 |
 |
 |
 |
 |
 |
 |
 |
 |
 |
 |
 |
 |
- |
Obtainable Items
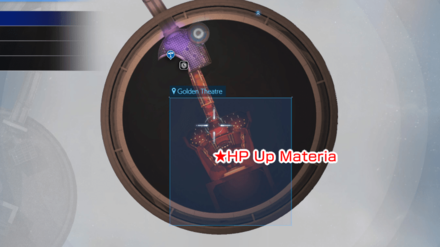
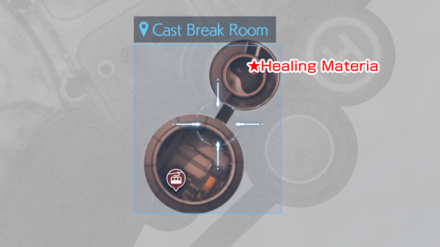
| Park - 2F Cast Break Room | ||
|---|---|---|
| - | - | |
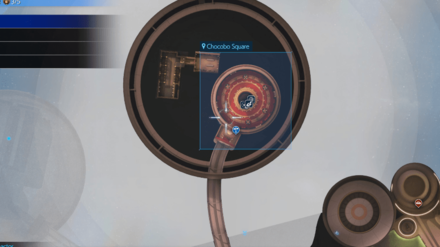
| Park - 1F Event Square | ||
| - | - | |
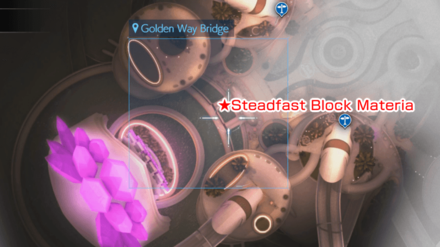
| Park - 2F Golden Way Bridge | ||
| - | - | |
| Settlement - Ground Level | ||
| Umbral Blade | - | - |
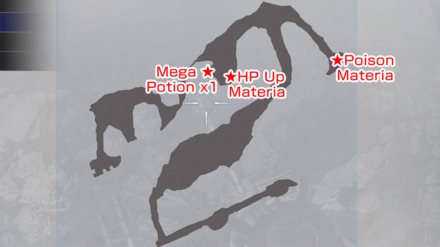
| Bandits' Bluff - Lower Level | ||
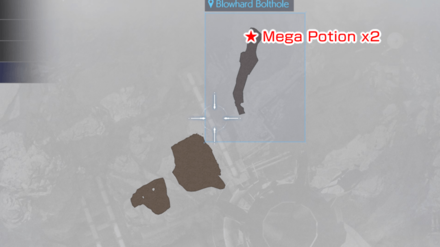
| Mega Potion x2 | - | - |
| Bandits' Bluff - Upper Level | ||
| Mega Potion x1 | ||
| Corel Region | ||
| Vulcan Cannon | - | - |
This list does not include the items that you get from destroying the wooden crates.
Materia List and How to Get All Materia
FF7 Rebirth Related Guides
| All Story Chapters | |
|---|---|
| Chapter 1 | Fall of a Hero |
| Chapter 2 | A New Journey Begins |
| Chapter 3 | Deeper into Darkness |
| Chapter 4 | Dawn of a New Era |
| Chapter 5 | Blood in the Water |
| Chapter 6 | Fool's Paradise |
| Chapter 7 | Those Left Behind |
| Chapter 8 | All That Glitters |
| Chapter 9 | The Planet Stirs |
| Chapter 10 | Watcher of the Vale |
| Chapter 11 | The Long Shadow of Shinra |
| Chapter 12 | A Golden Key |
| Chapter 13 | Where Angels Fear to Tread |
| Chapter 14 | End of the World |
| How Long to Beat? Game Length | |
| Post-Game Content and How to Get 100% Clear | |
Author

Chapter 8: All That Glitters Walkthrough
Please participate in our site
improvement survey
02/2026
improvement survey
02/2026
Would you assist in
improving Game8's site?
improving Game8's site?

×
We are listening to our users' valuable opinions and discussing how to act on them.
The information collected through this survey will be used for the purpose of improving our services. In addition, the information will only be disclosed a part of a statistic in a format that will not allow identification of personal information.
Begin Survey
Not Now
×
Please rate each item regarding Game8.co's Advertisements.
Amount of Ads
Very Dissatisfied
Somewhat Dissatisfied
Fine
Somewhat Satisfied
Highly Satisfied
Placement of Ads
Timing of Ad Display
Ad Loading Speed
Safeness of Ads
Content of Ads
×
Please rate each item regarding Game8.co's Quality of Articles.
Amount of information
Very Dissatisfied
Somewhat Dissatisfied
Fine
Somewhat Satisfied
Highly Satisfied
Frequency of updates
Speed of new information
Accuracy of articles
Understandibility of articles
Readability of sentences
×
Please rate each item regarding Game8.co's Usability of the Site.
Ease of finding information
Very Dissatisfied
Somewhat Dissatisfied
Fine
Somewhat Satisfied
Highly Satisfied
Loading Speed
Use of Color
Font Size
Visibility of Images
Easy to Understand Layout
×
Please rate each item regarding Game8.co's Message Boards, Comments.
Ease of Writing
Very Dissatisfied
Somewhat Dissatisfied
Fine
Somewhat Satisfied
Highly Satisfied
Readability
Ease in Finding Information
Comment Quality
Comment Quantity
Admin Response
×
Please rate each item regarding Game8.co's Site's new design.
Please rate our site's new design
Very Dissatisfied
Somewhat Dissatisfied
Fine
Somewhat Satisfied
Highly Satisfied
Do you think that the website's design change makes the site easier to use?
Has the new design made it easier for you to find information on the site?
Has the new design improved the overall visual appeal of the site?
How would you rate your overall satisfaction with the new design of the site?
×
How likely are you to recommend Game8 to someone you know?
Very Unlikely
0
1
2
3
4
5
6
7
8
9
10
Very Likely
If you have other opinions regarding potential improvement to the website, please share them with us. We would appreciate your honest opinion.
Note: This is a free response section, so you can proceed without entering anything.
Note: Please be sure not to enter any kind of personal information into your response.
Note: Please be sure not to enter any kind of personal information into your response.
×
Thank You
×
Thank you for participating in our survey! Your answers will help us to improve the quality of our website and services.
We hope you continue to make use of Game8.
We hope you continue to make use of Game8.
Close
Rankings
- We could not find the message board you were looking for.
Gaming News
![MENACE Review [Early Access] | Menacing, But Only at the Start](https://img.game8.co/4406385/400fc86faf7e41a4a05455d432d4d303.png/show)


Popular Games

Genshin Impact Walkthrough & Guides Wiki
Arknights: Endfield Walkthrough & Guides Wiki
Umamusume: Pretty Derby Walkthrough & Guides Wiki
Pokemon TCG Pocket (PTCGP) Strategies & Guides Wiki
Wuthering Waves Walkthrough & Guides Wiki
Honkai: Star Rail Walkthrough & Guides Wiki
Zenless Zone Zero Walkthrough & Guides Wiki
Where Winds Meet Walkthrough & Guides Wiki
Clair Obscur: Expedition 33 Walkthrough & Guides Wiki
Pokemon Legends: Z-A Walkthrough & Guides Wiki


Recommended Games
Fire Emblem Heroes (FEH) Walkthrough & Guides Wiki
Diablo 4: Vessel of Hatred Walkthrough & Guides Wiki
Super Smash Bros. Ultimate Walkthrough & Guides Wiki
Yu-Gi-Oh! Master Duel Walkthrough & Guides Wiki
Pokemon Brilliant Diamond and Shining Pearl (BDSP) Walkthrough & Guides Wiki
Elden Ring Shadow of the Erdtree Walkthrough & Guides Wiki
Monster Hunter World Walkthrough & Guides Wiki
The Legend of Zelda: Tears of the Kingdom Walkthrough & Guides Wiki
Persona 3 Reload Walkthrough & Guides Wiki
Cyberpunk 2077: Ultimate Edition Walkthrough & Guides Wiki


All rights reserved
© SQUARE ENIX CO., LTD. All Rights Reserved.
CHARACTER DESIGN: TETSUYA NOMURA/ROBERTO FERRARI
LOGO ILLUSTRATION: © 1997 YOSHITAKA AMANO
The copyrights of videos of games used in our content and other intellectual property rights belong to the provider of the game.
The contents we provide on this site were created personally by members of the Game8 editorial department.
We refuse the right to reuse or repost content taken without our permission such as data or images to other sites.
There is a Steal materia in Solumn Gus' room...the room you come through to get off the "prison" elevator, but you can only get it before you are about to leave to find Barrett.