Chapter 2: A New Journey Begins Walkthrough

A walkthrough for Chapter 2: A New Journey Begins in Final Fantasy 7 Rebirth (FF7 Rebirth). Read on for a detailed guide of Chapter 2, including item locations, rewards, bosses, as well as useful tips for completing this chapter!
| ◄ Previous Chapter | Next Chapter ▶ |
|---|---|
|
Chapter 1 Fall of a Hero |
Chapter 3 Deeper into Darkness |
List of Contents
Chapter 2: A New Journey Begins Walkthrough
| Chapter 2 Main Objectives | |
|---|---|
| 1 | Searching for Friends in Kalm |
| 2 | Heading for the Swamplands |
| 3 | Securing Chocobos from Bill's Ranch |
| 4 | Through the Swamplands ┗ Boss Battle: Midgardsormr |
Click on any of the links above to jump to the section!
Searching for Friends Walkthrough
| Objectives | |
|---|---|
| 1 | Once you wake up, exit through the door and head downstairs. Talk to Broden, the innkeeper, and he'll tell you where Barret and the rest of the group went. The Queen's Blood minigame is unlocked after leaving the room. The tutorial and your starter deck will be waiting for you before you head downstairs. |
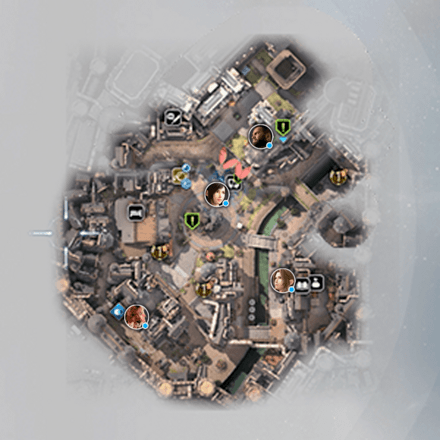
| 2 | Searching for Friends Outside, regroup with Red XIII to get your first bit of Party EXP. After he sends you off to find Sekvacarsa Weapons, make sure to meet up with Tifa, Barret, and Red XIII first in order to build up your relationship with them. Tifa: Near the center of Kalm, by the Water Tower. Barret: At the bar of the Rusty Arrow Tavern. Red XIII: At the southwest entrance of town. ┗ Jump to Chapter 2 Romance and Relationship Guide |
| 3 | Make your way to Sekvacarsa Weapons. Speak to the owner to unlock Weapon Upgrades. |
| 4 | Next, head toward the southeast side of town and meet up with Aerith outside of Maghnata Books to build up your relationship. After that, you can speak to the shopkeeper inside to learn about Folios as well as how to unlock Synergy Skills and Abilities.
┗ Jump to Synergy Skills and Party Level System |
| 5 | A Date with Aerith Once your errands are done, head over to the north side of town and meet up with Aerith to start the date. Follow her to the top of the Clock Tower and admire the view of Midgar. Warning: Progressing to this objective will lock you out of returning to Kalm and skip past talking with your party members to increase their Relationship Level, so try to talk to all 4 characters and do any needing shopping in Kalm before proceeding to this step. |
| 6 | Shinra will soon descend on the town. Head back down the tower and speak with Broden. He will try to get you out without alerting the soldiers. |
| 7 | Fleeing the Scene Follow Broden's instructions and make your way through back alleys and rooftop overhangs of Kalm until you reach the inn. Head inside to unlock the Item Transmuter. |
| 8 | After the Item Transmuter tutorial, descend into the Air-Raid Shelter underneath the inn. Link up with Barret, Red XIII, and Tifa before making your escape. Open the chest here to receive 3 sprigs of Laurel. |
| 9 | Once Cloud opens the exit, you will enter the first region map of the game: The Grasslands. |
Unlock Conversation Choices and Character Relationships
Choices are also introduced in this segment of Chapter 2, allowing you to influence Cloud's relationship with each of the party members as you progress through the game.
During key conversations with your friends, Cloud will given the choice between 3 timed dialogue options. Depending on your choice, the character will approve or remain neutral towards Cloud.
Chapter 2 Romance and Relationship Guide
| Character | Dialogue Choices | Results |
|---|---|---|
 Aerith Aerith
|
Sure. Let's ... If I have to. I'm busy. |
◎ 〇 △ |
 Barret Barret
|
No time soon then. First one'll taste good. First one's on me. |
△ 〇 ◎ |
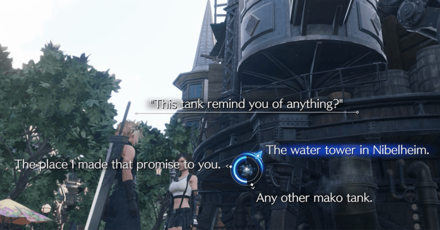
 Tifa Tifa
|
The water tower in Nibelheim The place I made that promise to you. Any other mako tank. |
〇 ◎ △ |
 Red XIII Red XIII
|
Thanks. I knew I could count on you. Good boy. |
〇 ◎ △ |
◎ - Best Answer, 〇 - Good Answer, △ - Bad Answer
Romance and Relationship Guide
Synergy Skills and Party Level System

Chapter 2 introduces a whole host of new features including the new Party Level System. The Party Level affects the Folios you can unlock at Maghnata Books, dictating which Synergy Skills and Abilities you can unlock and use for each character in your party.
Heading for the Swamplands Walkthrough
| Objectives | |
|---|---|
| 1 | 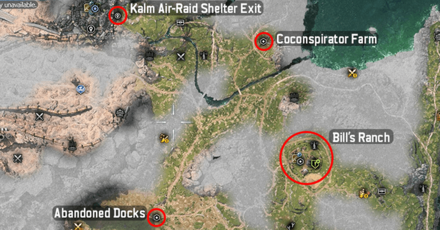 Once free, continue heading south to put some distance between your party and Kalm. Your destination is the Abandoned Dock near the swamplands. |
| 1a | Discovery: Coconspirator Optionally, you can meet with Broden's friend at a nearby farm. Doing so gives you access to your first Bench, Vending Machine, and Maghnata Automat. |
| 2 | Once you've rested, continue heading south towards the Abandoned Dock. Once you reach it, a cutscene will play wherein you discover that you'll need Chocobos before you can cross the swamp. |
Securing Chocobos Walkthrough
| Objectives | |
|---|---|
| 1 | After the cutscene, backtrack and head northeast towards Bill's Ranch. Once there, look for Billy inside the large Barn and he'll task you to look for Piko - an escaped Chocobo. |
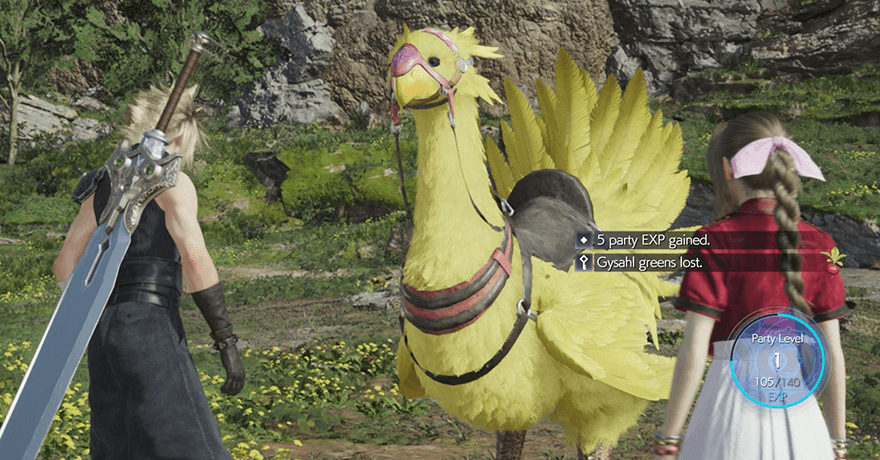
| 2 | Next, talk to Chloe. She'll be at the back of the barn, standing behind the desk. She'll give you Piko's favorite greens which you can use to fetch the runaway. |
| 3 | With the greens secure, go outside the ranch and follow the Chocobo traces on the road. Once you arrive near Piko's location, a short minigame called Chocobo Wrangling will begin. |
| 4 | 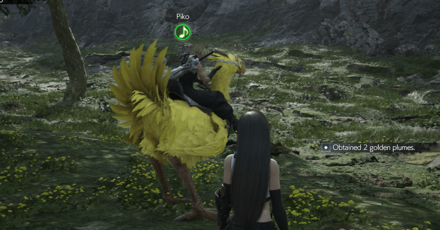 Chocobo Wrangling Sneak your way through the tall grass and approach Piko slowly. You'll have to get past two Chocobos before reaching Piko. Once near enough, use a rock to distract him before approaching and wrangling him. Tip: You can move faster while sneaking by holding R1. |
| 5 | Once Piko has been caught, go back to the Chocobo Ranch and return the bird to Billy. |
| 6 | While waiting for Piko to finish lunch, head outside the barn to trigger a cutscene where you are reunited with Chadley. |
| 7 | Follow Chadley to a nearby Remnawave Tower in order to unlock the new World Intel system of the game. |
| 8 | Once the tower is active, return to Billy to get the Chocowhistle - a key item which allows you to summon your Chocobo mount within the Grasslands Region. |
| 9 | Follow Billy to the training grounds outside the ranch to learn about Chocobo Races. |
| 10 | Break in the Saddle Use your Chocowhistle to summon your Chocobo and talk to Billy about participating in the Hustle de Chocobo. |
| 11 | After finishing a lap and getting your rewards, you'll be free to explore the entire Grasslands Region. |
Return to Kalm to Complete Side Quests
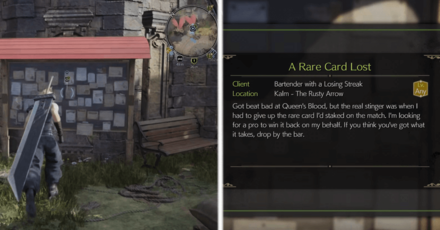
At this point, you'll be able to fast travel back Kalm, where several Side Quests will now be available from the Notice Board. Completing Side Quests will give Party EXP and improve your Relationship Level with specific characters.
Explore the Grasslands Region to Level Up and Get Better Gear

At this point in Chapter 2, you and your party will be free to roam the entirety of the Grasslands Region. Before attempting to cross the swamplands, it is recommended that you explore and complete World Intel in order to get additional levels for your party.
Chocobo Wrangling is Required Per Region
Unfortunately, mounts do not carry over between regions. Once you reach Chapter 4, you'll have to look for the new Junon variant of Chocobo in order to access mounts for that region. Your current mount will only be useable within the Grasslands.
Chocobo Locations in All Regions
Through the Swamplands Walkthrough
| Objectives | |
|---|---|
| 1 | 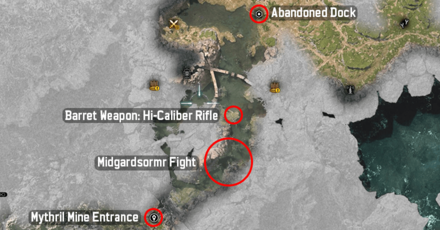 Through the Swamplands Return to the Abandoned Docks you found earlier (south of the Grasslands Region) and cross it on chocoback. Your destination will be the Mythril Mine entrance at the south side of the swamp. |
| 2 | As you approach the southern shore of the swamp, you will encounter Midgardsormr - the Chapter 2 boss. ┗ Recommended Party for Midgardsormr ▶ How to Beat Midgardsormr |
| 3 | After defeating the Midgardsormr, continue down the path and enter the tunnel. Once inside the Mythril Mine, Chapter 3 will begin. |
Chapter 2 Boss Strategy Guide
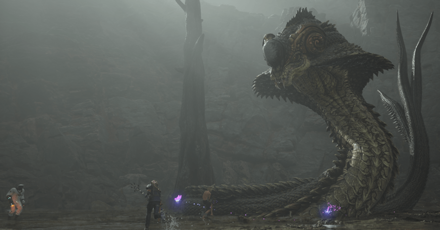
How to Beat Midgardsormr
| Midgardsormr | |
|---|---|
 |
|
| Location | Chapter Unlocked |
| Grasslands | A New Journey Begins |
| Weaknesses | Lesser Resistances |
|
|
|
| Greater Resistances | Immunities |
|
|
|
| Absorbed Elements | When Triggered |
|
None
|
|
| Pressure Conditions | |
| Inflicting enough damage by exploiting its elemental weakness will pressure it. Hitting it with synergy abilities will pressure it instantly. | |
You can find the Midgardsormr in the swamp area, south of the Grasslands Region at the end of Chapter 2.
Recommended Party Setup and Roles
| Character | Role |
|---|---|
 Cloud Cloud
|
・Attack when Midgardsormr is pressured to fill the Stagger Gauge ・Equip the Buster Sword and use Focused Thrust |
|
Aerith
|
・Exploit the Midgardsormr's weakness by attacking with Blizzard. Be sure to aim when its pressured ・Equip the Guard Stick and use Arcane Ward to cast spells twice |
|
Barret
|
・Can fill ATB quickly, allowing him to help with recovery ・Equip Shiva as a summon to deal massive damage ・Continue filling ATB while Shiva is summoned to use Summon Abilities ・Equip the Gatling Gun and use Focused Shot to increase stagger |
Midgardsormr Boss Fight Tips
- Take advantage of its weakness and use Ice attacks to deal damage.
- Hit it with Synergy Skills whenever possible.
Chapter 2 Maps and Obtainable Items
Maps
| List of Maps | ||
|---|---|---|
 |
 |
 |
Obtainable Items
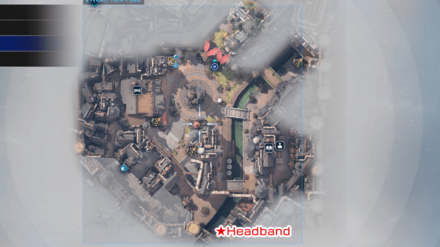
| Kalm - Village Center | ||
|---|---|---|
| Headband | ||
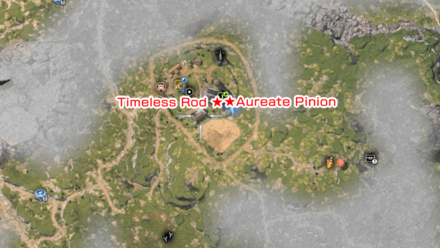
| Bill's Ranch | ||
| Aureate Pinion | Timeless Rod | |
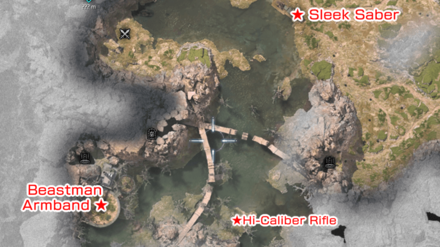
| Abandoned Dock | ||
| Sleek Saber | Hi-Caliber Rifle | Beastman Armband |
This list does not include the items that you get from destroying the wooden crates.
Materia List and How to Get All Materia
FF7 Rebirth Related Guides

| All Story Chapters | |
|---|---|
| Chapter 1 | Fall of a Hero |
| Chapter 2 | A New Journey Begins |
| Chapter 3 | Deeper into Darkness |
| Chapter 4 | Dawn of a New Era |
| Chapter 5 | Blood in the Water |
| Chapter 6 | Fool's Paradise |
| Chapter 7 | Those Left Behind |
| Chapter 8 | All That Glitters |
| Chapter 9 | The Planet Stirs |
| Chapter 10 | Watcher of the Vale |
| Chapter 11 | The Long Shadow of Shinra |
| Chapter 12 | A Golden Key |
| Chapter 13 | Where Angels Fear to Tread |
| Chapter 14 | End of the World |
| How Long to Beat? Game Length | |
| Post-Game Content and How to Get 100% Clear | |
Comment
Author

Chapter 2: A New Journey Begins Walkthrough
Rankings
- We could not find the message board you were looking for.
Gaming News
![Animal Crossing: New Horizons Review [Switch 2] | Needlessly Crossing Over to a New Generation](https://img.game8.co/4391759/47d0408b0b8a892e453a0b90f54beb8a.png/show)


Popular Games

Genshin Impact Walkthrough & Guides Wiki
Honkai: Star Rail Walkthrough & Guides Wiki
Arknights: Endfield Walkthrough & Guides Wiki
Umamusume: Pretty Derby Walkthrough & Guides Wiki
Wuthering Waves Walkthrough & Guides Wiki
Pokemon TCG Pocket (PTCGP) Strategies & Guides Wiki
Abyss Walkthrough & Guides Wiki
Zenless Zone Zero Walkthrough & Guides Wiki
Digimon Story: Time Stranger Walkthrough & Guides Wiki
Clair Obscur: Expedition 33 Walkthrough & Guides Wiki


Recommended Games
Fire Emblem Heroes (FEH) Walkthrough & Guides Wiki
Pokemon Brilliant Diamond and Shining Pearl (BDSP) Walkthrough & Guides Wiki
Diablo 4: Vessel of Hatred Walkthrough & Guides Wiki
Super Smash Bros. Ultimate Walkthrough & Guides Wiki
Yu-Gi-Oh! Master Duel Walkthrough & Guides Wiki
Elden Ring Shadow of the Erdtree Walkthrough & Guides Wiki
Monster Hunter World Walkthrough & Guides Wiki
The Legend of Zelda: Tears of the Kingdom Walkthrough & Guides Wiki
Persona 3 Reload Walkthrough & Guides Wiki
Cyberpunk 2077: Ultimate Edition Walkthrough & Guides Wiki


All rights reserved
© SQUARE ENIX CO., LTD. All Rights Reserved.
CHARACTER DESIGN: TETSUYA NOMURA/ROBERTO FERRARI
LOGO ILLUSTRATION: © 1997 YOSHITAKA AMANO
The copyrights of videos of games used in our content and other intellectual property rights belong to the provider of the game.
The contents we provide on this site were created personally by members of the Game8 editorial department.
We refuse the right to reuse or repost content taken without our permission such as data or images to other sites.