Can't Stop, Won't Stop Walkthrough and Hard Mode Guide

Can't Stop, Won't Stop is the final Side Quest that can be unlocked during Chapter 12 of Final Fantasy 7 Rebirth (FF7 Rebirth). Check out how to unlock Can't Stop, Won't Stop, how to beat the Ultimate Party Animal's challenges, how to beat Musclehead Colosseum (Send in the Clowns) on Normal and Hard Mode, as well as the available rewards for completing the Shinra Middle Manager's challenges.
Can't Stop, Won't Stop Bug Fix
Update to Patch v1.030
In Patch v1.020, the quest Can't Stop, Won't Stop is bugged and stops progression in the G-Bike minigame even if you get over 32,000 points.
As of April 11, 2024, this bug has been fixed with the release of Patch v1.030. Make sure to check and update your game to fix this bug.
1.030 Update Patch Notes (April 11 Patch)
How to Unlock Can't Stop, Won't Stop
Unlock Conditions
| Story Chapter | Chapter 12 |
|---|---|
| Unlock Conditions | • Complete all Side Quests • Complete Chapter 12 |
| Recommended Level | 46 |
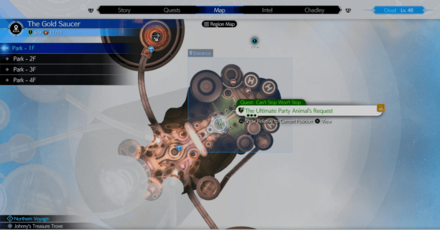
Quest Location
| Map View | In Game View |
|---|---|
 |
 |
To start the quest, you must complete all of the previous side quests available. Then, after you find Cait Sith and reach the end of Chapter 12, you can park the Tiny Bronco and go back to the Golden Saucer and look for the Ultimate Party Animal at the main entrance.
How to Complete Can't Stop, Won't Stop
| Quest Objectives | |
|---|---|
| 1 | Approach the Ultimate Party Animal to automatically accept the quest. |
| 2 | Win in 5 attractions: Chocobo Race: Beat the Ultimate Party Animal Galactic Saviors: Beat the high score. Musclehead Colosseum: Complete “Send in the Clowns” G-Bike: Get a score of 32,000 in the Expert Course Queen's Blood: Beat the Ultimate Party Animal |
| 3 | Settle the score in 3D Brawler |
Chocobo Race Strategy
Piko is the Most Recommended Chocobo

Piko, your starting Chocobo, is the most recommended Chocobo to take in Chocobo Races due to his well-balanced stats that don't skimp on speed.
His ability, Speed Burst, also allows him to surpass the competition easily and gets prolonged whenever you acquire Ability Balloons, which allows him to remain faster for longer.
Equip the Hyperion Set for the Best Results
 |
|
| Head: Hyperion's Helm | Increases abilities during the final lap. |
|---|---|
| Torso: Hyperion's Armor | Increases speed on the final lap. |
| Feet: Hyperion's Shin Guards | Increases Dash duration. |
The Hyperion Set is the most recommended Chocobo equipment for Chocobo Races. It increases stats and the effects of abilities during the final lap, allowing you to dash even faster ahead of the competition.
You can get the Hyperion Set by winning in the Odin Straits, Alexander Siege, and Phoenix Trial courses of the Chocobo Races.
Drift Over the Grass in Sharp Corners
You can quickly pass by most of the sharp corners in the track by drifting over the grass. This will help you save a significant amount of time each lap.
Glide Over the Water
Towards the end of the track, take the jump pads so that you can glide over the water to go across faster.
Galactic Saviors Strategy
Shoot Down Entire Squads

To attain the highest score possible in Galactic Saviors, you first need to focus on taking down entire enemy squads, which means leaving nothing behind in a wave of enemies. Taking down enemy troops will result in additional points.
Reserve Your Restorative Charges for When You Need It

The enemies in the Galactic Saviors' Expert Mode are powerful and will continuously sap you of your HP if you're not careful. Evade as much as possible and save your Restorative Charges for when you go up against powerful enemies.
Use Proton Bombs Without Hesitation

In Galactic Saviors, some enemies may boast higher HP than their companions. These crafts will likely be red . Whenever you see these units, do not hesitate to use your Proton Bombs to dispose of them as quickly as possible.
Galactic Saviors Minigame Guide
Follow the Worm's Tails
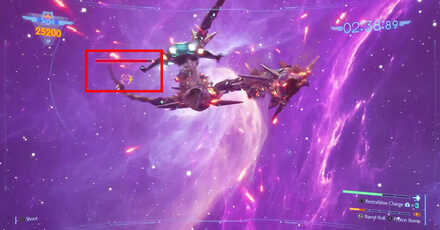
When the worm ships arrive, destroy all of its parts to continue. Make sure to follow the worm's tails as it moves around so you can take aim at it whenever it is on screen. Following it will also help you avoid the enemy's attacks at the same time.
Destroy the Ship Weapons First
In the final stage, you should focus on destroying the ship's weapons first before the ship's engines. This will help increase your score since destroying the engines will end the minigame even if you did not destroy the weapons.
Musclehead Colosseum (Send in the Clowns) Strategy
| Musclehead Colosseum (Send in the Clowns) Tips | |
|---|---|
| Enemies Per Round | Best Builds |
|
|
|
In Musclehead Colosseum (Send in the Clowns), you will be going head-to-head against 5 waves of extremely dangerous enemies. Similar to the other Musclehead Colosseum levels, items cannot be used during the bouts, so proper preparation is called for.
Check out a few recommended builds in the sections below, including suggested equipment and materia for the challenge. Once you're ready, be sure to bring along your best characters with you.
Musclehead Colosseum Minigame Guide
List of All Enemies Per Round
| Round | Enemies | Notes |
|---|---|---|
| 1 | Gigantuar x1 Gargantuar x1 |
Weakness: None • Use Focused Thrust twice during Rain of Needles to stagger them. • Each Rain of Needles strengthens 1000 Needles. • Use Barrier to reduce enemy physical damage. |
| 2 | Tonberry x10 | Weakness: None • Equip Karmic Cowl or Safety Bit to make the fight manageable • Chef's Knife is an insta-kill attack, but evading it pressures them. • Uses Scourge, which binds you, when you are out of Tonberry's melee range. |
| 3 | Ember Zu x1 | Weakness: • Exploiting its Ice elemental weakness pressures it. • Lure the Tornado away from your party |
| 4 | Gigantoad Joker x2 |
Weakness: Gigantoad: • Attacks with its tongue, which will be vulnerable after certain attacks. • Focus on targeting its tongue with strong ranged attacks to pressure it. Joker: • Avoiding Soul Steal repeatedly pressures them. • Constantly pressured when HP is less than half. • Joker card reduces your HP to 1. |
| 5 | Ironclad | Weakness: • Sharpens weapon, which automatically pressures it. • Spam Focused Thrust after it uses Sharpen to stagger it before it uses Thanatosian Blade. |
Recommended Party Setup
| The builds featured in this section are at Weapon Level 5. If you find that you don't have enough Materia slots to complete the setup, consider getting all the possible Manuscripts up to this point of the story, first. |
 Cloud Cloud Main DPS | |||||
| Weapon | Armor | ||||
|---|---|---|---|---|---|
| Igneous Saber | Yggdrasill Armlet | ||||
| Accessory | Summon Materia | ||||
| Karmic Cowl | Alexander | ||||
| Weapon Materia | Armor Materia | ||||
| Weapon Skills | |||||
 Tifa Tifa Sub DPS | |||||
| Weapon | Armor | ||||
|---|---|---|---|---|---|
| Kaiser Knuckles | Hades Armlet | ||||
| Accessory | Summon Materia | ||||
| Safety Bit | Kujata | ||||
| Weapon Materia | Armor Materia | ||||
| Weapon Skills | |||||
 Aerith Aerith Support | |||||
| Weapon | Armor | ||||
|---|---|---|---|---|---|
| Timeless Rod | Yggdrasill Armlet | ||||
| Accessory | Summon Materia | ||||
| Safety Bit | Phoenix | ||||
| Weapon Materia | Armor Materia | ||||
| Weapon Skills | |||||
Up to 4 Weapon Skills are listed for players with Weapon Levels higher than level 5.
Cloud will be your Main DPS on this team due to his strong abilities, such as Focused Thrust, that can quickly stagger enemies. He is also versatile since he has melee and ranged attacks, and can take a few hits from enemy attacks.
Tifa will be the Sub DPS when enemies are staggered because she has strong single-target damage thanks to her combination of Rise and Fall, Omnistrike, and True Strike. Additionally, she can act as a support to debuff enemies while you control Cloud.
Aerith's primary role in the party is to cast Barrier spells or Healing spells on the party to reduce the amount of damage everyone takes. Just make sure that she has extra ATB Charges to revive any party members.
Recommended Accessories that Grant Immunity to Instant Death
| Gear | How to Get |
|---|---|
 Karmic Cowl Karmic Cowl
|
• Reach Chapter 8 • Defeat the Tonberry King • Craft the Karmic Cowl |
 Safety Bit Safety Bit
|
• Obtained as early as Chapter 7 in the Corel Region's desert area • Alternatively, craft the Safety Bit |
The second round of this challenge will pit you against 10 Tonberries, which are all capable of using the Chef's Knife and Doom and Gloom ability that causes instant death. As such you'd want to negate this for all characters.
Equipping the Karmic Cowl on your main character and Safety Bits on your other party members will fully negate these insta-kill attacks, making the battle easier.
Gigantuar Tips: Use Focused Thrust Twice during Rain of Needles
In the first round, you will face two giant cactuars. Save up a full ATB gauge and use Focused Thrust twice when either use Rain of Needles. This will likely stagger it before it finishes the move, allowing you to kill it before it gets stronger.
You can also use the Barrier spell to reduce any incoming physical damage by half. This will help you survive longer in the fight since they only use physical attacks.
Tonberry Tips: Control Tifa and Stay in Melee Range
It would be best for you to control Tifa for most of the fight. This is because Tifa can quickly dodge Chef's Knife, and her abilities are mostly single-target. This lets you avoid multiple Tonberries using Doom and Gloom since they use it whenever they get attacked with an ability.
You will also want to stay in melee range for most of the fight since the Tonberries will cast Scourge whenever you are out of range. During most of the fight, your party members will get the attention of the Tonberries while you can freely kill them one by one.
Ember Zu Tips: Lure Tornadoes Away from Party
In the third round, you will fight against Ember Zu, a variant of King Zu. It will spawn tornadoes that follow the character you were directly controlling. Make sure to lure these tornadoes away from your party so they don't get interrupted.
You can also use Ice spells to exploit its weakness and pressure the beast. Once it is pressured, it will be easy to stagger and defeat it.
Gigantoad Tips: Focus on Targeting the Tongue
The fourth round will be a difficult fight since you are up against 3 bosses. Prioritize surviving during the first couple of minutes until the Gigantoad is exhausted. Once in this state, focus on targeting its tongue so that you can stagger it.
Once the Gigantoad is gone, keep avoiding the Jokers' Soul Steal until it becomes pressured as well. When it reaches half health, it will be perpetually pressured so keep using Focused Thrust to stagger it.
Ironclad Tips: Spam Focused Thrust during Sharpen
In the final round, you will fight an Ironclad, which is slow but very powerful. When it uses Sharpen, all of its attacks will deal more damage but it will be pressured. Spam Focused Thrust on it at this time so that you can stagger it before it uses Thanatosian Blade, which can one-hit your party members.
G-Bike Strategy
| G-Bike Basic Controls |
|---|
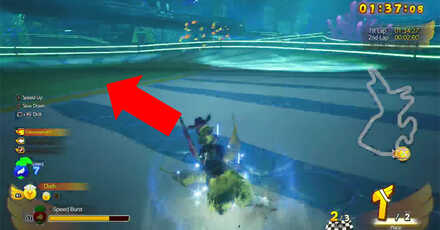
Prioritize Blue Point Panels
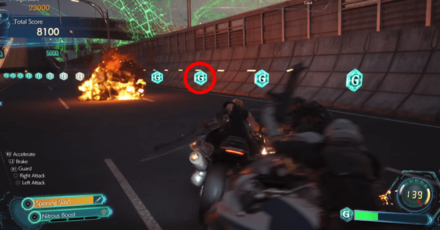
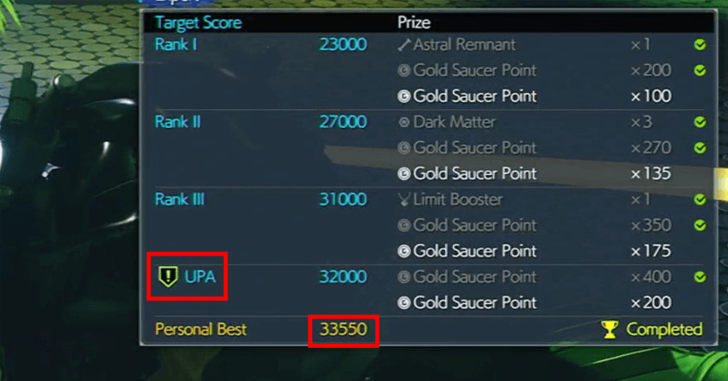
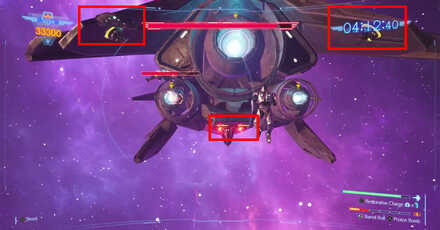
Your main goal in this challenge is to beat the Shinra Middle Manager's high score of 32,000.
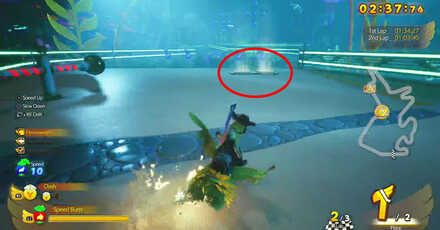
The Blue Point Panels in G-Bike will not only add to your overall score but will also restore Cloud's fuel. Should his fuel fall to 0, the minigame will be over. Prioritize these panels above all else, especially when you're running low.
Ignore Yellow Boost Panels
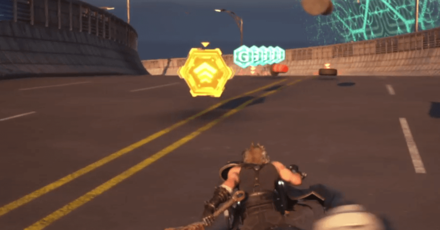
The main goal of the Ultimate Party Animal is to beat his score, not reach the finish line as fast as possible. Therefore, ignore all Yellow Boost Panels to give yourself more time to rack up your score.
Press L2 to Make a Sharp Turn
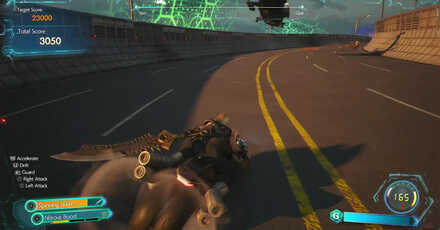
Turning in the G-Bike is slow unless you drift. Once you have enough speed, press the L2 button to make a sharp turn to grab any blue points or to avoid any obstacles that the enemies create.
Use Spinning Slash on Large Groups
In the middle and towards the end of the minigame, there will be a large group of enemies that appear from behind you. Use your Spinning Slash just as they pass you to clear out all of them instantly.
Queen's Blood Strategy
Recommended Deck for Shinra Middle Manager
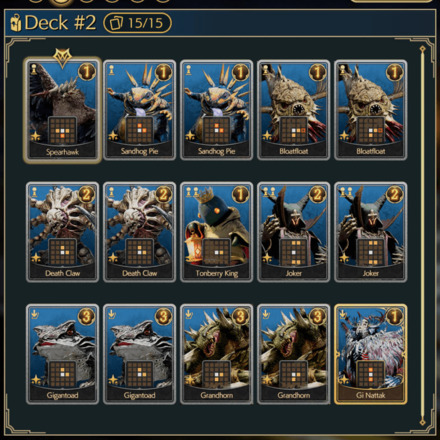
| Card | Range | Ability | How to Get |
|---|---|---|
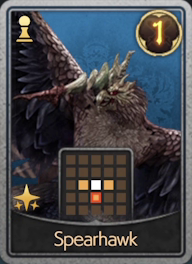 Spearhawk Spearhawk
|
 Raise the power of allied cards on affected tiles by 2 while this card is in play. |
From Chapter 6 Reward for completing Spears and Needles as part of the Card Carnival Challenge in Costa del Sol. |
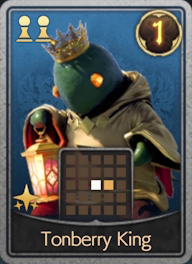 Tonberry King Tonberry King
|
 When allied cards are destroyed, raise this card's power by 2. |
From Chapter 6 Reward for completing Devil by Night as part of the Card Carnival Challenge in Costa del Sol. |
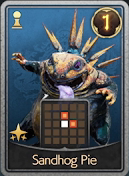 Sandhog Pie Sandhog Pie
|
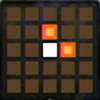 When destroyed, raise the power of allied cards on affected tile by 3. |
From Chapter 7 Purchase Uncanny Terrors Booster Pack at the Weapon Vendor in North Corel for 500 gil. |
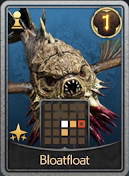 Bloatfloat Bloatfloat
|
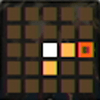 When destroyed, lower the power of allied and enemy cards on affected tiles by 4. |
From Chapter 7 Purchase Uncanny Terrors Booster Pack at the Weapon Vendor in North Corel for 500 gil. |
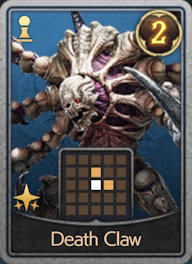 Death Claw Death Claw
|
 When enemy cards are destroyed, raise this card's power by 1. |
From Chapter 8 Beat Queen's Blood player Mary in Card Casino. |
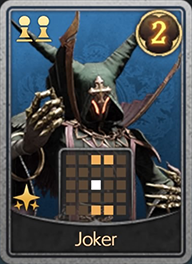 Joker Joker
|
 When allied and enemy cards are destroyed, raise this card's power by 1. |
From Chapter 8 Beat Queen's Blood player Pietro in Card Casino. |
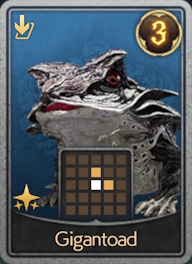 Gigantoad Gigantoad
|
 Destroy an allied card and replace it. |
From Chapter 9 Purchase Jungle Arcanum Booster Pack at the General Store Vendor in Gongaga for 500 gil. |
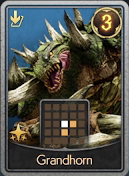 Grandhorn Grandhorn
|
 Destroy an allied card and replace it. |
From Chapter 8 Purchase Heavy Hitters Booster Pack at the Queen's Blood Card Vendor in The Dustbowl for 500 gil. |
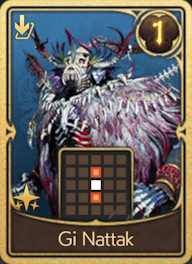 Gi Nattak Gi Nattak
|
 Replace an ally and raise the power of allied cards on affected tiles by the replaced ally's power. |
From Chapter 12 Complete Curse of the Gi at Card Carnival in Gold Saucer. |
For the Shinra Middle Manager's match, use a deck that thrives in replacing allies and the destruction of cards. Death Claw, Tonberry King, and Joker are cards that increase their power whenever allied and enemy cards get destroyed.
Play them early to net you large points with each replacement. Gi Nattak not only replaces cards, which will activate the aforementioned cards' abilities but also distributes power to affected ally cards based on the power of the card it replaced.
3D Brawler Strategy
Learn the Manager's Attack Patterns
| No. | Attack Pattern (if evasion is successful) |
|---|---|
| 1 | Attack x3 → Attack Chance |
| 2 | Combo → Attack Chance |
| 3 | Attack x3 → Combo → Attack Chance |
| 4 | Combo → Attack Chance |
| 5 | Combo → Attack Chance |
When going up against the Shinra Middle Manager, focus on his patterns. The table above is his guaranteed pattern, provided that you evade each string successfully. Otherwise, he will start from the beginning of the chain.
The attacks that he does will be random. He may do a left or a right hook, a left or a right straight, or a left or a right uppercut. Pay attention to the motion he does before executing his attack to know which way to tilt the left analog stick to.
Attack Motions
| Attack Motion | Controls |
|---|---|
Right Straight |
|
Right Hook |
|
Right Uppercut |
|
Left Straight |
|
Left Hook |
|
Left Uppercut |
Combo Motion A
| Combo Attack Motion |
|---|
| Controls |
Combo Motion B
| Combo Attack Motion |
|---|
| Controls |
Can't Stop, Won't Stop Hard Mode Guide
| Can't Stop, Won't Stop Hard Mode Tips |
|---|
| Best Hard Mode Builds for Can't Stop, Won't Stop |
|
|
Note that only the Musclehead Colosseum (Send in the Clowns) battles are affected by Hard Mode and every other minigame is the same as if it were on a lower difficulty level.
Can't Stop, Won't Stop Hard Mode Builds
| These Hard Mode builds use equipment that are at least Weapon Level 8. If you don't have enough Materia slots or the right Weapon Skills to complete a character setup, consider using a different weapon or collect all of the character's Manuscripts first. |
 Yuffie Yuffie Magic DPS | |||||
| Weapon | Armor | ||||
|---|---|---|---|---|---|
| Crescent Sickle | Cetran Bracer | ||||
| Accessory | Summon Materia | ||||
| Genji Gloves | Gilgamesh | ||||
| Weapon Materia | Armor Materia | ||||
| Weapon Skills | |||||
| Tifa Physical DPS | |||||
| Weapon | Armor | ||||
|---|---|---|---|---|---|
| Dragon Claws | Valkyrian Bangle | ||||
| Accessory | Summon Materia | ||||
| Enhanced Expeditionary Medal | Odin | ||||
| Weapon Materia | Armor Materia | ||||
| Weapon Skills | |||||
| Aerith Support | |||||
| Weapon | Armor | ||||
|---|---|---|---|---|---|
| Ceremonial Staff | Cetran Armlet | ||||
| Accessory | Summon Materia | ||||
| Enhanced Karmic Cowl | Phoenix | ||||
| Weapon Materia | Armor Materia | ||||
| Weapon Skills | |||||
Round 1: 2 Gigantuars
Cast Barrier to Survive 10,000 Needles
Make sure to have Barrier active at all times since the Gigantuar's 10,000 Needles attack will deal 10,000 damage and kill a character that doesn't have the buff active. This is especially important for the AI-controlled characters that will get KO'd from blocking the attack.
Save ATB Charges for Focused Strikes
Once Tifa's maxed out her Unbridled Strength, save the rest of her ATB Charges so that she can use Focused Strike as soon as the Gigantuars get pressured from using Rain of Needles. Just make sure that she has Barrier active to reduce the damage she takes from the attack.
Round 2: 10 Tonberries
Use Tifa to Kill One Tonberry at a Time
Tifa deals very high single-target damage, making it easy for her to pick off each Tonberry one by one. She also has a very fast dodge speed, making it easy for her to evade the Tonberries' melee attacks and pressure them.
Make Yourself Immune to Insta-Death
For this round, you'll want to make sure that you have the Warding and Subversion Materias linked or an Enhanced Karmic Cowl equipped to make your characters immune to Insta-Death. Just be careful of the damage that you take since you can still get KO'd by regular attacks.
Optionally, you could remove Warding-Subversion on Yuffie and Tifa and equip the Ribbon accessory on them instead. However, it's better to keep Warding-Subversion since it'll be useful in later rounds.
Watch Out for Scourge
Keep your eye out for the projectiles from the Scourge attack since getting hit by this move will stun a character and cause multiple Tonberries to teleport and attack them. Even if you're immune to Insta-Death, you can still get KO'd by the follow-up attacks from the Tonberries.
Round 3: Ember Zu
Elemental-Fire Trivializes This Round
Having a maxed Elemental Materia linked to Fire on your armor makes it so that you absorb all of the Ember Zu's Fire attacks. This makes this round extremely easy since you're constantly being healed and you can easily spam Ice attacks with Yuffie.
Be Careful of Its Physical Attacks
Even if you're constantly being healed by the Ember Zu's Fire attacks, you can still get KO'd if it chooses to use multiple physical attacks in a row. Pay attention to its attacks and dodge any non-Fire move that it uses.
Round 4: Gigantoad and 2 Jokers
Take Down Gigantoad First
Prioritize taking down the Gigantoad first since it can deal a lot of damage if you're hit by one of its attacks. Focus on destroying its tongue so that it gets pressured, allowing you to stagger and kill it with Tifa's abilities and Yuffie's Ice attacks.
Watch Out for the Joker Attack
Even if you're focusing on taking down the Gigantoad, you'll still want to be paying attention to the moves that the Jokers use. As soon as you see one of them using the Joker move, swap your focus to dodging the attack since getting hit by this move will leave on 1 HP.
Dispel the Joker's Buffs
Whenever the Jokers use Diamond, they will apply defensive buffs on themselves and become harder to take down. Thankfully, you have the Subversion Materia equipped, so you can cast Dispel to remove these buffs.
Round 5: Ironclad
Use Yuffie's Multiple Lightning Attacks
Unlike our recommended party for Normal Mode, you'll have Yuffie available for the Ironclad fight. Get her Lightning Ninjutsu active as soon as the fight starts so that you can exploit its Lightning weakness in conjunction with her Thunder spells and Thunderous Banishment casts.
Save ATB Charges for Focused Strikes
Similar to the first round, you'll want to save Tifa's ATB Charges so that she can spam Focused Strikes as soon as the Ironclad gets pressured from using Sharpen. You'll want to focus on staggering it as soon as possible so that it won't use Thanatosian Blade and potentially OHKO a character.
Cast Manawall Instead of Barrier
Even if the majority of the Ironclad's attacks deal physical damage, you'll still want to cast Manaward over Barrier in case it uses Graviga. This way you can still halve the damage of its attacks and you won't get set to 1 HP if it does use Graviga.
Do note that this won't help you survive Thanatosian Blade since this attack will always do 9999 damage and instantly kill a character.
Elemental-Fire Absorbs Firaga
Thanks to the Elemental-Fire equipped for Round 3, you will also get healed whenever Ironclad casts Firaga on one of your party members. This helps cut down on the amount of healing you'll need to do, and you can continue attacking without worry whenever it uses Firaga.
Can't Stop, Won't Stop Rewards
List of Rewards
| Rewards for Completing Can't Stop, Won't Stop |
|---|
| ▸ Card 142 - Ultimate Party Animal ▸ Gambler Materia ★ ▸ Unlock 3D Brawler Hidden Character ▸ Party EXP +10 ▸ Player EXP (based on current level) |
Fortunes Untold Vol. VII in Hard Mode
While playing in Hard Mode, completing this side quest will reward you the Fortunes Untold Vol. VII for Cait Sith. You can access Hard Mode after completing your first playthrough of the game in any difficulty.
FF7 Rebirth Related Guides

Side Quest Guides
| All Side Quest Guides |
|---|
| Best Side Quests to Do |
Grasslands Side Quests
| Side Quest List | Flowers from the Hill | Lifeline in Peril | A Rare Card Lost |
|---|---|---|
| Livestock's Bane | Where the Wind Blows | Hustle and Grind |
Junon Side Quests
| Side Quest List | Stuck in a Rut | When Words Won't Do | The Hardest Sell |
|---|---|---|
| Calling All Frogs | Dreaming of Blue Skies | Beneath Still Waters |
| Tides of War and Worry | ||
Corel Side Quests
| Side Quest List | The Saga of the Seaside Inn | Rendezvous in Costa del Sol | Bodybuilders in a Bind |
|---|---|---|
| Of Robed Men and Ransoms | Missing: Mr. Birdie | Gold Cup or Bust |
| Trouble in Paradise | Sand and Circuses | Can't Stop, Won't Stop |
Gongaga Side Quests
| Side Quest List | The Pursuit of Perfection | O Chicken, Where Art Thou | Teach Me, Great Warrior |
|---|---|---|
| The Spice of Life | Escape from Endless Writer's Block | Woodland Vigil |
Cosmo Canyon Side Quests
| Side Quest List | Bonds of Trust | Absence of a Sign | From Whence Life Flows |
|---|---|---|
| Promises to Keep | Victim of Circumstance | |
Nibel Side Quests
| Side Quest List | Esoteric Secrets of the Elders | My White-Haired Angel | Lament of the Damned |
|---|---|---|
Author

Can't Stop, Won't Stop Walkthrough and Hard Mode Guide
Rankings
- We could not find the message board you were looking for.
Gaming News
![Animal Crossing: New Horizons Review [Switch 2] | Needlessly Crossing Over to a New Generation](https://img.game8.co/4391759/47d0408b0b8a892e453a0b90f54beb8a.png/show)


Popular Games

Genshin Impact Walkthrough & Guides Wiki
Honkai: Star Rail Walkthrough & Guides Wiki
Arknights: Endfield Walkthrough & Guides Wiki
Umamusume: Pretty Derby Walkthrough & Guides Wiki
Wuthering Waves Walkthrough & Guides Wiki
Pokemon TCG Pocket (PTCGP) Strategies & Guides Wiki
Abyss Walkthrough & Guides Wiki
Zenless Zone Zero Walkthrough & Guides Wiki
Digimon Story: Time Stranger Walkthrough & Guides Wiki
Clair Obscur: Expedition 33 Walkthrough & Guides Wiki


Recommended Games
Fire Emblem Heroes (FEH) Walkthrough & Guides Wiki
Pokemon Brilliant Diamond and Shining Pearl (BDSP) Walkthrough & Guides Wiki
Diablo 4: Vessel of Hatred Walkthrough & Guides Wiki
Super Smash Bros. Ultimate Walkthrough & Guides Wiki
Yu-Gi-Oh! Master Duel Walkthrough & Guides Wiki
Elden Ring Shadow of the Erdtree Walkthrough & Guides Wiki
Monster Hunter World Walkthrough & Guides Wiki
The Legend of Zelda: Tears of the Kingdom Walkthrough & Guides Wiki
Persona 3 Reload Walkthrough & Guides Wiki
Cyberpunk 2077: Ultimate Edition Walkthrough & Guides Wiki


All rights reserved
© SQUARE ENIX CO., LTD. All Rights Reserved.
CHARACTER DESIGN: TETSUYA NOMURA/ROBERTO FERRARI
LOGO ILLUSTRATION: © 1997 YOSHITAKA AMANO
The copyrights of videos of games used in our content and other intellectual property rights belong to the provider of the game.
The contents we provide on this site were created personally by members of the Game8 editorial department.
We refuse the right to reuse or repost content taken without our permission such as data or images to other sites.
it’s most likely a typo on their end, not to mention a huge oversight