This survey will take about 1 minute.
Your answers will help us to improve our website.
Elden Ring
Caelid Walkthrough
Traverse Caelid and uncover all dungeons and bosses and items with our complete Elden Ring walkthrough.
| Caelid Guides | |
|---|---|
| Caelid Interactive Map | Caelid Walkthrough |
List of Contents
Caelid Walkthrough
Caelid Map
If you’re aiming to complete all of the optional content, track your progress through Caelid with our interactive map of the region.
Caelid Objectives
| 1 | 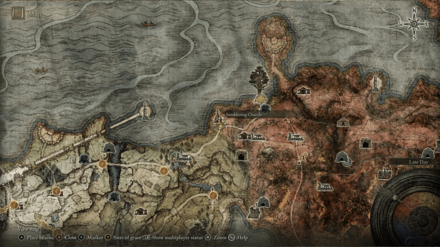 To get to Caelid, head east from the Saintsbridge Site of Grace and past Summonwater Village. Past Summonwater Village is the Smoldering Church. There is a Site of Grace inside, but you need to get past an Invader first. |
|---|---|
| 2 | 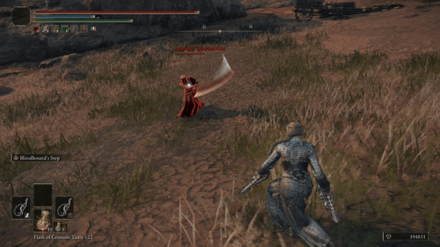 Anastasia, Tarnished Eater will Invade as soon as you approach the entrance to Smoldering Church. Defeat her and she will drop the Sacred Scorpion Charm Inside the Smoldering Church you can find the Missionary's Cookbook 3 and the Nomadic Warrior's Cookbook 14. ▶ How to Beat Anastasia, Tarnished-Eater |
| 3 | 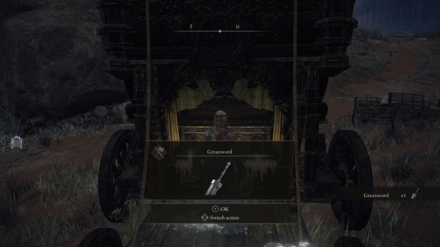 Continuing to head east by following the road, you will come across a horde of Putrid Corpses that inflict Scarlet Rot with their attacks. Past them along the road are a group of Giant Dogs surrounding a carriage. On the road near two Giant Dogs is a Scarab that will drop the Whirl, O Flame! Incantation. Inside the carriage is the Greatsword. |
| 4 | 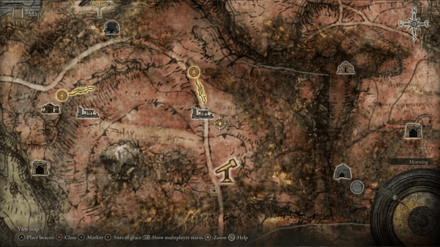 Past the Giant Dogs is Caelem Ruins. The stairs to the underground chamber is on the southeast area of the Ruins. Inside the chamber will be a boss fight with a pair of Pumpkin Heads. After defeating them, the door at the back of the chamber can be opened. Inside the chest in the next room is the Visage Shield. ▶ How to Beat Pumpkin Heads |
| 5 | 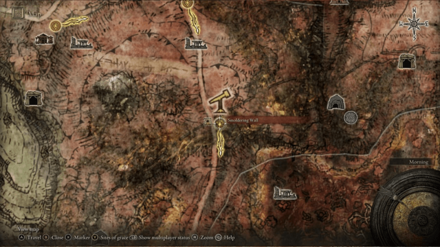 South of the Caelem Ruins in the Smoldering Wall. There is a Telescope and a Site of Grace nearby. A Finger Reader Crone is also near the Site of Grace who can be interacted with. |
| 6 |  A bit more south of the Smoldering Wall is the Astray From Caelid Highway North Site of Grace. Very near the Site of Grace is another Scarab that drops the Lifesteal Fist Ash of War when defeated. There is also a Wandering Merchant to the east of the Site of Grace. |
| 7 | 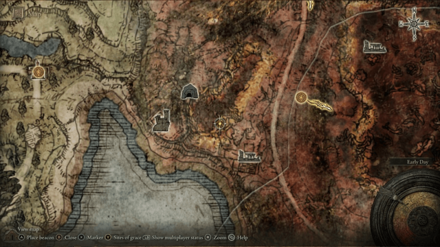 Southwest of the Astray From Caelid Highway North Site of Grace is the Caelid Waypoint Ruins. It's filled with several Kindred of Rot with the underground location found at the northwest area of the ruins. The underground chamber is filled with more Kindred of Rot. Across the chamber is another door. In the next room is a chest containing the Meteoric Ore Blade. |
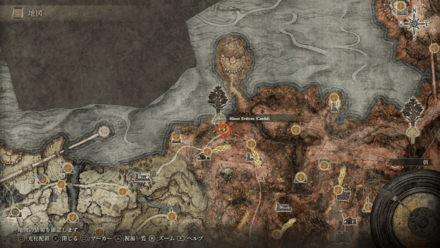
| 8 |  Continuing south is the dragon Decaying Ekzykes, who can be found just a little off the road. If defeated, he will drop a Dragon Heart, which can be used at the Cathedral of Dragon Communion south of his original position. ▶ How to Beat Decaying Ekzykes |
| 9 | 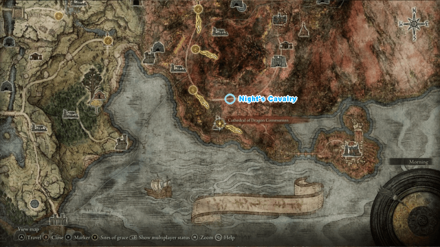 South of Decaying Ekzykes is the Catherdral of Dragon Communion, where the Dragon Heart obtained from him can be used to purchase Dragon Incantations. There is also a Banished Knight patrolling the area, with a Site of Grace inside the Cathedral itself. You can also loot the Ancient Dragon Apostle's Cookbook 3 here. On the road northeast is a Night's Cavalry boss that appears only at night. If defeated, you'll receive the Poison Moth Flight Ash of War. ▶ How to Beat Night's Cavalry |
| 10 | 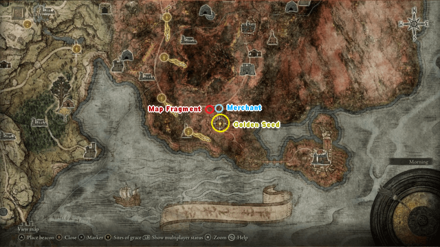 To the northeast of the Cathedral of Dragon Communion is a tree with a Golden Seed, a Merchant, and a Map Fragment that reveals the region of Caelid except Dragonbarrow. |
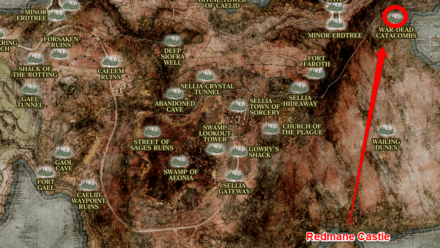
| 11 | 
To the southeast is the road to Redmane Castle, where you can head to if you want to fight Starscourge Radahn.However, do note that if you are too early on in the game the portals at the bridge may not be active and talking to Jerren may not trigger the Festival where you fight Radahn, making the boss fight unavailable until later. To trigger the portals and the Radahn fight, rest at any Sites of Grace in the Altus Plateau. This can be achieved by either activating the Grand Lift of Dectus or proceeding through the Ruin-Strewn Precipice in Liurnia of the Lakes. |
Caelid Optional Areas
| Jump To An Area! | |
|---|---|
| Caelid | Greyoll's Dragonbarrow |
Caelid
| Map Location | What You Can Find |
|---|---|
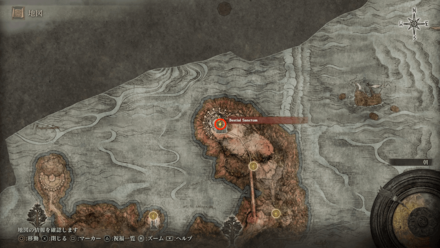
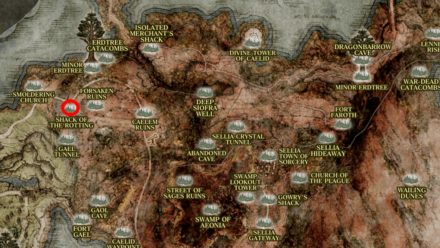 View Full Image Shack of the Rotting |
・Preserving Boluses x 5 ・Nascent Butterfly x 1 Note: There is a Site of Grace here for the Rotview Balcony. |
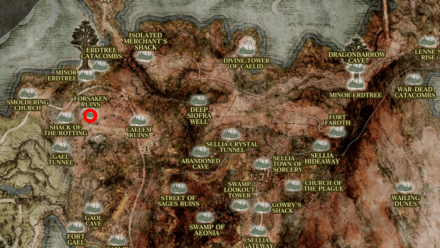 View Full Image Forsaken Ruins |
・ Sword of St. Trina ・Smithing Stone 4 ・Crimson Crystal Tear x 1 Note: The Sword of St. Trina is found in the underground chamber of the Forsaken Ruins. |
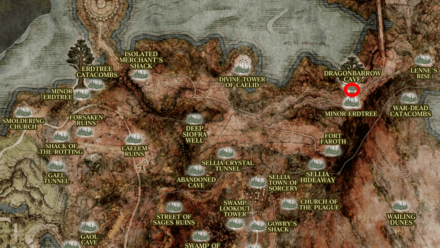
 View Full Image Minor Erdtree |
・Greenburst Crystal Tear x 1 ・Flame-Shrouding Cracked Tear x 1 ・Rune Arc x 1 ・Cracked Pot x 1 Note: The Erdtree Avatar fought here will drop the Greenburst Crystal Tear and the Flame-Shrouding Cracked Tear when defeated. |
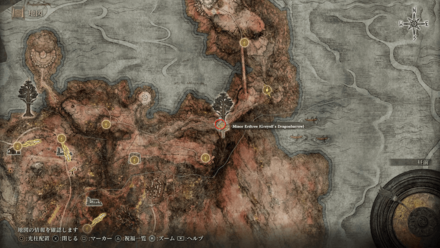
 View Full Image Minor Erdtree Catacombs |
・Ghost Glovewort 4 x 1 ・Grave Glovewort 3 x 3 ・Grave Glovewort 4 x 2 ・Grave Glovewort 5 x 2 ・Mad Pumpkin Head Ashes ・Imp Head (Wolf) Note: This dungeon has a duo Erdtree Burial Watchdog fight, one with a sword and the other a scepter. They will drop the Mad Pumpkin Head Ashes when defeated. |
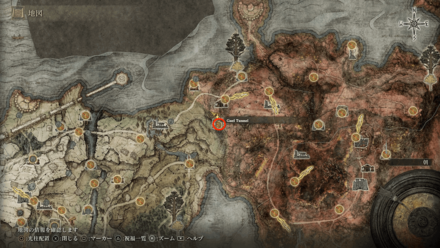
View Full Image Gael Tunnel |
・Moonveil ・Cross-Naginata ・Dragon Heart ・Smithing Stone 4 x 9 ・Somber Smithing Stone 2 x 1 Note: The Magma Wyrm that serves as the boss in this dungeon will drop the Moonveil and the Dragon Heart upon defeat. You can also encounter Alexander at the end of this tunnel if you progressed his questline. |
 View Full Image Fort Gael |
・Flame, Grant Me Strength ・Starscourge Heirloom ・Katar ・Lion's Claw ・Rune Arc x 1 Note: The Lion Guardian will drop the Lion's Claw Ash of War after being defeated. |
 View Full Image Gaol Cave |
・Stonesword Key x 1 ・Rune Arc x 1 ・Somber Smithing Stone 5 x 1 ・Wakizashi ・Pillory Shield ・Putrid Corpse Ashes Note: The Frenzied Duelist boss will drop the Putrid Corpse Ashes after being defeated. |
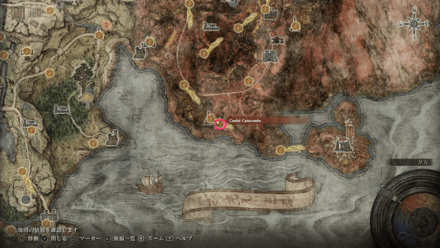 View Full Image Caelid Catacombs |
・Grave Glovewort 3 x 2 ・Grave Glovewort 4 x 3 ・Grave Glovewort 5 x 2 ・Ghost Glovewort 3 x 1 ・Ghost Glovewort 4 x 1 ・Miranda Sprout Ashes ・Kindred of Rot Ashes Note: The Cemetery Shade boss will drop the Kindred of Rot Ashes after being defeated. The Miranda Sprout Ashes are hidden behind an Illusory Wall. |
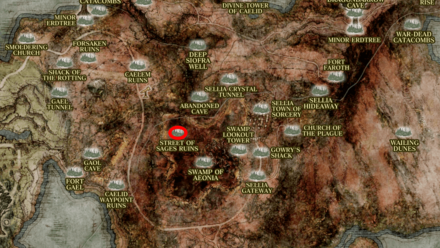 View Full Image Street of Sages Ruins |
・Meteorite Staff ・Perfumer's Traveling Set ・Rock Sling Note: Rock Sling Incantation is in a cellar found in the ruins. |
 View Full Image Swamp of Aeonia |
・Poisonous Mist ・Aeonian Butterfly x 1 ・Somber Smithing Stone 4 x 1 ・Sacred Ring of Light ・Unalloyed Gold Needle ・Commander's Standard Note: Commander O'Neil drops the Unalloyed Gold Needle and the Commander's Standard when defeated. Millicent will invade the area west of Commander O'Neil's arena if she has not yet been given the Unalloyed Gold Needle. |
 View Full Image Swamp Lookout Tower |
・Eternal Darkness |
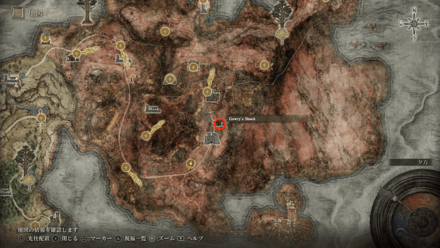 View Full Image Gowry's Shack |
・Flock's Canvas Talisman ・Gowry's Bell Bearing ・Glintstone Stars ・Night Shard ・Night Maiden's Mist ・Pest Threads Note: Gowry can be found here, which will start Millicent's questline. He sells Glintstone Stars, Night Shard, Night Maiden's Mist, and Pest Threads but will drop the Flock's Canvas Talisman and his Bell Bearing when killed. |
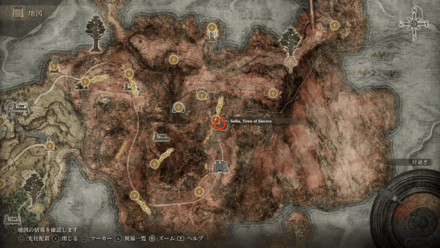 View Full Image Sellia, Town of Sorcery |
・Stonesword Key x 1 ・Poisonbloom x 1 ・Poison Grease x 2 ・Toxic Mushroom x 1 ・Imbued Sword Key ・Redmane Painting ・Double Slash ・Marionette Soldier Birdhelm ・Night Comet ・Staff of Loss ・Cerulean Tear Scarab ・Golden Seed ・Spelldrake Talisman +1 ・Rotten Stray Ashes ・Nox Flowing Sword ・Lusat's Glintstone Staff Note: The Nox Swordstress and the Nox Priest is a duo boss fight that will drop the Nox Flowing Sword when they are defeated. The small chamber in the boss room has a chest containing the Lusat's Glintstone Staff. |
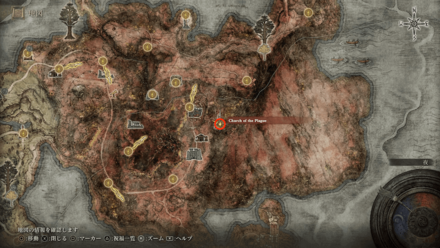 View Full Image Church of the Plague |
・Sacred Tear ・Sacramental Bud ・Prosthesis-Wearer Heirloom Note: You can encounter Millicent here after speaking to Gowry. You can also obtain the Prosthesis-Wearer Heirloom after giving Millicent the repaired Unalloyed Gold Needle. |
Greyoll's Dragonbarrow
| Map Location | What You Can Find |
|---|---|
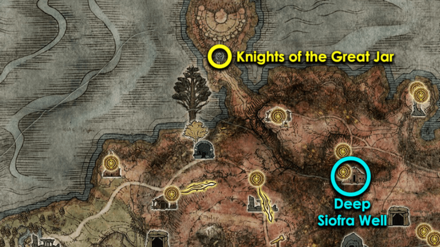 View Full Image Colisseum |
・Great-Jar's Arsenal
Note: You can encounter the Great Jar here. If you complete his challenge, he will award you |
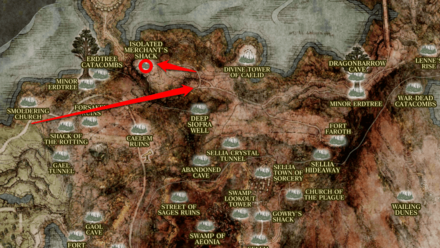 View Full Image Isolated Merchant's Shack |
・Gravity Stone Peddler's Bell Bearing
Note: There is an Isolated Merchant that can be found here. A Bell Bearing Hunter also spawns here at night. Defeating him will make him drop the Gravity Stone Peddler's Bell Bearing. |
 View Full Image Divine Tower of Caelid |
・Faded Erdleaf Flower x 1 ・Dragonwound Grease x 1 ・Stonesword Key x 1 ・Numen's Rune x 1 ・Godslayer Greatsword Note: This is the area where Radahn's Great Rune can be restored. However, the Tower also has a lower area with a Godskin Apostle boss fight. They will drop the complete Godskin Apostle set when they are defeated. |
 View Full Image Deep Siofra Well |
Note: This provides access to the northern area of the Siofra River. |
 View Full Image Abandoned Cave |
・Arteria Leaf x 1 ・Dragonwound Grease x 1 ・Fire Grease x 1 ・Venomous Fang ・Serpent Bow ・Gold Scarab Note: The duo Cleanrot Knight boss fight will drop the Gold Scarab Talisman when they are defeated. |
 View Full Image Sellia Evergaol |
・Battlemage Hugues Ashes
Note: Battlemage Hugues is the boss of this Evergaol. He will drop his Spirit Ashes when he is defeated. |
 View Full Image Sellia Crystal Tunnel |
・Gravity Stone Fan x 6 ・Gravity Stone Chunk x 3 ・Rune Arc x 1 ・Smithing Stone 5 x 8 ・Somber Smithing Stone 4 x 3 ・Smithing Stone 7 x 5 ・Somber Smithing Stone 6 x 1 ・Faithful's Canvas Talisman ・Rock Blaster ・Somberstone Miner's Bell Bearing 1 Note: You can be teleported to this area early in the game by opening a chest at Dragon-Burnt Ruins in Limgrave. |
 View Full Image Sellia Hideaway |
・Crystal Spear ・Stars of Ruin ・Crystal Torrent ・Lusat's Set ・Crystalian Ashes Note: Lusat can be encountered here if Sellen's questline is being followed and will give you Stars of Ruin if you interact with him. Access to him is barred until Sellen gives you the key to dispel the barrier. He will drop his entire armor set at the conclusion of Sellen's questline. |
 View Full Image Fort Faroth |
・Miquella's Lily x 1 ・Golden Rune 12 x 1 ・Radagon's Soreseal ・Dectus Medallion (Right) Note: The Dectus Medallion (Right) is one of two halves that are needed to access the Grand Lift of Dectus, which takes you to Altus Plateau. |
View Full Image Elder Dragon Greyoll |
・Dragon Heart
Note: Greyoll can be seen near Fort Faroth and is immobile. She can be used to farm easy Runes and if timed right, resting at the Fort Faroth Site of Grace before her death animation finishes will respawn her but let you keep your runes, enabling her to be farmed again and again. |
 View Full Image Minor Erdtree |
・Miquella's Lily x 1 ・Rain of Arrows ・Stonebarb Cracked Tear ・Opaline Hardtear Note: The Putrid Avatar will drop both the Stonebarb Cracked Teat and the Opaline Hardtear when its defeated. The entrance to Dragonbarrow Cave can also be found in this area. |
 View Full Image Dragonbarrow Cave |
・Golden Rune 12 x 1 ・Bull-Goat's Talisman ・Flamedrake Talisman +2 Note: The duo Beastmen of Farum Azula will drop the Flamedrake Talisman +2 when defeated. |
 View Full Image War-Dead Catacombs |
・Silver-Pickled Fowl Foot x 1 ・Magic Grease x 3 ・Golden Rune 6 x 1 ・Ghost Glovewort 4 x 1 ・Grave Glovewort 6 x 5 ・Collapsing Stars ・Radahn Soldier Ashes ・Redmane Knight Ogha Ashes ・Golden Seed Note: The Putrid Tree Spirit will drop a Golden Seed and Redmane Knight Ohga's Ashes when defeated. This dungeon can only be accessed through Radahn's arena, so Radahn must be defeated first. |
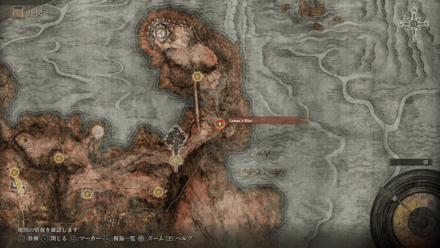 View Full Image Lenne's Rise |
・Silver-Pickled Fowl Foot x 1 ・Magic Grease x 3 ・Golden Rune 6 x 1 ・Miquella's Lily x 1 ・Memory Stone Note: The entrance is sealed but you can actually get inside by using a Spiritspring to get to the roof. From there, drop onto the balcony. |
 View Full Image Bestial Sanctum |
・Golden Seed ・Gargoyle's Black Halberd ・Gargoyle's Blackblade ・Cinquedea ・Dragoncrest Shield Talisman Note: The Cinquedea and the Dragoncrest Shield Talisman can be found in the round edges outside the Bestial Sanctum. This is another way to get to Caelid aside from riding in from Torrent or being warped to the Sellia Crystal Cave. To be transported to the Bestial Sanctum, progress through D's questline. |
Elden Ring Related Guides

Walkthrough and Progression Route
Story Walkthrough
| Base Game Walkthrough | |
|---|---|
| Limgrave & Weeping Peninsula | Liurnia of the Lakes |
| Siofra River | Caelid |
| Ainsel River | Altus Plateau |
| Mountaintops of the Giants | Leyndell, Ashen Capital |
DLC Walkthrough
| Shadow of the Erdtree DLC Walkthrough | |
|---|---|
| What to Do First | What to Do After Rellana |
| What to Do After Messmer | What to Do After Consort Radahn |
Author

Caelid Walkthrough
Please participate in our site
improvement survey
03/2026
improvement survey
03/2026
Would you assist in
improving Game8's site?
improving Game8's site?

×
We are listening to our users' valuable opinions and discussing how to act on them.
The information collected through this survey will be used for the purpose of improving our services. In addition, the information will only be disclosed a part of a statistic in a format that will not allow identification of personal information.
Begin Survey
Not Now
×
Please rate each item regarding Game8.co's Advertisements.
Amount of Ads
Very Dissatisfied
Somewhat Dissatisfied
Fine
Somewhat Satisfied
Highly Satisfied
Placement of Ads
Timing of Ad Display
Ad Loading Speed
Safeness of Ads
Content of Ads
×
Please rate each item regarding Game8.co's Quality of Articles.
Amount of information
Very Dissatisfied
Somewhat Dissatisfied
Fine
Somewhat Satisfied
Highly Satisfied
Frequency of updates
Speed of new information
Accuracy of articles
Understandibility of articles
Readability of sentences
×
Please rate each item regarding Game8.co's Usability of the Site.
Ease of finding information
Very Dissatisfied
Somewhat Dissatisfied
Fine
Somewhat Satisfied
Highly Satisfied
Loading Speed
Use of Color
Font Size
Visibility of Images
Easy to Understand Layout
×
Please rate each item regarding Game8.co's Message Boards, Comments.
Ease of Writing
Very Dissatisfied
Somewhat Dissatisfied
Fine
Somewhat Satisfied
Highly Satisfied
Readability
Ease in Finding Information
Comment Quality
Comment Quantity
Admin Response
×
Please rate each item regarding Game8.co's Site's new design.
Please rate our site's new design
Very Dissatisfied
Somewhat Dissatisfied
Fine
Somewhat Satisfied
Highly Satisfied
Do you think that the website's design change makes the site easier to use?
Has the new design made it easier for you to find information on the site?
Has the new design improved the overall visual appeal of the site?
How would you rate your overall satisfaction with the new design of the site?
×
How likely are you to recommend Game8 to someone you know?
Very Unlikely
0
1
2
3
4
5
6
7
8
9
10
Very Likely
If you have other opinions regarding potential improvement to the website, please share them with us. We would appreciate your honest opinion.
Note: This is a free response section, so you can proceed without entering anything.
Note: Please be sure not to enter any kind of personal information into your response.
Note: Please be sure not to enter any kind of personal information into your response.
×
Thank You
×
Thank you for participating in our survey! Your answers will help us to improve the quality of our website and services.
We hope you continue to make use of Game8.
We hope you continue to make use of Game8.
Close
Rankings
- We could not find the message board you were looking for.
Gaming News


![Everwind Review [Early Access] | The Shaky First Step to A Very Long Journey](https://img.game8.co/4440226/ab079b1153298a042633dd1ef51e878e.png/thumb)

![Monster Hunter Stories 3 Review [First Impressions] | Simply Rejuvenating](https://img.game8.co/4438641/2a31b7702bd70e78ec8efd24661dacda.jpeg/thumb)
Popular Games

Genshin Impact Walkthrough & Guides Wiki
Honkai: Star Rail Walkthrough & Guides Wiki
Umamusume: Pretty Derby Walkthrough & Guides Wiki
Pokemon Pokopia Walkthrough & Guides Wiki
Resident Evil Requiem (RE9) Walkthrough & Guides Wiki
Monster Hunter Wilds Walkthrough & Guides Wiki
Wuthering Waves Walkthrough & Guides Wiki
Arknights: Endfield Walkthrough & Guides Wiki
Pokemon FireRed and LeafGreen (FRLG) Walkthrough & Guides Wiki
Pokemon TCG Pocket (PTCGP) Strategies & Guides Wiki


Recommended Games
Diablo 4: Vessel of Hatred Walkthrough & Guides Wiki
Fire Emblem Heroes (FEH) Walkthrough & Guides Wiki
Yu-Gi-Oh! Master Duel Walkthrough & Guides Wiki
Super Smash Bros. Ultimate Walkthrough & Guides Wiki
Pokemon Brilliant Diamond and Shining Pearl (BDSP) Walkthrough & Guides Wiki
Elden Ring Shadow of the Erdtree Walkthrough & Guides Wiki
Monster Hunter World Walkthrough & Guides Wiki
The Legend of Zelda: Tears of the Kingdom Walkthrough & Guides Wiki
Persona 3 Reload Walkthrough & Guides Wiki
Cyberpunk 2077: Ultimate Edition Walkthrough & Guides Wiki


All rights reserved
ELDEN RING™ & ©BANDAI NAMCO Entertainment Inc. / ©2021 FromSoftware, Inc.
The copyrights of videos of games used in our content and other intellectual property rights belong to the provider of the game.
The contents we provide on this site were created personally by members of the Game8 editorial department.
We refuse the right to reuse or repost content taken without our permission such as data or images to other sites.