Chase Through Shakan Main Quest Guide
This is a complete walkthrough for Chase Through Shakan, which is the sixteenth Main Quest in Shin Megami Tensei V: Vengeance (SMT V). Read on for a detailed guide on Vengeance's newest dungeon, Abdiel Boss Strategy, maps, and encounterable demons!
| ◀ Previous Quest | Next Quest ▶ |
|---|---|
| Qadistu Showdown | The Three Keys (Taito) |
List of Contents
Chase Through the Shakan Walkthrough
Full Walkthrough
※ Select a Tab to see its Walkthrough Guide! ※
| Objective | |
|---|---|
| 1 | Teleport to the Tokyo Metropolitan Building leyline fount and proceed to the objective marker. |
| 2 | Proceed to Shakan through the Magatsu Rail, picking up the Qadistu Talisman and Periapt in the area before leaving. |
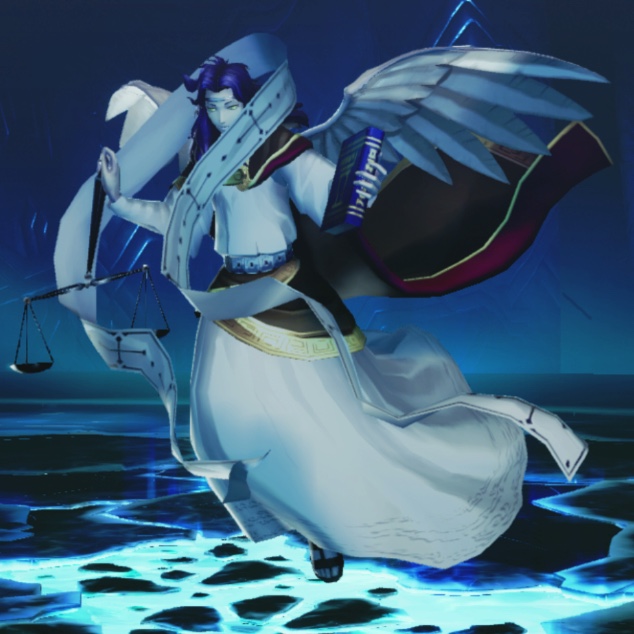
| 3 | Going deeper into the first floor, you will encounter a pair of Dominions and Powers guarding the entrance, engaging you in battle. Both Dominion and Power are weak to Force and Dark. Avoid using Electric and Light attacks on them. |
| 4 | 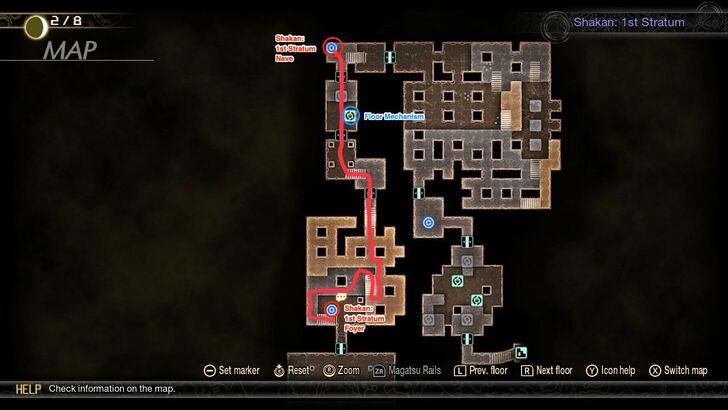 After the battle, proceed forward to find the Shakan: 1st Stratum Nave leyline fount. |
| 5 | 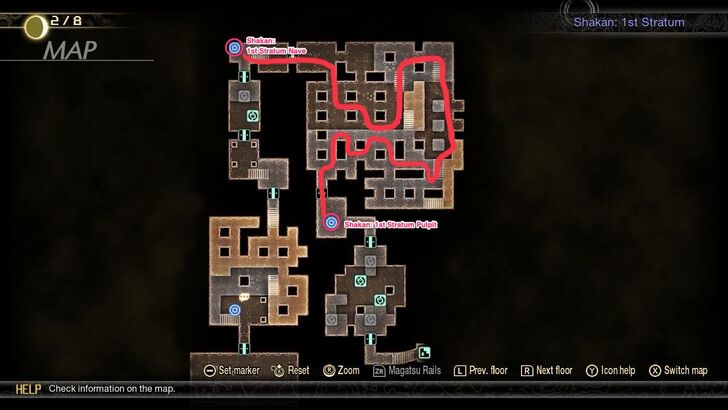 Proceeding from the Nave leyline, you will see Nues, who will block your path around the second part of the 1st Stratum. You will find the 1st Stratum Pulpit leyline fount at the end of the maze. |
| 6 | 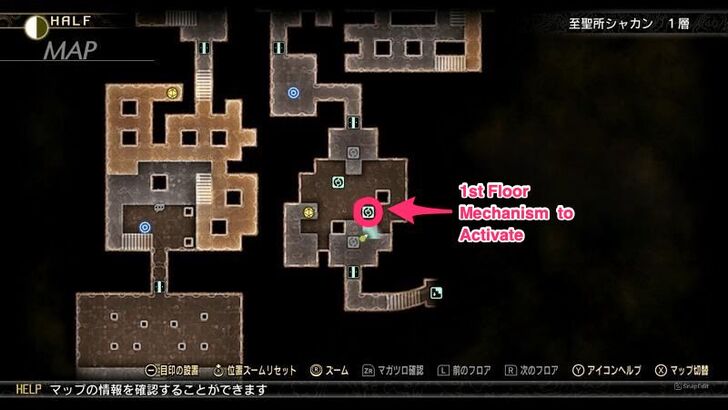 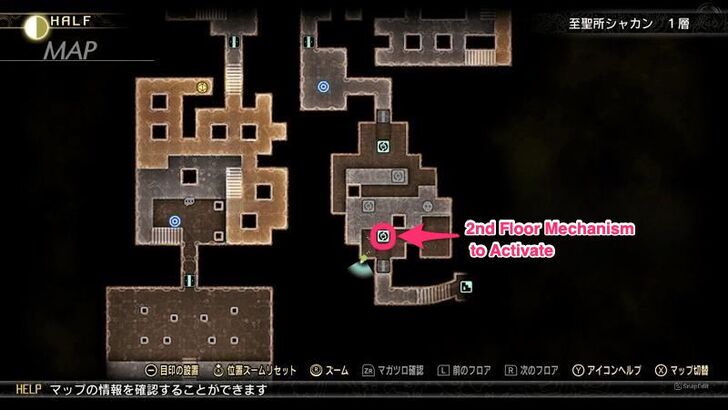 Entering the room from the Pulpit leyline, you will come across the same floor mechanisms you encountered in the first half of the Stratum. Activate them and proceed to the 2nd Stratum. |
| Objective | |
|---|---|
| 7 | 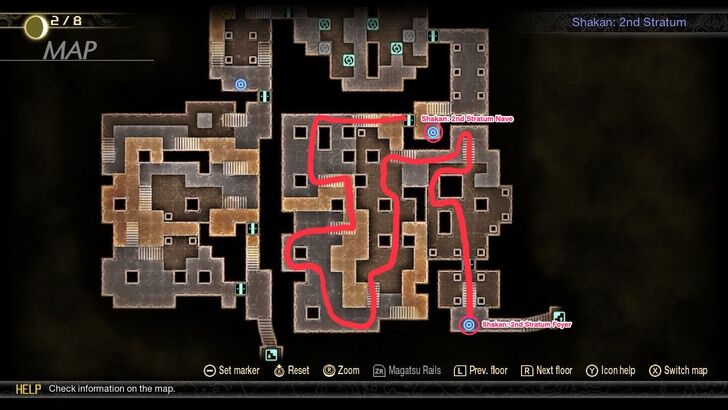 Make your way to the 2nd Stratum Nave leyline fount. |
| 8 | 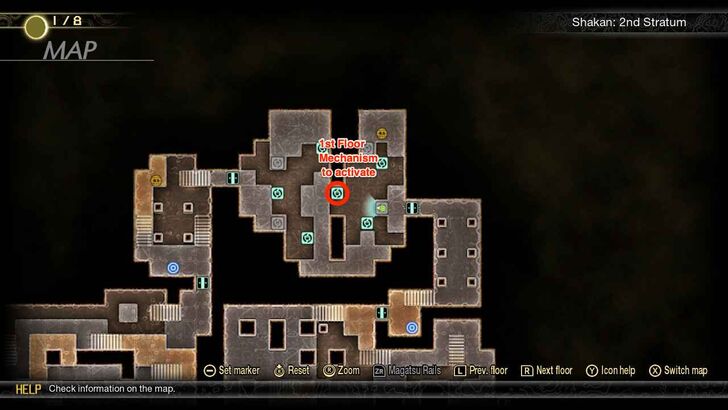 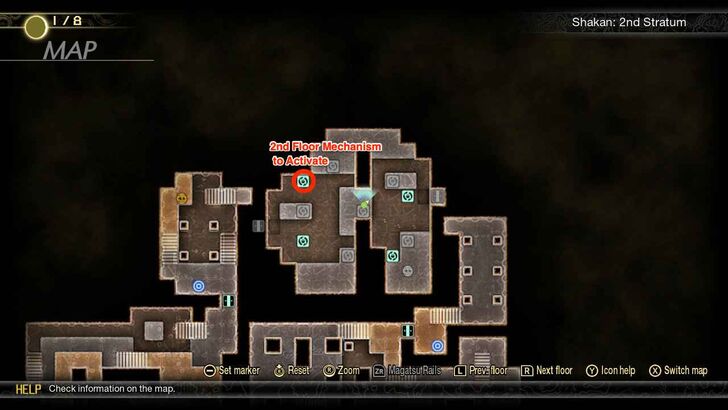 From the 2nd Stratum Nave leyline, proceed to the next room. Activate the mechanism in order and proceed to the next room. |
| 9 |  Continue to proceed south to reach the end of the Second Stratum. Activate the 2nd Stratum Pulpit leyline fount and head downstairs. |
| Objective | |
|---|---|
| 10 | 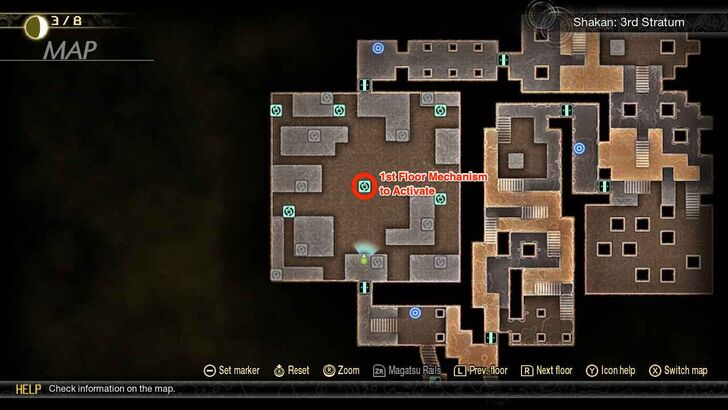 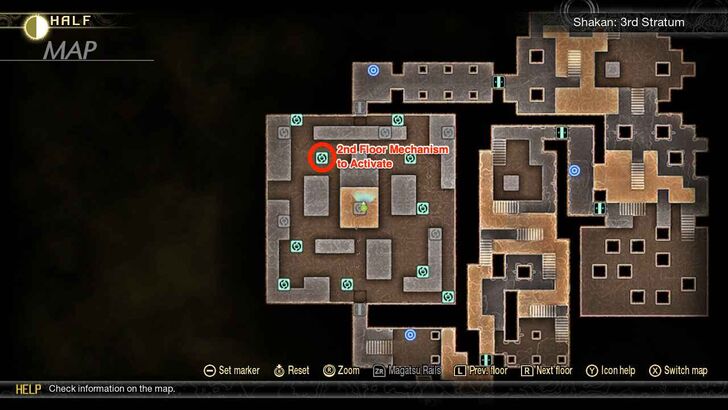 Entering the Third Stratum, you are greeted by another floor mechanism puzzle. Activate the ones indicated above and continue forward. |
| 11 | 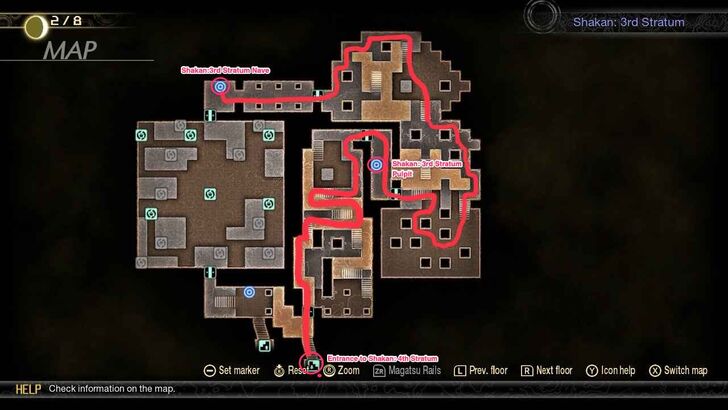 From the 3rd Stratum Nave leyline, make your way through the maze. |
| 12 | Once inside the Fourth Stratum, activate the nearby leyline fount and get ready for a battle against a pair of Cherub. Cherub uses Wind and Light skills and is weak to Dark. |
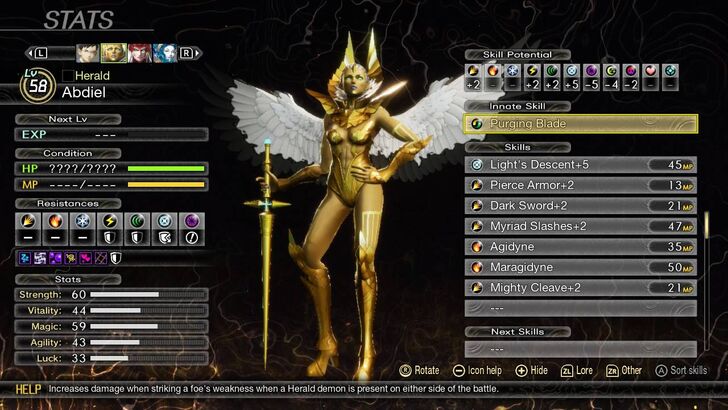
| 12 | After defeating Cherub, save and head inside the inner sanctuary. You will then fight Abdiel after a short cutscene. Abdiel reflects Light skills and is weak against Dark. Spam Mudo skills until she falls. |
⬆️ Jump to Chase Through Shakan Walkthrough ⬆️
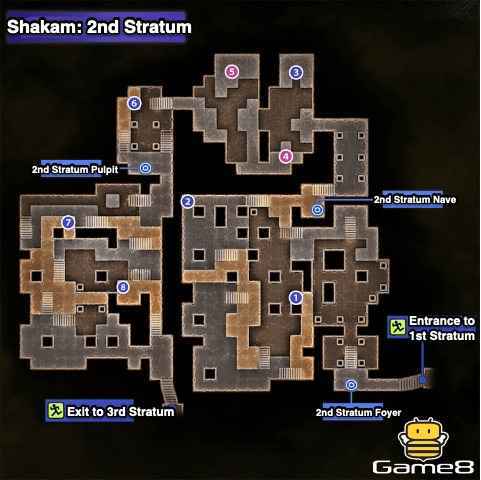
Shakan Maps and Locations
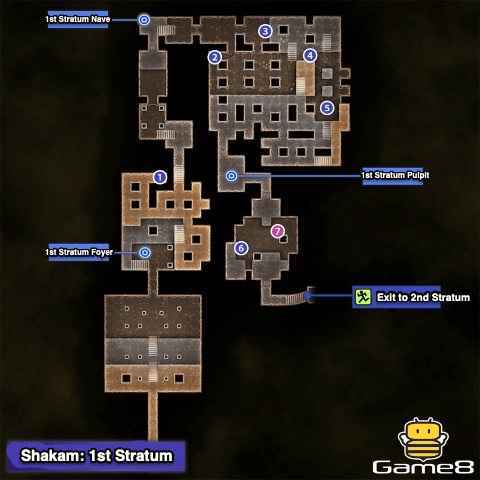
| Number | Item |
|---|---|
| 1 | Attack Mirror |
| 2 | Yurlurgur's Essence, Light Gem, Chakra Drop |
| 3 | Magic Mirror, Amrita Shower, Cu Chulainn's Essence |
| 4 | Light Gem, Dispel Charm |
| 5 | 30,000 Macca |
| 6 | Armaiti's Essence |
| 7 | Grimoire |
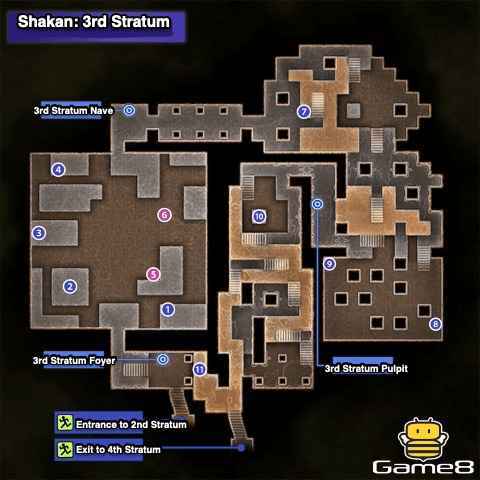
| Number | Item |
|---|---|
| 1 | Efreet's Essence, Critical Gem |
| 2 | Moloch's Essence, Hydra's Essence |
| 3 | Nue's Essence |
| 4 | Chernobog's Essence, Bead Chain |
| 5 | Grimoire |
| 6 | Chakra Pot, Attack Mirror |
| 7 | Purge Charm, Kin-ki's Essence |
| 7 | Gold Card, Muscle Drink, Life Drain Gem |
| Number | Item |
|---|---|
| 1 | Pazuzu's Essence |
| 2 | 20,000 Macca, Flauros's Essence |
| 3 | Ambrosia |
| 4 | Elec Gem |
| 5 | 20,000 Macca |
| 6 | Charge Gem, Concentrate Gem |
| 7 | Vritra's Essence |
| 8 | Balm of Life |
| 9 | Attack MIrror |
| 10 | Whittled Goat |
| 11 | Bead |
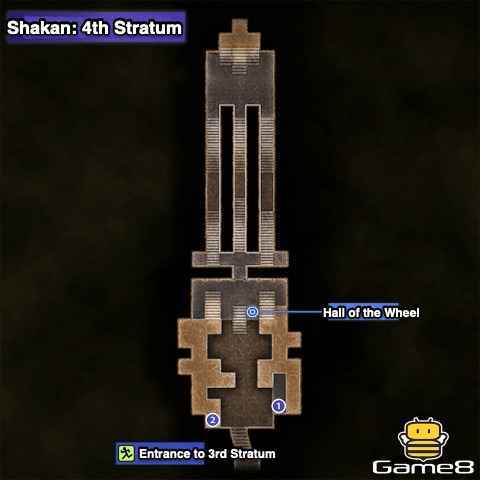 This is the map for the Fourth Stratum Leyline Founts.
| Number | Item |
|---|---|
| 1 | Atavak's Essence |
| 2 | Lavish Demon Box |
Shakan Bosses and Strategies
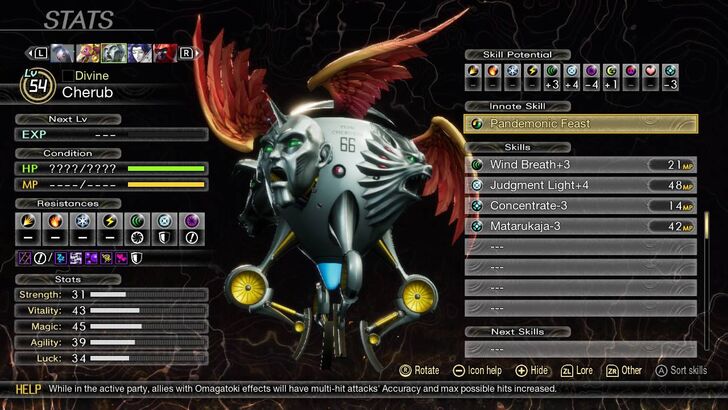
Cherub
| Recommended Level: 53 |
|---|
 |
| Tips and Strategy |
|
|
Bring demons who block Light and Wind
Cherub mainly uses regular Physical attacks and Wind Breath throughout the fight. When he charges up for Magatsuhi, he may use Concentrate and use Judgement Light. Bringing demons who counter Light and Wind will limit his Press Turns and chances to move.
Use Dark skills against Cherub
Spam Dark skills, like Mudoon or Mamudoon to bring the fight to an end fast. We recommend bringing Pazuzu, Anansi or Flauros against Cherub.
Abdiel
| Recommended Level: 58 |
|---|
 |
| Tips and Strategy |
|
|
Bring demons who block Light, Fire and Physical
Abdiel has a lot of moves to dish out damage so bring demons who can block or resist Physical, Light and Fire. When Abdiel charges her Magatsuhi, she will use Maragidyne or her Physical skills to get crits so make sure to use dampeners before her turn.
Use Dark skills against Abdiel
Spam Dark skills, like Mudoon or Mamudoon to bring the fight to an end fast. We recommend bringing Pazuzu, Anansi or Flauros against Abdiel.
Shakan Encounterable Demons
| Demons | Lv | Race |
|---|---|---|
 Orobas Orobas
|
49 | Beast |
 Kin-Ki Kin-Ki
|
49 | Brute |
 Power Power
|
39 | Divine |
 Dakini Dakini
|
46 | Femme |
 Nue Nue
|
49 | Wilder |
 Dominion Dominion
|
50 | Divine |
 Yurlungur Yurlungur
|
50 | Snake |
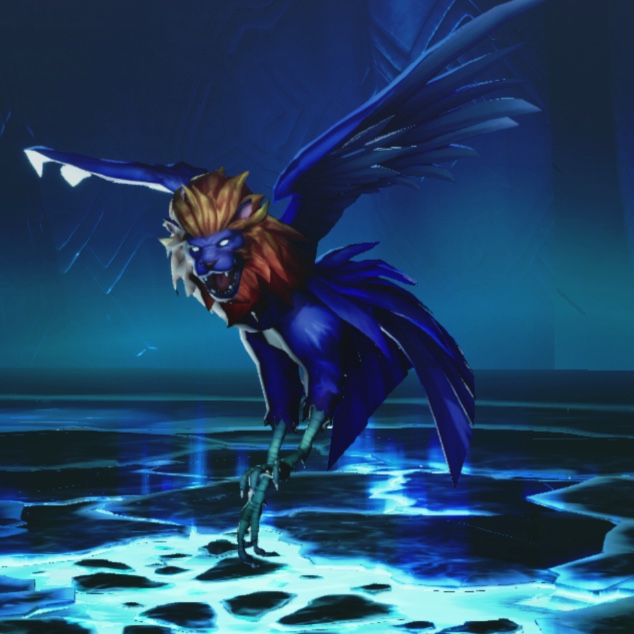 Anzu Anzu
|
48 | Raptor |
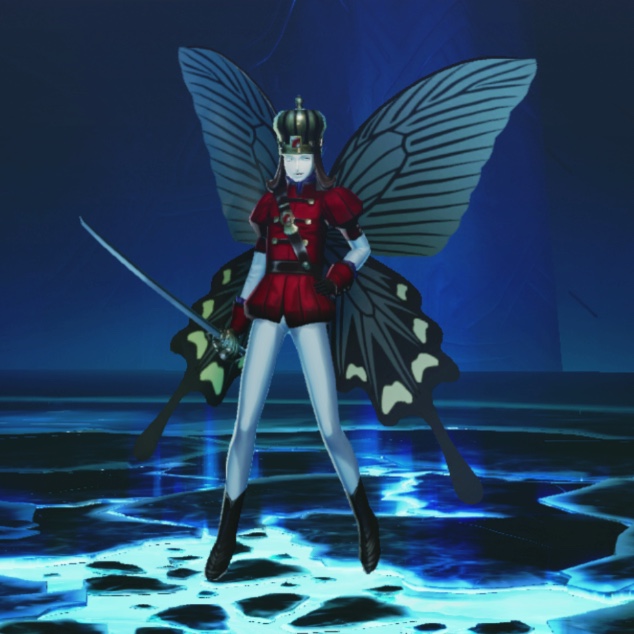 Oberon Oberon
|
47 | Fairy |
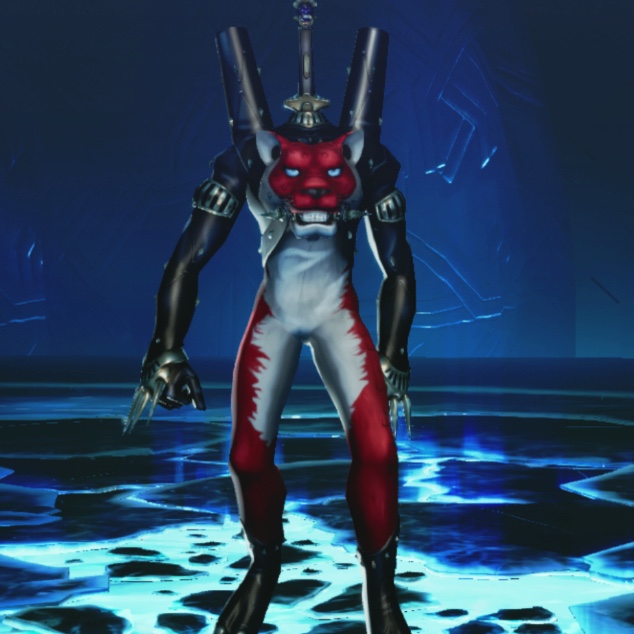 Flauros Flauros
|
50 | Fallen |
 Pazuzu Pazuzu
|
52 | Vile |
 Kaiwan Kaiwan
|
45 | Night |
 Efreet Efreet
|
52 | Yoma |
 Cherub Cherub
|
71 | Divine |
Shin Megami Tensei V: Vengeance Related Guides

Story Walkthrough and Route Guides
SMT V: Vengeance Walkthrough Guides
| Both Story Routes | |
|---|---|
 The Lay of the Land The Lay of the Land |
 The Angel's Trail The Angel's Trail |
 The Angels' Request The Angels' Request |
 Head to Jozoji Temple Head to Jozoji Temple |
 Save the Students Save the Students |
 A Golden Opportunity A Golden Opportunity |
| ↓ Canon of Creation ↓ | ↓ Canon of Vengeance ↓ |
 Chiyoda Chiyoda |
 Investigate the Anomalies in Tokyo Investigate the Anomalies in Tokyo |
 Tokyo Station Tokyo Station |
 Rescue Miyazu Atsuta Rescue Miyazu Atsuta
|
 Demon King's Castle Demon King's Castle |
 Chase Through Shakan Chase Through Shakan
|
| Both Story Routes | |
 The Three Keys The Three Keys
|
 To The Empyrean To The Empyrean
|
 Towards a New World Towards a New World
|
 Endings Guide Endings Guide |
Comment
Author
Shin Megami Tensei V Vengeance (SMTVV) Walkthrough & Guides Wiki
Chase Through Shakan Main Quest Guide
improvement survey
03/2026
improving Game8's site?

Your answers will help us to improve our website.
Note: Please be sure not to enter any kind of personal information into your response.

We hope you continue to make use of Game8.
Rankings
- We could not find the message board you were looking for.
Gaming News
Popular Games

Genshin Impact Walkthrough & Guides Wiki

Honkai: Star Rail Walkthrough & Guides Wiki

Umamusume: Pretty Derby Walkthrough & Guides Wiki

Pokemon Pokopia Walkthrough & Guides Wiki

Resident Evil Requiem (RE9) Walkthrough & Guides Wiki

Monster Hunter Wilds Walkthrough & Guides Wiki

Wuthering Waves Walkthrough & Guides Wiki

Arknights: Endfield Walkthrough & Guides Wiki

Pokemon FireRed and LeafGreen (FRLG) Walkthrough & Guides Wiki

Pokemon TCG Pocket (PTCGP) Strategies & Guides Wiki
Recommended Games

Diablo 4: Vessel of Hatred Walkthrough & Guides Wiki

Cyberpunk 2077: Ultimate Edition Walkthrough & Guides Wiki

Fire Emblem Heroes (FEH) Walkthrough & Guides Wiki

Yu-Gi-Oh! Master Duel Walkthrough & Guides Wiki

Super Smash Bros. Ultimate Walkthrough & Guides Wiki

Pokemon Brilliant Diamond and Shining Pearl (BDSP) Walkthrough & Guides Wiki

Elden Ring Shadow of the Erdtree Walkthrough & Guides Wiki

Monster Hunter World Walkthrough & Guides Wiki

The Legend of Zelda: Tears of the Kingdom Walkthrough & Guides Wiki

Persona 3 Reload Walkthrough & Guides Wiki
All rights reserved
©ATLUS. ©SEGA. All rights reserved. ATLUS and SEGA are registered in the U.S. Patent and Trademark Office. ATLUS, the ATLUS logo, SHIN MEGAMI TENSEI and SMT are either registered trademarks or trademarks of ATLUS Co., Ltd. or its affiliates.
The copyrights of videos of games used in our content and other intellectual property rights belong to the provider of the game.
The contents we provide on this site were created personally by members of the Game8 editorial department.
We refuse the right to reuse or repost content taken without our permission such as data or images to other sites.


![Everwind Review [Early Access] | The Shaky First Step to A Very Long Journey](https://img.game8.co/4440226/ab079b1153298a042633dd1ef51e878e.png/thumb)

![Monster Hunter Stories 3 Review [First Impressions] | Simply Rejuvenating](https://img.game8.co/4438641/2a31b7702bd70e78ec8efd24661dacda.jpeg/thumb)


