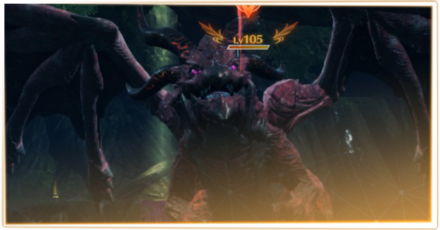
Seraphic Ceratinia Boss Guide
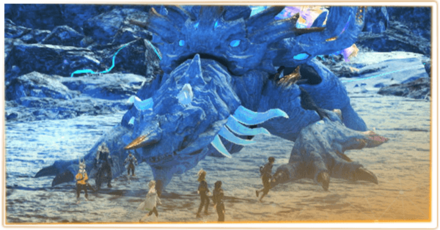
Seraphic Ceratinia is one of the Superbosses in Xenoblade Chronicles 3. Check out where to find Seraphic Ceratinia, how to beat it, and the best party setup against this boss!
List of Contents
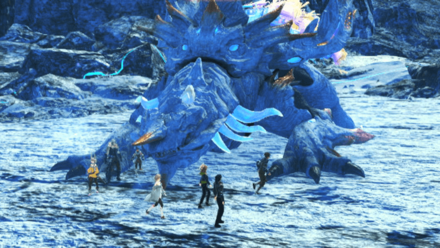
Seraphic Ceratinia Superboss Information
Overview
| Seraphic Ceratinia Lv. | |
|---|---|
 |
|
| Region | Swordmarch |
| Location | The Cavity, Great Sword Upper |
| Type | Terrestrial Life |
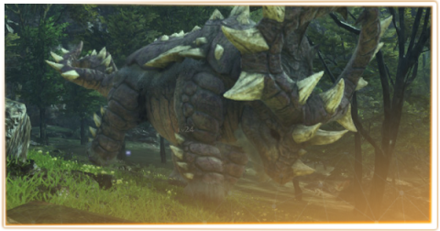
Location
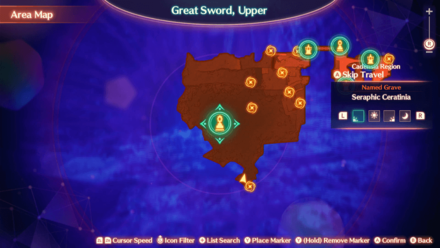
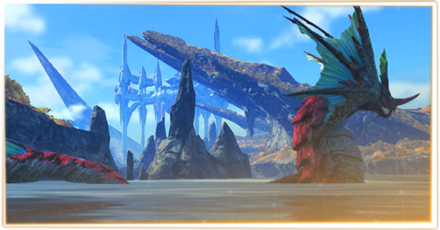
Seraphic Ceratinia can be found deep within The Cavity at the Great Sword, Upper. To reach this area, fast travel to the Dolgan Cliff landmark and cross the bridge you see in front of you. Once across, take the ramp to your right and it should take you to the previously hidden area.
Note: Arriving at the location of Seraphic Ceratinia for the first time will immediately trigger the superboss battle. Make sure you have everything ready before wandering into its area within the Cavity.
How to Beat Seraphic Ceratinia
| Seraphic Ceratinia Boss Guide |
|---|
Use Chain Attacks to Dodge Damage or Heal Party
The easiest way to avoid taking massive amounts of damage during this superboss battle is by using Chain Attacks over and over to dodge damage or even just heal your party back up to full.
Remember, none of your party members can take fatal damage during Chain Attacks. Use this to your advantage if you find your party members getting knocked out or brought down to critical HP.
Use the Ouroboros Chain Order to Deal Damage
Given that this guide makes use of a Soulhacker primary attacker and Nia as the party hero, Chain Attacks will have low TP accumulation during their early Chain Orders.
To deal any kind of damage during Chain Attacks, focus on raising Noah's TP and triggering an Ouroboros Chain Order during the Chain Attack. One way to get a free TP boost is by using Noah, Mio, Eunie, and Sena at Turn 1, and finishing the Chain Order with Nia's Heroic Chain to reactivate them for the next Turn.
Familiarize Yourself With Chain Order Effects

Each of your party members (hero included) will have their own unique Chain Orders during a Chain Attack. For this fight, it is not enough to simply deal damage. Take advantage of the different Chain Order effects to give your party a boost once you exit the Chain Attack.
Always Attack Cancel & Fuse Soulhacker Arts
The greatest advantage of the Soulhacker primary Attacker is its low Art cooldowns. By having easy-to-recharge Arts, you can have a constant stream of Attack Canceled Arts and Fusion Arts being performed during the fight.
With this in mind, remember to always attack cancel and fuse your Arts. By doing so, you will be simultaneously charging your Chain Attack gauge and raising your Ouroboros Interlink level.
Be Wary of Seraphic Ceratinia's High Block Rate
Much like Kilocorn Grandeps, this final superboss will have a high block rate against regular autoattacks. While this may make Attack Cancelling difficult (since Block interrupts regular attack animations), it isn't really a big issue so long as you pay attention to your Attacker's timings during the fight.
Use Burst to Remove the Enraged Status
| Break | Use Phantom Slash while Noah is at Interlink Lv. 3 for easier procs. |
|---|---|
| Topple | Have Lanz equip and use the Heavy Guard Topple Art, Bull Rush, when the boss is broken. |
| Daze | Have Eunie or Mio use Myopic Screen to inflict Daze while the boss is toppled. |
| Burst | Have Mio or Eunie use Way Home to purge the Enraged status of the boss. |
When Enraged, Seraphic Ceratinia will use a lot of powerful AOE attacks including spamming an AOE debuff called Star-Spangled Fan. To prevent it from using these attacks, you can opt to use a Burst combo to remove the Enraged Status.
Note: When setting up a Burst combo, remember to set your team combo to Burst by holding LT and pressing the Right D-Pad button twice. Also, make sure you have Topple, Daze, and Burst reactions equipped to your party members.
Noah's Interlink Lv. 3 Phantom Slash is the Only Reliable Break Art
Seraphic Ceratinia will start resisting regular Break Arts once it enters the Enraged status. In order to reliably apply Break, you will need to use an Interlink Lv. 3 Phantom Slash via Noah's Ouroboros form.
Periodically Regains Engraged Status during the Boss Battle
The Enraged status purge is not permanent. It will continue to return throughout the duration of this superboss battle while also granting Seraphic Ceratinia an increased resistance to Break Arts. Once this happens, focus on whittling down its HP the regular way (Arts, Ouroboros forms, and Chain Attacks) since the Burst Combo is harder to pull off during the latter stages of the fight.
Ally Ouroboros Forms are Unreliable
Another thing to note about setting up the Burst combo is that the AI of your allies tend to be unreliable and unpredictable especially when they start spamming their Ouroboros forms.
Due to how random their behavior tends to be, do keep in mind that pulling off a Burst Combo will get increasingly difficult as the fight progresses.
Beware of Serpahic Ceratinia's Enemy Arts
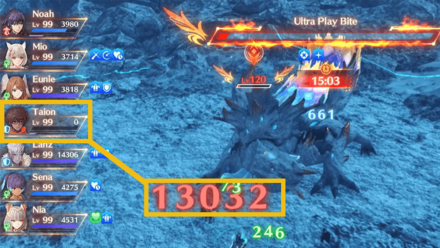
| Ultra Play Bite | A one-hit-kill Art that can deal up to 13,000+ damage in a single hit. |
|---|---|
| Transient Bond | An AOE attack Art that shoots high-damage projectiles at multiple members of your party. |
| Celestial Dash | Dashes forward, dealing damage to anyone in the way and inflicting Break. |
| Star-Spangled Fan | Inflicts the Phys. Def Down and Ether Def. Down debuffs to all of your party members. |
| Sensational Vortex | Creates a tornado of wind in front of the monster, dealing damage and Knockback in an AOE. |
The one enemy Art you have to be wary of is the Ultra Play Bite. Sometimes, Seraphic Ceratinia likes to use it in quick succession, quickly killing off two of your party members in the blink of an eye. If it does this to both of your Defenders, it will be difficult to restabilize the party.
Best Party Setup Against Seraphic Ceratinia
Recommended Leader Setup
 Noah Noah
|
Master Arts | Class Arts |
|---|---|---|
| Enemy & Role Skills | Gems | |
Soulhacker Class is Suited for Very Long and Difficult Battles
Noah's Soulhacker build is best utilized for long, drawn-out fights like this one. Armed with Amazing Growth (which increases the damage you do based on how long the battle is) and low-cooldown, easy-to-charge Arts, this setup is ideal against the large HP pool that Seraphic Ceratinia brings to the table.
Build does not Care about Drawing Aggro
Unlike most Attacker builds that rely on not drawing aggro, this rather lightweight build does not care about getting knocked out. Armed with low-cooldown, easy-to-charge Arts, Noah's Soulhacker simply gets back up and dishes out damage like normal since it is heavily supported by 4 Healers.
Remember, this build is all about fighting a battle of attrition. In order to outlast Seraphic Ceratinia's one-hit-kill attacks and heavy-hitting AOE Arts, you will need an equally durable Attacker in the form of the Soulhacker.
Talent Art Damage Depends on Number of Unique Monsters Defeated
The biggest downside to this build is that the strength of its Talent Art, Final Countdown, relies on the number of Enemy Arts you've Soulhacked. Despite being easy to recharge, the Talent Art only starts dealing a lot of damage once you've defeated and Soulhacked at least 70~80% of XC3's Unique Monsters.
Before fighting Seraphic Ceratinia, make sure you have all the Arts and Skills you need for the build. If you don't, start out on your journey to get all the Soulhacker Arts to power-up and prepare for Aionios' strongest.
All Enemy Arts and How to Unlock
Recommended Party Members
| Member/Class | Role |
|---|---|
 Mio Mio
|
・Can use Way Home - the only Burst Art in the game that isn't a Talent, Ouroboros, or Soulhacker Art. ・Can apply the Fast Recharge buff in a large area. ・Has a great skill that boosts accuracy and evasion for allies. |
 Eunie Eunie
|
・Rank 20 Group Heal on Eunie heals almost everyone to full HP in a single use. ・Skills and items can be specialized to focus on healing and ally revival (in case of wipes). |
 Taion Taion
|
・High TP generation during Chain Attacks means it's easier to get Bravo ratings at Turn 1. ・Defender class ensures you get guaranteed reactivations of high TP party members. |
 Lanz Lanz
|
・Has a naturally high HP pool which is perfect for a duo-Defender lineup. ・Has access to a reliable Topple Art in the form of Bull Rush. |
 Sena Sena
|
・Can have almost 100% uptime on buffs at Rank 20. ・Low cooldown Arts synergizes well with her Cheer Up, Everyone skill that heals all with every Art use by Sena. ・Grants access to the Armor Veil buff which is very important against the almost one-hit-kill attacks of the Superboss. |
 Nia Nia
|
・Provides good overall healing alongside Eunie, with a 15% party damage reduction when ascended. ・Heroic Chain is great for building up TP at Turn 1 of the Chain Attack. ・Chain Order is perfect for reviving fallen allies during a Chain Attack. |
Swap Out Nia for Fiona if Team Has Enough Heals
 Fiona Fiona
|
Chain Order: Charges Chain Attack gauge and grants Power Charge to all allies. Heroic Chain: When chosen, multiplies the TP of all active characters, except self by 120%. |
|---|
If you plan to use Sena as a regular healer (Medic Gunner or Lifesage), you can opt to swap out Nia for Fiona in order to get Signifer buffs for your team. The biggest bonus she will bring to the table will be her Chain Order Completion Bonus (which extends your Chain Attack) and her Rank 10 Gems (if Fiona is ascended).
Note: Fiona will only pay off as a support during this fight if she is ascended to a Rank 20 Signifer. If not, you're usually better off with Nia since her kit is much better at healing and reducing the damage your party takes.
Play Around Your 4 Healers
One of the greatest strengths of this party setup is that you have 4 Healers to fall back on. This allows Attackers like Noah and both your Defenders to always have healing support no matter where they are on the battlefield.
Couple this with the many Fast Recharge Arts used by the Troubadour and Signifer classes and you have a party that can consistently stay up and deal damage throughout the lengthy boss battle.
Equip One Healer and Defender with Brute Memory if Available
| 100% chance to survive a KO with 1HP and five seconds of invincibility (once per battle, does not stack.) |
If you are tackling Seraphic Ceratinia with a party that has a few non-Ascended classes, make sure you have at least 2 Brute Memory accessories equipped. One should be given to a Healer and the other to a Defender in order to avoid wipes (especially when the superboss enters its enraged mode).
Xenoblade Chronicles 3 Related Guides

All Superboss Locations and How to Beat
| Superboss Guides | |
|---|---|
 Kilocorn Grandeps Kilocorn Grandeps |
 Perilwing Ryuho Perilwing Ryuho |
 The King-Kings The King-Kings |
 Dreadwyrm Nizoont Dreadwyrm Nizoont |
 Levialord Empireo Levialord Empireo |
 Seraphic Ceratinia Seraphic Ceratinia |
Author

Seraphic Ceratinia Boss Guide
Rankings
- We could not find the message board you were looking for.
Gaming News

![Death Stranding 2: On The Beach [PC] Review | A Port That Delivers](https://img.game8.co/4447392/15310a0c9aa1b6843bb713b2ea216930.jpeg/show)


Popular Games

Genshin Impact Walkthrough & Guides Wiki
Umamusume: Pretty Derby Walkthrough & Guides Wiki
Crimson Desert Walkthrough & Guides Wiki
Monster Hunter Stories 3: Twisted Reflection Walkthrough & Guides Wiki
Honkai: Star Rail Walkthrough & Guides Wiki
Pokemon Pokopia Walkthrough & Guides Wiki
The Seven Deadly Sins: Origin Walkthrough & Guides Wiki
Wuthering Waves Walkthrough & Guides Wiki
Zenless Zone Zero Walkthrough & Guides Wiki
Arknights: Endfield Walkthrough & Guides Wiki


Recommended Games
Fire Emblem Heroes (FEH) Walkthrough & Guides Wiki
Diablo 4: Vessel of Hatred Walkthrough & Guides Wiki
Cyberpunk 2077: Ultimate Edition Walkthrough & Guides Wiki
Yu-Gi-Oh! Master Duel Walkthrough & Guides Wiki
Super Smash Bros. Ultimate Walkthrough & Guides Wiki
Pokemon Brilliant Diamond and Shining Pearl (BDSP) Walkthrough & Guides Wiki
Elden Ring Shadow of the Erdtree Walkthrough & Guides Wiki
Monster Hunter World Walkthrough & Guides Wiki
The Legend of Zelda: Tears of the Kingdom Walkthrough & Guides Wiki
Persona 3 Reload Walkthrough & Guides Wiki


All rights reserved
© Nintendo / MONOLITHSOFT
The copyrights of videos of games used in our content and other intellectual property rights belong to the provider of the game.
The contents we provide on this site were created personally by members of the Game8 editorial department.
We refuse the right to reuse or repost content taken without our permission such as data or images to other sites.
Ogre with Break Brooch and break master art is actually the most reliable way to break