This survey will take about 1 minute.
Your answers will help us to improve our website.
Diablo Immortal
Crusader Holy Banner Raid Build Guide: Gems, Items, and How to Play
Check out Game8's Diablo 4 Wiki for our latest guides!
☆Diablo 4 Best Builds
☆Diablo 4 Interactive Map
☆Diablo 4 Class Tier List
☆Diablo 4 Story Walkthrough
☆Diablo 4 Leveling Guide
This is a guide to the Holy Banner Raid Build, a PvE Crusader Build in Diablo Immortal! This build grants you and your allies damage auras and guaranteed crits via Conjuration of Light and Holy Banner respectively, making it the perfect build for dungeons and raids. Read on to see this raid build's gear, gems, and skill setups, including a guide on how to play it!
| All Crusader Guides | ||
|---|---|---|
 Crusader Class Overview Crusader Class Overview |
 Best Crusader Builds Best Crusader Builds |
|
Holy Banner Raid Build Profile
Build Profile and Rating
| Holy Banner Raid | |
|---|---|
| Class |
 Crusader Crusader
|
| Build Rating |
|
| Preference | Solo and Party |
| Build Focus | PvE: Dungeon, Elder Rift, Challenge Rift, Raid |
| Stat Priorities |
・Strength ・Vitality ・Critical Hit Damage ・Cooldown Reduction ・Fortitude |
Build Strengths and Weaknesses
| Strengths | Weaknesses |
|---|---|
| ・Strong party-wide damage buffs
・Great single-target damage ・Great AoE damage |
・Skills need proper aim and usage
・No mobility skills |
Build Gear and Skill Summary
| Main Hand | Off Hand | ||
|---|---|---|---|
 Tumult Tumult
|
 Sinkhole Cross Sinkhole Cross
|
||
| Head | Shoulder | Chest | Legs |
| Arrowkeeper | Wind-Blessed Pauldrons |
 Justice Without Favor Justice Without Favor
|
 Leggings of the Consigner Leggings of the Consigner
|
| Set (Vithu's Urges + Grace of the Flagellant) | |||
| Neck | Ring 1 | Ring 2 | Waist |
 Slit Throat Slit Throat
|
 Broken Palm Broken Palm
|
Severed Thumb
|
 Exemplar's Urge Exemplar's Urge
|
| Hands | Feet | ||
 Bloody Hand Bloody Hand
|
Beacon's Urge | ||
| Paragon Trees | |||
| Vanquisher > Treasure Hunter > Survivor > Mastermind | |||
| Skills | |||
|
|
|||
|
|
|
||
|
|
|
||
| Charm Priority | |||
Gem Setup
Normal Gems
Legendary Gems
| Gem Name | Effect |
|---|---|
| + 8 Armor | |
| + 8 Potency | |
| + 80 Life | |
| + 8 Armor Penetration | |
| + 8 Resistance | |
| + 8 Damage |
| Gem Name | Effect |
|---|---|
 Blood-Soaked Jade Blood-Soaked Jade | Increases all damage you deal by up to 8% while at full Life, with a minimum bonus of 4% while at low Life. Increases your Movement Speed by 10%. Take 2% decreased damage while below 50% Life. Unlocks at Rank 3 |
 Bottled Hope Bottled Hope | Using a skill to grant a buff increases the target's damage done and movement speed by 8.00% for 6 seconds. Cannot occur more often than once every 20 seconds per target. Decreases the cooldown on all your skills by 1.5%. Unlocks at Rank 3 |
 Everlasting Torment Everlasting Torment | Your critical hits inflict agony, dealing 16.7% Base damage + 202 every second for 3 seconds. Each enemy can only be affected by this once every 6 seconds. Each nearby enemy afflicted with agony increases your Attack Speed by 1%. Each enemy can only be affected by this once every 6 seconds. Unlocks at Rank 3 |
 Fervent Fang Fervent Fang | Each time you deal damage to an enemy, that enemy now takes 0.80% increased from your attacks, up to a maximum increase of 8% at 10 stacks. All damage you deal to Elite monsters increased by 1.5% Unlocks at Rank 3 |
 Power and Command Power and Command | Power and Command alternates states every 9 seconds. Power increases your Primary Attack damage by 8%. Command increases all other skill damage by 8%. You have a 7.5% chance to dispel a negative effect on you each time Power and Command states alternate. Unlocks at Rank 3 |
 Unity Crystal Unity Crystal | You and all party members take 0.50% reduced damage per additional party member within 6 yards of you. Each nearby party member increases damage done by all party members by 0.3% Unlocks at Rank 3 |
Indicated gem effects only display their base effect. Values will be higher depending on the gem's upgrade level.
Party-Wide Crits and Damage Auras
This build grants strong party-wide buffs in the form of Guaranteed Crits and Damage Auras through Holy Banner and an augmented Conjuration of Light respectively. It also sports solid single-target damage via Falling Sword and Spinning Shield, a potent combo for any raid or dungeon boss in the current version of the game.
Legendary Gear Setup
Our legendary gear offers a good balance of utility and damage improvements, with Conjuration of Light taking most of the slots to ensure maximum efficiency with the party-wide auras it provides.
Holy Banner's ensured via Arrowkeeper at the helm slot. This legendary piece essentially turns you into the banner itself, removing the need for optimal placement during raid and dungeon runs. All you need to worry about is timing.
Tumult and Sinkhole Cross turns Falling Sword and Spinning Shield into DPS machines that can shred any target with proper aim and usage.
Two-Set Combo
This build takes advantage of two sets: Vithu's Urges and Grace of the Flagellant. This combo bolsters your party-wide buffs, while pumping your damage as you hit your targets — a solid blend of damage and utility.
Start off with your two-piece from Vithu's Urges to improve the uptime of your Conjuration of Light auras from the get-go. Fill out the remaining four slots with Grace of the Flagellant.
Normal and Legendary Gems
Normal gems look like your standard blend of damage and survivability, with a little bit more to the latter due to the 3/3 split of your red gems. Tourmalines and Rubies have been equally split as you'd want to pump as much HP as possible for your personal shield from Conjuration of Light, without losing too much DPS.
Your Legendary gems offer the same thing, but cranked to 11. Personal damage is bolstered through Blood-soaked Jade, Everlasting Torment, Fervent Fang, and Power and Command.
Bottled Hope and Unity Crystal, on the other hand, improve your party-wide buffs for offense and defense respectively.
Stats and Paragon Priorities
Attribute Priorities
| Strength | Your main stat should always be your top priority! This is the most efficient way to pump your DPS regardless of your build. |
|---|---|
| Vitality | HP in Diablo Immortal matters. Increase your vitality as much as possible to ensure survival in higher level content. |
| Critical Hit Damage | Your Holy Banner already gives you guaranteed crits for its entire duration. Increase its effectiveness by pumping as much Critical Hit Damage as possible. |
| Cooldown Reduction | Your skills have considerable cooldowns. Investing in Cooldown Reduction lets you activate your skills more frequently, leading to more DPS. |
| Fortitude | Fortitude is a great skill to pump your armor and armor penetration at the same time. |
Paragon Priorities
| Vanquisher > Treasure Hunter > Survivor > Mastermind |
|---|
As with most builds, Vanquisher is a solid starter tree that gives you a much-needed boost in DPS, while increasing your HP through its only life node. Once you hit 50, start investing in Treasure Hunter and grab the Swift Learner node as soon as possible to gain more XP from elite packs, which you will find more of as you clear higher-level rifts. Once you start feeling the pain at higher levels, start getting a few life and armor nodes from the Survivor tree.
Lastly, the Mastermind tree grants you insanely good party-wide boons depending on your party composition. This is a great tree to invest in as soon as possible since almost all forms of PvE content in the Hell I and above are group-based.
How to Play
| |
Coordinate With Your Party
Coordination with your party is important. A poorly coordinated team results in inefficient banners and damage auras, wasting your Holy Banner and Conjuration of Light's potential to help clear the raid as fast as possible.
Identify the optimal time to activate your banners before starting the raid. Discussing the party's cooldowns and skills will help determine the correct timing. The start of a raid is guaranteed to be one of them, as everyone's skills are ready to go at this stage.
Be mindful of your party's positions as well! This is will ensure that your Conjuration of Light is applied to as many party members as possible — if not all of them. Anyone outside of your skill's activation radius (the huge circle that spawns around you as soon as you press the skill) will not receive the buff.
Proper Positioning is Paramount
You need to be mindful of your own positioning at all times too! Remember that this build has limited mobility, which can punish you and the raid severely if you overextend or step in the wrong spot for mechanics.
Poor positioning will also lead to inefficient buff applications as well, so make sure that you're standing at the right spots at the right times to bolster the party's damage effectively.
Make sure your Raid's DPS is in your party!
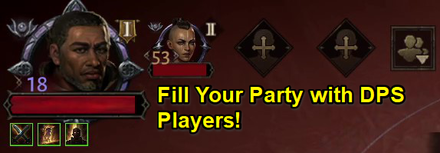
It is important to note that Holy Banner and Conjuration of Light's buffs only affect those within your immediate party (top left roster). Raid members that are not part of your party will not receive buffs regardless if they're in range or not. Make sure your raid's top DPS players are inside your immediate party for maximum damage.
It is currently unknown whether buffs from other classes behave the same way, or if this was also an intentional design choice.
Aim Spinning Shield and Falling Sword Properly
Do not waste your Spinning Shields and Falling Swords. Group mobs up closely to ensure maximum effectiveness for both skills. As far as bosses are concerned, learn their movesets and determine times where they stand still for a significant amount of time before chucking your skills out.
Use Ultimates Wisely
Sacred Fire's ultimate is extremely powerful and can turn the tide in most scenarios. This ultimate takes a while to charge up, so only use this under two conditions to ensure its maximum value:
- When your HP is low and in need of an emergency shield.
- When you have Holy Banner up.
Diablo Immortal Related Guides
Builds By Class
| Diablo Immortal Builds | ||
|---|---|---|
All Crusader Builds
| Diablo Immortal Builds | ||
|---|---|---|
 Crusader Leveling Guide Crusader Leveling Guide
(PvE) |
 Draw and Quarter Challenge Rift Draw and Quarter Challenge Rift
(PvE) |
 Draw and Quarter PvP Draw and Quarter PvP
(PvP) |
 Holy Banner Raid Holy Banner Raid
(PvE) |
||
Author

Crusader Holy Banner Raid Build Guide: Gems, Items, and How to Play
Please participate in our site
improvement survey
03/2026
improvement survey
03/2026
Would you assist in
improving Game8's site?
improving Game8's site?

×
We are listening to our users' valuable opinions and discussing how to act on them.
The information collected through this survey will be used for the purpose of improving our services. In addition, the information will only be disclosed a part of a statistic in a format that will not allow identification of personal information.
Begin Survey
Not Now
×
Please rate each item regarding Game8.co's Advertisements.
Amount of Ads
Very Dissatisfied
Somewhat Dissatisfied
Fine
Somewhat Satisfied
Highly Satisfied
Placement of Ads
Timing of Ad Display
Ad Loading Speed
Safeness of Ads
Content of Ads
×
Please rate each item regarding Game8.co's Quality of Articles.
Amount of information
Very Dissatisfied
Somewhat Dissatisfied
Fine
Somewhat Satisfied
Highly Satisfied
Frequency of updates
Speed of new information
Accuracy of articles
Understandibility of articles
Readability of sentences
×
Please rate each item regarding Game8.co's Usability of the Site.
Ease of finding information
Very Dissatisfied
Somewhat Dissatisfied
Fine
Somewhat Satisfied
Highly Satisfied
Loading Speed
Use of Color
Font Size
Visibility of Images
Easy to Understand Layout
×
Please rate each item regarding Game8.co's Message Boards, Comments.
Ease of Writing
Very Dissatisfied
Somewhat Dissatisfied
Fine
Somewhat Satisfied
Highly Satisfied
Readability
Ease in Finding Information
Comment Quality
Comment Quantity
Admin Response
×
Please rate each item regarding Game8.co's Site's new design.
Please rate our site's new design
Very Dissatisfied
Somewhat Dissatisfied
Fine
Somewhat Satisfied
Highly Satisfied
Do you think that the website's design change makes the site easier to use?
Has the new design made it easier for you to find information on the site?
Has the new design improved the overall visual appeal of the site?
How would you rate your overall satisfaction with the new design of the site?
×
How likely are you to recommend Game8 to someone you know?
Very Unlikely
0
1
2
3
4
5
6
7
8
9
10
Very Likely
If you have other opinions regarding potential improvement to the website, please share them with us. We would appreciate your honest opinion.
Note: This is a free response section, so you can proceed without entering anything.
Note: Please be sure not to enter any kind of personal information into your response.
Note: Please be sure not to enter any kind of personal information into your response.
×
Thank You
×
Thank you for participating in our survey! Your answers will help us to improve the quality of our website and services.
We hope you continue to make use of Game8.
We hope you continue to make use of Game8.
Close
Rankings
- We could not find the message board you were looking for.
Gaming News


![Monster Hunter Stories 3 Review [First Impressions] | Simply Rejuvenating](https://img.game8.co/4438641/2a31b7702bd70e78ec8efd24661dacda.jpeg/thumb)
Popular Games

Genshin Impact Walkthrough & Guides Wiki
Honkai: Star Rail Walkthrough & Guides Wiki
Umamusume: Pretty Derby Walkthrough & Guides Wiki
Pokemon Pokopia Walkthrough & Guides Wiki
Resident Evil Requiem (RE9) Walkthrough & Guides Wiki
Monster Hunter Wilds Walkthrough & Guides Wiki
Wuthering Waves Walkthrough & Guides Wiki
Arknights: Endfield Walkthrough & Guides Wiki
Pokemon FireRed and LeafGreen (FRLG) Walkthrough & Guides Wiki
Pokemon TCG Pocket (PTCGP) Strategies & Guides Wiki


Recommended Games
Diablo 4: Vessel of Hatred Walkthrough & Guides Wiki
Cyberpunk 2077: Ultimate Edition Walkthrough & Guides Wiki
Fire Emblem Heroes (FEH) Walkthrough & Guides Wiki
Yu-Gi-Oh! Master Duel Walkthrough & Guides Wiki
Super Smash Bros. Ultimate Walkthrough & Guides Wiki
Pokemon Brilliant Diamond and Shining Pearl (BDSP) Walkthrough & Guides Wiki
Elden Ring Shadow of the Erdtree Walkthrough & Guides Wiki
Monster Hunter World Walkthrough & Guides Wiki
The Legend of Zelda: Tears of the Kingdom Walkthrough & Guides Wiki
Persona 3 Reload Walkthrough & Guides Wiki


All rights reserved
©2022 BLIZZARD ENTERTAINMENT, INC. ALL RIGHTS RESERVED.
All trademarks referenced herein are the properties of their respective owners.
The copyrights of videos of games used in our content and other intellectual property rights belong to the provider of the game.
The contents we provide on this site were created personally by members of the Game8 editorial department.
We refuse the right to reuse or repost content taken without our permission such as data or images to other sites.