 Story Walkthrough
 Bosses
 Side Quests
 Queen's Blood
 Minigames
 Characters
 Romance
 World Intel
 Materia
 Weapons
 Armor
Armor Accessories
 Limit Breaks
 Folio Skill Tree
 Chocobos
 Maps and Locations
 Combat Simulator
 Crafting Materials
 Enemies
 News and Game Info
 Demo Walkthrough
This survey will take about 1 minute.
Your answers will help us to improve our website.
FF7 Rebirth
Should You Pay 2,000 Gil to the Bandits?
The final protorelic site in the Grasslands in Final Fantasy 7 Rebirth (FF7 Rebirth) will prompt players to pay 2,000 gil to a group of bandits. Read on to find out if you need to pay 2,000 gil, what happens if you don't, and how to get 2,000 gil.
List of Contents
Should You Pay 2,000 Gil?
Yes, You Should

In order to acquire the final protorelic of the Grasslands region, you must first acquire 2,000 gil and hand it over. Should you be short on funds or refuse to pay, the protorelic will remain unclaimed.
Even after refusing, you will not be able to fight the bandits. The only option is to pay up.
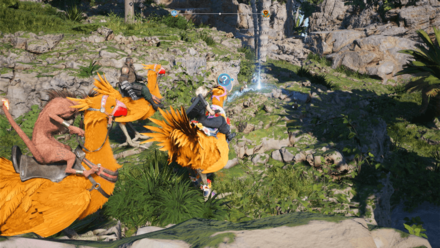
Protorelic Site Location
Northern Grasslands
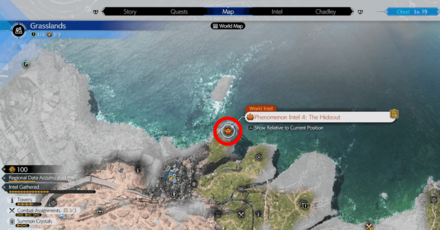
After acquiring all three protorelics, the fourth and final protorelic site will be marked on your map by Chadley. It is located to the north of the Grasslands.
How to Get 2,000 Gil
Sell Unused Items and Gear
Selling items is the fastest way of acquiring gil as you won't have to look far and wide, and you won't have to fight hordes of enemies.
Should you have any materials, equipment, or Materia that you no longer need, sell them to shops. Not only will you gain money, but you'll also declutter your inventory in the process.
Farm for Gil Through Battles
Another effective way of farming gil is by engaging in fights and emerging victorious. Simply optimize and build your teammates properly, and engage in as many fights as you can until you reach 2,000 Gil.
Open Chests and Dig for Treasure
Chests and Shinra boxes sometimes contain gil. Should you spot these in the wild, be sure to open and shatter them, respectively.
Alternatively, should your Chocobo pick up the scent of something buried, follow it and dig it up. Sometimes, Chocobos will unearth gil instead of items and materials.
Rewards for Paying 2,000 Gil
Grasslands Final Protorelic for World Intel
As a reward for paying 2,000 gil, the bandits will willingly hand over the final protorelic of the Grasslands region, contributing to the World Intel that Chadley needs for his research.
World Intel can be used by Chadley to develop new Materia and even create Combat Simulations to provide you with Summon Materias!
FF7 Rebirth Related Guides

All FF7 Rebirth Guides

Beginner's Guide and Getting Started
Gameplay System Tips and Tricks
Character Stat Guides
Mount Guides
| Mount Guides | |
|---|---|
| All Mounts and How to Unlock | How to Get the Buggy |
| How to Get the Tiny Bronco | How to Get the Wheelie (Segway) |
Farming Guides
Post-Game Guides
Story Guides
Comment
Author

Should You Pay 2,000 Gil to the Bandits?
Please participate in our site
improvement survey
03/2026
improvement survey
03/2026
Would you assist in
improving Game8's site?
improving Game8's site?

×
We are listening to our users' valuable opinions and discussing how to act on them.
The information collected through this survey will be used for the purpose of improving our services. In addition, the information will only be disclosed a part of a statistic in a format that will not allow identification of personal information.
Begin Survey
Not Now
×
Please rate each item regarding Game8.co's Advertisements.
Amount of Ads
Very Dissatisfied
Somewhat Dissatisfied
Fine
Somewhat Satisfied
Highly Satisfied
Placement of Ads
Timing of Ad Display
Ad Loading Speed
Safeness of Ads
Content of Ads
×
Please rate each item regarding Game8.co's Quality of Articles.
Amount of information
Very Dissatisfied
Somewhat Dissatisfied
Fine
Somewhat Satisfied
Highly Satisfied
Frequency of updates
Speed of new information
Accuracy of articles
Understandibility of articles
Readability of sentences
×
Please rate each item regarding Game8.co's Usability of the Site.
Ease of finding information
Very Dissatisfied
Somewhat Dissatisfied
Fine
Somewhat Satisfied
Highly Satisfied
Loading Speed
Use of Color
Font Size
Visibility of Images
Easy to Understand Layout
×
Please rate each item regarding Game8.co's Message Boards, Comments.
Ease of Writing
Very Dissatisfied
Somewhat Dissatisfied
Fine
Somewhat Satisfied
Highly Satisfied
Readability
Ease in Finding Information
Comment Quality
Comment Quantity
Admin Response
×
Please rate each item regarding Game8.co's Site's new design.
Please rate our site's new design
Very Dissatisfied
Somewhat Dissatisfied
Fine
Somewhat Satisfied
Highly Satisfied
Do you think that the website's design change makes the site easier to use?
Has the new design made it easier for you to find information on the site?
Has the new design improved the overall visual appeal of the site?
How would you rate your overall satisfaction with the new design of the site?
×
How likely are you to recommend Game8 to someone you know?
Very Unlikely
0
1
2
3
4
5
6
7
8
9
10
Very Likely
If you have other opinions regarding potential improvement to the website, please share them with us. We would appreciate your honest opinion.
Note: This is a free response section, so you can proceed without entering anything.
Note: Please be sure not to enter any kind of personal information into your response.
Note: Please be sure not to enter any kind of personal information into your response.
×
Thank You
×
Thank you for participating in our survey! Your answers will help us to improve the quality of our website and services.
We hope you continue to make use of Game8.
We hope you continue to make use of Game8.
Close
Rankings
- We could not find the message board you were looking for.
Gaming News


![Monster Hunter Stories 3 Review [First Impressions] | Simply Rejuvenating](https://img.game8.co/4438641/2a31b7702bd70e78ec8efd24661dacda.jpeg/thumb)
Popular Games

Genshin Impact Walkthrough & Guides Wiki
Honkai: Star Rail Walkthrough & Guides Wiki
Umamusume: Pretty Derby Walkthrough & Guides Wiki
Pokemon Pokopia Walkthrough & Guides Wiki
Resident Evil Requiem (RE9) Walkthrough & Guides Wiki
Monster Hunter Wilds Walkthrough & Guides Wiki
Wuthering Waves Walkthrough & Guides Wiki
Arknights: Endfield Walkthrough & Guides Wiki
Pokemon FireRed and LeafGreen (FRLG) Walkthrough & Guides Wiki
Pokemon TCG Pocket (PTCGP) Strategies & Guides Wiki


Recommended Games
Diablo 4: Vessel of Hatred Walkthrough & Guides Wiki
Fire Emblem Heroes (FEH) Walkthrough & Guides Wiki
Yu-Gi-Oh! Master Duel Walkthrough & Guides Wiki
Super Smash Bros. Ultimate Walkthrough & Guides Wiki
Pokemon Brilliant Diamond and Shining Pearl (BDSP) Walkthrough & Guides Wiki
Elden Ring Shadow of the Erdtree Walkthrough & Guides Wiki
Monster Hunter World Walkthrough & Guides Wiki
The Legend of Zelda: Tears of the Kingdom Walkthrough & Guides Wiki
Persona 3 Reload Walkthrough & Guides Wiki
Cyberpunk 2077: Ultimate Edition Walkthrough & Guides Wiki


All rights reserved
© SQUARE ENIX CO., LTD. All Rights Reserved.
CHARACTER DESIGN: TETSUYA NOMURA/ROBERTO FERRARI
LOGO ILLUSTRATION: © 1997 YOSHITAKA AMANO
The copyrights of videos of games used in our content and other intellectual property rights belong to the provider of the game.
The contents we provide on this site were created personally by members of the Game8 editorial department.
We refuse the right to reuse or repost content taken without our permission such as data or images to other sites.