Lament of the Damned Walkthrough and Rewards
Lament of the Damned is a Side Quest unlocked during Chapter 12 of Final Fantasy 7 Rebirth (FF7 Rebirth). Read on to learn how to unlock Lament of the Damned, how to clear the combat simulator trials, beat Dranabarga and obtain Aerith's Plumrose Rod, as well as other available rewards.
List of Contents
How to Unlock Lament of the Damned
Reach Chapter 12

Reach the beginning of Chapter 12 of the main storyline in the game, where fast travel to all other regions is unlocked. Fast travel to Nibel and accept the quest at the Community Noticeboard.
Chapter 12: A Golden Key Walkthrough
How to Complete Lament of the Damned
- Enter Shinra Manor
- Go to Mako-Research Facility - Sub Basement.
- Complete the Combat Simulator Challenges.
- Defeat Dranabarga
Enter Shinra Manor
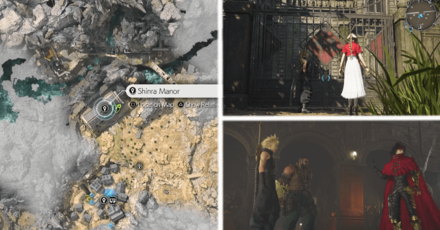
After talking to the Supervisor, head to Shinra Manor north of Nibelheim. Entering the manor will play a cutscene, with Vincent Valentine making an appearance. He will then help Cloud and the party investigate the "haunted" establishment.
Go to the Mako Research Facility - Sub-Basement
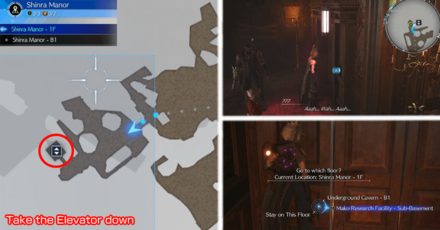
Head to the left and take the elevator down to the Mako Research Facility - Sub-Basement. As soon as you reach it, there will be a rest stop, a Maghnata Automat, and a Vending Machine close by, so make use of it before pressing on.
Follow Vincent until you reach a platform that will take you further down the Sub-Basement. Use the keycard he will hand over to activate this platform, which will lead you to a long hallway. Follow this hallway until you reach a circular room.
Complete the Combat Simulator Challenges
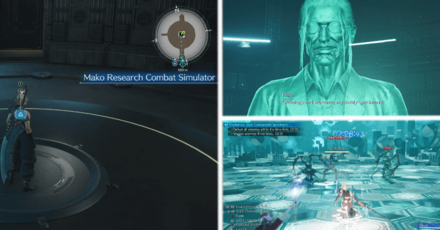
In the middle of the room is a combat simulator, similar to Chadley's. However, instead of our ally intern appearing, a hologram recording of Professor Hojo will appear, who will ask Cloud and the party to participate in a series of combat simulations. Finish these simulations to advance the quest!
List of Enemies, Weaknesses, and How to Stagger Them
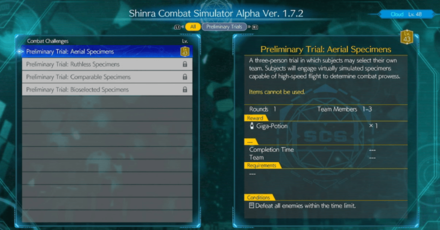
There will be a couple of combat trials you will participate in to complete Hojo's challenge. These trials will have objectives within them, which will be mostly the following:
- Defeat enemies within the time limit of 2 minutes
- Stagger enemies
Listed below are the Preliminary Trials, the enemies and their weaknesses, and the proper way to stagger them.
| Preliminary Trial | Enemies | Tips |
|---|---|---|
| Aerial Specimens | Scrutineye x4 | ・Weak to |
| Ruthless Specimens | Amalgam x3 | ・Weak to ・Can resurrect itself up to two times unless affected by a |
| Adjudicator x1 | ・Weak to ・Goes into Pressured State after taking a certain amount of DMG. ・Pressuring this enemy with Physical damage will make them immune to Physical attacks. ・Pressuring this enemy with Magic damage will make them immune to Magic attacks. |
|
| Comparable Specimens | Necrotic Entity x3 | ・Hitting this enemy with powerful Abilities while they are casting a spell will easily Pressure them. |
| Yin & Yang x1 | ・ Becomes pressured when either head is incapacitated by dealing enough damage. Although the remaining head will go berserk. |
|
| Bioselected Specimens | Adjudicator x1 | ▲ Refer to Ruthless Specimens Tips |
| Yin & Yang x1 | ▲ Refer to Comparables Specimen Tips |
Defeat Dranabarga with Ice

Dranabarga is an enemy who can be easily pressured through the use of Ice attacks. Pressuring Dranabarga while its using Subdue will quickly fill up the Stagger meter. Try to save up an ATB bar and use a quick ability like Triple Slash when it uses Subdue.
All of Dranabarga's attacks are easily avoided by dodging backwards. Build up ATB with quick attacks, back off, and cast Ice spells. When it has been staggered, unleash your Limit Breaks and Synergy abilities to deal massive damage.
Note that physical attacks from behind the boss simply bounce off. Attempt to attack from the front or sides instead.
Check Out New Combat Challenges
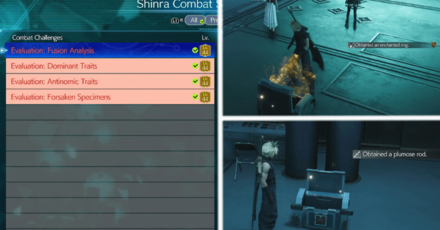
After defeating Dranabarga, check out the combat simulator for new challenges under the Evaluations tab. Completing these will unlock a secret room full of items, the Enchanted Ring accessory, and a weapon for Aerith.
The enemies here are similiar to the initial Preliminary Trial ones, except for the last one; a simulation of the Diabolic Variant.
| Evaluations | Enemies |
|---|---|
| Fusion Analysis | Amalgam x2 |
| Necrotic Entity x2 | |
| Dominant Traits | Yin & Yang x2 |
| Adjudicator x1 | |
| Antinomic Traits | Yin & Yang x1 |
| Adjudicator x2 | |
| Forsaken Specimens | Diabolic Variant x1 ▶ How to Beat Diabolic Variant |
Lament of the Damned Rewards
List of Rewards
| Rewards for Completing Lament of the Damned |
|---|
| ▸ The Art of Swordplay Vol. VI (10 SP for Cloud) ▸ 10 Party EXP ▸ Player EXP (based on current level) |
Increase Favorability With Barret

Completing Lament of the Damned will also increase your friendship with Barret. This will affect the events that will occur when you visit the Gold Saucer later in the game.
Romance and Relationship Guide
Aerith's Weapon: Plumose Rod
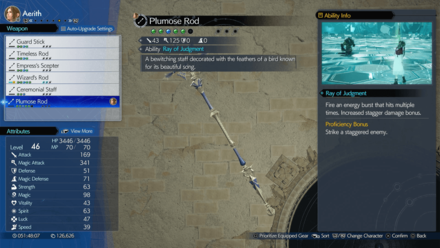
You can unlock the Plumose Rod for Aerith after completing Mako Research Combat Simulator challenges. This includes all challenges during the Lament of the Damned sidequest and after completing it.
Plumose Rod Abilities, Stats, and Skills
Sharpshooter's Companion Vol. XIV Dropped by Dranabarga in Hard Mode
While playing in Hard Mode, the Dranabarga at the end of the quest will drop the Sharpshooter's Companion Vol. VII for Barret. You can access Hard Mode after completing your first playthrough of the game in any difficulty.
Lament of the Damned Information
Information and Overview
| Basic Information | |||||
|---|---|---|---|---|---|
 Recommended Level: 44 |
|||||
| Availability | Region | Side Quest Giver | |||
| Chapter 12 | Nibel | Supervisor | |||
| Unlock Requirement | Reach Chapter 12, and arrive at Costa del Sol. | ||||
FF7 Rebirth Related Guides

Side Quest Guides
| All Side Quest Guides |
|---|
| Best Side Quests to Do |
Grasslands Side Quests
| Side Quest List | Flowers from the Hill | Lifeline in Peril | A Rare Card Lost |
|---|---|---|
| Livestock's Bane | Where the Wind Blows | Hustle and Grind |
Junon Side Quests
| Side Quest List | Stuck in a Rut | When Words Won't Do | The Hardest Sell |
|---|---|---|
| Calling All Frogs | Dreaming of Blue Skies | Beneath Still Waters |
| Tides of War and Worry | ||
Corel Side Quests
Gongaga Side Quests
| Side Quest List | The Pursuit of Perfection | O Chicken, Where Art Thou | Teach Me, Great Warrior |
|---|---|---|
| The Spice of Life | Escape from Endless Writer's Block | Woodland Vigil |
Cosmo Canyon Side Quests
| Side Quest List | Bonds of Trust | Absence of a Sign | From Whence Life Flows |
|---|---|---|
| Promises to Keep | Victim of Circumstance | |
Nibel Side Quests
| Side Quest List | Esoteric Secrets of the Elders | My White-Haired Angel | Lament of the Damned |
|---|---|---|
Comment
Author
Lament of the Damned Walkthrough and Rewards
improvement survey
03/2026
improving Game8's site?

Your answers will help us to improve our website.
Note: Please be sure not to enter any kind of personal information into your response.

We hope you continue to make use of Game8.
Rankings
- We could not find the message board you were looking for.
Gaming News
Popular Games

Genshin Impact Walkthrough & Guides Wiki

Honkai: Star Rail Walkthrough & Guides Wiki

Umamusume: Pretty Derby Walkthrough & Guides Wiki

Pokemon Pokopia Walkthrough & Guides Wiki

Resident Evil Requiem (RE9) Walkthrough & Guides Wiki

Monster Hunter Wilds Walkthrough & Guides Wiki

Wuthering Waves Walkthrough & Guides Wiki

Arknights: Endfield Walkthrough & Guides Wiki

Pokemon FireRed and LeafGreen (FRLG) Walkthrough & Guides Wiki

Pokemon TCG Pocket (PTCGP) Strategies & Guides Wiki
Recommended Games

Diablo 4: Vessel of Hatred Walkthrough & Guides Wiki

Fire Emblem Heroes (FEH) Walkthrough & Guides Wiki

Yu-Gi-Oh! Master Duel Walkthrough & Guides Wiki

Super Smash Bros. Ultimate Walkthrough & Guides Wiki

Pokemon Brilliant Diamond and Shining Pearl (BDSP) Walkthrough & Guides Wiki

Elden Ring Shadow of the Erdtree Walkthrough & Guides Wiki

Monster Hunter World Walkthrough & Guides Wiki

The Legend of Zelda: Tears of the Kingdom Walkthrough & Guides Wiki

Persona 3 Reload Walkthrough & Guides Wiki

Cyberpunk 2077: Ultimate Edition Walkthrough & Guides Wiki
All rights reserved
© SQUARE ENIX CO., LTD. All Rights Reserved.
CHARACTER DESIGN: TETSUYA NOMURA/ROBERTO FERRARI
LOGO ILLUSTRATION: © 1997 YOSHITAKA AMANO
The copyrights of videos of games used in our content and other intellectual property rights belong to the provider of the game.
The contents we provide on this site were created personally by members of the Game8 editorial department.
We refuse the right to reuse or repost content taken without our permission such as data or images to other sites.


![Everwind Review [Early Access] | The Shaky First Step to A Very Long Journey](https://img.game8.co/4440226/ab079b1153298a042633dd1ef51e878e.png/thumb)

![Monster Hunter Stories 3 Review [First Impressions] | Simply Rejuvenating](https://img.game8.co/4438641/2a31b7702bd70e78ec8efd24661dacda.jpeg/thumb)


