Industrial Labyrinth Stage 4 Guide
✪ Check Game8 Endfield Twitter for daily tips!
★ Exclusive: Endfield's Connection to Arknights
★ Ver. 1.1: Release Date | Livestream | Maintenance
★ Tangtang (Build | Banner) | Rossi (Build | Banner)
★ Best Builds: Yvonne | Last Rite | Laevatain
★ Hot: Essence Tool | Blueprint | Best Dijiang Setup
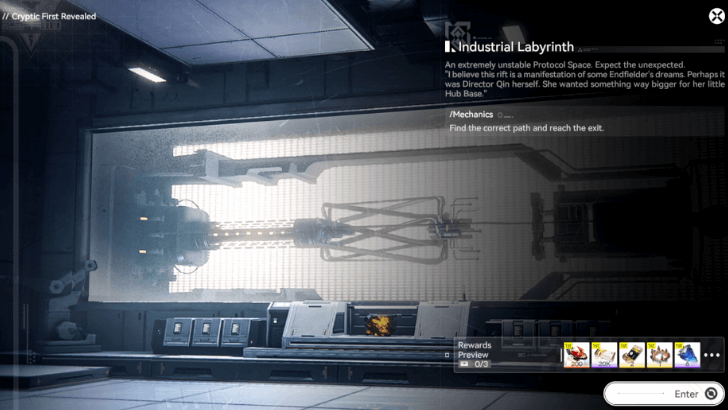
Industrial Labyrinth is the fourth stage of Cryptic First Revealed in Delver of the Cryptic in Arknights: Endfield. See a walkthrough of Industrial Labyrinth and all of its rewards here!
List of Contents
Industrial Labyrinth Walkthrough
Industrial Labyrinth Guide
| Step | Walkthrough |
|---|---|
| 1 |
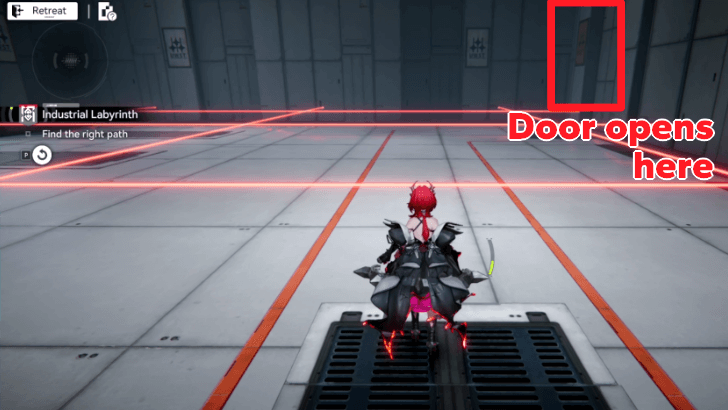
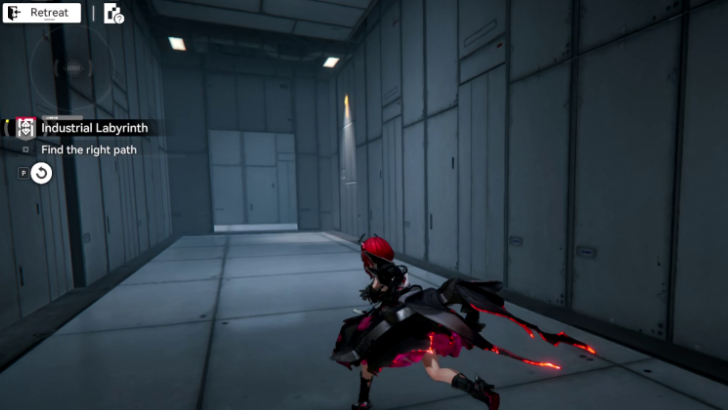
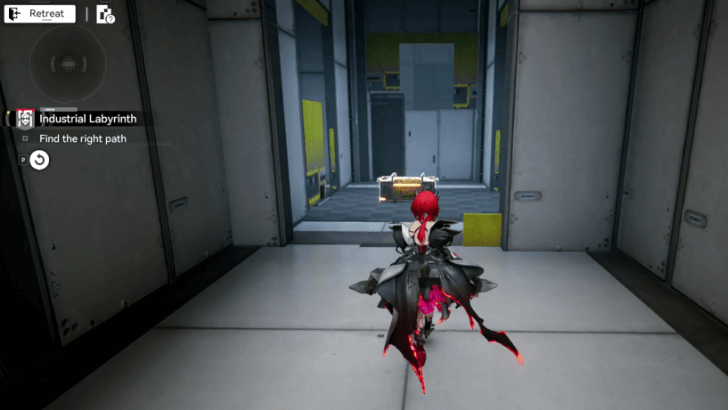
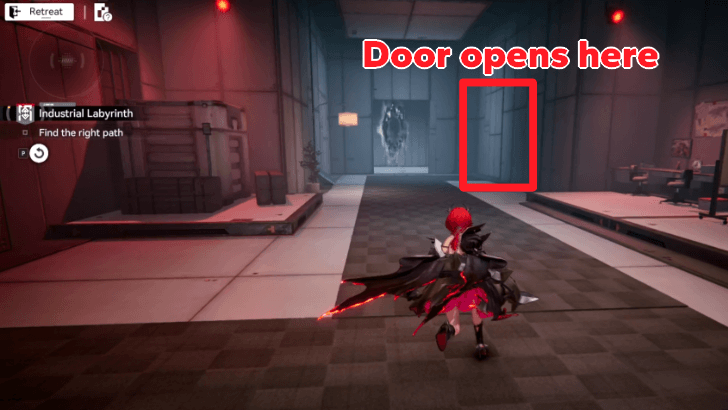 Go down the hall until you reach a room bathed in red light. There should be a door towards a portal that closes when you approach it. Instead, enter through the door that opens on the right side when you get close. |
| 2 |
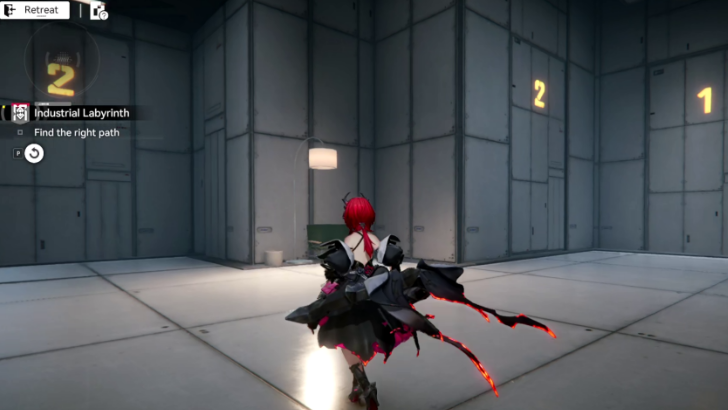
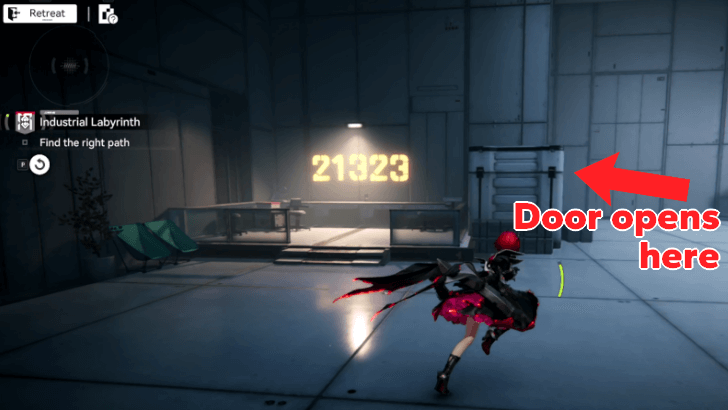 From here, simply go into the room, and head to the left side of the area. Keep note of the number 21323 going forward; you will need it on later steps. |
| 3 |
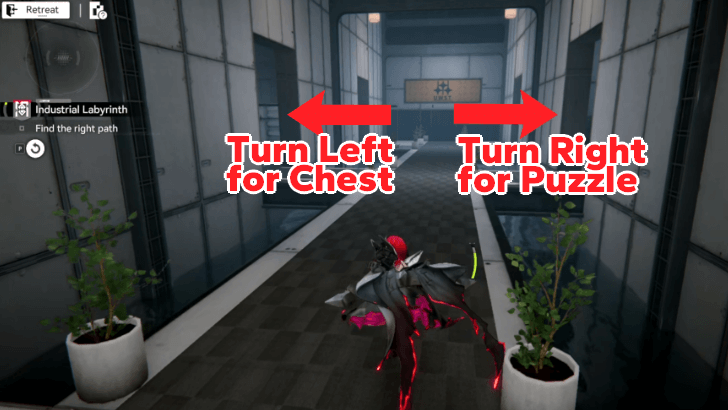
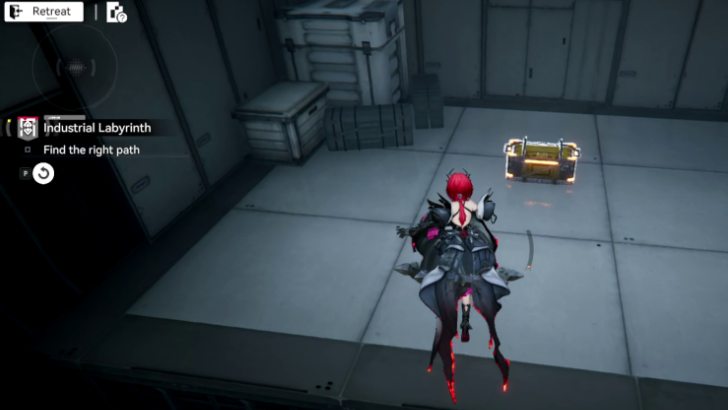
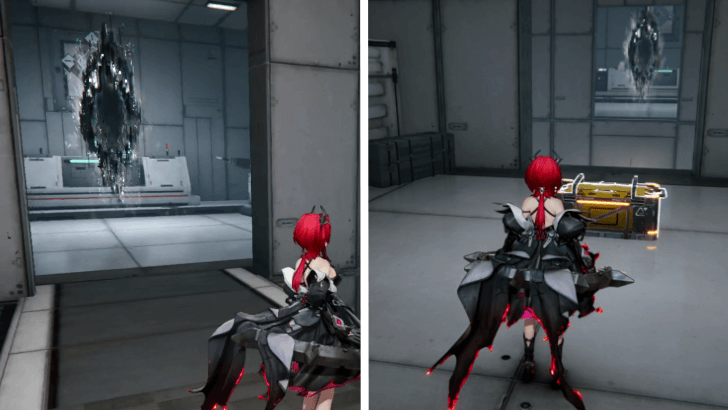
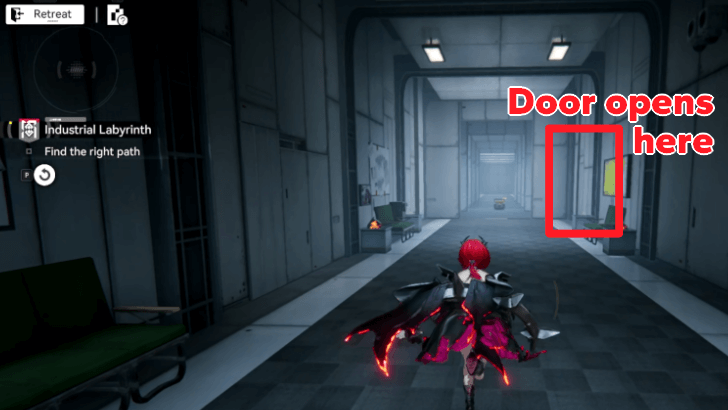 From Step 2, you will enter a hallway that shows a path towards a chest. Get close to it and that door closes, while two more open on each side. Go into the room on the right nearest the path where the Crate was before it closed. |
| 4 |
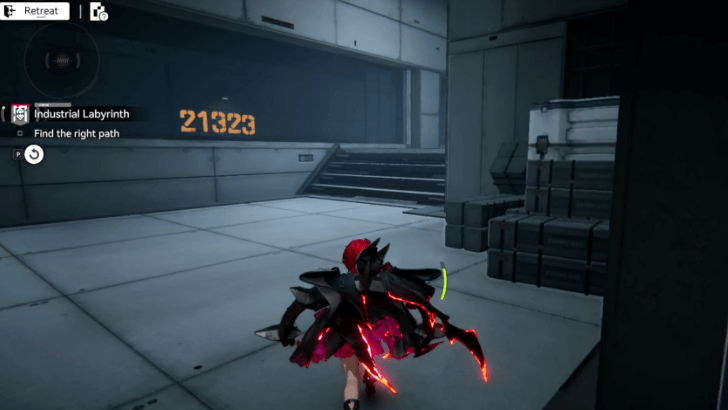 Simply go through the room normally, and it will loop you back to the hallway from Step 3. This is a necessary step. The number 21323 shows up again on the other side of the window; again, keep note of this as you will need it later in the Labyrinth. |
| 5 |
 Go down the corridor again, but this time when the door to the chest closes, a new pathway opens on the left side. Enter there, and the first Crate should be found. |
| 6 |
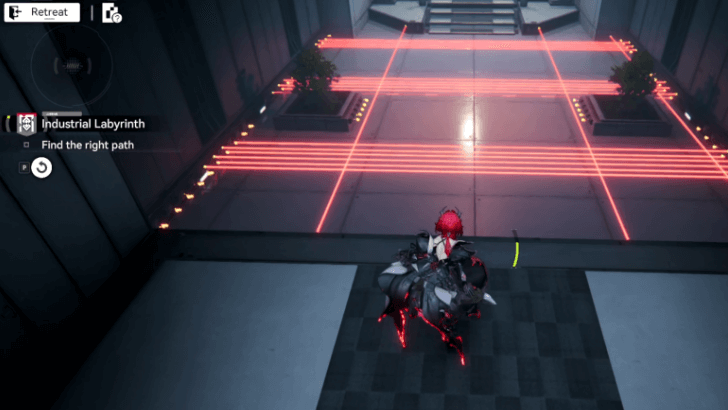
 The next room after Step 5 involves lasers that periodically switch on and off. Navigate the room until you reach a differently-colored frame of the UWST logo on the right side of the room. |
| 7 |
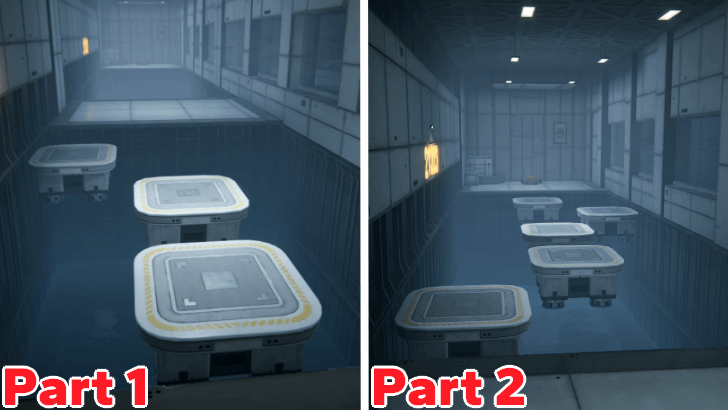 The next challenge has you memorize platforms that stay stable when you jump on top of them. Jump on a wrong platform, and it immediately falls and makes you reset to the start of their respective sections. The second Crate can be found at the end of this puzzle. |
| 8 |
 The next puzzle shows doorways that are numbered 1, 2, or 3 above them. Enter the room based on the numbers 2-1-3-2-3 that kept showing up in previous rooms; make sure to pay attention by looking around what's inside each room before entering. Keep doing this until you enter the fourth door that has 2 above it. |
| 9 |
 The last doorway of this puzzle is not numbered. Simply go down the hallway and enter through the already open door. Ignore any other door that opens on the sides, as those will lead you to traps that will reset you to the start of the door puzzle. |
| 10 |
 After clearing the door puzzle, you now enter a hallway where doors on both sides will open, nearly all of them having portals to exit the Protocol Space. Go down the hall until you reach the second to last pair of doors. The door to the left leads you to a Protocol Space exit that instead teleports you to where the 3rd Crate is. The door to the right leads you to the final puzzle of the Labyrinth. |
| 11 |
 Doors will continue to open up until you reach a room that has lasers maneuvering toward you. Simply time your jumps well to approach the Protocol Space exit to finish this level! |
Industrial Labyrinth Chest Locations
| Chest | Location Walkthrough |
|---|---|
| 1 |
 The first Crate can be found immediately after solving the hallway puzzle in Step 5. |
| 2 |
 The second Crate can be found after solving the platform puzzle in Step 7. |
| 3 |
 The third Crate is actually not in the direct path of the Labyrinth like the previous two were. Instead of turning right to go to the next step, turn left and interact with the portal. This will lead you to a floor above it, where the chest is located. |
Industrial Labyrinth Rewards
Total Completion Rewards
| Clear Reward |
|
|---|---|
| Crate Rewards |
|
Industrial Labyrinth Stage Information
Stage 4 of Cryptic First Revealed
Industrial Labyrinth is the fourth stage of the Cryptic First Revealed stage in the Delver of the Cryptic permanent game mode, in which you are tasked to complete puzzles that involve critical thinking.
Industrial Labyrinth Details
 |
|
| Mechanics | Find the correct path and reach the exit. |
|---|---|
| Bonus Goal | Find all 3 Crates. |
Arknights: Endfield Related Guides
Delver of the Cryptic Series
 Cryptic First Revealed Cryptic First Revealed |
 Grotto Survey Grotto Survey |
Cryptic First Revealed Stage Guides
 Pressure Sensitive Pressure Sensitive(Stage 1) |
 Crane Support Guide Crane Support Guide (Stage 2) |
 Ride the Wind Ride the Wind(Stage 3) |
Industrial Labyrinth (Stage 4) |
 Heat Interception Heat Interception(Stage 5) |
 External Detonation External Detonation(Stage 6) |
 Long-Ear Invitation Long-Ear Invitation(Stage 7) |
 Ode of Bombardment Ode of Bombardment(Stage 8) |
 Beam Dodger Beam Dodger(Stage 9) |
- |
Author

Industrial Labyrinth Stage 4 Guide
Premium Articles
Rankings

Gaming News

![The Liar Princess and the Blind Prince Review [PC] | Lovely to Look at but Tedious to Play](https://img.game8.co/4442586/8d95f5faf05780f1765ce7e0938bd825.jpeg/show)
![Monster Hunter Stories 3 Review [First Impressions] | Simply Rejuvenating](https://img.game8.co/4438641/2a31b7702bd70e78ec8efd24661dacda.jpeg/thumb)

![The Seven Deadly Sins: Origin [First Impressions] | A Promising Start](https://img.game8.co/4440581/584e0bfb87908f12c4eab6e846eb1afd.png/thumb)
Popular Games

Genshin Impact Walkthrough & Guides Wiki
Umamusume: Pretty Derby Walkthrough & Guides Wiki
Pokemon Pokopia Walkthrough & Guides Wiki
Honkai: Star Rail Walkthrough & Guides Wiki
Monster Hunter Stories 3: Twisted Reflection Walkthrough & Guides Wiki
Arknights: Endfield Walkthrough & Guides Wiki
Wuthering Waves Walkthrough & Guides Wiki
Zenless Zone Zero Walkthrough & Guides Wiki
Pokemon TCG Pocket (PTCGP) Strategies & Guides Wiki
Monster Hunter Wilds Walkthrough & Guides Wiki


Recommended Games
Diablo 4: Vessel of Hatred Walkthrough & Guides Wiki
Cyberpunk 2077: Ultimate Edition Walkthrough & Guides Wiki
Fire Emblem Heroes (FEH) Walkthrough & Guides Wiki
Yu-Gi-Oh! Master Duel Walkthrough & Guides Wiki
Super Smash Bros. Ultimate Walkthrough & Guides Wiki
Pokemon Brilliant Diamond and Shining Pearl (BDSP) Walkthrough & Guides Wiki
Elden Ring Shadow of the Erdtree Walkthrough & Guides Wiki
Monster Hunter World Walkthrough & Guides Wiki
The Legend of Zelda: Tears of the Kingdom Walkthrough & Guides Wiki
Persona 3 Reload Walkthrough & Guides Wiki


All rights reserved
Copyright © 2022 - 2025 GRYPHLINE. All Rights Reserved.
The copyrights of videos of games used in our content and other intellectual property rights belong to the provider of the game.
The contents we provide on this site were created personally by members of the Game8 editorial department.
We refuse the right to reuse or repost content taken without our permission such as data or images to other sites.
All of your left/right are flipped the other way?