This survey will take about 1 minute.
Your answers will help us to improve our website.
Splatoon 3
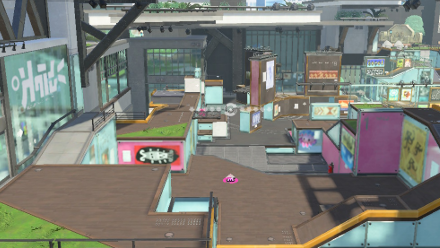
Eeltail Alley Map and Stage Tips
Eeltail Alley is a new stage in Splatoon 3. Read on to learn more about this stage, as well as some tips, the best spots, and the best weapons to use when playing on this map.
List of Contents
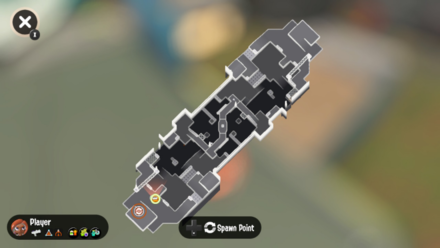
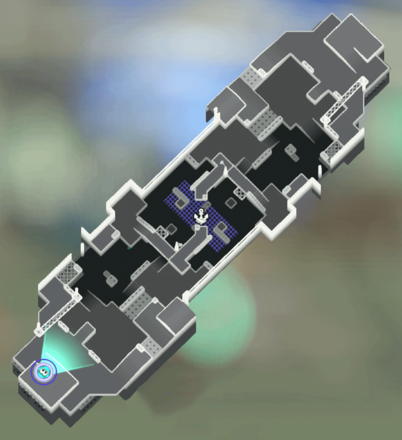
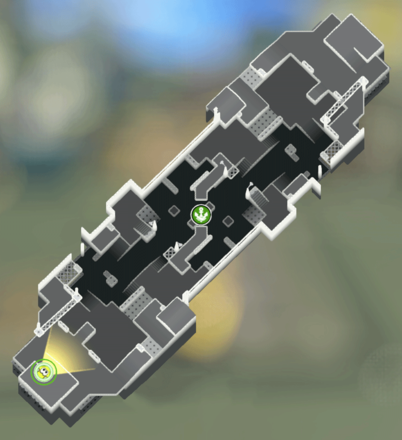
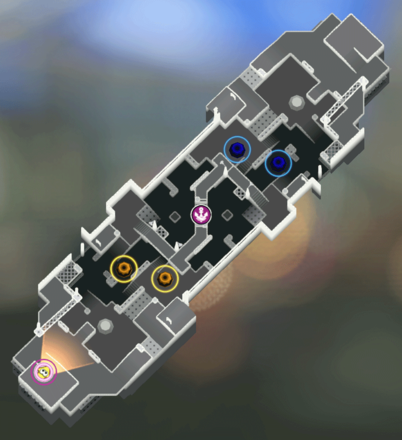
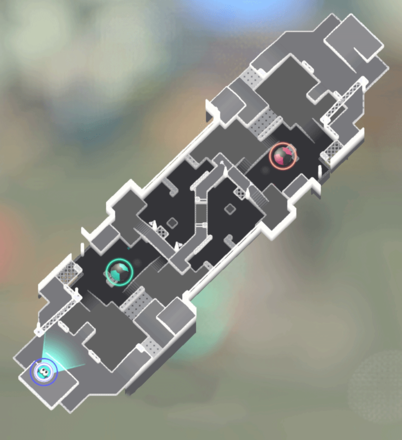
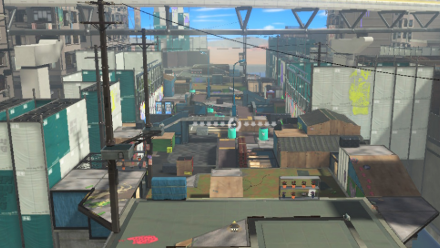
Eeltail Alley Map
Eeltail Alley Map Layouts
| Eeltail Alley Map Layouts | |
|---|---|
 Turf War (View Full Stage Layout) |
|
 Splat Zones |
 Tower Control |
 Rainmaker |
 Clam Blitz |
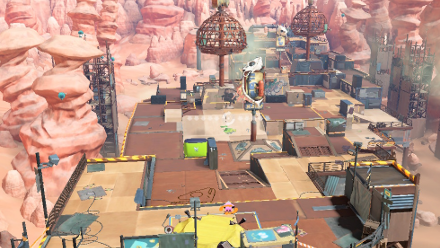
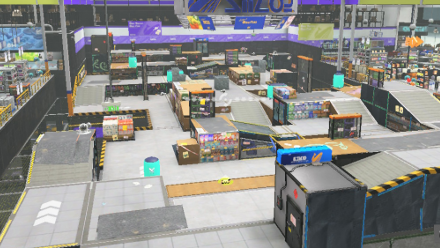
Eeltail Alley is a new stage in Splatoon 3. It doesn't have any gimmicks or cool features like the moving platforms in other stages but it does have plenty of obstacles and winding paths that anyone can utilize to their advantage.
Eeltail Alley Tips and Best Spots
| Eeltail Alley Tips |
|---|
|
|
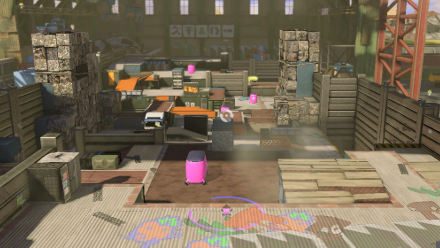
Use the Obstacles to Your Advantage
There are plenty of obstacles in Eeltail Alley that you can use as a shield when you're running away from an enemy. You can even use them to your advantage by going around the obstacle and splatting the enemy by surprise.
Hide behind walls scattered all over the map when an enemy is attacking you or use them to ambush enemies coming your way.
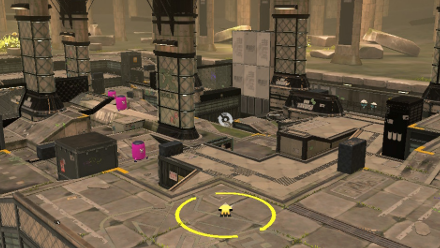
Advance as Fast as You Can
We recommend advancing on the enemy team as fast as you can to make sure you have the upper hand during fights. You can position yourself easily and take advantage of the winding pathways and obstacles near their base.
Each team's base isn't that wide so it can be very easy to camp enemies.
Eeltail Alley Best Weapons
Shooters and Chargers
| Main | Sub | Special | Lv. Required |
|---|---|---|---|
 Hero Shot Replica Hero Shot Replica
|
 Suction Bomb Suction Bomb
|
 Trizooka Trizooka
|
Clear Hero Mode |
 Hero Gear Hero Gear
|
 Smallfry Smallfry
|
TBD | Hero Mode exclusive weapon |
 Splattershot Jr. Splattershot Jr.
|
 Splat Bomb Splat Bomb
|
 Big Bubbler Big Bubbler
|
1 |
 Splat Charger Splat Charger
|
Splat Bomb
|
 Ink Vac Ink Vac
|
2 |
 Splattershot Splattershot
|
Suction Bomb
|
Trizooka
|
2 |
 Aerospray MG Aerospray MG
|
 Fizzy Bomb Fizzy Bomb
|
 Reefslider Reefslider
|
5 |
 N-ZAP '85 N-ZAP '85
|
Suction Bomb
|
 Tacticooler Tacticooler
|
6 |
 Classic Squiffer Classic Squiffer
|
 Point Sensor Point Sensor
|
Big Bubbler
|
8 |
 Splattershot Pro Splattershot Pro
|
 Angle Shooter Angle Shooter
|
 Crab Tank Crab Tank
|
9 |
 Sploosh-o-matic Sploosh-o-matic
|
 Curling Bomb Curling Bomb
|
 Ultra Stamp Ultra Stamp
|
9 |
 Splatterscope Splatterscope
|
Splat Bomb
|
Ink Vac
|
10 |
 .52 Gal .52 Gal
|
 Splash Wall Splash Wall
|
 Killer Wail 5.1 Killer Wail 5.1
|
11 |
 L-3 Nozzlenose L-3 Nozzlenose
|
Curling Bomb
|
Crab Tank
|
13 |
 Jet Squelcher Jet Squelcher
|
Angle Shooter
|
Ink Vac
|
15 |
 Splash-o-matic Splash-o-matic
|
 Burst Bomb Burst Bomb
|
Crab Tank
|
16 |
 .96 Gal .96 Gal
|
 Sprinkler Sprinkler
|
Ink Vac
|
17 |
 E-liter 4K E-liter 4K
|
 Ink Mine Ink Mine
|
 Wave Breaker Wave Breaker
|
18 |
 Squeezer Squeezer
|
Splash Wall
|
Trizooka
|
19 |
 Bamboozler 14 MK 1 Bamboozler 14 MK 1
|
 Autobomb Autobomb
|
Killer Wail 5.1
|
23 |
 H-3 Nozzlenose H-3 Nozzlenose
|
Point Sensor
|
Tacticooler
|
24 |
 Goo Tuber Goo Tuber
|
 Torpedo Torpedo
|
 Tenta Missiles Tenta Missiles
|
25 |
 E-liter 4K Scope E-liter 4K Scope
|
Ink Mine
|
Wave Breaker
|
27 |
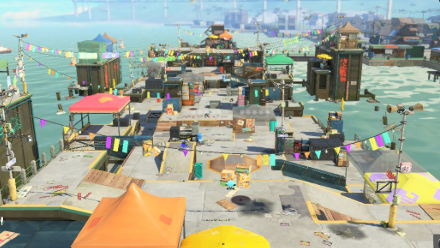
Shooters and Chargers are great to use in Eeltail Alley because of their range and capability to splat opponents and ink turf easily. When using a ranged weapon, remember to take advantage of the stage's elevated platforms.
Splatoon 3 Related Guides

List of All New Stages
| All New Stages | |
|---|---|
 Scorch Gorge |
 Eeltail Alley |
 Mincemeat Metalworks |
 Undertow Spillway |
 Hagglefish Market |
|
List of All Returning Stages
| All Returning Stages | |
|---|---|
 Museum D'Alfonsino |
 Mahi-Mahi Resort |
 Inkblot Art Academy |
 Sturgeon Shipyard |
 Makomart |
 Wahoo World |
 Hammerhead Bridge |
- |
Author

Eeltail Alley Map and Stage Tips
Please participate in our site
improvement survey
04/2026
improvement survey
04/2026
Would you assist in
improving Game8's site?
improving Game8's site?

×
We are listening to our users' valuable opinions and discussing how to act on them.
The information collected through this survey will be used for the purpose of improving our services. In addition, the information will only be disclosed a part of a statistic in a format that will not allow identification of personal information.
Begin Survey
Not Now
×
Please rate each item regarding Game8.co's Advertisements.
Amount of Ads
Very Dissatisfied
Somewhat Dissatisfied
Fine
Somewhat Satisfied
Highly Satisfied
Placement of Ads
Timing of Ad Display
Ad Loading Speed
Safeness of Ads
Content of Ads
×
Please rate each item regarding Game8.co's Quality of Articles.
Amount of information
Very Dissatisfied
Somewhat Dissatisfied
Fine
Somewhat Satisfied
Highly Satisfied
Frequency of updates
Speed of new information
Accuracy of articles
Understandibility of articles
Readability of sentences
×
Please rate each item regarding Game8.co's Usability of the Site.
Ease of finding information
Very Dissatisfied
Somewhat Dissatisfied
Fine
Somewhat Satisfied
Highly Satisfied
Loading Speed
Use of Color
Font Size
Visibility of Images
Easy to Understand Layout
×
Please rate each item regarding Game8.co's Message Boards, Comments.
Ease of Writing
Very Dissatisfied
Somewhat Dissatisfied
Fine
Somewhat Satisfied
Highly Satisfied
Readability
Ease in Finding Information
Comment Quality
Comment Quantity
Admin Response
×
Please rate each item regarding Game8.co's Site's new design.
Please rate our site's new design
Very Dissatisfied
Somewhat Dissatisfied
Fine
Somewhat Satisfied
Highly Satisfied
Do you think that the website's design change makes the site easier to use?
Has the new design made it easier for you to find information on the site?
Has the new design improved the overall visual appeal of the site?
How would you rate your overall satisfaction with the new design of the site?
×
How likely are you to recommend Game8 to someone you know?
Very Unlikely
0
1
2
3
4
5
6
7
8
9
10
Very Likely
If you have other opinions regarding potential improvement to the website, please share them with us. We would appreciate your honest opinion.
Note: This is a free response section, so you can proceed without entering anything.
Note: Please be sure not to enter any kind of personal information into your response.
Note: Please be sure not to enter any kind of personal information into your response.
×
Thank You
×
Thank you for participating in our survey! Your answers will help us to improve the quality of our website and services.
We hope you continue to make use of Game8.
We hope you continue to make use of Game8.
Close
Rankings
- We could not find the message board you were looking for.
Gaming News


![Forza Horizon 6 Review [Preview] | Beautiful Roads With a Whole Lot of Oversteer](https://img.game8.co/4460981/a7254c24945c43fbdf6ad9bea52b5ce9.png/thumb)
![Borderlands Mobile Review [Playtest] | The Same Borderlands Made Easy](https://img.game8.co/4465500/aac0c880a39ec5cd46073e49d18f3ed5.png/thumb)
Popular Games

Genshin Impact Walkthrough & Guides Wiki
Crimson Desert Walkthrough & Guides Wiki
Umamusume: Pretty Derby Walkthrough & Guides Wiki
Honkai: Star Rail Walkthrough & Guides Wiki
Monster Hunter Stories 3: Twisted Reflection Walkthrough & Guides Wiki
Wuthering Waves Walkthrough & Guides Wiki
The Seven Deadly Sins: Origin Walkthrough & Guides Wiki
Pokemon TCG Pocket (PTCGP) Strategies & Guides Wiki
Pokemon Pokopia Walkthrough & Guides Wiki
Zenless Zone Zero Walkthrough & Guides Wiki


Recommended Games
Fire Emblem Heroes (FEH) Walkthrough & Guides Wiki
Pokemon Brilliant Diamond and Shining Pearl (BDSP) Walkthrough & Guides Wiki
Super Smash Bros. Ultimate Walkthrough & Guides Wiki
Diablo 4: Vessel of Hatred Walkthrough & Guides Wiki
Cyberpunk 2077: Ultimate Edition Walkthrough & Guides Wiki
Yu-Gi-Oh! Master Duel Walkthrough & Guides Wiki
Elden Ring Shadow of the Erdtree Walkthrough & Guides Wiki
Monster Hunter World Walkthrough & Guides Wiki
The Legend of Zelda: Tears of the Kingdom Walkthrough & Guides Wiki
Persona 3 Reload Walkthrough & Guides Wiki


All rights reserved
© Nintendo
The copyrights of videos of games used in our content and other intellectual property rights belong to the provider of the game.
The contents we provide on this site were created personally by members of the Game8 editorial department.
We refuse the right to reuse or repost content taken without our permission such as data or images to other sites.