
This survey will take about 1 minute.
Your answers will help us to improve our website.
Fire Emblem Engage (FE Engage)
Chapter 25: The Final Guardian Walkthrough
★ Use Zelestia, Gregory, & Madeline in Wave 4 of the DLC!
☆ Unlock the Fell Xenologue by visiting the Ancient Well!
★ All Paired Endings and Mementos from the Pact Ring.
☆ Unit Tier List | Best Classes | Best Pairings | Best Party
★ Farming Guides: Bond Fragments | SP | Gold | Ingots
☆ Increase Supports with Gifts and Recreation.

This is the walkthrough for Chapter 25 of Fire Emblem Engage (FE Engage). Read on to see a full list of all recruitable characters in Chapter 25, all Chapter 25 paralogues, and all the obtainable weapons and items for this chapter!
| Previous Chapter | Next Chapter |
|---|---|
| Chapter 24 | Chapter 26 |
Chapter 25 Main Quest Battle Guide
Chapter 25 Battle Info
| Victory Conditions | |||
|---|---|---|---|
| Defeat Corrupted Lumera | |||
| Defeat Conditions | |||
| Alear is Defeated | |||
| Location | Gradlon Temple | ||
| Recommended Level | Advanced Class Lvl 18 | ||
| # of Player Units | 14 | ||
| # of Enemies | 48 | ||
Recommended Units, and Emblems
| Class | Explanation |
|---|---|
|
|
Staff users can use Fracture to inflict break on the dragons on this stage. Additionally, they can also use Warp to instantly allow your units to jump unto the magicians beside Lumera. |
 Lyn Lyn
|
Allows you to easily kill high priority targets such as Lumera's body guards and the corrupted with Entrap on the right side of the map. |
Chapter 25 Battle Walkthrough
| Objective | |
|---|---|
| 1 | Your team will be split into two. Have both teams march towards the doors on their respective areas as soon as possible. You'll want to use your engage skills as soon as you can as there are numerous amounts of enemies that will come at you while your team is divided. |
| Note | There is a corrupted with the Entrap Staff on the right side of the map near the right team. Avoid slowly pushing during this phase or you can use Lyn's Emblem attack to assassinate it from afar. |
| 2 | The Dragons each have revival stones. The Dragon's attacks ignore DEF and RES so the safest way to defeat these Dragons is to use Fracture. This will prevent the dragons from countering your attacks while you focus your attacks on them. |
| 3 | Do not destroy the door immediately. Make sure that enemies are near the door first. However, you want to be swift as the third batch of reinforcements will spawn Thieves that will attempt to steal the items up north. |
| 4 | Wait for the ambush on the right and left sides of the door before breaking the doors. This gives you enough time to defeat the enemies in the center of the map as well as intercept the thieves that will appear on the area. |
| 5 | Wait for the three wyverns and cavalries to reach you on the center then defeat them. This will allow us to focus on the front side of the map entirely and place our units accordingly. |
| 6 | Before proceeding, defeat the three last flanking reinforcements that spawn in the center of the map This is the same area that the thieves spawn at. |
| 7 | March forward and defeat the heavily compressed corrupted placed in front of your team. These corrupted units are stationary so you can attack them from afar using longer ranged attacks. |
| 8 | Immediately attempt to get all chests on the side. |
| 9 | Have everyone head straight for Lumera's area then focus the dragons then Mages. The Dragons are the biggest threat among all of Lumera's guards with the magicians as the second. |
| 10 | With the Dragons gone, focus on Lumera to finish the stage. |
Reinforcements List
| Reinforcements list | |
|---|---|
| 1 | The first batch would be corrupteds that would spawn on the opposite side of each door. |
| 2 | The second batch would be a set of three cavalries and three wyvern riders. They will spawn on the starting area of your party. |
| 3 | The third batch are thieves that will spawn on the center of the map. Make sure to be on the center already before they spawn! |
| 4 | The fourth batch are corrupted that will spawn on the same area as the 1st and 3rd batch but all are corrupted units only. |
| 5 | The fifth and the last one are corrupted that will spawn on the same area as the second batch. |
All the reinforcements listed above will spawn after the first one which encompasses a total of 5 turns. However, the fifth reinforcements are never ending and will start spawning once every two turns.
Assassinating Corrupted with Entral

The Corrupted with the Entrap staff is the Qi Master that's on the right side team's path. Make sure that you take it out first if you will advance slowly or rush them with all your units to render the entrap skill useless.
The Fell Dragon Shard Beam
The Beam will cover a huge part of a map whenever it is used. It will deal a hefty amount of damage so make sure to dodge it if feasible. However, since it does cover a large part of the map, having your units, especially your low mobility units getting hit is inevitable. To counter this attack, you can use Micaiah's Great Sacrifice to heal all the damage the cannon has dealt at the cost of one engage attack (and the majority of the user's HP).
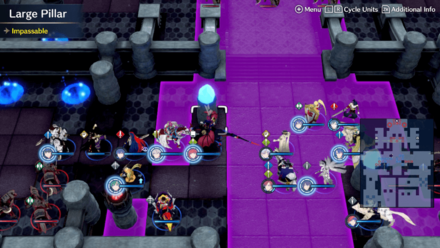
Another thing to note is that you can use the pillars with the blue light to hide from the beam attack.
Defeating the Dragons
Unlike previous levels, the dragons on this stage have revival stones. You'll want to invest more damage into killing them so make sure to use Brave weapons or engage attacks to ensure that you kill them in one turn. Alternatively, you can use the Fracture staff to inflict Break on the Dragons making them free targets.
Chapter 25 Obtainable Items
Obtainable Items in Battle
| Item | How to Get |
|---|---|
| Wille Glanz | Dropped by corrupted Lumera |
| Cinquedea | Obtained on the chest on the upper left side of the map. |
| Dracoshield | Obtained on the chest on the upper right side of the map. |
Obtainable Items in Exploration Phase
| Materials | |
|---|---|
| Iron Ingot | Steel Ingot |
| Silver Ingot | - |
Fire Emblem Engage Related Guides
All Story Chapters
All Paralogues
All Fell Xenologue Chapters
| Fell Xenologue Chapter | |
|---|---|
| Dragons From Afar | Seeds of Unrest |
| Path to War | Clash of Queens |
| The Fell Heir | Seven Bracelets |
Comment
3  Anonymous about 3 years
If you bring like enough warps (4) is minimum ,u can just skip the rooms and warp into the center. Camp the doors with your mages and kill the thieves so you skip both the sides and the infinite(?) reinforcements
Author

Chapter 25: The Final Guardian Walkthrough
Please participate in our site
improvement survey
03/2026
improvement survey
03/2026
Would you assist in
improving Game8's site?
improving Game8's site?

×
We are listening to our users' valuable opinions and discussing how to act on them.
The information collected through this survey will be used for the purpose of improving our services. In addition, the information will only be disclosed a part of a statistic in a format that will not allow identification of personal information.
Begin Survey
Not Now
×
Please rate each item regarding Game8.co's Advertisements.
Amount of Ads
Very Dissatisfied
Somewhat Dissatisfied
Fine
Somewhat Satisfied
Highly Satisfied
Placement of Ads
Timing of Ad Display
Ad Loading Speed
Safeness of Ads
Content of Ads
×
Please rate each item regarding Game8.co's Quality of Articles.
Amount of information
Very Dissatisfied
Somewhat Dissatisfied
Fine
Somewhat Satisfied
Highly Satisfied
Frequency of updates
Speed of new information
Accuracy of articles
Understandibility of articles
Readability of sentences
×
Please rate each item regarding Game8.co's Usability of the Site.
Ease of finding information
Very Dissatisfied
Somewhat Dissatisfied
Fine
Somewhat Satisfied
Highly Satisfied
Loading Speed
Use of Color
Font Size
Visibility of Images
Easy to Understand Layout
×
Please rate each item regarding Game8.co's Message Boards, Comments.
Ease of Writing
Very Dissatisfied
Somewhat Dissatisfied
Fine
Somewhat Satisfied
Highly Satisfied
Readability
Ease in Finding Information
Comment Quality
Comment Quantity
Admin Response
×
Please rate each item regarding Game8.co's Site's new design.
Please rate our site's new design
Very Dissatisfied
Somewhat Dissatisfied
Fine
Somewhat Satisfied
Highly Satisfied
Do you think that the website's design change makes the site easier to use?
Has the new design made it easier for you to find information on the site?
Has the new design improved the overall visual appeal of the site?
How would you rate your overall satisfaction with the new design of the site?
×
How likely are you to recommend Game8 to someone you know?
Very Unlikely
0
1
2
3
4
5
6
7
8
9
10
Very Likely
If you have other opinions regarding potential improvement to the website, please share them with us. We would appreciate your honest opinion.
Note: This is a free response section, so you can proceed without entering anything.
Note: Please be sure not to enter any kind of personal information into your response.
Note: Please be sure not to enter any kind of personal information into your response.
×
Thank You
×
Thank you for participating in our survey! Your answers will help us to improve the quality of our website and services.
We hope you continue to make use of Game8.
We hope you continue to make use of Game8.
Close
Rankings
- We could not find the message board you were looking for.
Gaming News


![Everwind Review [Early Access] | The Shaky First Step to A Very Long Journey](https://img.game8.co/4440226/ab079b1153298a042633dd1ef51e878e.png/thumb)

![Monster Hunter Stories 3 Review [First Impressions] | Simply Rejuvenating](https://img.game8.co/4438641/2a31b7702bd70e78ec8efd24661dacda.jpeg/thumb)
Popular Games

Genshin Impact Walkthrough & Guides Wiki
Honkai: Star Rail Walkthrough & Guides Wiki
Umamusume: Pretty Derby Walkthrough & Guides Wiki
Pokemon Pokopia Walkthrough & Guides Wiki
Resident Evil Requiem (RE9) Walkthrough & Guides Wiki
Monster Hunter Wilds Walkthrough & Guides Wiki
Wuthering Waves Walkthrough & Guides Wiki
Arknights: Endfield Walkthrough & Guides Wiki
Pokemon FireRed and LeafGreen (FRLG) Walkthrough & Guides Wiki
Pokemon TCG Pocket (PTCGP) Strategies & Guides Wiki


Recommended Games
Diablo 4: Vessel of Hatred Walkthrough & Guides Wiki
Fire Emblem Heroes (FEH) Walkthrough & Guides Wiki
Yu-Gi-Oh! Master Duel Walkthrough & Guides Wiki
Super Smash Bros. Ultimate Walkthrough & Guides Wiki
Pokemon Brilliant Diamond and Shining Pearl (BDSP) Walkthrough & Guides Wiki
Elden Ring Shadow of the Erdtree Walkthrough & Guides Wiki
Monster Hunter World Walkthrough & Guides Wiki
The Legend of Zelda: Tears of the Kingdom Walkthrough & Guides Wiki
Persona 3 Reload Walkthrough & Guides Wiki
Cyberpunk 2077: Ultimate Edition Walkthrough & Guides Wiki


All rights reserved
©2023 Nintendo / INTELLIGENT SYSTEMS.
The copyrights of videos of games used in our content and other intellectual property rights belong to the provider of the game.
The contents we provide on this site were created personally by members of the Game8 editorial department.
We refuse the right to reuse or repost content taken without our permission such as data or images to other sites.
thanks for the Warp tips. I managed to clear the map on maddening by Warping my Right team toward the left side then proceeded to steamroll left side till door and killed reinforcement/enemies behind door that way. Reinforcements seems not infinite and stopped after I started to kill/people the foes coming from center of map.