
This survey will take about 1 minute.
Your answers will help us to improve our website.
Fire Emblem Engage (FE Engage)
Paralogue: The Holy Knight Walkthrough
★ Use Zelestia, Gregory, & Madeline in Wave 4 of the DLC!
☆ Unlock the Fell Xenologue by visiting the Ancient Well!
★ All Paired Endings and Mementos from the Pact Ring.
☆ Unit Tier List | Best Classes | Best Pairings | Best Party
★ Farming Guides: Bond Fragments | SP | Gold | Ingots
☆ Increase Supports with Gifts and Recreation.

This is the walkthrough for The Holy Knight Paralogue of Fire Emblem Engage (FE Engage). Read on to see a full list of rewards in Paralogue: The Holy Knight, how to unlock, and all obtainable weapons and items!
List of Contents
Paralogue: The Holy Knight Rewards
Unlocks Sigurd's Max Bond Level
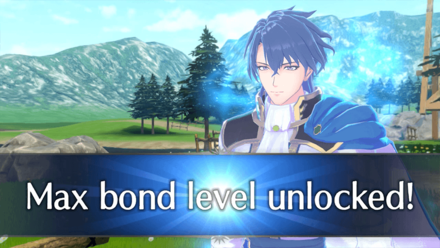
Completing Sigurd's paralogue increases his Bond Level cap from 10 to 20, opening up the option to learn new skills and gain the Tyrfing. This references the map's source, Chapter 10 of Genealogy of the Holy War, where Sigurd's son, Seliph, gains the same weapon.
Sigurd Engage Skills, Abilities, and Engage Weapon
How to Unlock Paralogue: The Holy Knight
Unlocked Upon Reaching Chapter 18
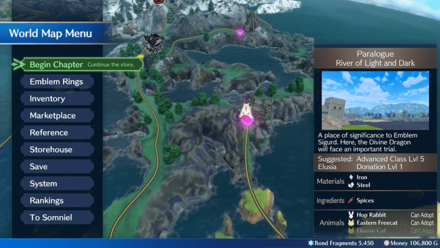
Once you reach Chapter 18: The Cold Voyage, the River of Light and Dark becomes available on the world map and unlocks Paralogue: The Holy Knight.
Chapter 18: The Cold Voyage Walkthrough
Paralogue: The Holy Knight Main Quest Battle Guide
The Holy Knight Battle Info
| Victory Conditions | |||
|---|---|---|---|
| Defeat Emblem Sigurd. | |||
| Defeat Conditions | |||
| Alear is defeated. | |||
| Location | River of Light and Dark | ||
| Restrictions | Cannot use Sigurd's Emblem Ring. | ||
| Recommended Level | Advanced Class Lvl 5 | ||
| # of Player Units | 12 | ||
| # of Enemies | 31 | ||
Recommended Classes and Emblems
| Class | Explanation |
|---|---|
|
|
The map is full of mages, so bringing units with high Res and can counterattack is recommended. Fliers like the Griffin Knight are notable as they can also cross the river to reach Sigurd early. |
|
|
Ivy has great utility in this map if she's leveled enough. She should have enough Spd, Def, and Res to fly across the river, survive a Meteor, and take on Sigurd. Otherwise, she can still use Staves to support the party. |
|
|
Lyn allows the use of Astra Storm to damage Sigurd from afar. She also has the Mani Katti which is effective against Sigurd's Cavalry unit type. |
The Holy Knight Battle Walkthrough
| Objective | |
|---|---|
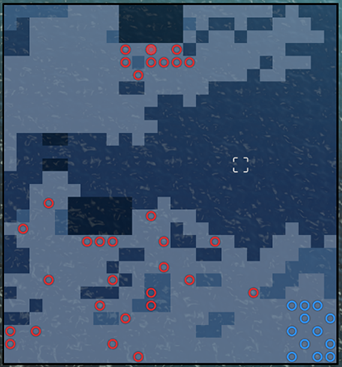
| 1 | Move your units toward the lower fortress. Your units should kill any enemies along the way to the Sage guarding the fortress. Ignore the two Sages on the lower left corner unless you want a challenge. |
| 2 | Send your Flying units toward Sigurd. Sigurd's movement spans almost the entire upper portion of the map. Place one of your Fliers on a tile where only Sigurd and the Sage with Meteor can target you. This should draw him in, allowing the rest of your fliers to finish him off the next turn. Make sure the unit you choose can survive both Meteor and Sigurd's initial attack. |
| 3 | Defeat Sigurd with your Fliers. After Sigurd's first attack, close in with your Flying units, attacking with ranged or Cavalry-effective weapons like the Ridersbane or Mani Katti. |
| 4 | Alternate Route: Kill the Sage guarding the fortress to lower the bridge. If you find yourself unable to isolate Sigurd or lack good Flying units, you can defeat the Sage on the Fortress to lower the bridge on the next turn. This will spawn reinforcements on the upper section of the map and Sigurd will start moving. |
| 5 | Alternate Route: Lure in Sigurd then defeat him. Once the bridge is lowered, bring your army closer to it. Have a tanky unit take an attack from Sigurd. Avoid having any unit directly adjacent to your tank since he will use Override. Finish him off with Cavalry-effective weapons or ranged attacks. |
3. How to Beat Sigurd
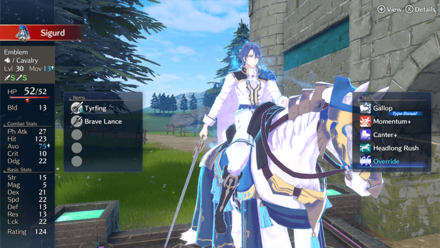
Sigurd stands out with his massive movement. However, unlike the other Emblems, his stats aren't that much higher compared to the enemies you were facing in the chapter before unlocking his paralogue. This makes him easier to bait out and finish off alone. He's also a Cavalry unit, giving him an exploitable weakness to the Ridersbane, Noble Rapier, and Mani Katti. Magic and Bows also work as Sigurd doesn't carry a ranged weapon.
Paralogue: The Holy Knight Obtainable Items
Obtainable Items in Battle
| Item | How to Get |
|---|---|
| 2000 G | Dropped by the Sage guarding the bridge fortress. |
| 1000 G | Dropped by the 2 Sages representing Julius and Ishtar. |
| Goddess Icon | Have a unit wait on the ground above the rocks and beach on the upper rightmost corner of the map. |
Obtainable Items in Exploration Phase
| Materials | |
|---|---|
| Iron Ingot | Steel Ingot |
| Ingredients | |
| Spices | |
| Animals | |
| Hop Rabbit | Eastern Freecat |
| Elusian Cat | - |
Fire Emblem Engage Related Guides
All Story Chapters
All Paralogues
| Base Game Paralogues | |
|---|---|
| Budding Talent | Mysterious Merchant |
| The Exalt | The Lady of the Plains |
| The Radiant Hero | The Instructor |
| The Crux of Fate | The Azure Twin |
| The Holy Knight | The Sage Lord |
| The Dawn Maiden | The Young Lion |
| The Caring Princess | The Hero-King |
| The Connector | - |
| Divine Paralogues (DLC) | |
| The Ancestor | The Radiant Strategist |
| The Brash General | The Doting Sister |
| The Shepherd Exalt | The Lonely Heir |
All Fell Xenologue Chapters
| Fell Xenologue Chapter | |
|---|---|
| Dragons From Afar | Seeds of Unrest |
| Path to War | Clash of Queens |
| The Fell Heir | Seven Bracelets |
Comment
1  Anonymous about 3 years
You can farm exp. with micaiah by healing damaged units since the sage with the meteor wont move.
Author

Paralogue: The Holy Knight Walkthrough
Please participate in our site
improvement survey
03/2026
improvement survey
03/2026
Would you assist in
improving Game8's site?
improving Game8's site?

×
We are listening to our users' valuable opinions and discussing how to act on them.
The information collected through this survey will be used for the purpose of improving our services. In addition, the information will only be disclosed a part of a statistic in a format that will not allow identification of personal information.
Begin Survey
Not Now
×
Please rate each item regarding Game8.co's Advertisements.
Amount of Ads
Very Dissatisfied
Somewhat Dissatisfied
Fine
Somewhat Satisfied
Highly Satisfied
Placement of Ads
Timing of Ad Display
Ad Loading Speed
Safeness of Ads
Content of Ads
×
Please rate each item regarding Game8.co's Quality of Articles.
Amount of information
Very Dissatisfied
Somewhat Dissatisfied
Fine
Somewhat Satisfied
Highly Satisfied
Frequency of updates
Speed of new information
Accuracy of articles
Understandibility of articles
Readability of sentences
×
Please rate each item regarding Game8.co's Usability of the Site.
Ease of finding information
Very Dissatisfied
Somewhat Dissatisfied
Fine
Somewhat Satisfied
Highly Satisfied
Loading Speed
Use of Color
Font Size
Visibility of Images
Easy to Understand Layout
×
Please rate each item regarding Game8.co's Message Boards, Comments.
Ease of Writing
Very Dissatisfied
Somewhat Dissatisfied
Fine
Somewhat Satisfied
Highly Satisfied
Readability
Ease in Finding Information
Comment Quality
Comment Quantity
Admin Response
×
Please rate each item regarding Game8.co's Site's new design.
Please rate our site's new design
Very Dissatisfied
Somewhat Dissatisfied
Fine
Somewhat Satisfied
Highly Satisfied
Do you think that the website's design change makes the site easier to use?
Has the new design made it easier for you to find information on the site?
Has the new design improved the overall visual appeal of the site?
How would you rate your overall satisfaction with the new design of the site?
×
How likely are you to recommend Game8 to someone you know?
Very Unlikely
0
1
2
3
4
5
6
7
8
9
10
Very Likely
If you have other opinions regarding potential improvement to the website, please share them with us. We would appreciate your honest opinion.
Note: This is a free response section, so you can proceed without entering anything.
Note: Please be sure not to enter any kind of personal information into your response.
Note: Please be sure not to enter any kind of personal information into your response.
×
Thank You
×
Thank you for participating in our survey! Your answers will help us to improve the quality of our website and services.
We hope you continue to make use of Game8.
We hope you continue to make use of Game8.
Close
Rankings
- We could not find the message board you were looking for.
Gaming News


![Everwind Review [Early Access] | The Shaky First Step to A Very Long Journey](https://img.game8.co/4440226/ab079b1153298a042633dd1ef51e878e.png/thumb)

![Monster Hunter Stories 3 Review [First Impressions] | Simply Rejuvenating](https://img.game8.co/4438641/2a31b7702bd70e78ec8efd24661dacda.jpeg/thumb)
Popular Games

Genshin Impact Walkthrough & Guides Wiki
Honkai: Star Rail Walkthrough & Guides Wiki
Umamusume: Pretty Derby Walkthrough & Guides Wiki
Pokemon Pokopia Walkthrough & Guides Wiki
Resident Evil Requiem (RE9) Walkthrough & Guides Wiki
Monster Hunter Wilds Walkthrough & Guides Wiki
Wuthering Waves Walkthrough & Guides Wiki
Arknights: Endfield Walkthrough & Guides Wiki
Pokemon FireRed and LeafGreen (FRLG) Walkthrough & Guides Wiki
Pokemon TCG Pocket (PTCGP) Strategies & Guides Wiki


Recommended Games
Diablo 4: Vessel of Hatred Walkthrough & Guides Wiki
Fire Emblem Heroes (FEH) Walkthrough & Guides Wiki
Yu-Gi-Oh! Master Duel Walkthrough & Guides Wiki
Super Smash Bros. Ultimate Walkthrough & Guides Wiki
Pokemon Brilliant Diamond and Shining Pearl (BDSP) Walkthrough & Guides Wiki
Elden Ring Shadow of the Erdtree Walkthrough & Guides Wiki
Monster Hunter World Walkthrough & Guides Wiki
The Legend of Zelda: Tears of the Kingdom Walkthrough & Guides Wiki
Persona 3 Reload Walkthrough & Guides Wiki
Cyberpunk 2077: Ultimate Edition Walkthrough & Guides Wiki


All rights reserved
©2023 Nintendo / INTELLIGENT SYSTEMS.
The copyrights of videos of games used in our content and other intellectual property rights belong to the provider of the game.
The contents we provide on this site were created personally by members of the Game8 editorial department.
We refuse the right to reuse or repost content taken without our permission such as data or images to other sites.
If you clear out the bottom side of the map before killing the sage, another tactic is to bait Sigurd into using Override through your units. Then he'll be alone in the middle of your team and you can kill him in 1 turn. Just position a line of tanky units in range of Sigurd on the bridge just outside of range of the units that spawn after the bridge is lowered. Sigurd will most likely override through them into you