This survey will take about 1 minute.
Your answers will help us to improve our website.
The Elder Scrolls IV Oblivion Remastered
Tutorial Walkthrough: Escape the Prison
Tutorial is a main quest in The Elder Scrolls IV Oblivion Remastered. Read on for a complete walkthrough of Tutorial, rewards, and how to escape the sewers.
| Next Guide ▶ |
|---|
| Deliver the Amulet |
List of Contents
Tutorial Walkthrough
| 1 | Wake Up in a Prison Cell |
|---|---|
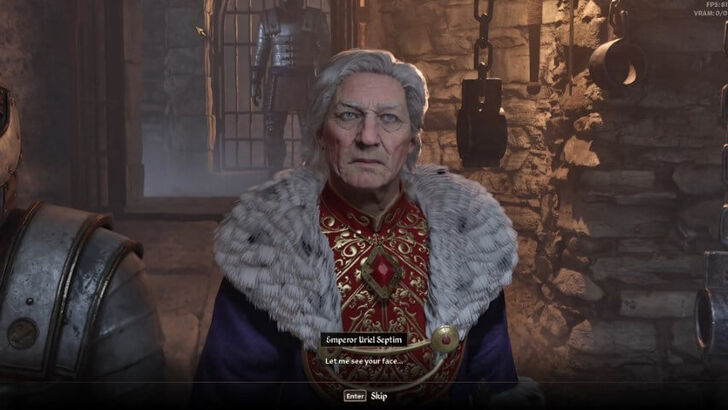 You'll wake up inside a prison cell. Shortly after, guards and Emperor Uriel Septim will enter. The Emperor will want to talk to you. |
|
| 2 | Follow the Emperor |
 After speaking with the Emperor, follow him and his bodyguards through the newly opened secret passage. |
|
| 3 | Get Weapons and Clothes |
 Continue following them until the Emperor's party is ambushed by Assassins. It’s best to let the guards handle the fight and avoid drawing attention. |
|
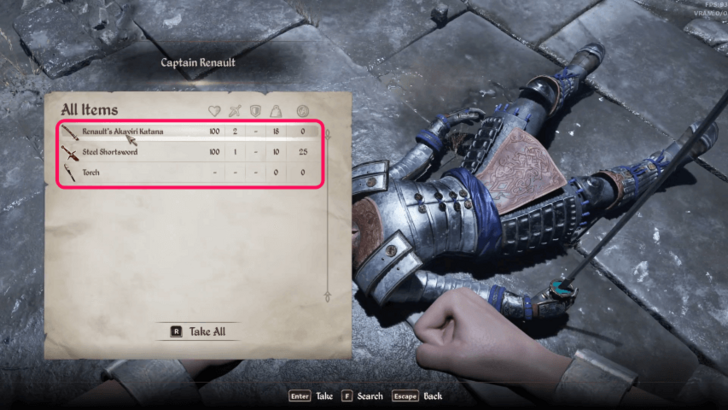 Once the fight is over, loot Captain Renault’s body for a weapon and one of the Assassins for clothing. Open the Menu and equip your weapon and gear in the Inventory tab. ▶ List of Controls |
|
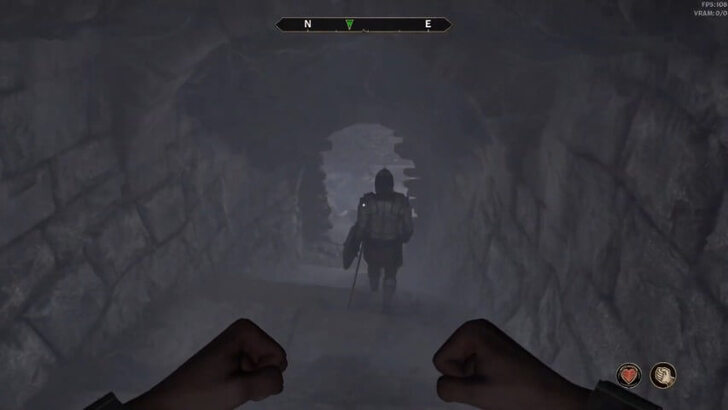
| 4 | Learn How to Fight |
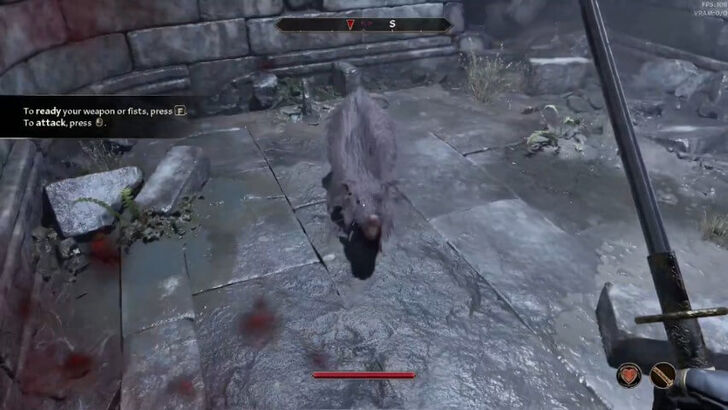 The Emperor's party will leave you behind. A section of the wall to the right will then crumble, and Rats will rush in to attack. This is where you'll learn basic combat, so pay attention to the on-screen tutorial prompts. |
|
 Enter through the hole in the wall. Explore the dungeon for valuable loot and be ready to encounter more enemies along the way! |
|
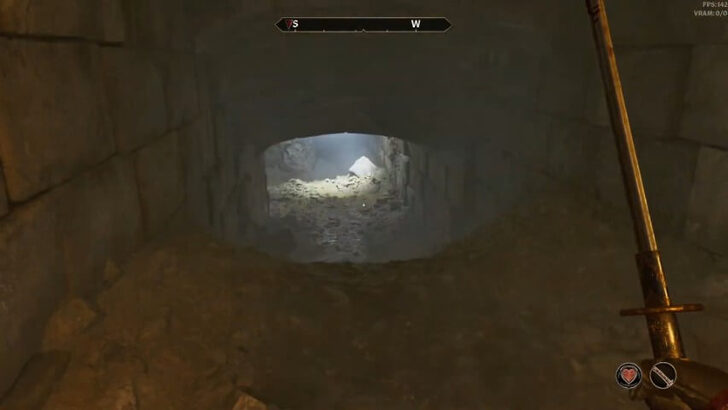
| 5 | Enter the Natural Caverns |
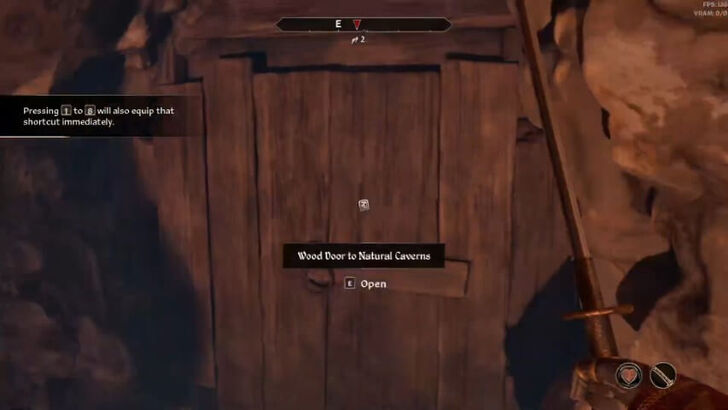 Continue forward until you reach the door to the Natural Caverns. If you’re feeling lost, you can use the Clairvoyance spell (new in the remaster) from the Magic tab in the Menu to guide you to your next objective. |
|
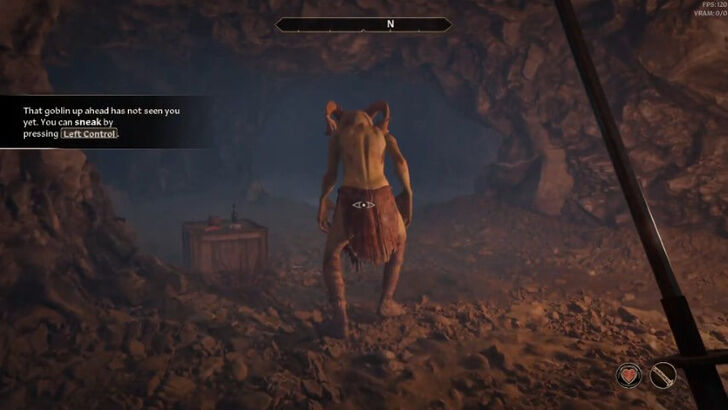 Once inside the Natural Caverns, head northwest while following tutorial instructions, including how to Sneak. You can also obtain a bow and arrows from a Goblin in the area. |
|
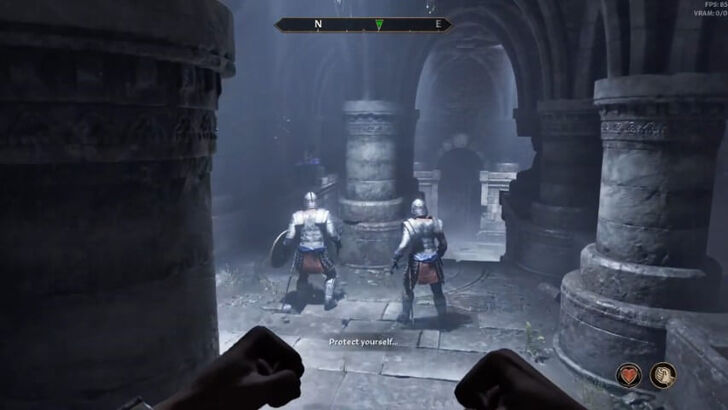
| 6 | Reunite with the Emperor |
 Enter the door to the Imperial Subterrane, where you'll find the Emperor and his guards under attack by Assassins again. Since you're now geared up, you can help fend off their attackers. |
|
| 7 | Select Your Birthsign |
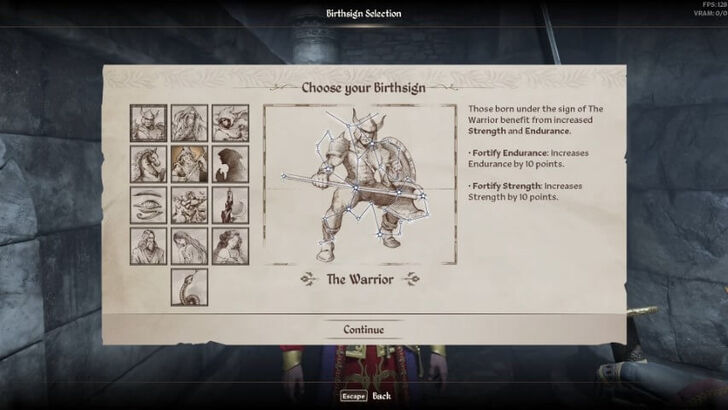 Speak to the Emperor afterward and you’ll be prompted to select your Birthsign, which represent the constellation your character was born under. Each Birthsign grants unique passive or active powers. You’ll have an opportunity to change it before leaving the sewers. ▶ Best Birthsigns Tier List |
|
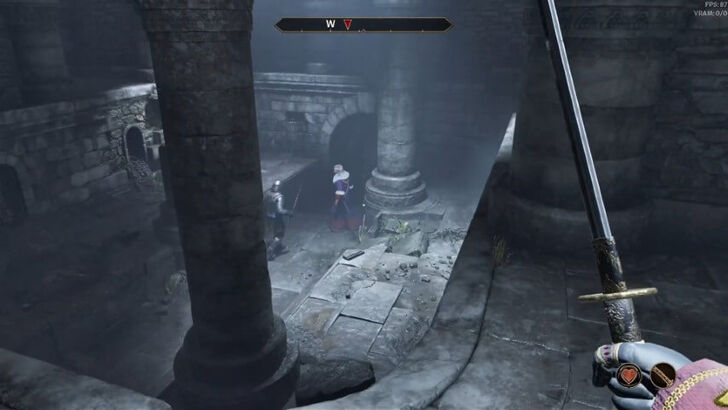
| 8 | Protect the Emperor |
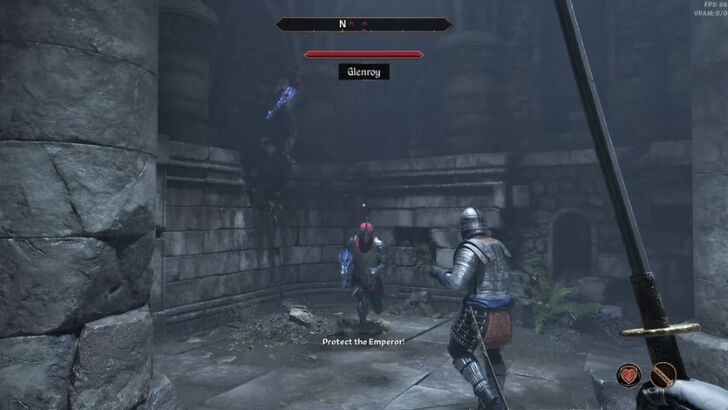 Continue following the Emperor and his guards through the cistern. Along the way, you’ll be ambushed by Assassins. Defeat them to proceed. |
|
| 9 | Enter the Sanctum |
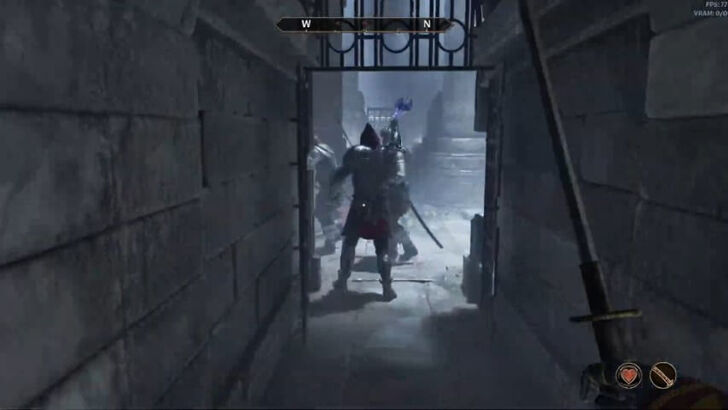 Enter the Sanctum and follow the guards to a dead end. Prepare to fend off another wave of Assassins! |
|
| 10 | Take the Amulet from the Emperor |
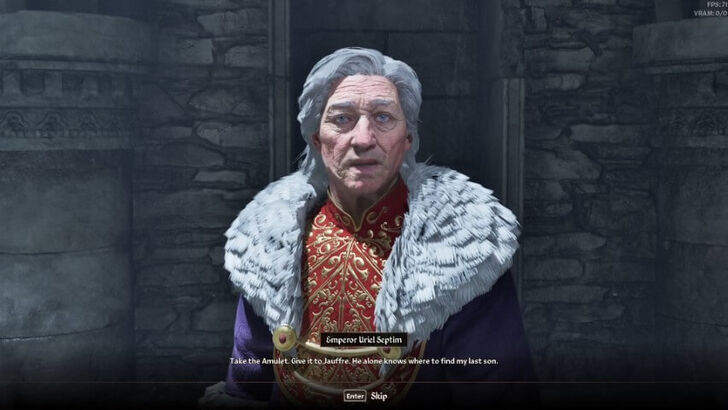 Talk to the Emperor, who will entrust you with the Amulet of Kings and ask you to deliver it to Jauffre. After speaking with him, he’ll be killed by an Assassin. |
|
| 11 | Select Your Class |
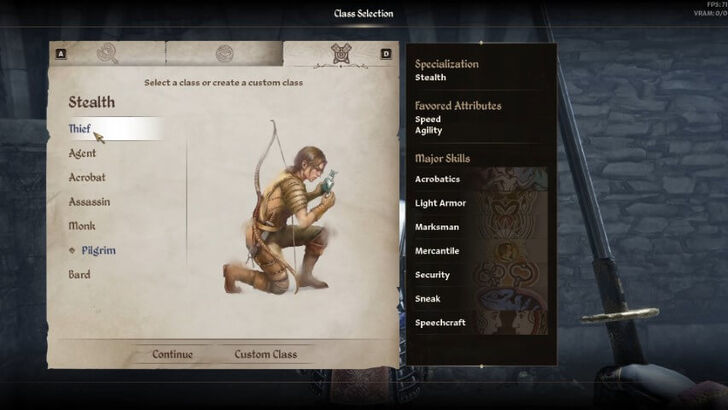 Talk to Baurus, who will give you the key to the sewers. You’ll then be prompted to select a Class, which are character archetypes that define your attributes, strengths, and weaknesses. You’ll also have an opportunity to change it before leaving the sewers. ▶ Best Class |
|
| 12 | Leave the Sewers |
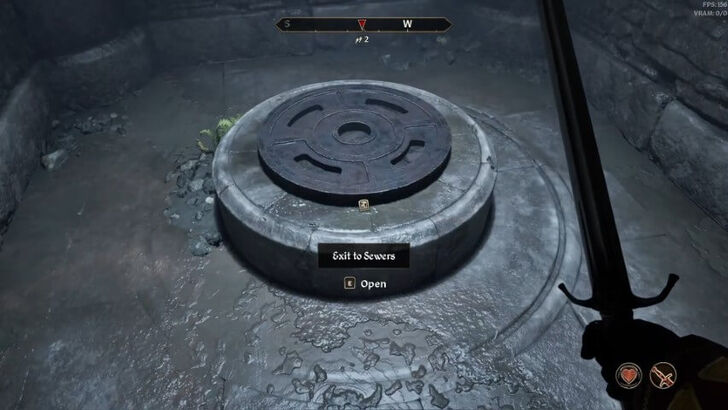 Use Baurus’s key to open the door on the right, and continue to the manhole cover to exit to the sewers. |
|
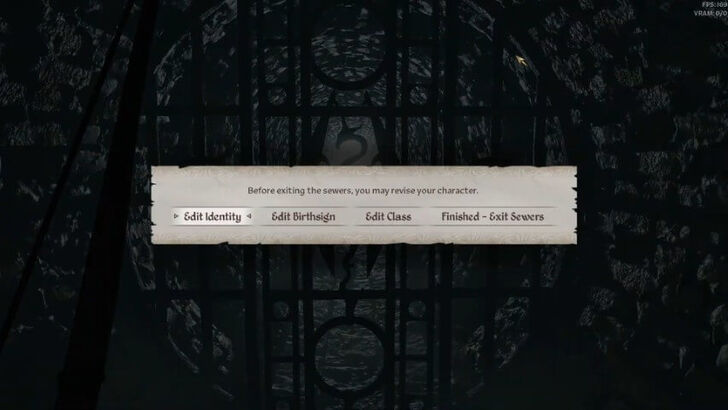 Make your way northeast through the sewers until you reach the gate to City Isle. This is your last chance to change your character’s Identity, Birthsign, and Class, so choose wisely. When you're ready, leave the sewers! |
Oblivion Remastered Related Guides

Full Walkthrough and Main Quest List
All Main Quests
| 1 | Tutorial |
|---|---|
| 2 | Delivering the Amulet |
| 3 | Find the Heir |
| 4 | Breaking the Siege of Kvatch |
| 5 | The Battle for Castle Kvatch (Optional) |
| 6 | Weynon Priory |
| 7 | The Path of Dawn |
| 8 | Dagon Shrine |
| 9 | Spies |
| 10 | Blood of the Daedra |
| 11 | Bruma Gate |
| 12 | Allies for Bruma (Optional) |
| 13 | Blood of the Divines |
| 14 | Miscarcand |
| 15 | Defense of Bruma |
| 16 | Great Gate |
| 17 | Paradise |
| 18 | Light the Dragonfires |
| 19 | Imperial Dragon Armor (Epilogue) |
Comment
Author
Tutorial Walkthrough: Escape the Prison
Please participate in our site
improvement survey
03/2026
improvement survey
03/2026
Would you assist in
improving Game8's site?
improving Game8's site?

×
We are listening to our users' valuable opinions and discussing how to act on them.
The information collected through this survey will be used for the purpose of improving our services. In addition, the information will only be disclosed a part of a statistic in a format that will not allow identification of personal information.
Begin Survey
Not Now
×
Please rate each item regarding Game8.co's Advertisements.
Amount of Ads
Very Dissatisfied
Somewhat Dissatisfied
Fine
Somewhat Satisfied
Highly Satisfied
Placement of Ads
Timing of Ad Display
Ad Loading Speed
Safeness of Ads
Content of Ads
×
Please rate each item regarding Game8.co's Quality of Articles.
Amount of information
Very Dissatisfied
Somewhat Dissatisfied
Fine
Somewhat Satisfied
Highly Satisfied
Frequency of updates
Speed of new information
Accuracy of articles
Understandibility of articles
Readability of sentences
×
Please rate each item regarding Game8.co's Usability of the Site.
Ease of finding information
Very Dissatisfied
Somewhat Dissatisfied
Fine
Somewhat Satisfied
Highly Satisfied
Loading Speed
Use of Color
Font Size
Visibility of Images
Easy to Understand Layout
×
Please rate each item regarding Game8.co's Message Boards, Comments.
Ease of Writing
Very Dissatisfied
Somewhat Dissatisfied
Fine
Somewhat Satisfied
Highly Satisfied
Readability
Ease in Finding Information
Comment Quality
Comment Quantity
Admin Response
×
Please rate each item regarding Game8.co's Site's new design.
Please rate our site's new design
Very Dissatisfied
Somewhat Dissatisfied
Fine
Somewhat Satisfied
Highly Satisfied
Do you think that the website's design change makes the site easier to use?
Has the new design made it easier for you to find information on the site?
Has the new design improved the overall visual appeal of the site?
How would you rate your overall satisfaction with the new design of the site?
×
How likely are you to recommend Game8 to someone you know?
Very Unlikely
0
1
2
3
4
5
6
7
8
9
10
Very Likely
If you have other opinions regarding potential improvement to the website, please share them with us. We would appreciate your honest opinion.
Note: This is a free response section, so you can proceed without entering anything.
Note: Please be sure not to enter any kind of personal information into your response.
Note: Please be sure not to enter any kind of personal information into your response.
×
Thank You
×
Thank you for participating in our survey! Your answers will help us to improve the quality of our website and services.
We hope you continue to make use of Game8.
We hope you continue to make use of Game8.
Close
Rankings
- We could not find the message board you were looking for.
Gaming News


![Everwind Review [Early Access] | The Shaky First Step to A Very Long Journey](https://img.game8.co/4440226/ab079b1153298a042633dd1ef51e878e.png/thumb)

![Monster Hunter Stories 3 Review [First Impressions] | Simply Rejuvenating](https://img.game8.co/4438641/2a31b7702bd70e78ec8efd24661dacda.jpeg/thumb)
Popular Games

Genshin Impact Walkthrough & Guides Wiki
Honkai: Star Rail Walkthrough & Guides Wiki
Umamusume: Pretty Derby Walkthrough & Guides Wiki
Pokemon Pokopia Walkthrough & Guides Wiki
Resident Evil Requiem (RE9) Walkthrough & Guides Wiki
Monster Hunter Wilds Walkthrough & Guides Wiki
Wuthering Waves Walkthrough & Guides Wiki
Arknights: Endfield Walkthrough & Guides Wiki
Pokemon FireRed and LeafGreen (FRLG) Walkthrough & Guides Wiki
Pokemon TCG Pocket (PTCGP) Strategies & Guides Wiki


Recommended Games
Diablo 4: Vessel of Hatred Walkthrough & Guides Wiki
Fire Emblem Heroes (FEH) Walkthrough & Guides Wiki
Yu-Gi-Oh! Master Duel Walkthrough & Guides Wiki
Super Smash Bros. Ultimate Walkthrough & Guides Wiki
Pokemon Brilliant Diamond and Shining Pearl (BDSP) Walkthrough & Guides Wiki
Elden Ring Shadow of the Erdtree Walkthrough & Guides Wiki
Monster Hunter World Walkthrough & Guides Wiki
The Legend of Zelda: Tears of the Kingdom Walkthrough & Guides Wiki
Persona 3 Reload Walkthrough & Guides Wiki
Cyberpunk 2077: Ultimate Edition Walkthrough & Guides Wiki


All rights reserved
© 2025 ZeniMax Media Inc. All Rights Reserved.
The copyrights of videos of games used in our content and other intellectual property rights belong to the provider of the game.
The contents we provide on this site were created personally by members of the Game8 editorial department.
We refuse the right to reuse or repost content taken without our permission such as data or images to other sites.