
This survey will take about 1 minute.
Your answers will help us to improve our website.
Horizon Forbidden West (HFW)
Relic Ruins: Runner's Wild Walkthrough
┣ Complete Quests → Quest Walkthroughs
┣ Learn the Best Skills → Best Skills
┣ Collect Gear → List of Weapons / Outfits
┣ Collect All Legendaries → All Legendary Weapons/Outfits
┗ Take Down Machines → List of Enemy Machines
★The Ver. 1.08 Patch is now Available!
Relic Ruins: Runner's Wild is the fifth Relic Ruins quest you can access in Horizon Forbidden West (HFW). Read on to learn the best approach to completing this quest, as well as other hints and advice.
List of Contents
To complete this Quest, you will need the Igniter ability for your Spear. You can obtain this by taking part in the Story Quest 'Death's Door'.
Relic Ruins: Runner's Wild Information
General Info
| Relic Ruins: Runner's Wild | |
|---|---|
| Description | Treasures await those who dare explore the ruins of the Old World. |
| Rewards | ・5000 XP ・2 Skill Points |
| Level | 20 |
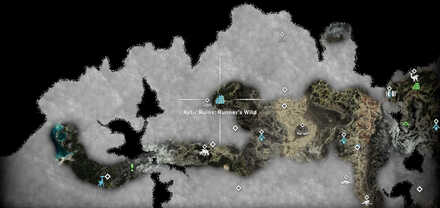
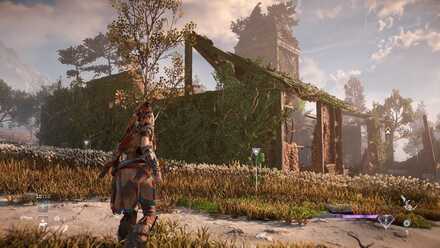
Rebel Ruins: Runner's Wild Location
| World Map Location | In-Game Location |
|---|---|
 |
 |
Rebel Ruins: Runner's Wild Walkthrough
How to Complete
| Objectives | |
|---|---|
| 1 | 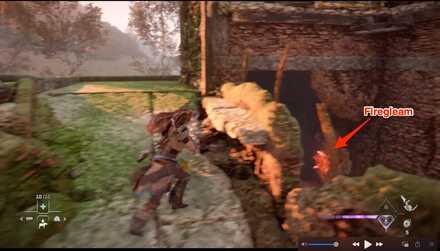 Break the Walls
Enter the ruins through the first opening and destory the cracked wall with your Pull caster. After that jump left onto the slope and immediately drop down in the opening on the right. Ignite the Firegleam that you see to proceed. |
| 2 | 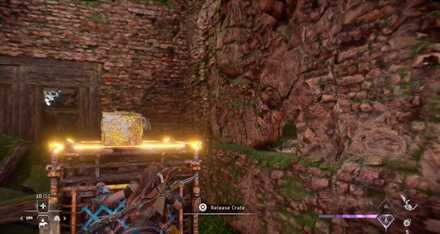 Make an Exit
You should see a crate after the Firegleam explodes. Use your Pullcaster to pull it towards you. You can try to climb the ledge behind you but it will crumble when yo do. Instead use your Pullcaster on the crumblimg wall behind you and push the crate through the hole all the way to the wall. |
| 3 | 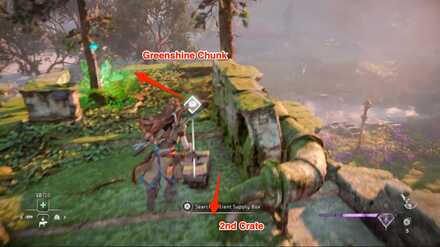 Find Another Crate
Use the crate to climb up to the top of the ruins. If you turn around, you will see another crate that you must push down to the bottom floor (use yor Pullcaster if the crate gets stuck). |
| 4 | 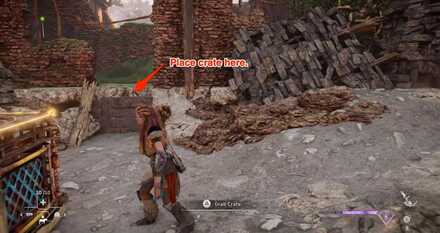 Stack the Crates
Place the crate you just got in the space next to where it fell. When you are done go back to where the first crate is and slide it on top of the second one. |
| 5 |  Get the key
Move the stack of crates next the small platform at the other end of the ruins. You can then use them to climb on the brick structures. As you climb up, left, then down, you should catch a glimpse of the key on the inside of the structure. Once you climb down, pull the stack of crates further within the structure (next to the broken ladder), and climb up them once again to get the key. |
| 6 | 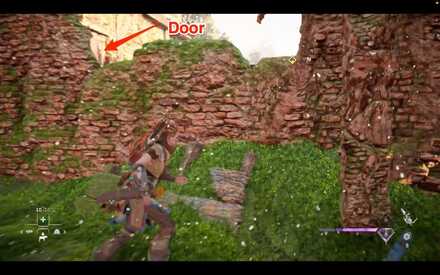 Open the Door
After you climb down again pass through the brick arch and over the wall to the right to use the key on the door. |
| 7 | 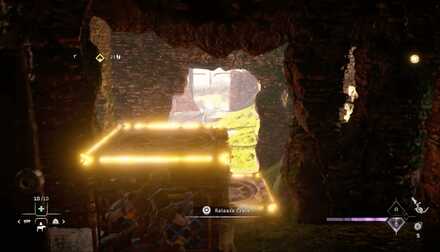 Separate the crates
After using your Pullcaster on the wall, bring the stack of crates all the way back to the opening you just made. After climbing up through the opening again, pull the top crate away from the bottom and push it through the door. |
| 8 | 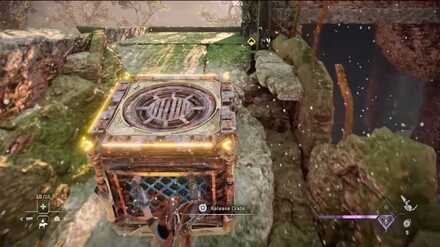 Climb up and Collect the Ornament
Push the single crate up the hill near the wall of ivy. After climbing up you should see the ornament. Collect it to complete the quest. |
Tips and Strategies
Grab the Greenshine Chunk Before Pushing Down the Second Crate
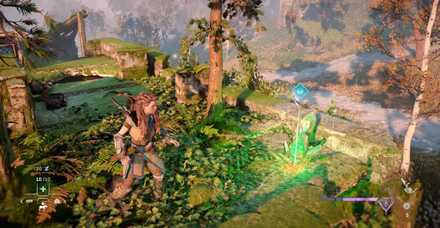
When you get to the top of the ruins where the second crate is located, go straight and collect the Greeshine Chunk before dealing with the crate.
Horizon Forbidden West Quests
List of All Quest Types
List of Relic Ruin Guides
| All Relic Ruins Guides | |
|---|---|
| The Stillsands Relic Ruins | Isle of Spires Relic Ruins |
| Runner's Wild Relic Ruins | Dry Yearn Relic Ruins |
| No Man's Land Relic Ruins | The Daunt Relic Ruins |
| The Restless Weald | The Long Coast Relic Ruins |
Author

Relic Ruins: Runner's Wild Walkthrough
Please participate in our site
improvement survey
03/2026
improvement survey
03/2026
Would you assist in
improving Game8's site?
improving Game8's site?

×
We are listening to our users' valuable opinions and discussing how to act on them.
The information collected through this survey will be used for the purpose of improving our services. In addition, the information will only be disclosed a part of a statistic in a format that will not allow identification of personal information.
Begin Survey
Not Now
×
Please rate each item regarding Game8.co's Advertisements.
Amount of Ads
Very Dissatisfied
Somewhat Dissatisfied
Fine
Somewhat Satisfied
Highly Satisfied
Placement of Ads
Timing of Ad Display
Ad Loading Speed
Safeness of Ads
Content of Ads
×
Please rate each item regarding Game8.co's Quality of Articles.
Amount of information
Very Dissatisfied
Somewhat Dissatisfied
Fine
Somewhat Satisfied
Highly Satisfied
Frequency of updates
Speed of new information
Accuracy of articles
Understandibility of articles
Readability of sentences
×
Please rate each item regarding Game8.co's Usability of the Site.
Ease of finding information
Very Dissatisfied
Somewhat Dissatisfied
Fine
Somewhat Satisfied
Highly Satisfied
Loading Speed
Use of Color
Font Size
Visibility of Images
Easy to Understand Layout
×
Please rate each item regarding Game8.co's Message Boards, Comments.
Ease of Writing
Very Dissatisfied
Somewhat Dissatisfied
Fine
Somewhat Satisfied
Highly Satisfied
Readability
Ease in Finding Information
Comment Quality
Comment Quantity
Admin Response
×
Please rate each item regarding Game8.co's Site's new design.
Please rate our site's new design
Very Dissatisfied
Somewhat Dissatisfied
Fine
Somewhat Satisfied
Highly Satisfied
Do you think that the website's design change makes the site easier to use?
Has the new design made it easier for you to find information on the site?
Has the new design improved the overall visual appeal of the site?
How would you rate your overall satisfaction with the new design of the site?
×
How likely are you to recommend Game8 to someone you know?
Very Unlikely
0
1
2
3
4
5
6
7
8
9
10
Very Likely
If you have other opinions regarding potential improvement to the website, please share them with us. We would appreciate your honest opinion.
Note: This is a free response section, so you can proceed without entering anything.
Note: Please be sure not to enter any kind of personal information into your response.
Note: Please be sure not to enter any kind of personal information into your response.
×
Thank You
×
Thank you for participating in our survey! Your answers will help us to improve the quality of our website and services.
We hope you continue to make use of Game8.
We hope you continue to make use of Game8.
Close
Rankings
- We could not find the message board you were looking for.
Gaming News


![Everwind Review [Early Access] | The Shaky First Step to A Very Long Journey](https://img.game8.co/4440226/ab079b1153298a042633dd1ef51e878e.png/thumb)

![Monster Hunter Stories 3 Review [First Impressions] | Simply Rejuvenating](https://img.game8.co/4438641/2a31b7702bd70e78ec8efd24661dacda.jpeg/thumb)
Popular Games

Genshin Impact Walkthrough & Guides Wiki
Honkai: Star Rail Walkthrough & Guides Wiki
Umamusume: Pretty Derby Walkthrough & Guides Wiki
Pokemon Pokopia Walkthrough & Guides Wiki
Resident Evil Requiem (RE9) Walkthrough & Guides Wiki
Monster Hunter Wilds Walkthrough & Guides Wiki
Wuthering Waves Walkthrough & Guides Wiki
Arknights: Endfield Walkthrough & Guides Wiki
Pokemon FireRed and LeafGreen (FRLG) Walkthrough & Guides Wiki
Pokemon TCG Pocket (PTCGP) Strategies & Guides Wiki


Recommended Games
Diablo 4: Vessel of Hatred Walkthrough & Guides Wiki
Fire Emblem Heroes (FEH) Walkthrough & Guides Wiki
Yu-Gi-Oh! Master Duel Walkthrough & Guides Wiki
Super Smash Bros. Ultimate Walkthrough & Guides Wiki
Pokemon Brilliant Diamond and Shining Pearl (BDSP) Walkthrough & Guides Wiki
Elden Ring Shadow of the Erdtree Walkthrough & Guides Wiki
Monster Hunter World Walkthrough & Guides Wiki
The Legend of Zelda: Tears of the Kingdom Walkthrough & Guides Wiki
Persona 3 Reload Walkthrough & Guides Wiki
Cyberpunk 2077: Ultimate Edition Walkthrough & Guides Wiki


All rights reserved
©2021 Sony Interactive Entertainment Europe. Developed by Guerrilla. Horizon Forbidden West is a trademark of Sony Interactive Entertainment LLC.
Sony Interactive Entertainment Privacy Policy & EULA
The copyrights of videos of games used in our content and other intellectual property rights belong to the provider of the game.
The contents we provide on this site were created personally by members of the Game8 editorial department.
We refuse the right to reuse or repost content taken without our permission such as data or images to other sites.