
This survey will take about 1 minute.
Your answers will help us to improve our website.
Horizon Forbidden West (HFW)
Nights of Lights Errand Walkthrough
┣ Complete Quests → Quest Walkthroughs
┣ Learn the Best Skills → Best Skills
┣ Collect Gear → List of Weapons / Outfits
┣ Collect All Legendaries → All Legendary Weapons/Outfits
┗ Take Down Machines → List of Enemy Machines
★The Ver. 1.08 Patch is now Available!

This guide will show you how to complete the Nights of Lights, an Errand in Horizon Forbidden West (HFW). Read on to learn the quest objectives, strategies, location, and rewards for the Nights of Lights Errand.
List of Contents
Nights of Lights Quest Information
General Info
| Nights of Lights | |
|---|---|
| Quest Giver | Stemmur |
| Description | Stemmur needs Aloy to recover an Old World gizmo from one of the ruins in the underground dome. |
| Rewards |
・4771 XP ・1 Skill Points |
| Recommended Level | 22 |
How to Unlock Nights of Lights and Location
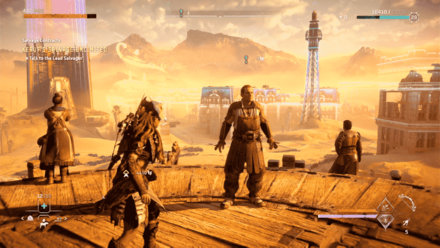
Talk to Stemmur in Dunehollow
After completing the Main Quest Sea of Sands, players can return to Dunehollow to find that Stemmur has a request for Aloy. Head up to the top-most floor of the main structure and talk to Stemmur to begin the Errand.
Quest Location
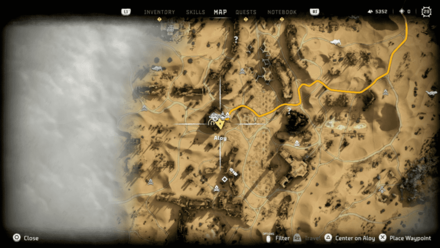 |
 |
Nights of Lights Walkthrough
How to Complete
| Objectives | |
|---|---|
| 1 | 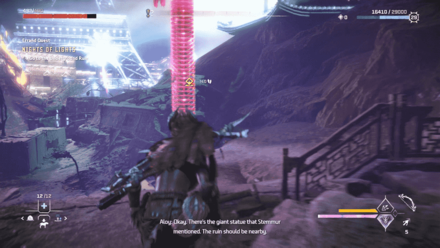 Head into the Ruins Head into the RuinsAfter speaking with Stemmur, head down into the Ruins through the elevator shaft that you used in Sea of Sands. From there, make your way out into where the underground buildings are. |
| 2 | 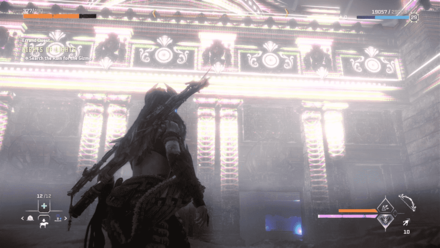 Sneak or Destroy the Machines Sneak or Destroy the MachinesYou will face several Machines blocking your way – sneak past them or destroy them for loot. After sneaking past or fighting them, head towards the building on the Southeastern corner of the area – this building is hard to miss due to the many lights posted on its front. The entrance to the building will be on the second landing that you can climb up to where there will be an opening to the side. |
| 3 | 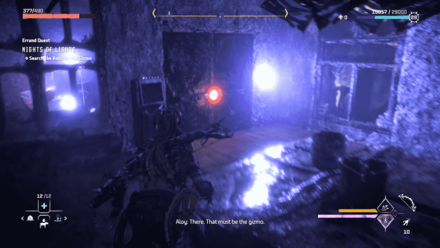 Find the Code Find the CodeAfter making your way inside, you'll spot a door with a red-locked hologram on its front. There is a side panel here that can be interacted with – you will need to find a code. Note:You can choose to follow and look for the code yourself, or skip directly to Objective 8. |
| 4 | 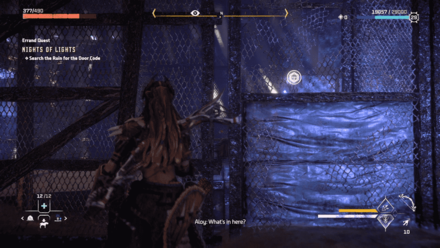 Find the First Half of the Code Find the First Half of the CodeInside of the same room with the locked door, there is a point leading up to the secone floor that you can use your Pullcaster on. Once you reach the second floor, you'll find several cages – behind the first cage you see as you ascend another flight of stairs, you'll find a Data Point you can scan for the first half of the code. |
| 5 | 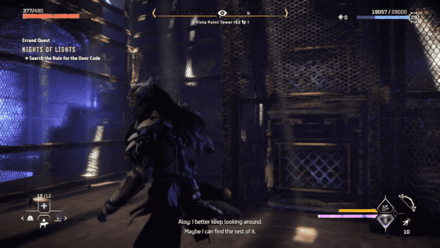 Move the Boxes Move the BoxesEnter through the broken part of the fence where the Data Point sits behind – you'll see another fenced off area adjacent of where you exit. Move to the right of this fenced area and use your Pullcaster to pull the top-most box. Move to the side of the fence afterwards where there is an opening and pull the box out – walk to the other end of the fence and use your Pullcaster again on the top box and pull it down to the ground. |
| 6 | 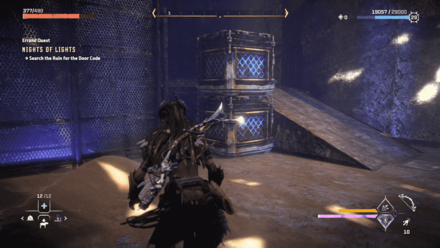 Stack the Boxes Stack the BoxesOnce both boxes have been put down to the ground, look around for a short ascending platform – push one of the boxes up this platform, and then bring the second box to the base of it. Push the box on top of the platform onto the second one to stack them, and then push the stack towards the last fenced off area. Before climbing on top, you'll see the fence has a break to the side that you can use your Pullcaster to pull to the ground the box on the other side – do so, and climb the stack to get into the fenced off area. |
| 7 | 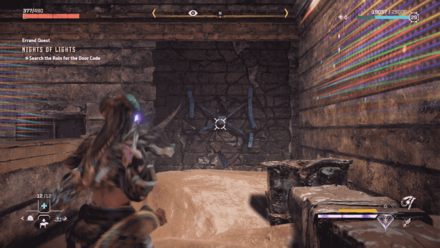 Find the Second Half of the Code Find the Second Half of the CodeInside of the fenced area, you'll find a vent that you can open with your Pullcaster. Do so, and move through the vents until you reach the outside. To your right will be a wall that can be opened with your Pullcaster, and the second half of the code on top of a table inside. |
| 8 | 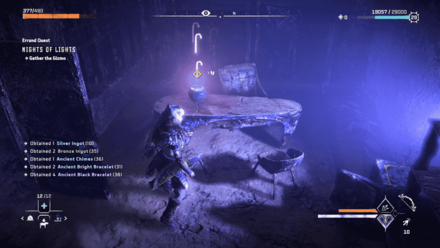 Enter the Locked Room and Return to Stemmur Enter the Locked Room and Return to StemmurWith both halves of the code – 739135 – enter it into the keypad with the locked door and enter. Take the Ornament on the table, and bring it back to Stemmur to finish the Errand. |
Tips and Strategies
Take Care of the Snapmaw First
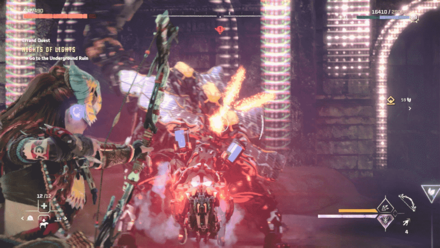
When you enter the Ruins, you'll be presented with two choices – sneak your way through the Machines in the area, or fight them head on. When fighting against the Machines, it is best to take care of the stronger Snapmaw first before battling against the Leaplashers.
Generally, Snapmaws are weak to Fire or Shock Damage, so it is highly advised that any arrows you possess that casts those two types of Elemental Damage be used when targeting the Machine's various Weak Points found on the top-side of its body.
Horizon Forbidden West Quests
List of All Quest Types
List of All Errands
Author

Nights of Lights Errand Walkthrough
Please participate in our site
improvement survey
03/2026
improvement survey
03/2026
Would you assist in
improving Game8's site?
improving Game8's site?

×
We are listening to our users' valuable opinions and discussing how to act on them.
The information collected through this survey will be used for the purpose of improving our services. In addition, the information will only be disclosed a part of a statistic in a format that will not allow identification of personal information.
Begin Survey
Not Now
×
Please rate each item regarding Game8.co's Advertisements.
Amount of Ads
Very Dissatisfied
Somewhat Dissatisfied
Fine
Somewhat Satisfied
Highly Satisfied
Placement of Ads
Timing of Ad Display
Ad Loading Speed
Safeness of Ads
Content of Ads
×
Please rate each item regarding Game8.co's Quality of Articles.
Amount of information
Very Dissatisfied
Somewhat Dissatisfied
Fine
Somewhat Satisfied
Highly Satisfied
Frequency of updates
Speed of new information
Accuracy of articles
Understandibility of articles
Readability of sentences
×
Please rate each item regarding Game8.co's Usability of the Site.
Ease of finding information
Very Dissatisfied
Somewhat Dissatisfied
Fine
Somewhat Satisfied
Highly Satisfied
Loading Speed
Use of Color
Font Size
Visibility of Images
Easy to Understand Layout
×
Please rate each item regarding Game8.co's Message Boards, Comments.
Ease of Writing
Very Dissatisfied
Somewhat Dissatisfied
Fine
Somewhat Satisfied
Highly Satisfied
Readability
Ease in Finding Information
Comment Quality
Comment Quantity
Admin Response
×
Please rate each item regarding Game8.co's Site's new design.
Please rate our site's new design
Very Dissatisfied
Somewhat Dissatisfied
Fine
Somewhat Satisfied
Highly Satisfied
Do you think that the website's design change makes the site easier to use?
Has the new design made it easier for you to find information on the site?
Has the new design improved the overall visual appeal of the site?
How would you rate your overall satisfaction with the new design of the site?
×
How likely are you to recommend Game8 to someone you know?
Very Unlikely
0
1
2
3
4
5
6
7
8
9
10
Very Likely
If you have other opinions regarding potential improvement to the website, please share them with us. We would appreciate your honest opinion.
Note: This is a free response section, so you can proceed without entering anything.
Note: Please be sure not to enter any kind of personal information into your response.
Note: Please be sure not to enter any kind of personal information into your response.
×
Thank You
×
Thank you for participating in our survey! Your answers will help us to improve the quality of our website and services.
We hope you continue to make use of Game8.
We hope you continue to make use of Game8.
Close
Rankings
- We could not find the message board you were looking for.
Gaming News


![Everwind Review [Early Access] | The Shaky First Step to A Very Long Journey](https://img.game8.co/4440226/ab079b1153298a042633dd1ef51e878e.png/thumb)

![Monster Hunter Stories 3 Review [First Impressions] | Simply Rejuvenating](https://img.game8.co/4438641/2a31b7702bd70e78ec8efd24661dacda.jpeg/thumb)
Popular Games

Genshin Impact Walkthrough & Guides Wiki
Honkai: Star Rail Walkthrough & Guides Wiki
Umamusume: Pretty Derby Walkthrough & Guides Wiki
Pokemon Pokopia Walkthrough & Guides Wiki
Resident Evil Requiem (RE9) Walkthrough & Guides Wiki
Monster Hunter Wilds Walkthrough & Guides Wiki
Wuthering Waves Walkthrough & Guides Wiki
Arknights: Endfield Walkthrough & Guides Wiki
Pokemon FireRed and LeafGreen (FRLG) Walkthrough & Guides Wiki
Pokemon TCG Pocket (PTCGP) Strategies & Guides Wiki


Recommended Games
Diablo 4: Vessel of Hatred Walkthrough & Guides Wiki
Fire Emblem Heroes (FEH) Walkthrough & Guides Wiki
Yu-Gi-Oh! Master Duel Walkthrough & Guides Wiki
Super Smash Bros. Ultimate Walkthrough & Guides Wiki
Pokemon Brilliant Diamond and Shining Pearl (BDSP) Walkthrough & Guides Wiki
Elden Ring Shadow of the Erdtree Walkthrough & Guides Wiki
Monster Hunter World Walkthrough & Guides Wiki
The Legend of Zelda: Tears of the Kingdom Walkthrough & Guides Wiki
Persona 3 Reload Walkthrough & Guides Wiki
Cyberpunk 2077: Ultimate Edition Walkthrough & Guides Wiki


All rights reserved
©2021 Sony Interactive Entertainment Europe. Developed by Guerrilla. Horizon Forbidden West is a trademark of Sony Interactive Entertainment LLC.
Sony Interactive Entertainment Privacy Policy & EULA
The copyrights of videos of games used in our content and other intellectual property rights belong to the provider of the game.
The contents we provide on this site were created personally by members of the Game8 editorial department.
We refuse the right to reuse or repost content taken without our permission such as data or images to other sites.