Cauldron Gemini Walkthrough
┣ Complete Quests → Quest Walkthroughs
┣ Learn the Best Skills → Best Skills
┣ Collect Gear → List of Weapons / Outfits
┣ Collect All Legendaries → All Legendary Weapons/Outfits
┗ Take Down Machines → List of Enemy Machines
★The Ver. 1.08 Patch is now Available!
Gemini is one of the main quests in Horizon Forbidden West. Read on to see the detailed walkthrough, rewards, location, and tips for the Gemini quest!
| Previous Quest | Current Quest | Next Quest |
|---|---|---|
| Faro's Tomb | Gemini | All That Remains |
List of Contents
Gemini Overview and Location
Basic Information
| Gemini | |
|---|---|
| Description | With Omega Clearance secured, GAIA should be able to subdue and capture HEPHAESTUS at Cauldron GEMINI. Aloy must prepare for the mission. |
| Rewards |
・24000 XP ・2 Skill Points |
| Recommended Level | 30 |
Cauldron Gemini Location
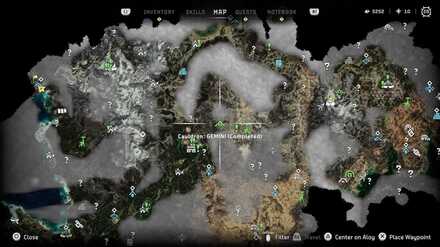
Note: Cauldron Gemini is part of a Main Quest and is not available before clearing the Faro's Tomb Main Quest.
Gemini Walkthrough
| Objectives | |
|---|---|
| 1 |  ・Return to the Base ・Talk to GAIA ・Talk to Varl ・Talk to GAIA Once you agree to go to Gemini, you'll be thrown directly into the Cauldron in the middle of a battle, so be sure to make all preparations beforehand. |
| 2 |  ・Protect Beta Defeat the machines and the Behemoth. All the machines here are weak to Acid, so keep them loaded up with Acid Arrows. If you have an Elite Blast Trap, you can use it take the Behemoth out fast. |
| 3 | 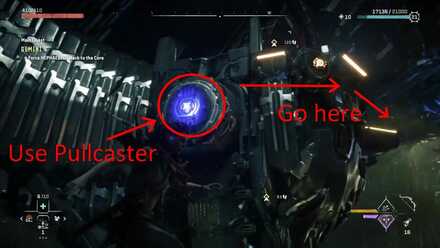 ・Pursure HEPHAESTUS Into the Cauldron In the next room, use the Shieldwing from the ledge to glide down to the platform ahead and below. Use the Pullcaster on the blue disc to pull out a pipe that you can climb up. Shieldwing down, and go left, then grapple up to the ledge on the left. Pullcaster out another pipe and climb up. From the ledge, hitch a ride on one of the machines that flies by. You can also just boost your way up using the Pullcaster and grab on the transporting machine. |
| 4 |  ・Force HEPHAESTUS Back to the Core In the next room, you will have to fight a huge number of machines at once. You will not be able to perform the override until the machines are cleared. If you stay on the ground, you'll be swarmed. There is a platform on the opposite wall of the one you entered the room on that you can grapple up to. From here, you can camp all of the machines and simply dodge their long-range attacks to easily clear the room. |
| 5 |  ・Return to the Assembly Chamber Platform across the room and grapple up to the high ledge directly ahead. When you attempt to use the override, you'll have to fight another big wave of machines. Hide in the vents in the middle of the room to lose the machines' attention. From here, you can move out into the steam vents to catch machines by surprise. |
| 6 |  ・Kill the Slaughterspine ・Override the Network Uplink ・Return to Beta and Varl You'll fight a Slaughterspine. After defeating it, return to Varl and Beta to complete the Quest. While it's charging its Plasma attacks, place an Advanced Purgewater Trap in its line of motion to inflict it with the Drenched status and prevent its attacks from having a Plasma elemental effect. |
Tips and Strategies
Prepare All Weapons and Supplies You Need
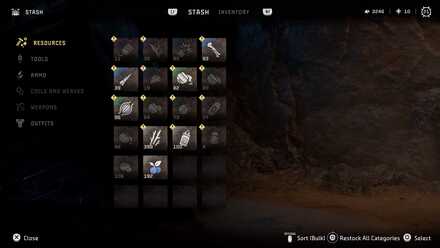
You'll be relentlessly faced with machine battles each step of the way for this Quest. Although there are plenty of healing supplies available throughout, make sure your valuable inventory space and Potions Pouch are not filled up with ones you won't need. Consider upgrading your Potions Pouch before Quest to make things easier on yourself.
Use the Terrain to Your Advantage

Some enemies can lose sight of you if you hide behind walls or go up the ledges. It will allow you to prepare your ammo, potions, traps, and other things before heading back to the fight again. It will also allow you to sneak behind them and then attack them using Silent Strike once they are unaware.
Apply Berserk Status Effect

Since there will be a lot of machines in here, it is a good idea that you use weapons that can put enemies into Berserk State. Enemies affected by it will attack anything on sight, regardless of whether they're allies or foes. It will also allow you to attack them without risking getting shot back.
Boss Strategy Guide
Slaughterspine

How to Beat Slaughterspine - Key Points
- Shoot Purgewater projectile on the Purgewater Canisters.
- Detach the Spinetail Launcher and use it against Slaughterspine.
- Destroy the Metalbite Sacs on Slaughterspine arms.
- Put it to Brittle State using Frost ammo and traps.
How to Beat Slaughterspine: Boss Fight Guide
Horizon Forbidden West Quests
List of All Quest Types
List of All Main Quests
| No. | Quest |
|---|---|
| 1 | Reach for the Stars |
| 2 | The Point of the Lance |
| 3 | To the Brink |
| 4 | The Embassy |
| 5 | Death's Door |
| 6 | The Dying Lands |
| 7 | The Eye of the Earth |
| 8 | The Broken Sky |
| 9 | The Kulrut |
| 10 | Cradle of Echoes |
| 11 | The Sea of Sands |
| 12 | Seeds of the Past |
| 13 | Faro's Tomb |
| 14 | Gemini |
| 15 | All That Remains |
| 16 | The Wings of the Ten |
| 17 | Singularity |
Author
Cauldron Gemini Walkthrough
improvement survey
03/2026
improving Game8's site?

Your answers will help us to improve our website.
Note: Please be sure not to enter any kind of personal information into your response.

We hope you continue to make use of Game8.
Rankings
- We could not find the message board you were looking for.
Gaming News
Popular Games

Genshin Impact Walkthrough & Guides Wiki

Honkai: Star Rail Walkthrough & Guides Wiki

Umamusume: Pretty Derby Walkthrough & Guides Wiki

Pokemon Pokopia Walkthrough & Guides Wiki

Resident Evil Requiem (RE9) Walkthrough & Guides Wiki

Monster Hunter Wilds Walkthrough & Guides Wiki

Wuthering Waves Walkthrough & Guides Wiki

Arknights: Endfield Walkthrough & Guides Wiki

Pokemon FireRed and LeafGreen (FRLG) Walkthrough & Guides Wiki

Pokemon TCG Pocket (PTCGP) Strategies & Guides Wiki
Recommended Games

Diablo 4: Vessel of Hatred Walkthrough & Guides Wiki

Cyberpunk 2077: Ultimate Edition Walkthrough & Guides Wiki

Fire Emblem Heroes (FEH) Walkthrough & Guides Wiki

Yu-Gi-Oh! Master Duel Walkthrough & Guides Wiki

Super Smash Bros. Ultimate Walkthrough & Guides Wiki

Pokemon Brilliant Diamond and Shining Pearl (BDSP) Walkthrough & Guides Wiki

Elden Ring Shadow of the Erdtree Walkthrough & Guides Wiki

Monster Hunter World Walkthrough & Guides Wiki

The Legend of Zelda: Tears of the Kingdom Walkthrough & Guides Wiki

Persona 3 Reload Walkthrough & Guides Wiki
All rights reserved
©2021 Sony Interactive Entertainment Europe. Developed by Guerrilla. Horizon Forbidden West is a trademark of Sony Interactive Entertainment LLC.
Sony Interactive Entertainment Privacy Policy & EULA
The copyrights of videos of games used in our content and other intellectual property rights belong to the provider of the game.
The contents we provide on this site were created personally by members of the Game8 editorial department.
We refuse the right to reuse or repost content taken without our permission such as data or images to other sites.


![Everwind Review [Early Access] | The Shaky First Step to A Very Long Journey](https://img.game8.co/4440226/ab079b1153298a042633dd1ef51e878e.png/thumb)

![Monster Hunter Stories 3 Review [First Impressions] | Simply Rejuvenating](https://img.game8.co/4438641/2a31b7702bd70e78ec8efd24661dacda.jpeg/thumb)


