Death's Door Walkthrough and Door Code
┣ Complete Quests → Quest Walkthroughs
┣ Learn the Best Skills → Best Skills
┣ Collect Gear → List of Weapons / Outfits
┣ Collect All Legendaries → All Legendary Weapons/Outfits
┗ Take Down Machines → List of Enemy Machines
★The Ver. 1.08 Patch is now Available!
Death's Door is one of the main quests in Horizon Forbidden West (HFW). Read on for a detailed walkthrough, the code to the locked door which is 7482, rewards, location, and tips for the Death's Door quest!
| Previous Quest | Current Quest | Next Quest |
|---|---|---|
| The Embassy | Death's Door | The Dying Lands |
List of Contents
Death's Door Overview
Basic Information
| Death's Door | |
|---|---|
| Description | For months, Aloy has searched for a backup of GAIA, to no avail. Now, thanks to information that Sylens gleaned from HADES, she explores the ancient ruins where the rogue AI was created in hopes of finally finding what she needs. |
| Rewards |
・5500 XP ・2 Skill Points |
| Recommended Level | 10 |
Death's Door Walkthrough
| Objectives | |
|---|---|
| 1 | 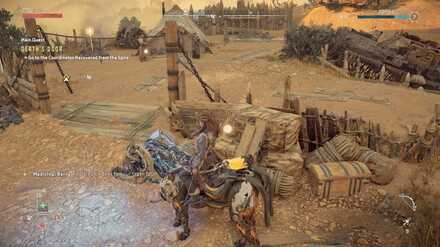 ・Go to the Coordinates Recovered from the Spire Head to the objective. This is a good time to call your mount if you did the Override a Charger objective in the previous Quest. You can test out the Shieldwing on the way, but it won't take you far. |
| 2 |  Upon reaching the water, swim across toward the objective. If you go underwater here, you can get a Deepwater Kindle Weed, which you will need for one of the following steps. |
| 3 | 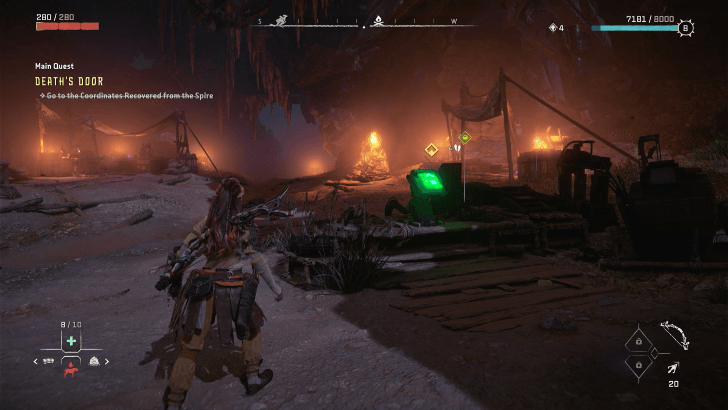 ・Watch the Hologram ・Examine the Device ・Investigate Sylens' Workshop ・Follow the Orb's Trail ・Examine the Orb Scan the two datapoints at Sylens' lab then approach and activate the nearby green console. To follow the Orb's Trail, follow the path ahead until it reaches a door. The Quest marker will not show you the way, so you simply have to continue following the path on the ground ahead of you. Some machines will be on the path, so call your mount and ride past them if you want to get through quickly. If you fight, you can go ahead and grab a Leaplasher Spark Coil from a Leaplasher, which is needed for one of the following steps. |
| 4 | 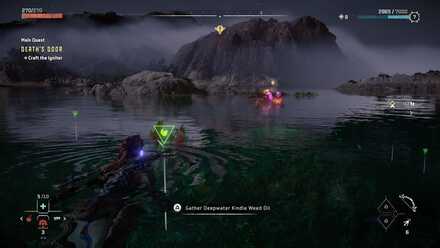 ・Gather Resources for the Igniter If you haven't obtained them so far, you'll need a Deepwater Kindle Weed from underwater in the lake you passed, and Leaplasher Spark Coil, which can be obtained by detaching the Power Cell from a Leaplasher. Leaplashers are found in the enemy group from the previous step. The Power Cell is on the Leaplasher's back, so you'll have to target it deliberately to try to detach it. Check its location in the Notebook, and target it with the Focus if you have time. |
| 5 | 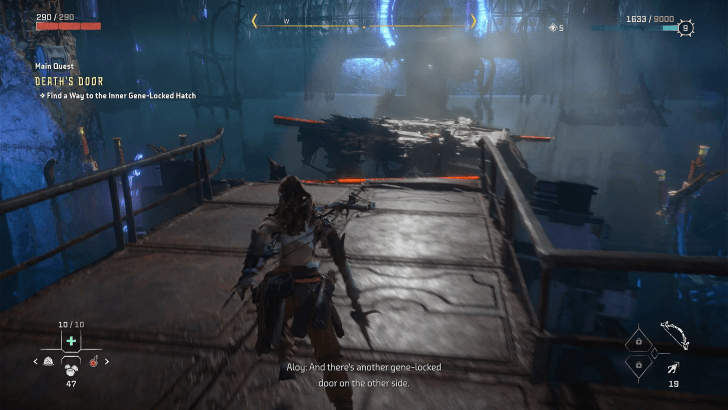 ・Craft the Igniter ・Ignite the Firegleam ・Enter the Facility After crafting and using the igniter on the door, head deeper into the facility until you are faced with a room full of water and some metal structures. |
| 6 | 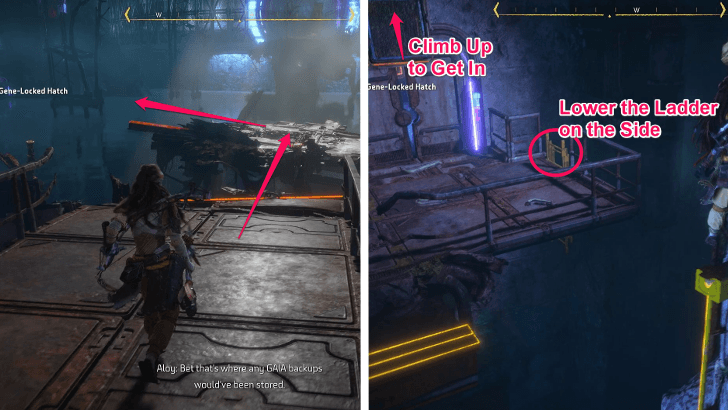 ・Restore Power to the Terminal Head onto the large broken metal platform and go down the path to the left, climbing and grappling when needed. Note that you'll encounter some vent panels that you need to use the Pullcaster on. You'll eventually find yourself at a door with a small crack and some climbable bars on top. Don't forget to lower the ladder.. |
| 7 | 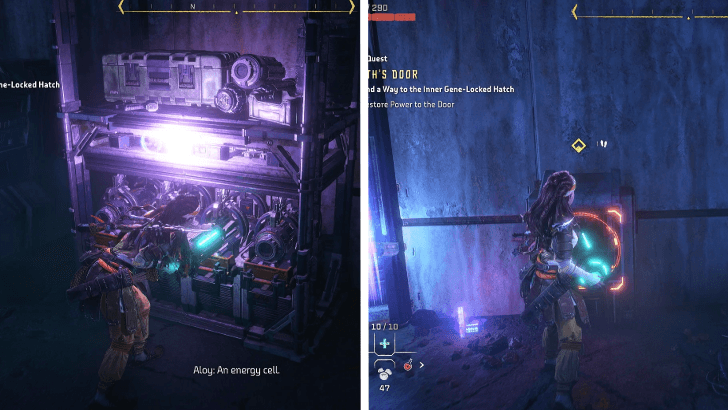 ・Restore Power to the Terminal Head inside the room by climbing the bars above the door. There will be a door with a red battery inside. In this same room, there will be a generator on the wall. Take the energy cell from it and place it where the red battery is to open the door. This will be one of the main puzzle features of this area so remember this process. |
| 8 | 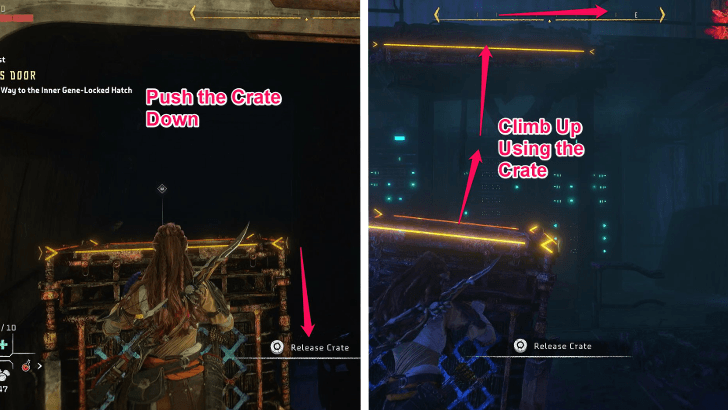 ・Restore Power to the Terminal In the next room, after grappling to the upper level, push the crate down the hole and drop down as well. There will be a room with two red batteries but you'll only need to activate the one on the larger wall. Move the crate to the other side and climb to the upper level. . |
| 9 | 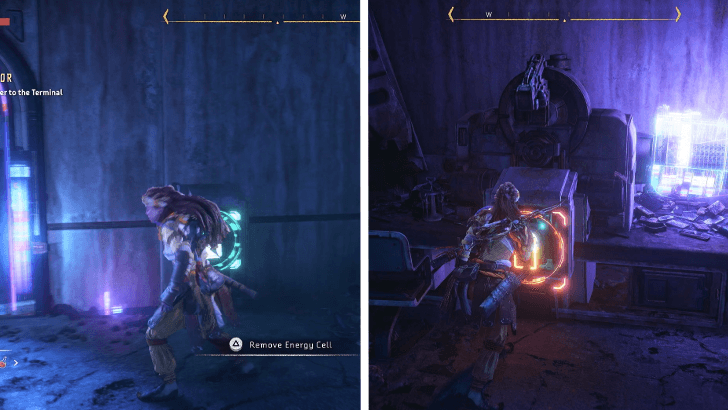 ・Restore Power to the Terminal Ignite and enter the wall on the right side then take the energy cell from the first area. Transfer it to the previous rooms' red battery on the larger wall. This will activate some holograms and open the door on the second level. |
| 10 | 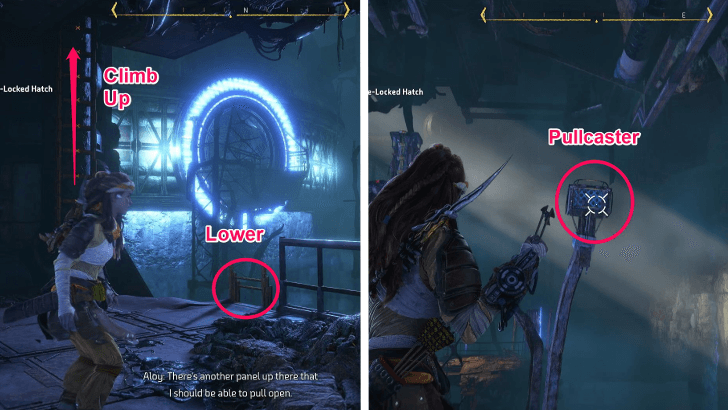 ・Explore the North Side of the Facility This door will lead back to the area with the water. Lower the ladder on the edge and climb the ladder leading up. From here you'll need to use your pullcaster on the grated rectangular structure to get across.. |
| 11 | 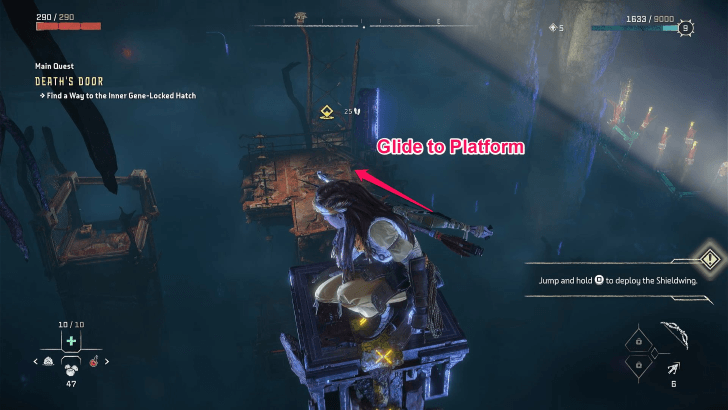 ・Explore the North Side of the Facility When you dont see anymore climbable points, use the glide feature to get onto the rusty platform. Continue grappling and climbing until you're in the room on the other side. |
| 12 |  ・Unlock the Door Use ignite on the wall to proceed to the next room. There will be two scannable data points, some locked doors and doorway that's open. Go down the doorway that's open and scan the info to give you the code (7482). The info should be titled Bad Urges. Enter the code beside the locked door to proceed to the next area. |
| 13 | 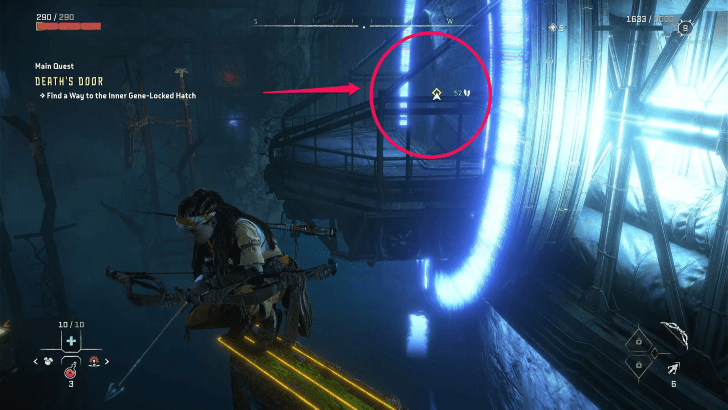 ・Find a Way to the Inner Gene-Locked Hatch You'll eventually head out of the room and back to the area with water. The next path to take will be down to the northern central door. Similar to the previous steps, use your focus, pullcaster to maneuver and climb to this door. |
| 14 | 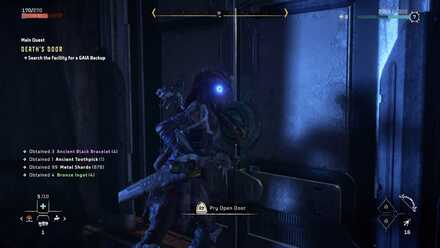 ・Find a Way to the Inner Gene-Locked Hatch Pry open the door in the next room and climb up. Go through the door, and platform to the ledge closest to the Gene-Locked Hatch. From there, use the Pullcaster on the nearby pole with the metal X. Go across, then use the Pullcaster again on the pole with the grating ahead. Head across and finally, use the Shieldwing to glide to the door. |
| 15 | 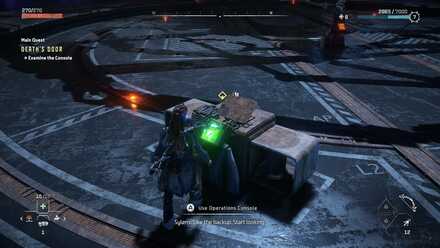 ・Examine the Console ・Examine the Access Console Use the console, then shoot the arm. Check the GAIA repository. |
| 16 | 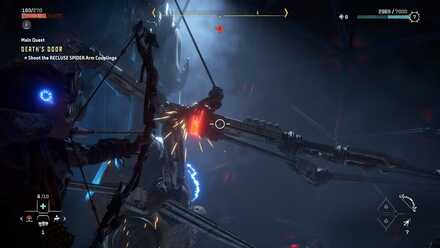 ・Kill the Mysterious Attacker Attacking him will not do anything, so focus on avoiding his attacks. First, activate the terminal. Then, shoot the connectors (red spots) on the Spider four times. Next, you'll need to hit the couplings (orange lines) on the top of the Spider's Head. Each of these must be shot twice. |
| 17 | 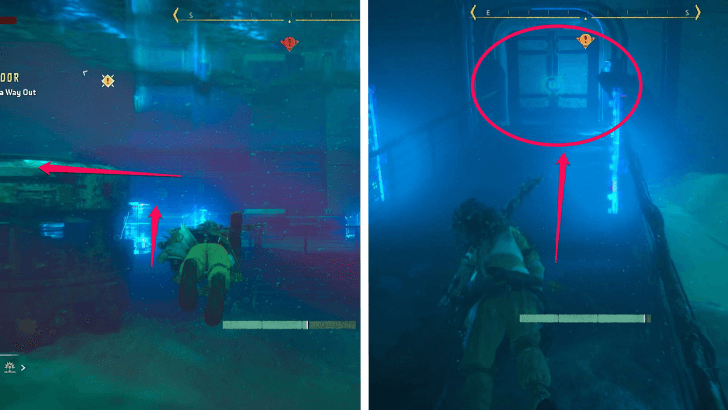 ・Search for a Way Out Follow the path ahead. In the next room, where machines are shooting at you if you stay too close to the surface or go up, submerge and head to the north west. There will be a door surrounded by blue lights. Open the door and head there. Go left, and ascend on the opposite end; in the next room, use the Pullcaster to open the vent. Press down the left control stick to swim faster throughout this segment. |
| 18 |  Submerge again before you get shot at and go through the door. Go through the door and resurface, and go into the vent. Go through the next door and ignite the Firegleam to escape and end the Quest. |
Death's Door Code Solution
After making your way to the other side of the facility, you will have to go inside the crack on the left. You will then see the door that requires a code on the left side to proceed. You can enter the 7482 code immediately on it, or you can scan the Bad Urges Text Datapoint on the opposite side where the locked door is.
Tips and Strategies
Wait for the Attacker to Stop Shooting

When battling the Mysterious Attacker, although his attacks come quickly, he will still take a moment between each attack. Use this time to aim for your target on the Spider. Using Concentration by pressing down the right control stick will allow you to take more time for each shot, giving you a moment to dodge the next attack after shooting.
Lower the Ladders Down
You can lower the ladders down as you progress through to the Inner Gene-Locked Hatch. They will serve as a checkpoint so that you won't have to start all over again if you fall into the water.
Horizon Forbidden West Quests

List of All Quest Types
List of All Main Quests
| No. | Quest |
|---|---|
| 1 | Reach for the Stars |
| 2 | The Point of the Lance |
| 3 | To the Brink |
| 4 | The Embassy |
| 5 | Death's Door |
| 6 | The Dying Lands |
| 7 | The Eye of the Earth |
| 8 | The Broken Sky |
| 9 | The Kulrut |
| 10 | Cradle of Echoes |
| 11 | The Sea of Sands |
| 12 | Seeds of the Past |
| 13 | Faro's Tomb |
| 14 | Gemini |
| 15 | All That Remains |
| 16 | The Wings of the Ten |
| 17 | Singularity |
Author

Death's Door Walkthrough and Door Code
Rankings
- We could not find the message board you were looking for.
Gaming News


![Monster Hunter Stories 3 Review [First Impressions] | Simply Rejuvenating](https://img.game8.co/4438641/2a31b7702bd70e78ec8efd24661dacda.jpeg/thumb)
Popular Games

Genshin Impact Walkthrough & Guides Wiki
Honkai: Star Rail Walkthrough & Guides Wiki
Umamusume: Pretty Derby Walkthrough & Guides Wiki
Pokemon Pokopia Walkthrough & Guides Wiki
Resident Evil Requiem (RE9) Walkthrough & Guides Wiki
Monster Hunter Wilds Walkthrough & Guides Wiki
Wuthering Waves Walkthrough & Guides Wiki
Arknights: Endfield Walkthrough & Guides Wiki
Pokemon FireRed and LeafGreen (FRLG) Walkthrough & Guides Wiki
Pokemon TCG Pocket (PTCGP) Strategies & Guides Wiki


Recommended Games
Diablo 4: Vessel of Hatred Walkthrough & Guides Wiki
Cyberpunk 2077: Ultimate Edition Walkthrough & Guides Wiki
Fire Emblem Heroes (FEH) Walkthrough & Guides Wiki
Yu-Gi-Oh! Master Duel Walkthrough & Guides Wiki
Super Smash Bros. Ultimate Walkthrough & Guides Wiki
Pokemon Brilliant Diamond and Shining Pearl (BDSP) Walkthrough & Guides Wiki
Elden Ring Shadow of the Erdtree Walkthrough & Guides Wiki
Monster Hunter World Walkthrough & Guides Wiki
The Legend of Zelda: Tears of the Kingdom Walkthrough & Guides Wiki
Persona 3 Reload Walkthrough & Guides Wiki


All rights reserved
©2021 Sony Interactive Entertainment Europe. Developed by Guerrilla. Horizon Forbidden West is a trademark of Sony Interactive Entertainment LLC.
Sony Interactive Entertainment Privacy Policy & EULA
The copyrights of videos of games used in our content and other intellectual property rights belong to the provider of the game.
The contents we provide on this site were created personally by members of the Game8 editorial department.
We refuse the right to reuse or repost content taken without our permission such as data or images to other sites.
Life saver