This survey will take about 1 minute.
Your answers will help us to improve our website.
Pikmin 4
Cavern for a King Treasures, Castaway, and Onion Locations
❀ Pikmin 4 is out! Get a headstart by following these tips!
❀ Get more Pikmin by getting all the onion types!
❀ New and returning bosses are back in the Piklopedia!
❀ Brave the Trial of the Sage Leaf to get more onions!
❀ Make Oatchi stronger by upgrading his skills!
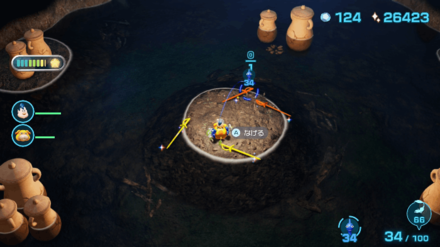
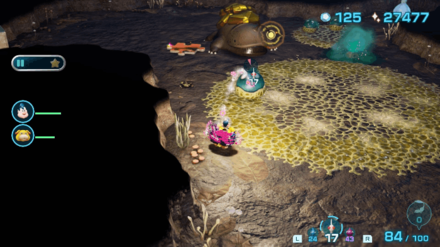
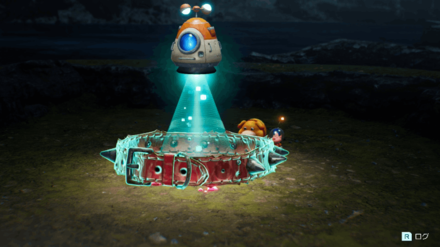
Cavern for a King in Pikmin 4 is a cave that can be found in Primordial Thicket. See all treasures, bosses, enemies, castaways, and onion locations in Cavern for a King. The guide below also has its map, a section on how to reach it and tips and strategies on how to complete it 100%.
List of Contents
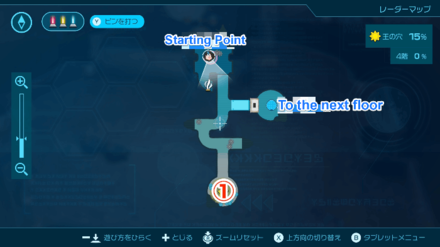
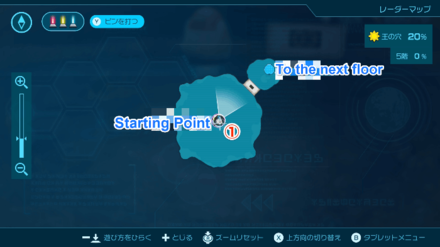
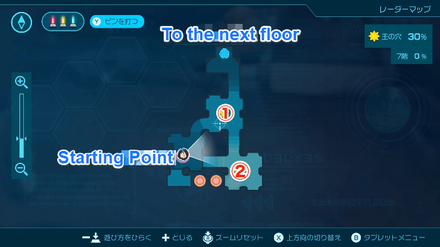
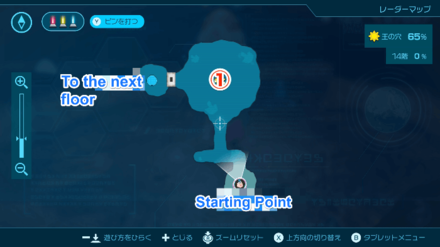
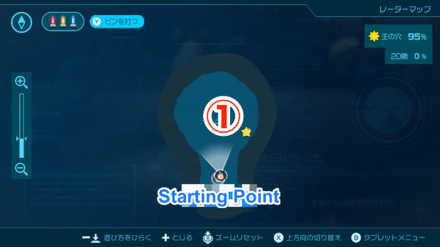
Cavern for a King Map and Overview
Map
| Map Location | 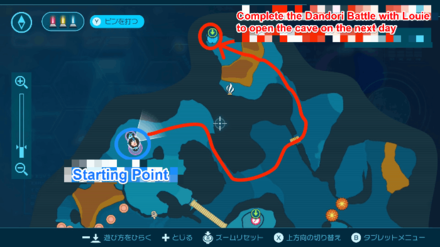 |
|---|---|
| Overworld Location |  |
Overview
| Location | Primordial Thicket | ||
|---|---|---|---|
| Castaways | 1 | ||
| Treasures | 48 | ||
| Onions | 0 | ||
| Pikmin |
Red Pikmin
Blue Pikmin Ice Pikmin Purple Pikmin White Pikmin |
||
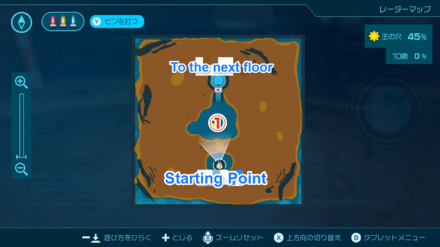
How to Reach Cavern for a King
Unlock After Defeating Louie in a Dandori Battle
The Cavern for a King only unlocks the day after you defeat Louie in Primordial Thicket and rescue the castaways in that area.
Cavern for a King Bosses and Enemies
Bosses
|
|
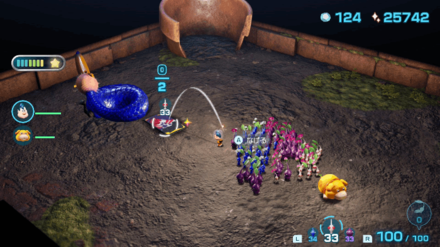
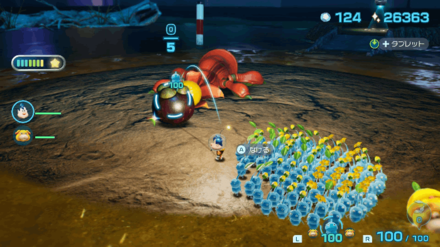
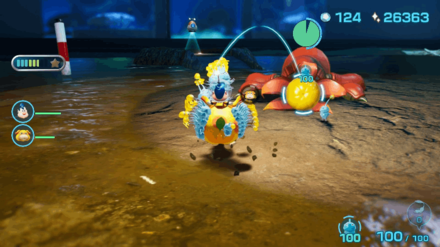
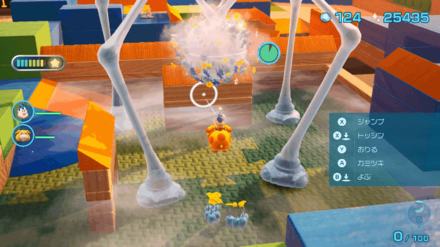
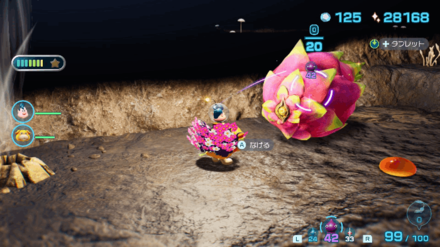
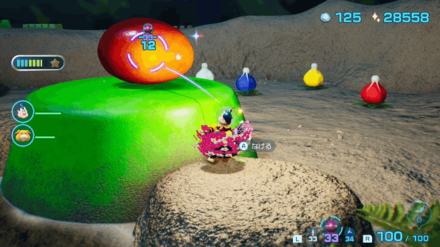
Ancient Sirehound is the final boss of Pikmin 4 and is found at the 20th sublevel of Cavern for a King. The boss has five forms that matches to a corresponding Pikmin type to use.
Its main weak point is the tail, which the boss lowers when it performs an attack in each of the five forms.
Enemies
|
|
|
|
|
|
|
|
|
|
|
|
|
|
|
Cavern for a King Treasure Locations
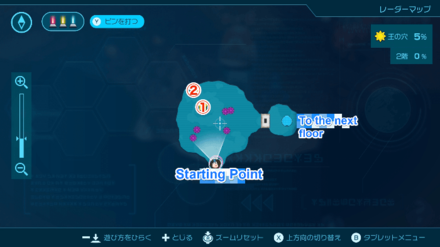
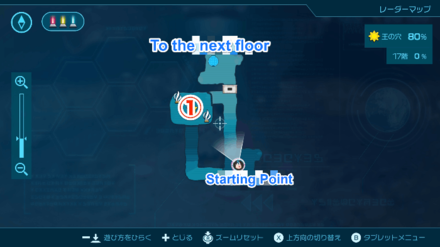
Sublevel 1
| Jump to a Sublevel | |||||||||
|---|---|---|---|---|---|---|---|---|---|
| 1 | 2 | 3 | 4 | 5 | |||||
| 6 | 7 | 8 | 9 | 10 | |||||
| 11 | 12 | 13 | 14 | 15 | |||||
| 16 | 17 | 18 | 19 | 20 | |||||
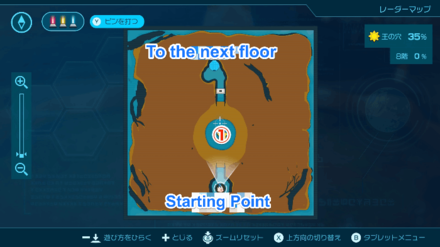
| Cavern for a King Sublevel 1 Map | ||
|---|---|---|
 |
||
| All Treasures | ||
| 1 |
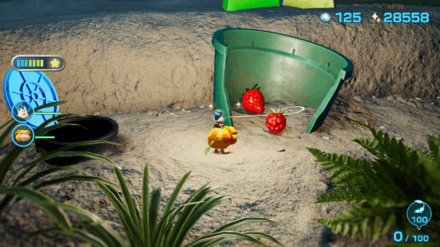
Sparklium: 20 |
 Defeat the boss and it will drop the treasure. |
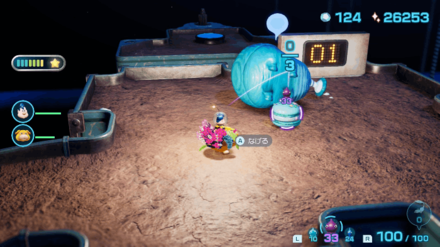
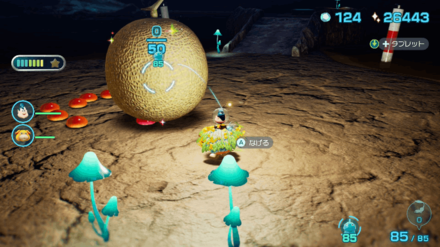
Use White Pikmin or Upgraded Rush to Defeat Enemies
The first sublevel contains sticky mold that you can remove using White Pikmin. If you have Sniff Saver equipped, you can also defeat the enemies that spew poison using Oatchi's Rush ability.
Make sure to also collect the small enemies immediately as the spores from the boss will revive them. Use White Pikmin to collect and transport them to the base as they are not affected by the poison.
Rush Towards Toxstool
Once you have defeated the small enemies, use an Ultra-Spicy Spray and Oatchi's Rush ability to charge towards the boss so it falls over. Use this opportunity to deploy all your Pikmin to attack it before it recovers and counterattacks.
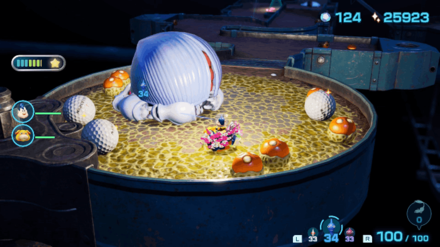
Sublevel 2
| Jump to a Sublevel | |||||||||
|---|---|---|---|---|---|---|---|---|---|
| 1 | 2 | 3 | 4 | 5 | |||||
| 6 | 7 | 8 | 9 | 10 | |||||
| 11 | 12 | 13 | 14 | 15 | |||||
| 16 | 17 | 18 | 19 | 20 | |||||
| Cavern for a King Sublevel 2 Map | ||
|---|---|---|
 |
||
| All Treasures | ||
| 1 |
Sparklium: 80 |
 Defeat the Jumbo Bulbobrb and it will drop the treasure. |
| 2 |
Sparklium: 150 |
 Pick it up from the ground. |
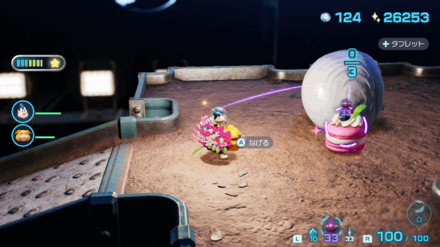
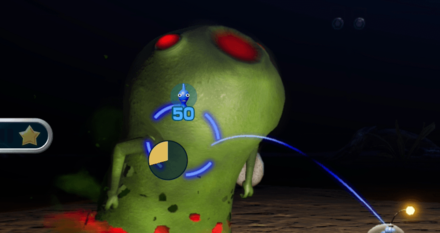
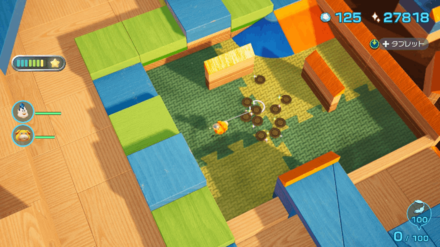
Defeat the Enemies One by One
On the second sublevel, you will need to defeat a total of 6 enemies. Make sure to defeat them one by one as they can easily overwhelm you if all enemies attack.
Rush Towards the Bulborb's Back
Use the grass to hide and sneak up on the Bulborbs. Wait for the enemy to turn around and have its back towards you before you use Oatchi's Rush ability to defeat them.
Sublevel 3
| Jump to a Sublevel | |||||||||
|---|---|---|---|---|---|---|---|---|---|
| 1 | 2 | 3 | 4 | 5 | |||||
| 6 | 7 | 8 | 9 | 10 | |||||
| 11 | 12 | 13 | 14 | 15 | |||||
| 16 | 17 | 18 | 19 | 20 | |||||
| Cavern for a King Sublevel 3 Map | ||
|---|---|---|
 |
||
| All Treasures | ||
| 1 |
Sparklium: 40 |
 Defeat the Burrowing Snagret and it will drop the treasure. |
Check the Burrowing Snagret's Locations on the Map

There are three Burrowing Snagret's in the 3rd sublevel that will only come out if you move within a certain range, so it is possible to fight them one by one.
Rush Towards the Boss As It Emerges from the Ground
The Burrowing Snagret's weak point is the head, which will appear first when it emerges from the ground. Use this opportunity to use Oatchi's Rush ability to charge towards it as soon as it emerges from the ground.
Sublevel 4
| Jump to a Sublevel | |||||||||
|---|---|---|---|---|---|---|---|---|---|
| 1 | 2 | 3 | 4 | 5 | |||||
| 6 | 7 | 8 | 9 | 10 | |||||
| 11 | 12 | 13 | 14 | 15 | |||||
| 16 | 17 | 18 | 19 | 20 | |||||
| Cavern for a King Sublevel 4 Map | ||
|---|---|---|
 |
||
| All Treasures | ||
| 1 |
Sparklium: 40 |
 Collect 3 of these when you defeat the enemy. |
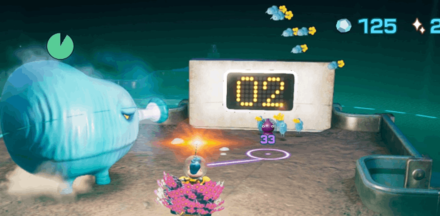
Run on the Edge of the Path
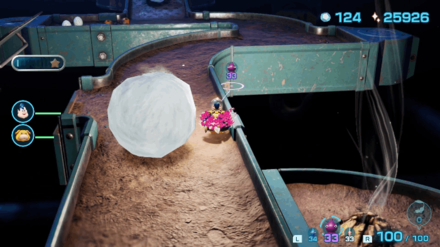
On the 4th sublevel, there is an enemy that shoots giant snowballs that will roll down the passageway. You can avoid the snowball by running on the edge of the path, however watch out for the curves as the snowball can still hit you while you are on the sides.
If you get hit by the snowball, you will get knocked off and your Pikmin may fall off the stage.
Sublevel 5
| Jump to a Sublevel | |||||||||
|---|---|---|---|---|---|---|---|---|---|
| 1 | 2 | 3 | 4 | 5 | |||||
| 6 | 7 | 8 | 9 | 10 | |||||
| 11 | 12 | 13 | 14 | 15 | |||||
| 16 | 17 | 18 | 19 | 20 | |||||
| Cavern for a King Sublevel 5 Map | ||
|---|---|---|
 |
||
| All Treasures | ||
| 1 |
Sparklium: 90 |
 Defeat the boss and it will drop the treasure. |
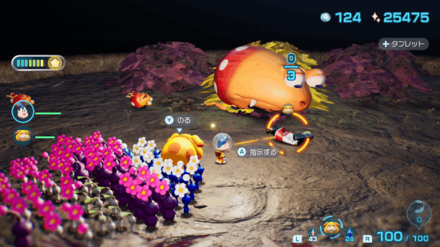
Be Careful Not to Wake Up the Three Bosses at the Same Time
The fifth sublevel contains three Emperor Bulblax that will wake up if you get close to their location. You can defeat them one by one if you stick close to one area as the others will not attack.
Rewind Time If the Boss Roars
There is a chance that the Emperor Bulblax will roar which sends your Pikmin and Oatch in a panic. In addition, the attack also wakes up the other two Emperor Bulblax forcing you to fight all three of them at the same time.
If this happens, it is recommended to rewind time and try again if the boss uses this attack.
Alternative: Lure Bosses Away If They Roar
If the boss does roar and you do not want to restart, you can lure away the bosses from each other and attack them one by one from there. Get close to its head to start its attack but then back away immediately. This gives you time to charge up Oatchi's rush attack and release it.
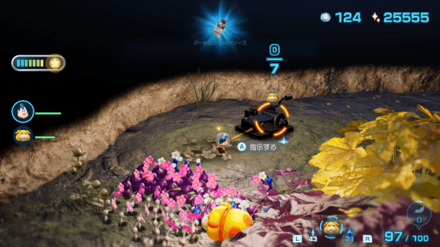
Use Pikpik Carrot and Lightning Shock
|
|
|
To stop the Emperor Bulblax from moving, you can use Pikpik Carrot or Lightning Shock to paralyze them in place for a short period of time. Once you paralyze the boss, you can use Oatchi's Rush ability to attack and defeat the boss.
Note that the Lightning Shock wakes up all the Emperor Bulbax on the ground, so be sure to only use it if there's only one boss remaining in the area.
Sublevel 6
| Jump to a Sublevel | |||||||||
|---|---|---|---|---|---|---|---|---|---|
| 1 | 2 | 3 | 4 | 5 | |||||
| 6 | 7 | 8 | 9 | 10 | |||||
| 11 | 12 | 13 | 14 | 15 | |||||
| 16 | 17 | 18 | 19 | 20 | |||||
| Cavern for a King Sublevel 6 Map | ||
|---|---|---|
 |
||
| All Treasures | ||
| 1 |
Sparklium: 20 |
 Go around the sublevel clockwise and throw Pikmin to reach it. |
Use the Floating Platform to Reach the Treasure
The sixth sublevel serves as a rest area and only contains one treasure on top of a high platform in the center. Use the floating platforms to move around and reach the treasure to bring it to the base.
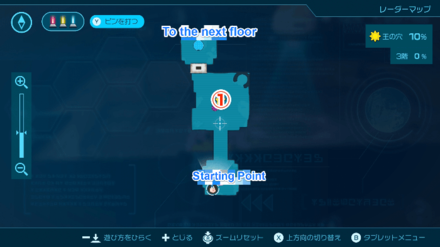
Sublevel 7
| Jump to a Sublevel | |||||||||
|---|---|---|---|---|---|---|---|---|---|
| 1 | 2 | 3 | 4 | 5 | |||||
| 6 | 7 | 8 | 9 | 10 | |||||
| 11 | 12 | 13 | 14 | 15 | |||||
| 16 | 17 | 18 | 19 | 20 | |||||
| Cavern for a King Sublevel 7 Map | ||
|---|---|---|
 |
||
| All Treasures | ||
| 1 |
Sparklium: 50 |
 Defeat the enemy and it will drop the treasure. |
| 2 |
Sparklium: 40 |
 Defeat the enemy and it will drop the treasure. |
Call Your Pikmin Before the Boss Shakes Them Off
The 7th sublevel is a narrow area where your Pikmin can fall off the stage if they get shaken off by the bosses. Make sure to use the whistle before this happens to call them back or use Oatchi's Rush ability to stun the boss.
Sublevel 8
| Jump to a Sublevel | |||||||||
|---|---|---|---|---|---|---|---|---|---|
| 1 | 2 | 3 | 4 | 5 | |||||
| 6 | 7 | 8 | 9 | 10 | |||||
| 11 | 12 | 13 | 14 | 15 | |||||
| 16 | 17 | 18 | 19 | 20 | |||||
| Cavern for a King Sublevel 8 Map | ||
|---|---|---|
 |
||
| All Treasures | ||
| 1 |
Sparklium: 40 |
 Defeat the Crusted Rumpup and it will drop the treasure. |
Be Careful Not to Fall Into the Swamp
Make sure to not fight the boss in the swamp as this slows down your movement speed and drowns your Pikmin. Stick close to the ground and throw your Pikmin to the boss' tail to attack its weakpoint. Purple Pikmin are recommended as you only need to throw two but make sure to lure its tail away first from the mud.
Sublevel 9
| Jump to a Sublevel | |||||||||
|---|---|---|---|---|---|---|---|---|---|
| 1 | 2 | 3 | 4 | 5 | |||||
| 6 | 7 | 8 | 9 | 10 | |||||
| 11 | 12 | 13 | 14 | 15 | |||||
| 16 | 17 | 18 | 19 | 20 | |||||
| Cavern for a King Sublevel 9 Map | ||
|---|---|---|
 |
||
| All Treasures | ||
| 1 |
Sparklium: 5 |
 Defeat the Man-at-Legs and it will drop 2. |
| 2 |
Sparklium: 5 |
Defeat the Man-at-Legs and it will drop 2. |
Ride Oatchi When Fighting the Boss
Use Blue Pikmin during this boss fight as the arena is covered in water and other Pikmin types will drown if you swim on it. Make sure to upgrade Oatchi's Doggy-Paddle skill to make him swim faster and avoid the Man-at-Legs' long-range attack.
Use Ice Pikmin to Freeze the Water and the Boss
Another way to defeat the boss is to lure it towards the water and freeze it using Ice Pikmin. This freezes the boss permanently, allowing you to defeat it without losing any Pikmin.
For this method to work, having 50 Ice Pikmin and 50 Blue Pikmin are required to freeze the water and to deplete the boss' health respectively.
Sublevel 10
| Jump to a Sublevel | |||||||||
|---|---|---|---|---|---|---|---|---|---|
| 1 | 2 | 3 | 4 | 5 | |||||
| 6 | 7 | 8 | 9 | 10 | |||||
| 11 | 12 | 13 | 14 | 15 | |||||
| 16 | 17 | 18 | 19 | 20 | |||||
| Cavern for a King Sublevel 10 Map | ||
|---|---|---|
 |
||
| All Treasures | ||
| 1 |
Sparklium: 200 |
 Defeat the Smoky Progg and it will drop the treasure. |
Use Ultra-Spicy Spray and Attack the Boss Before It Starts to Move
It is recommended to use Ultra-Spicy Spray to attack the boss after it hatches from the egg. The boss surrounds itself with a red smoke that inflicts instant death if your Pikmin gets close to it.
Another way to defeat the boss is to use Ice Pikmin as they can freeze the boss, allowing you to attack safely.
Avoid Attacking Its Mouth
Smoky Progg uses instant death attacks that comes from its mouth, so it is recommended to attack from the sides and avoid facing the boss head on.
You Can Skip the Boss Fight If You Rush Towards It
If you use Ultra-Spicy Spray and rush towards the boss as fast as possible, you can skip the boss fight entirely as the egg will break open and turn into the Wayward Moon immediately.
Sublevel 11
| Jump to a Sublevel | |||||||||
|---|---|---|---|---|---|---|---|---|---|
| 1 | 2 | 3 | 4 | 5 | |||||
| 6 | 7 | 8 | 9 | 10 | |||||
| 11 | 12 | 13 | 14 | 15 | |||||
| 16 | 17 | 18 | 19 | 20 | |||||
| Cavern for a King Sublevel 11 Map | ||
|---|---|---|
 |
||
| All Treasures | ||
| 1 |
Sparklium: 50 |
 Pick it up from the ground. If the enemy eats it, defeat the enemy. |
| 2 |
Sparklium: 25 |
 Defeat the enemy and it will drop the treasure. |
| 3 |
Sparklium: 80 |
 Defeat the long-nosed salmon lobster boss for the treasure to appear. |
| 4 |
Sparklium: 110 |
 Use 7 Pikmin to pull the tree branch for the treasure to emerge. |
Use Purple Pikmin to Easily Defeat the Bloomcap Bloyster
If you attack the Bloomcap Bloyster, it will raise its shell to protect its weak spot. Oatchi's Rush ability will not work but you can throw Purple Pikmin to reach its weak spot and defeat it.
Sublevel 12
| Jump to a Sublevel | |||||||||
|---|---|---|---|---|---|---|---|---|---|
| 1 | 2 | 3 | 4 | 5 | |||||
| 6 | 7 | 8 | 9 | 10 | |||||
| 11 | 12 | 13 | 14 | 15 | |||||
| 16 | 17 | 18 | 19 | 20 | |||||
| Cavern for a King Sublevel 12 Map | ||
|---|---|---|
 |
||
| All Treasures | ||
| 1 |
Sparklium: 300 |
 Go through the pipe towards the passage beyond the wall to carry the treasure. |
Enter the Hole to the Passage Beyond the Wall
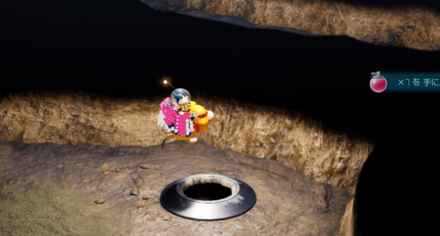
The 12th sublevel serves as a rest area and has no enemies. To get the treasure, go through the hole on the passageway to reach the other side.
Sublevel 13
| Jump to a Sublevel | |||||||||
|---|---|---|---|---|---|---|---|---|---|
| 1 | 2 | 3 | 4 | 5 | |||||
| 6 | 7 | 8 | 9 | 10 | |||||
| 11 | 12 | 13 | 14 | 15 | |||||
| 16 | 17 | 18 | 19 | 20 | |||||
| Cavern for a King Sublevel 13 Map | ||
|---|---|---|
 |
||
| All Treasures | ||
| 1 |
Sparklium: 50 |
 Remove the sticky mold for the treasure to appear. |
| 2 |
Sparklium: 150 |
 Defeat the Gildemander and it will drop the treasure. |
Use White Pikmin or Lure the Boss to Remove the Poison
The 13th sublevel contains sticky mold and poisonous obstacles. Use White Pikmin to clear out the poison before defeating the boss. Alternatively, you can guide the boss to get rid of the toxic mushrooms in its path.
Sublevel 14
| Jump to a Sublevel | |||||||||
|---|---|---|---|---|---|---|---|---|---|
| 1 | 2 | 3 | 4 | 5 | |||||
| 6 | 7 | 8 | 9 | 10 | |||||
| 11 | 12 | 13 | 14 | 15 | |||||
| 16 | 17 | 18 | 19 | 20 | |||||
| Cavern for a King Sublevel 14 Map | ||
|---|---|---|
 |
||
| All Treasures | ||
| 1 |
Sparklium: 80 |
Picture of Treasure Defeat the Horned Cannon Beatle and it will drop the treasure. |
Let the Horned Cannon Beetle Defeat the Armored Cannon Larvae
The 14th sublevel contains one Horned Cannon Beetle and three Armored Cannon Larva.
You can let the Horned Cannon Beetle defeat the other three enemies when it spits out a boulder. Use this method to defeat the Armored Cannon Larvae and avoid losing Pikmin in the fight.
Sublevel 15
| Jump to a Sublevel | |||||||||
|---|---|---|---|---|---|---|---|---|---|
| 1 | 2 | 3 | 4 | 5 | |||||
| 6 | 7 | 8 | 9 | 10 | |||||
| 11 | 12 | 13 | 14 | 15 | |||||
| 16 | 17 | 18 | 19 | 20 | |||||
| Cavern for a King Sublevel 15 Map | ||
|---|---|---|
 |
||
| All Treasures | ||
| 1 |
Sparklium: 20 |
 Get 10 by defeating Baldy Long Legs |
Use Blue Pikmin to Defeat the Boss
You will need to defeat the boss surrounded in water, so having Blue Pikmin is required as they will not drown when in water.
Do not forget to call your Pikmin after the boss shakes them off its body as the boss can followup with a trampling attack.
Use Ice Pikmin to Freeze the Water and the Boss
Much like the boss fight with the Man-at-Legs, you can use 10 Ice Pikmin to freeze the boss permanently and attack it while it is frozen.
Sublevel 16
| Jump to a Sublevel | |||||||||
|---|---|---|---|---|---|---|---|---|---|
| 1 | 2 | 3 | 4 | 5 | |||||
| 6 | 7 | 8 | 9 | 10 | |||||
| 11 | 12 | 13 | 14 | 15 | |||||
| 16 | 17 | 18 | 19 | 20 | |||||
| Cavern for a King Sublevel 16 Map | ||
|---|---|---|
 |
||
| All Treasures | ||
| 1 |
Sparklium: 150 |
 Defeat the Waterwraith for the treasure to appear. |
Use Purple Pikmin to Pull the Flower Pot
You can use Purple Pikmin to pull out the flower pot on the narrow hallway to create another route in the 16th sublevel.
Defeat the Waterwraith One by One
It is safer and easier to defeat the Waterwraith one by one as there is less chance that you will lose Pikmin in the process. In some cases, sticking to the walls can help you avoid getting run over by the Waterwraith.
Sublevel 17
| Jump to a Sublevel | |||||||||
|---|---|---|---|---|---|---|---|---|---|
| 1 | 2 | 3 | 4 | 5 | |||||
| 6 | 7 | 8 | 9 | 10 | |||||
| 11 | 12 | 13 | 14 | 15 | |||||
| 16 | 17 | 18 | 19 | 20 | |||||
| Cavern for a King Sublevel 17 Map | ||
|---|---|---|
 |
||
| All Treasures | ||
| 1 |
Sparklium: 170 |
 Defeat the Empress Bulblax and it will drop the treasure. |
Defeat Empress Bulblax As Fast as Possible
The goal of this boss fight is to defeat Empress Bulblax as fast as possible. If you let the fight go on, multiple rockfalls will appear which will leave you at the disadvantage.
Jump on the Air Spout to Avoid Its Rolling Attack
To avoid the Empress Bulblax's rolling attack, use the air spouts on the corner of the area to jump high and land on the opposite side.
If You Do Not Have Pikmin with High Attack Go Slow
If you cannot defeat the boss in one go, taking your time is the way to go. The boss' rolling attack has a wide hitbox which can hit you even if you have jumped from the air spout. Make sure to recall your Pikmin as soon as you can before the Empress Bulblax starts to roll on either side. Even though this will deal less damage, it will prevent you from losing a lot of Pikmin from one roll.
Sublevel 18
| Jump to a Sublevel | |||||||||
|---|---|---|---|---|---|---|---|---|---|
| 1 | 2 | 3 | 4 | 5 | |||||
| 6 | 7 | 8 | 9 | 10 | |||||
| 11 | 12 | 13 | 14 | 15 | |||||
| 16 | 17 | 18 | 19 | 20 | |||||
| Cavern for a King Sublevel 18 Map | ||
|---|---|---|
 |
||
| All Treasures | ||
| 1 |
Sparklium: 180 |
 Defeat the Sovereign Bulblax for the treasure to appear. |
Use Ultra-Spicy Spray to Instantly Defeat the Sovereign Bulblax
Use a combination of Ultra-Spicy Spray, Oatchi's Rush ability, and an all-out attack by your Pikmin to instantly defeat the Sovereign Bulblax.
Once the boss emerges from the ground, it will start to look around at the sides giving you time to deplete its health before it starts to attack.
Use Pikpik Carrot and Lighting Shock If You Cannot Defeat the Boss Instantly
|
|
|
If you cannot defeat it on one hit, you can use Pikpik Carrot or Lightning Shock to paralyze the boss for a short period of time. Use this opportunity to attack while it is stunned to deplete its health.
Sublevel 19
| Jump to a Sublevel | |||||||||
|---|---|---|---|---|---|---|---|---|---|
| 1 | 2 | 3 | 4 | 5 | |||||
| 6 | 7 | 8 | 9 | 10 | |||||
| 11 | 12 | 13 | 14 | 15 | |||||
| 16 | 17 | 18 | 19 | 20 | |||||
| Cavern for a King Sublevel 19 Map | ||
|---|---|---|
 |
||
| All Treasures | ||
| 1 |
Sparklium: 90 |
 Dig it up using Pikmin or Oatchi. |
| 2 |
Sparklium: 20 |
 Use Blue Pikmin to get 3 of these in the water. |
| 3 |
Sparklium: 60 |
 Use Blue Pikmin to get the treasure from the water. |
| 4 |
Sparklium: 40 |
 Use Blue Pikmin to get the treasure from the water. |
| 5 |
Sparklium: 90 |
 Throw Pikmin to reach it. |
| 6 |
Sparklium: 20 |
 Find it inside a crumbling bucket. |
| 7 |
Sparklium: 70 |
Find it inside a crumbling bucket. |
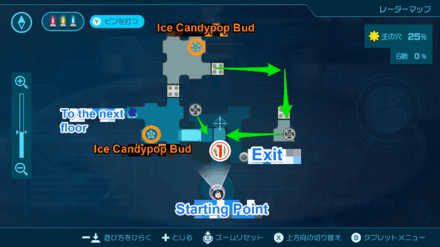
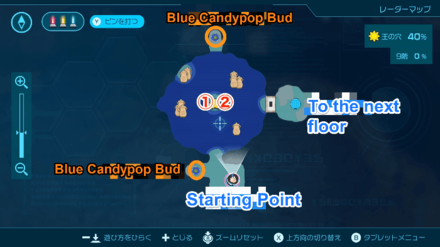
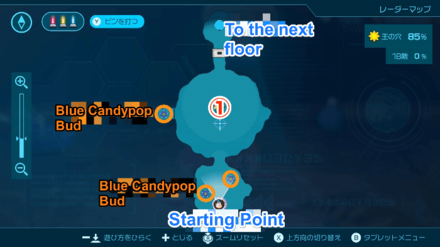
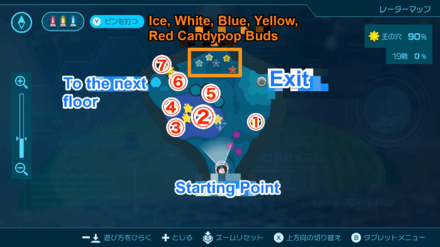
Last Rest Sublevel Before the Final Boss
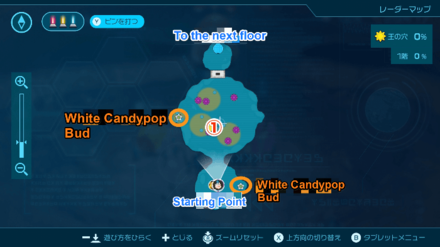
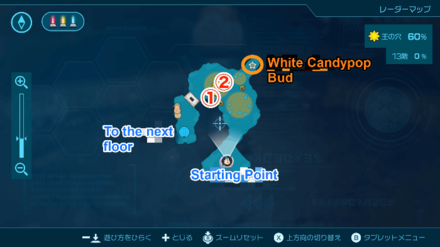
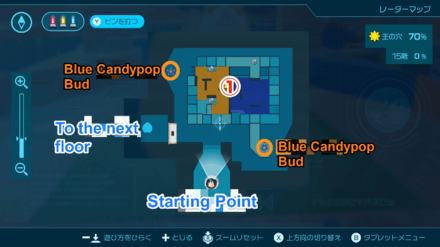
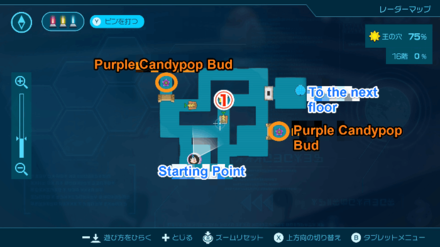
The 19th sublevel serves as the last rest area before the final boss fight. It contains ice, white, blue, yellow, and red candypop buds that you can use to convert your Pikmin into a different type.
Use the candypop buds to increase the number of Pikmin type you have. It is recommended to use Red Pikmin, Yellow Pikmin, and Purple Pikmin for the boss fight.
Sublevel 20
| Jump to a Sublevel | |||||||||
|---|---|---|---|---|---|---|---|---|---|
| 1 | 2 | 3 | 4 | 5 | |||||
| 6 | 7 | 8 | 9 | 10 | |||||
| 11 | 12 | 13 | 14 | 15 | |||||
| 16 | 17 | 18 | 19 | 20 | |||||
| Cavern for a King Sublevel 20 Map | ||
|---|---|---|
 |
||
| All Treasures | ||
| 1 |
Sparklium: 80 |
 Defeat the final boss for the treasure to appear. |
1st Form: Lure the Boss Towards the Rocks
Lure the Ancient Sirehound towards the fallen rocks to stun it for a short period of time. Once its tail is down, throw Pikmins at it to deplete its health.
How to Beat the Ancient Sirehound
2nd Form: Circle Around to Avoid Its Ice Breath Attack
During its 2nd form, the Ancient Sirehound uses an ice breath to attack. Circle around the boss during this attack and throw Pikmin at its tail.
Watch out for the giant snowballs that roll around in the area.
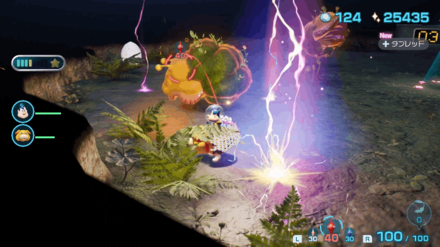
3rd Form: Move Around to Avoid the Electric Attack
In its 3rd form, the Ancient Sirehound uses an electric discharge attack to surround the area with rotating electric obstacles. You can move around the obstacle or jump over it and then throw 15 Pikmin at the boss' tail.
Defeat the Electric Bugs First
You can destroy the rotating electric obstacles using Yellow Pikmin. You need at least 5 of them to defeat the electric bug that generates the obstacle.
4th Form: Circle Around to Avoid the Wave of Fire
During its 4th form, the Ancient Sirehound will stomp the ground to create a slow moving wave of fire. Circle around and move towards its back to throw Pikmin at its lowered tail to deal damage.
Use Red Pikmin to Destroy the Fireballs
There are red fireballs that appear during its 4th form that you can destroy using Fire Pikmin. Be careful not to get it by the fireball as they generate a fire shockwave upon doing so.
5th Form: Avoid the Breath Attack and Red Areas
In its 5th form, the Ancient Sirehound will hover around the area and shoot an instant death breath attack that leaves a patch of red areas that also cause instant death. You will need to get close to the boss to throw Pikmin at its tail. Be careful however, as the boss can release a roar which will scatter your Pikmin and Oatchi when you are nearby. Keep an eye for when the boss flaps its ears as that will signal when it will roar.
It is recommended to only move close to the boss if it is not situated near the red areas.
Use Glow Pikmin When It is Stunned
If you have Glow Pikmin, you can throw them at its tail and use the Glowmob ability to stun the Ancient SIrehound for a short period of time. This is an easy method to defeat the boss as you can stun it each time it lowers its tail when it floats to the sky again.
Cavern for a King Castaway Locations
No Castaways
There are no castaways in this cave.
Cavern for a King Onion Locations
No Onions
There are no onions in this cave.
No Flarlics
There are no flarlics in this cave.
Cavern for a King Tips and Strategies
| Cavern for a King Tips and Strategies |
|---|
|
|
Most Difficult Cave in Pikmin 4
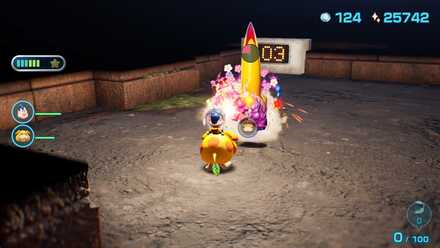
Cavern for a King serves as the final cave in Pikmin 4. Each sublevel serves as a boss arena from previous caves, so it is recommended to bring consumable items, equip gear, and upgrade Oatchi's skills before proceeding. Take note that player progress is saved between completed sublevels so there is no need to worry about taking a break between each challenge.
Recommended Items and Gear
| Recommended Items | ||
|---|---|---|
|
20 or more |
10 or more |
At least 5 |
| Recommended Gear | ||
|
|
|
|
|
|
|
|
|
|
|
|
|
|
|
|
Rewind Time If You Lose Pikmin
If you lose a lot of Pikmin while descending down the cave, it is recommended to use the Rewind Time function to restart and try again.
Use Pikmin With High Attack Power
| Pikmin to Bring | ||
|---|---|---|
|
|
|
|
| Around 40 of any of the Pikmin Type | ||
Bring Pikmin that excel at combat such as Red Pikmin, Rock Pikmin, and Purple Pikmin as each of the cave's sublevel contains a boss fight. If you bring enough of these Pikmin types, you can easily defeat some of the bosses in one hit.
Bring Blue Pikmin and White Pikmin
| Pikmin to Bring | |
|---|---|
|
At least 30 |
At least 30 |
In addition, you also need to bring Blue Pikmin and White Pikmin to help you fight enemies in the water and remove poisonous obstacles respectively.
There are some sublevels that require you to use Ice Pikmin and Purple Pikmin. For those cases, there is usually a candypop bud on that floor that lets you convert your Pikmin into the required Pikmin type.
Pikmin 4 Related Guides

List of All Cave Locations and Maps
All Rescue Command Post Caves
| Rescue Command Post Cave |
|---|
| Burrow of Beginnings |
All Sun-Speckled Terrace Caves
| Sun-Speckled Terrace Caves | |
|---|---|
| Last-Frost Cavern | Hectic Hollows |
| Crackling Cauldron | Industrial Maze |
| Aquiferous Summit | - |
All Blossoming Arcadia Caves
| Blossoming Arcadia Caves | |
|---|---|
| Secluded Courtyard | Drafty Gallery |
| Sightless Passage | Kingdom of Beasts |
All Serene Shores Caves
| Serene Shores Caves | |
|---|---|
| Subzero Sauna | Seafloor Resort |
| Below-Grade Discotheque | Engulfed Castle |
All Hero's Hideaway Caves
| Hero's Hideaway Caves | |
|---|---|
| Plunder Palace | Doppelganger's Den |
| Frozen Inferno | - |
All Giant's Hearth Caves
| Giant's Hearth Caves | |
|---|---|
| Dream Home | Ultimate Testing Range |
| Cradle of the Beast | - |
All Primordial Thicket Caves
| Primordial Thicket Caves | |
|---|---|
| Subterranean Swarm | The Mud Pit |
| Cavern for a King | - |
Comment
1  Anonymous over 2 years
If you exit in any of the sublevels before the final boss, can you come back to that sublevel without doing th others again? Or do i have to do all of them in 1 go?
Author

Cavern for a King Treasures, Castaway, and Onion Locations
Please participate in our site
improvement survey
03/2026
improvement survey
03/2026
Would you assist in
improving Game8's site?
improving Game8's site?

×
We are listening to our users' valuable opinions and discussing how to act on them.
The information collected through this survey will be used for the purpose of improving our services. In addition, the information will only be disclosed a part of a statistic in a format that will not allow identification of personal information.
Begin Survey
Not Now
×
Please rate each item regarding Game8.co's Advertisements.
Amount of Ads
Very Dissatisfied
Somewhat Dissatisfied
Fine
Somewhat Satisfied
Highly Satisfied
Placement of Ads
Timing of Ad Display
Ad Loading Speed
Safeness of Ads
Content of Ads
×
Please rate each item regarding Game8.co's Quality of Articles.
Amount of information
Very Dissatisfied
Somewhat Dissatisfied
Fine
Somewhat Satisfied
Highly Satisfied
Frequency of updates
Speed of new information
Accuracy of articles
Understandibility of articles
Readability of sentences
×
Please rate each item regarding Game8.co's Usability of the Site.
Ease of finding information
Very Dissatisfied
Somewhat Dissatisfied
Fine
Somewhat Satisfied
Highly Satisfied
Loading Speed
Use of Color
Font Size
Visibility of Images
Easy to Understand Layout
×
Please rate each item regarding Game8.co's Message Boards, Comments.
Ease of Writing
Very Dissatisfied
Somewhat Dissatisfied
Fine
Somewhat Satisfied
Highly Satisfied
Readability
Ease in Finding Information
Comment Quality
Comment Quantity
Admin Response
×
Please rate each item regarding Game8.co's Site's new design.
Please rate our site's new design
Very Dissatisfied
Somewhat Dissatisfied
Fine
Somewhat Satisfied
Highly Satisfied
Do you think that the website's design change makes the site easier to use?
Has the new design made it easier for you to find information on the site?
Has the new design improved the overall visual appeal of the site?
How would you rate your overall satisfaction with the new design of the site?
×
How likely are you to recommend Game8 to someone you know?
Very Unlikely
0
1
2
3
4
5
6
7
8
9
10
Very Likely
If you have other opinions regarding potential improvement to the website, please share them with us. We would appreciate your honest opinion.
Note: This is a free response section, so you can proceed without entering anything.
Note: Please be sure not to enter any kind of personal information into your response.
Note: Please be sure not to enter any kind of personal information into your response.
×
Thank You
×
Thank you for participating in our survey! Your answers will help us to improve the quality of our website and services.
We hope you continue to make use of Game8.
We hope you continue to make use of Game8.
Close
Rankings
- We could not find the message board you were looking for.
Gaming News


Popular Games

Genshin Impact Walkthrough & Guides Wiki
Honkai: Star Rail Walkthrough & Guides Wiki
Umamusume: Pretty Derby Walkthrough & Guides Wiki
Pokemon Pokopia Walkthrough & Guides Wiki
Resident Evil Requiem (RE9) Walkthrough & Guides Wiki
Monster Hunter Wilds Walkthrough & Guides Wiki
Wuthering Waves Walkthrough & Guides Wiki
Arknights: Endfield Walkthrough & Guides Wiki
Pokemon FireRed and LeafGreen (FRLG) Walkthrough & Guides Wiki
Pokemon TCG Pocket (PTCGP) Strategies & Guides Wiki


Recommended Games
Diablo 4: Vessel of Hatred Walkthrough & Guides Wiki
Fire Emblem Heroes (FEH) Walkthrough & Guides Wiki
Yu-Gi-Oh! Master Duel Walkthrough & Guides Wiki
Super Smash Bros. Ultimate Walkthrough & Guides Wiki
Pokemon Brilliant Diamond and Shining Pearl (BDSP) Walkthrough & Guides Wiki
Elden Ring Shadow of the Erdtree Walkthrough & Guides Wiki
Monster Hunter World Walkthrough & Guides Wiki
The Legend of Zelda: Tears of the Kingdom Walkthrough & Guides Wiki
Persona 3 Reload Walkthrough & Guides Wiki
Cyberpunk 2077: Ultimate Edition Walkthrough & Guides Wiki


All rights reserved
© Nintendo.
The copyrights of videos of games used in our content and other intellectual property rights belong to the provider of the game.
The contents we provide on this site were created personally by members of the Game8 editorial department.
We refuse the right to reuse or repost content taken without our permission such as data or images to other sites.
Just to let u know if u feed a Bulblax a bomb rock he gets stunned for a bit giving u time to use ur spicy spray then ram him with Oatchi for a massive attack with ur Pikmin that's what I did just giving a tip alr.