
 Pikmin Types
 Onions
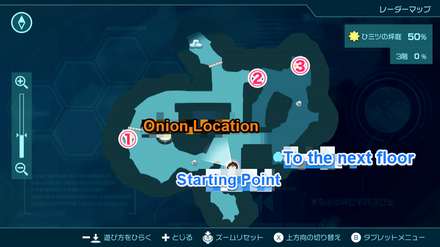
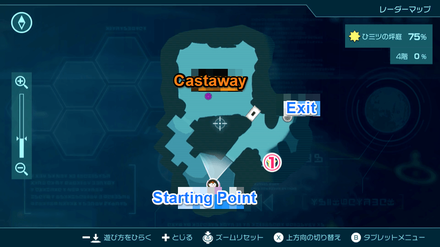
 Areas
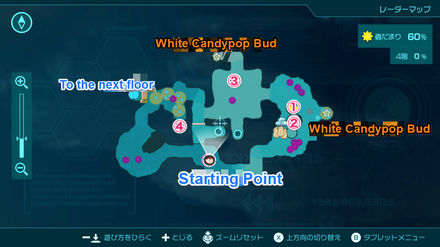
Areas Caves
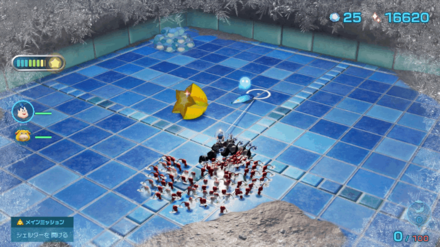
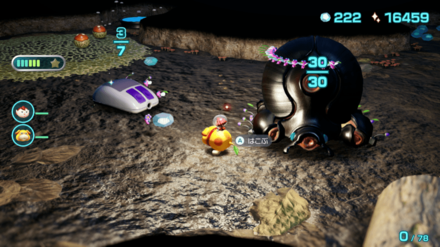
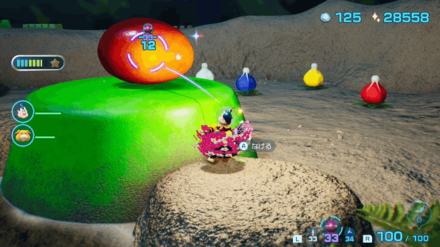
Caves Bosses
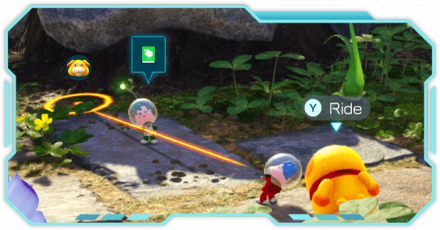 Piklopedia
 Treasures
 Oatchi
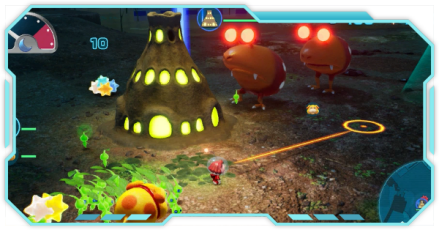 Night Expeditions
 Main Missions
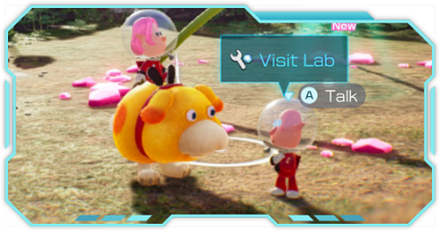 Side Missions
 Characters
 Gear
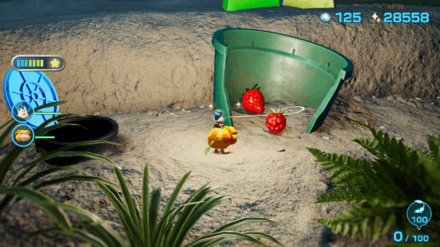
Gear Items
Items Dandori Challenges
 Dandori Battles
 Olimar's Shipwreck Tale
 Trial of the Sage Leaf
This survey will take about 1 minute.
Your answers will help us to improve our website.
Pikmin 4
List of All Treasures and Locations
❀ Pikmin 4 is out! Get a headstart by following these tips!
❀ Get more Pikmin by getting all the onion types!
❀ New and returning bosses are back in the Piklopedia!
❀ Brave the Trial of the Sage Leaf to get more onions!
❀ Make Oatchi stronger by upgrading his skills!
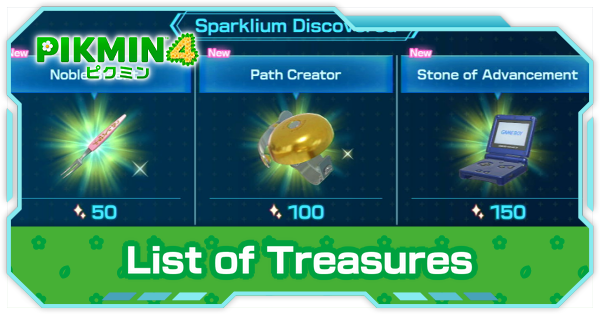
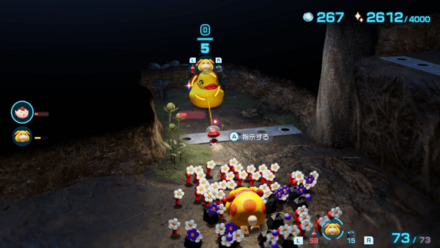
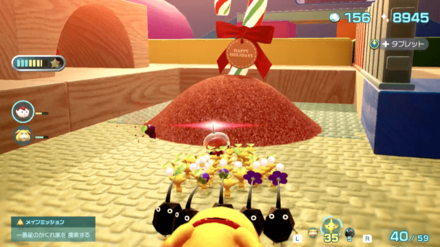
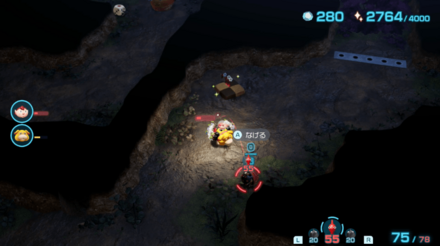
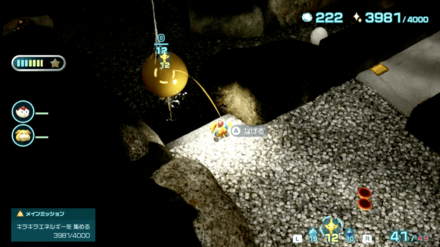
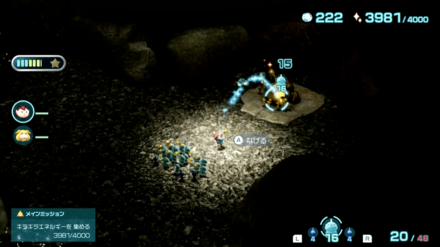
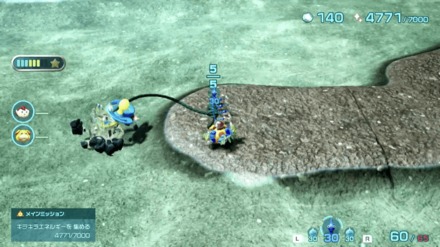
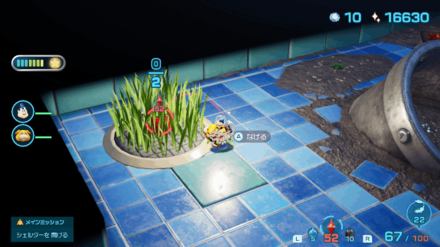
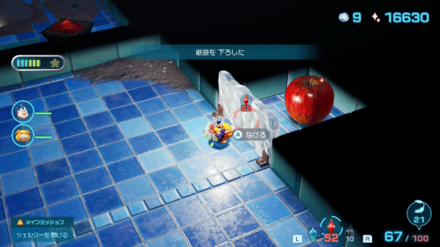
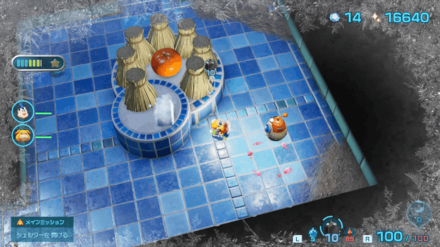
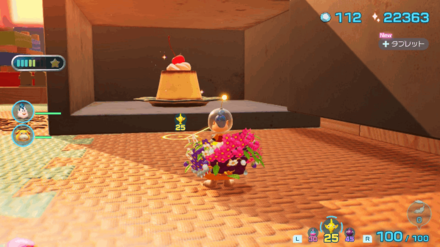
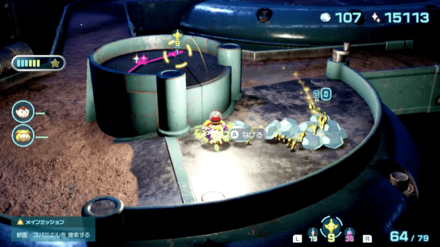
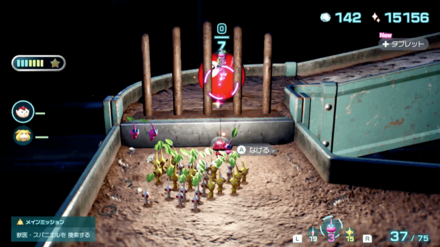
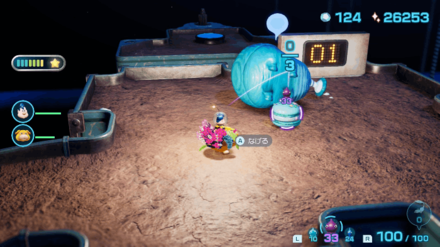
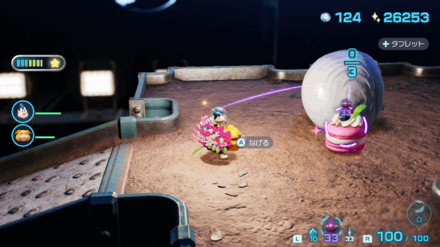
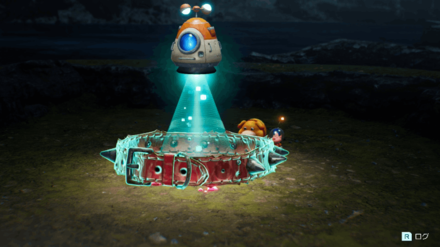
Treasures are collectibles you can find on every surface and underground map in Pikmin 4. Check out this list for all Treasure map locations, their values, and how to get all Treasures!
List of Contents
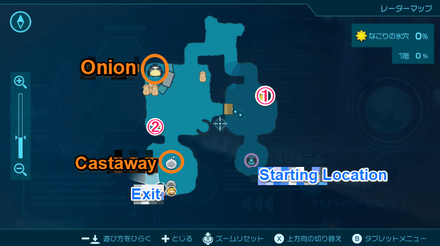
All Surface Treasures in Pikmin 4
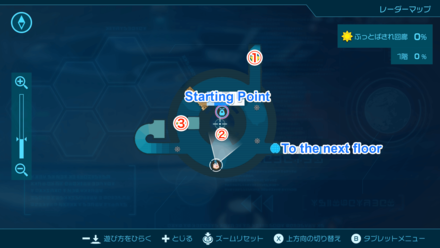
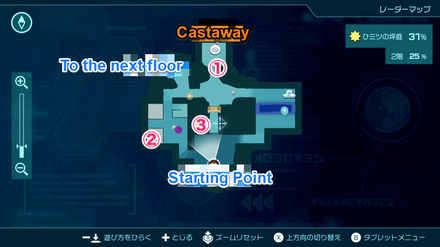
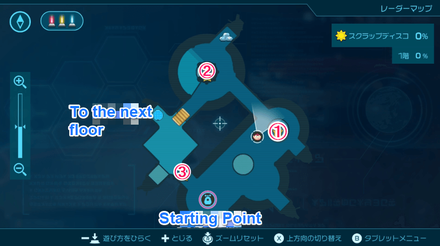
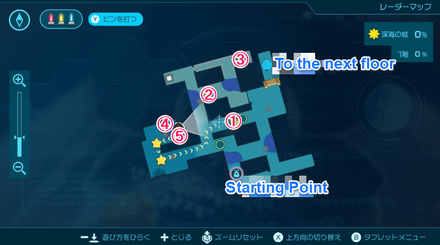
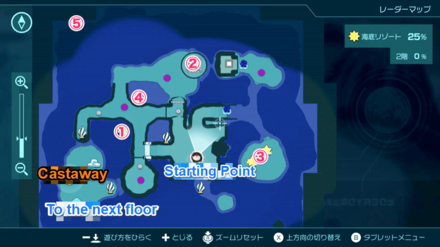
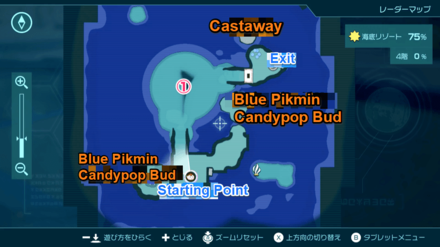
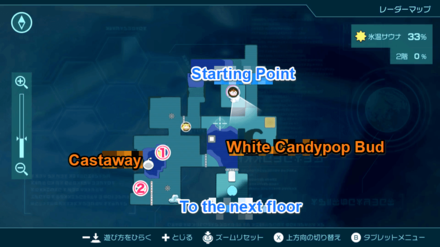
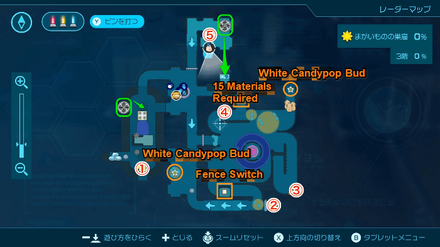
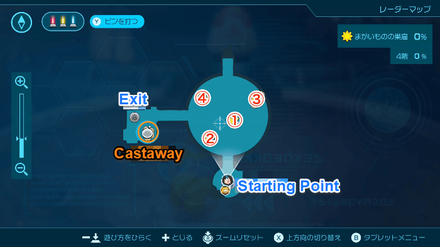
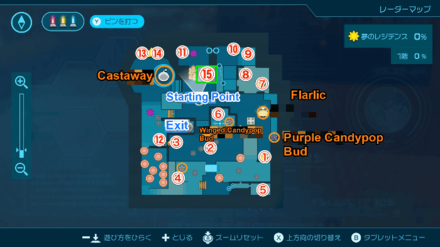
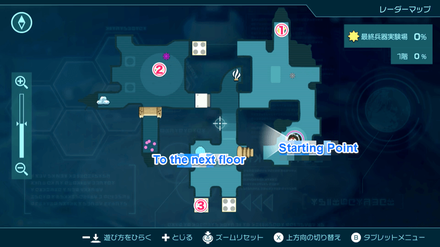
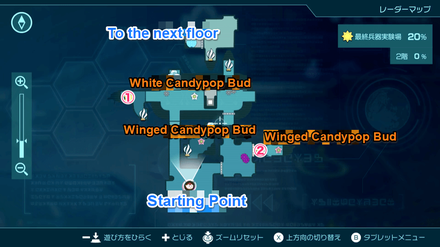
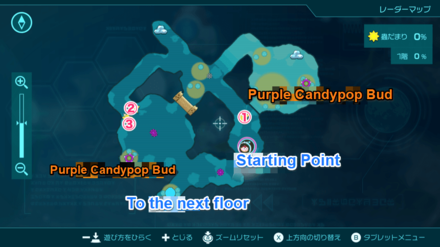
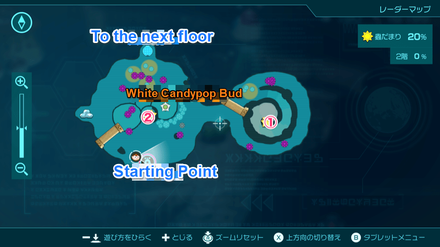
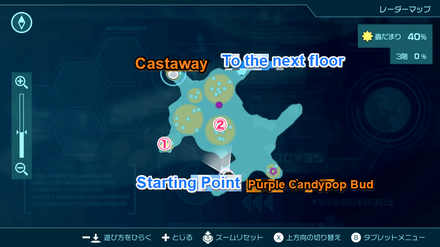
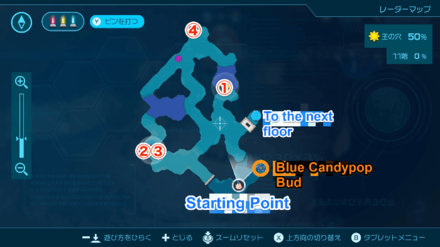
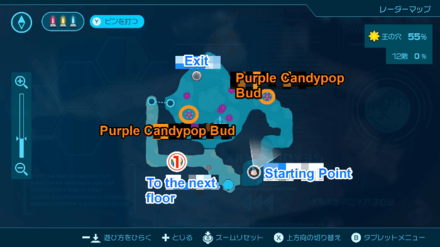
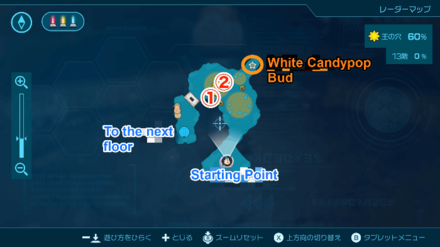
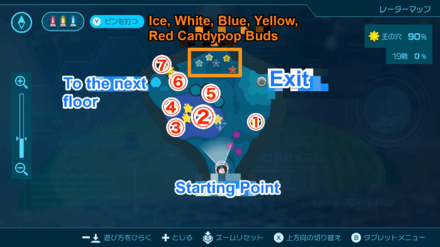
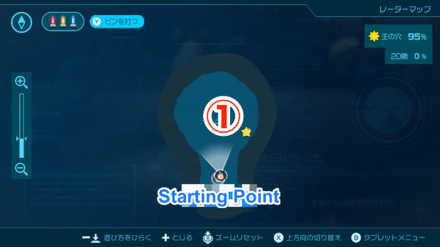
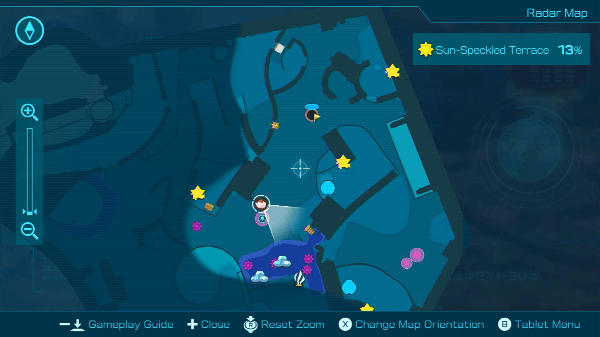
The Interactive Map both shows the location of key points on the map, and doubles as a collectible checker.
- Click an icon on the right side to show all the pins of a specific type, or click the magnifying glass button to search for a specific pin by name.
- Click a pin on the map to see its name and description, and a relevant picture or video if available.
- From here, click Mark as Discovered to indicate that you've gotten a collectible already. This will change its icon on the map to show that it has been collected.
- To undo this, click on the same pin and click Restore to Undiscovered.
| Icon | How to Use |
|---|---|
 | Show Names This button reveals the Name of every icon currently shown. |
 | Fullscreen This button will change the map display to fill the screen. |
 | Search Mode Toggle This button will display a searchbar which you can use to search for an individual pin by its name. |
 | Icon Mode Toggle In Search Mode, this button will toggle you back to Icon Mode, removing the search bar and displaying the icons again. |
All Underground Treasures in Pikmin 4
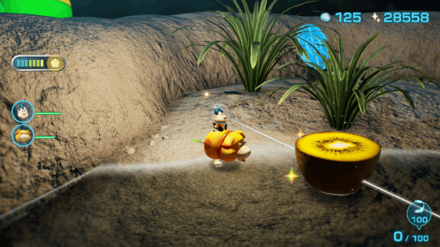
Sun-Speckled Terrace
| Jump to an Area! | ||
|---|---|---|
| Sun-Speckled Terrace | Blossoming Arcadia | Serene Shores |
| Hero's Hideaway | Giant's Hearth | Primordial Thicket |
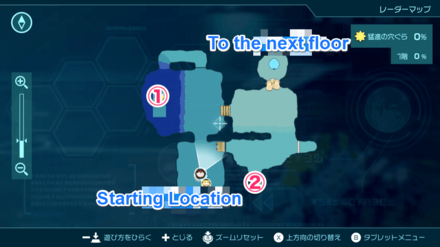
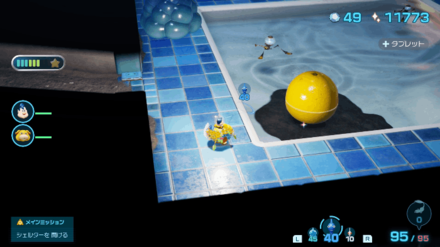
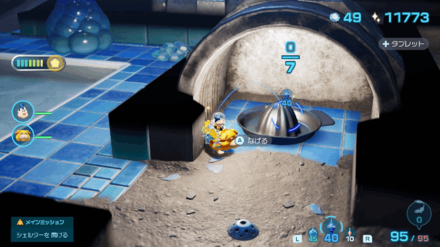
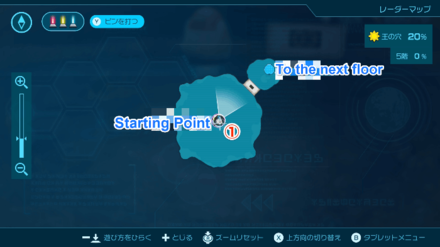
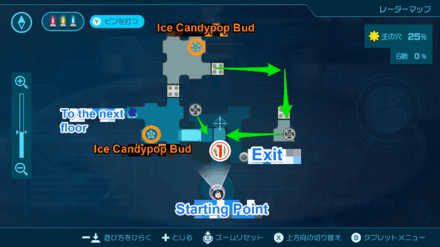
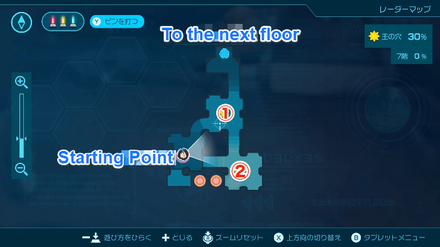
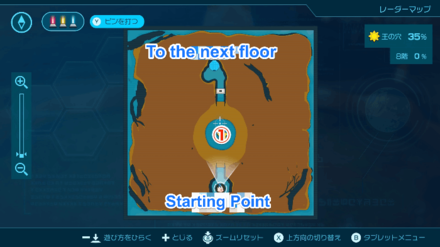
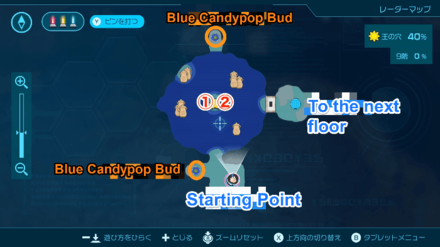
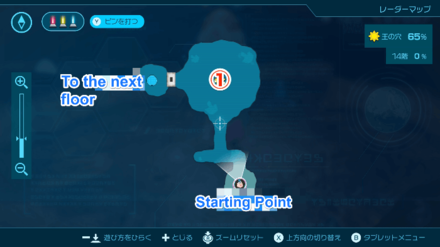
Aquiferous Summit
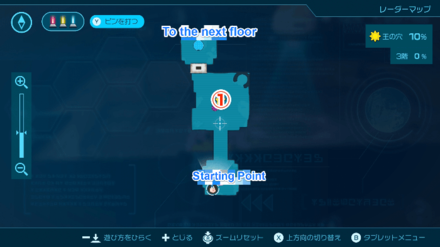
| Sublevel 1 Treasure Map | ||
|---|---|---|
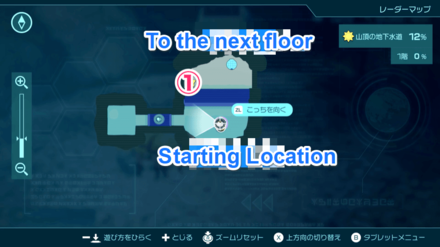 |
||
| 1 |
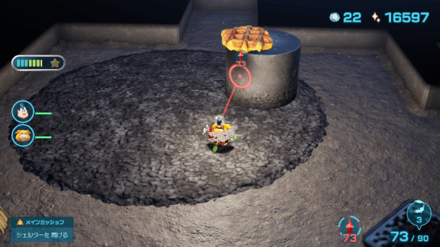
Sparklium: 40 |
Freeze the water using Ice Pikmin to reach the treasure. |
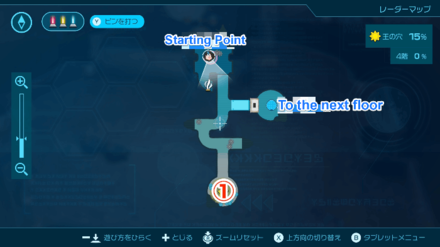
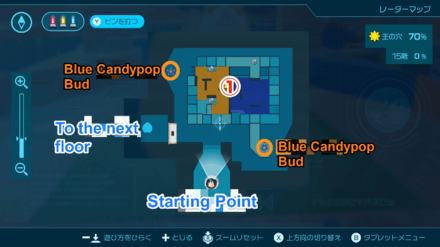
| Sublevel 2 Treasure Map | ||
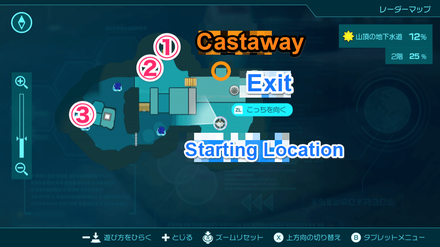 |
||
| 1 |
Sparklium: 5 |
Pick up the treasure on the ground. |
| 2 |
Sparklium: 50 |
Pick up the treasure on the ground. |
| 3 |
Sparklium: 40 |
Throw Pikmin on the high ground to reach the treasure. |
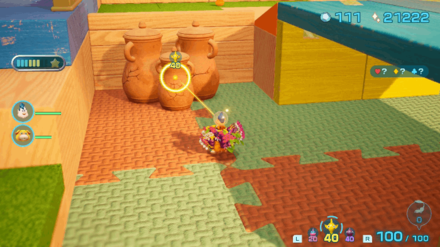
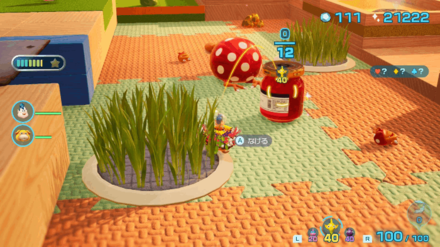
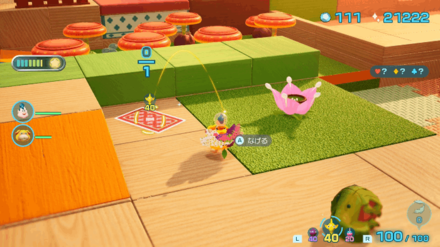
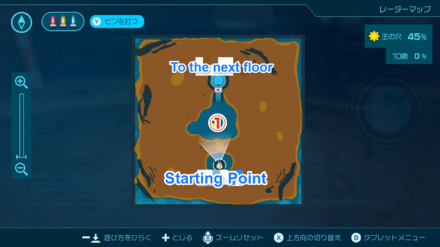
Crackling Cauldron
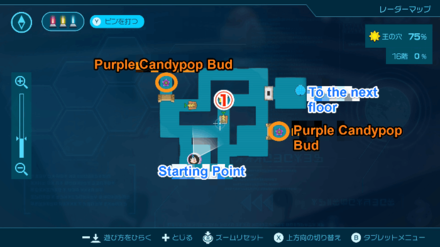
| Sublevel 1 Treasure Map | ||
|---|---|---|
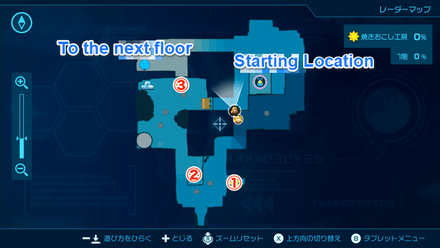 |
||
| 1 |
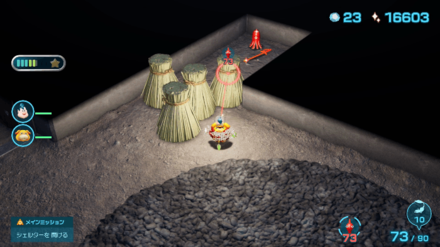
Sparklium: 40 |
Use Pikmin to pick up and drag the treasure to the base. |
| 2 |
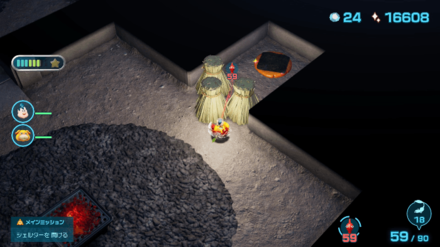
Sparklium: 80 |
Use Yellow Pikmin to dig up the treasure. |
| 3 |
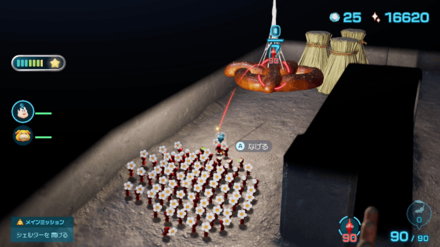
Sparklium: 150 |
Use Yellow Pikmin to drop the eraser down and pick it up. |
| Sublevel 2 Treasure Map | ||
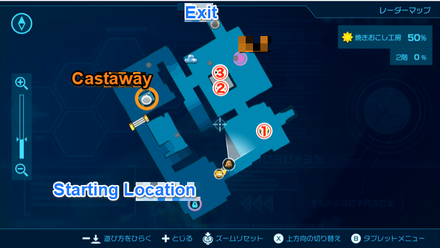 |
||
| 1 |
Sparklium: 110 |
Use the Red Pikmin to extinguish the lava surrounding the treasure |
| 2 |
Sparklium: 40 |
Use Yellow Pikmin to reach the treasure and pick it up. |
| 3 |
Sparklium: 50 |
Use Yellow Pikmin to reach the treasure and pick it up. |
Hectic Hollows
| Sublevel 1 Treasure Map | ||
|---|---|---|
 |
||
| 1 |
Sparklium: 150 |
Freeze the water using 10 Ice Pikmin to reach the treasure. |
| 2 |
Sparklium: 150 |
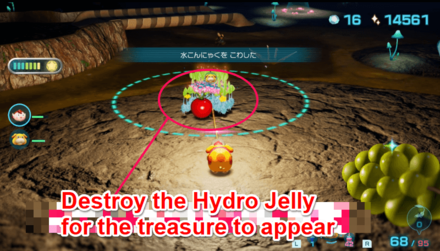
Destroy the Hydro Jelly using Ice Pikmin. |
| Sublevel 2 Treasure Map | ||
 |
||
| 1 |
Sparklium: 150 |
Throw the Pikmin to weigh down the object from the cobweb. |
Industrial Maze
| Sublevel 1 Treasure Map | ||
|---|---|---|
 |
||
| 1 |
Sparklium: 80 |
Use Yellow Pikmin to pick up the treasure from the high ledge. |
| 2 |
Sparklium: 50 |
Use Oatchi's rush ability to break the pots to reach the treasure. |
| Sublevel 2 Treasure Map | ||
 |
||
| 1 |
Sparklium: 230 |
Use the Pikmin to drop the paper bag down to create a route for the treasure. |
| 2 |
Sparklium: 110 |
Use the Pikmin to dig up the treasure and bring it back to the base. |
| 3 |
Sparklium: 20 |
Use the Pikmin to dig up the treasure and bring it back to the base. |
Last-Frost Cavern
| Sublevel 1 Treasure Map | ||
|---|---|---|
 |
||
| 1 |
Sparklium: 110 |
Throw Pikmin on the high ground to pick up the treasure. |
| 2 |
Sparklium: 80 |
Pick up the treasure from the grass. |
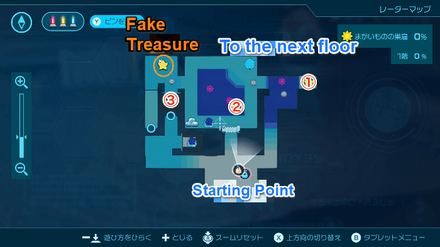
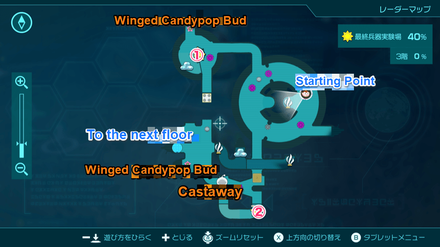
Blossoming Arcadia
| Jump to an Area! | ||
|---|---|---|
| Sun-Speckled Terrace | Blossoming Arcadia | Serene Shores |
| Hero's Hideaway | Giant's Hearth | Primordial Thicket |
Drafty Gallery
| Sublevel 1 Treasure Map | ||
|---|---|---|
 |
||
| 1 |
Sparklium: 50 |
 Use Yellow Pikmin to reach the treasure. |
| 2 |
Sparklium: 130 |
 Pick it up from the ground. |
| 3 |
Sparklium: 70 |
 Climb up the hill and use Yellow Pikmin to reach the high ground and carry the treasure. |
| Sublevel 2 Treasure Map | ||
 |
||
| 1 |
Sparklium: 150 |
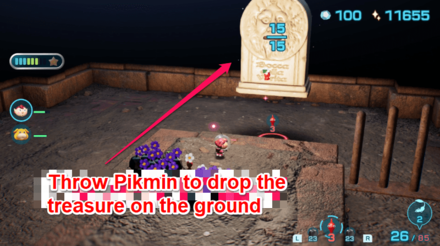
 Throw Pikmin over the treasure to pick it up. |
| 2 |
Sparklium: 5 |
 Pick up the 10 pieces from the ground. |
| 3 |
Sparklium: 110 |
 Ride the wind spout to reach the opposite path where the treasure is located. |
| 4 |
Sparklium: 110 |
 Throw the Pikmin towards the treasure to pick it up. |
| Sublevel 3 Treasure Map | ||
 |
||
| 1 |
Sparklium: 120 |
 Climb up the hill to reach a high ground and throw the Pikmin toward the treasure. |
| 2 |
Sparklium: 110 |
 Use 20 Pikmin to take down the bridge and make a path leading to the treasure. |
| Sublevel 4 Treasure Map | ||
 |
||
| 1 |
Sparklium: 110 |
 Defeat the Puffy Blowhog boss for the treasure to spawn. |
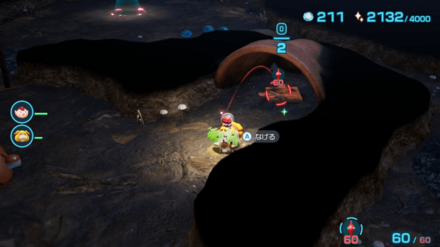
Kingdom of Beasts
| Sublevel 1 Treasure Map | ||
|---|---|---|
 |
||
| 1 |
Sparklium: 110 |
 Extinguish the lava floor using Red Pikmin and transport the treasure. |
| 2 |
Sparklium: 50 |
 Pick up the treasure from the ground. |
| Sublevel 2 Treasure Map | ||
 |
||
| 1 |
Sparklium: 80 |
 Destroy the glass wall using Rock Pikmin to reach the treasure. |
| 2 |
Sparklium: 90 |
 Dig up the treasure from the ground. |
| Sublevel 3 Treasure Map | ||
 |
||
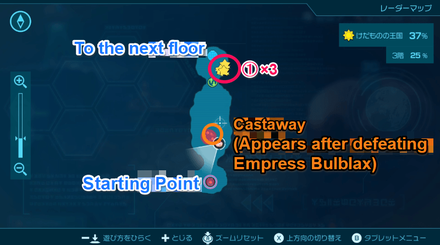
| 1 |
Sparklium: 1 |
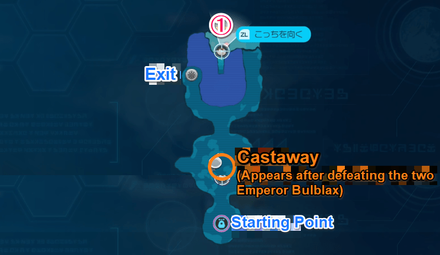
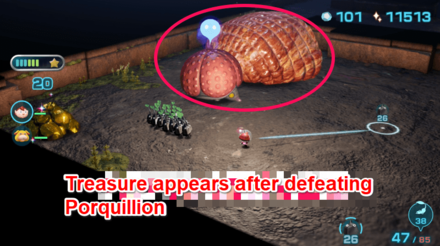
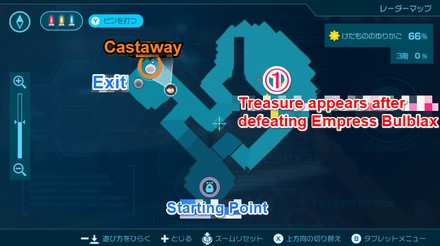
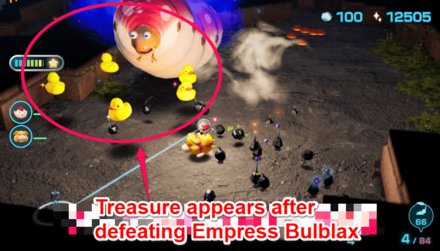
 At the end of the three doors after defeating Empress Bulblax. |
| Sublevel 4 Treasure Map | ||
 |
||
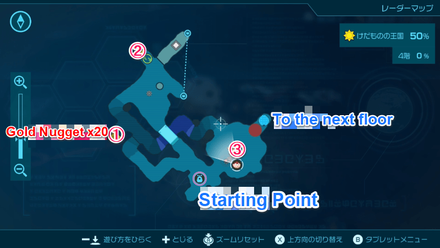
| 1 |
Sparklium: 5 |
 Pick up the 20 pieces from the ground. |
| 2 |
Sparklium: 40 |
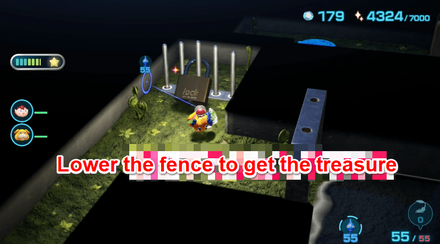
 Pick up after lowering the fence. |
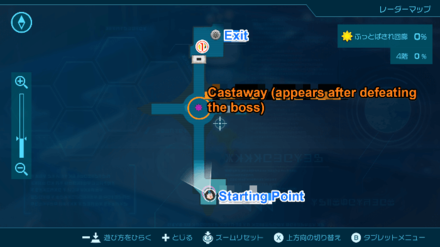
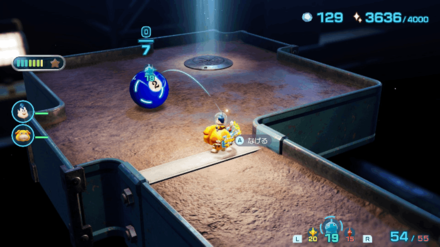
| 3 |
Sparklium: 60 |
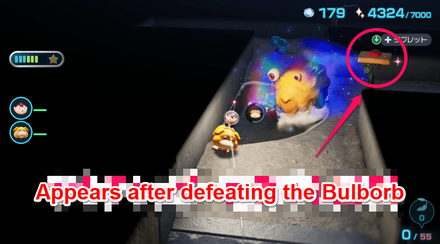
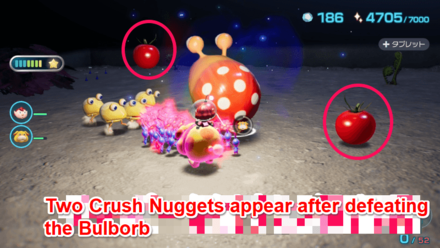
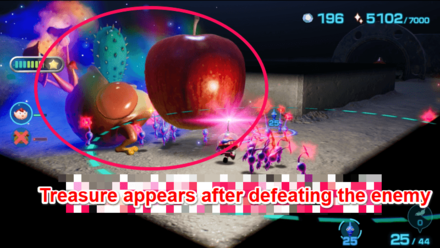
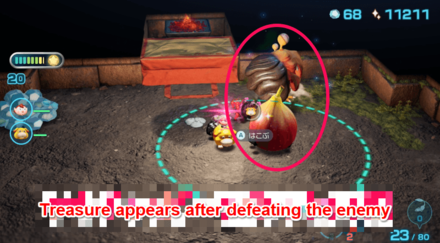
 Appears after defeating the large Bulborb. |
| Sublevel 5 Treasure Map | ||
 |
||
| 1 |
Sparklium: 50 |
 Pick up from the ground. |
| 2 |
Sparklium: 90 |
 Dig up the treasure from the ground. |
| 3 |
Sparklium: 20 |
 Pick up the 3 pieces after defeating the Bulborb. |
| Sublevel 6 Treasure Map | ||
 |
||
| 1 |
Sparklium: 200 |
 Ride Oatchi and cross the water. Use Red Pikmin to destroy the lava to reach the treasure. |
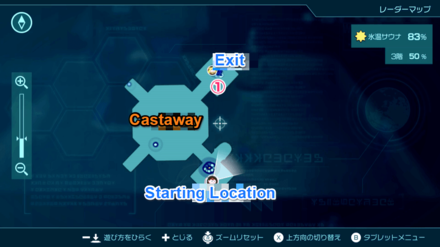
Secluded Courtyard
| Sublevel 1 Treasure Map | ||
|---|---|---|
 |
||
| 1 |
Sparklium: 80 |
 Throw Pikmin on the ledge to get the treasure. |
| 2 |
Sparklium: 60 |
 Throw Yellow Pikmin on the treasure hanging from cobwebs. |
| 3 |
Sparklium: 90 |
 Pick up the treasure past the Skitter Leaf enemies. |
| Sublevel 2 Treasure Map | ||
 |
||
| 1 |
Sparklium: 180 |
 Defeat the spider enemy under the treasure to safely carry the treasure back. |
| 2 |
Sparklium: 40 |
 Climb up the slope and throw Yellow Pikmin on the climbing stick to reach the treasure. |
| 3 |
Sparklium: 40 |
 Command the Pikmin to carry the treasure then defeat the spider to reclaim the it. |
| Sublevel 3 Treasure Map | ||
 |
||
| 1 |
Sparklium: 40 |
 Throw Yellow Pikmin on the treasure hanging from cobwebs. |
| 2 |
Sparklium: 90 |
 Cover the hole with water coming out below the treasure then throw Yellow Pikmin on the treasure hanging from cobwebs. |
| 3 |
Sparklium: 5 |
 Pick up the treasure on the ground. |
| Sublevel 4 Treasure Map | ||
 |
||
| 1 |
Sparklium: 150 |
 Proceed to Gate 01 after defeating the boss, Foolix, and carry the treasure back. |
Sightless Passage
| Sublevel 1 Treasure Map | ||
|---|---|---|
 |
||
| 1 |
Sparklium: 150 |
 At the back of the room on the southeastern corner of the map. |
| 2 |
Sparklium: 110 |
 Throw Yellow Pikmin to reach and transport the treasure. |
| 3 |
Sparklium: 130 |
 Command Oatchi to go over the hole and transport it. |
| 4 |
Sparklium: 120 |
 Dig up the treasure from the ground. |
Serene Shores
| Jump to an Area! | ||
|---|---|---|
| Sun-Speckled Terrace | Blossoming Arcadia | Serene Shores |
| Hero's Hideaway | Giant's Hearth | Primordial Thicket |
Below-Grade Discotheque
| Sublevel 1 Treasure Map | ||
|---|---|---|
 |
||
| 1 |
Sparklium: 150 |
 Throw the Pikmin on the high ground. |
| 2 |
Sparklium: 110 |
 Throw the Pikmin on the high ground. |
| 3 |
Sparklium: 110 |
 Throw Yellow Pikmin to reach the treasure hanging from the ceiling. |
| Sublevel 2 Treasure Map | ||
 |
||
| 1 |
Sparklium: 150 |
 While riding the floating platform, throw the Pikmin towards the treasure. |
| 2 |
Sparklium: 230 |
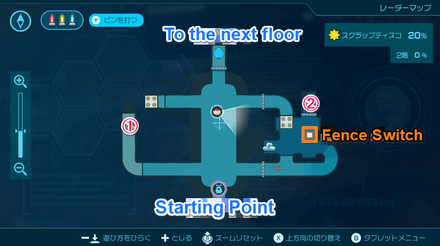
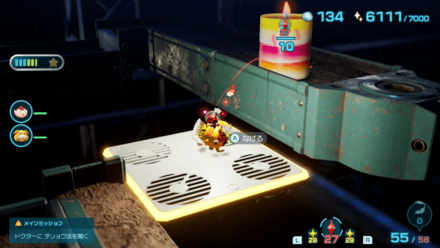
 Lower the fence to reach the treasure. |
| Sublevel 3 Treasure Map | ||
 |
||
| 1 |
Sparklium: 5 |
 Pick up the 10 pieces on the ground. |
| 2 |
Sparklium: 150 |
 Pick up the treasure on the ground. |
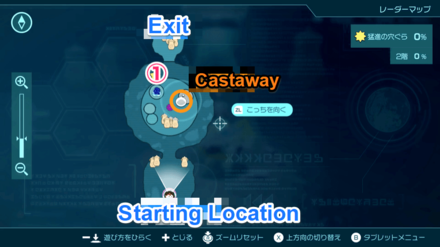
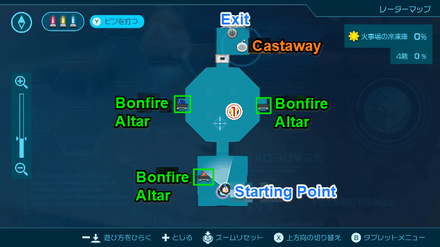
Below-Grade Discotheque Cave Guide
Engulfed Castle
| Sublevel 1 Treasure Map | ||
|---|---|---|
 |
||
| 1 |
Sparklium: 130 |
 Pick up on the ground. |
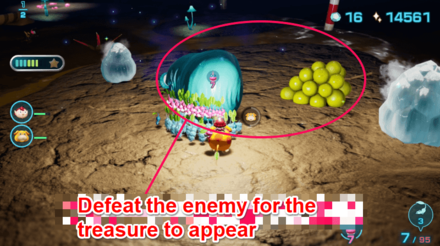
| 2 |
Sparklium: 50 |
 Defeat the Bulborb for the treasure to appear. |
| 3 |
Sparklium: 150 |
 Press the switch to lower the fence and reach the treasure. |
| 4 |
Sparklium: 20 |
 Pick up on the puddle. |
| 5 |
Sparklium: 5 |
 Pick up on the puddle. |
| Sublevel 2 Treasure Map | ||
 |
||
| 1 |
Sparklium: 20 |
 Two pieces will appear after you defeat the Bulborb. |
| 2 |
Sparklium: 110 |
 Command Oatchi to sniff out the treasure to find its exact spot then command him to dig up the sweet potato. |
| Sublevel 3 Treasure Map | ||
 |
||
| 1 |
Sparklium: 70 |
 Throw the Pikmin towards the treasure on the ceiling to drop it on the floor. |
| 2 |
Sparklium: 50 |
 Command Oatchi to sniff out the treasure to find its exact spot then command him to dig up the potato. |
| 3 |
Sparklium: 50 |
 Pick it up on the ledge. |
| Sublevel 4 Treasure Map | ||
 |
||
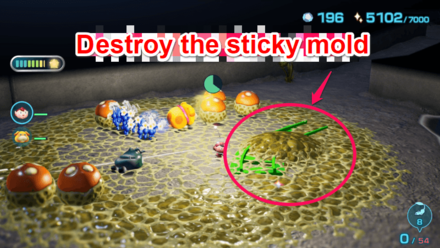
| 1 |
Sparklium: 150 |
 Appears after destroying the sticky mold. |
| 2 |
Sparklium: 20 |
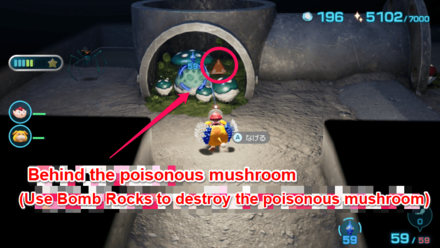 Destroy the Poisonous Mushroom with Bomb Rocks and find the treasure behind it. |
| 3 |
Sparklium: 90 |
 Defeat the large enemy on the 4th sublevel. |
| 4 |
Sparklium: 40 |
 Pick it up on the ground. |
| Sublevel 5 Treasure Map | ||
 |
||
| 1 |
Sparklium: 80 |
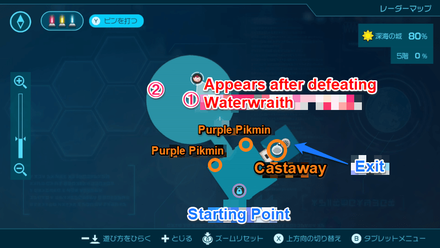
 Defeat the Waterwraith boss for the treasure to appear. |
| 2 |
Sparklium: 80 |
 Dig it out from the ground. |
Seafloor Resort
| Sublevel 1 Treasure Map | ||
|---|---|---|
 |
||
| 1 |
Sparklium: 5 |
 Pick up the 15 pieces on the ground. |
| 2 |
Sparklium: 80 |
 Use the Blue Pikmin twice to carry the treasure. |
| 3 |
Sparklium: 70 |
 Stop the water spout using Blue Pikmin and carry the treasure to the base. |
| 4 |
Sparklium: 110 |
 Throw Pikmin on the treasure hanging from cobwebs. |
| 5 |
Sparklium: 80 |
 Use the fishing line and have the Blue Pikmin grab the treasure. |
| Sublevel 2 Treasure Map | ||
 |
||
| 1 |
Sparklium: 20 |
 Let the Blue Pikmin pick up the treasure. |
| 2 |
Sparklium: 90 |
 Press the switch and carry the treasure using Blue Pikmin. |
| 3 |
Sparklium: 40 |
 Defeat the brown spider enemy for the treasure to appear. |
| 4 |
Sparklium: 40 |
 Let the Blue Pikmin pick up the treasure. |
| 5 |
Sparklium: 40 |
 Carry 2 pieces using Blue Pikmin. |
| Sublevel 3 Treasure Map | ||
 |
||
| 1 |
Sparklium: 40 |
 Throw Blue Pikmin to get the treasures. |
| 2 |
Sparklium: 5 |
 Carry the two pieces using Blue Pikmin. |
| 3 |
Sparklium: 300 |
 Let the Blue Pikmin pick up the treasure. |
| 4 |
Sparklium: 80 |
 Pick up on the ground. |
| 5 |
Sparklium: 5 |
 Pick up the 15 pieces on the ground. |
| Sublevel 4 Treasure Map | ||
 |
||
| 1 |
Sparklium: 230 |
 Defeat the big frog boss to make it drop the treasure. |
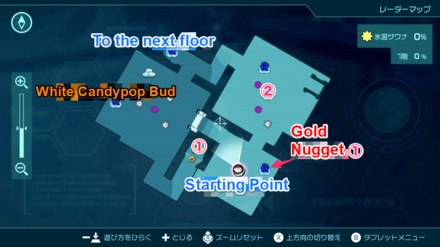
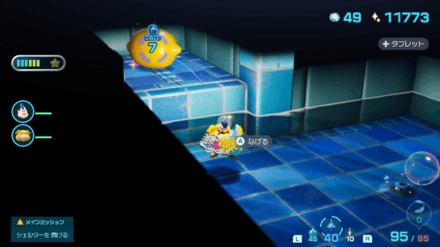
Subzero Sauna
| Sublevel 1 Treasure Map | ||
|---|---|---|
 |
||
| 1 |
Sparklium: 5 |
 Use White Pikmin to destroy the poison gas and pick up 10 pieces of the Gold Nugget. |
| 2 |
Sparklium: 40 |
 Use Ice Pikmin to break the Hydro Jelly to reveal the treasure. |
| Sublevel 2 Treasure Map | ||
 |
||
| 1 |
Sparklium: 50 |
 Let the Blue Pikmin pick up the treasure. |
| 2 |
Sparklium: 80 |
 Use Ice Pikmin to break the Hydro Jelly to reveal the treasure. |
| Sublevel 3 Treasure Map | ||
 |
||
| 1 |
Sparklium: 300 |
 Pick up the treasure from the ground. |
Hero's Hideaway
| Jump to an Area! | ||
|---|---|---|
| Sun-Speckled Terrace | Blossoming Arcadia | Serene Shores |
| Hero's Hideaway | Giant's Hearth | Primordial Thicket |
Doppelganger's Den
| Sublevel 1 Treasure Map | ||
|---|---|---|
 |
||
| 1 |
Sparklium: 50 |
 Freeze the water using 15 Ice Pikmin then throw Pikmin to collect the treasure. |
| 2 |
Sparklium: 90 |
 Use Blue Pikmin to reach it. |
| 3 |
Sparklium: 110 |
 Pick it up from the ground. |
| Sublevel 2 Treasure Map | ||
 |
||
| 1 |
Sparklium: 50 |
 Pick it up from the ground. |
| 2 |
Sparklium: 150 |
 Push the red switch and cross the gate. Throw Pikmin at the treasure. |
| 3 |
Sparklium: 50 |
 Enter the pipe and collect the treasure. |
| 4 |
Sparklium: 5 |
 Throw Pikmin to collect all 50. |
| Sublevel 3 Treasure Map | ||
 |
||
| 1 |
Sparklium: 120 |
 Use the fan to ride the moving platform then throw your Pikmin at the treasure. |
| 2 |
Sparklium: 60 |
 Hit the switch to lower the iron fence. Throw Pikmin to carry the treasure. |
| 3 |
Sparklium: 5 |
 Throw Pikmin to collect all 30. |
| 4 |
Sparklium: 90 |
 Complete the climbing wall using Raw Materials then throw Pikmin at the treasure. |
| 5 |
Sparklium: 50 |
 Climb the conveyor and pick it up from the ground. |
| Sublevel 4 Treasure Map | ||
 |
||
| 1 |
Sparklium: 150 |
 Use the fan to ride the moving platform then throw your Pikmin at the treasure. |
| 2 |
Sparklium: 5 |
 Break the pots to get 10 pieces of the treasure |
| 3 |
Sparklium: 20 |
 Break the pots to collect treasure. |
| 4 |
Sparklium: 40 |
 Complete the climbing wall using Raw Materials then throw Pikmin at the treasure. |
Frozen Inferno
| Sublevel 1 Treasure Map | ||
|---|---|---|
 |
||
| 1 |
Sparklium: 110 |
 Extinguish the lava surrounding the platform and use Oatchi's Rush to drop the treasure on the ground. |
| 2 |
Sparklium: 40 |
 Burn the straw and then collect the treasure. |
| 3 |
Sparklium: 5 |
Burn the straw to reach the treasure behind it. |
| 4 |
Sparklium: 40 |
 Burn the straw and then collect the treasure. |
| 5 |
Sparklium: 110 |
 Throw 7 Pikmin to drop the treasure from the ceiling. |
| Sublevel 2 Treasure Map | ||
 |
||
| 1 |
Sparklium: 40 |
 Defeat the enemies at the upper right corner of the map. |
| 2 |
Sparklium: 20 |
 Throw Pikmin into the tall grass. |
| 3 |
Sparklium: 90 |
 Destroy the wall using Rock Pikmin and collect treasure. |
| Sublevel 3 Treasure Map | ||
|
||
| 1 |
Sparklium: 60 |
 Burn the straw and throw Pikmin to carry it off. |
| 2 |
Sparklium: 90 |
 On the lower-right most hole among the four screw holes at the top part of the map. |
| 3 |
Sparklium: 60 |
 Defeat the enemies at the upper right corner of the map. |
| Sublevel 4 Treasure Map | ||
 |
||
| 1 |
Sparklium: 150 |
 Defeat the enemies for them to drop the treasure. |
Plunder Palace
| Sublevel 1 Treasure Map | ||
|---|---|---|
 |
||
| 1 |
Sparklium: 170 |
 Find the treasure hidden in the grass and pick it up. |
| 2 |
Sparklium: 25 |
 Pick it up on the ground. |
| 3 |
Sparklium: 50 |
 Pick it up on the ground. |
| 4 |
Sparklium: 40 |
 Throw Yellow Pikmin to pick up the treasure on a high platform. |
| 5 |
Sparklium: 40 |
 Ride the fan to reach the treasure and use Yellow Pikmin to pick it up. |
| Sublevel 2 Treasure Map | ||
 |
||
| 1 |
Sparklium: 80 |
 Ride on the fan and pick up the treasure on the high platform. |
| 2 |
Sparklium: 5 |
 Pick up the 15 pieces on the ground. |
| 3 |
Sparklium: 80 |
 Use Yellow Pikmin to retrieve the treasure on the yellow and white platform. |
| 4 |
Sparklium: 150 |
 Ride on the fan to reach the treasure. |
| Sublevel 3 Treasure Map | ||
 |
||
| There are no treasures in the 3rd Sublevel. | ||
| Sublevel 4 Treasure Map | ||
 |
||
| 1 |
Sparklium: 40 |
 Throw Yellow Pikmin to reach the treasure on the high ground. |
| 2 |
Sparklium: 40 |
 Pick it up on the ground. |
| 3 |
Sparklium: 5 |
 Pick up the 20 pieces on the ground. |
| 4 |
Sparklium: 100 |
 Pick it up on the ground. |
| 5 |
Sparklium: 50 |
 Pick it up on the ground. |
| 6 |
Sparklium: 1 |
 Defeat the enemy for it to drop the treasure. |
| Sublevel 5 Treasure Map | ||
 |
||
| 1 |
Sparklium: 10 |
 Defeat the first Giant Breadbug for it to drop 3 pieces of the treasure. |
| 2 |
Sparklium: 40 |
 Defeat the second Giant Breadbug for it to drop the treasure. |
| 3 |
Sparklium: 10 |
 Find the treasure hidden in the grass. |
| 4 |
Sparklium: 50 |
 Throw the Pikmin on the elevated platform to retrieve the treasure. |
| 5 |
Sparklium: 50 |
 Throw the Pikmin on the elevated platform to retrieve the treasure. |
| 6 |
Sparklium: 40 |
 Climb the elevator and head to the desk to find the treasure on top of a yellow plate. |
| 7 |
Sparklium: 150 |
 Climb the elevator to reach the desk that has the treasure on top of a blue plate. |
| 8 |
Sparklium: 60 |
 Dig up the soil to retreive the treasure. |
Giant's Hearth
| Jump to an Area! | ||
|---|---|---|
| Sun-Speckled Terrace | Blossoming Arcadia | Serene Shores |
| Hero's Hideaway | Giant's Hearth | Primordial Thicket |
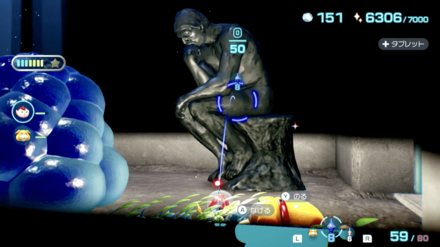
Cradle of the Beast
| Sublevel 1 Treasure Map | ||
|---|---|---|
 |
||
| 1 |
Sparklium: 50 |
 Defeat the enemy and the treasure will appear. |
| 2 |
Sparklium: 70 |
 Defeat the enemy and it will drop the treasure. |
| 3 |
Sparklium: 5 |
 Use Pikmin to collect all 15 on the ground. |
| 4 |
Sparklium: 60 |
 Crush the Paper Bag with 30 Pikmin then collect the treasure. |
| Sublevel 2 Treasure Map | ||
 |
||
| 1 |
Sparklium: 350 |
 Throw Pikmin to reach it. |
| 2 |
Sparklium: 5 |
 Use Pikmin to collect all 20 on the ground. |
| 3 |
Sparklium: 500 |
 Defeat the enemy. Use Purple Pikmin afterward as it weighs 300. |
| Sublevel 3 Treasure Map | ||
 |
||
| 1 |
Sparklium: 20 |
 Defeat the boss to get 5 of these. |
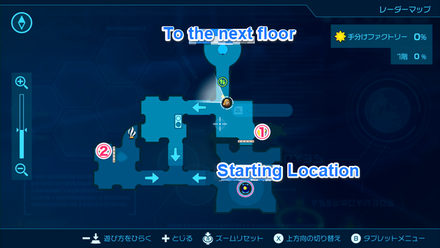
Cradle of the Beast Cave Guide
Dream Home
| Sublevel 1 Treasure Map | ||
|---|---|---|
 |
||
| 1 |
Sparklium: 10 |
 Command Oatchi to Rush at the lower-right part of the map and the treasure will appear. |
| 2 |
Sparklium: 180 |
 Defeat the enemy and it will drop the treasure. |
| 3 |
Sparklium: 5 |
 Use Pikmin to collect all 20. |
| 4 |
Sparklium: 20 |
 Complete the construction using Raw Materials to reach the treasure. |
| 5 |
Sparklium: 40 |
 Enter a tunnel using Oatchi or use Winged Pikmin. |
| 6 |
Sparklium: 110 |
 Cross the bridge to get to higher ground and collect the treasure. |
| 7 |
Sparklium: 80 |
 Ride the platform to reach it. |
| 8 |
Sparklium: 20 |
 Pick it up from the ground. |
| 9 |
Sparklium: 110 |
 Carry it using Pikmin. |
| 10 |
Sparklium: 5 |
 Use Pikmin to collect all 20 at the upper right corner of the map. |
| 11 |
Sparklium: 20 |
 Remove the soil blocking the pipe or destroy the obstacle at the sublevel's starting point. |
| 12 |
Sparklium: 20 |
 Jump on the mushrooms at the lower-left part of the map. It is at the landing point. |
| 13 |
Sparklium: 40 |
 Command Oatchi to Rush at the pillar for the treasure to fall. |
| 14 |
Sparklium: 20 |
 Command Oatchi to Rush at the pillar for the treasure to fall. |
| 15 |
Sparklium: 150 |
 Collect playing cards and open the safe to reach the treasure. |
Ultimate Testing Range
| Sublevel 1 Treasure Map | ||
|---|---|---|
 |
||
| 1 |
Sparklium: 40 |
 Defeat the green spider and carry it to base. |
| 2 |
Sparklium: 110 |
 Defeat the green spider and pick up the treasure. |
| 3 |
Sparklium: 60 |
 Ride the platform and throw Pikmin at the treasure. |
| Sublevel 2 Treasure Map | ||
 |
||
| 1 |
Sparklium: 110 |
 Pick it up from the ground. |
| 2 |
Sparklium: 150 |
 Pick it up from the high ledge. |
| Sublevel 3 Treasure Map | ||
 |
||
| 1 |
Sparklium: 5 |
 Find it atop a hill. Throw Pikmin to reach the treasure. |
| 2 |
Sparklium: 110 |
 Throw Pikmin over the fence for them to pick up the treasure. |
| Sublevel 4 Treasure Map | ||
 |
||
| 1 |
Sparklium: 100 |
 Defeat the spider and collect it. |
| 2 |
Sparklium: 5 |
 Collect all 15 on the ground. |
| 3 |
Sparklium: 50 |
 Pick it up from the ground. |
| Sublevel 5 Treasure Map | ||
 |
||
| 1 |
Sparklium: 300 |
 Pick it up from the ground. |
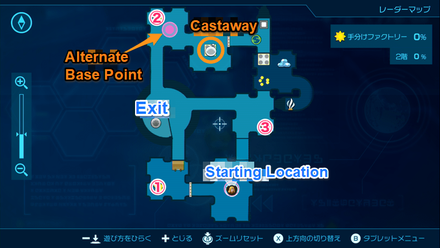
Ultimate Testing Range Cave Guide
Primordial Thicket
| Jump to an Area! | ||
|---|---|---|
| Sun-Speckled Terrace | Blossoming Arcadia | Serene Shores |
| Hero's Hideaway | Giant's Hearth | Primordial Thicket |
Subterranean Swarm
| Sublevel 1 Treasure Map | ||
|---|---|---|
 |
||
| 1 |
Sparklium: 110 |
 Throw the Pikmin towards the treasure to drop it from the ceiling. |
| 2 |
Sparklium: 130 |
 Defeat the Arachnode and collect the treasure. |
| 3 |
Sparklium: 130 |
Defeat the Arachnode and collect the treasure. |
| Sublevel 2 Treasure Map | ||
 |
||
| 1 |
Sparklium: 70 |
 Pick it up from the ground. |
| 2 |
Sparklium: 80 |
 Pick it up from the ground. |
| Sublevel 3 Treasure Map | ||
 |
||
| 1 |
Sparklium: 110 |
 Destroy the mushrooms and collect the treasure. |
| 2 |
Sparklium: 110 |
 Appears after defeating the boss. |
| Sublevel 4 Treasure Map | ||
 |
||
| 1 |
Sparklium: 50 |
 Pick it up from the ground. |
| 2 |
Sparklium: 20 |
 Break the pot to collect treasure. |
| 3 |
Sparklium: 250 |
 Pick it up from the ground. |
| 4 |
Sparklium: 5 |
 Collect all 15 on the ground. |
| Sublevel 5 Treasure Map | ||
 |
||
| 1 |
Sparklium: 60 |
 Dig it up using Pikmin or Oatchi. |
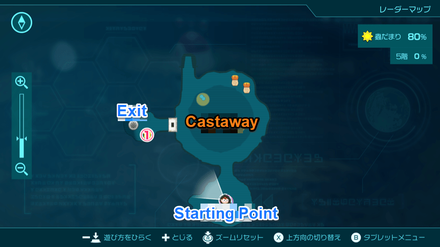
The Mud Pit
| Sublevel 1 Treasure Map | ||
|---|---|---|
 |
||
| 1 |
Sparklium: 5 |
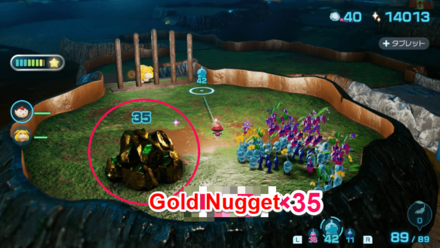 Collect all 35 on the ground. |
| 2 |
Sparklium: 60 |
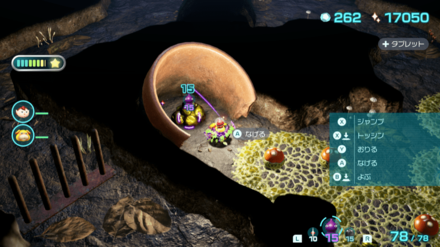
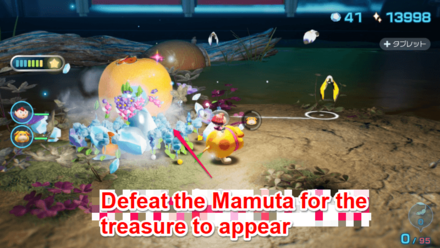 Defeat the Mamuta and it will drop the treasure. |
| 3 |
Sparklium: 130 |
 Pick it up from the ground. |
| 4 |
Sparklium: 110 |
 Pick it up from the ground. |
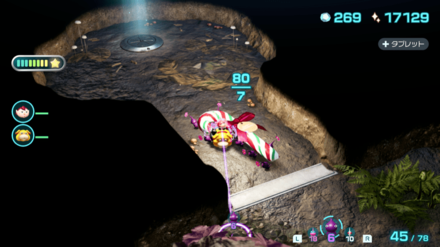
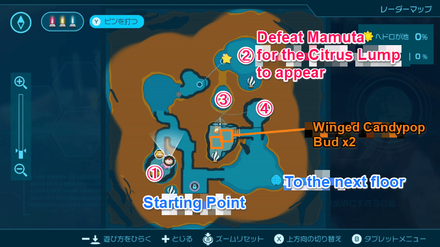
| Sublevel 2 Treasure Map | ||
 |
||
| 1 |
Sparklium: 70 |
 Defeat the enemy and it will drop the treasure. |
| 2 |
Sparklium: 5 |
 Break the pot and get 5 of these. |
| 3 |
Sparklium: 40 |
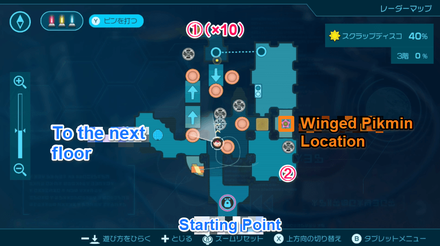
 Use Winged Pikmin. |
| 4 |
Sparklium: 40 |
 Use Winged Pikmin. |
| 5 |
Sparklium: 20 |
 Destroy the Hydro Jelly to collect the treasure. |
| 6 |
Sparklium: 110 |
 Defeat the enemy and the treasure will appear. |
| Sublevel 3 Treasure Map | ||
 |
||
| 1 |
Sparklium: 150 |
 Find it in the boss' area. |
Cavern for a King
| Sublevel 1 Treasure Map | ||
|---|---|---|
 |
||
| 1 |
Sparklium: 20 |
 Defeat the boss and it will drop the treasure. |
| Sublevel 2 Treasure Map | ||
 |
||
| 1 |
Sparklium: 80 |
 Defeat the Jumbo Bulbobrb and it will drop the treasure. |
| 2 |
Sparklium: 150 |
 Pick it up from the ground. |
| Sublevel 3 Treasure Map | ||
 |
||
| 1 |
Sparklium: 40 |
 Defeat the Burrowing Snagret and it will drop the treasure. |
| Sublevel 4 Treasure Map | ||
 |
||
| 1 |
Sparklium: 40 |
 Collect 3 of these when you defeat the enemy. |
| Sublevel 5 Treasure Map | ||
 |
||
| 1 |
Sparklium: 90 |
 Defeat the boss and it will drop the treasure. |
| Sublevel 6 Treasure Map | ||
 |
||
| 1 |
Sparklium: 20 |
 Go around the sublevel clockwise and throw Pikmin to reach it. |
| Sublevel 7 Treasure Map | ||
 |
||
| 1 |
Sparklium: 50 |
 Defeat the enemy and it will drop the treasure. |
| 2 |
Sparklium: 40 |
 Defeat the enemy and it will drop the treasure. |
| Sublevel 8 Treasure Map | ||
 |
||
| 1 |
Sparklium: 40 |
 Defeat the Crusted Rumpup and it will drop the treasure. |
| Sublevel 9 Treasure Map | ||
 |
||
| 1 |
Sparklium: 5 |
 Defeat the Man-at-Legs and it will drop 2. |
| 2 |
Sparklium: 5 |
Defeat the Man-at-Legs and it will drop 2. |
| Sublevel 10 Treasure Map | ||
 |
||
| 1 |
Sparklium: 200 |
 Defeat the Smoky Progg and it will drop the treasure. |
| Sublevel 11 Treasure Map | ||
 |
||
| 1 |
Sparklium: 50 |
 Pick it up from the ground. If the enemy eats it, defeat the enemy. |
| 2 |
Sparklium: 25 |
 Defeat the enemy and it will drop the treasure. |
| 3 |
Sparklium: 80 |
 Defeat the long-nosed salmon lobster boss for the treasure to appear. |
| 4 |
Sparklium: 110 |
 Use 7 Pikmin to pull the tree branch for the treasure to emerge. |
| Sublevel 12 Treasure Map | ||
 |
||
| 1 |
Sparklium: 300 |
 Go through the pipe towards the passage beyond the wall to carry the treasure. |
| Sublevel 13 Treasure Map | ||
 |
||
| 1 |
Sparklium: 50 |
 Remove the sticky mold for the treasure to appear. |
| 2 |
Sparklium: 150 |
 Defeat the Gildemander and it will drop the treasure. |
| Sublevel 14 Treasure Map | ||
 |
||
| 1 |
Sparklium: 80 |
Picture of Treasure Defeat the Horned Cannon Beatle and it will drop the treasure. |
| Sublevel 15 Treasure Map | ||
 |
||
| 1 |
Sparklium: 20 |
 Get 10 by defeating Baldy Long Legs |
| Sublevel 16 Treasure Map | ||
 |
||
| 1 |
Sparklium: 150 |
 Defeat the Waterwraith for the treasure to appear. |
| Sublevel 17 Treasure Map | ||
 |
||
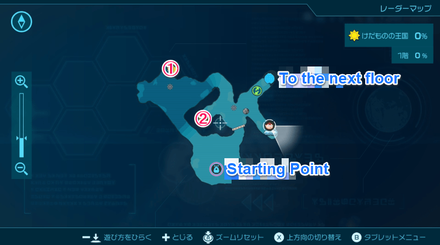
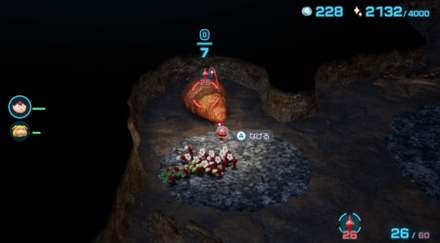
| 1 |
Sparklium: 170 |
 Defeat the Empress Bulblax and it will drop the treasure. |
| Sublevel 18 Treasure Map | ||
 |
||
| 1 |
Sparklium: 180 |
 Defeat the Sovereign Bulblax for the treasure to appear. |
| Sublevel 19 Treasure Map | ||
 |
||
| 1 |
Sparklium: 90 |
 Dig it up using Pikmin or Oatchi. |
| 2 |
Sparklium: 20 |
 Use Blue Pikmin to get 3 of these in the water. |
| 3 |
Sparklium: 60 |
 Use Blue Pikmin to get the treasure from the water. |
| 4 |
Sparklium: 40 |
 Use Blue Pikmin to get the treasure from the water. |
| 5 |
Sparklium: 90 |
 Throw Pikmin to reach it. |
| 6 |
Sparklium: 20 |
 Find it inside a crumbling bucket. |
| 7 |
Sparklium: 70 |
Find it inside a crumbling bucket. |
| Sublevel 20 Treasure Map | ||
 |
||
| 1 |
Sparklium: 80 |
 Defeat the final boss for the treasure to appear. |
All Treasure Series
Note: The total number also includes multiple instances of the same treasure in each treasure series.
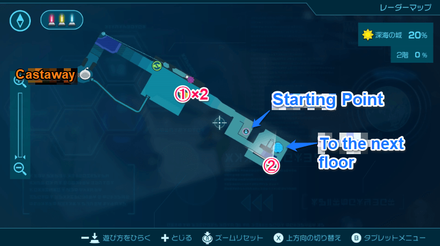
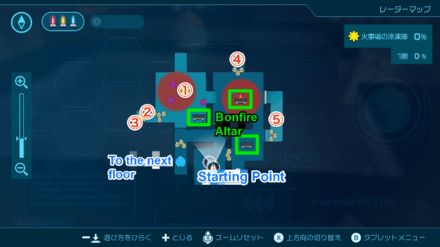
Where to Get Treasures
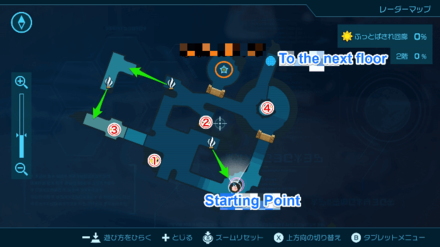
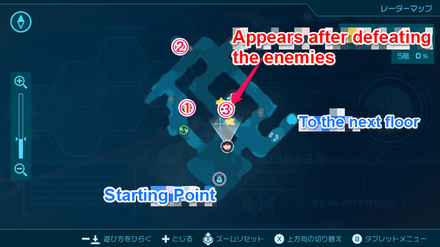
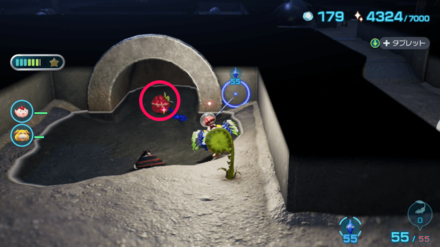
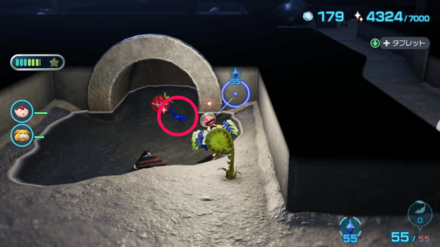
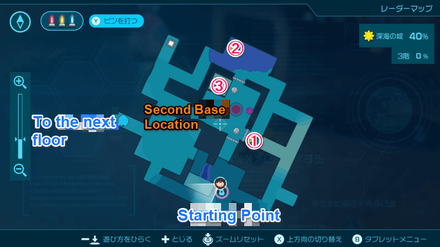
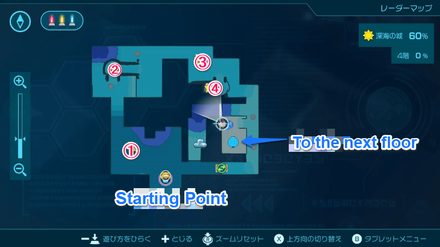
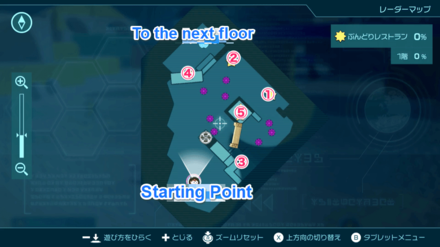
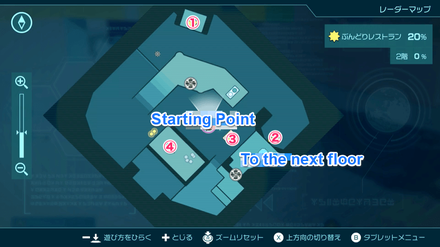
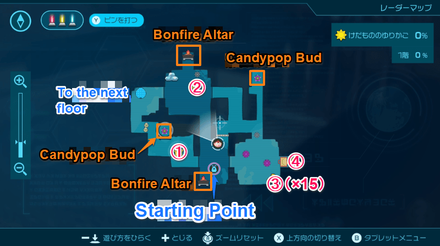
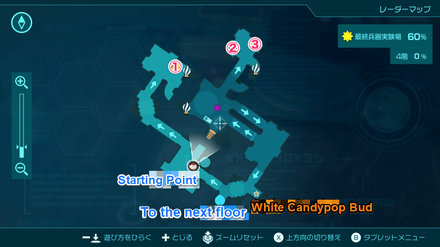
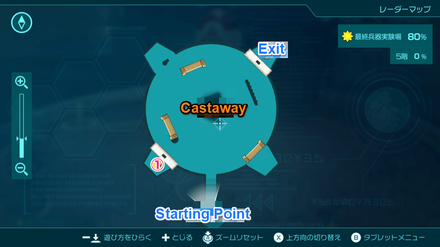
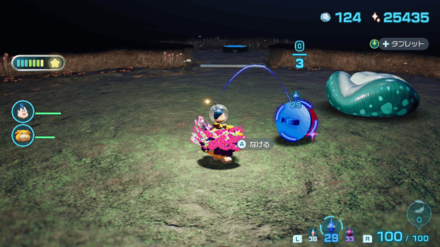
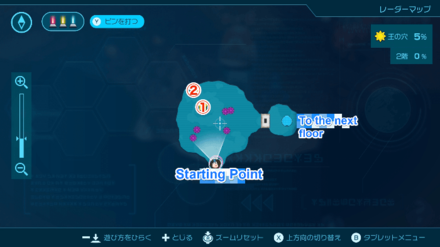
Find the Star Icons on the Radar Map
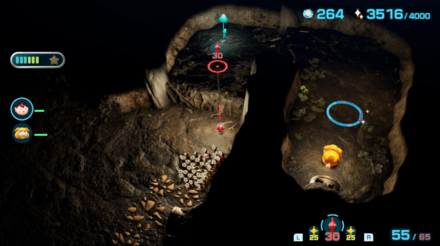
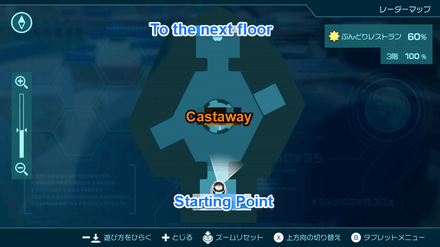
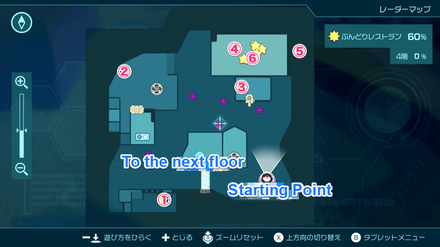
The easiest way to locate treasures is to open the Radar Map and look for the yellow stars. You can then hover the cursor and press the ZL Button to look to the direction of the treasure.
Rescue Schnauz to Unlock the Treasure Catalog
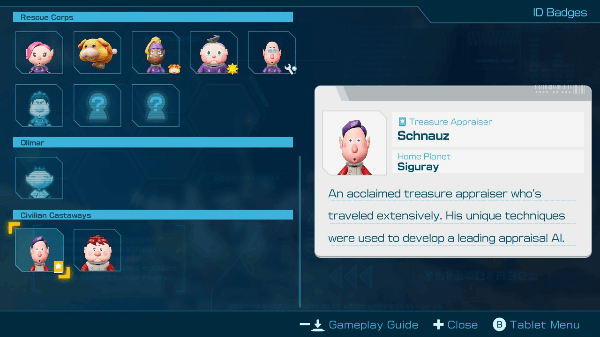
You can see a list of the treasures that you have obtained once you rescue Schnauz in any of the underground caves.
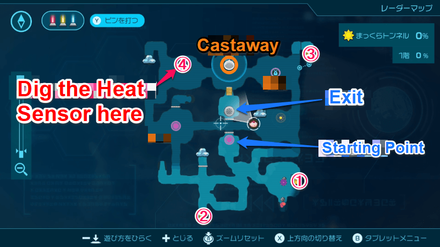
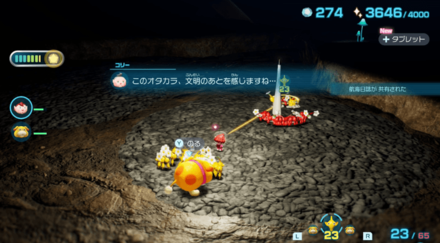
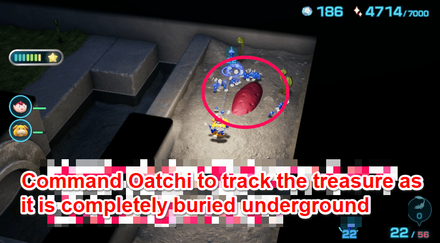
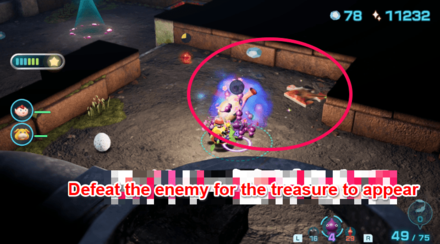
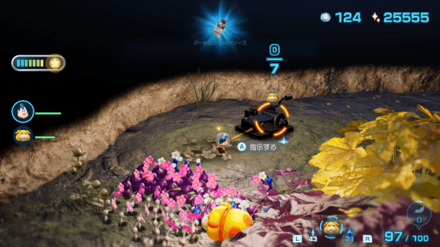
Let Oatchi Track the Treasure
Some treasures such as the Child of the Earth in Sun-Speckled Terrace and the Mooching Vase in Blossoming Arcadia are buried underground and do not show up as yellow stars on the Radar Map.
To find these treasures, press and hold the Y Button to open the shortcut and select Command. On the next menu, select Treasure to command Oatchi to track the potato treasure.
This method comes in handy when trying to 100% each area or if you happen to be stuck at 99% completion. You can also purchase the Treasure Gauge at The Lab to see the total number of treasures in each area.
Pikmin 4 Related Guides
All Pikmin 4 Guides
All Tips and Tricks Articles
All News Articles
Comment
Author

List of All Treasures and Locations
Please participate in our site
improvement survey
02/2026
improvement survey
02/2026
Would you assist in
improving Game8's site?
improving Game8's site?

×
We are listening to our users' valuable opinions and discussing how to act on them.
The information collected through this survey will be used for the purpose of improving our services. In addition, the information will only be disclosed a part of a statistic in a format that will not allow identification of personal information.
Begin Survey
Not Now
×
Please rate each item regarding Game8.co's Advertisements.
Amount of Ads
Very Dissatisfied
Somewhat Dissatisfied
Fine
Somewhat Satisfied
Highly Satisfied
Placement of Ads
Timing of Ad Display
Ad Loading Speed
Safeness of Ads
Content of Ads
×
Please rate each item regarding Game8.co's Quality of Articles.
Amount of information
Very Dissatisfied
Somewhat Dissatisfied
Fine
Somewhat Satisfied
Highly Satisfied
Frequency of updates
Speed of new information
Accuracy of articles
Understandibility of articles
Readability of sentences
×
Please rate each item regarding Game8.co's Usability of the Site.
Ease of finding information
Very Dissatisfied
Somewhat Dissatisfied
Fine
Somewhat Satisfied
Highly Satisfied
Loading Speed
Use of Color
Font Size
Visibility of Images
Easy to Understand Layout
×
Please rate each item regarding Game8.co's Message Boards, Comments.
Ease of Writing
Very Dissatisfied
Somewhat Dissatisfied
Fine
Somewhat Satisfied
Highly Satisfied
Readability
Ease in Finding Information
Comment Quality
Comment Quantity
Admin Response
×
Please rate each item regarding Game8.co's Site's new design.
Please rate our site's new design
Very Dissatisfied
Somewhat Dissatisfied
Fine
Somewhat Satisfied
Highly Satisfied
Do you think that the website's design change makes the site easier to use?
Has the new design made it easier for you to find information on the site?
Has the new design improved the overall visual appeal of the site?
How would you rate your overall satisfaction with the new design of the site?
×
How likely are you to recommend Game8 to someone you know?
Very Unlikely
0
1
2
3
4
5
6
7
8
9
10
Very Likely
If you have other opinions regarding potential improvement to the website, please share them with us. We would appreciate your honest opinion.
Note: This is a free response section, so you can proceed without entering anything.
Note: Please be sure not to enter any kind of personal information into your response.
Note: Please be sure not to enter any kind of personal information into your response.
×
Thank You
×
Thank you for participating in our survey! Your answers will help us to improve the quality of our website and services.
We hope you continue to make use of Game8.
We hope you continue to make use of Game8.
Close
Rankings
- We could not find the message board you were looking for.
Gaming News


Popular Games

Genshin Impact Walkthrough & Guides Wiki
Arknights: Endfield Walkthrough & Guides Wiki
Honkai: Star Rail Walkthrough & Guides Wiki
Wuthering Waves Walkthrough & Guides Wiki
Umamusume: Pretty Derby Walkthrough & Guides Wiki
Zenless Zone Zero Walkthrough & Guides Wiki
Pokemon TCG Pocket (PTCGP) Strategies & Guides Wiki
Clair Obscur: Expedition 33 Walkthrough & Guides Wiki
Digimon Story: Time Stranger Walkthrough & Guides Wiki
Where Winds Meet Walkthrough & Guides Wiki


Recommended Games
Fire Emblem Heroes (FEH) Walkthrough & Guides Wiki
Diablo 4: Vessel of Hatred Walkthrough & Guides Wiki
Super Smash Bros. Ultimate Walkthrough & Guides Wiki
Yu-Gi-Oh! Master Duel Walkthrough & Guides Wiki
Pokemon Brilliant Diamond and Shining Pearl (BDSP) Walkthrough & Guides Wiki
Elden Ring Shadow of the Erdtree Walkthrough & Guides Wiki
Monster Hunter World Walkthrough & Guides Wiki
The Legend of Zelda: Tears of the Kingdom Walkthrough & Guides Wiki
Persona 3 Reload Walkthrough & Guides Wiki
Cyberpunk 2077: Ultimate Edition Walkthrough & Guides Wiki


All rights reserved
© Nintendo.
The copyrights of videos of games used in our content and other intellectual property rights belong to the provider of the game.
The contents we provide on this site were created personally by members of the Game8 editorial department.
We refuse the right to reuse or repost content taken without our permission such as data or images to other sites.