Below-Grade Discotheque Treasures, Castaway, and Onion Locations
❀ Pikmin 4 is out! Get a headstart by following these tips!
❀ Get more Pikmin by getting all the onion types!
❀ New and returning bosses are back in the Piklopedia!
❀ Brave the Trial of the Sage Leaf to get more onions!
❀ Make Oatchi stronger by upgrading his skills!
Below-Grade Discotheque in Pikmin 4 is a cave that can be found in Serene Shores. See all treasures, bosses, enemies, castaways, and onion locations in Below-Grade Discotheque. The guide below also has its map, a section on how to reach it and tips and strategies on how to complete it 100%.
List of Contents
Below-Grade Discotheque Map and Overview
Map
| Map Location | 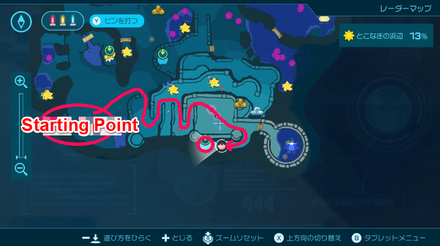 |
|---|---|
| Overworld Location | 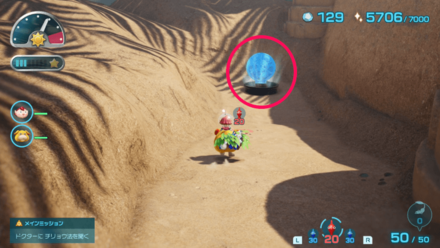 |
Overview
| Location | Serene Shores | ||
|---|---|---|---|
| Castaways | 1 | ||
| Treasures | 11 | ||
| Onions | 0 | ||
| Pikmin |
Winged Pikmin
Yellow Pikmin Red Pikmin |
||
How to Reach Below-Grade Discotheque
At the Back of the Sandcastle

From the starting base location, go east and traverse the large sandcastle, eventually reaching the middle area where you can place your base after defeating a large enemy there. The Below-Grade Discotheque's cave is found south of that middle area.
Below-Grade Discotheque Bosses and Enemies
Bosses
|
|
Make sure to fight the boss while riding Oatchi as it makes it easier for you to gather the Pikmin after attacking. This also makes it easy to avoid the purple smoke attack as any Pikmin affected by the smoke cannot be called back and may be trampled in the process. Groovy Long Legs will start shooting a purple smoke once you attack its weak point.
Once Groovy Long Legs' health becomes low, it will start to glow red and move faster. Do not attack the boss while in this state as there is a risk that your Pikmin may get trampled as it stomps around the arena. Wait for the boss to turn blue before attacking.
Enemies
|
|
|
|
|
|
|
Below-Grade Discotheque Treasure Locations
Sublevel 1
| Jump to a Sublevel | ||
|---|---|---|
| Sublevel 1 | Sublevel 2 | Sublevel 3 |
| Sublevel 4 | Sublevel 5 | - |
| Below-Grade Discotheque Sublevel 1 Map | ||
|---|---|---|
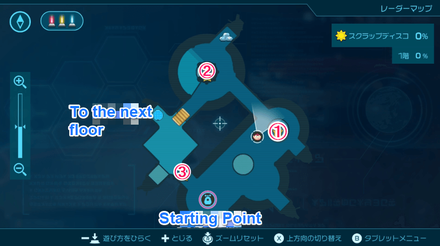 |
||
| All Treasures | ||
| 1 |
Sparklium: 150 |
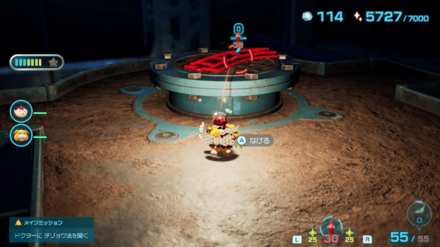 Throw the Pikmin on the high ground. |
| 2 |
Sparklium: 110 |
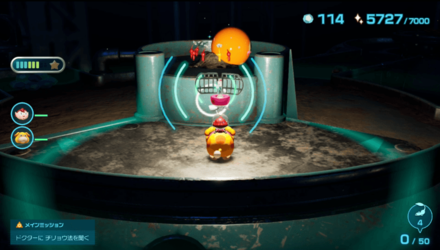 Throw the Pikmin on the high ground. |
| 3 |
Sparklium: 110 |
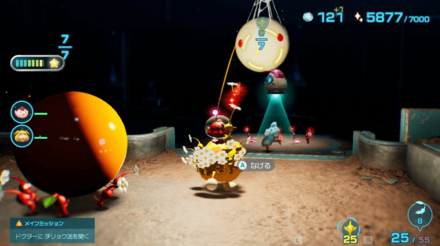 Throw Yellow Pikmin to reach the treasure hanging from the ceiling. |
Use Yellow Pikmin to Reach the Treasures
All treasures on the 1st sublevel are on a high platform or ceiling. Use Yellow Pikmin to reach and transport them to the base.
Sublevel 2
| Jump to a Sublevel | ||
|---|---|---|
| Sublevel 1 | Sublevel 2 | Sublevel 3 |
| Sublevel 4 | Sublevel 5 | - |
| Below-Grade Discotheque Sublevel 2 Map | ||
|---|---|---|
 |
||
| All Treasures | ||
| 1 |
Sparklium: 150 |
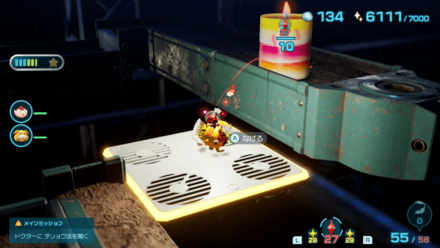 While riding the floating platform, throw the Pikmin towards the treasure. |
| 2 |
Sparklium: 230 |
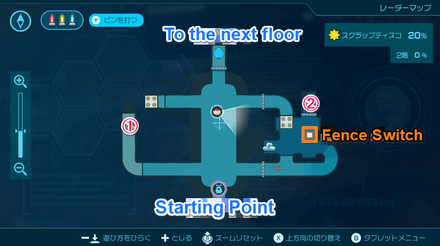
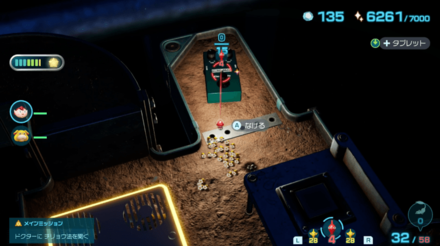 Lower the fence to reach the treasure. |
2. Throw the Pikmin Towards the Switch
You can press the fence switch on the right side of the map as you ride the floating yellow platform. While on the platform, throw a Pikmin towards the switch to lower the fence.
Sublevel 3
| Jump to a Sublevel | ||
|---|---|---|
| Sublevel 1 | Sublevel 2 | Sublevel 3 |
| Sublevel 4 | Sublevel 5 | - |
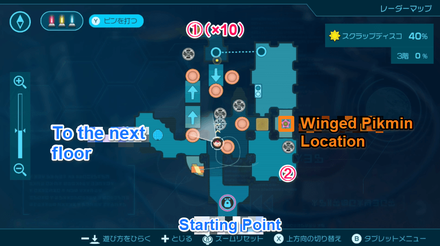
| Below-Grade Discotheque Sublevel 3 Map | ||
|---|---|---|
 |
||
| All Treasures | ||
| 1 |
Sparklium: 5 |
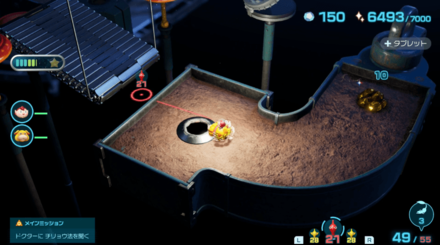 Pick up the 10 pieces on the ground. |
| 2 |
Sparklium: 150 |
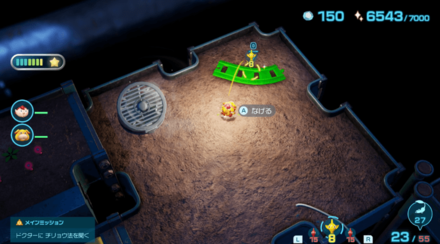 Pick up the treasure on the ground. |
1. Dig the Hole at the Upper-Right Corner
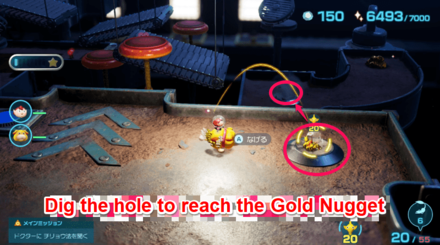
You can reach the Gold Nugget when you command your Pikmin to dig a hole on the upper-right side of the map.
2. Press the Switch at the Right Time
In order to collect the Turn-of-Events Track , you need to transport your Pikmin on the conveyor belt and control its path using the red and blue buttons.
| How to Solve the Conveyor Belt Puzzle | |
|---|---|
| 1 | 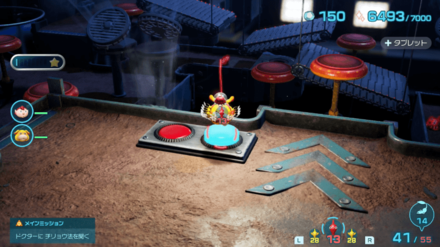 Press the blue switch. |
| 2 | 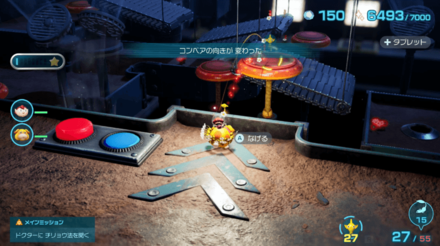 Throw the Pikmin on the orange platform to transport them to the conveyor belt. |
| 3 | 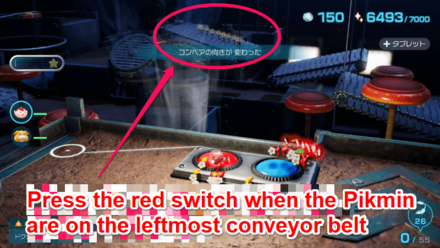 Wait for the Pikmin to move on the leftmost conveyor belt and press the red switch. |
| 4 | 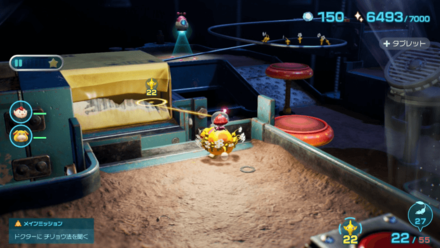 Wait for the Pikmin to reach the leftside of the area and push the paper bag to create a path. |
Jump from the Top of the Box to Reach the Winged Pikmin
To get to the location of the wild Wing Pikmin, jump from the top of the box towards the fan to push you towards their area.
Sublevel 4
| Jump to a Sublevel | ||
|---|---|---|
| Sublevel 1 | Sublevel 2 | Sublevel 3 |
| Sublevel 4 | Sublevel 5 | - |
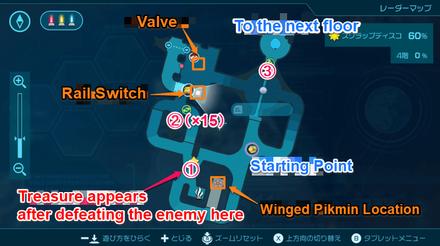
| Below-Grade Discotheque Sublevel 4 Map | ||
|---|---|---|
 |
||
| All Treasures | ||
| 1 |
Sparklium: 60 |
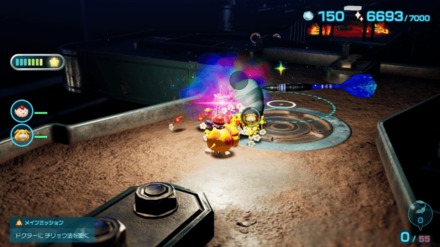 Defeat the gray enemy for the treasure to appear. |
| 2 |
Sparklium: 5 |
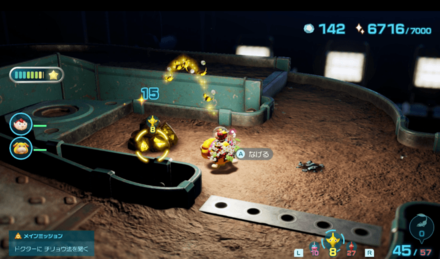 Lower the fence and pick up the 10 pieces on the ground. |
| 3 |
Sparklium: 110 |
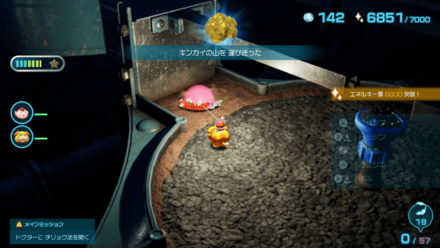 Move the valve using 12 Pikmin to activate the sprinkler and extinguish the lava floor. |
2. Give Oatchi 10 Pikmin to Lower the Bridge
The fence switch is located within an area where you need to pass through a hole. To reach the area, throw Pikmin on the high platform and switch to Oatchi to enter the hole.
Once you arrive at the high platform, call the Pikmin on the high platform and throw them towards the hanging bridge to make a path.
Oatchi Controls and How to Use Him
3. Move the Valve to Extinguish the Lava Floor
You can extinguish the lava floor on the upper-right corner of the map when you move the valve on the upper-left corner.
Sublevel 5
| Jump to a Sublevel | ||
|---|---|---|
| Sublevel 1 | Sublevel 2 | Sublevel 3 |
| Sublevel 4 | Sublevel 5 | - |
| Below-Grade Discotheque Sublevel 5 Map | ||
|---|---|---|
 |
||
| All Treasures | ||
| 1 |
Sparklium: 180 |
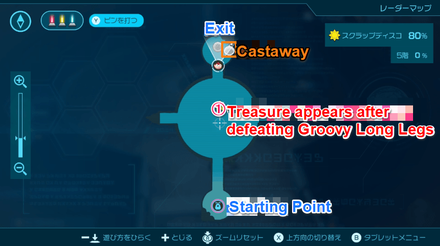
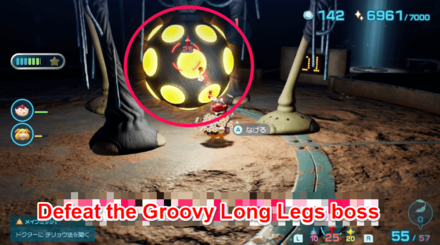 Defeat the Groovy Long Legs boss. |
Defeat Groovy Long Legs to Reach the Exit
The fifth sublevel contains a large arena where you fight the boss, Groovy Long Legs. Defeat it to reach the castaway near the exit point.
Below-Grade Discotheque Castaway Locations
Defeat Groovy Long Legs at Sublevel 5
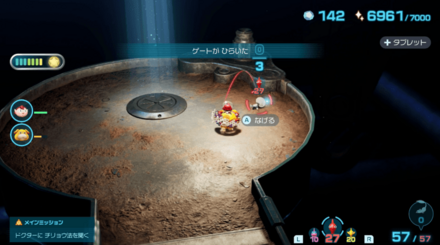
You can find the castaway near the exit point of the 5th sublevel after defeating the boss, Groovy Long Legs.
Below-Grade Discotheque Onion Locations
No Onions
There are no onions in this cave.
No Flarlics
There are no flarlics in this cave.
Below-Grade Discotheque Tips and Strategies
| Below-Grade Discotheque Tips and Strategies |
|---|
|
|
Bring Red Pikmin and Yellow Pikmin
| Pikmin to Bring | |
|---|---|
|
30 or 40 |
20 or more |
Below-Grade Discotheque has a lot of fire obstacles, electric gates, and high platforms so be sure to bring a lot of Red Pikmin and Yellow Pikmin with you.
The boss, Groovy Long Legs, has high health so having Red Pikmin is recommended due to its high attack power.
Recruit Winged Pikmin
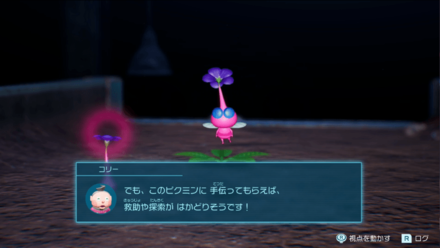
You can find Winged Pikmin as you descend down the Below-Grade Discotheque. This Pikmin type can reach high places and is not affected by ground-type attacks.
Pikmin 4 Related Guides

List of All Cave Locations and Maps
All Rescue Command Post Caves
| Rescue Command Post Cave |
|---|
| Burrow of Beginnings |
All Sun-Speckled Terrace Caves
| Sun-Speckled Terrace Caves | |
|---|---|
| Last-Frost Cavern | Hectic Hollows |
| Crackling Cauldron | Industrial Maze |
| Aquiferous Summit | - |
All Blossoming Arcadia Caves
| Blossoming Arcadia Caves | |
|---|---|
| Secluded Courtyard | Drafty Gallery |
| Sightless Passage | Kingdom of Beasts |
All Serene Shores Caves
| Serene Shores Caves | |
|---|---|
| Subzero Sauna | Seafloor Resort |
| Below-Grade Discotheque | Engulfed Castle |
All Hero's Hideaway Caves
| Hero's Hideaway Caves | |
|---|---|
| Plunder Palace | Doppelganger's Den |
| Frozen Inferno | - |
All Giant's Hearth Caves
| Giant's Hearth Caves | |
|---|---|
| Dream Home | Ultimate Testing Range |
| Cradle of the Beast | - |
All Primordial Thicket Caves
| Primordial Thicket Caves | |
|---|---|
| Subterranean Swarm | The Mud Pit |
| Cavern for a King | - |
Comment
Author
Below-Grade Discotheque Treasures, Castaway, and Onion Locations
improvement survey
03/2026
improving Game8's site?

Your answers will help us to improve our website.
Note: Please be sure not to enter any kind of personal information into your response.

We hope you continue to make use of Game8.
Rankings
- We could not find the message board you were looking for.
Gaming News
Popular Games

Genshin Impact Walkthrough & Guides Wiki

Honkai: Star Rail Walkthrough & Guides Wiki

Umamusume: Pretty Derby Walkthrough & Guides Wiki

Pokemon Pokopia Walkthrough & Guides Wiki

Resident Evil Requiem (RE9) Walkthrough & Guides Wiki

Monster Hunter Wilds Walkthrough & Guides Wiki

Wuthering Waves Walkthrough & Guides Wiki

Arknights: Endfield Walkthrough & Guides Wiki

Pokemon FireRed and LeafGreen (FRLG) Walkthrough & Guides Wiki

Pokemon TCG Pocket (PTCGP) Strategies & Guides Wiki
Recommended Games

Diablo 4: Vessel of Hatred Walkthrough & Guides Wiki

Fire Emblem Heroes (FEH) Walkthrough & Guides Wiki

Yu-Gi-Oh! Master Duel Walkthrough & Guides Wiki

Super Smash Bros. Ultimate Walkthrough & Guides Wiki

Pokemon Brilliant Diamond and Shining Pearl (BDSP) Walkthrough & Guides Wiki

Elden Ring Shadow of the Erdtree Walkthrough & Guides Wiki

Monster Hunter World Walkthrough & Guides Wiki

The Legend of Zelda: Tears of the Kingdom Walkthrough & Guides Wiki

Persona 3 Reload Walkthrough & Guides Wiki

Cyberpunk 2077: Ultimate Edition Walkthrough & Guides Wiki
All rights reserved
© Nintendo.
The copyrights of videos of games used in our content and other intellectual property rights belong to the provider of the game.
The contents we provide on this site were created personally by members of the Game8 editorial department.
We refuse the right to reuse or repost content taken without our permission such as data or images to other sites.





![Everwind Review [Early Access] | The Shaky First Step to A Very Long Journey](https://img.game8.co/4440226/ab079b1153298a042633dd1ef51e878e.png/thumb)

![Monster Hunter Stories 3 Review [First Impressions] | Simply Rejuvenating](https://img.game8.co/4438641/2a31b7702bd70e78ec8efd24661dacda.jpeg/thumb)


