
This survey will take about 1 minute.
Your answers will help us to improve our website.
Pikmin 4
Giant's Hearth 100% Completion Guide
❀ Pikmin 4 is out! Get a headstart by following these tips!
❀ Get more Pikmin by getting all the onion types!
❀ New and returning bosses are back in the Piklopedia!
❀ Brave the Trial of the Sage Leaf to get more onions!
❀ Make Oatchi stronger by upgrading his skills!
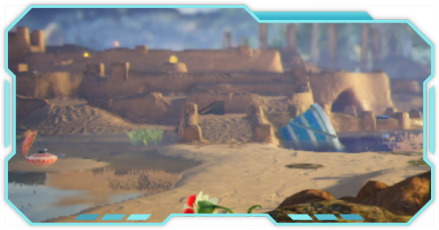
Giant's Hearth in Pikmin 4 has a set number of objectives that you need to find to complete it 100%. Read on to learn how to complete the area, how to unlock, as well as a list of all treasures, caves, castaways, and onions that can be found in Giant's Hearth.
List of Contents
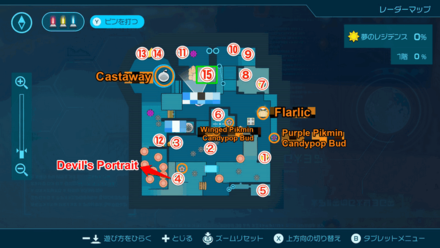
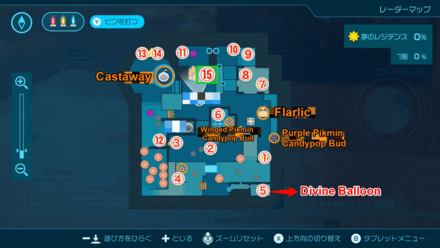
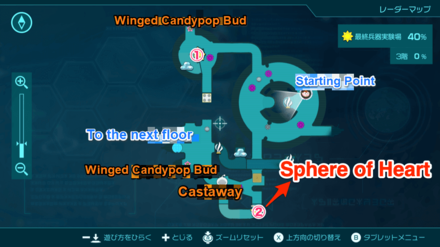
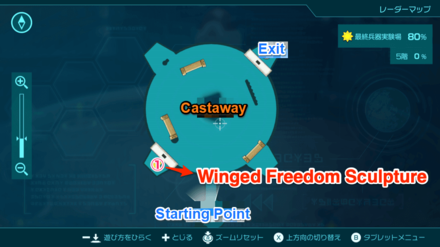
Giant's Hearth Map and How to Unlock
Giant's Hearth Interactive Map
The Interactive Map both shows the location of key points on the map, and doubles as a collectible checker.
- Click an icon on the right side to show all the pins of a specific type, or click the magnifying glass button to search for a specific pin by name.
- Click a pin on the map to see its name and description, and a relevant picture or video if available.
- From here, click Mark as Discovered to indicate that you've gotten a collectible already. This will change its icon on the map to show that it has been collected.
- To undo this, click on the same pin and click Restore to Undiscovered.
| Icon | How to Use |
|---|---|
 | Show Names This button reveals the Name of every icon currently shown. |
 | Fullscreen This button will change the map display to fill the screen. |
 | Search Mode Toggle This button will display a searchbar which you can use to search for an individual pin by its name. |
 | Icon Mode Toggle In Search Mode, this button will toggle you back to Icon Mode, removing the search bar and displaying the icons again. |
Objectives and How to Unlock
| Castaways | 8 |
|---|---|
| Pikmin |
Red Pikmin
Rock Pikmin Winged Pikmin Purple Pikmin White Pikmin |
| Treasures | 55 |
| Onions | 3 |
| How to Unlock | Unlock after rescuing Olimar and getting 11,000 Sparklium. |
Giant's Hearth Completion Checklist
| Collectible | Count |
|---|---|
| Caves | 3 |
| Treasures | 55 |
| Onions | Rock Onion |
| Flarlics | 2 |
| Castaways | 8 |
| Dandori Battles | 1 |
| Dandori Challenges | 3 |
Giant's Hearth Caves
Cave Locations
| Cave | Map Location / Collectibles |
|---|---|
| Cradle of the Beast |
 ・ Rock Pikmin ・ Purple Pikmin |
| Dream Home |
 ・ Purple Pikmin |
| Ultimate Testing Range |
 ・ White Pikmin |
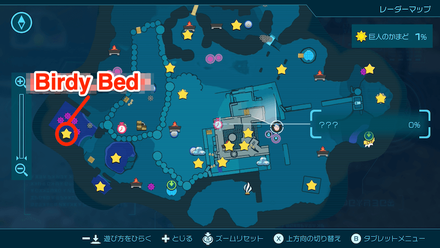
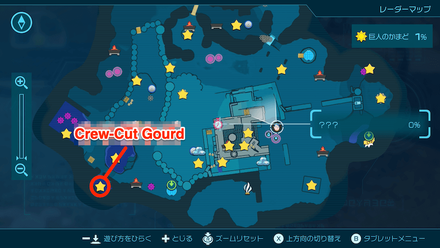
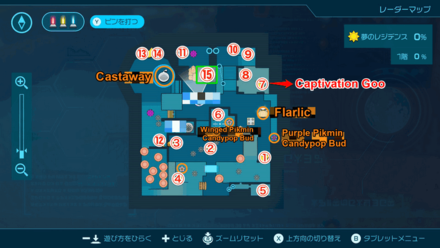
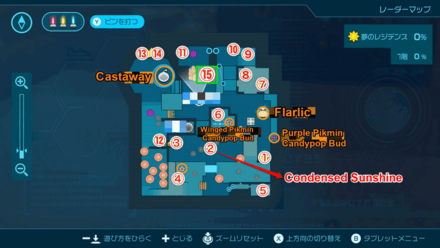
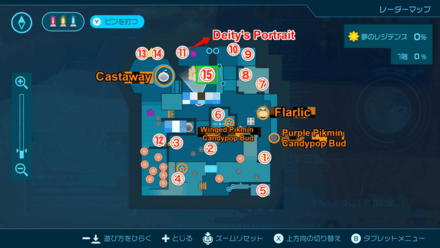
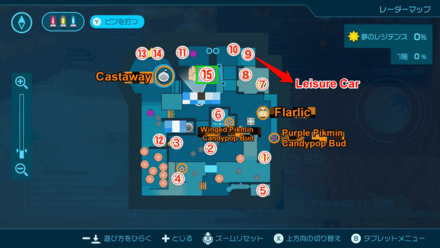
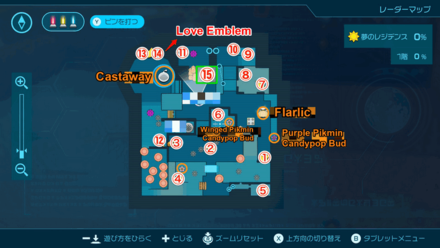
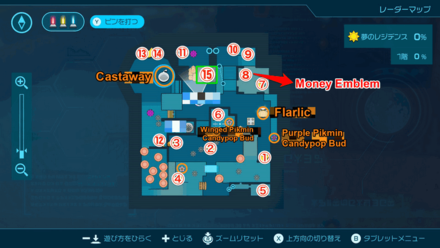
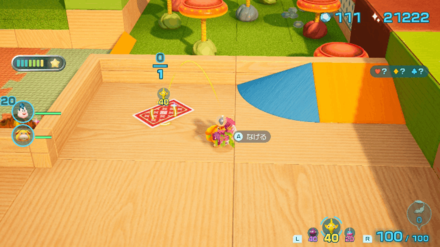
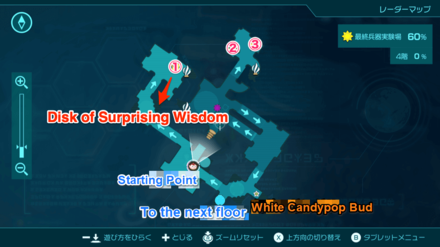
Giant's Hearth Treasures
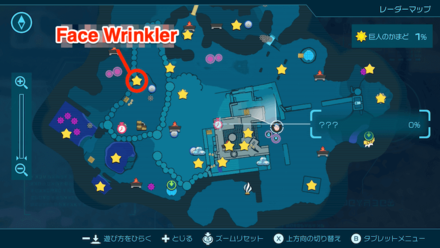
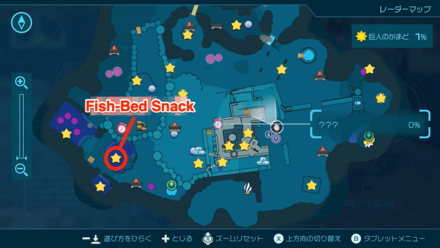
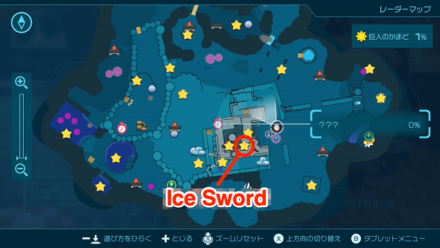
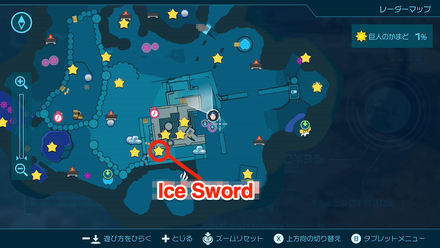
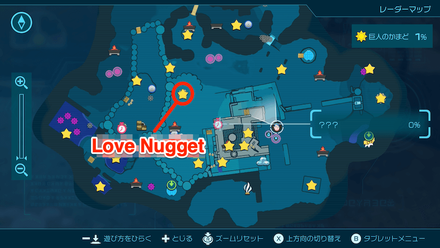
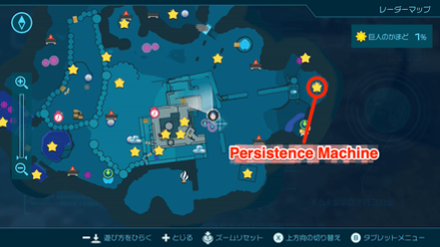
Surface Treasure Locations
| Click to Jump to a Section | |
|---|---|
| Surface | Cradle of the Beast |
| Dream Home | Ultimate Testing Range |
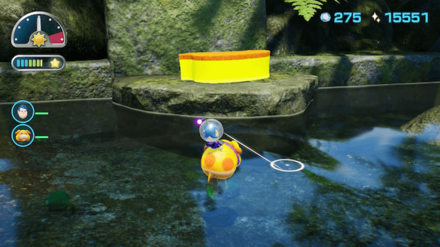
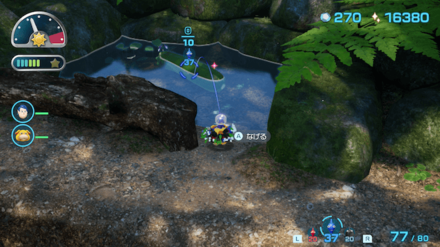
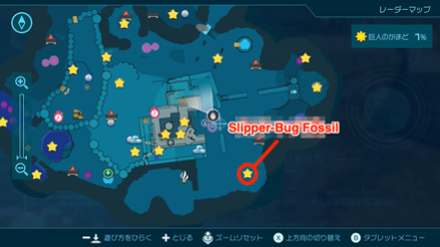
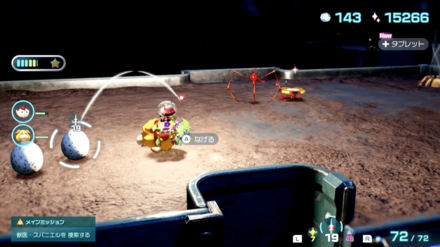
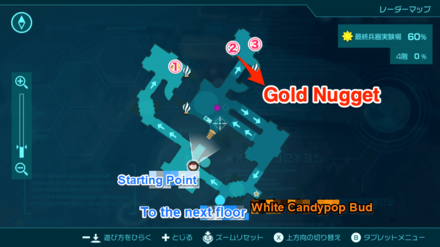
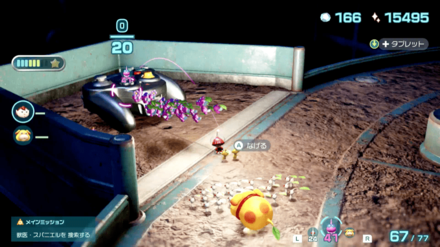
| Treasure | Map Location | Overworld Location |
|---|---|---|
|
Sparklium: 90 |
 |
 |
| Dig it up using Pikmin. | ||
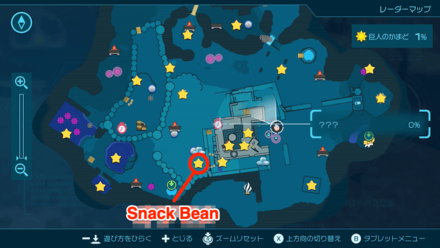
|
Sparklium: 110 |
 |
 |
| Throw your Blue Pikmin to collect it. | ||
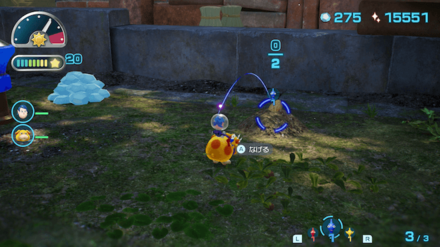
|
Sparklium: 90 |
 |
 |
| Throw Blue PIkmin at it. | ||
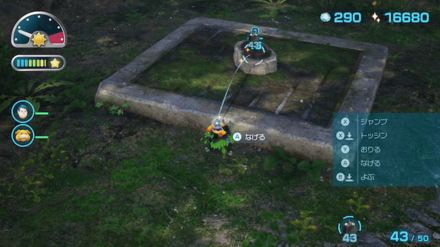
|
Sparklium: 50 |
 |
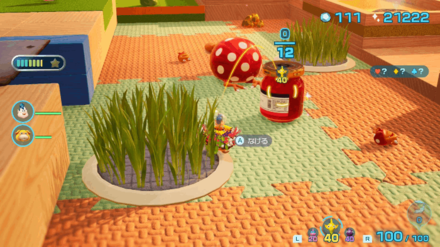
 |
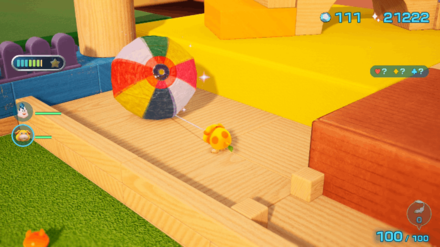
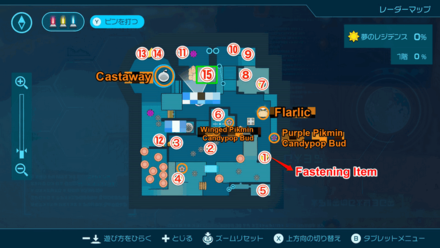
| Complete the valve using raw Materials to stop the sprinkler then throw Yellow Pikmin at the treasure. | ||
|
Sparklium: 80 |
 |
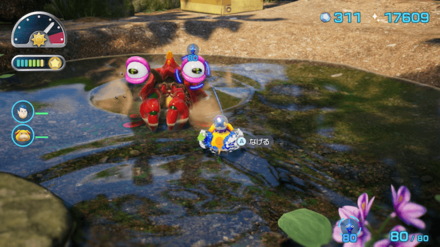 |
| Defeat the Bug-Eyed Crawmad in the water and the treasure will appear. | ||
|
Sparklium: 5 |
 |
 |
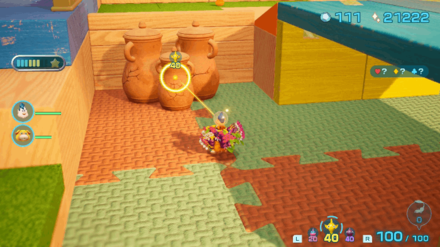
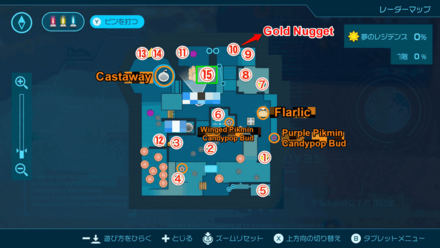
| Climb to the top of the hearth and throw your Yellow Pikmin at it. | ||
|
Sparklium: 5 |
 |
 |
| Exit the hearth at the south and jump towards the outer wall. | ||
|
Sparklium: 90 |
 |
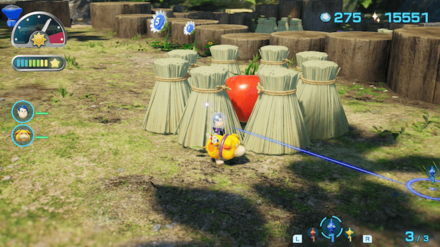 |
| Burn the surrounding straw using Fire Starters. | ||
|
Sparklium: 300 |
 |
 |
| Hit the branch of the tree next to the pump then climb and drain the water. Burn the straw using Fire Starters. | ||
|
Sparklium: 90 |
 |
 |
| Defeat the Bug-Eyed Crawmad near the sprinkler and the treasure will appear. | ||
|
Sparklium: 120 |
 |
 |
| Throw Pikmin at it. | ||
|
Sparklium: 300 |
 |
 |
| Throw your Pikmin at it. | ||
|
Sparklium: 30 |
 |
 |
| Dig it up using Pikmin. | ||
|
Sparklium: 20 |
 |
 |
| Drain the water and defeat the Arachnode. | ||
|
Sparklium: 230 |
 |
 |
| Climb up the furnace and collect the treasure. | ||
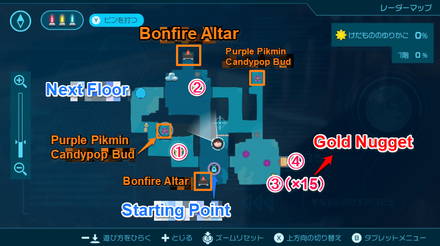
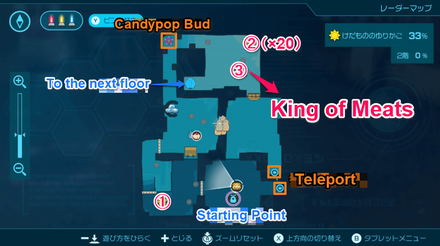
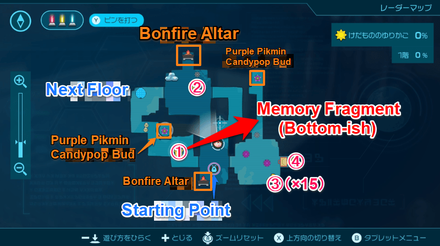
Cradle of the Beast Treasure Locations
| Click to Jump to a Section | |
|---|---|
| Surface | Cradle of the Beast |
| Dream Home | Ultimate Testing Range |
| Treasure | Map Location | Overworld Location |
|---|---|---|
|
Sparklium: 60 |
 |
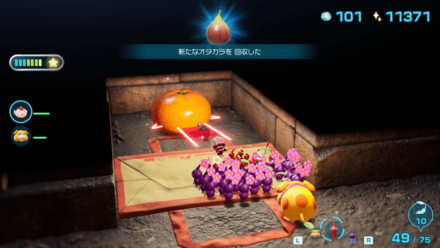 |
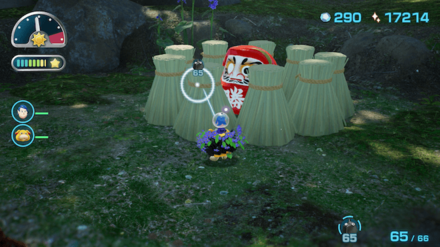
| Crush the Paper Bag with 30 Pikmin then collect the treasure. | ||
|
Sparklium: 70 |
 |
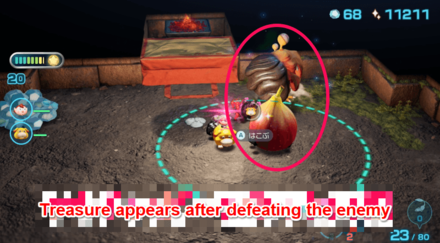 |
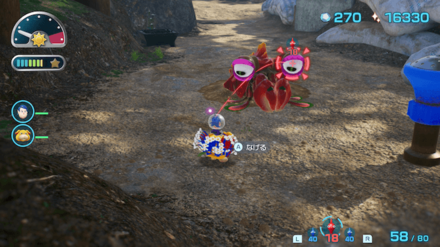
| Defeat the enemy and it will drop the treasure. | ||
|
Sparklium: 5 |
 |
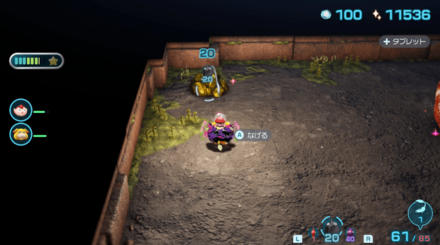 |
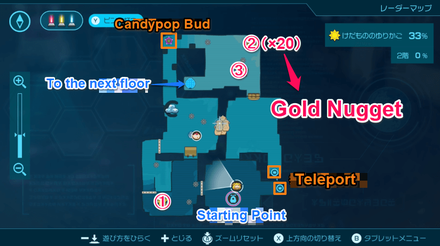
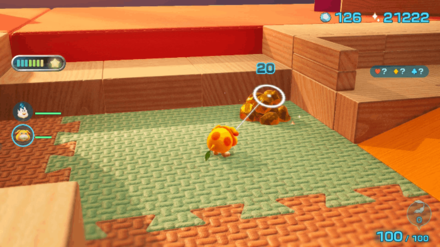
| Use Pikmin to collect all 20 on the ground. | ||
|
Sparklium: 5 |
 |
|
| Use Pikmin to collect all 15 on the ground. | ||
|
Sparklium: 500 |
 |
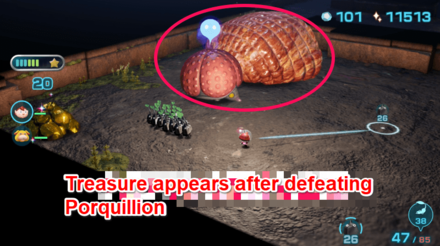 |
| Defeat the enemy. Use Purple Pikmin afterward as it weighs 300. | ||
|
Sparklium: 50 |
 |
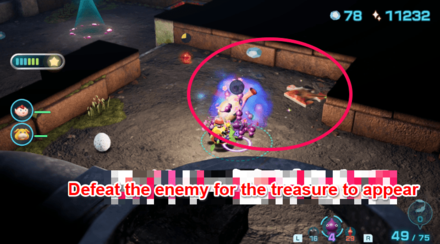 |
| Defeat the enemy and the treasure will appear. | ||
|
Sparklium: 350 |
 |
 |
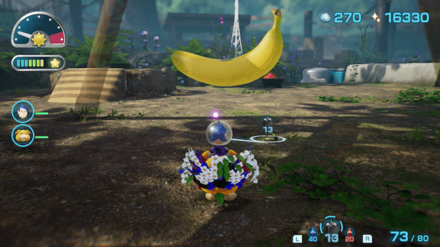
| Throw Pikmin to reach it. | ||
|
Sparklium: 20 |
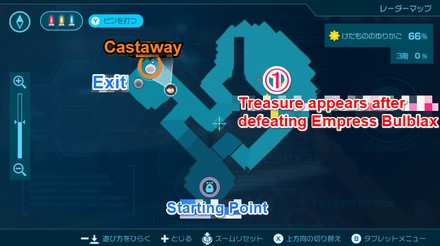 |
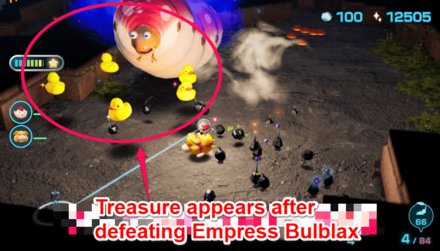 |
| Defeat the boss to get 5 of these. | ||
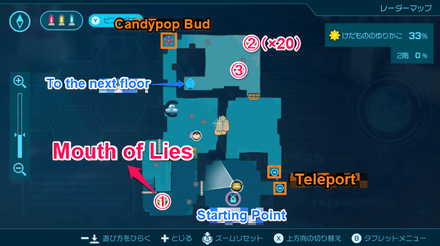
Dream Home Treasure Locations
| Click to Jump to a Section | |
|---|---|
| Surface | Cradle of the Beast |
| Dream Home | Ultimate Testing Range |
| Treasure | Map Location | Overworld Location |
|---|---|---|
|
Sparklium: 40 |
 |
 |
| Command Oatchi to Rush at the pillar for the treasure to fall. | ||
|
Sparklium: 80 |
 |
 |
| Ride the platform to reach it. | ||
|
Sparklium: 180 |
 |
 |
| Defeat the enemy and it will drop the treasure. | ||
|
Sparklium: 20 |
 |
 |
| Remove the soil blocking the pipe or destroy the obstacle at the sublevel's starting point. | ||
|
Sparklium: 20 |
 |
 |
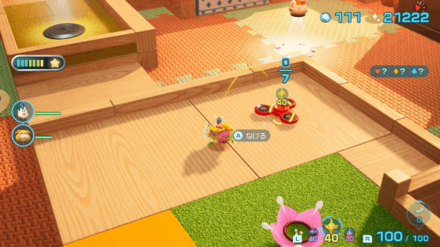
| Complete the construction using Raw Materials to reach the treasure. | ||
|
Sparklium: 40 |
 |
 |
| Enter a tunnel using Oatchi or use Winged Pikmin. | ||
|
Sparklium: 10 |
 |
 |
| Command Oatchi to Rush at the lower-right part of the map and the treasure will appear. | ||
|
Sparklium: 5 |
 |
 |
| Use Pikmin to collect all 20 at the upper right corner of the map. | ||
|
Sparklium: 5 |
 |
 |
| Use Pikmin to collect all 20. | ||
|
Sparklium: 150 |
 |
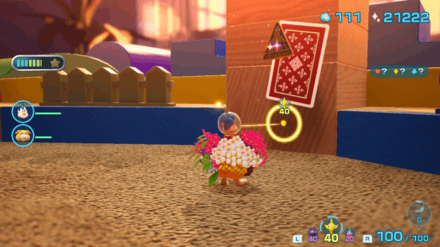
 |
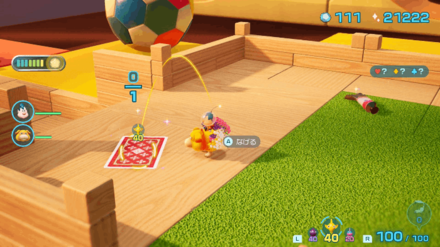
| Collect playing cards and open the safe to reach the treasure. | ||
|
Sparklium: 110 |
 |
 |
| Carry it using Pikmin. | ||
|
Sparklium: 20 |
 |
 |
| Command Oatchi to Rush at the pillar for the treasure to fall. | ||
|
Sparklium: 20 |
 |
 |
| Pick it up from the ground. | ||
|
Sparklium: 110 |
 |
 |
| Cross the bridge to get to higher ground and collect the treasure. | ||
|
Sparklium: 20 |
 |
 |
| Jump on the mushrooms at the lower-left part of the map. It is at the landing point. | ||
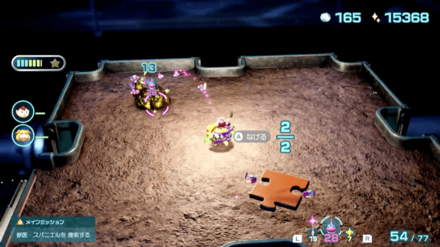
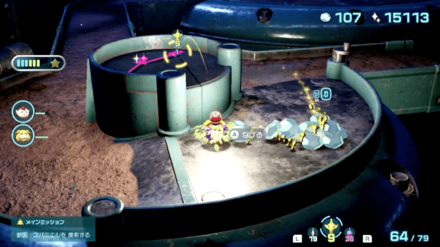
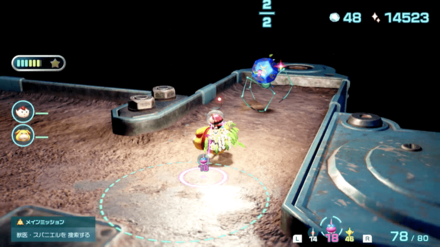
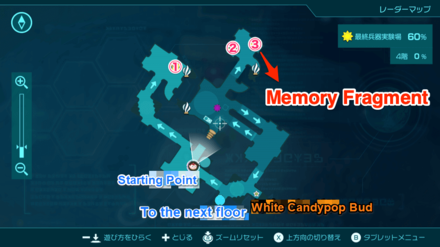
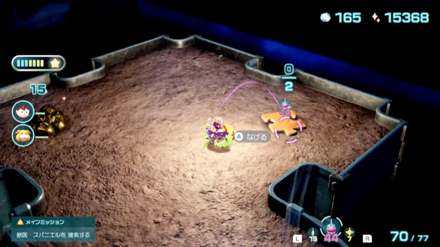
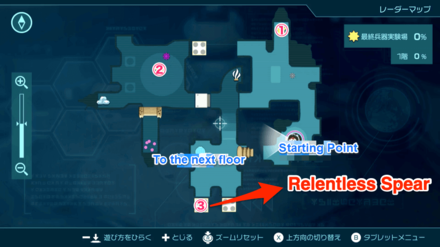
Ultimate Testing Range Treasure Locations
| Click to Jump to a Section | |
|---|---|
| Surface | Cradle of the Beast |
| Dream Home | Ultimate Testing Range |
| Treasure | Map Location | Overworld Location |
|---|---|---|
|
Sparklium: 100 |
 |
 |
| Defeat the spider and collect it. | ||
|
Sparklium: 5 |
 |
 |
| Collect all 15 on the ground. | ||
|
Sparklium: 5 |
 |
 |
| Find it atop a hill. Throw Pikmin to reach the treasure. | ||
|
Sparklium: 40 |
 |
 |
| Defeat the enemy and carry it to base. | ||
|
Sparklium: 50 |
 |
 |
| Pick it up from the ground. | ||
|
Sparklium: 60 |
 |
 |
| Ride the platform and throw Pikmin at the treasure. | ||
|
Sparklium: 110 |
 |
 |
| Throw Pikmin over the fence for them to pick up the treasure. | ||
|
Sparklium: 110 |
 |
 |
| Defeat the green spider and pick up the treasure. | ||
|
Sparklium: 110 |
 |
 |
| Pick it up from the ground. | ||
|
Sparklium: 150 |
 |
 |
| Pick it up from the high ledge. | ||
|
Sparklium: 300 |
 |
 |
| Pick it up from the ground. | ||
Ultimate Testing Range Treasures
Giant's Hearth Onions
Onion Locations
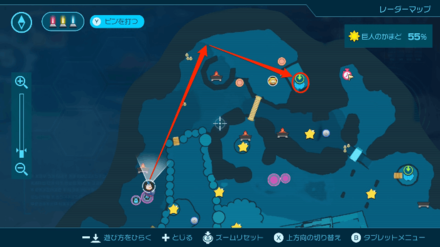
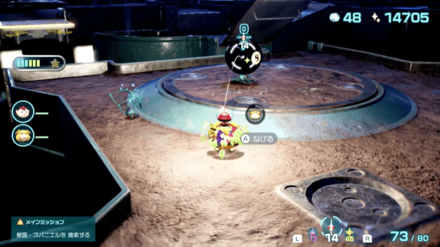
Rock Onion

Bring Bomb Rocks to enter the part of the area with the Rock Onion. You'll also want to prepare for a fight against Emperor Bulblax so you can bring the onion back safely.
Flarlic Locations
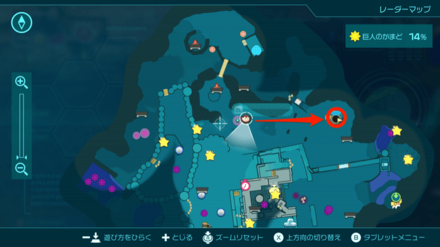
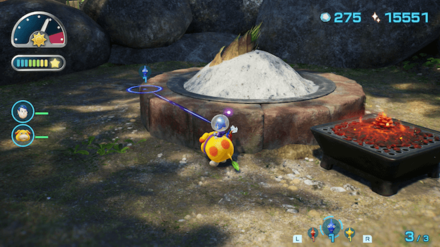
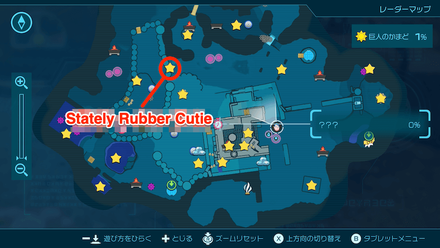
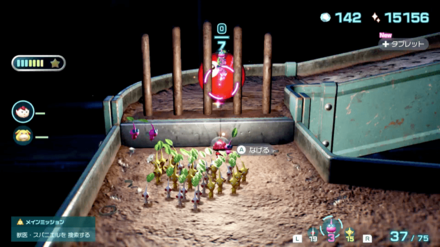
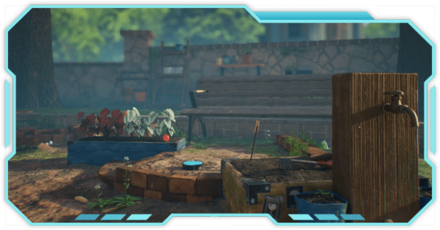
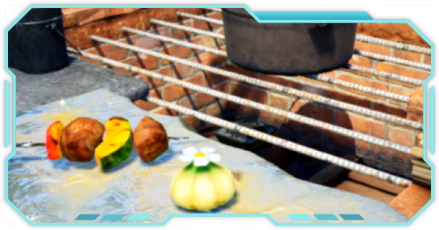
On Top of Grill on the Surface
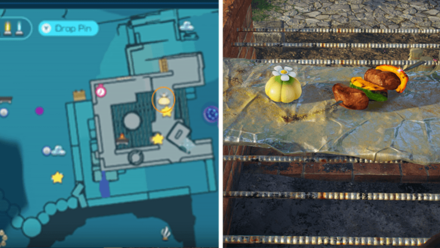
There's a flarlic on top of the large furnace in the area beside The Four Grill Brothers. Bring this onion back down to the base with your Pikmin.
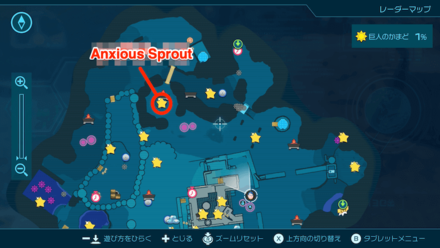
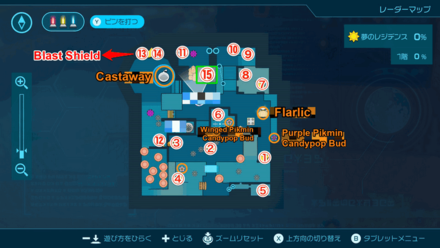
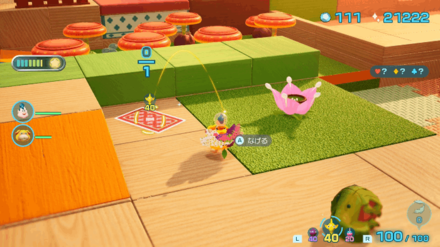
Dream Home

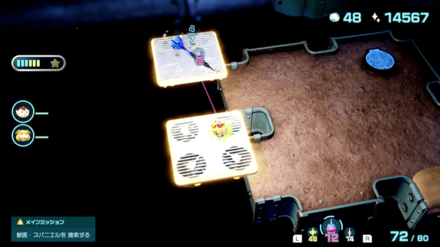
The flarlic in the Dream Home cave can be found on a moving platform. Throw your Pikmin at it so you can collect the onion.
Giant's Hearth Castaways
Castaway Locations
| Cave | Location / Sublevel |
|---|---|
| Cradle of the Beast | 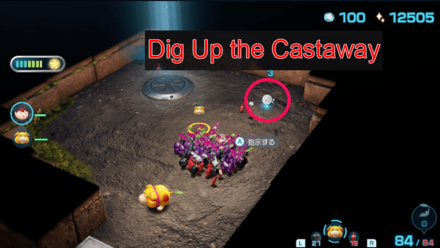 Sublevel 3 |
| Dream Home | 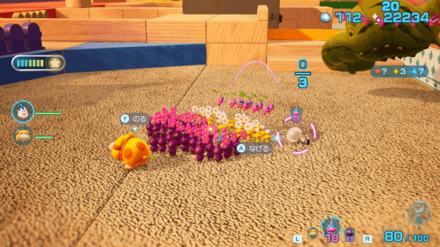 Sublevel 1 |
| Ultimate Testing Range | 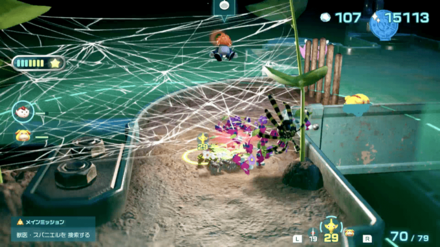 Sublevel 3 |
 Sublevel 5 |
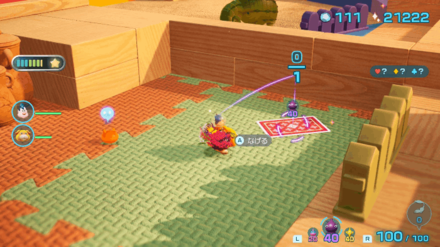
Giant's Hearth Dandori Battles and Challenges
Dandori Battles
| Dandori Battle | Location and Overview |
|---|---|
| Hot Sandy Duel |
Time: 5:00 Dandori Level: ★★★★★ Pikmin Types: Red Pikmin |
Dandori Challenges
| Dandori Challenge | Location and Overview |
|---|---|
| Aerial Incinerator |
Time: 7:00 Dandori Level: ★★★★☆ Pikmin Types: Red Pikmin, Winged Pikmin |
| Strategic Freezeway |
Time: 7:00 Dandori Level: ★★★★☆ Pikmin Types: Red Pikmin, Ice Pikmin |
| Planning Pools |
Time: 7:00 Dandori Level: ★★★★☆ Pikmin Types: Yellow Pikmin, Blue Pikmin |
All Dandori Challenge Locations
Pikmin 4 Related Guides
List of All Areas
| All Areas | |
|---|---|
 Sun-Speckled Terrace Sun-Speckled Terrace |
 Blossoming Arcadia Blossoming Arcadia |
 Serene Shores Serene Shores |
 Hero's Hideaway Hero's Hideaway |
 Giant's Hearth Giant's Hearth |
 Primordial Thicket Primordial Thicket |
Comment
Author
Giant's Hearth 100% Completion Guide
Please participate in our site
improvement survey
03/2026
improvement survey
03/2026
Would you assist in
improving Game8's site?
improving Game8's site?

×
We are listening to our users' valuable opinions and discussing how to act on them.
The information collected through this survey will be used for the purpose of improving our services. In addition, the information will only be disclosed a part of a statistic in a format that will not allow identification of personal information.
Begin Survey
Not Now
×
Please rate each item regarding Game8.co's Advertisements.
Amount of Ads
Very Dissatisfied
Somewhat Dissatisfied
Fine
Somewhat Satisfied
Highly Satisfied
Placement of Ads
Timing of Ad Display
Ad Loading Speed
Safeness of Ads
Content of Ads
×
Please rate each item regarding Game8.co's Quality of Articles.
Amount of information
Very Dissatisfied
Somewhat Dissatisfied
Fine
Somewhat Satisfied
Highly Satisfied
Frequency of updates
Speed of new information
Accuracy of articles
Understandibility of articles
Readability of sentences
×
Please rate each item regarding Game8.co's Usability of the Site.
Ease of finding information
Very Dissatisfied
Somewhat Dissatisfied
Fine
Somewhat Satisfied
Highly Satisfied
Loading Speed
Use of Color
Font Size
Visibility of Images
Easy to Understand Layout
×
Please rate each item regarding Game8.co's Message Boards, Comments.
Ease of Writing
Very Dissatisfied
Somewhat Dissatisfied
Fine
Somewhat Satisfied
Highly Satisfied
Readability
Ease in Finding Information
Comment Quality
Comment Quantity
Admin Response
×
Please rate each item regarding Game8.co's Site's new design.
Please rate our site's new design
Very Dissatisfied
Somewhat Dissatisfied
Fine
Somewhat Satisfied
Highly Satisfied
Do you think that the website's design change makes the site easier to use?
Has the new design made it easier for you to find information on the site?
Has the new design improved the overall visual appeal of the site?
How would you rate your overall satisfaction with the new design of the site?
×
How likely are you to recommend Game8 to someone you know?
Very Unlikely
0
1
2
3
4
5
6
7
8
9
10
Very Likely
If you have other opinions regarding potential improvement to the website, please share them with us. We would appreciate your honest opinion.
Note: This is a free response section, so you can proceed without entering anything.
Note: Please be sure not to enter any kind of personal information into your response.
Note: Please be sure not to enter any kind of personal information into your response.
×
Thank You
×
Thank you for participating in our survey! Your answers will help us to improve the quality of our website and services.
We hope you continue to make use of Game8.
We hope you continue to make use of Game8.
Close
Rankings
- We could not find the message board you were looking for.
Gaming News


![Everwind Review [Early Access] | The Shaky First Step to A Very Long Journey](https://img.game8.co/4440226/ab079b1153298a042633dd1ef51e878e.png/thumb)

![Monster Hunter Stories 3 Review [First Impressions] | Simply Rejuvenating](https://img.game8.co/4438641/2a31b7702bd70e78ec8efd24661dacda.jpeg/thumb)
Popular Games

Genshin Impact Walkthrough & Guides Wiki
Honkai: Star Rail Walkthrough & Guides Wiki
Umamusume: Pretty Derby Walkthrough & Guides Wiki
Pokemon Pokopia Walkthrough & Guides Wiki
Resident Evil Requiem (RE9) Walkthrough & Guides Wiki
Monster Hunter Wilds Walkthrough & Guides Wiki
Wuthering Waves Walkthrough & Guides Wiki
Arknights: Endfield Walkthrough & Guides Wiki
Pokemon FireRed and LeafGreen (FRLG) Walkthrough & Guides Wiki
Pokemon TCG Pocket (PTCGP) Strategies & Guides Wiki


Recommended Games
Diablo 4: Vessel of Hatred Walkthrough & Guides Wiki
Fire Emblem Heroes (FEH) Walkthrough & Guides Wiki
Yu-Gi-Oh! Master Duel Walkthrough & Guides Wiki
Super Smash Bros. Ultimate Walkthrough & Guides Wiki
Pokemon Brilliant Diamond and Shining Pearl (BDSP) Walkthrough & Guides Wiki
Elden Ring Shadow of the Erdtree Walkthrough & Guides Wiki
Monster Hunter World Walkthrough & Guides Wiki
The Legend of Zelda: Tears of the Kingdom Walkthrough & Guides Wiki
Persona 3 Reload Walkthrough & Guides Wiki
Cyberpunk 2077: Ultimate Edition Walkthrough & Guides Wiki


All rights reserved
© Nintendo.
The copyrights of videos of games used in our content and other intellectual property rights belong to the provider of the game.
The contents we provide on this site were created personally by members of the Game8 editorial department.
We refuse the right to reuse or repost content taken without our permission such as data or images to other sites.