Blossoming Arcadia 100% Completion Guide
❀ Pikmin 4 is out! Get a headstart by following these tips!
❀ Get more Pikmin by getting all the onion types!
❀ New and returning bosses are back in the Piklopedia!
❀ Brave the Trial of the Sage Leaf to get more onions!
❀ Make Oatchi stronger by upgrading his skills!
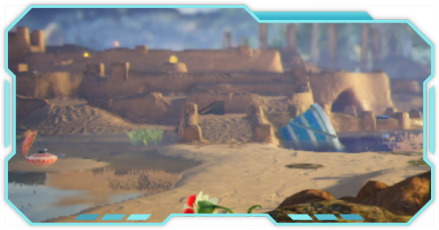
Blossoming Arcadia in Pikmin 4 has a set number of objectives that you need to achieve to complete it 100%. If you are stuck at 99% exploration, read on to learn how to complete the area, how to unlock it, as well as a list of all treasures, caves, castaways, and onions.
List of Contents
Blossoming Arcadia Map and How to Unlock
Interactive Map
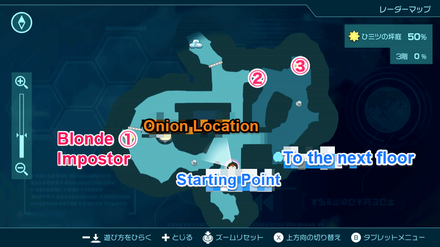
The Interactive Map both shows the location of key points on the map, and doubles as a collectible checker.
- Click an icon on the right side to show all the pins of a specific type, or click the magnifying glass button to search for a specific pin by name.
- Click a pin on the map to see its name and description, and a relevant picture or video if available.
- From here, click Mark as Discovered to indicate that you've gotten a collectible already. This will change its icon on the map to show that it has been collected.
- To undo this, click on the same pin and click Restore to Undiscovered.
| Icon | How to Use |
|---|---|
 | Show Names This button reveals the Name of every icon currently shown. |
 | Fullscreen This button will change the map display to fill the screen. |
 | Search Mode Toggle This button will display a searchbar which you can use to search for an individual pin by its name. |
 | Icon Mode Toggle In Search Mode, this button will toggle you back to Icon Mode, removing the search bar and displaying the icons again. |
Objectives and How to Unlock
| Castaways | 9 |
|---|---|
| Pikmin |
Red Pikmin
Yellow Pikmin Blue Pikmin Ice Pikmin Rock Pikmin |
| Treasures | 60 |
| Onions | 3 |
| How to Unlock | Obtain 1,500 Sparklium. |
Complete Blossoming Arcadia 99
Find Hidden Treasure Northwest of the Map
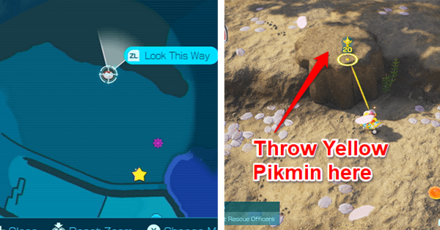
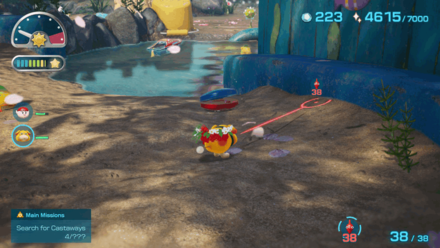
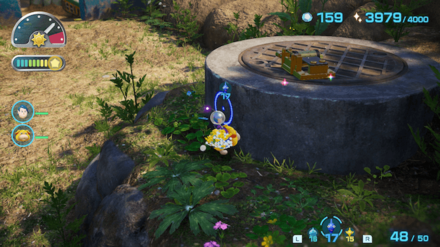
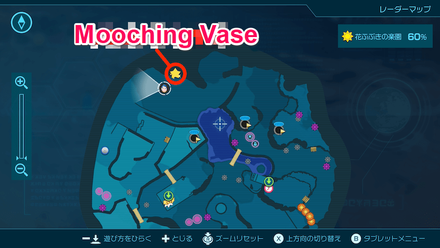
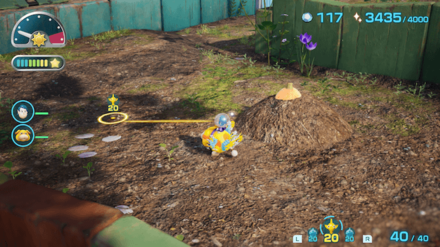
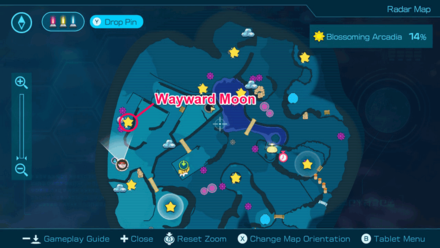
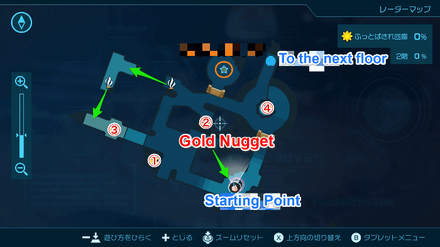
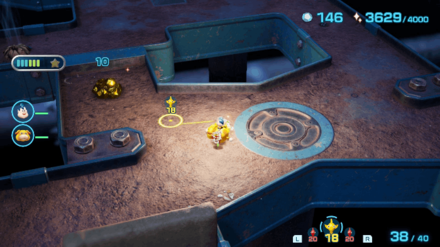
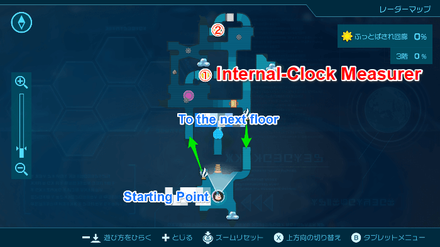
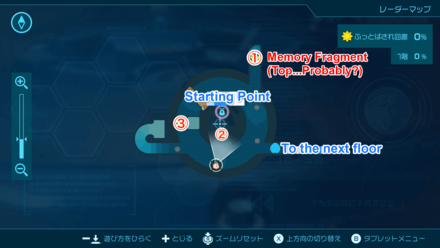
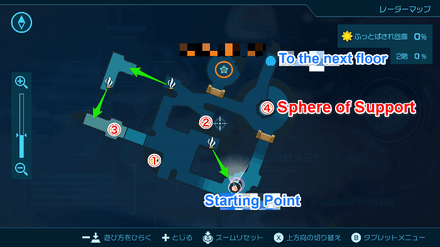
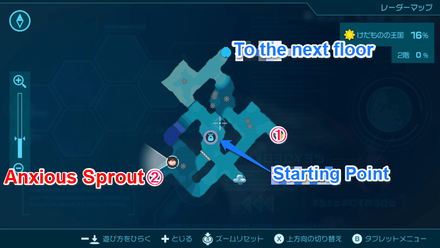
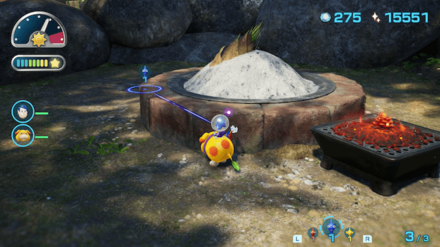
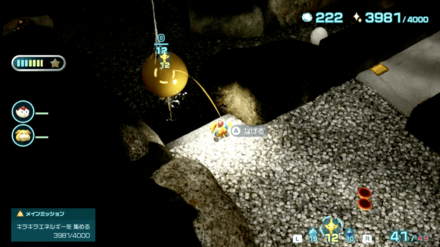
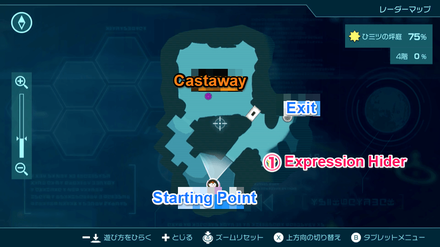
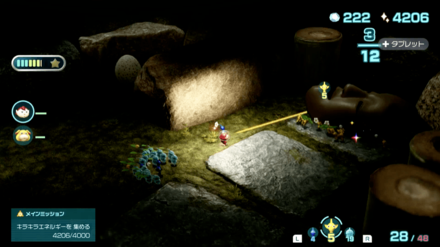
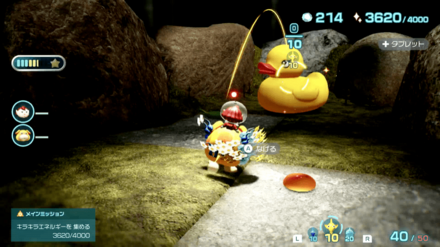
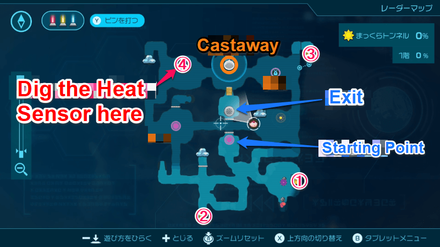
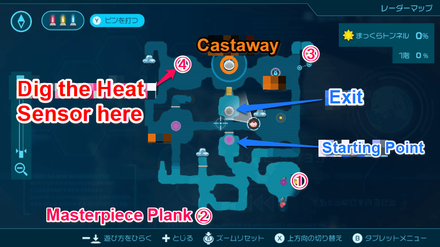
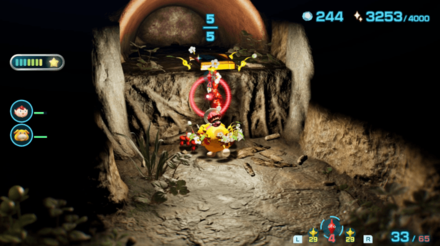
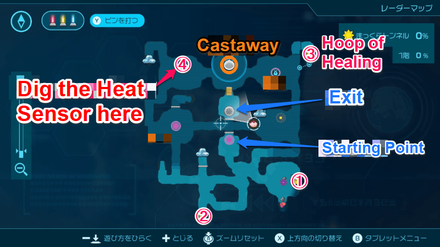
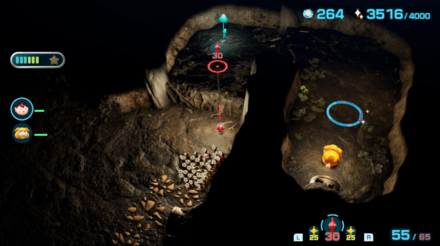
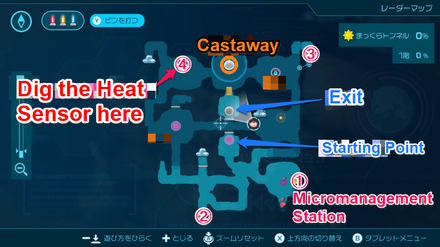
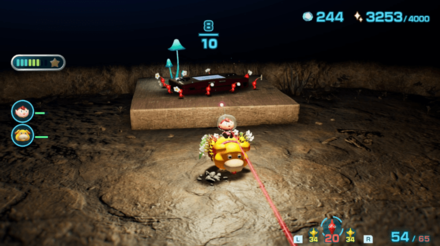
The Mooching Vase does not show up on the map as it is hidden underground. To find it, head to the northwestern part of the map near the area with the two Joustmites (armored worm enemies). You can also command Oatchi to track its treasure scent.
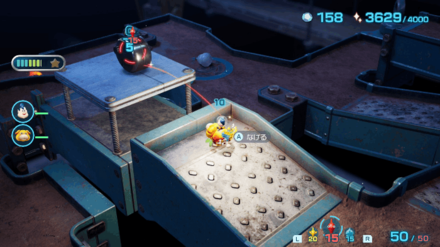
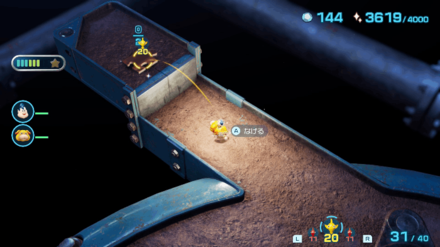
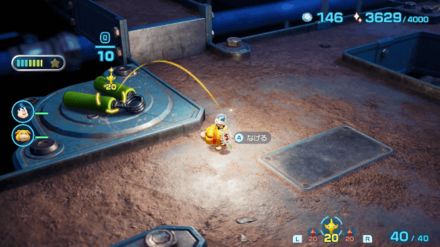
Find the elevated ledge that juts out and throw Yellow Pikmin to dig out the Mooching Vase.
Mooching Vase Location and Treasure Guide
Blossoming Arcadia Completion Checklist
| Collectible | Count |
|---|---|
| Caves | 4 |
| Treasures | 60 |
| Onions | Yellow Onion |
| Flarlics | 2 |
| Castaways | 9 |
| Dandori Battles | 1 |
| Dandori Challenges | 2 |
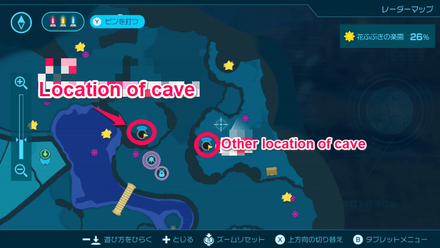
Blossoming Arcadia Caves
Cave Locations
| Cave | Map Location / Collectibles |
|---|---|
| Drafty Gallery |
 |
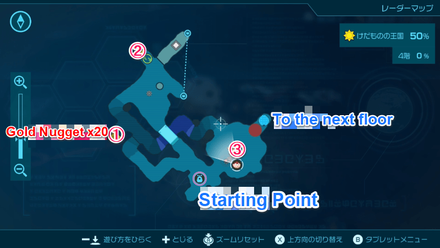
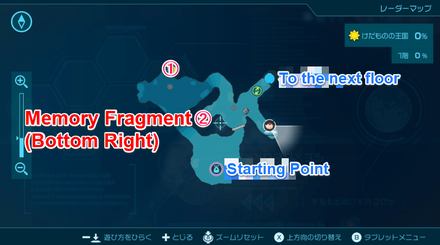
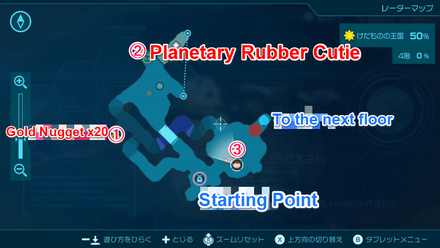
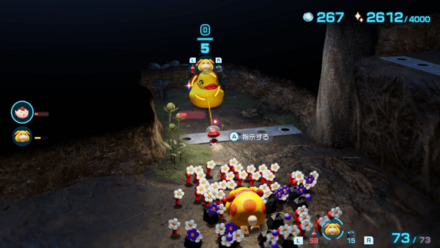
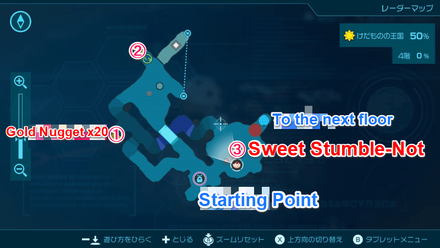
| Kingdom of Beasts |
 ・ Red Pikmin |
| Secluded Courtyard |
 ・ Blue Pikmin |
| Sightless Passage |
 ・ Red Pikmin |
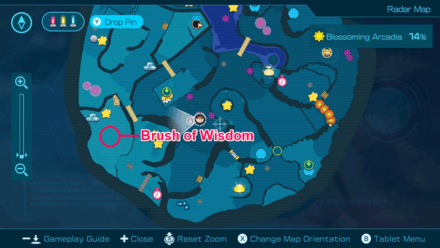
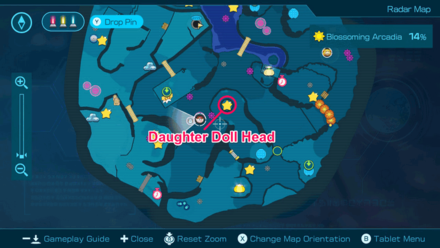
Blossoming Arcadia Treasures
Surface Treasure Locations
| Click to Jump to a Section | ||
|---|---|---|
| Surface | Drafty Gallery | Kingdom of Beasts |
| Secluded Courtyard | Sightless Passage | - |
| Treasure | Map Location | Overworld Location |
|---|---|---|
|
Sparklium: 80 |
 |
 |
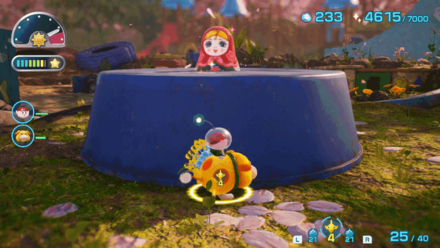
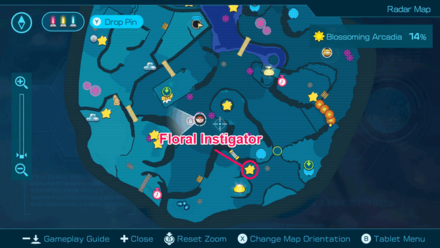
| Defeat the boss and it will drop the treasure. | ||
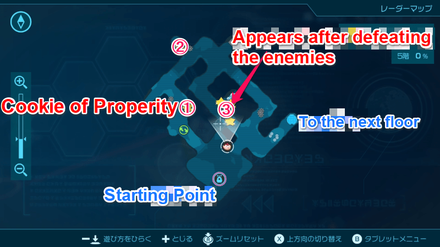
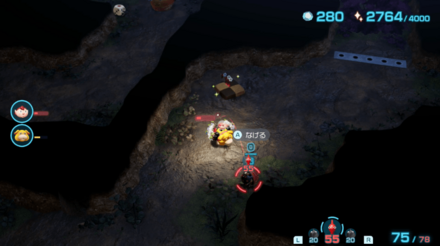
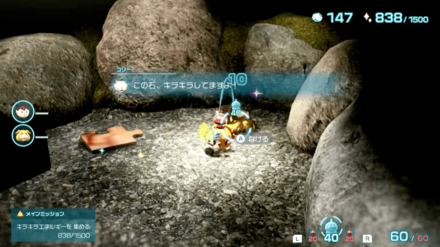
|
Sparklium: 20 |
 |
 |
| Defeat the enemy and the treasure will appear. | ||
|
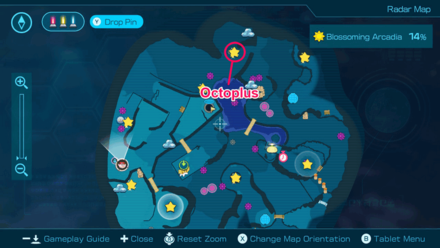
Sparklium: 80 |
 |
 |
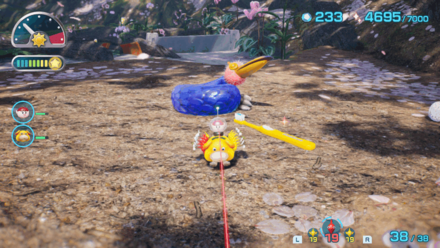
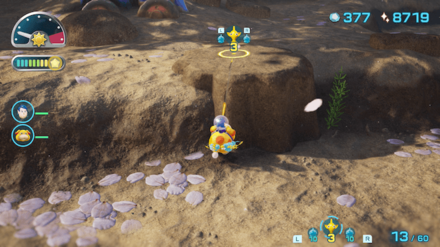
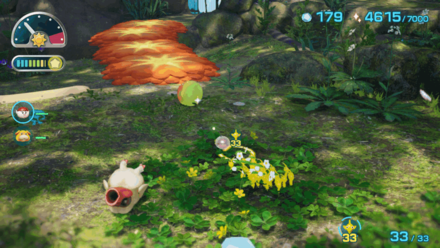
| Throw Yellow Pikmin on the high ground. | ||
|
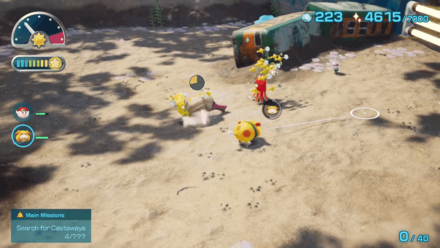
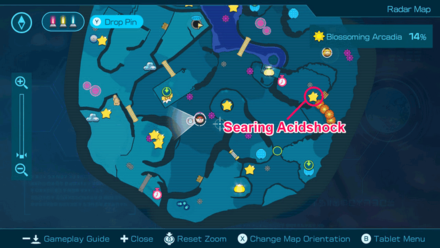
Sparklium: 20 |
 |
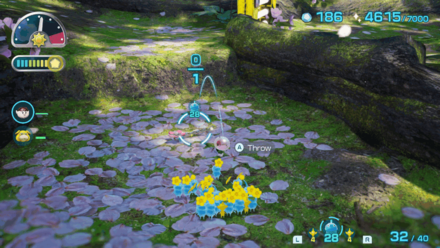 |
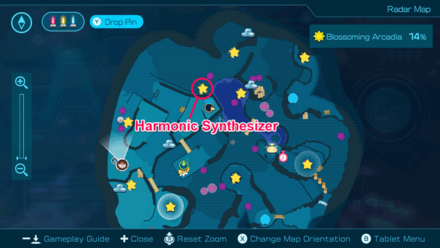
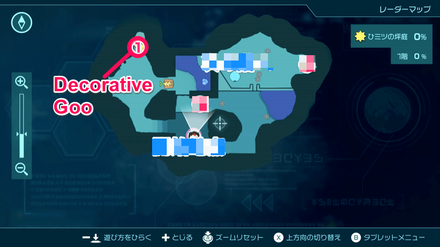
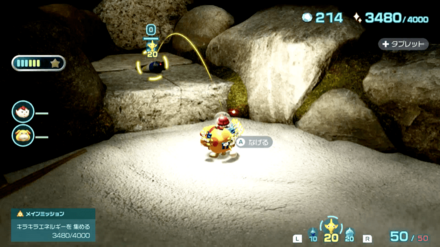
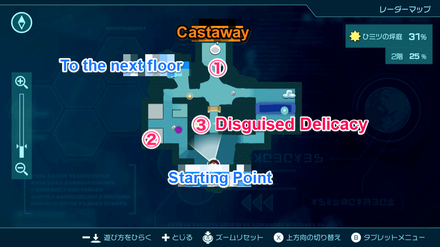
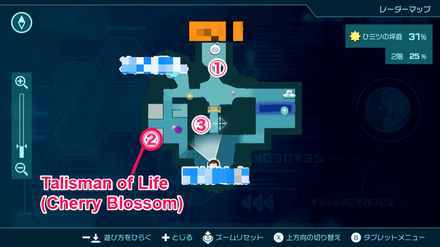
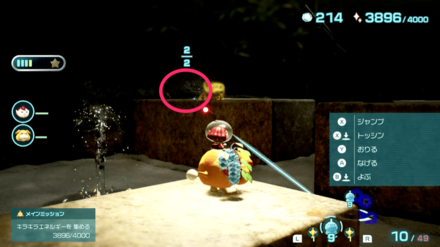
| Pick up the treasure on the ground full of pink petals. | ||
|
Sparklium: 110 |
 |
 |
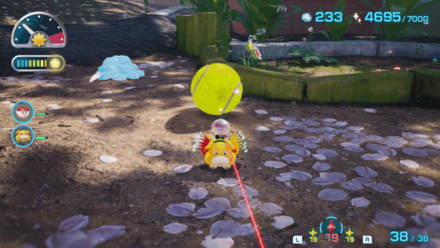
| Pick it up from the ground. | ||
|
Sparklium: 150 |
 |
 |
| Throw Yellow Pikmin to reach the treasure. | ||
|
Sparklium: 80 |
 |
 |
| Dig it up using Pikmin or Oatchi. | ||
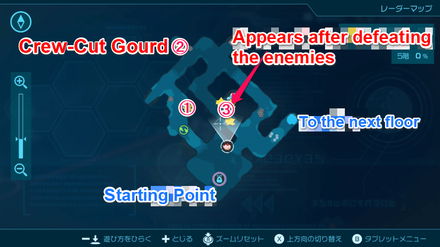
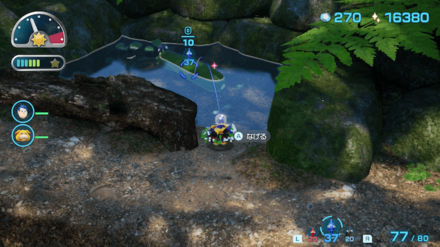
|
Sparklium: 40 |
 |
 |
| Defeat the enemy and the treasure will appear. | ||
|
Sparklium: 50 |
 |
 |
| Complete the wall using Raw Materials, climb up, and collect the treasure. | ||
|
Sparklium: 180 |
 |
 |
| Defeat the Mamuta and the treasure will appear. | ||
|
Sparklium: 100 |
 |
 |
| Dig it up using Pikmin or Oatchi. | ||
|
Sparklium: 20 |
 |
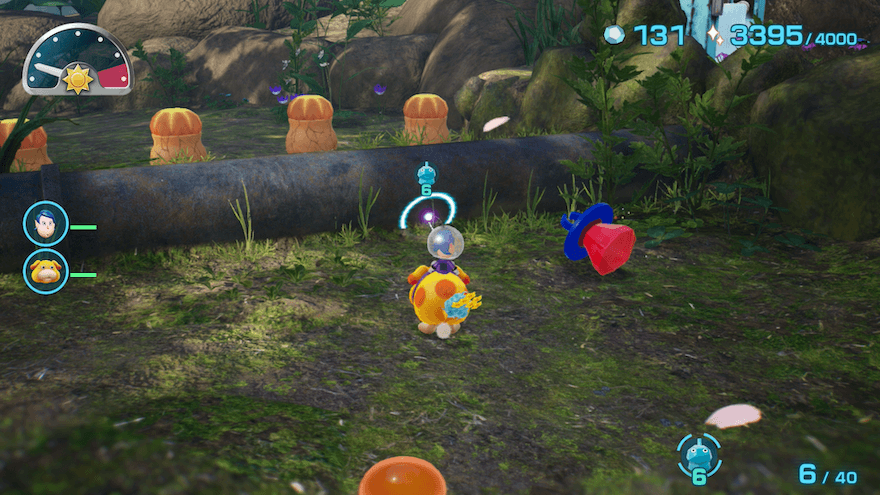 |
| Pick up the treasure beside the metal pipe. | ||
|
Sparklium: 40 |
 |
 |
| Pick up the treasure beside the Pellet Posy. | ||
|
Sparklium: 180 |
 |
 |
| Use Blue Pikmin to collect the treasure. | ||
|
Sparklium: 40 |
 |
 |
| Use Yellow Pikmin to dig it up from the ground. | ||
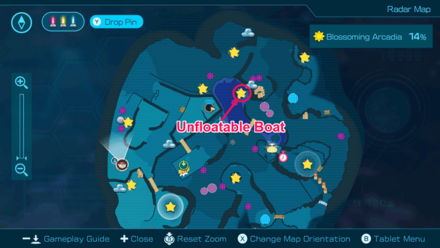
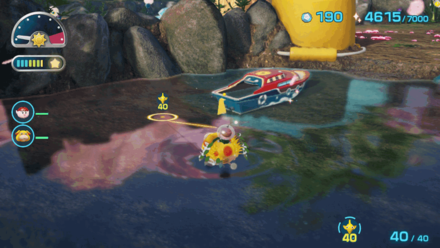
|
Sparklium: 200 |
 |
 |
| Use 50 Pikmin to carry it to the base. | ||
|
Sparklium: 110 |
 |
 |
| Dig it up using PIkmin or Oatchi. | ||
Drafty Gallery Treasure Locations
| Click to Jump to a Section | ||
|---|---|---|
| Surface | Drafty Gallery | Kingdom of Beasts |
| Secluded Courtyard | Sightless Passage | - |
| Treasure | Map Location | Overworld Location |
|---|---|---|
|
Sparklium: 110 |
 |
 |
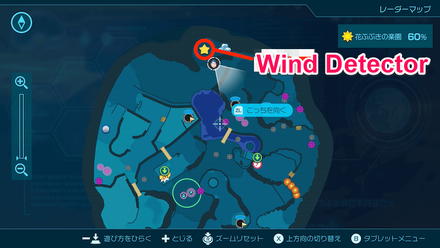
| Ride the wind spout to reach the opposite path where the treasure is located. | ||
|
Sparklium: 5 |
 |
 |
| Pick up on the ground. | ||
|
Sparklium: 130 |
 |
 |
| Pick it up from the ground. | ||
|
Sparklium: 120 |
 |
 |
| Climb up the hill to reach a high ground and throw the Pikmin toward the treasure. | ||
|
Sparklium: 50 |
 |
 |
| Use Yellow Pikmin to reach the treasure. | ||
|
Sparklium: 110 |
 |
 |
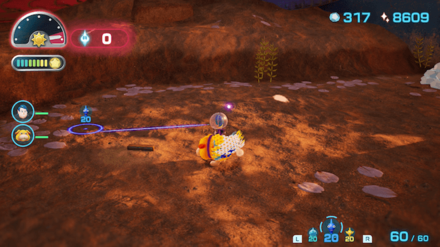
| Use 20 Pikmin to take down the bridge and make a path leading to the treasure. | ||
|
Sparklium: 110 |
 |
 |
| Defeat the boss for the treasure to spawn. | ||
|
Sparklium: 110 |
 |
 |
| Throw the Pikmin towards the treasure to pick it up. | ||
|
Sparklium: 70 |
 |
 |
| Climb up the hill and use Yellow Pikmin to reach the high ground and carry the treasure. | ||
|
Sparklium: 150 |
 |
 |
| Throw Pikmin over the treasure to pick it up. | ||
Kingdom of Beasts Treasure Locations
| Click to Jump to a Section | ||
|---|---|---|
| Surface | Drafty Gallery | Kingdom of Beasts |
| Secluded Courtyard | Sightless Passage | - |
| Treasure | Map Location | Overworld Location |
|---|---|---|
|
Sparklium: 80 |
 |
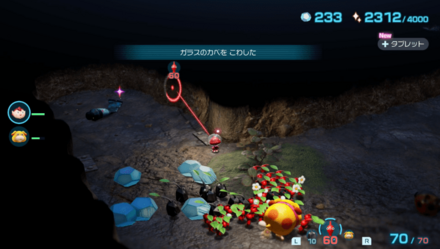 |
| Destroy the glass wall using Rock Pikmin to reach the treasure. | ||
|
Sparklium: 200 |
 |
 |
| Ride Oatchi and cross the water. Use Red Pikmin to destroy the lava to reach the treasure. | ||
|
Sparklium: 90 |
 |
 |
| Dig up the treasure from the ground. | ||
|
Sparklium: 20 |
 |
 |
| Pick up the 3 pieces after defeating the Bulborb. | ||
|
Sparklium: 50 |
 |
 |
| Pick up from the ground. | ||
|
Sparklium: 90 |
 |
 |
| Dig up the treasure from the ground. | ||
|
Sparklium: 1 |
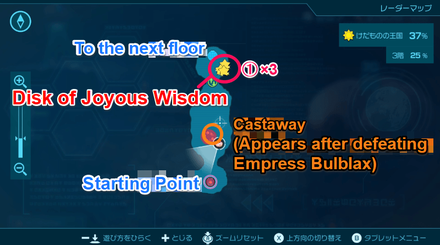 |
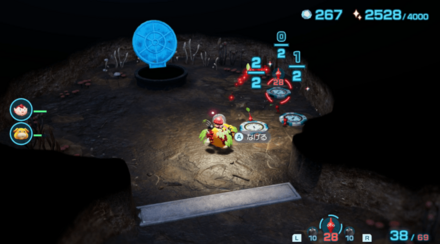 |
| At the end of the three doors after defeating Empress Bulblax. | ||
|
Sparklium: 110 |
 |
 |
| Extinguish the lava floor using Red Pikmin and transport the treasure. | ||
|
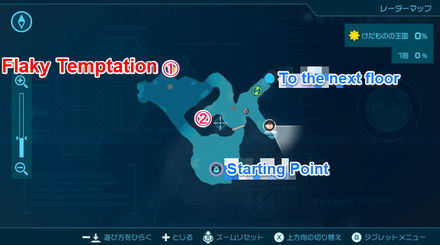
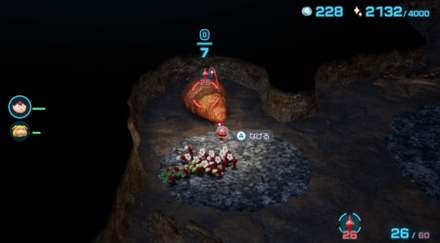
Sparklium: 5 |
 |
 |
| Pick up the 20 pieces from the ground. | ||
|
Sparklium: 50 |
 |
 |
| Pick up the treasure from the ground. | ||
|
Sparklium: 40 |
 |
 |
| Pick up after lowering the fence. | ||
|
Sparklium: 60 |
 |
 |
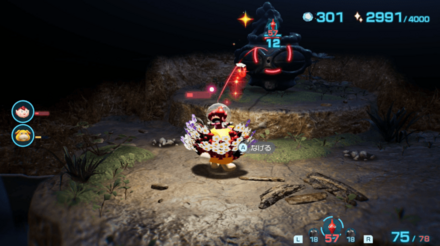
| Appears after defeating the large Bulborb. | ||
Secluded Courtyard Treasure Locations
| Click to Jump to a Section | ||
|---|---|---|
| Surface | Drafty Gallery | Kingdom of Beasts |
| Secluded Courtyard | Sightless Passage | - |
| Treasure | Map Location | Overworld Location |
|---|---|---|
|
Sparklium: 90 |
 |
 |
| Cover the hole with water coming out below the treasure then throw Yellow Pikmin on the treasure hanging from cobwebs. | ||
|
Sparklium: 40 |
 |
 |
| Throw Yellow Pikmin on the treasure hanging from cobwebs. | ||
|
Sparklium: 60 |
 |
 |
| Throw Yellow Pikmin on the treasure hanging from cobwebs. | ||
|
Sparklium: 80 |
 |
 |
| Throw Pikmin on the ledge to get the treasure. | ||
|
Sparklium: 40 |
 |
 |
| Command the Pikmin to carry the treasure then defeat the spider to reclaim the it. | ||
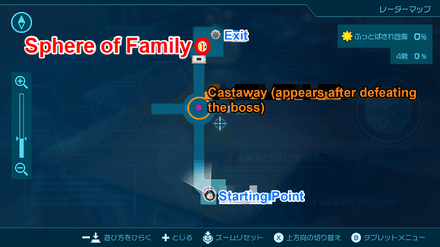
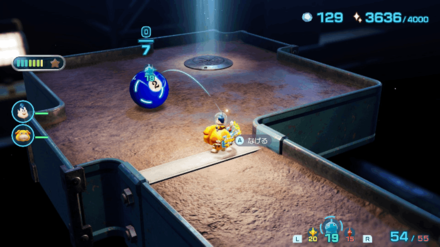
|
Sparklium: 150 |
 |
 |
| Proceed to Gate 01 after defeating the boss, Foolix, and carry the treasure back. | ||
|
Sparklium: 5 |
 |
 |
| Pick up the treasure on the ground. | ||
|
Sparklium: 40 |
 |
 |
| Climb up the slope and throw Yellow Pikmin on the climbing stick to reach the treasure. | ||
|
Sparklium: 180 |
 |
 |
| Defeat the spider enemy under the treasure to safely carry the treasure back. | ||
|
Sparklium: 90 |
 |
 |
| Pick up the treasure past the Skitter Leaf enemies. | ||
Sightless Passage Treasure Locations
| Click to Jump to a Section | ||
|---|---|---|
| Surface | Drafty Gallery | Kingdom of Beasts |
| Secluded Courtyard | Sightless Passage | - |
| Treasure | Map Location | Overworld Location |
|---|---|---|
|
Sparklium: 120 |
 |
 |
| Dig up the treasure from the ground. | ||
|
Sparklium: 130 |
 |
 |
| Command Oatchi to go over the hole and transport it. | ||
|
Sparklium: 110 |
 |
 |
| Throw Yellow Pikmin to reach and transport the treasure. | ||
|
Sparklium: 150 |
 |
 |
| At the back of the room on the southeastern corner of the map. | ||
Blossoming Arcadia Onions
Onion Locations
Yellow Onion
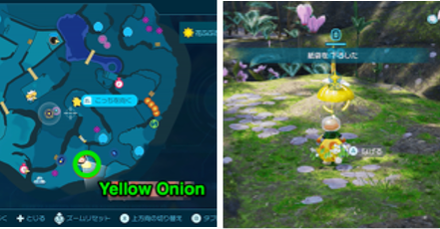
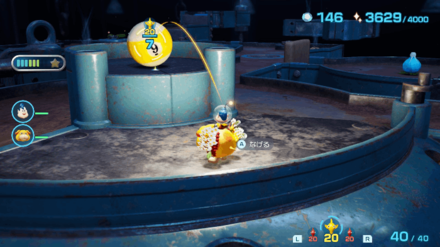
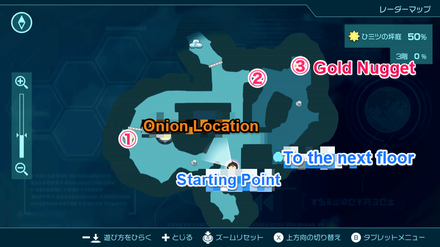
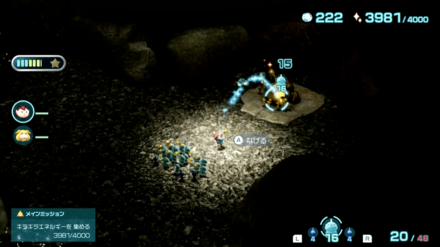
The Yellow Onion in Blossoming Arcadia is relatively easy to get to. Destroy the dirt wall near the base and dig it out.
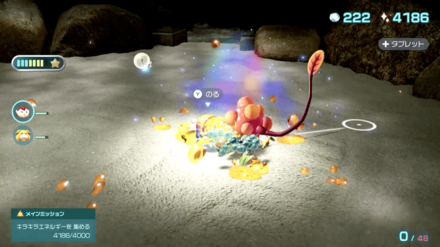
Flarlic Locations
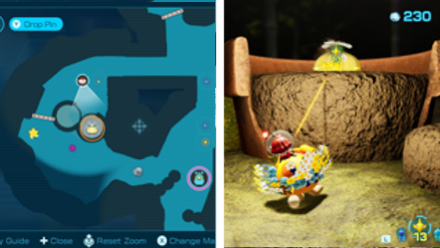
Surface

Use Blue Pikmin to carry the flarlic back to base. Alternatively, freeze the water with Ice Pikmin if you don't have Blue Pikmin yet.
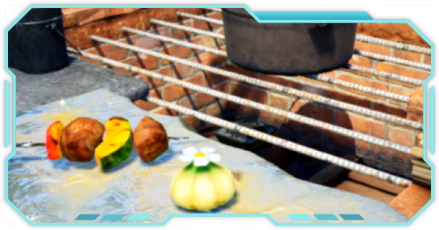
Secluded Courtyard
There is a flarlic in Sublevel 3 of the Secluded Courtyard. Use Yellow Pikmin to dig it out and return it to base.
Secluded Courtyard Onion Locations
Blossoming Arcadia Castaways
Castaway Locations
| Cave | Location / Sublevel |
|---|---|
| Drafty Gallery |  Sublevel 4 |
| Kingdom of Beasts |  Sublevel 3 |
 Sublevel 6 |
|
| Secluded Courtyard | 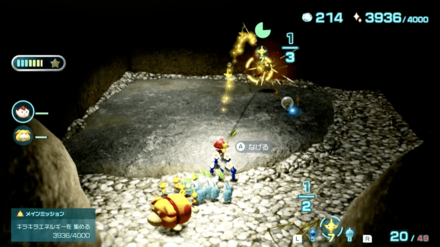 Sublevel 2 |
 Sublevel 4 |
|
| Sightless Passage | 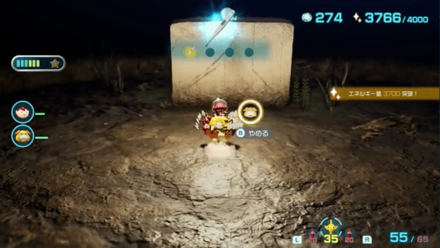 Sublevel 1 |
Blossoming Arcadia Dandori Battles and Challenges
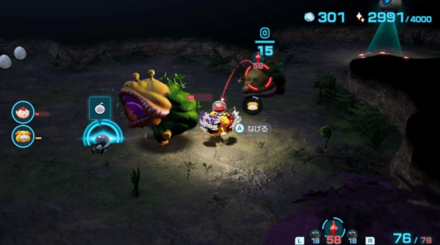
Dandori Battles
| Dandori Battle | Location and Overview |
|---|---|
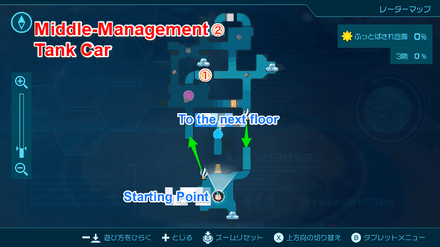
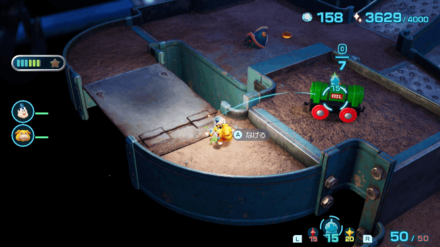
| Battle in a Box |
Time: 5:00 Dandori Level: ★★☆☆☆ Pikmin Types: Ice Pikmin |
Dandori Challenges
| Dandori Challenge | Location and Overview |
|---|---|
| Hotshock Canyon |
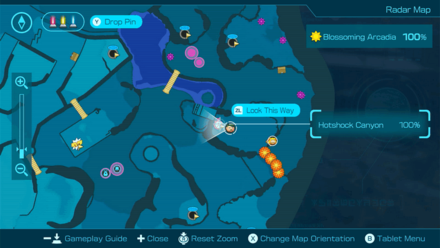 Time: 7:00 Dandori Level: ★★☆☆☆ Pikmin Types: Red Pikmin, Yellow Pikmin |
| Rockaway Cellars |
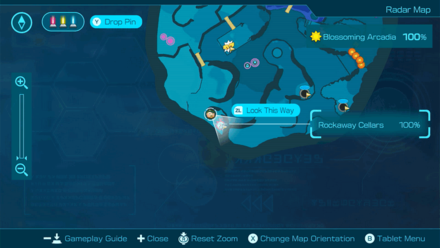 Time: 7:00 Dandori Level: ★★☆☆☆ Pikmin Types: Red Pikmin, Rock Pikmin |
All Dandori Challenge Locations
Pikmin 4 Related Guides

List of All Areas
| All Areas | |
|---|---|
 Sun-Speckled Terrace Sun-Speckled Terrace |
 Blossoming Arcadia Blossoming Arcadia |
 Serene Shores Serene Shores |
 Hero's Hideaway Hero's Hideaway |
 Giant's Hearth Giant's Hearth |
 Primordial Thicket Primordial Thicket |
Comment
Author
Blossoming Arcadia 100% Completion Guide
Rankings
- We could not find the message board you were looking for.
Gaming News


Popular Games

Genshin Impact Walkthrough & Guides Wiki
Honkai: Star Rail Walkthrough & Guides Wiki
Arknights: Endfield Walkthrough & Guides Wiki
Umamusume: Pretty Derby Walkthrough & Guides Wiki
Wuthering Waves Walkthrough & Guides Wiki
Pokemon TCG Pocket (PTCGP) Strategies & Guides Wiki
Abyss Walkthrough & Guides Wiki
Zenless Zone Zero Walkthrough & Guides Wiki
Digimon Story: Time Stranger Walkthrough & Guides Wiki
Clair Obscur: Expedition 33 Walkthrough & Guides Wiki


Recommended Games
Fire Emblem Heroes (FEH) Walkthrough & Guides Wiki
Pokemon Brilliant Diamond and Shining Pearl (BDSP) Walkthrough & Guides Wiki
Diablo 4: Vessel of Hatred Walkthrough & Guides Wiki
Super Smash Bros. Ultimate Walkthrough & Guides Wiki
Yu-Gi-Oh! Master Duel Walkthrough & Guides Wiki
Elden Ring Shadow of the Erdtree Walkthrough & Guides Wiki
Monster Hunter World Walkthrough & Guides Wiki
The Legend of Zelda: Tears of the Kingdom Walkthrough & Guides Wiki
Persona 3 Reload Walkthrough & Guides Wiki
Cyberpunk 2077: Ultimate Edition Walkthrough & Guides Wiki


All rights reserved
© Nintendo.
The copyrights of videos of games used in our content and other intellectual property rights belong to the provider of the game.
The contents we provide on this site were created personally by members of the Game8 editorial department.
We refuse the right to reuse or repost content taken without our permission such as data or images to other sites.