This survey will take about 1 minute.
Your answers will help us to improve our website.
Bravely Default 2 (Bravely Default II)
Chapter 3 Story Walkthrough and Boss Guides
This is a walkthrough for Chapter 3 of Bravely Default 2 (Bravely Default II) for the Nintendo Switch. Read on to know all the objectives for this chapter, all the boss fights and strategies against them, all the side quests and missions, and all the necessary tips to get through this chapter.
List of Contents
Bravely Default 2 Chapter 3 Walkthrough
Main Objectives
| Rimedhal | Serpent's Grotto | Jaw of Judgement -> Hall of High Holies |
Rimedhal
| Objectives | |
|---|---|
| Note | 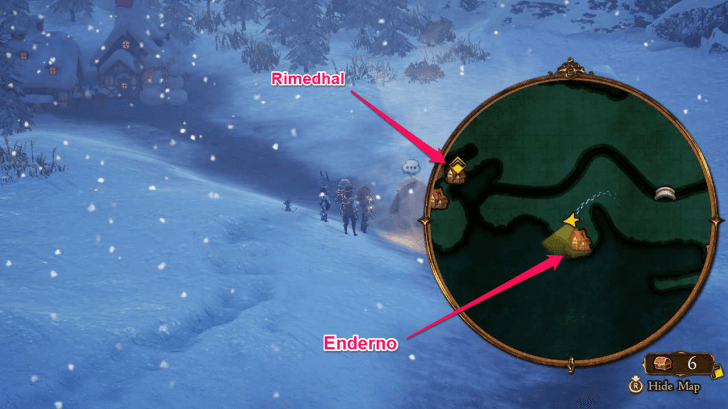 It is highly recommended to go to Enderno once you arrive at Rimedhal. There are two important side quests available at the start of Chapter 3: In Dreams and Human's Best Friend: Part III. You will find both quests by going left from the bridge, once you enter Rimedhal from the Wayward Woods. In Dreams will unlock the Salve-Maker job , a powerful support class. Human's Best Friend: Part III will grant you the ability to destroy rocks in the overworld. This will be useful in a later dungeon. |
| 1 | Use the stairs then head into the crowd for a bizarre scene. |
| 2 | Enter the church then talk to the archbishop |
| 3 | After the cutscenes, head out then proceed to the cave north of Rimedhal. |
Serpent's Grotto
| Objectives | |
|---|---|
| Note | The Serpent's Grotto is located exactly north of Rimedhal. The enemies here are tough so you'll want to have several AOE abilities or be prepared to consume lots of MP from your mages to clear them out faster. |
| 1 | Head through the cave. While there will be lots of stairs, your primary objective is simply heading north inside the cave. |
| 2 | After the 2nd save point, feel free to approach the lady nearby. |
| 3 | After the scenes, return to the save point and save your game. You'll also want to recover your party's status to prepare for a boss fight. |
| Boss | 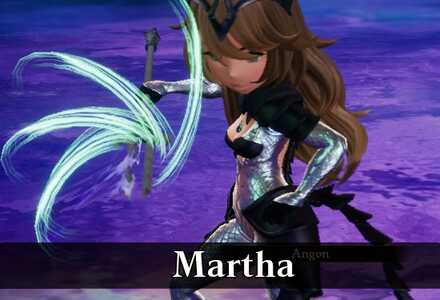 Martha Martha |
| Note | You'll now have a new ally in your party! He uses AOE fire attacks often so take this chance to explore the tundra regions! |
| 4 | After the boss fight, return to Rimedhal. |
| 5 | Return to the plaza. |
| 6 | Gather intel from the people in the Plaza then talk to the man just after the staircase in the plaza leading up. |
| 7 | Head northwest to find Rhydion's home. Talk to the man inside. |
| 8 | Head to the inn. |
| 9 | After recieving the grim news, head to the Church to the North Eastern most side of Rimedhal. |
| 10 | Exit Rimedhal then head north to reach the Jaws of Judgement. |
Jaw of Judgement -> Hall of High Holies
| Objectives | |
|---|---|
| Note | The wolves in the area counters physical attacks and they can deal a huge amount of damage. |
| 1 | The Jaws of Judgement is a simple dungeon that's a spiral path. The entrances to the other areas may be hard to find, so check for a different lighting on the walls to see if it's an enterable area or not. Beware of blue slopes, they will force you to move in a certain direciton. Check the area before crossing paths like these to avoid enemy ambushes! ► Jaws of Judgement Dungeon Map |
| 2 | Keep descending until you reach Rhydion. |
| Boss Fight | 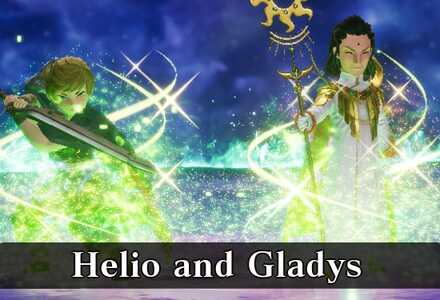 Helio and Gladys Helio and Gladys |
| 3 | After the battle, return to Rimedhal. |
| 4 | Head to the area church on the west most side of Rimedhal. |
| 5 | Make your way through the Hall of High Holies. The dungeon is 5 floors and enemies counter magical attacks so you'll want to prepare a physical team for this dungeon. |
| Note 1 | 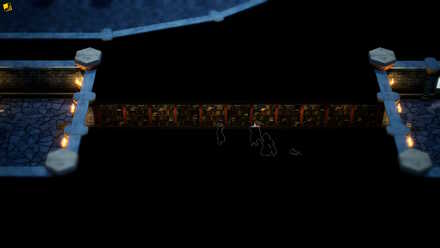 |
| Note 2 | 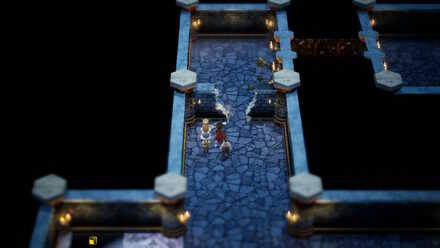 |
| 6 | Upon reaching the 5th floor, you'll find Domenic. Prepare for a tough boss battle! |
| Boss Fight |  Domenic Domenic |
| 7 | Head to the bar near the entrance of Rimedhal. |
| 8 | Talk to Martha and agree to head out. (Be prepared for a series of battles!) |
Chapter 4 Story Walkthrough and Boss Guides
Chapter 3 Maps
| Chapter 3 | |
|---|---|
| Rimedhal | Near Rimedhal |
| Serpent's Grotto | Jaws of Judgement |
| Hall of High Holies | Frosty Forest |
| Enderno | Crystalcap Mountain |
Chapter 3 Bosses
Martha
Martha is the guardian of the dragon and has the Dragoon Asterisk. Despite looking like a fair and sweet maiden, she actually craves fights like a battle hardened Valkyrie and she's definitely not a push over!
Helio and Gladys
The next duo boss you'll fight after Selene and Dag. They follow the prior battle's strategy as a healer and damager role. With Helio being the healer, we should know who to prioritize first in this fight.
Domenic
Domenic, the head of the dragon worshippers in Rimedhal is the last boss of Chapter 3. He possess the Oracle Asterisk and has command over time magics and can unleash strong water, lightning, and fire elemental spells at random.
A tough boss fight, but we have you covered with our Domenic boss fight guide!
Optional Boss: Glenn

Glenn is an optional boss you can fight while in Enderno. You'll have to complete the quest “In Dreams” then agree to Glenn and enter his brother's dreams.
Chapter 3 Obtainable Asterisks
Salve-Maker
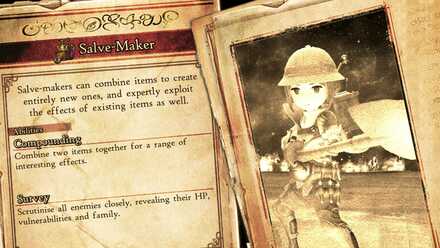
The Salve-Maker is an expert in item usage. This class can use ingredient items and combine it with existing items to produce unique effects! They are also able to analyze enemies and give more information to the player which can ease the flow of battle. Definitely a handy class!
Salve-Maker Job Abilities and Best Sub-Jobs
Dragoon
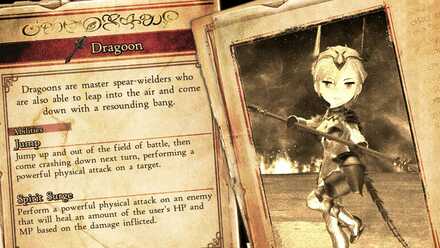
A famous attacker class in several Job system based games. They are well known for their ability to jump and be away from battle for a short period of time. They are a master of the lance and they are often key fighters in some bosses thanks to their signature jump move.
Dragoon Job Abilities and Best Sub-Jobs
Spirit Master
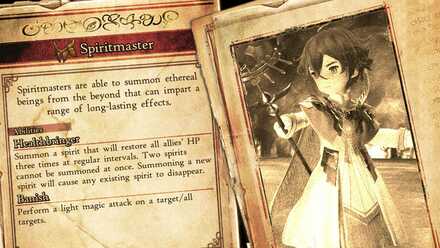
The Spirit Master can be considered an extension of the White Mage. They can cast light magic and use restorative spells too. The difference is these effects are often restorative buffs like regen and reraise. They can also summon Spirits (why call them spirit masters if they can't) that can use abilities automatically at different intervals during the battle.
Spirit Master Job Abilities and Best Sub-Jobs
Sword Master
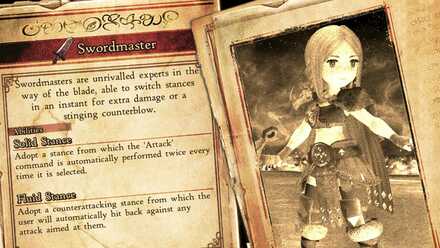
Sword Master is a class that specializes in damage. It can assume an offensive stance that can delay enemy turns and deal heavy damage or assume a counter attack stance that can destroy enemy momentum by damaging their BP.
Sword Master Job Abilities and Best Sub-Jobs
Oracle
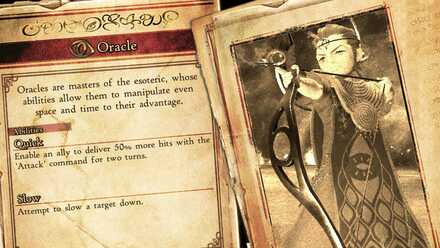
More commonly known as a Time Mage in previous rpg franchises that features Job systems. They can cast time manipulating magics that can speed up allies and slow down foes. They can also increase the amount of attack hits an ally (or enemy for that matter) in a single attack but they're not just supporters, Oracles can also damage enemies via using Triple magic to demolish them using three elements at once!
Oracle Job Abilities and Best Sub-Jobs
Chapter 3 Sidequests
The Tea of Teas
| Quest No. | Objective | Reward | Difficulty | |
|---|---|---|---|---|
| 35 | Collect mandarin tea leaves from defeated laerads. (0/3) |
Booster Bun (MP) x 2 | ★★★★ | |
| Quest Giver | ||||
| Elvis inside the shop in Wiswald | ||||
Like Teacher, Like Student
| Quest No. | Objective | Reward | Difficulty | |
|---|---|---|---|---|
| 41 | Search all the bookshelves in the Institute. |
Amulet x 1 | ★ | |
| Quest Giver | ||||
| Elvis inside the Institute in Wiswald | ||||
Scales in the Sand
| Quest No. | Objective | Reward | Difficulty | |
|---|---|---|---|---|
| 42 | Defeat Mushussu |
Light Talisman x 1 | ★★★★★★ | |
| Quest Giver | ||||
| Grandma in Savalon | ||||
Blinded by Beauty
| Quest No. | Objective | Reward | Difficulty | |
|---|---|---|---|---|
| 43 | Search for the lost little girl |
Small JP Orb x 10 | ★★★★★ | |
| Quest Giver | ||||
| Young boy near Elvis in Wiswald's tree hollow | ||||
Taste Test
| Quest No. | Objective | Reward | Difficulty | |
|---|---|---|---|---|
| 45 | Find some banananectarines |
Bomb Arm x 4 | 0/3 | |
| Quest Giver | ||||
| Bar lady in Wiswald | ||||
Test Your Strength
| Quest No. | Objective | Reward | Difficulty | |
|---|---|---|---|---|
| 46 | Defeat an aka-oni. 0/1 |
Ikaboshi Kabuto x 1 | ★★★★★ | |
| Quest Giver | ||||
| Lady in Wiswald | ||||
In Dreams
| Quest No. | Objective | Reward | Difficulty | |
|---|---|---|---|---|
| 47 | Acquire some luneclover |
Large Experience Orb x 1 | ★★★★★ | |
| Quest Giver | ||||
| Mayor of Enderno's brother | ||||
Human's Best Friend: Part III
| Quest No. | Objective | Reward | Difficulty | |
|---|---|---|---|---|
| 48 | Find Mitch |
Large Experience Orb x 1 | ★★ | |
| Quest Giver | ||||
| Truff in the north of Enderno | ||||
Leading by Example
| Quest No. | Objective | Reward | Difficulty | |
|---|---|---|---|---|
| 49 | Speak to the townspeople. |
Heart Ring x 1 | ★★★★ | |
| Quest Giver | ||||
| Lily | ||||
The Wayward Merchant
| Quest No. | Objective | Reward | Difficulty | |
|---|---|---|---|---|
| 50 | Look for the lost merchant. | pg x11500 | ★★★★★ | |
| Quest Giver | ||||
| Merchant in the upper area of Rimedhal | ||||
Mysteries of the Heart
| Quest No. | Objective | Reward | Difficulty | |
|---|---|---|---|---|
| 51 | Speak to the girl |
Booster Bun (Aim) x 1 | ★ | |
| Quest Giver | ||||
| The worried boy in Rimedhal | ||||
The Joys of Spring
| Quest No. | Objective | Reward | Difficulty | |
|---|---|---|---|---|
| 52 | Collect some horsetail buds. | pg x 7700 | ★★★ | |
| Quest Giver | ||||
| Old woman at Rimedhal | ||||
Gone Fishing
| Quest No. | Objective | Reward | Difficulty | |
|---|---|---|---|---|
| 53 | Defeat some flanbaneros. |
Adamant Bangle x 1 | ★★★★ | |
| Quest Giver | ||||
| Man near the plaza in Rimedhal | ||||
The Ultimate Stew
| Quest No. | Objective | Reward | Difficulty | |
|---|---|---|---|---|
| 54 | Collect a snow cabbage 0/1 Collect a moon onion 0/1 Collect a flowery fungus 0/1 |
Carving Knife x 1 | ★★★★ | |
| Quest Giver | ||||
| A man east of Rimedhal | ||||
That's the Spirit
| Quest No. | Objective | Reward | Difficulty | |
|---|---|---|---|---|
| 56 | Collect some soul food from defeated kitty-caits or other sources. |
Monstrous Medley x 2 | ★★★★★★ | |
| Quest Giver | ||||
| Man in Rimedhal | ||||
More Side Quests
For a complete list of all available side quests in Bravely Default 2, see our side quest guide below!
Chapter 3 Tips
Organize and Plan your Party Setups
The dungeons and boss fights from this chapter onward will start to pack some challenges (as if they didn't already). You'll want to properly organize your party and plan out which Job and which role you would like each character to have for the future.
If you're looking for specific Job combos, check our Job combination pages for references!
Don't Sell Old Gear
Unless they surpass the amount of people that can equip it (4 for armour, and headwear, 8 for weapons, shields, and accessories). Old gear may have less stats but some have unique effects that can still be used against future boss battles so don't sell them!
List of Rimedhal and Enderno Shop Items
Available from the Beginning
Items
| Item | Price | Item | Price |
|---|---|---|---|
| Antidote | 15 | Ether | 220 |
| Mini Ether | 90 | Phoenix Down | 150 |
| Hi-Potion | 200 | Potion | 40 |
| Balsam | 66 | Atlatl | 240 |
| Stone | 240 | Magnifying Glass | 22 |
| Teleport Stone | 180 | Tent | 270 |
| Ward Light | 85 | Eye Drops | 20 |
| Echo Herbs | 24 | Wakeup Bell | 40 |
| Animator | 52 | Throwing Knife | 240 |
| Shuriken | 240 | Throwing Axe | 240 |
| Dart | 240 | Throwing Stick | 240 |
| Bomb Fragment | 240 | Antarctic Wind | 260 |
| Zeus's Wrath | 260 | Direct Moonlight | 260 |
| Earth Drum | 260 | Tengu Yawn | 260 |
| Stardust | 260 | Dark Drops | 260 |
Weapons
| Weapon | Price | Weapon | Price |
|---|---|---|---|
| Jade Crosier | 5720 | Rod of Fire | 4140 |
| Rod of Ice | 4140 | Oak Staff | 3420 |
| Ancient Bow | 5620 | Quickdraw Bow | 3610 |
| Halberd | 5800 | Hinderlance | 4610 |
| Crimson Spear | 3020 | Alastor | 6300 |
| Earthbreaker | 3880 | Hawkeye | 3160 |
| Scimitar | 6050 | Kiku-Ichimonji | 2940 |
| Air Knife | 5390 | Main-Gauche | 3810 |
| Orichal Dagger | 2460 |
Armor
| Armor | Price | Armor | Price |
|---|---|---|---|
| Adamant Armour | 4230 | Plate Mail | 3290 |
| Mirage Vest | 3090 | Protector | 4000 |
| Nanosuit | 2970 | Academy Gown | 2010 |
| Eisenhut | 3110 | Adamant Helm | 2830 |
| Adamant Hat | 1450 | Iron Headband | 2840 |
| Shako | 1850 | Laurel Wreath | 1400 |
| Tactician's Hat | 2630 | Mortarboard | 1250 |
| Adamant Shield | 3350 | Typhoon Shield | 2110 |
Accessories
| Accessory | Price | Accessory | Price |
|---|---|---|---|
| Ice Talisman | 1560 | Flame Talisman | 1560 |
| Iron Bangle | 880 | Thunder Talisman | 1560 |
| Star Pendant | 600 | Silver Glasses | 620 |
| White Veil | 760 | Safety Ring | 2320 |
| Locket | 2200 | Peace Ring | 2270 |
| Courage Ring | 840 | Earthing Rod | 880 |
| Clothespin | 810 | Artisan Gloves | 2470 |
| Wind Talisman | 3490 | Artisan Gloves | 2470 |
| Force Armlets | 2160 | Vambraces | 3420 |
| Thief Gloves | 2830 | Mythril Gloves | 1670 |
| Mittens | 120 | Power Bracers | 2190 |
| Mythril Bangle | 1340 |
Available after entering Jaws of Judgement
Items
| There are no new items available for purchase |
Weapons
| Weapon | Price |
|---|---|
| Great Bow | 7230 |
| Defender | 7120 |
| Carving Knife | 6790 |
Armor
| Armor | Price |
|---|---|
| Ninja Garb | 4890 |
| Full-Face Helm | 3850 |
Accessories
| There are no new items available for purchase |
Available from Chapter 4
Items
| Item | Price | Item | Price |
|---|---|---|---|
| Pathogen | 2000 | Witch's Whisper | 1500 |
| Wildweed | 1000 | Dreadstool | 500 |
| Numbneedle | 250 | Hush Pollen | 200 |
| Ink | 100 | Magic Herb | 800 |
| Healing Herb | 100 | X-Potion | 630 |
Weapons
| Weapon | Price | Weapon | Price |
|---|---|---|---|
| Gaia Rod | 7120 | Yggdrasil Staff | 7010 |
| Staggering Sword | 7970 | Summoner's Axe | 8360 |
| Chronos Glaive | 8220 |
Armor
| Armor | Price | Armor | Price |
|---|---|---|---|
| Cuirass | 5620 | Valkyrie's Coat | 5230 |
| Brigandine | 4930 | Kalasiris | 5240 |
| Acorn Hat | 4200 | Spiked Shield | 4310 |
Accessories
| Armor | Price | Armor | Price |
|---|---|---|---|
| Heart Ring | 2860 | Adamant Bangle | 3310 |
Available from Chapter 5
Items
| Item | Price | Item | Price |
|---|---|---|---|
| Spellblossom | 15000 | Healing Bloom | 2000 |
| Meteorite | 2200 | Dark Deluge | 2200 |
| Direct Sunlight | 2200 | Tengu Sneeze | 2200 |
| Earth Mallet | 2200 | Pantheon's Wrath | 2200 |
| Arctic Wind | 2200 | Bomb Arm | 2200 |
| Elixir | 10000 |
Weapons
| Weapon | Price | Weapon | Price |
|---|---|---|---|
| Zwill Crossblade | 8680 | Yatagarasu | 10350 |
| Blind Blade | 8960 | Ama-no-Murakumo | 10470 |
| Sandman's Axe | 9460 | Deforester | 10810 |
| Wyvern Spear | 9170 | Ama-no-Sakahoko | 10700 |
| Shigeto Bow | 8940 | Ama-no-Kagoyumi | 10640 |
| Hammer Mace | 8740 | Gambanteinn | 10260 |
Armor
| Armor | Price | Armor | Price |
|---|---|---|---|
| Icefire Shield | 5020 | Aegis Shield | 5520 |
| Blessing | 6670 | Ascetic's Cap | 3370 |
| Dragonskin Headscarf | 6470 | Carbon Cap | 5320 |
| Armet | 5580 | Saffron Robes | 5690 |
| Minerva Bustier | 7570 | Crimson Vest | 6170 |
| Fluted Armour | 6370 |
Accessories
| Accessory | Price | Accessory | Price |
|---|---|---|---|
| Vaccine | 10870 | Self-Portrait | 11810 |
| Snappy Sash | 10780 | Adamant Gauntlets | 6840 |
| Amulet | 2730 | Sands of Time | 3720 |
| Gauntlets | 4620 | Snug Scarf | 3680 |
Available from Chapter 6
Items
| Item | Price | Item | Price |
|---|---|---|---|
| Soul Food | 5770 | Devil's Delight | 5190 |
| Ghoulash | 5770 | Plant Food | 5190 |
| Insect Nectar | 5630 | Fresh Fish | 5440 |
| Beast Flesh | 5440 | People Pleasers | 5630 |
Weapons
| There are no new items available for purchase |
Armor
| There are no new items available for purchase |
Accessories
| There are no new items available for purchase |
Available from Chapter 7
Items
| There are no new items available for purchase |
Weapons
| There are no new items available for purchase |
Armor
| There are no new items available for purchase |
Accessories
| There are no new items available for purchase |
Bravely Default 2 Related Guides
Bravely Default 2 Story Walkthroughs
| Story Chapter Walkthroughs | |
|---|---|
| Demo Walkthrough | |
 Prologue Prologue |
 Chapter 1 Chapter 1 |
 Chapter 2 Chapter 2 |
Chapter 3 |
 Chapter 4 Chapter 4 |
 Chapter 5 Chapter 5 |
 Chapter 6 Chapter 6 |
 Chapter 7 Chapter 7 |
| Side Quests | |
| Complete Quest List | |
| More Guides | |
| New Game + Options & How to Unlock | |
Author
Chapter 3 Story Walkthrough and Boss Guides
Please participate in our site
improvement survey
03/2026
improvement survey
03/2026
Would you assist in
improving Game8's site?
improving Game8's site?

×
We are listening to our users' valuable opinions and discussing how to act on them.
The information collected through this survey will be used for the purpose of improving our services. In addition, the information will only be disclosed a part of a statistic in a format that will not allow identification of personal information.
Begin Survey
Not Now
×
Please rate each item regarding Game8.co's Advertisements.
Amount of Ads
Very Dissatisfied
Somewhat Dissatisfied
Fine
Somewhat Satisfied
Highly Satisfied
Placement of Ads
Timing of Ad Display
Ad Loading Speed
Safeness of Ads
Content of Ads
×
Please rate each item regarding Game8.co's Quality of Articles.
Amount of information
Very Dissatisfied
Somewhat Dissatisfied
Fine
Somewhat Satisfied
Highly Satisfied
Frequency of updates
Speed of new information
Accuracy of articles
Understandibility of articles
Readability of sentences
×
Please rate each item regarding Game8.co's Usability of the Site.
Ease of finding information
Very Dissatisfied
Somewhat Dissatisfied
Fine
Somewhat Satisfied
Highly Satisfied
Loading Speed
Use of Color
Font Size
Visibility of Images
Easy to Understand Layout
×
Please rate each item regarding Game8.co's Message Boards, Comments.
Ease of Writing
Very Dissatisfied
Somewhat Dissatisfied
Fine
Somewhat Satisfied
Highly Satisfied
Readability
Ease in Finding Information
Comment Quality
Comment Quantity
Admin Response
×
Please rate each item regarding Game8.co's Site's new design.
Please rate our site's new design
Very Dissatisfied
Somewhat Dissatisfied
Fine
Somewhat Satisfied
Highly Satisfied
Do you think that the website's design change makes the site easier to use?
Has the new design made it easier for you to find information on the site?
Has the new design improved the overall visual appeal of the site?
How would you rate your overall satisfaction with the new design of the site?
×
How likely are you to recommend Game8 to someone you know?
Very Unlikely
0
1
2
3
4
5
6
7
8
9
10
Very Likely
If you have other opinions regarding potential improvement to the website, please share them with us. We would appreciate your honest opinion.
Note: This is a free response section, so you can proceed without entering anything.
Note: Please be sure not to enter any kind of personal information into your response.
Note: Please be sure not to enter any kind of personal information into your response.
×
Thank You
×
Thank you for participating in our survey! Your answers will help us to improve the quality of our website and services.
We hope you continue to make use of Game8.
We hope you continue to make use of Game8.
Close
Rankings
- We could not find the message board you were looking for.
Gaming News


Popular Games

Genshin Impact Walkthrough & Guides Wiki
Honkai: Star Rail Walkthrough & Guides Wiki
Umamusume: Pretty Derby Walkthrough & Guides Wiki
Pokemon Pokopia Walkthrough & Guides Wiki
Resident Evil Requiem (RE9) Walkthrough & Guides Wiki
Monster Hunter Wilds Walkthrough & Guides Wiki
Wuthering Waves Walkthrough & Guides Wiki
Arknights: Endfield Walkthrough & Guides Wiki
Pokemon FireRed and LeafGreen (FRLG) Walkthrough & Guides Wiki
Pokemon TCG Pocket (PTCGP) Strategies & Guides Wiki


Recommended Games
Diablo 4: Vessel of Hatred Walkthrough & Guides Wiki
Fire Emblem Heroes (FEH) Walkthrough & Guides Wiki
Yu-Gi-Oh! Master Duel Walkthrough & Guides Wiki
Super Smash Bros. Ultimate Walkthrough & Guides Wiki
Pokemon Brilliant Diamond and Shining Pearl (BDSP) Walkthrough & Guides Wiki
Elden Ring Shadow of the Erdtree Walkthrough & Guides Wiki
Monster Hunter World Walkthrough & Guides Wiki
The Legend of Zelda: Tears of the Kingdom Walkthrough & Guides Wiki
Persona 3 Reload Walkthrough & Guides Wiki
Cyberpunk 2077: Ultimate Edition Walkthrough & Guides Wiki


All rights reserved
© 2021 SQUARE ENIX CO., LTD. All Rights Reserved.
The copyrights of videos of games used in our content and other intellectual property rights belong to the provider of the game.
The contents we provide on this site were created personally by members of the Game8 editorial department.
We refuse the right to reuse or repost content taken without our permission such as data or images to other sites.