Best Job Combos

Learn all the best Job Combos in Bravely Default 2 (Braveley Default II)! Here we list all the possible combinations you can make with all the Jobs available in the game and the best abilities to equip to them.
List of Contents
Best Job Combinations
Below are all the best combinations for the original levels. Since the Brave Bearer Job is only during the late stages of the game, we will not be adding it to this list. For the best end-game Job combinations, refer to our second list below! Or if you wish to learn the best Job party combos for each chapter, refer to our best Job combos for each chapter!
Best Party Build for Each Story Chapter
Phantom and Salve Maker
| Main Job | Sub Job |
|---|---|
|
|
|
| Choose your Ailment | |
Compound and Inflict Ailments to Enemies!
With the Phantom's 2nd Speciality, all ailments gets a 100% chance of getting inflicted to enemies. This comes with a measly cost of 40 MP but being able to paralyze the strongest bosses makes that 40 MP spent extremely worth it. It can also be a guaranteed way to poison or inflict contagion on them which combos with the Phantom's Milk Poison and Sick Twist.
Phantom and Ranger
| Main Job | Sub Job |
|---|---|
|
|
|
| Paralysis Lock | |
Infinite Paralysis
Similar to the Phantom-Salve Maker combo, this Job's aim is to continiously inflict an ailment to the enemy. Most end-game bosses are vulnerable to paralysis which makes the Ranger one of the best Sub-Job for the Phantom to guarantee your paralysis' effect.
Oracle and Arcanist
| Main Job | Sub Job |
|---|---|
|
|
|
| Spell Damage Amplified Using Arcanist's Magic Stat | |
Give Me Your Magic Stat
The Oracle can copy its sub-Job's stat using its 2nd Speciality. This is a flat damage stat boost for the Oracle by taking the Arcanist's magic stat then amplifying Triplara's damage. This setup also allows you to use AOE Darkga without hitting yourself in the process (but it will deal less damage due to not getting access to the Arcanist's speciality 1).
Arcanist and Bastion
| Main Job | Sub Job |
|---|---|
|
|
|
| Gives the option to prevent ally damage. | |
Eco-Friendly Arcanist
The Arcanist's high magic stat makes it one of the strongest spell slinger in the game. Unfortunately, it can also hit allies with its attacks which makes it an unideal character to include in a normal party. With a Bastion as its Sub-Job, you'll be able to prevent friendly fire using Vallation!
Gambler and Bastion
| Main Job | Sub Job |
|---|---|
|
|
|
| Sanctuary Prevents Dealer's Choice self harm | |
Gamble Responsibly
The Gambler's level 12 ability “Dealer's Choice” is a move that can cause random effects. It can even raise your PG, EXP, and JP after the battle but it can also cause your gambler to instantly die or cause your whole party's HP to be reduced to 1. With Sanctuary, all of these damages will be negated so you can safely try to gamble for those extra EXP and JP!
Shield Master and Arcanist
| Main Job | Other Character's Main Job |
|---|---|
|
|
|
| Shield Master's Protect Ally blocks Arcanist self attacks | |
Hit them not us!
The Shield Master's ability to protect allies isn't just for single target attacks but also for group target moves! If your allies are in Critical HP, the Shield Master will block all the spells that gets fired towards the team as well.
Shield Master and Hellblade
| Main Job | Sub-Job |
|---|---|
|
|
|
| Regenerating Tank | |
| Requires Sub-Job Speciality 1 Support ability from Spiritmaster | |
Undying Tank Damage Dealer
The Shield Master's super tanky nature is further amplified by the Hellblade's passive HP and MP Regeneration. This makes the Shield Master unkillable. This also gives the Shield master the ability to damage enemies via Minus Strike and Ultima Blade (with HP/MP Converter ability).
White Mage and Spirit Master
| Main Job | Sub-Job |
|---|---|
|
|
|
| Holistic Medicine and Reraise Abuse | |
Immortal Army
Perhaps, the best healer combo in the game, the White Mage and Spirit master combo allows your White Mage to AOE cast Reraise on all your party members. This is a crucial combo for many boss fights that can save your team from the brink of defeat. Just don't use Purebringer to remove your Reraise and Regeneration buffs!
Red Mage and Oracle
| Main Job | Sub-Job |
|---|---|
|
|
|
| Triplara and Chainspell can dish out massive damage. | |
Gatling Spell Slinger
The Oracle's main damage ability is its Triple/Triplara spell. With the Red Mage's Chain Spell, you'll be able to use Triple/ra twice in a single use which allows you to potentially hit an enemy 6 times in a single turn. With the Brave command, you can hit the enemy for a potential 24 times in a single turn (assuming all Triplara spells hits three times).
Berserker and Dragoon
| Main Job | Sub-Job |
|---|---|
|
|
|
| Comeback Kid and Vent Fury is a free restoration ability | |
Infinite Rage
This playstyle involves giving your Berserker the Dragoon's Comeback Kid support ability. With this ability, your Berserker will be able to refill his/her HP and MP after a few turns have passed. With the Berserker's Rage and Reason, this will give you the ability to hit enemies hard using the Berserker's strongest ability while replenishing your HP and MP again.
Swordmaster and Vanguard
| Main Job | Sub-Job |
|---|---|
|
|
|
| 999 Physical Attack Build | |
| Dual Wield amplifies this build's damage. | |
It's Over 9000!
The Sword Master's speciality 2 “Double Duty” will allow your Sword Master to use the Vanguard's “Attention Seeker” Speciality that gives your character a massive damage boost equivalent to your target chance.
Together with the Swordmaster's Divide Attention ability, you can easily reach max attack as soon as you reach Level 12 on the Sword Master and have a tank with high target chance on your team!
Monk and Hellblade
| Main Job | Sub-Job |
|---|---|
|
|
|
| Minus Strike abuse. | |
| Sub-Job BP Saver and Sub-Job Speciality 1 amplifies this build. | |
Minus Strike Abuse
The Monk's high HP coupled by the Hellblade's passive Regeneration and Minus Strike makes this Job combo extremely strong.
The higher the character's HP, the higher the damage potential of Minus Strike is. With the Monk's high HP cost abilities, you'll be able to easily reach critical state in a few moves.
Not to mention that you get unlimited Inner Alchemy and Invigorate thanks to the Hellblade's MP regeneration.
Another combo this build can abuse is the Firebird and Ruby Blades combo to deal massive fire damage to the enemy by lowering their resistance to flames.
Berserker and Gambler
| Main Job | Sub-Job |
|---|---|
|
|
|
| High Roller and Vent Fury turns Free-for-All into a free massive damage move. | |
| Sub-Job BP Saver and Sub-Job Speciality 1 amplifies this build. | |
Mad Gambler
While this is not the most efficient Job combo, it is definitely a fun one. The Gambler's High Roller move is a 10,000 PG cost move that can deal massive damage to the enemy the stronger your physical attack is.
Thanks to Berserk and the Berserker's high damage stat plus Free-for-All's free ability costs, you can easily dish out thousands of damage with this combo for free. However, This won't work with Rage and Reason and your Flash the Cash will not deal damage due to being free.
Vanguard and Hellblade
| Main Job | Sub-Job |
|---|---|
|
|
|
| High Elemental damage! | |
| Sub-Job BP Saver and Sub-Job Speciality 1 amplifies this build. | |
Elemental Blade Combo
Thanks to the Vanguard's high damage stat via “Attention Seeker”, the Hellblade's elemental blades will deal a ton of damage. Just make sure to have Sub-Job Speciality 1 to replenish your HP!
Dragoon and Thief
| Main Job | Sub-Job |
|---|---|
|
|
|
| God Speed Strike Amplification | |
| Fast Hands from Shield Master amplifies this build's damage.[/red] | |
Dual Wielded God Speed Strike
The Dragoon is one of the classes that possess high speed stat along with Thief, Phantom, and the last hidden class.
With the Dragoon's ability to dual wield equipment without the Phantom's support ability, you'll be able to hit like a truck pretty early in the game. Not to mention that Spirit Surge is a better HP/MP absorption tool.
Best Job Combinations (Post Game)
These Job Combinations are a list for the last section of the game. All abilities are included and the hidden class Bravebearer will also be considered in the Job combinations.
| Post Game Job Combo Directory | |||
|---|---|---|---|
| Hellblade and Red Mage | Oracle and Bravebearer | Sword Master and Vanguard | Sword Master and Spirit Master |
| Phantom and Beastmaster | Freelancer and Gambler | Berserker and Monk | |
Hellblade With Any High HP Job
| Main Job | Sub-Job |
|---|---|
| Any Job with High HP |
|
| Vallation and AOE Spell and Drain | |
| Red Mage's HP/MP Converter is needed. | |
Ultima Blade Abuse
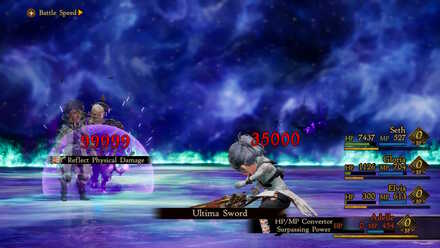
The HP/MP Converter will turn all MP costs into HP and vice versa, with the Ultima Blade's damage being reliant on the spent resource, you'll be able to spend more resources than the maximum MP allows. This combo can easily deal 99,999 damage at the expense of the character's life.
Oracle and Bravebearer
| Main Job | Sub-Job |
|---|---|
|
|
|
| High Base stat and ability to use Elemental Supplement on all enemies. | |
| Across the Board is needed for this Job combo. | |
Add Elemental Damage to Attacks
Elemental Supplement is a move that's normally used on your physical attackers to exploit enemy elemental vulnerabilities. However, you can also use this on enemies to make them hit you with the respective element instead.
By having 66% resistrance to the element you used, you'll be able to absorb all the attacks they do! With Across the Board, you'll now be able to use this against groups of enemies which can make many battles trivial.
Sword Master and Vanguard
| Main Job | Sub-Job |
|---|---|
|
|
|
| Ninefold Heavy Strikes | |
It's Over 999!
Similar to the previous Sword Master and Vanguard combo except this time, the Sword Master gains access to Ninefold Flurry. It's similar to fourfold flurry but this time, it hits 9 times and with high physical attack, you'll be able to dish out massive damage in a few turns.
Sword Master and Spirit Master
| Main Job | Sub-Job |
|---|---|
|
|
|
| Infinite MP and support skills | |
The Shaman King
This combo again, relies on the Sword Master's ability to use its Sub-Job's speciality. With the Spirit Master's permanent 5 spirits, your party will never run out of anything.
Infinite healing, MP, status ailment cure, buff and debuff cure, and ressurection. All for free and you still retain a strong physical attacker.
Phantom and Beastmaster
| Main Job | Sub-Job |
|---|---|
|
|
|
| Maximize Muzzled Maelstrom! | |
Muzzle then Maelstrom!
The Phantom's guaranteed hit together with the Beastmaster's Muzzle and Muzzling Maelstrom combo is a strong 4 hit strike. Use this against lone enemies to deal strong damage!
Freelancer and Gambler
| Main Job | Sub-Job |
|---|---|
|
|
|
| Mimic and Highroller combo | |
Gambling hard for free!
The Freelancer's ability to use Mimic can allow you to use Highroller for free. A fun combo similar to the Berserker and Gambler combo but it is way more reliable and stronger the more Jobs you master.
Berserker and Monk
| Main Job | Sub-Job |
|---|---|
|
|
|
| Phoenix Flight and Death's Door combo is strong | |
| Sub-Job BP Saver, Maximise HP, and Comeback Kid makes this combo stronger | |
Call an ambulance, But not for me!
The Monk's Phoenix Flight partnered by the Berserker's Death's Door is a strong 2 Hit combo that will instantly consume all your HP then deal massive damage to the enemies. With Vent Fury and Comeback Kid, you'll also be able to replenish all resources spent then use it all again!
Bravely Default 2 Job List and Guides
Jobs List

Job Guides
| Related Job Guides | |
|---|---|
| Best Job Combos | Job Points Guide |
| Best Beastmaster Monsters Guide | Steal List Guide |
| How to Unlock the Max Job Level | List of Beastmaster Moves & Effects |
Comment
Try to main swordmaster and beastmaster sub-job. Bump up the beast master and use the swordmaster Double Duty to get the buff from all the monsters caught. Having dual wield will have dual wield equipped to bump up the damage.
Author
Best Job Combos
Rankings
- We could not find the message board you were looking for.
Gaming News
Popular Games

Genshin Impact Walkthrough & Guides Wiki

Umamusume: Pretty Derby Walkthrough & Guides Wiki

Crimson Desert Walkthrough & Guides Wiki

Monster Hunter Stories 3: Twisted Reflection Walkthrough & Guides Wiki

Honkai: Star Rail Walkthrough & Guides Wiki

Pokemon Pokopia Walkthrough & Guides Wiki

The Seven Deadly Sins: Origin Walkthrough & Guides Wiki

Wuthering Waves Walkthrough & Guides Wiki

Zenless Zone Zero Walkthrough & Guides Wiki

Arknights: Endfield Walkthrough & Guides Wiki
Recommended Games

Fire Emblem Heroes (FEH) Walkthrough & Guides Wiki

Diablo 4: Vessel of Hatred Walkthrough & Guides Wiki

Cyberpunk 2077: Ultimate Edition Walkthrough & Guides Wiki

Yu-Gi-Oh! Master Duel Walkthrough & Guides Wiki

Super Smash Bros. Ultimate Walkthrough & Guides Wiki

Pokemon Brilliant Diamond and Shining Pearl (BDSP) Walkthrough & Guides Wiki

Elden Ring Shadow of the Erdtree Walkthrough & Guides Wiki

Monster Hunter World Walkthrough & Guides Wiki

The Legend of Zelda: Tears of the Kingdom Walkthrough & Guides Wiki

Persona 3 Reload Walkthrough & Guides Wiki
All rights reserved
© 2021 SQUARE ENIX CO., LTD. All Rights Reserved.
The copyrights of videos of games used in our content and other intellectual property rights belong to the provider of the game.
The contents we provide on this site were created personally by members of the Game8 editorial department.
We refuse the right to reuse or repost content taken without our permission such as data or images to other sites.
 Freelancer
 White Mage
 Black Mage
 Monk
Monk Vanguard
 Thief
Thief Bard
Bard Beast Master
 Gambler
 Berserker
 Red Mage
 Ranger
 Shieldmaster
 Pictomancer
 Dragoon
 Swordmaster
 Spiritmaster
 Salve-Maker
 Oracle
 Bastion
 Phantom
 Arcanist
 Hellblade
 Bravebearer


If you don't like swordmaster just level up the bravebearer job until you get sub-job specialty 2