Pokopia Walkthrough Guide
★ Tip: Use Frames to organize your Storage.
☆ Build Habitats with Ditto's Moves.
★ Build Houses and Structures for your Pokemon
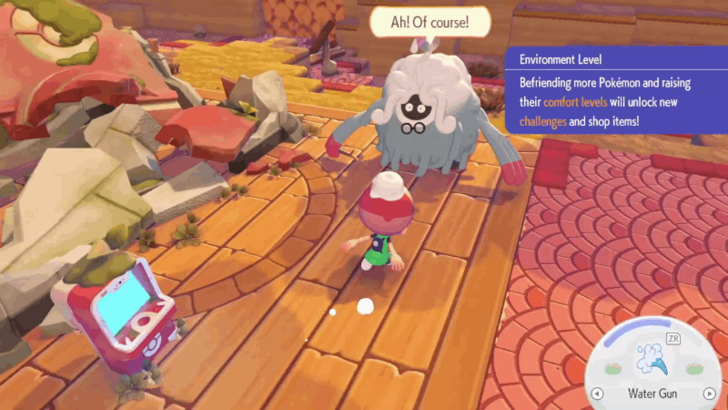
☆ Increase Comfort & Environment Levels.
★ Redeem Mystery Gifts for free items & furniture.
☆ Limited Time Event: Befriend Hoppip until 3/24!

This is a walkthrough guide for Pokemon Pokopia. See the walkthrough guide for Pokemon Pokopia here, including all unlocks and things you can build.
Pokopia Walkthrough Guides
List of Walkthroughs
| All Walkthrough Guides | |
|---|---|
 Withered Wasteland Withered Wasteland |
 Bleak Beach Bleak Beach |
 Rocky Ridges Rocky Ridges |
 Sparkling Skylands Sparkling Skylands |
 Do the...Team Initiation Challenge Do the...Team Initiation Challenge |
 Post-Game Guide Post-Game Guide |
Important Request Walkthroughs
| All Important Request Walkthroughs | |
|---|---|
| Yawn Up a Storm! | Brighten Things Up |
| Time to Party! | Rebuild the Huge Building! |
| Do the...Team Initiation Challenge | Rebuild the Pokemon Center |
| Raise the Environment Level | |
Pokopia Story Walkthrough
Withered Wasteland Walkthrough
| All Areas | |||||
|---|---|---|---|---|---|
| Withered Wasteland | Bleak Beach | Rocky Ridges | |||
| Sparkling Skylands | |||||
| All Withered Wasteland Sections | |||||
| 1 | Befriend the Kanto Starters | ||||
| 2 | Build Your First Home | ||||
| 3 | Rebuild the Pokemon Center | ||||
| 4 | Unlock Rock Smash and Slowpoke | ||||
| 5 | Complete Yawn Up a Storm! Request | ||||
| 6 | Finish Rebuilding the Pokemon Center | ||||
Befriend the Kanto Starters
| # | Step by Step Objectives |
|---|---|
| 1 |
 Start by customizing your human Ditto to your preference. You have tons of customization options to choose from, so feel free to personalize your look. |
| 2 |
 After customizing your character, talk to Professor Tangrowth. |
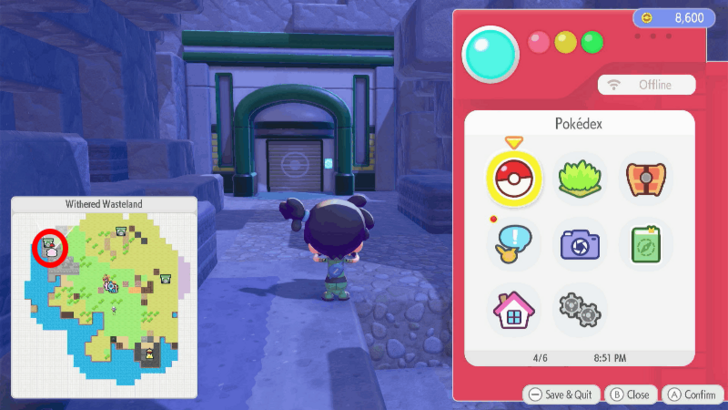
| 3 |
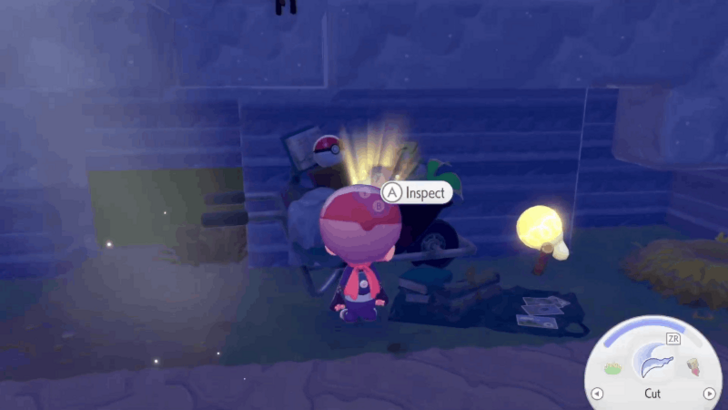
 Interact with the gold shiny spot in the wheelbarrow to obtain the Pokedex. |
| 4 |
 Climb the ledges and follow Tangrowth at the cliff overlooking the area. |
| 5 |
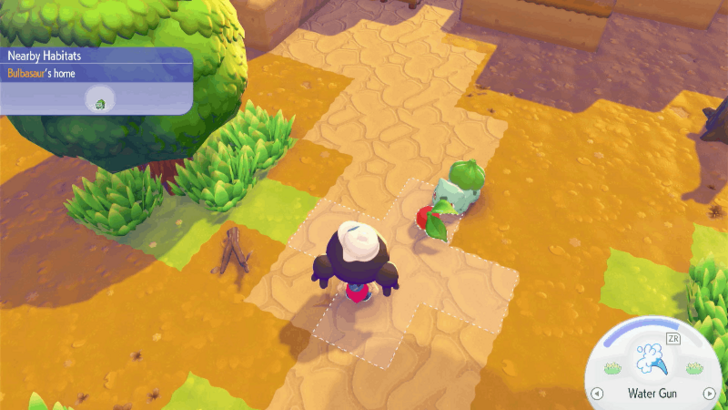
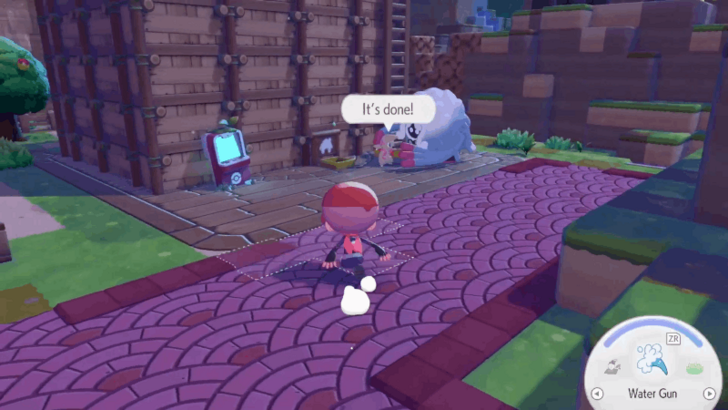
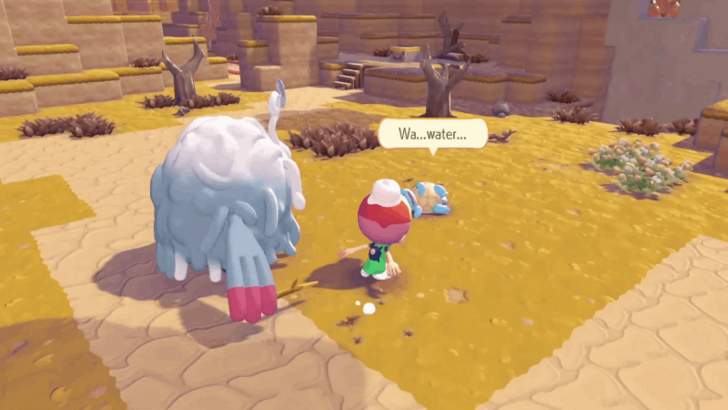
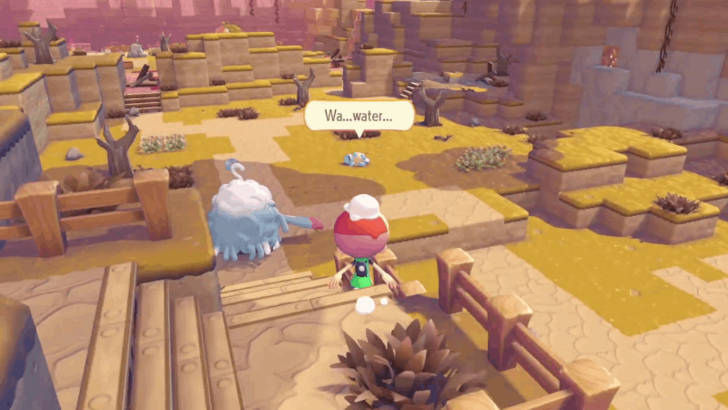 Go down the steps and interact with the Squirtle to learn Water Gun. |
| 6 |
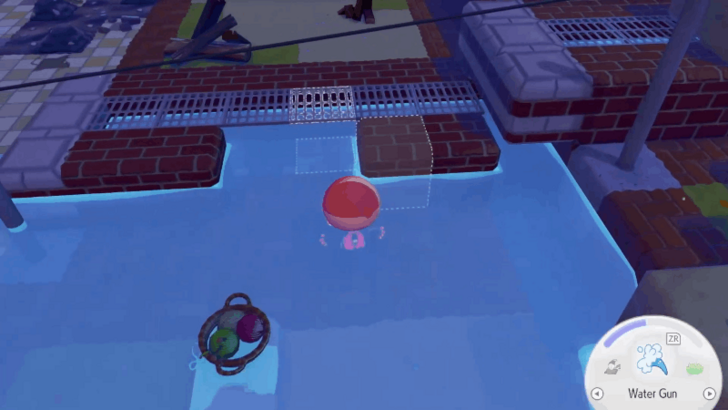
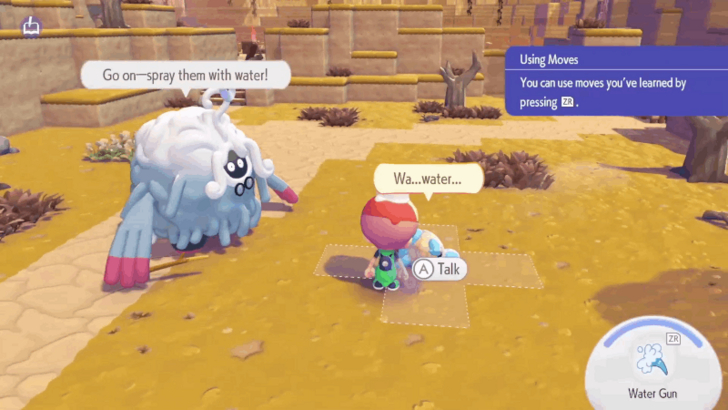 Move next to Squirtle and press the ZR button to use Water Gun at them. |
| 7 |
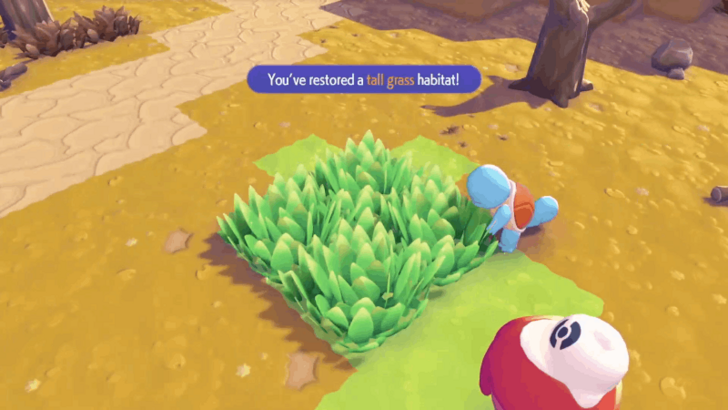 Use Water Gun in the area to unlock the Tall Grass habitat and the Pretty Flower Bed habitat. ▶︎ How to Build Every Type of Habitat |
| 8 |
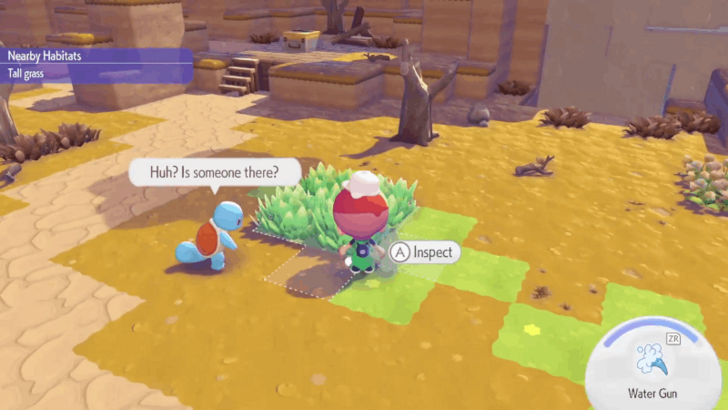 Inspect the tall grass that you watered to unlock Bulbasaur. Talk to them after to unlock your first Request in the Pokedex. |
| 9 |
 Press the Plus (+) button to open the Pokedex. Select Requests and click on the "Water dry grass!" request. You will need to use Water Gun to revive 10 patches of Dry Tall Grass. |
| 10 |
 Once you have watered 10 patches of Dry Tall Grass, talk to Bulbasaur to complete the request and unlock the Leafage move. Open the Request menu from the Pokedex to receive a new request from Squirtle. |
| 11 |
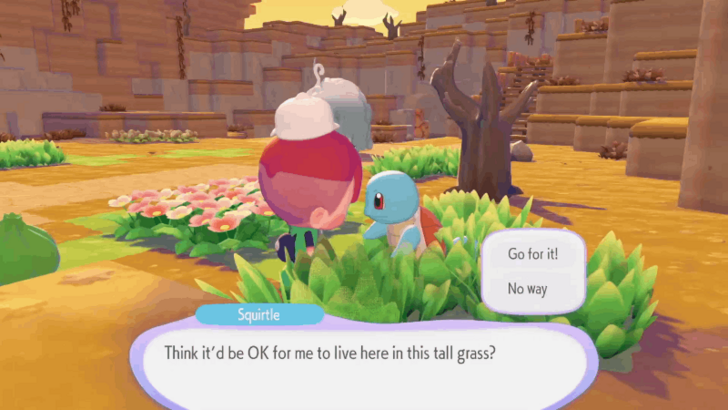 Talk to Squirtle after and use Leafage to create a Tall Grass habitat. Talk to Squirtle again and allow them to live in the tall grass you just created to complete the request. |
| 12 |
 Use Water Gun at the dead tree to revive it. Press the A Button to headbutt the tree and pick up the Leppa Berry from the ground. Talk to either Squirtle or Bulbasaur and select Look at this!. Choose the Leppa Berry to give it to them. |
| 13 |
 Talk to Tangrowth and he will give you a log chair. Place the chair nearby and press the A button to sit on it. |
| 14 |
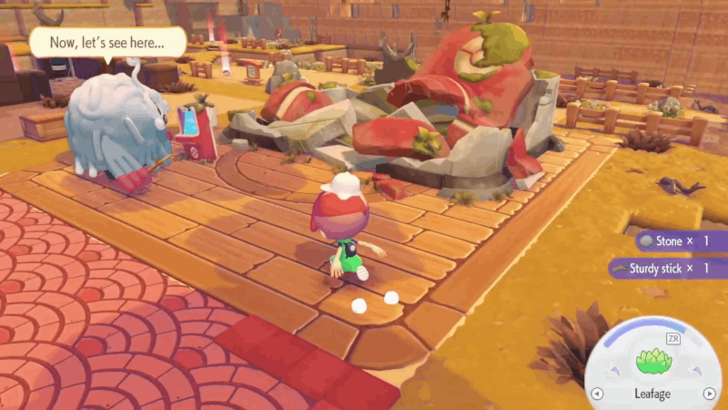
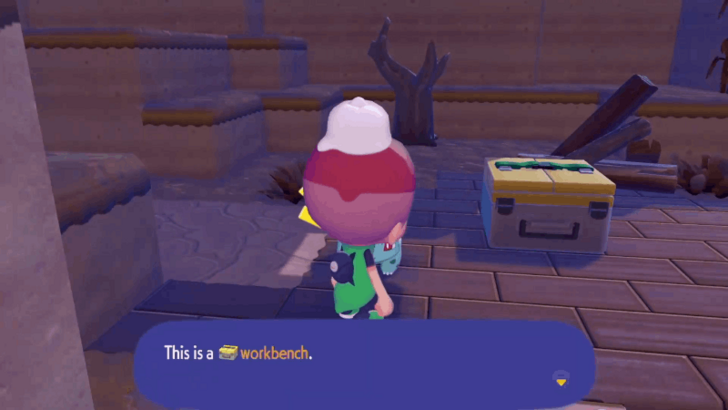 Follow Bulbasaur towards the nearby area to find the Workbench. Press the A Button to interact with the Workbench to obtain simple wooden DIY recipes. Create a Campfire to progress the objective. |
| 15 |
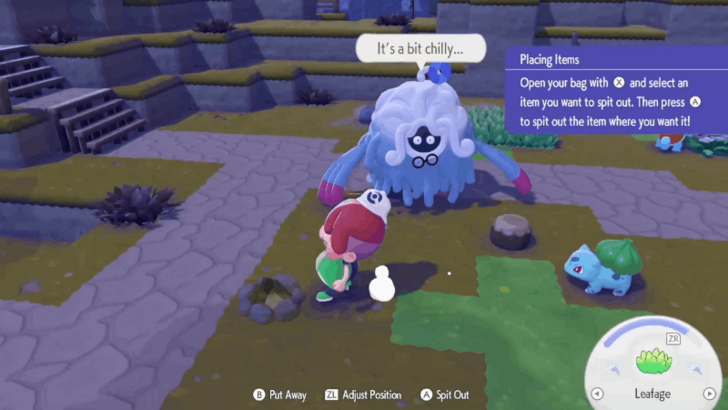 Press X Button to open the bag and select the Campfire. Return to Professor Tangrowth and press the A Button to spit out the Campfire. |
| 16 |
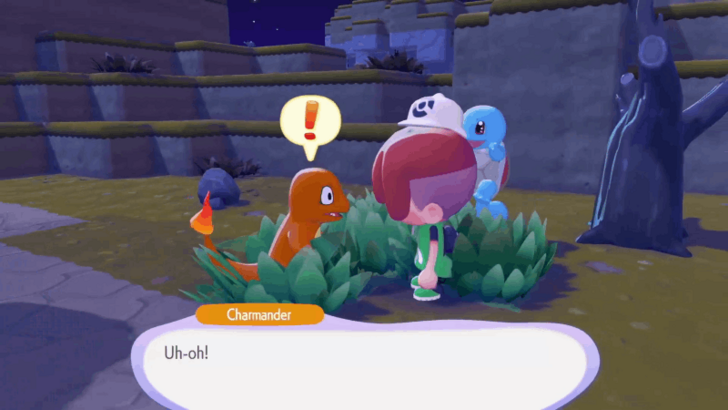 Create a Tall Grass habitat using Leafage and inspect the rustling grass to unlock Charmander. Press the Up Button on the D-Pad to make them follow you towards the Campfire. Charmander will automatically light the fire once they are near the Campfire. |
Build Your First Home
| # | Step by Step Objectives |
|---|---|
| 1 |
 Once the cutscene ends, follow Professor Tangrowth to reach the location of the destroyed Pokemon Center. Inspect the building for a cutscene and check the PC after to unlock the Challenges. |
| 2 |
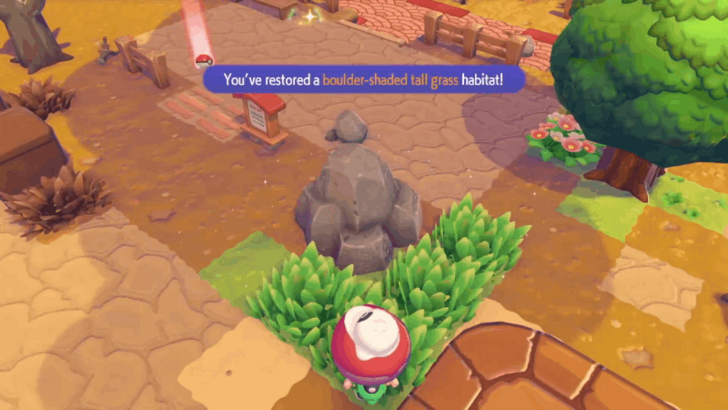 One of the Challenges requires you to find new Pokemon. Create a Boulder-Shaded Tall Grass using Leafage and inspect it to unlock Timburr. Go back to the PC to receive Life Coins as a reward. |
| 3 |
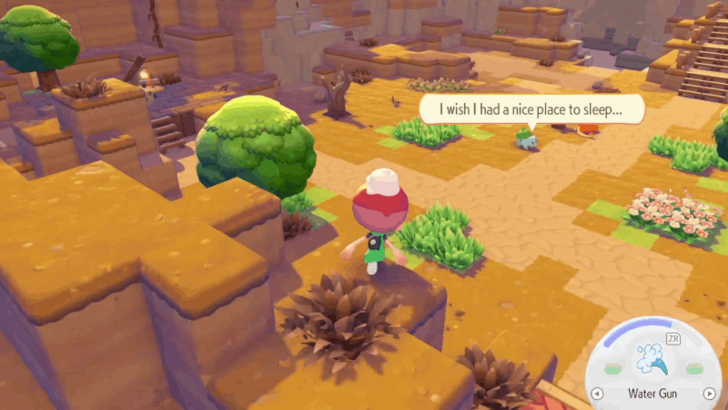 Water 5 trees and gather 10 sturdy sticks to complete the first set of challenges. After that, speak with Bulbasaur and choose "Do you need anything?" to unlock the recipe for the Straw Bed. |
| 4 |
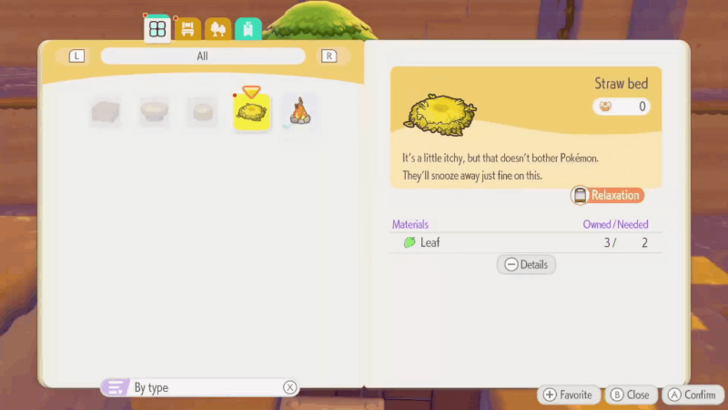 Use the Workbench to craft the Straw Bed. You will need 2 Leaves to create the bed. Place the Straw Bed within the boundaries Bulbasaur's habitat. Talk to Bulbasaur after placing the bed to complete the request. |
| 5 |
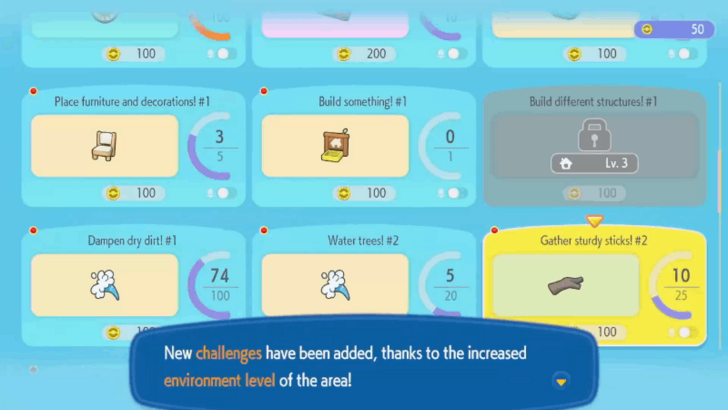 Interact with the PC to check the new Challenges that have been added. |
| 6 |
 Talk to Professor Tangrowth and he will mention about building houses. Go to the PC and purchase a Leaf Den Kit from the Shop. |
| 7 |
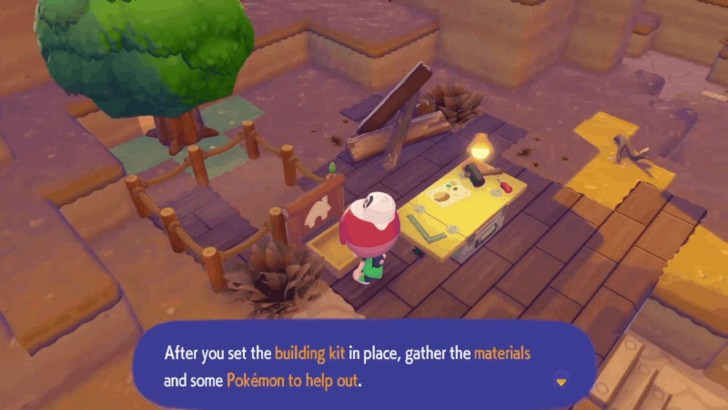 Place the Leaf Den Kit on the area and gather 3 Sturdy Sticks and 3 Leaves. Have Timburr and another Pokemon follow you and lead them to the Leaf Den Kit construction area. Inspect the Leaf Den and select the Pokemon and the required materials to construct the den. Constructing a building takes real-world hours to complete, you can skip this by changing your Switch 2's system time. |
| 8 |
 Enter the Leaf Den and place 3 furnitures inside. Talk to Timburr to complete the request. |
| 9 |
 Talk to Charmander and they will suggest to throw a celebration after building the house. Bring them to Professor Tangrowth and talk to the latter. Watch the cutscene and you will receive a Ditto Flag after. |
| 10 |
 Head to the Leaf Den and place a Ditto Flag to mark the den as your house. |
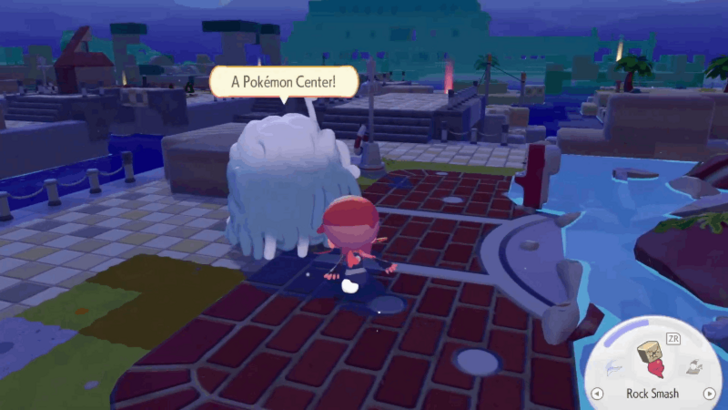
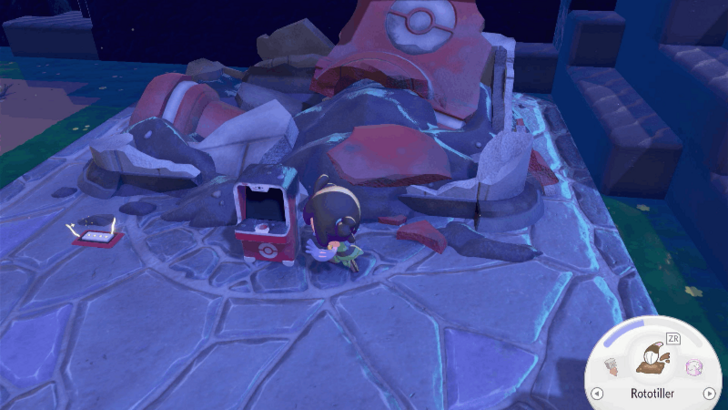
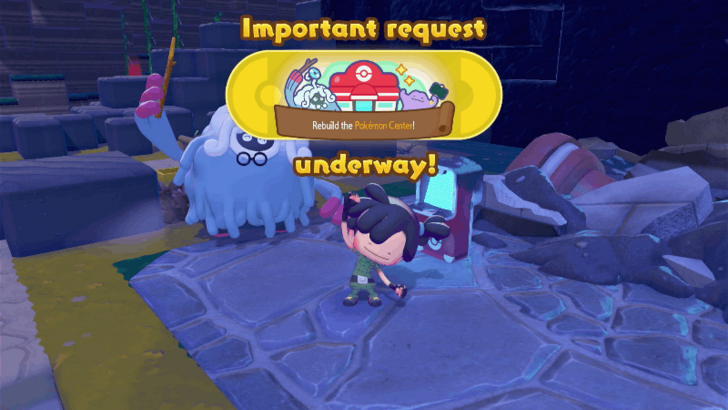
Rebuild the Pokemon Center
| # | Step by Step Objectives |
|---|---|
| 1 |
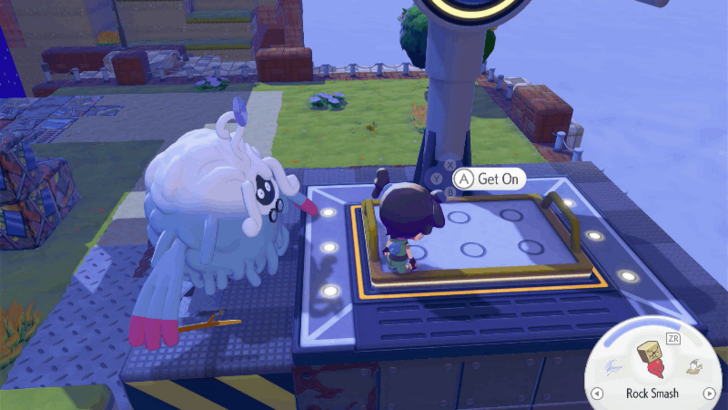
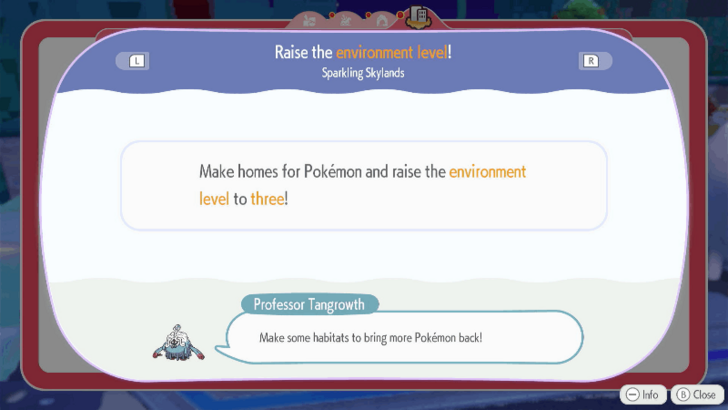
 Talk to Professor Tangrowth and he will ask you to obtain a building kit for the Pokemon Center. Raise your environment level to three in order to unlock the building kit at the Shop. |
| 2 |
 After raising the environment level to three and gathering enough Life Coins, go to the PC and select Shop. Scroll down and purchase the Pokemon Center Rebuilding Kit for 1000 Life Coins. |
| 3 |
 Gather the materials needed to rebuild the Pokemon Center. You will need 20 Lumber, 20 Stones, 10 Leaves, and 10 Vine Ropes. |
| 4 |
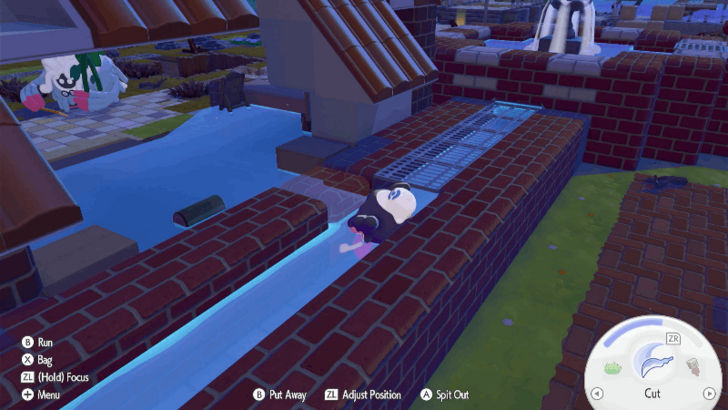
 To get Lumber, you need to befriend a Pokemon with the Chop Specialty to turn the Small Logs into Lumber. Create a Tree-Shaded Tall Grass habitat to befriend Scyther. Give him Sturdy Sticks to complete his request and unlock the Cut move. Talk to Scyther and select Look at this! Choose the Small Logs in the inventory and select Make me some lumber. You only need 2 Small Logs to get 10 Lumber. |
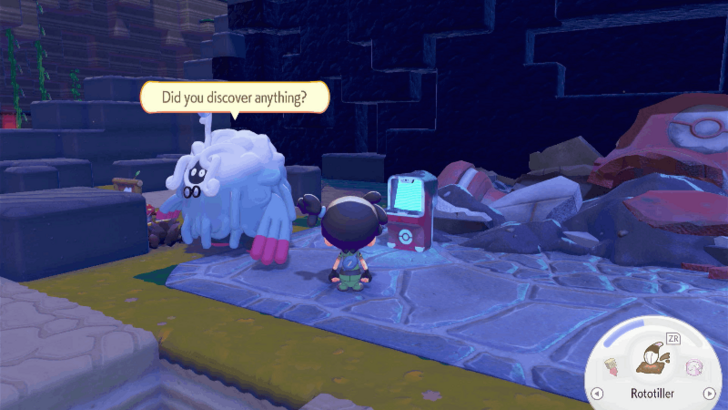
| 5 | At this point, you will need to restore the habitats to befriend new Pokemon in order to complete the rebuilding process. |
Unlock Rock Smash and Slowpoke
| # | Step by Step Objectives |
|---|---|
| 1 |
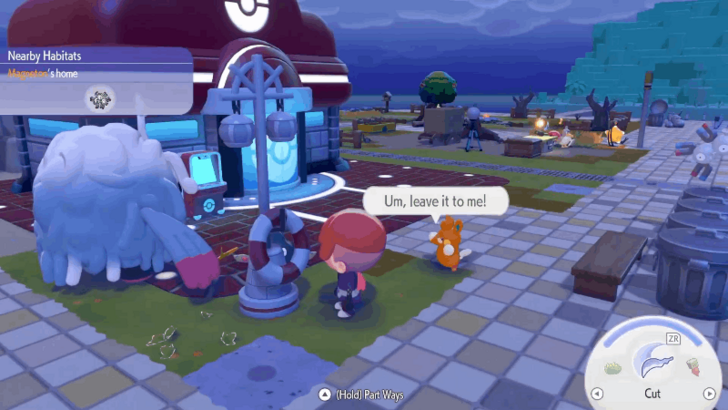
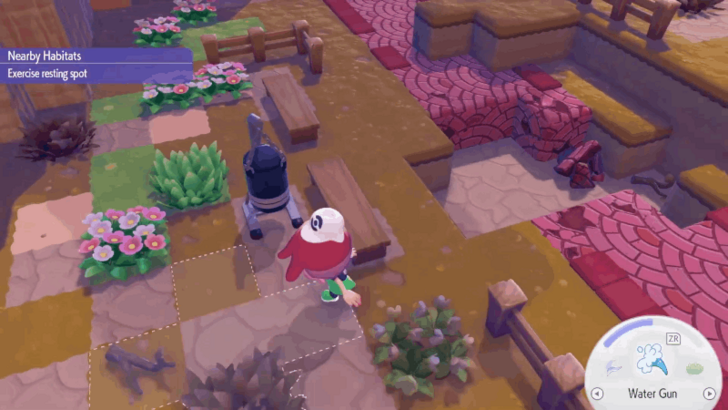 Place the punching bag next to the bench to restore the Exercise Resting Spot Habitat. Wait for Hitmonchan to appear next to the punching bag and befriend him. |
| 2 |
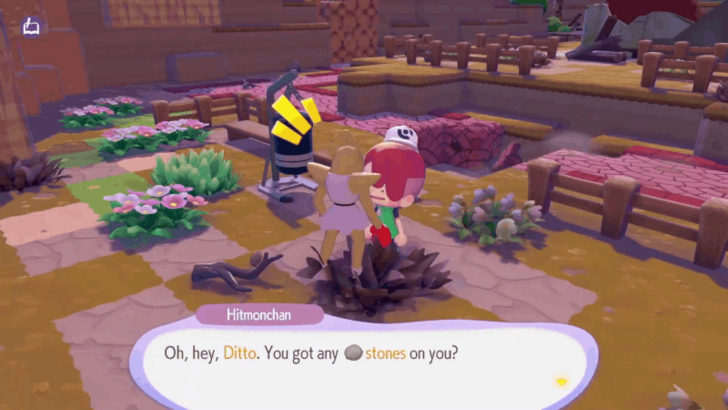 Talk to Hitmonchan and give him 2 Stones to complete his request and unlock the Rock Smash move. |
| 3 |
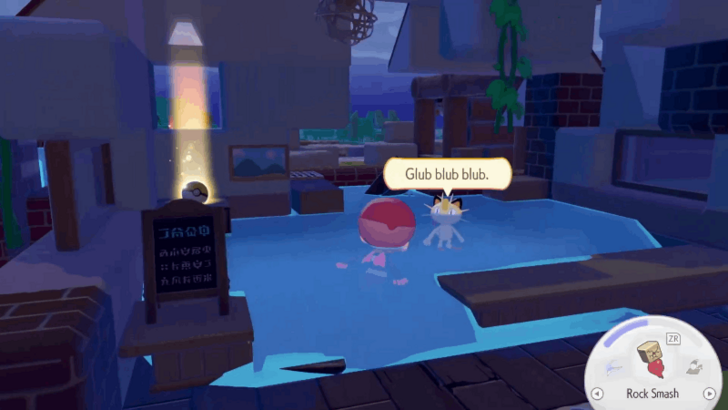
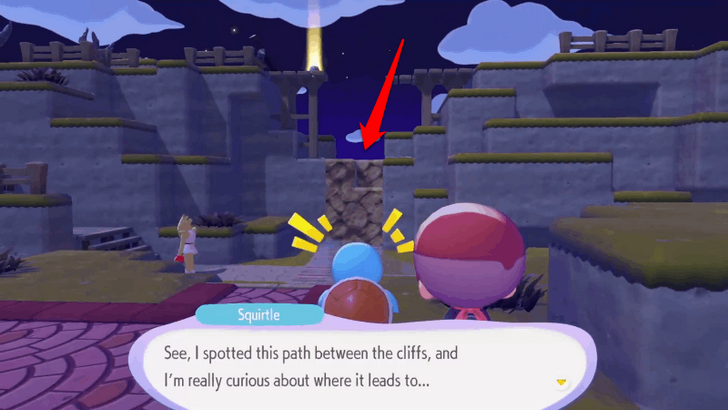 Talk to Squirtle to receive his request. Head west from the destroyed Pokemon Center and destroy the rock blocking the path using Rock Smash. |
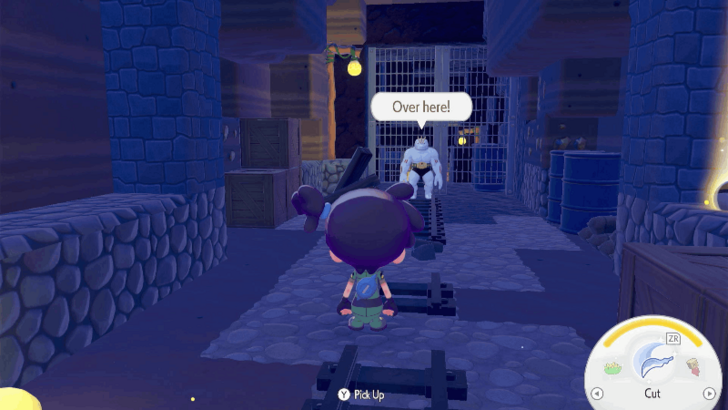
| 4 |
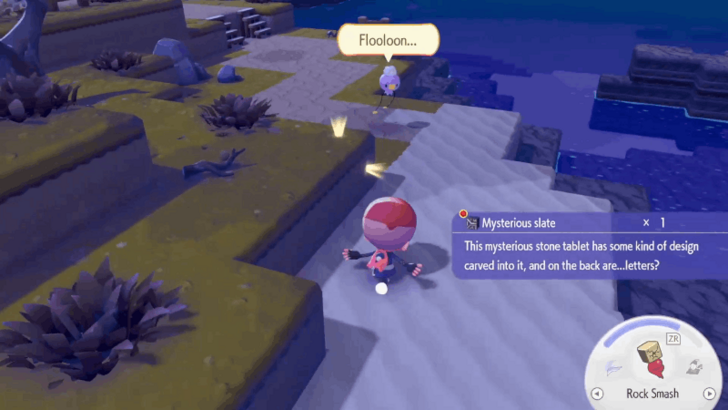 Head west following the shoreline to find Drifloon. Although this is not required to progress the story, completing Drifloon's request unlocks the Dream Island feature. It is recommended to talk to Drifloon to unlock the feature later on. |
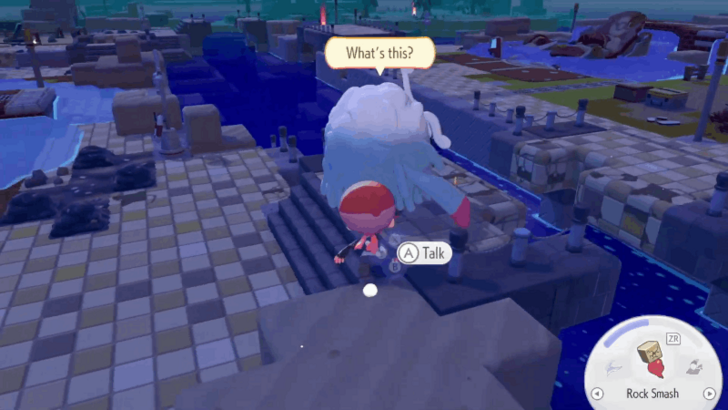
| 5 |
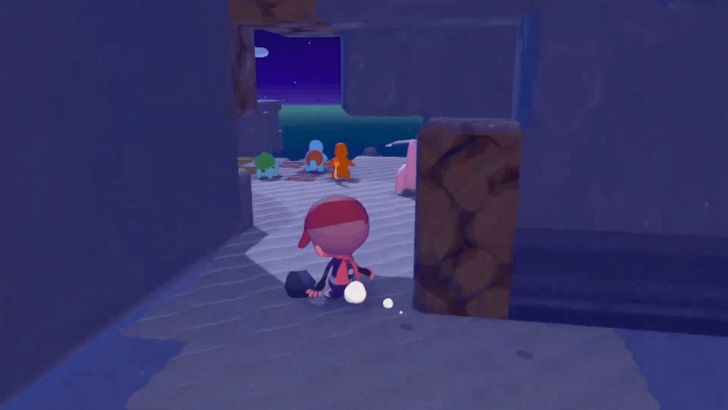
 Continue heading north until you reach Onix located beyond the rocks that you can destroy using Rock Smash. Use the yellow speech bubble as a hint to find his location. Make sure to collect the smooth rocks in the cave, as they are required to build Onix's habitat. |
| 6 |
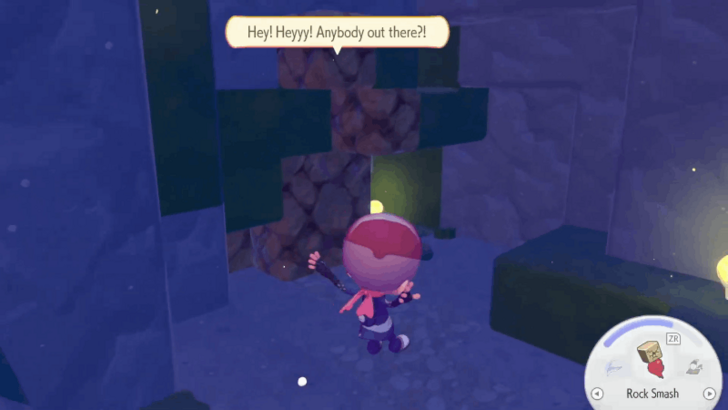
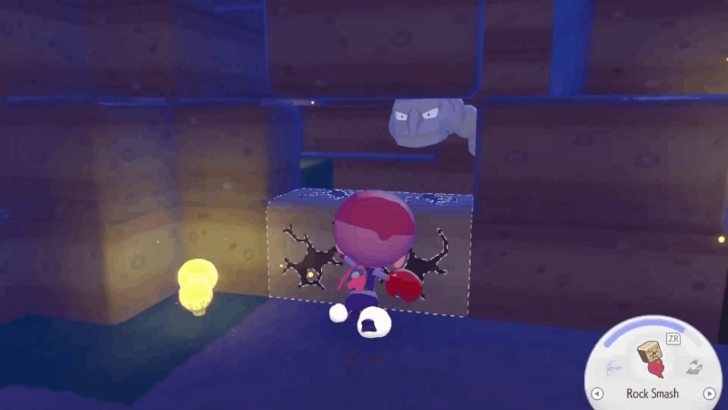
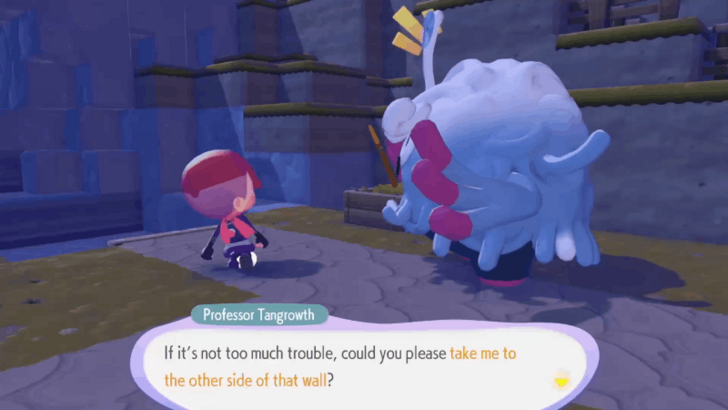 Return to Professor Tangrowth and he will ask you to break the wall to get to the other side. Head towards the cliff where Professor Tangrowth is facing and use Rock Smash to break the rocks, revealing a new area. |
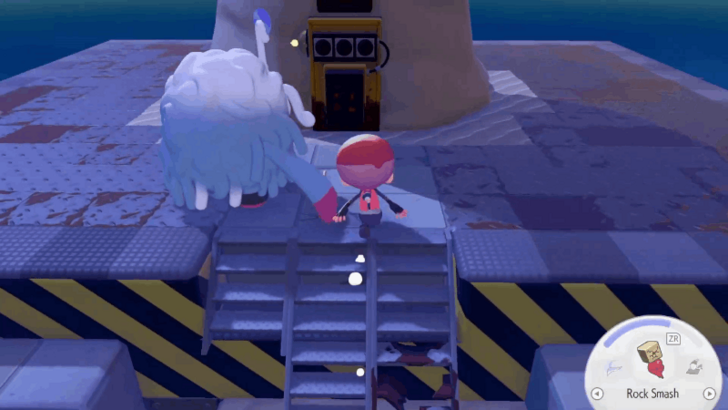
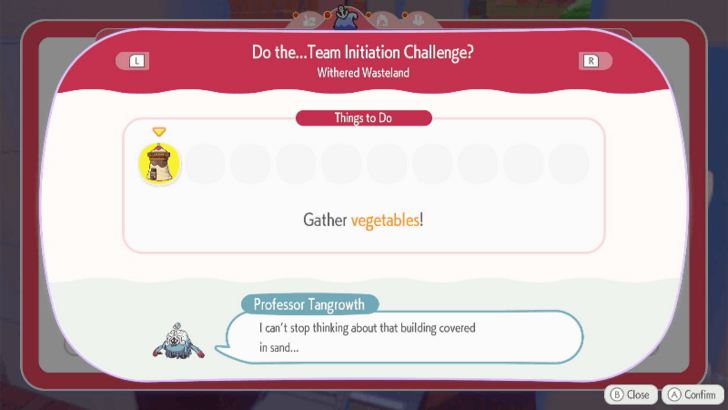
| 7 |
 Follow Professor Tangrowth to reach the abandoned building. Talk to him once he reaches the building. Inspect the building to receive the Important Request: "Do the...Team Initiation Challenge?" |
| 8 |
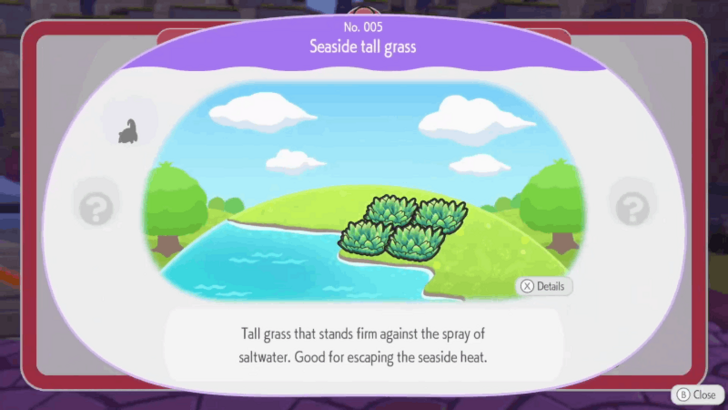 Return home and talk to Professor Tangrowth. He will give you a hint about Slowpoke's habitat, the Seaside Tall Grass. |
| 9 |
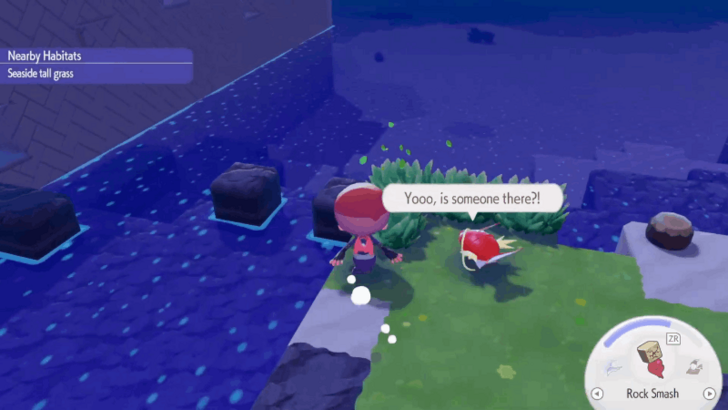 Head back to the beach where the abandoned building is located and create a Seaside Tall Grass Habitat by placing four patches of grass on the beach side. |
| 10 |
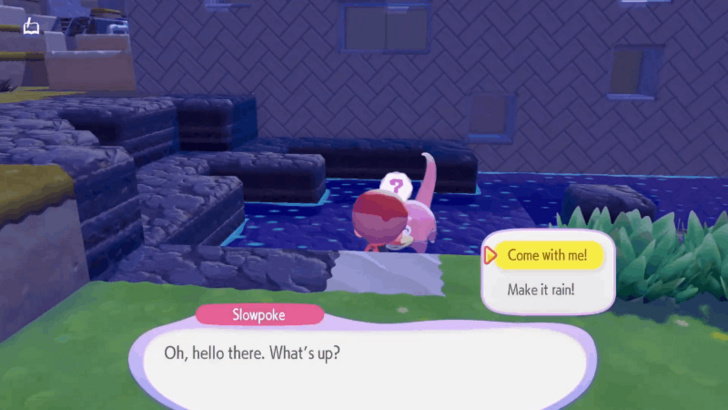 Talk to Slowpoke and accept his request. To fulfill Slowpoke's request, you need to befriend Scyther first. If you have befriended and completed Scyther's request beforehand, you can talk to Slowpoke and choose Make it rain! to unlock the recipe for Wooden Steps. |
| 11 |
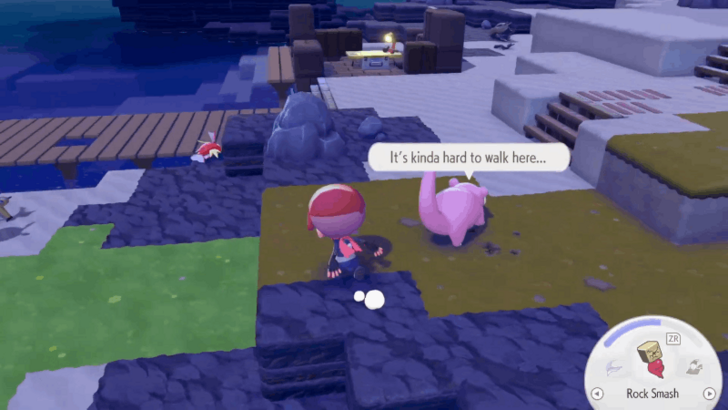 To help Slowpoke travel to the Pokemon Center, use Water Gun to water the dry paths and place Wooden Steps on the uneven surfaces. Since Slowpoke moves slowly, you can talk to him first, have him move, and then prepare the path. |
| 12 |
 Once Slowpoke reaches the Pokemon Center, talk to him and watch the cutscene that follows to unlock the Important Request: Yawn Up a Storm! |
Yawn Up a Storm! Walkthrough
| # | Step by Step Objectives |
|---|---|
| 1 |
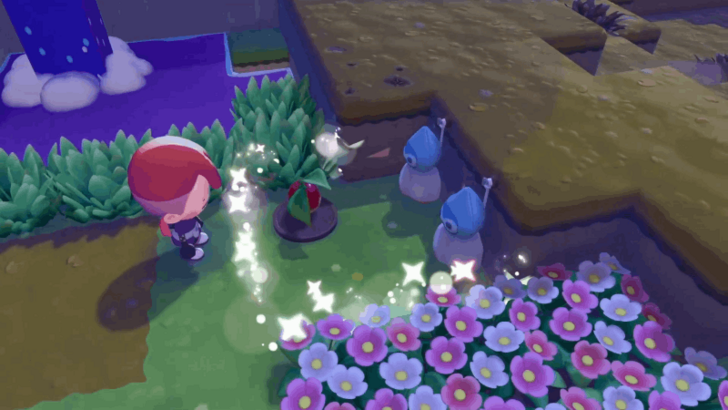
 Talk to Bulbasaur to receive a hint on how to create the Field of Flowers habitat to increase the humidity level. |
| 2 | Open the PC and purchase the Horsea Fountain from the Shop. |
| 3 |
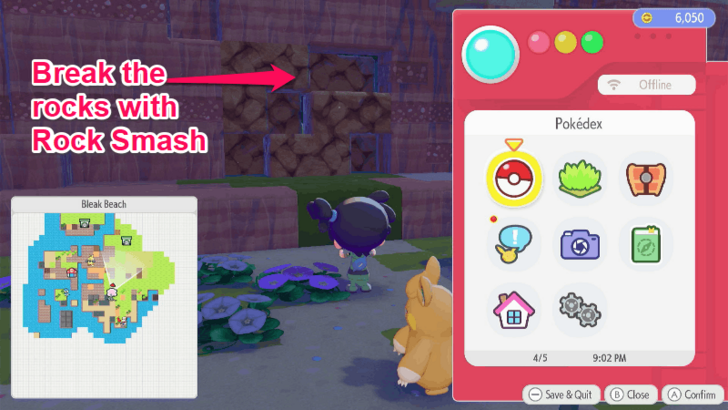
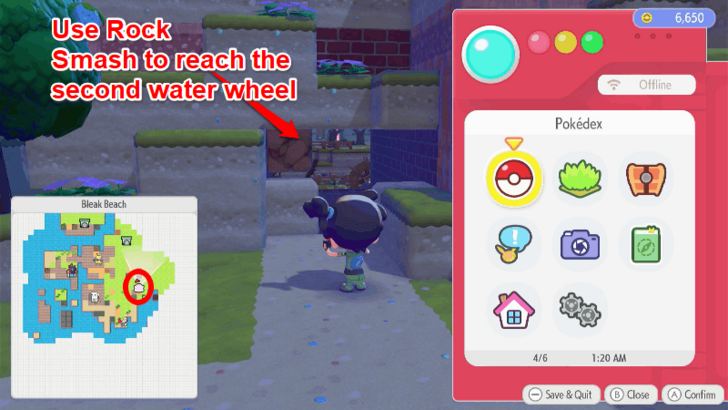
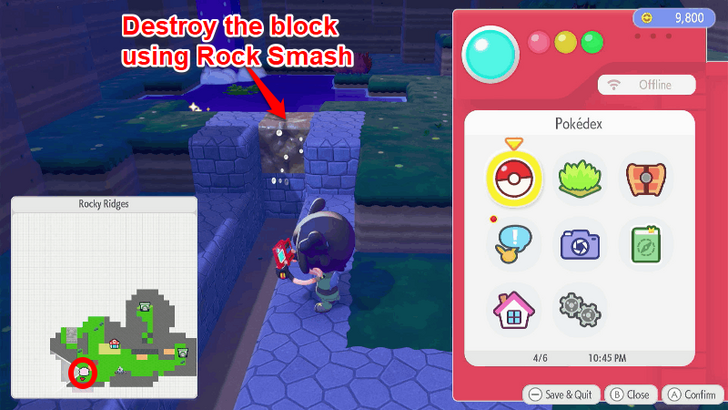
 Use Rock Smash to break the shiny rock northwest of the Pokemon Center to reveal water. |
| 4 |
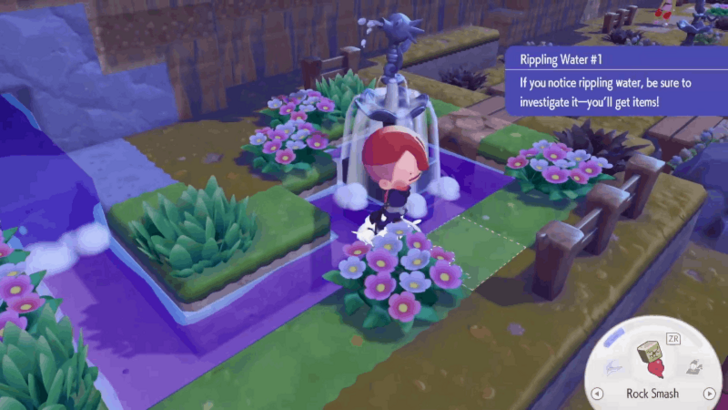 Place the Horsea Fountain in the water that appeared. Placing the fountain increases the humidity level. |
| 5 |
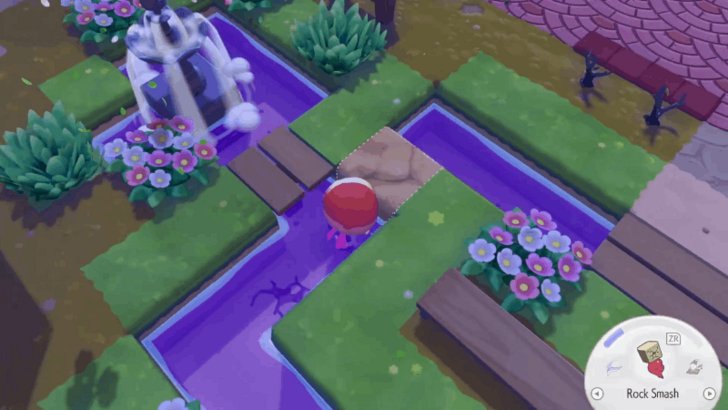 Break more rocks near the location where you placed the Horsea Fountain to expand the water area. By extending the water area, you can activate the second fountain nearby to increase the humidity level further. |
| 6 |
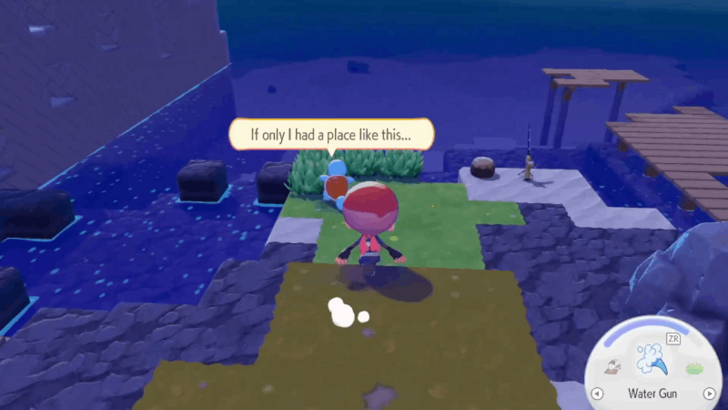 Talk to Squirtle to receive a new request and a hint for the Hydrated Tall Grass habitat. |
| 7 |
 Create the Hydrated Tall Grass habitat by placing four patches of grass near a body of water. |
| 8 |
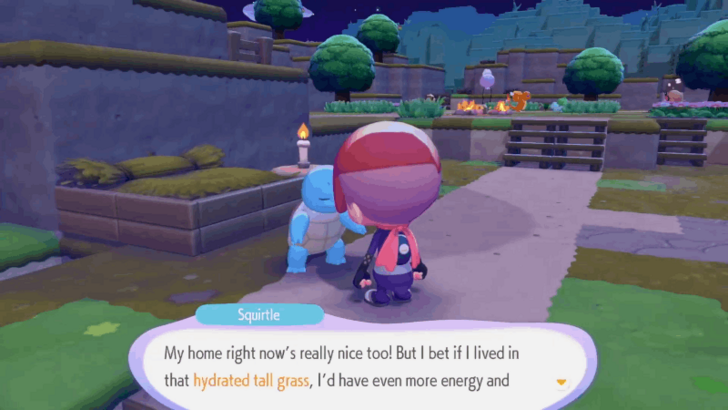 Talk to Squirtle again to receive another request. He will ask if he can move to the Hydrated Tall Grass. |
| 9 |
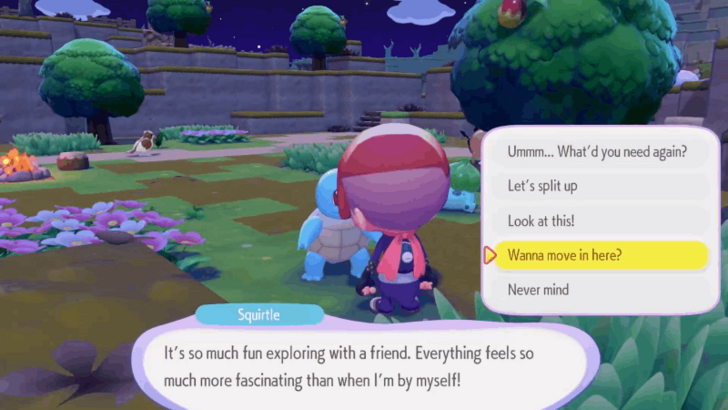 Have Squirtle follow you and take him to the Hydrated Tall Grass habitat. Talk to Squirtle while you are next to the habitat and choose "Wanna move in here?" |
| 10 |
 Talk to Slowpoke and Professor Tangrowth to receive a hint on where to go next. |
| 11 |
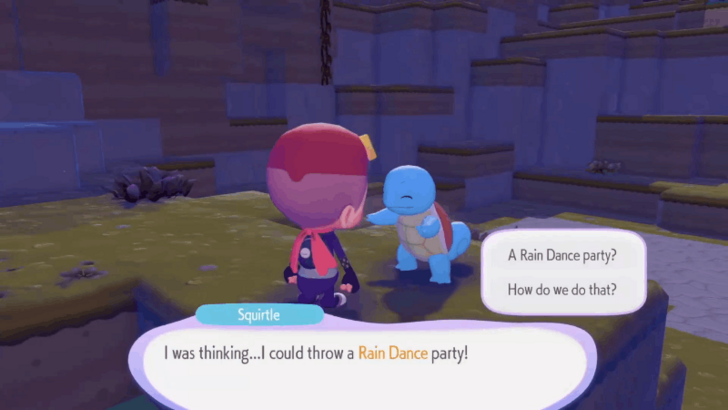 Talk to Squirtle and he will give you a hint on how to create the Rain Dance Site habitat. |
| 12 |
 Talk to Tangrowth to receive a hint on where to find the Castform Weather Charm. |
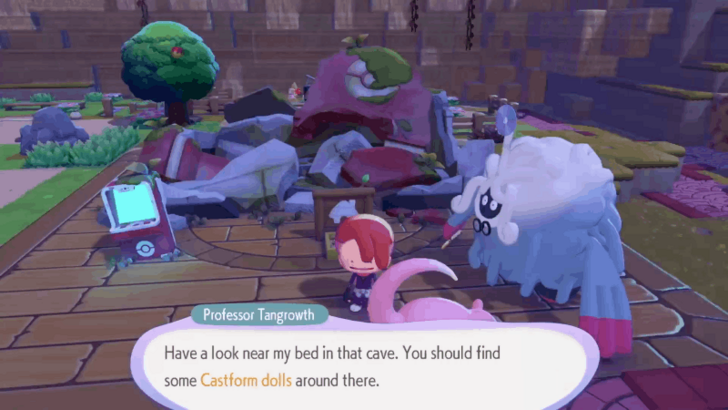
| 13 |
 Go to the cave where you first encountered Professor Tangrowth and inspect the gold shiny spot in the wheelbarrow to get two Castform Weather Charms. |
| 14 |
 Place the two Castform Weather Charms against a wall. Place a Wooden Plate and a Leppa Berry to create the Rain Dance Site habitat. Talk to Squirtle and have him follow you towards the Rain Dance Site to start the Rain Dance party. |
| 15 |
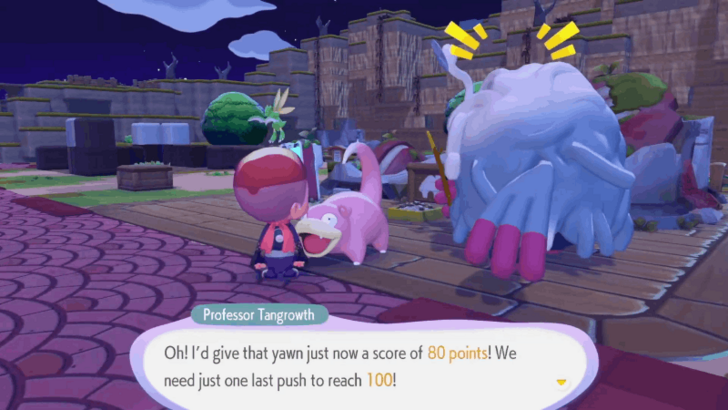
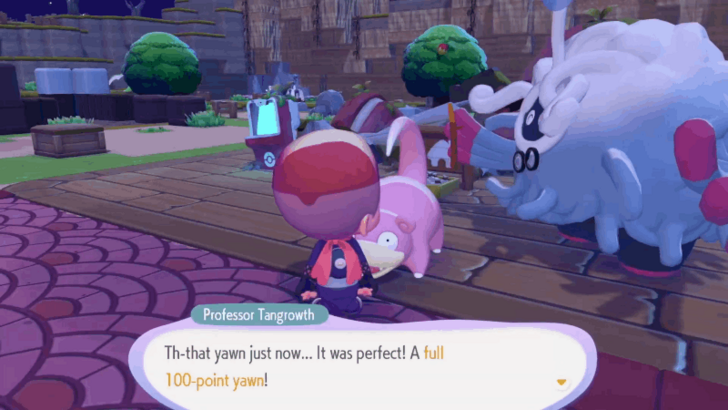
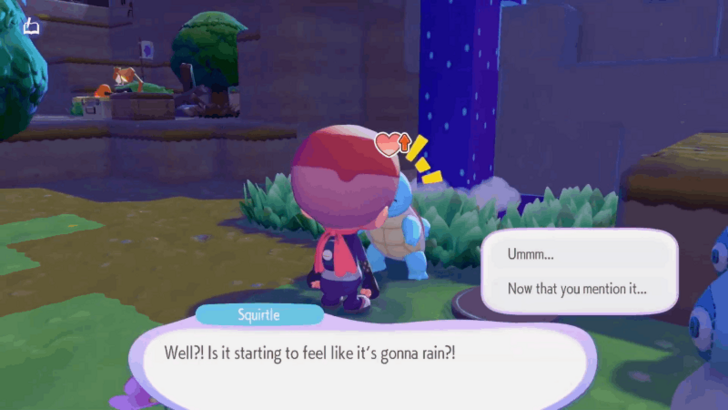 Once the Rain Dance party is over, talk to Squirtle to complete the request. He will tell you to go to Slowpoke to check the humidity level. |
| 16 |
 Talk to Slowpoke and ask him to yawn. If it is a 100 point yawn, you can proceed with the next step. If not, you need to increase the humidity level further by scattering water using Water Gun, using Rock Smash to destroy wet rocks and create springs, and creating Field of Flowers habitats. |
| 17 |
 Head south towards the beach and a cutscene will occur as you approach the area. |
| 18 |
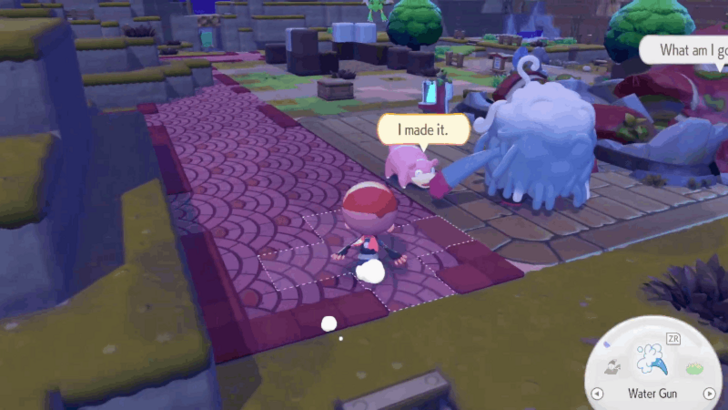
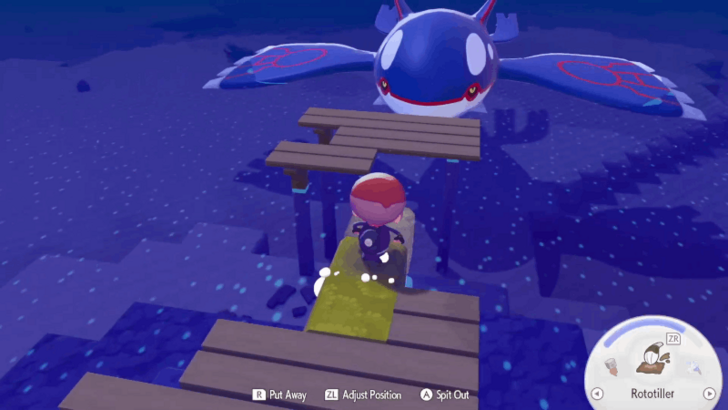 Connect the missing bridge and talk to Kyogre to make it rain. |
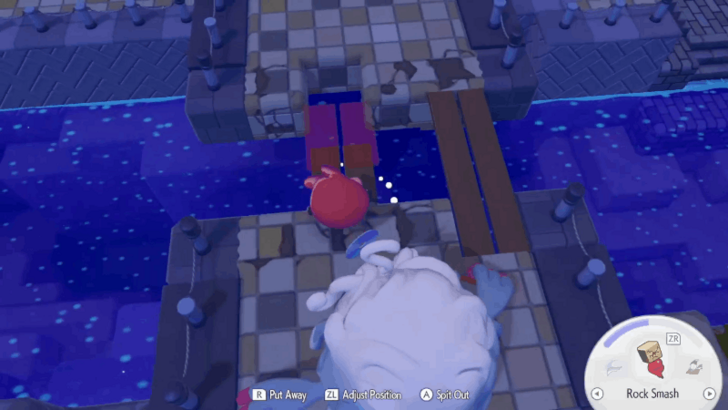
| 19 |
 Head to Onix's location and use Rock Smash a few times to destroy the rocks to free the Pokemon. |
| 20 |
 Return to Professor Tangrowth to complete the Yawn Up a Storm! important request. |
Finish Rebuilding the Pokemon Center
| # | Step by Step Objectives |
|---|---|
| 1 |
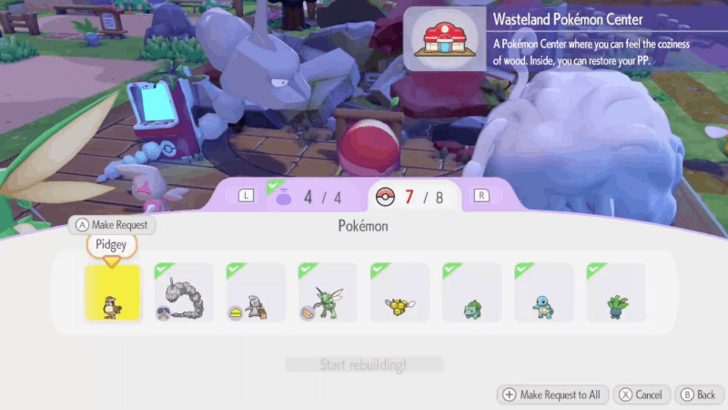 After rescuing Onix, you can start rebuilding the Pokemon Center. Gather Onix and 7 other Pokemon to start rebuilding and collect 20 Lumber, 20 Stones, 10 Leaves, and 10 Vine Ropes for the materials. Rebuilding the Pokemon Center requires waiting until tomorrow in real-world time, but you can skip this by changing your Switch 2's system time. |
| 2 |
 Once the Pokemon Center has been rebuilt, talk to the Pokemon beside it and watch the cutscene that follows to complete the Rebuild the Pokemon Center request. |
Withered Wasteland Walkthrough
Bleak Beach Walkthrough
| All Areas | |||||
|---|---|---|---|---|---|
| Withered Wasteland | Bleak Beach | Rocky Ridges | |||
| Sparkling Skylands | |||||
| All Bleak Beach Sections | |||||
| 1 | Enter the Gate and Restore the PC | ||||
| 2 | Complete Meowth's Requests | ||||
| 3 | Unlock Surf from Piplup | ||||
| 4 | Complete Brighten Things Up Request | ||||
Enter the Gate and Restore the PC
| # | Step by Step Objectives |
|---|---|
| 1 |
 Approach the green gate surrounded by the rock cliffs east of the Pokemon Center and inspect the door to open it. |
| 2 |
 Leave the other side of the gate to enter Bleak Beach. |
| 3 |
 Follow and talk to Professor Tangrowth once he reaches the destroyed bridge. |
| 4 |
 Use the Workbench to craft Bridge Planks. Use the Bridge Planks to connect the two bridges together to allow Professor Tangrowth to cross. |
| 5 |
 Follow Professor Tangrowth to reach the location of the destroyed Pokemon Center. Talk to Professor Tangrowth and inspect the PC. |
| 6 |
 Use a block, such as Beach Sand, and place it north of the destroyed Pokemon Center to remove the water surrounding it. |
| 7 |
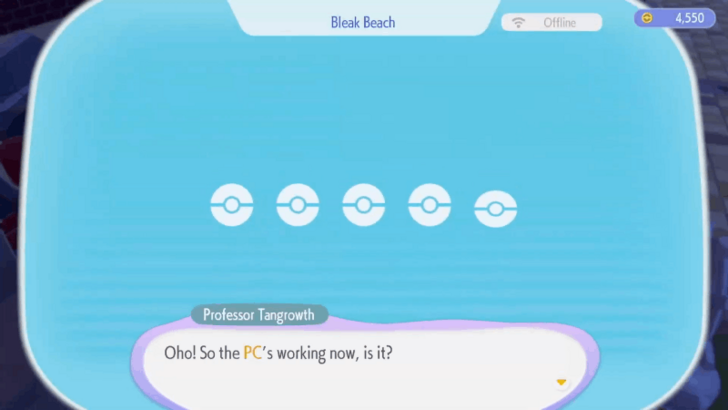 Check the PC to boot it up and confirm that it is working. Talk to Professor Tangrowth to receive the important request: Rebuild the Pokemon Center. |
Complete Meowth's Requests
| # | Step by Step Objectives |
|---|---|
| 1 |
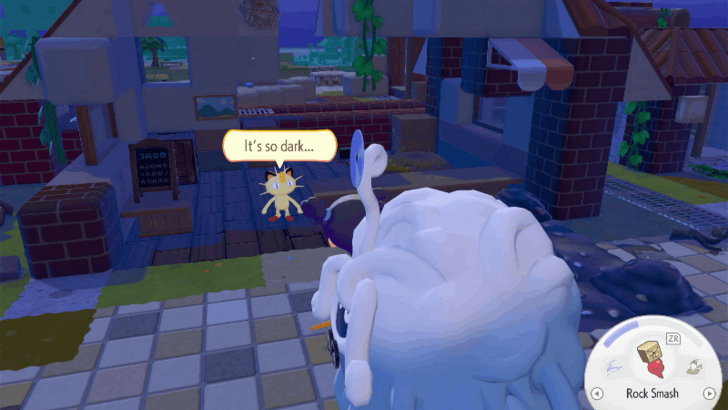
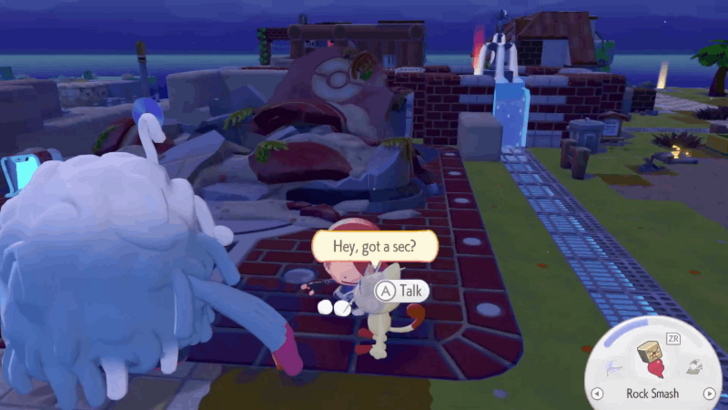 Talk to Meowth near Professor Tangrowth and follow him towards the shack. |
| 2 |
 Talk to Meowth once he is submerged in the water to begin his request. |
| 3 |
 Place blocks behind Meowth's house to stop the water from flowing into it to complete the request and unlock the Resting Spot habitat. |
| 4 |
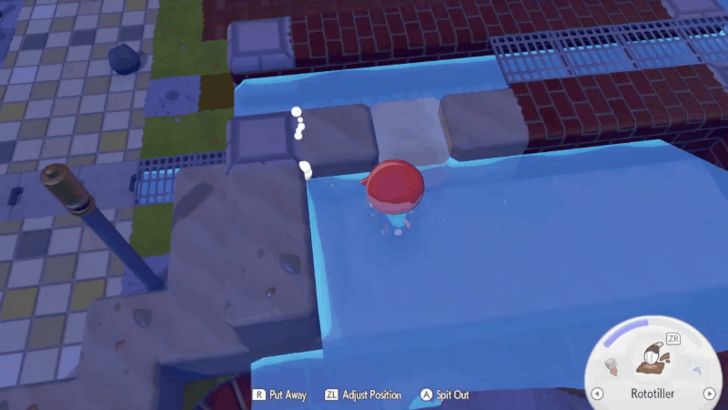
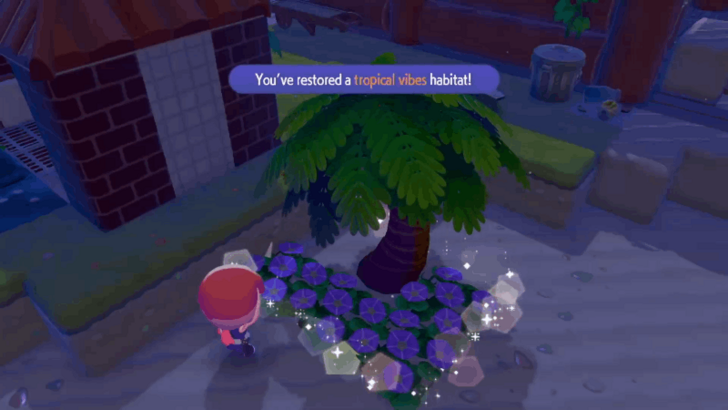 The next step requires you to befriend two Pokemon. Inspect the glowing spots on the floor to receive habitat hints in the area. Use Rototiller to place seashore flowers next to the tropical tree to create a Tropical Vibes habitat. |
| 5 |
 Find the flooded area that contains a knitting basket and place fill two blocks between the red brick blocks to remove the flooding to create the Knitting Station habitat. |
| 6 |
 After befriending two Pokemon, a yellow speech bubble will appear from Meowth. Talk to him to receive his request. |
| 7 |
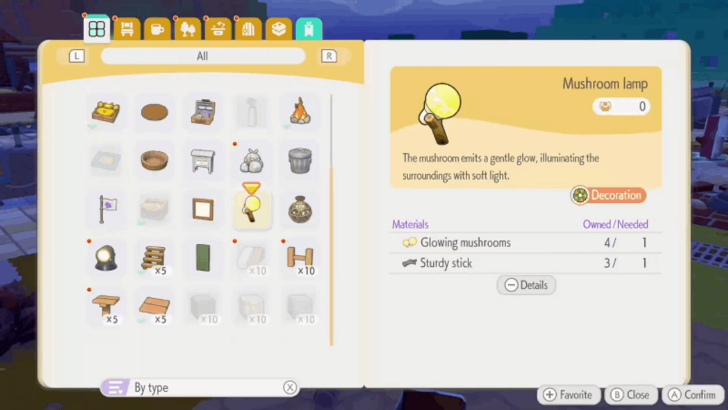 Use the workbench to create two Mushroom Lamps and place them in Meowth's house. This furniture requires Glowing Mushrooms which you can get from nearby caves. |
| 8 |
 Talk to Meowth after placing the two Mushroom Lamps to activate a cutscene. Wait for a yellow speech bubble to appear from him and accept his request after. |
| 9 |
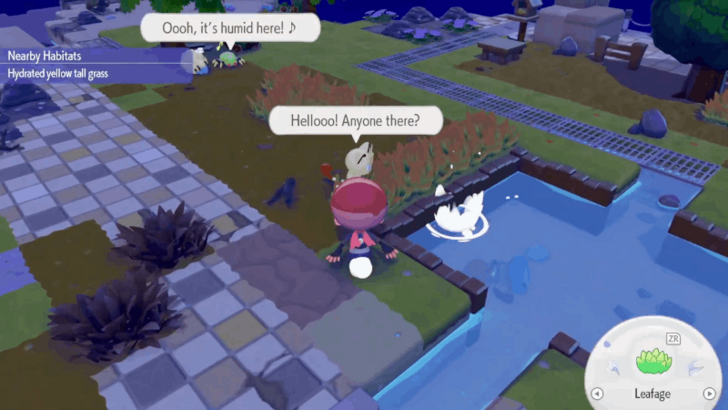 Create the Hydrated Yellow Tall Grass habitat by placing 4 Yellow Tall Grass near the water to befriend Piplup. Talk to him after. |
| 10 |
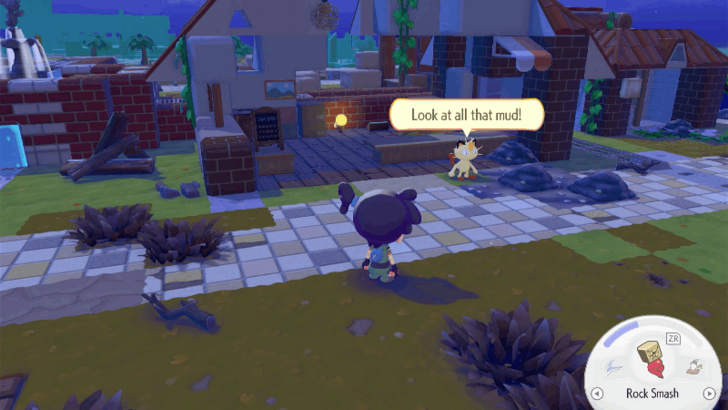
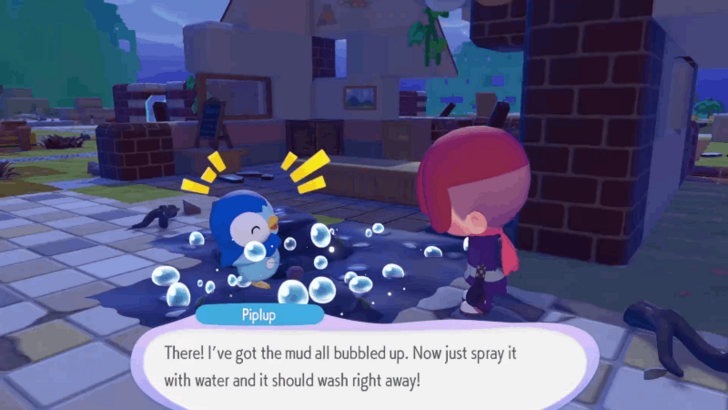 After talking to Piplup, take him to the muddy area in front of Meowth's house and have him spray bubbles on you. |
| 11 |
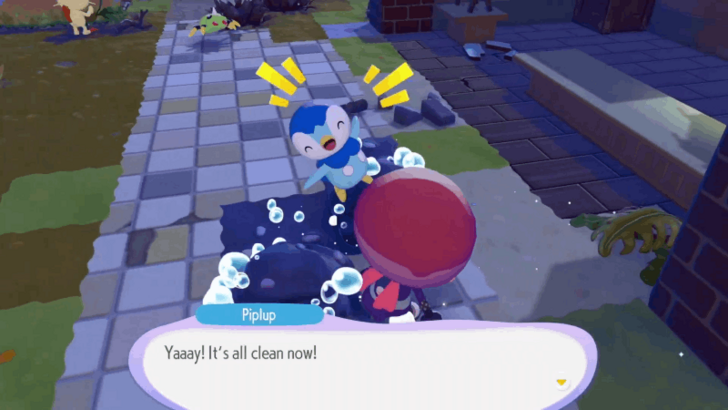 Once Piplup has sprayed bubbles on the mud, use Water Gun to wash it off. You need to wash away all the mud in front of the house. Talk to Meowth after to complete the request. |
| 12 |
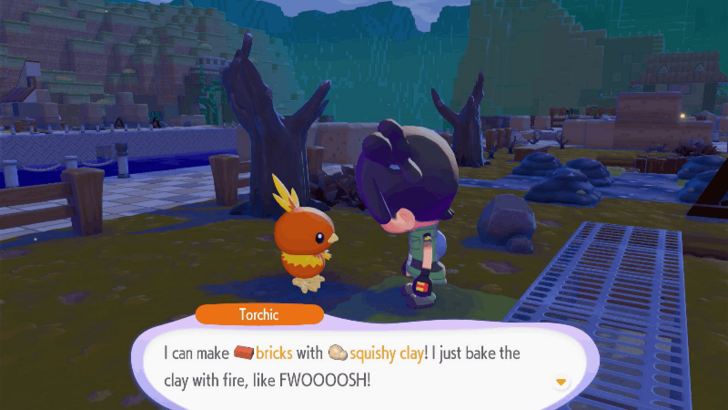
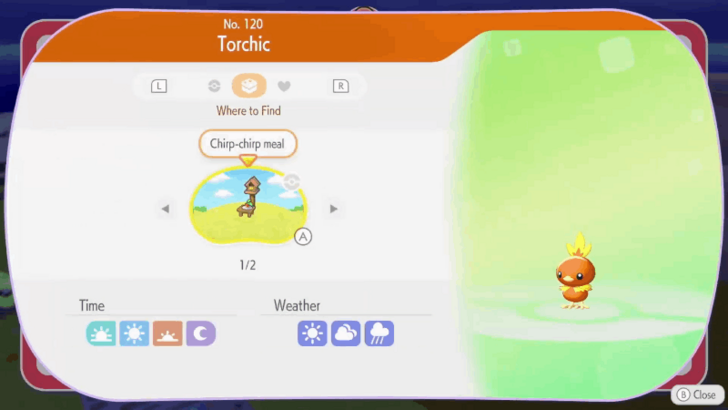 Build a Chirp-Chirp Meal habitat to befriend Torchic. Most of the furniture required to make the habitat are located in front of Meowth's house. |
| 13 |
 Talk to Torchic to have him process the Squishy Clay into Bricks. Use Rock Smash on nearby clay blocks to obtain Squishy Clays. |
| 14 |
 Use 1 Brick and 1 Stone on the workbench to create a Planter. Place it inside Meowth's house. |
| 15 |
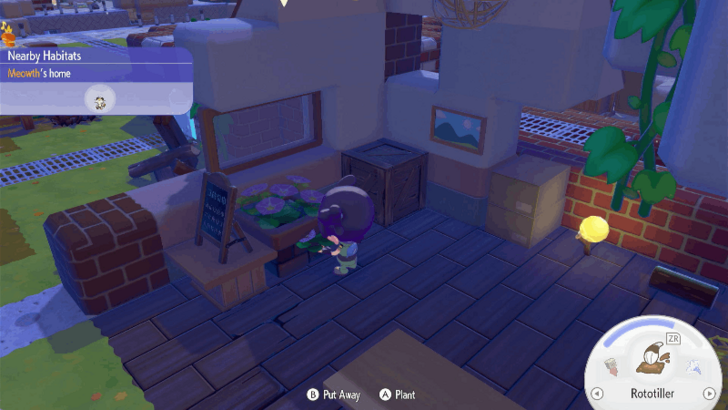 Plant flowers in the Planters that you have places. You can plant seeds and grow them or use Rototiller to plant flowers directly on it. Talk to Meowth after to complete the request. |
| 16 |
 Talk to Professor Tangrowth and accept his request. |
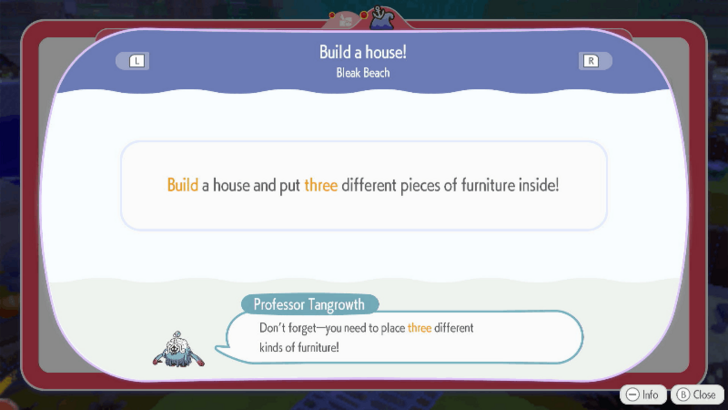
| 17 |
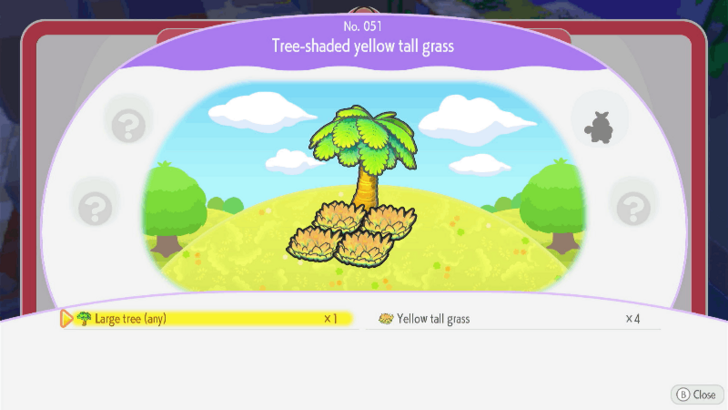 Build any house in the area and place three pieces of furniture inside. Any house will work, so use either the Leaf Den or Sand Den. The Pokemon that appears in the Tree-Shaded Yellow Tall Grass habitat has the Builder Specialty. Make sure to befriend one to help you build the house. |
| 18 |
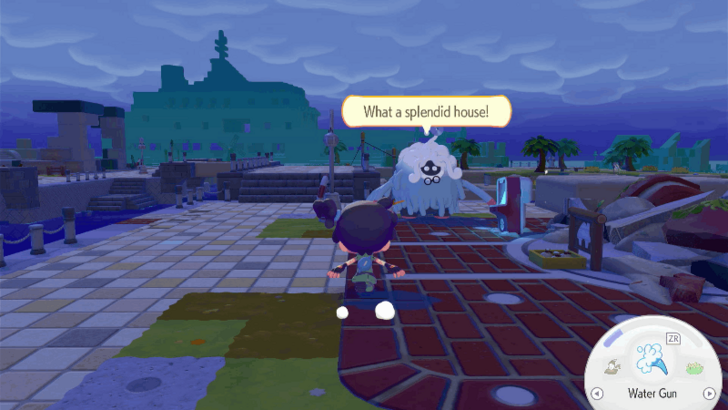 Once you have built a house, talk to Professor Tangrowth. |
Unlock Surf from Piplup
| # | Step by Step Objectives |
|---|---|
| 1 |
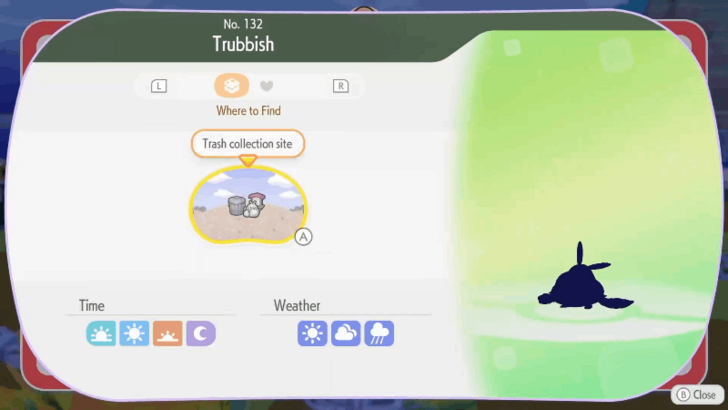 Talk to Piplup and accept his request. Talking to Piplup gives you a hint about Trubbish's habitat: Trash Collection Site. You need a Waste Bin, Garbage Bag, and a Sign to create it. |
| 2 |
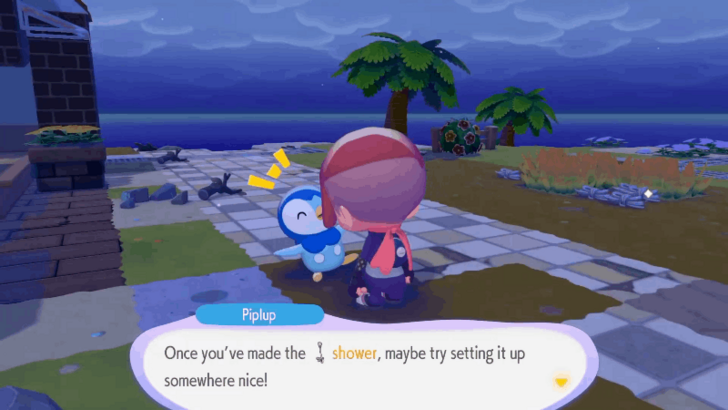
 Create the Trash Collection Site habitat to befriend Trubbish. Give him the Nonburnable Garbage to convert it into Iron Ore. You will receive the recipe for the Shower when doing so. |
| 3 |
 Use the workbench to create the Shower and place it on the area. Talk to Piplup after to complete the request. |
| 4 |
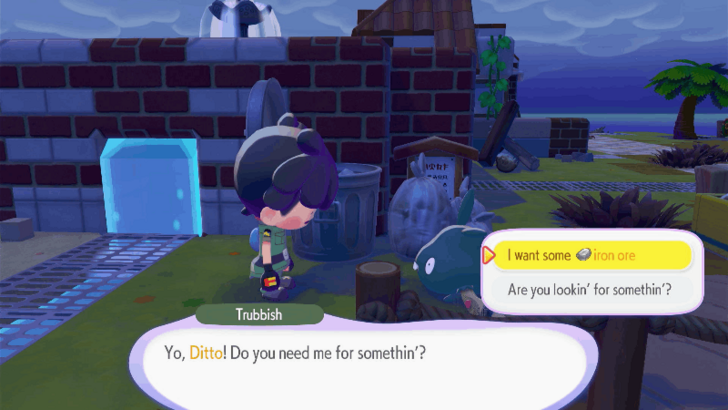
 Talk to Trubbish near Professor Tangrowth to receive a new request and a hint of a new habitat: Breezy Flower Bed. |
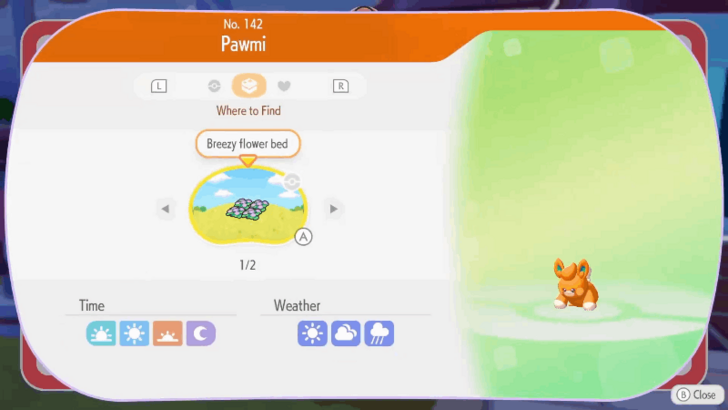
| 5 |
 Build a Breezy Flower Bed using four Seashore Flowers to befriend Pawmi. Have Pawmi follow you to the location of the gate to light up the lamp and complete Trubbish's request. |
| 6 |
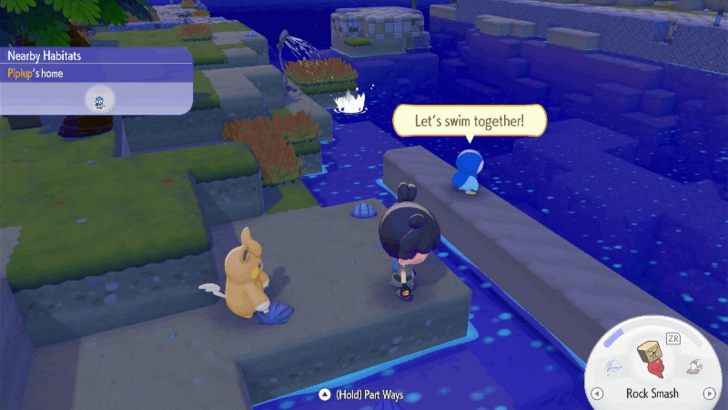 Talk to Piplup once he has the Let's swim together! yellow speech bubble and accept his request. Talk to Professor Tangrowth after to receive a hint of a new habitat: Tropical Seaside. To create a Tropical Seaside habitat, place 1 Large Palm Tree, 2 Ocean Water blocks, and 4 Hedges across the shoreline. |
| 7 | Once you befriend Lapras, talk to him and accept his request. |
| 8 | Have Piplup follow you around muddy areas so he can blow bubbles on it. Use Water Gun to wash away 80 squares of mud in the surrounding area. |
| 9 |
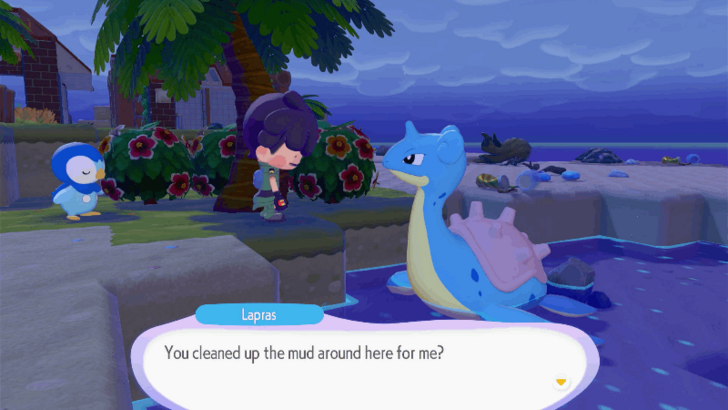 Talk to Lapras after you are done washing away the mud to receive the Surf move, allowing you to swim freely in the area. |
| 10 |
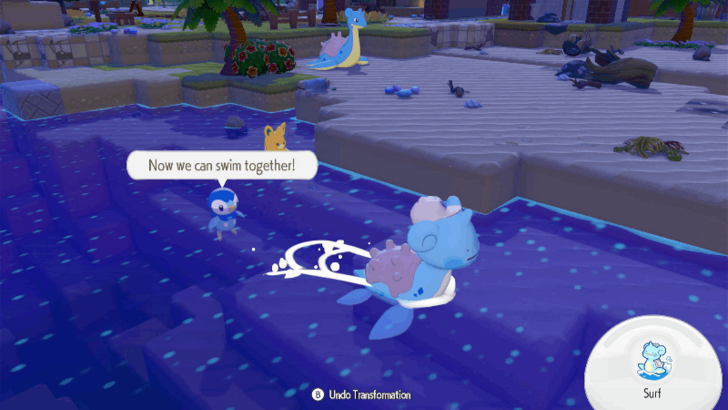 Once you can swim, talk to Piplup. After the conversation, follow Piplup after he moves. |
| 11 |
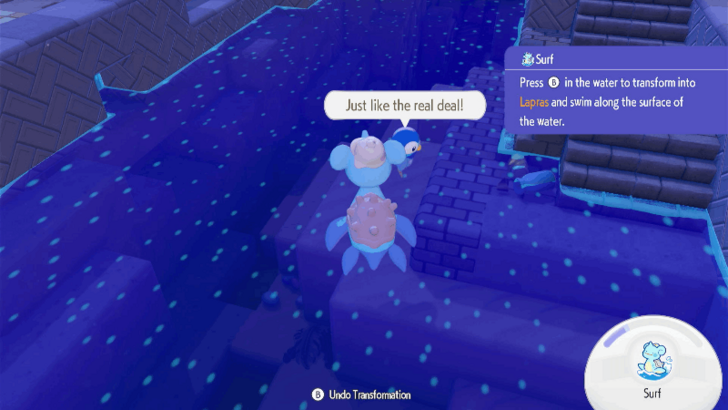 Once Piplup starts swimming, transform into Lapras and follow him. Note that using Surf uses you PP, so follow him while keeping an eye on your remaining PP. Talk to Piplup when he stops moving to complete the request. |
Complete Brighten Things Up Request
| # | Step by Step Objectives |
|---|---|
| 1 |
 Talk to Trubbish near the Pokemon Center and accept his request. |
| 2 |
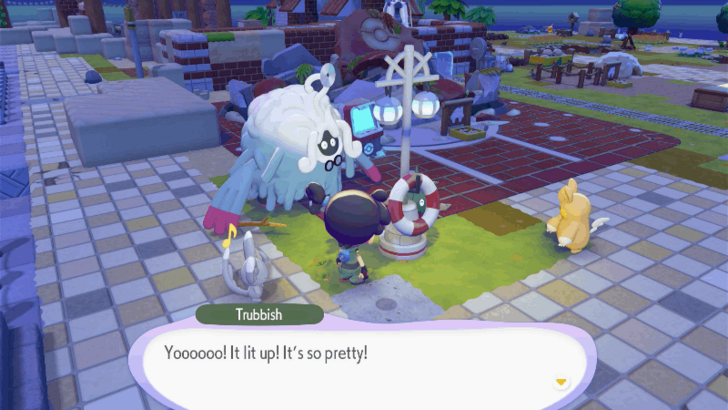 Befriend either a Pawmi or a Pawmo and have it follow you towards the Harbor Streetlight next Trubbish to light it up. This completes Trubbish's request. |
| 3 |
 After completing Trubbish's request, follow him towards the dock area and talk to him once the yellow speech bubble appears. |
| 4 |
 Take Trubbish to the source of the sound located southeast of the Pokemon Center. Use blocks to repair the collapsed bridge so that he can cross the bridge. |
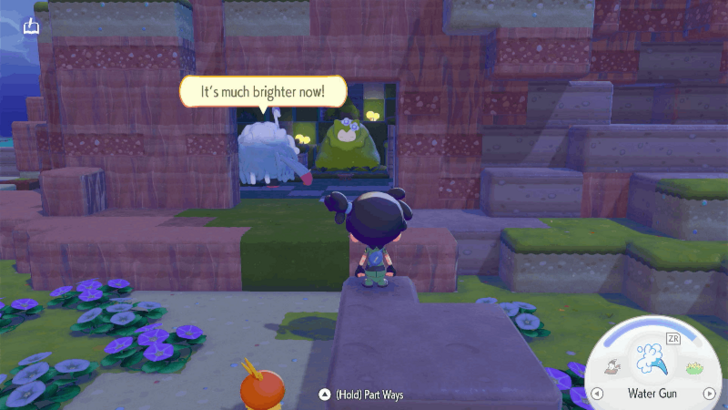
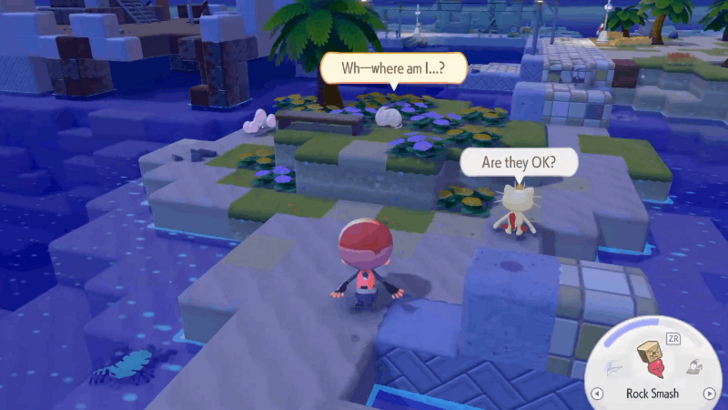
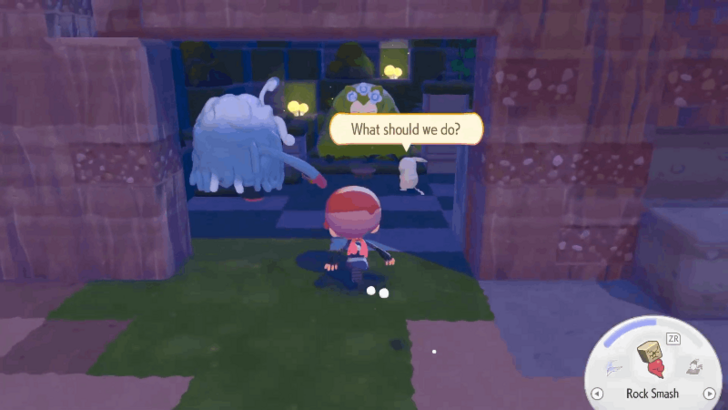
| 5 |
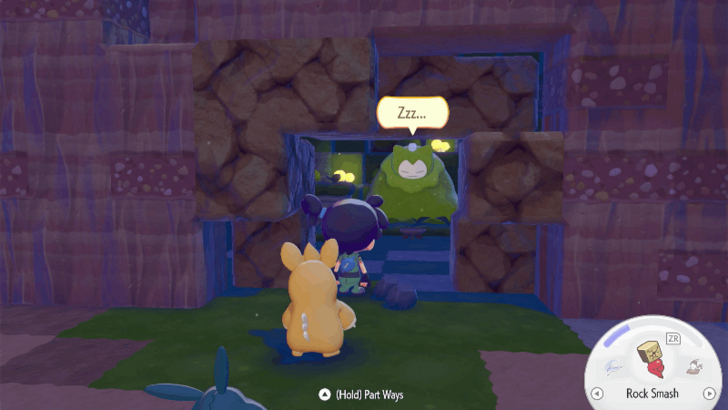 Head to the source of the sound and break the wall using Rock Smash. Investigate the moss-covered Snorlax inside to complete Trubbish's request. Return to Professor Tangrowth and take him to Mosslax's location to unlock the important request: Brighten Things Up. |
| 6 |
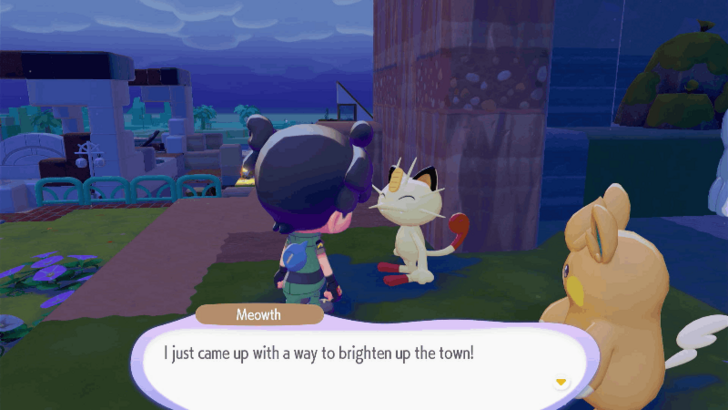 Talk to Meowth nearby and accept his request. |
| 7 | Talk to Pawmi or Pawmo and light up the three streetlights. It does not matter which streetlight you light up, as long as three are lit. Go back to Meowth and talk to him to complete the request. |
| 8 |
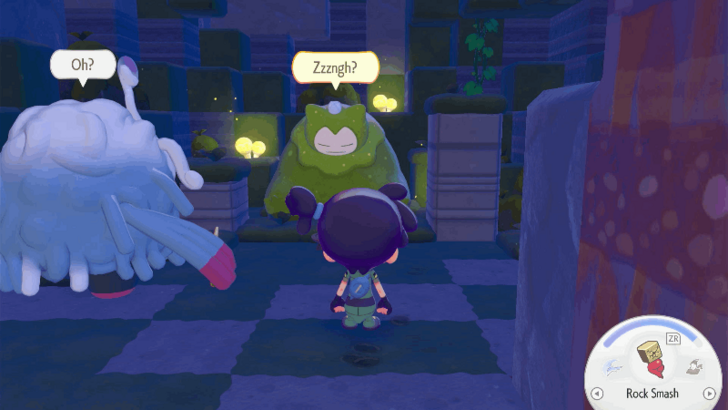 After completing Meowth's request, talk Mosslax to check the current number of bloom points. 100 bloom points are required to wake up Mosslax. |
| 9 |
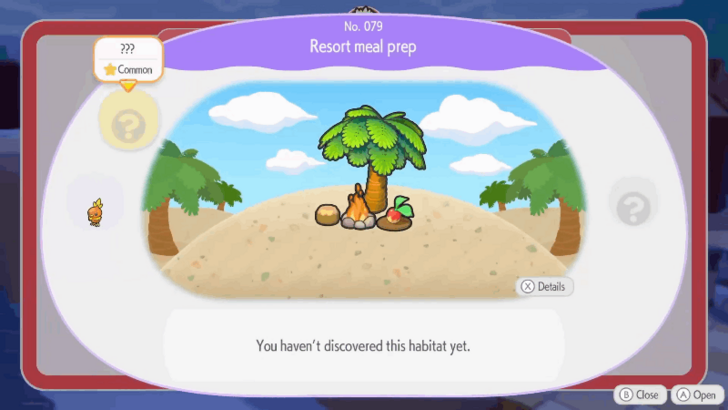 Talk to Torchic to receive his request and obtain the habitat hint for Resort Meal Prep. Place a Bonfire, a Log Chair, and a Wooden Plate with a Leppa Berry next to a Palm Tree to complete the habitat. |
| 10 |
 Talk to Professor Tangrowth after completing Torchi's request to activate a cutscene. |
| 11 |
 Head over to the fallen Pokemon to befriend Peakychu. |
| 12 |
 Continue lighting up the area and check if Peakychu has to Mosslax's location. Once Peakychu has a yellow speech bubble, talk to him to receive a new request. |
| 13 |
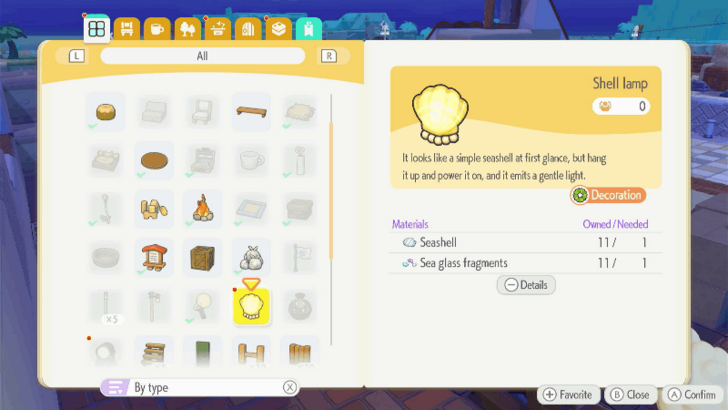 Go to the workbench and create a Shell Lamp using 1 Shell and 1 Sea Glass Fragments. Once you have a Shell Lamp, place it in Mosslax's cave. |
| 14 |
 Have Pawmi or any Pokemon that can generate electricity follow you to light up the Shell Lamp and complete the request. |
| 15 |
 Follow Peakychu towards the windmill. Once he stops and a yellow speech bubble appears, talk to him. |
| 16 |
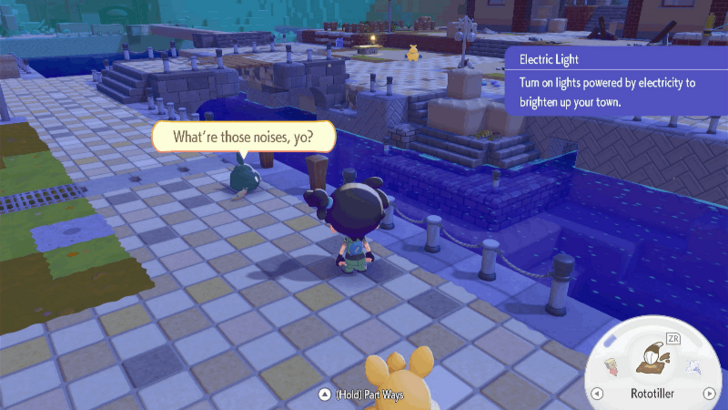
 Collect the nearby Utility Pole and connect it to the wind turbine. If you place the utility pole with a thin wire still connected, you can place the utility pole connected to the wind turbine. Talk to Peakychu after. |
| 17 |
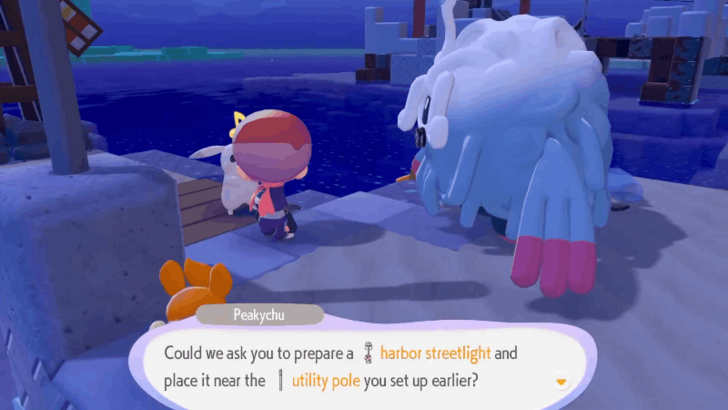 Collect the Harbor Streelight nearby and place it near the Utility Pole that has electricity. Placing the Harbor Streetlight near the Utility Pole will light up and illuminate the town. |
| 18 |
 Wait for Peakychu to walk all the way to Mosslax's location. Talk to him once the yellow speech bubble appears. |
| 19 |
 Follow Peakychu to head to a charging station. Place a Utility Pole and connect it to the other Utility Poles that are powered by the windmill to activate it. Talk to Peakychu after to complete the request and unlock another request: Power up the charging station. |
| 20 |
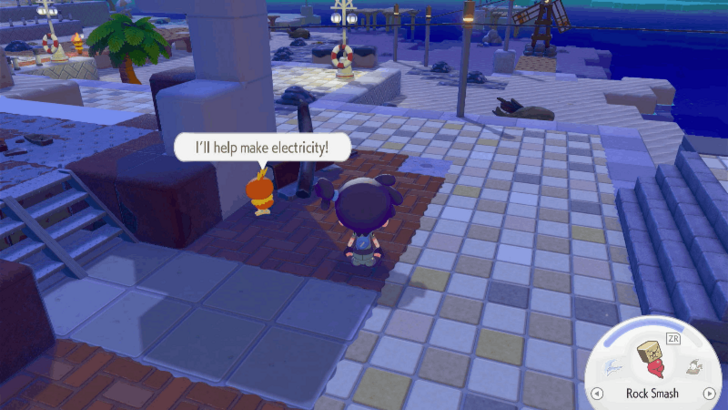 Talk to Torchic once he has the "I'll help make electricity!" speech bubble to receive his request. |
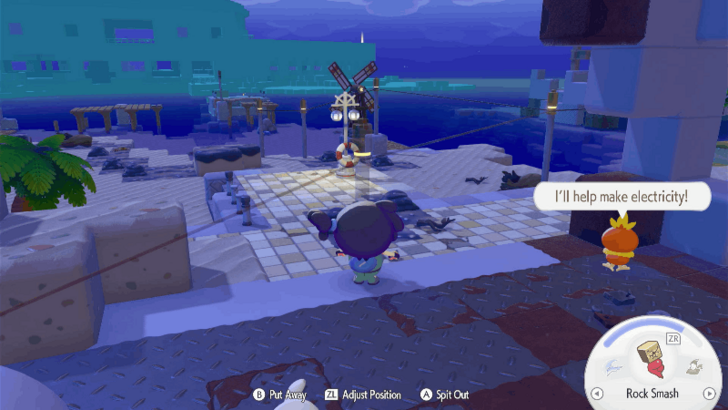
| 21 |
 Take Torchic with you and search for the Furnace located at the southwest side of the map. Place Utility Poles to power up the Furnace. |
| 22 |
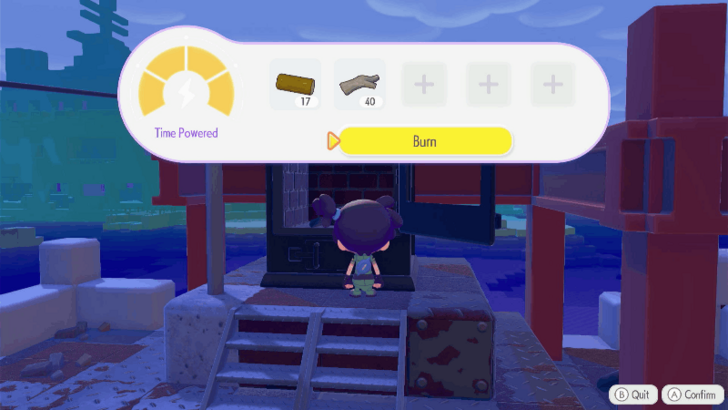 Inspect the furnace and add burnable materials such as Lumber and Sturdy Sticks. Select Burn to generate electricity from it and complete the request. |
| 23 |
 Talk to Piplup once he has the "I wish I could help..." speech bubble to receive his request. |
| 24 |
 Take Piplup with you and search for the Water Wheel located at the southeast side of the map. |
| 25 |
 Destroy the blocks blocking the water north of the Water Wheel to allow the water to flow. When the water flows, the Water Wheel will activate and generate electricity. This also completes the request. |
| 26 | Talk to Trubbish near Mosslax's cave to receive his request. |
| 26 |
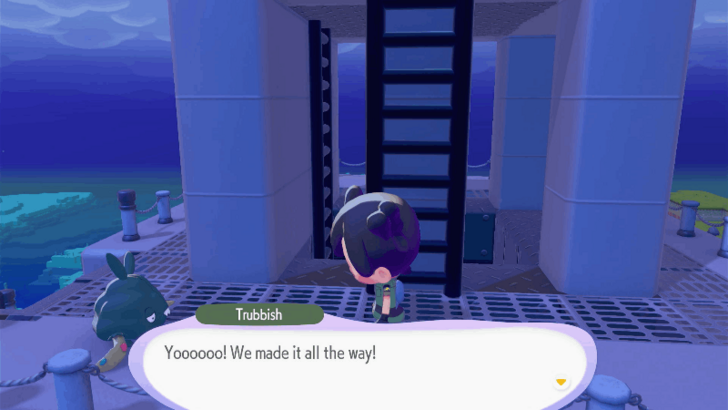 Take Trubbish to the lighthouse at the east side of the map. Connect a power pole to the roof to light up the spotlight on the roof. Climb to the top of the lighthouse to complete the request. |
| 27 |
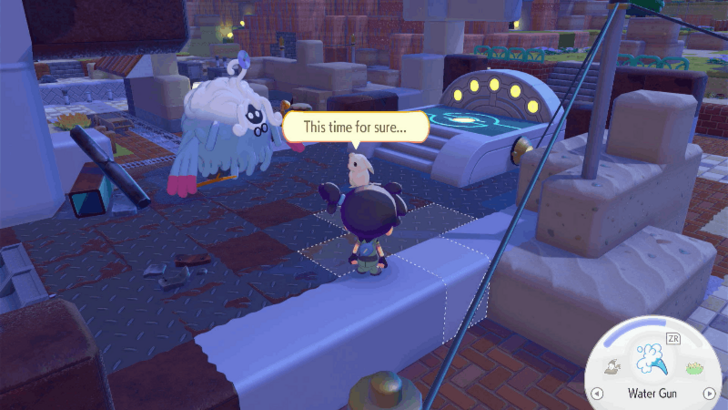 Connect the water wheel, furnace, and the windmill to the charging station using the Utility Poles. You can proceed to the next objective once Peakychu has the "This time for sure.."* yellow speech bubble above his head. Talk to Peakychu again for a cutscene. You should be able to interact with Mosslax in his cave after. |
| 28 | If you have not reached 100 Bloom Points, use lights, spotlights, and flames to light up the entire city. Explore the area and light up lights that are not lit and connect them to utility poles. |
| 29 |
 Once you have reached 100 Bloom Points, climb to the top and talk to Raikou. After talking to Raikou, talk to Mosslax to complete the important request. |
| 30 |
 After completing the important request, head to the gate on the north side. Open the gate and go to the next area. Note that you can only pass through the gate once you have finished both Bleak Beach and Rocky Ridges. |
Rocky Ridges Walkthrough
| All Areas | |||||
|---|---|---|---|---|---|
| Withered Wasteland | Bleak Beach | Rocky Ridges | |||
| Sparkling Skylands | |||||
| All Rocky Ridges Sections | |||||
| 1 | Enter the Gate and Restore the PC | ||||
| 2 | Rescue Chef Dente | ||||
| 3 | Unlock Rollout from Graveler | ||||
| 4 | Complete Time to Party! Request | ||||
Enter the Gate and Restore the PC
| # | Step by Step Objectives |
|---|---|
| 1 |
 Head to the northwest gate in Withered Wasteland to enter the Rocky Ridges. Once you enter the gate, Professor Tangrowth will follow you. |
| 2 |
 Once you enter the area, a cutscene will occur. Follow Professor Tangrowth as he moves forward. |
| 3 |
 Go west through the area and examine the PC. A cutscene will occur after you examine it. |
| 4 |
 Wait until a yellow speech bubble appears above Professor Tangrowth. Talk to him once it appears. |
| 5 |
 Create a 2x2 patch of red grass to create a habitat called Red Tall Grass. |
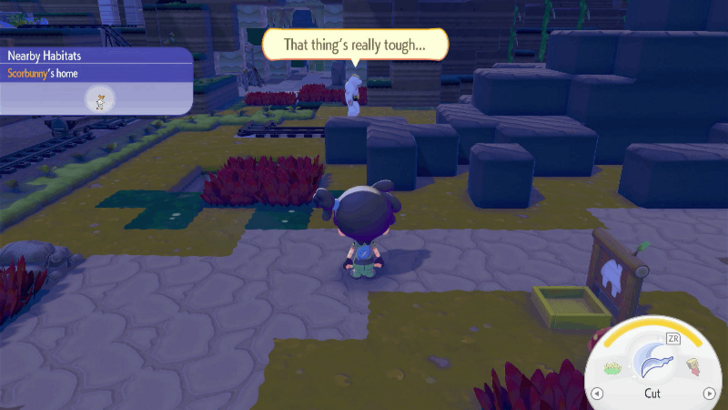
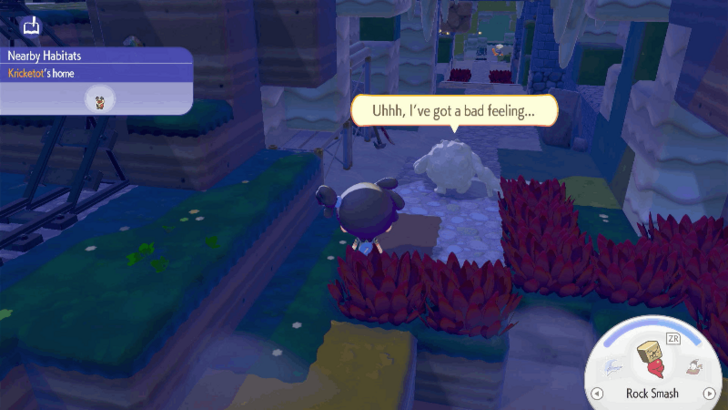
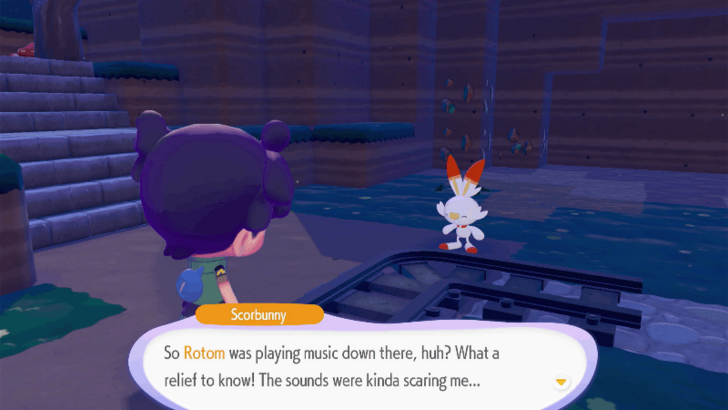
| 6 | Examine the rustling grass at the Red Tall Grass to befriend Scorbunny. |
| 7 |
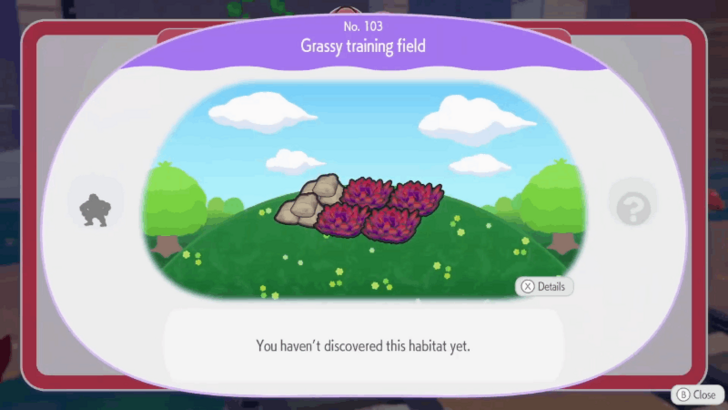 Talk to Scorbunny to receive a request and a hint for the habitat, Grassy Training Field. |
| 8 |
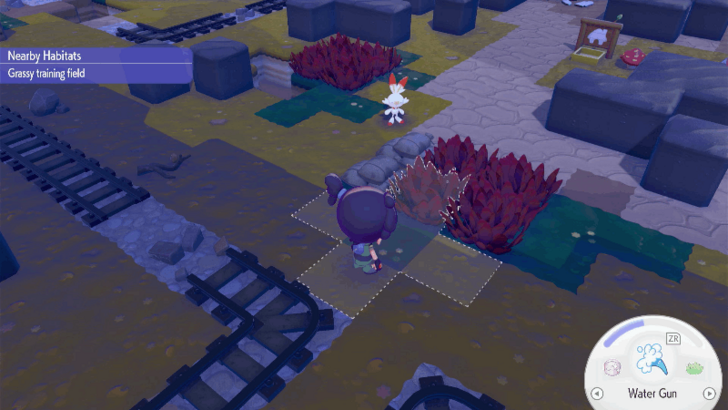 Collect sandbags near the workbench across the PC to create the Grassy Training Field habitat. Note that placing a sandbag near the Red Tall Grass where Scorbunny lives will not create a Grassy Training Field. You need to place a second 2x2 patch of red grass and the two sandbags for it to work. |
| 9 |
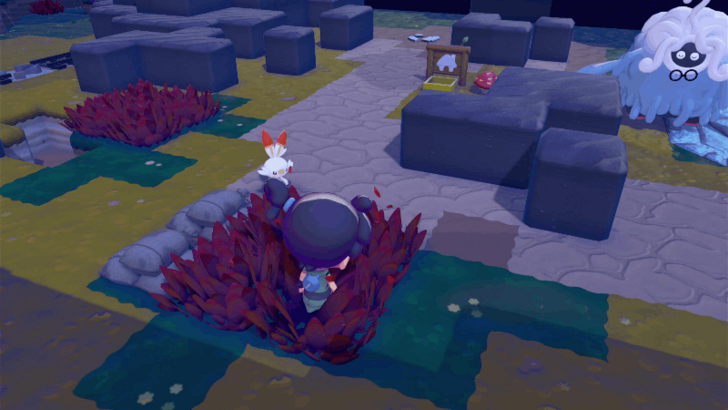 Examine the rustling grass at the Grassy Training Field to befriend Machoke. |
| 10 |
 Follow Machoke and talk to him again to receive his request. |
| 11 |
 Once Machoke's request begins, pick up five stones from the surrounding area. Once you have picked them up, go back to Machoke to learn Strength. |
| 12 |
 After learning Strength, carry the nearby giant rock to Machoke. Hold down the A Button while moving in front of the giant rock to use Strength. You cannot use Strength by holding down ZR. |
| 13 |
 Talk to Machoke again after you deliver the giant boulder. |
| 14 |
 Return to the Pokemon Center and hold down the A Button to push the PC to the electric socket. |
| 15 |
 Once the PC is restored, examine it to receive an important request: Rebuild the Pokemon Center. |
Rescue Chef Dente
| # | Step by Step Objectives |
|---|---|
| 1 |
 Talk to Professor Tangrowth after restoring the PC. |
| 2 |
 Follow Professor Tangrowth after the cutscene ends. |
| 3 |
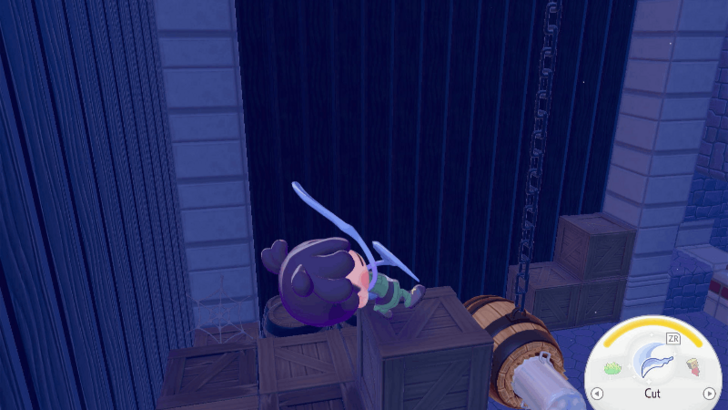
 Climb onto the wooden box and use Cut to cut the chain hanging from the barrel. This gives you a hint of a new habitat, Pointy Tree-Shaded Rocky Tall Grass. |
| 4 |
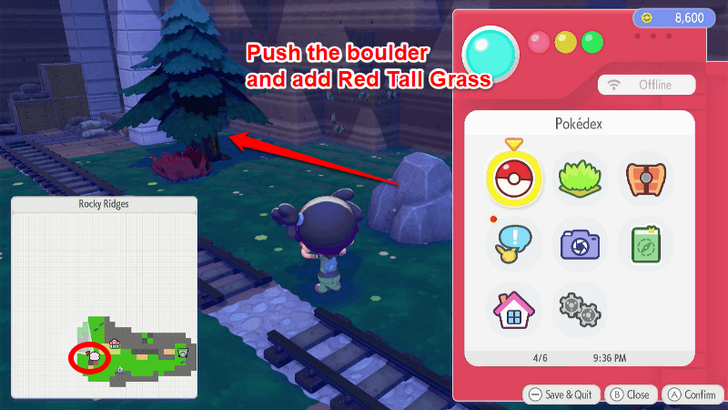 Head to the southwestern side of the map and use Strength to place a boulder next to the pointy tree. Place 4 Red Tall Grass to create the Pointy Tree-Shaded Rocky Tall Grass habitat. |
| 5 |
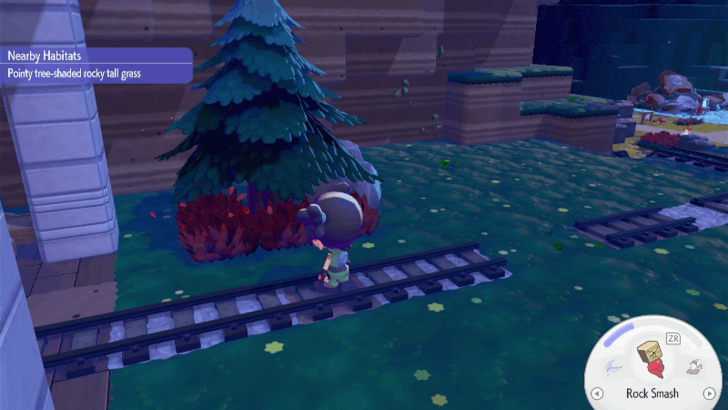 Examine the swaying grass at the Pointy Tree-Shaded Rocky Tall Grass habitat to befriend Dartrix. |
| 6 |
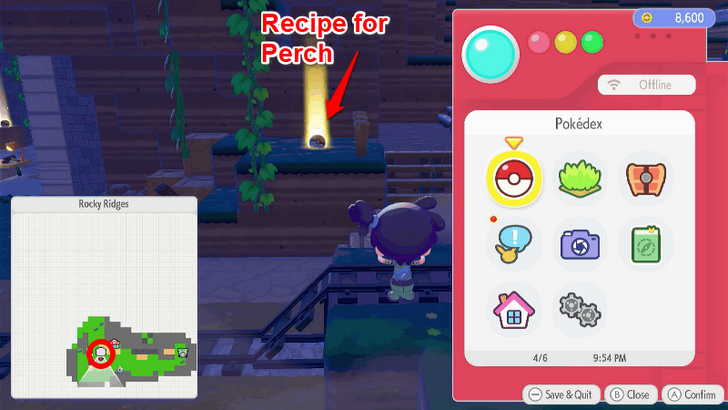 Talk to Dartrix and choose "Can you make cutting boards?. You will receive a request first to craft the Perch. The recipe for Perch can be obtained from the golden Poke Ball near the workbench. |
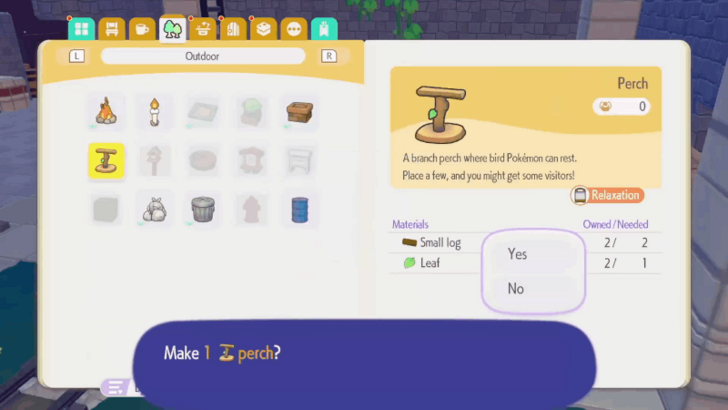
| 7 |
 Create the Perch using 2 Small Logs and 1 Leaf and place it near Dartrix. Doing so completes the request and unlocks the recipe for the Cutting Board. |
| 8 |
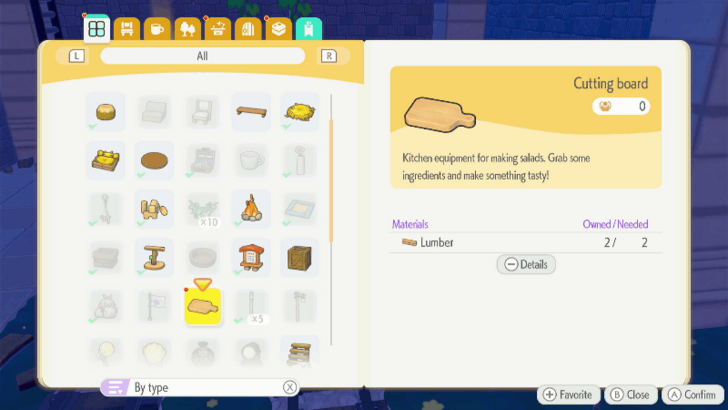 Give Lumber to Dartrix to create the material needed for the Cutting Board. After that, go to the workbench and craft the Cutting Board using 2 Lumbers. |
| 9 |
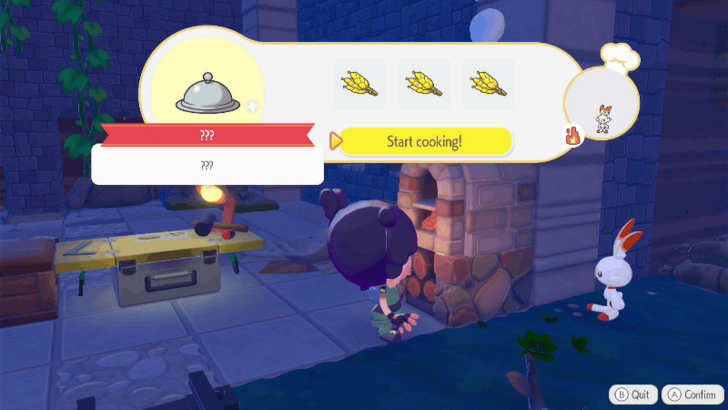
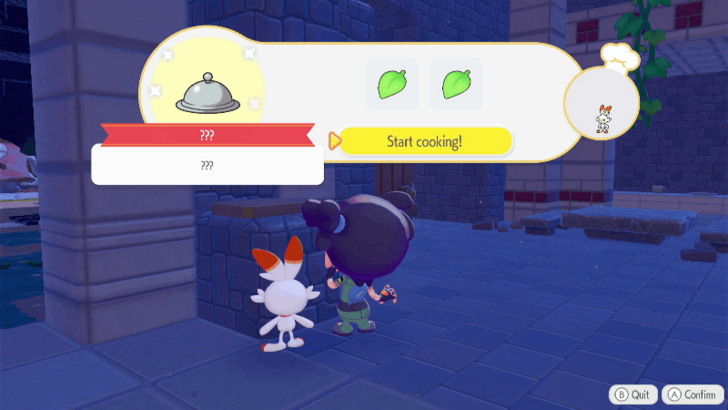 Place the Cutting Board nearby and make a Simple Salad using two Leaves. |
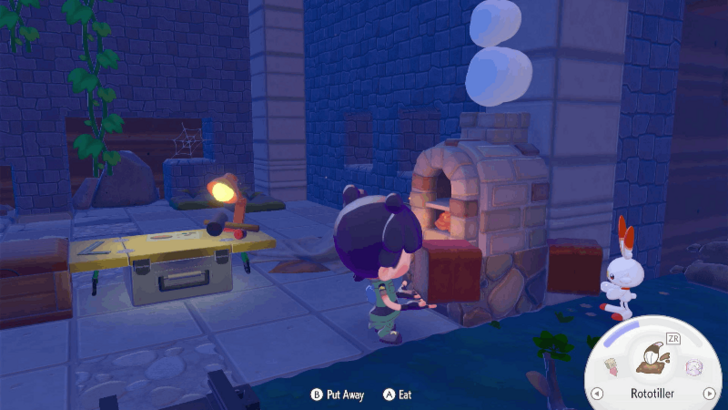
| 10 |
 Eat the Simple Salad you made to strengthen the effect of Leafage. Using the move after eating the Simple Salad allows you to place grass over a wider area and also grow moss and aquatic plants. Hold down ZR to use the strengthened version of Leafage. Note that there is a limit to the number of times you can use this, so it is recommended to make a lot of Simple Salads. |
| 11 |
 After eating the Simple Salad, talk to Professor Tangrowth to obtain a hint for a new habitat: Mossy Hot Spring It is recommended to craft some wooden stairs at the workbench beforehand in preparation for a request that will appear later. |
| 12 |
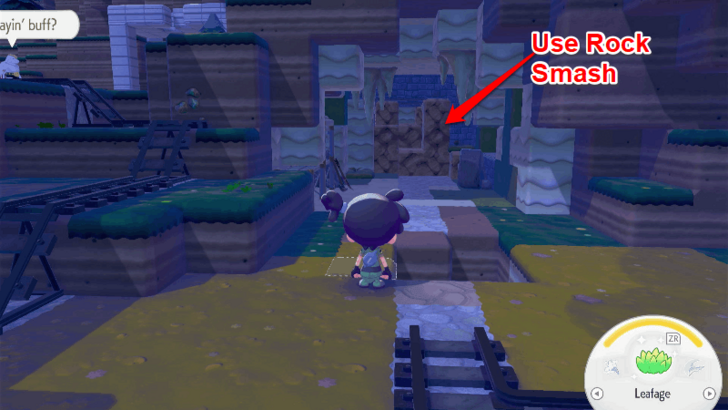 Use Rock Smash to enter the western cave and create the Mossy Hot Spring habitat inside. Place 4 Moss Plants near the water to make the habitat. |
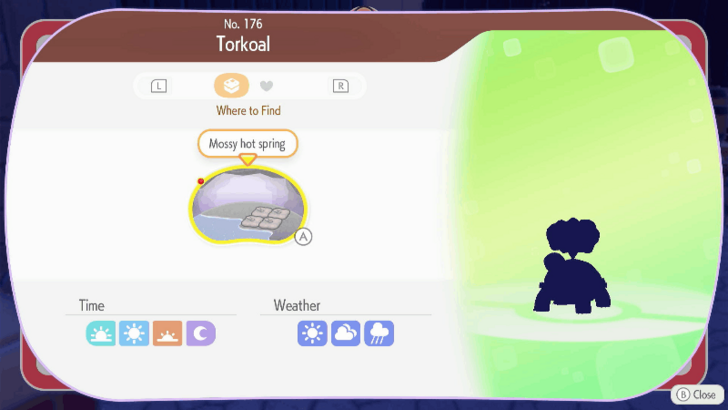
| 13 |
 Examine the swaying moss at the Mossy Hot Spring habitat to befriend Torkoal. Talk to Torkoal to receive the request. |
| 14 |
 Start creating a path from the Mossy Hot Spring to the Pokemon Center. Place the stairs and create moss to make it easy for Torkoal to move without stopping to take breaks. You can grow moss by using Leafage while under the effects of Simple Salad. Once you have prepared the path, talk to Torkoal to move. |
| 15 |
 Talk to Torkoal once it arrives to the Pokemon Center to receive the recipe for the Bread Oven. |
| 16 |
 Have 2 Stones, 2 Small Logs, and 4 Volcanic Ashes to create the Bread Oven. You can get Volcanic Ash by using Rock Smash at the black soil east of the Pokemon Center. Place the Bread Oven and have Torkoal or Scorbunny light the fire on it. |
| 17 |
 Grow Wheat at the fields southwest of the map. Destroy the rocks that are blocking the water on the hill and this allows the water to flow. You can also grow wheat by using Water Gun to raise the water level. |
| 18 |
 Once you have three pieces of Wheat, inspect the Bread Oven and place three Wheat to make Simple Bread. |
| 19 |
 Eat the bread to strengthen your Cut move and allow you to cut through solid objects such as chains and wire mesh. |
| 20 |
 Go to the location of the hanging barrel and cut the chain with Cut. Once you cut the chain from the barrel, a cutscene will occur and you will rescue Chef Dente in the process. |
Unlock Rollout from Graveler
| # | Step by Step Objectives |
|---|---|
| 1 |
 Talk to Chef Dente in front of the Pokemon Center. |
| 2 |
 Go inside the cave where Chef Dente will walk to and talk to him again. |
| 3 |
 Talk to Professor Tangrowth to get the recipe for the Frying Pan. |
| 4 |
 Talk to Machoke once he has a yellow speech bubble above his head and follow him. |
| 5 |
 Follow Machoke and use Cut to destroy the wire mesh that's blocking Machoke's path. You will need to eat Bread to power up the move to cut it. Professor Tangrowth will contact you and provide information about Magmar once you break the wire mesh. |
| 6 |
 Examine the sparkly spot in front of the smelting furnace to receive a hint for the Digging and Burning habitat. |
| 7 |
 Turn right from the smelting furnace to find the Wheelbarrow and Excavation Tools. Place them beside the Smelting Furnace to create the Digging and Burning habitat. |
| 8 |
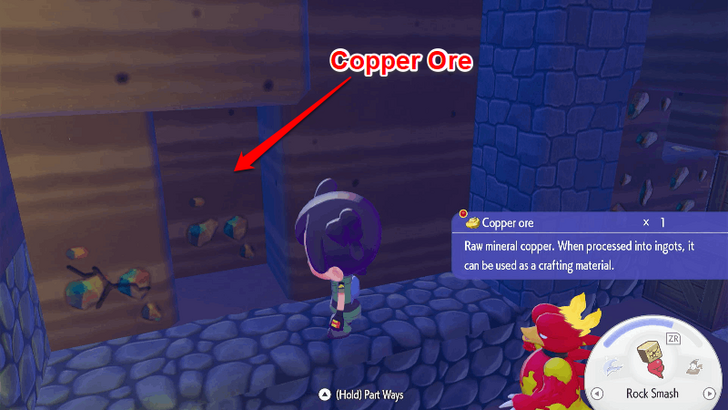 After befriending Magmar, you can put copper ore in the smelting furnace to create ingots. You can harvest copper from the blocks that have ore in it using Rock Smash. |
| 9 |
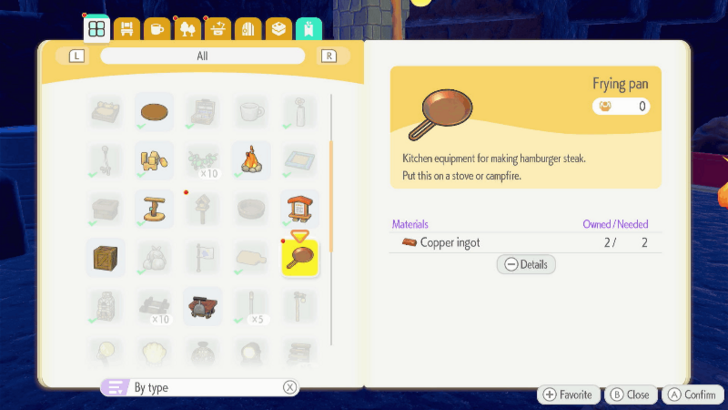 Use two Copper Ingots at the workbench to create a Frying Pan. Report back to Chef Dente and place the Frying Pan on the stove. |
| 10 |
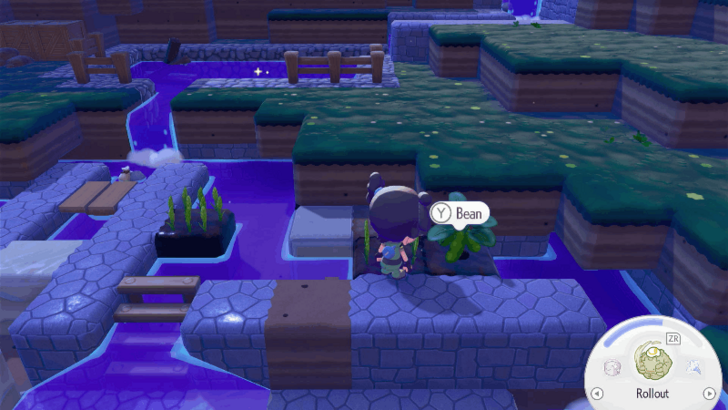 Grow beans on the fields southwest of the map. If there is a waterway on the field used to grow wheat, beans will grow. Collect three Beans to make Simple Hamburger Steaks. |
| 11 |
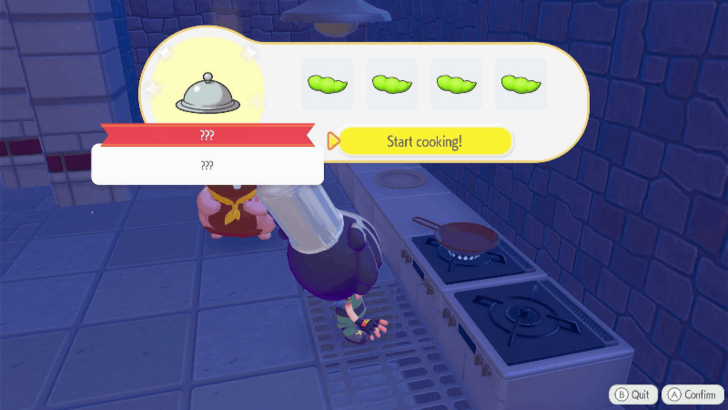 After collecting the Beans, return to the stove near Chef Dente and cook them using the Frying Pan to create a Simple Hamburger Steak. |
| 12 |
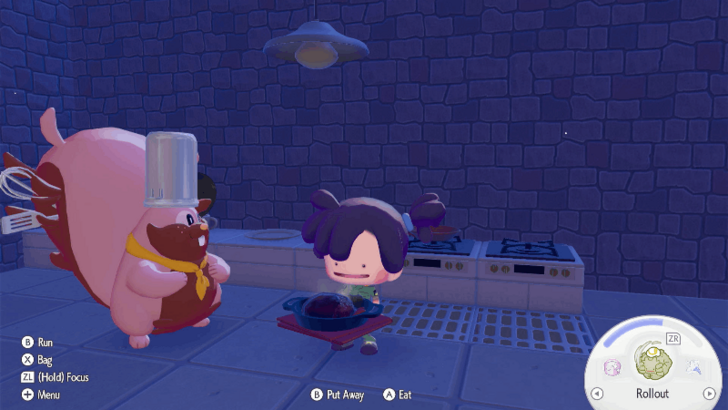 Eat the Simple Hamburger Steak to strengthen your Rock Smash move. This allows you to destroy hard rocks. |
| 13 | Talk to Machoke and accept his request to receive a hint of a new habitat: Mossy Boulder. |
| 14 |
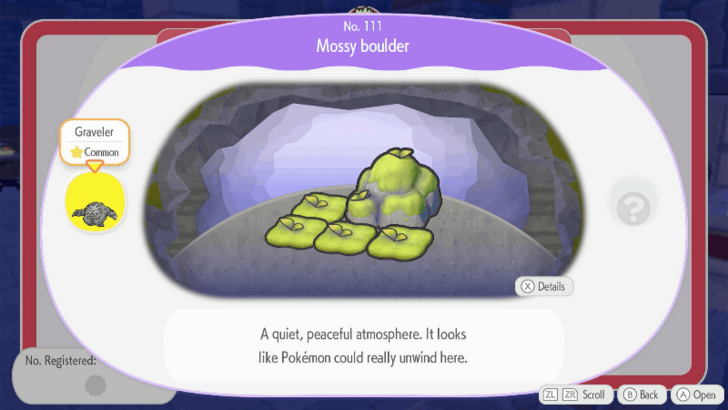 Create the Mossy Boulder habitat in the cave with the hot spring. Place 4 moss around the mossy boulder. |
| 15 |
 Examine the swaying moss at the Mossy Boulder habitat to befriend Graveler. You will also receive the new Rollout move when you talk to him. |
| 16 | After learning Rollout, talk to Machoke and Graveler. Talking to Graveler completes the request. |
| 17 |
Talk to Professor Tangrowth and he will tell you to raise the Environment Level to 3. Check the PC to see your current Environment Level. If your Environment Level is 3 or higher, you can move on to the next objective. If not, you need to befriend more Pokemon and increase their comfort level. |
Time to Party! Request Walkthrough
| # | Step by Step Objectives |
|---|---|
| 1 |
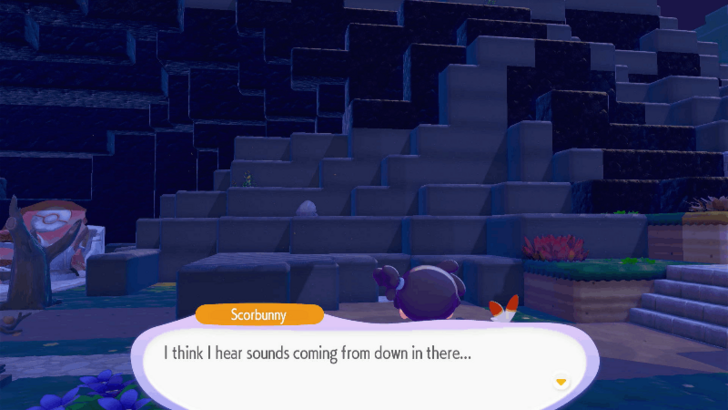 Talk to Scorbunny near the Pokemon Center and eat a Simple Hamburger Steak to strengthen your Rock Smash move. Break the wall and proceed through the cave. |
| 2 |
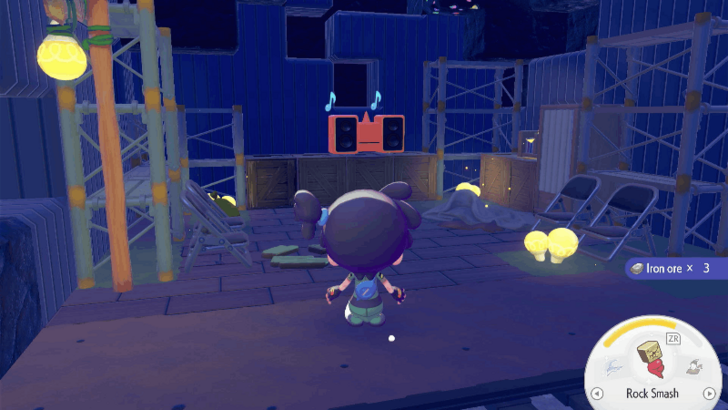 Proceed through the cave by smashing through the blocks using Rock Smash and examine the radio at the back for a cutscene. |
| 3 |
 Exit the cave and report to Scorbunny. |
| 4 |
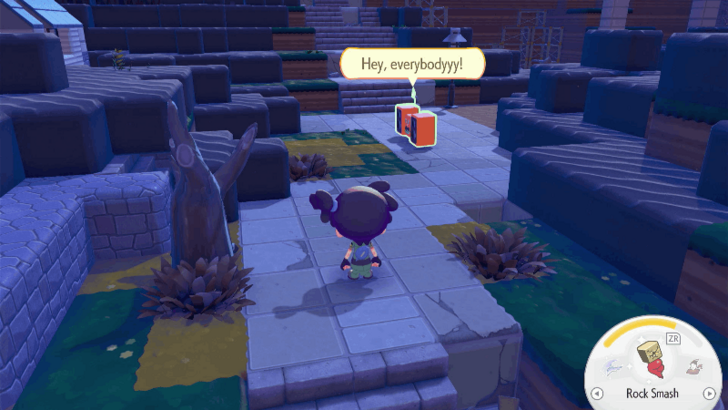 Talk to DJ Rotom outside of the cave to start the important request: Time to Party! |
| 5 |
 Talk to Chef Dente to receive a Party Cooking Pot. |
| 6 |
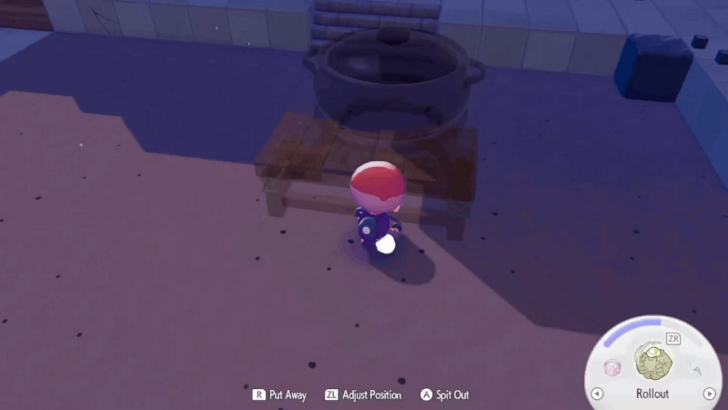 Level the area where you received the important request before placing the Party Cooking Pot. Use Rock Smash or Rollout to remove the volcanic ash and stones before placing the pot. |
| 7 |
 Talk to Chef Dente after placing the pot. You will need to increase mood in the area by 100 for the next steps. |
| 8 |
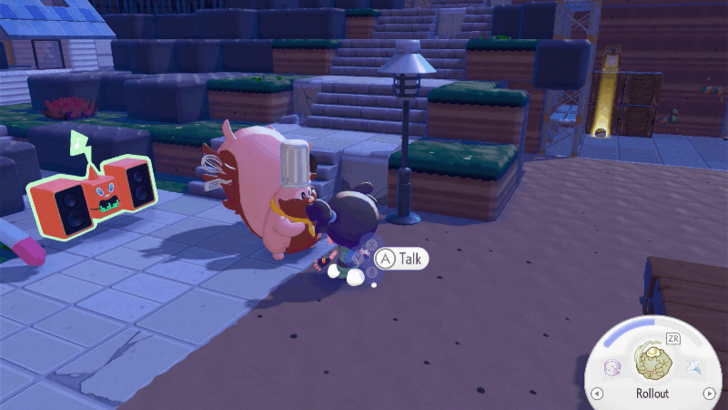
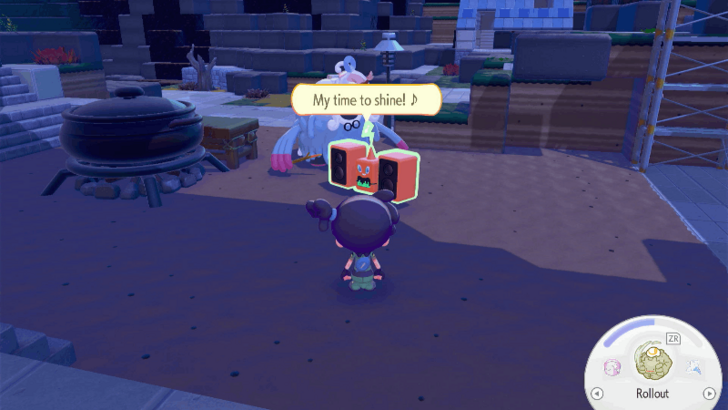 Talk to Rotom to accept his request. |
| 9 |
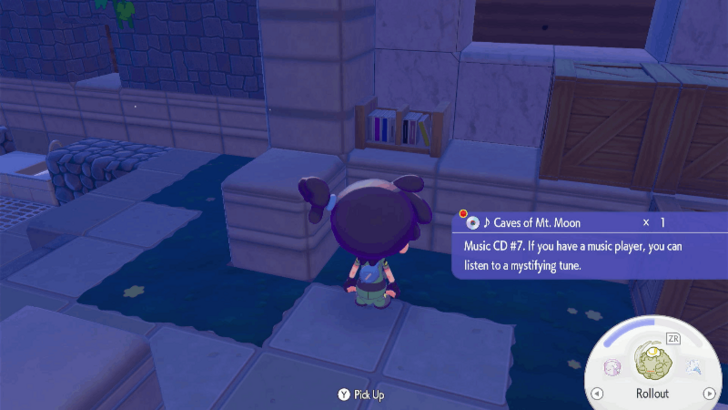 Find a CD and give it to Rotom to raise the mood. You can get a CD from the bookshelf near where you placed the Party Cooking Pot. |
| 10 |
 Talk to Professor Tangrowth to receive his request. |
| 11 |
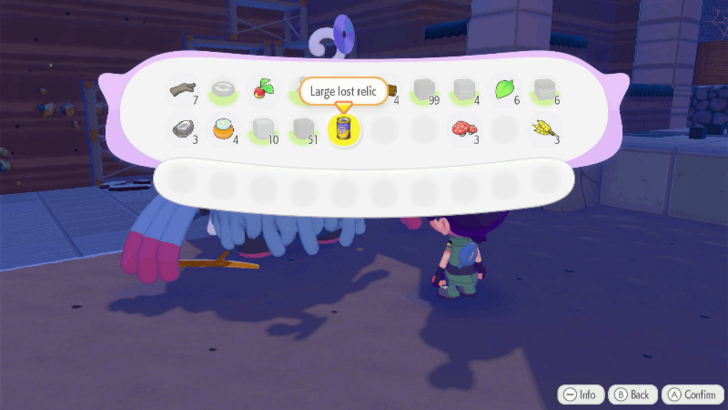 Find a large lost relic and have Professor Tangrowth appraise it. You can obtain this item by destroying the volcanic ash around the located where you placed the Party Cooking Pot. |
| 12 |
 Place the appraised relics around to increase the mood. |
| 13 |
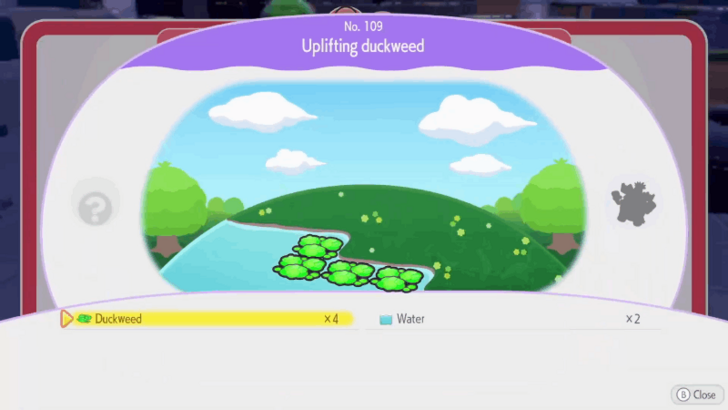 Talk to Rotom and accept his request. He will give you a hint of a new habitat: Uplifting Duckweed. |
| 14 |
 Place four Duckweed near a body of water to befriend Ludicolo. |
| 15 |
 Bring Ludicolo to Rotom to raise the mood. |
| 16 |
 Talk to Chef Dente to receive his request and the recipe for Party Platter. |
| 17 | Collect five Iron Ores and place them in the Smelting Furnace. Iron Ores can be collected in the cave where Rotom was located. Once you place the Iron Ores in the Smelting Furnace, you can create Party Platters using the workbench. |
| 18 |
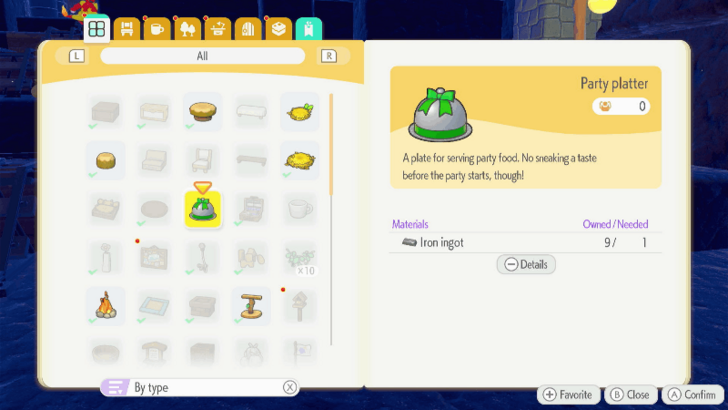 Use the 5 Iron Ingots at the workbench to create 5 Party Platters. |
| 19 | Make 5 dishes of your choice to put on the Party Platter. It is recommended to make simple Simple Salad, as you will need to use Wheat and Beans later on. |
| 20 |
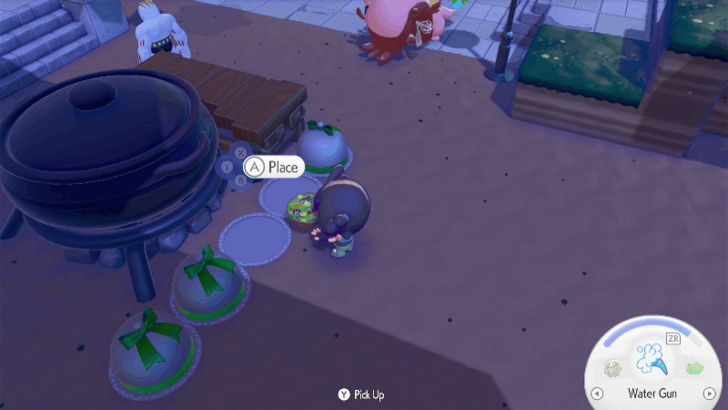 Place the five Party Platters around the pot and fill them with the food you like. |
| 21 |
 After placing the Party Platters, talk to Chef Dente. |
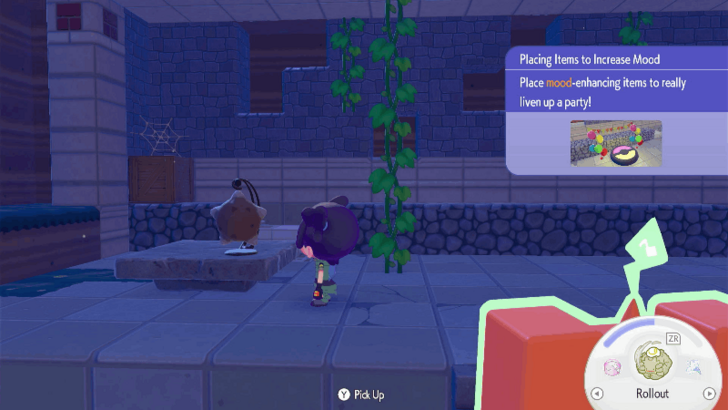
| 22 |
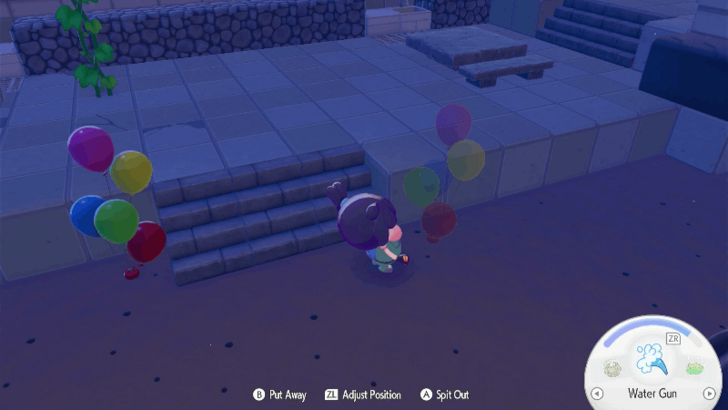 If you haven't raised the mood to 100 points, place decorations such as balloons and stage stands from the Shop. You can also place party wall decorations that you can craft from the workbench. |
| 23 |
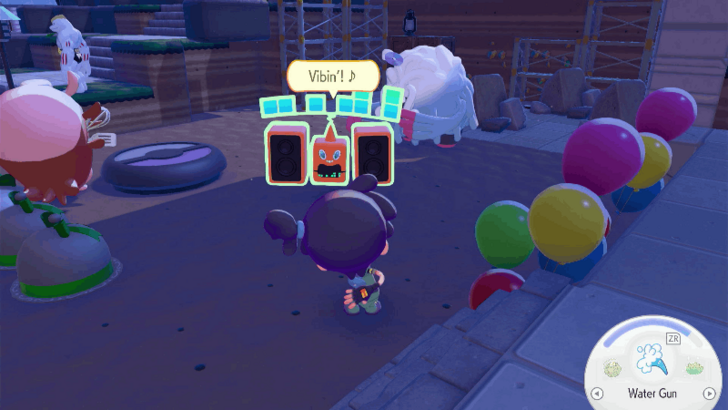 Once you raised the mood to 100 points, talk to Rotom. |
| 24 |
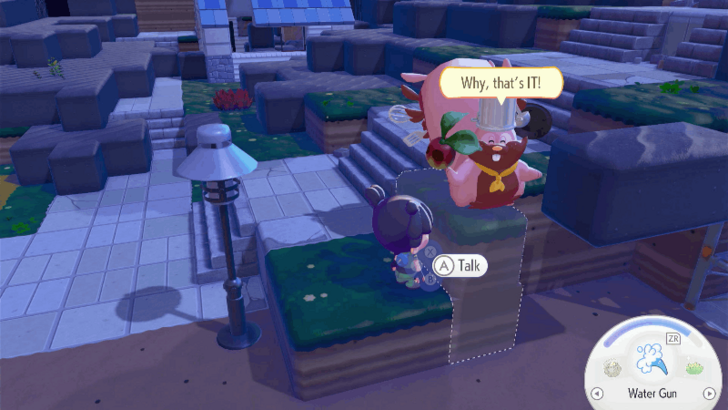 After talking to Rotom, talk to Chef Dente and you will get to decide what curry to make. |
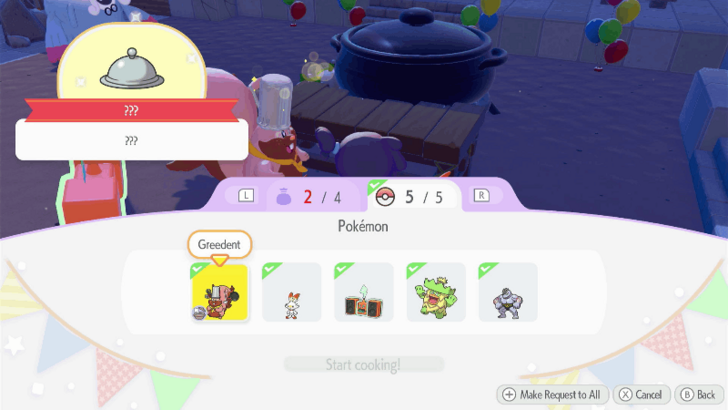
| 25 |
 The ingredients you need to gather are 15 Leppa Berries, 15 Wheat, 15 Beans, and 15 Honey. You can get wheat and beans in large quantities from the fields at the back of the cave northwest of the map. Honey can be obtained by examining glowing flowers. |
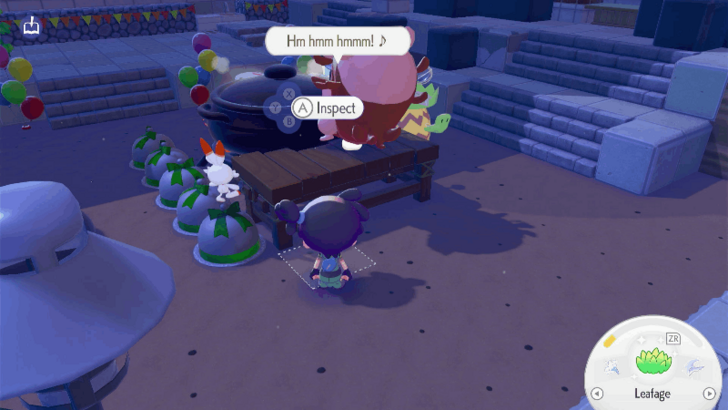
| 26 |
 Once you have placed the ingredients, bring Chef Dente and four other Pokemon to the Party Cooking Pot. |
| 27 |
 It will take 6 minutes in real-world time to cook the curry in the Party Cooking Pot. You can change the Switch 2's time to advance it. Once it is finished cooking, talk to Professor Tangrowth to advance the story. |
| 28 |
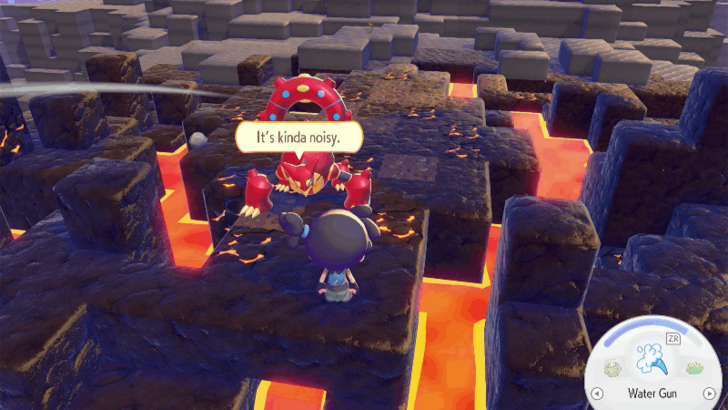 Talk to Volcanion at the top of the mountain. Use Water Gun to hit the lava to turn them into blocks, allowing you to cross and reach the Pokemon. |
| 29 |
 Talk to Professor Tangrowth near the Party Pot to complete the important request. |
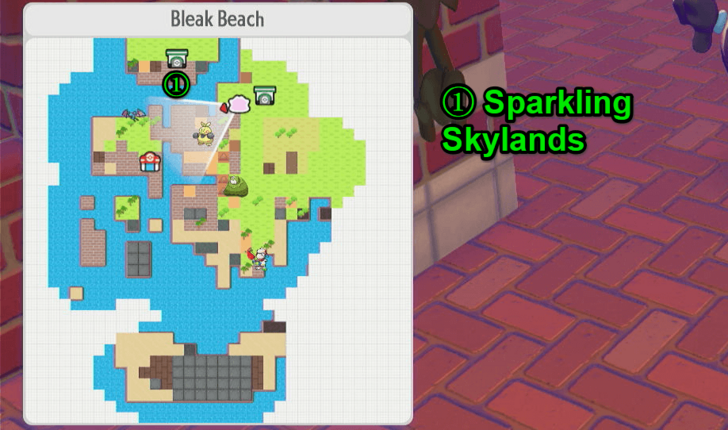
Sparkling Skylands
| All Areas | |||||
|---|---|---|---|---|---|
| Withered Wasteland | Bleak Beach | Rocky Ridges | |||
| Sparkling Skylands | |||||
| All Sparkling Skylands Sections | |||||
| 1 | Enter the Gate and Restore the PC | ||||
| 2 | Learn Glide from Dragonite | ||||
| 3 | Complete Rebuild the Huge Building! Request | ||||
| 4 | Reach the End Credits | ||||
Enter the Gate and Restore the PC
| # | Step by Step Objectives |
|---|---|
| 1 |
 Enter Bleak Beach and head north towards the gate. Enter the gate and talk to Professor Tangrowth. |
| 2 |
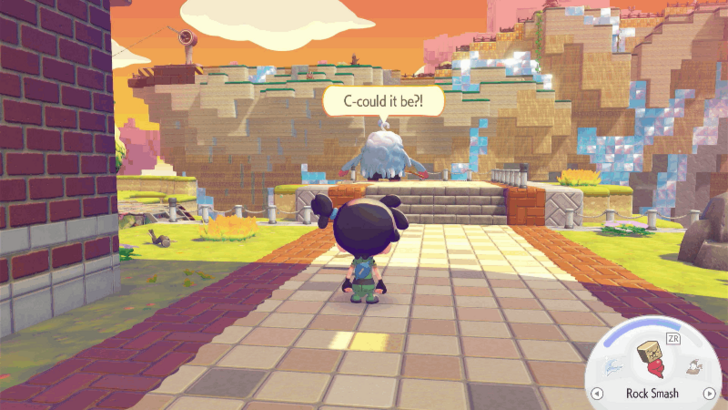 Talk to Professor Tangrowth once the yellow speech bubble appears and talk to him. |
| 3 |
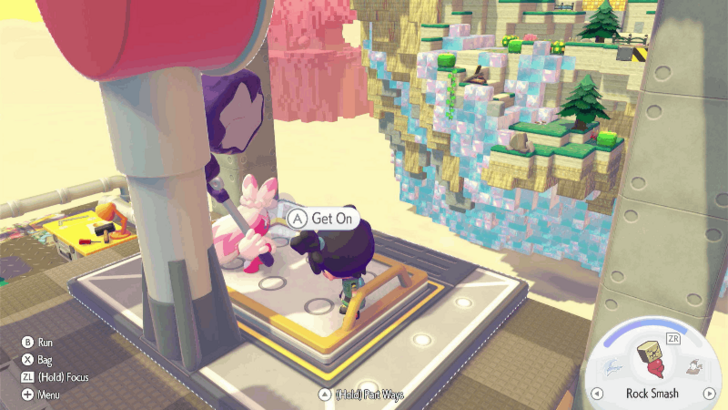
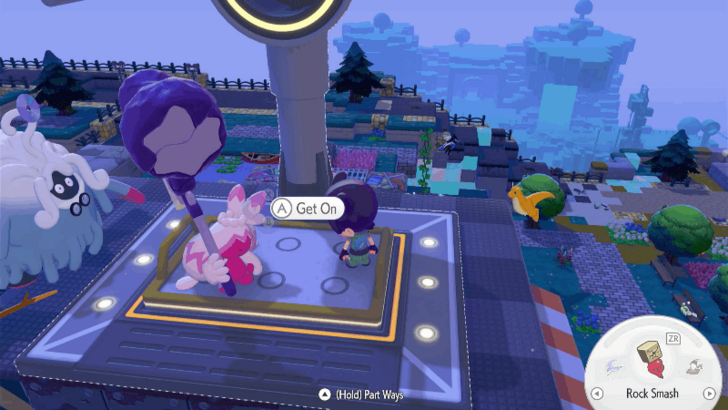
 Get on the platform of the machine nearby. When you get on the platform, you can reach the island at the back. |
| 4 |
 Talk to Rookidee in front of the lift to befriend him. |
| 5 |
 Wait for Professor Tangrowth to move next to the Pokemon Center. Then, examine the PC beside to progress the story. |
| 6 |
 Examine shiny spots to get habitat hints, create habitats in the area and complete requests to raise the environment level to 3. |
| 7 |
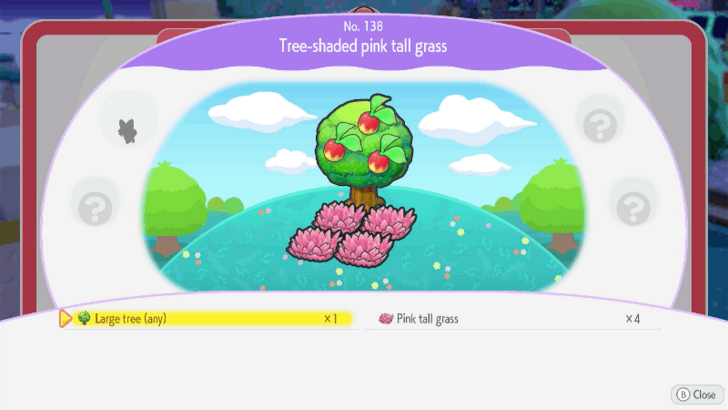 Create a habitat called Tree-Shaded Pink Tall Grass to befriend Sprigatito and get the habitat hint for Hydrated Pink Tall Grass to befriend Froakie. Froakie will give you the hint for Dragonite's habitat: Waterside Dinghy. |
Learn Glide from Dragonite
| # | Step by Step Objectives |
|---|---|
| 1 |
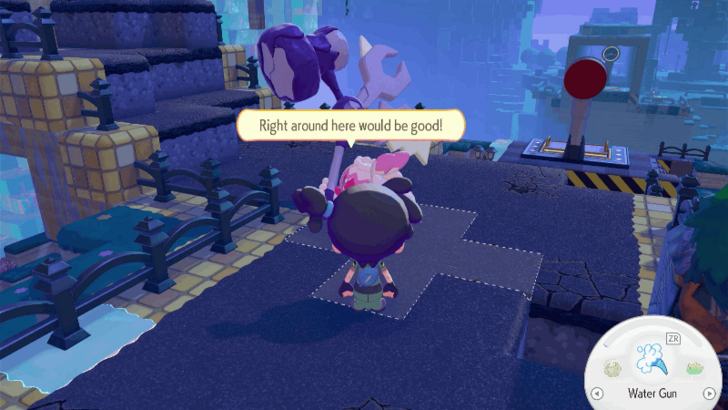
 Build the Waterside Dinghy habitat by placing 1 Canoe and 2 Duckweeds at a high-up location in the water. Head east from the Pokemon Center to reach a high-up location. Eat a Plain Salad to power up your Leafage to spawn Duckweeds near the Canoe. |
| 2 |
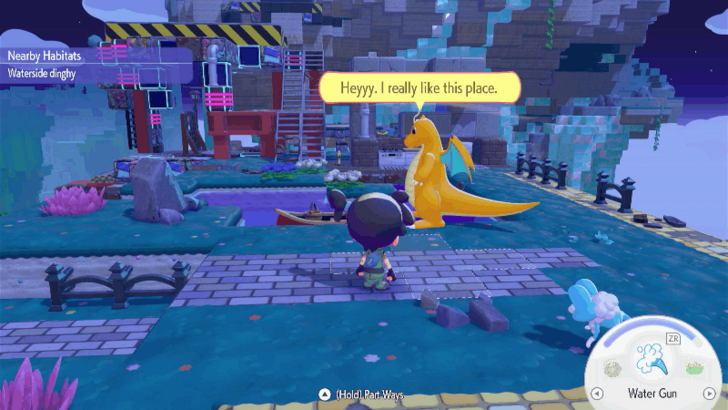 Talk to Dragonite to learn Glide. Talk to him again to practive using the move. |
| 3 |
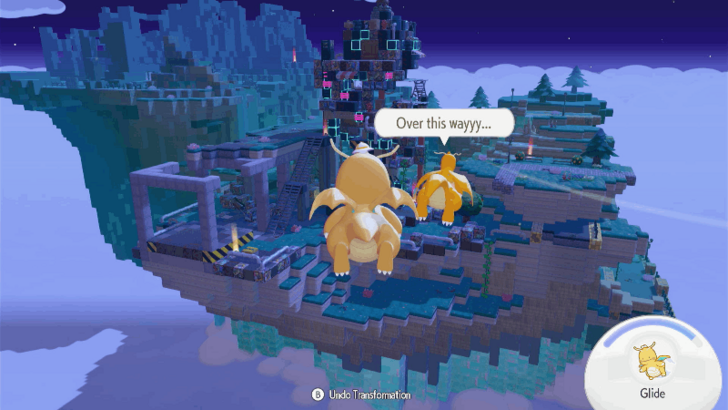 Use Glide to move to the next island and talk to Dragonite. You need PP to use Glide, so make sure to fill up the meter first. |
| 4 |
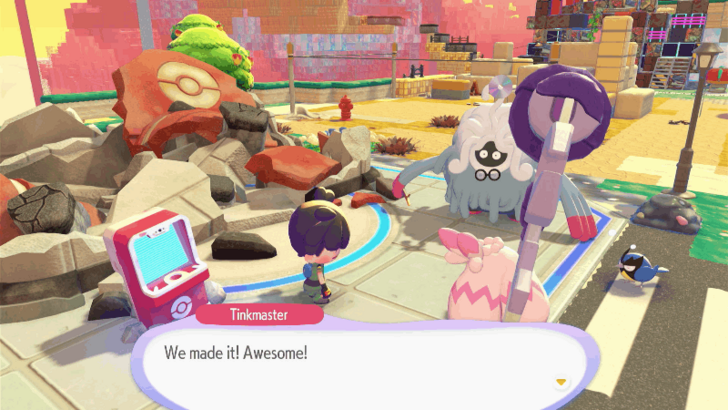
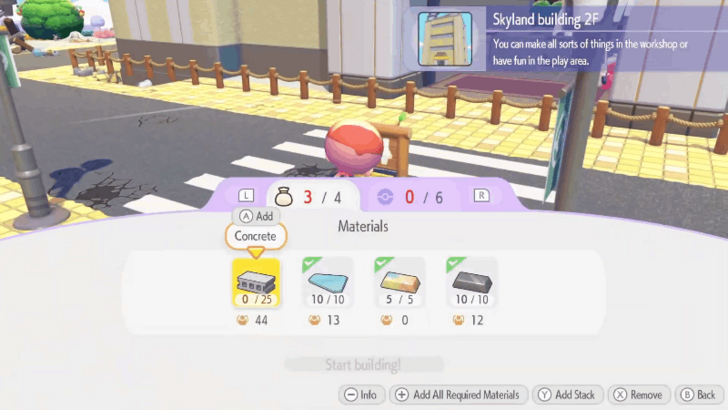
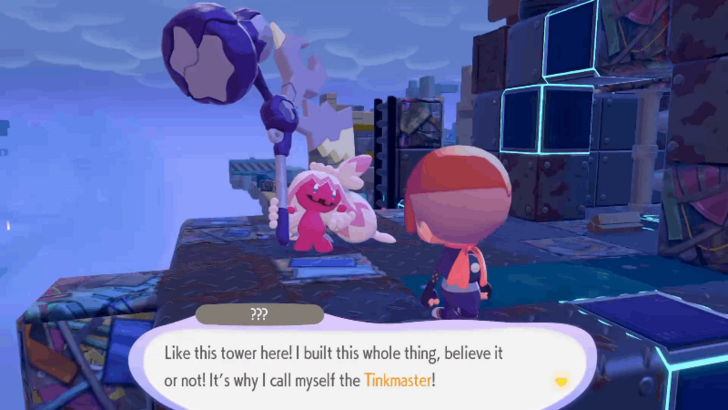 Climb to the top of the tower on the island. When you reach the top, a cutscene will occur and Tinkmaster will ask you to bring six bricks of concrete. You will receive a hint for the habitat, Construction-Site Generator, in order to befriend Conkeldurr. 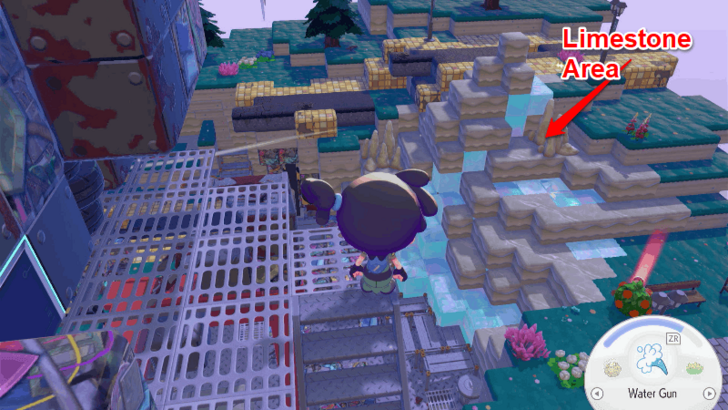 |
| 5 |
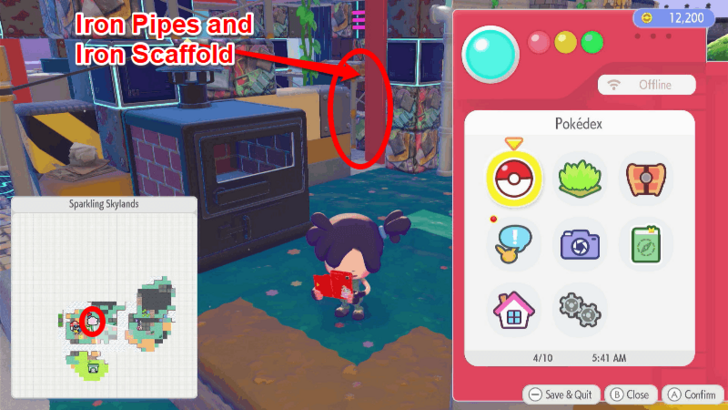 Head east from the Pokemon Center to find the Furnace. Head to the back of the Furnace to find 1 Iron Pipe and the 2 Iron Scaffolds. Place these materials together to create the Construction-Site Generator to befriend Conkeldurr. |
| 6 |
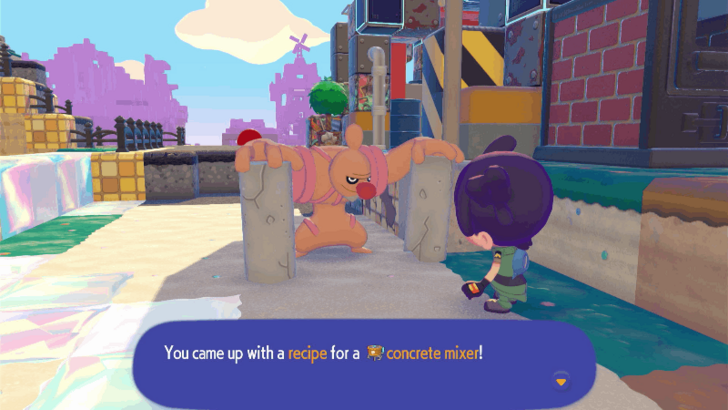 Talk to Conkeldurr to receive his request and obtain the recipe for the Concrete Mixer. |
| 7 |
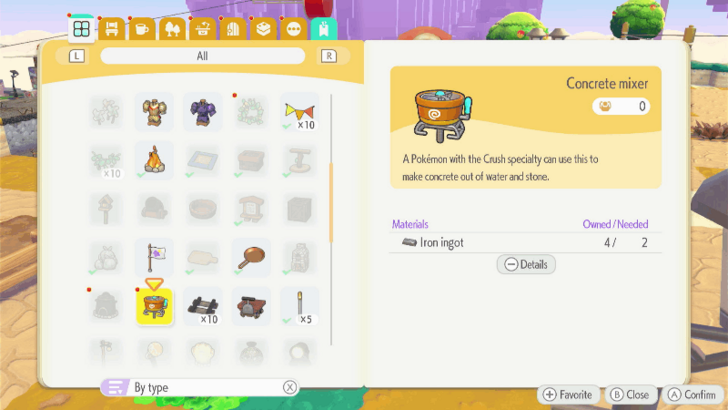 Build a Concrete Mixer and place it near the water. You can make the mixer with two Iron Ingots. If you do not have an Iron Smelter, gather iron from nearby areas to build a smelter. Create a Fluffy Flower Garden habitat by placing a 2x2 patch of Skyland Flowers to befriend Vulpix. |
| 8 |
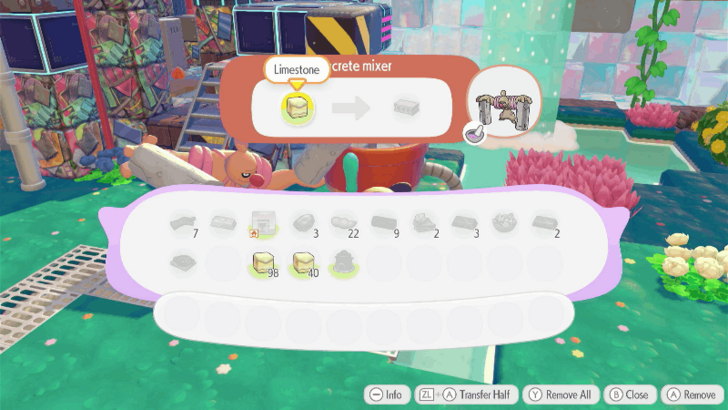 Put the Limestone in the Concrete Mixer and have Conkeldurr follow you to help convert it to Concrete. Create at least 6 pieces of Concrete. |
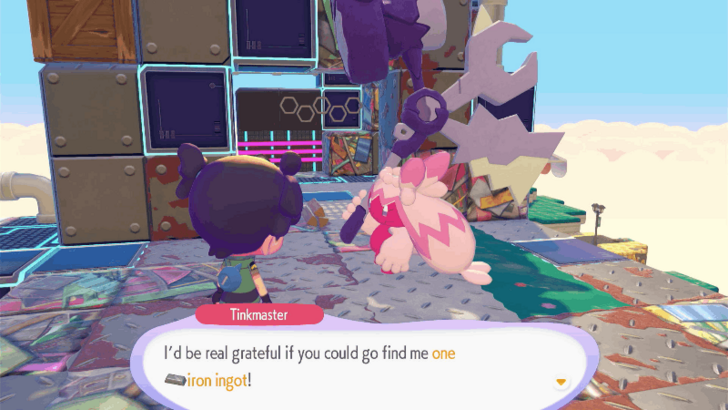
| 9 |
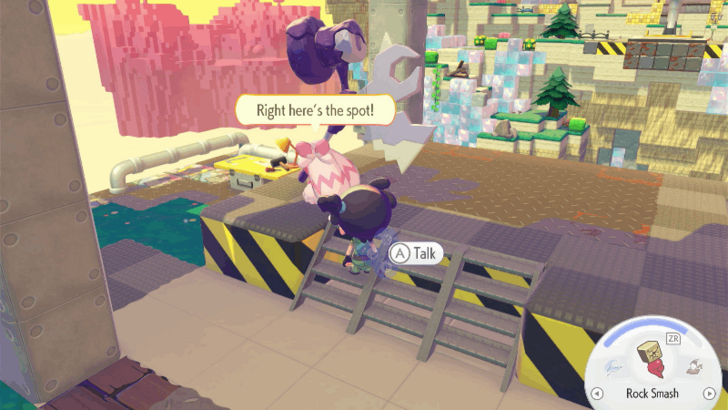
 Once you have 6 pieces of Concrete, Tinkmaster will ask you to get one Iron Ingot. Give him one Iron Ingot and wait for a while to receive Tinkagears. |
| 10 |
 Once you receive the Tinkagears, follow Tinkmaster until a yellow speech bubble appears. Talk to him to receive the recipe for the Lift Platform. |
| 11 |
 Create a Lift Platform using 5 Iron Ingots, 5 Concrete, and 1 Tinkagear. Place it so that it connects to the Lift Platform on the other side. |
| 12 |
 After setting up the Lift Platform, report to Tinkmaster. Have him follow you and get on the lift. |
| 13 |
 Take Tinkmaster to Professor Tangrowth for a cutscene. |
| 14 |
 After the cutscene ends, follow Tinkmaster and talk to him when he stops. Note that if Tinkmaster does not move and stays near Professor Tangrowth, you need to raise your Environment Level to 3 first. Once you level up the Environment Level, talk to Professor Tangrowth to resume the objective. |
| 15 |
 Create a Lift Platform and place it so that it connects to the Lift Station on the island with the huge building. Go to the hill on the east side of the island with the Pokemon Center and place it there. |
| 16 |
 Take TInkmaster and ride the lift together towards the island with the huge building. |
| 17 |
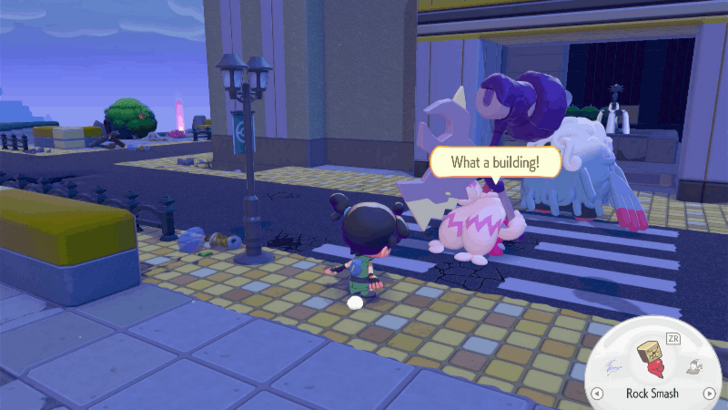 Talk to Tinkmaster in front of the huge building. Talking to him will lead you to scout the building. |
| 18 |
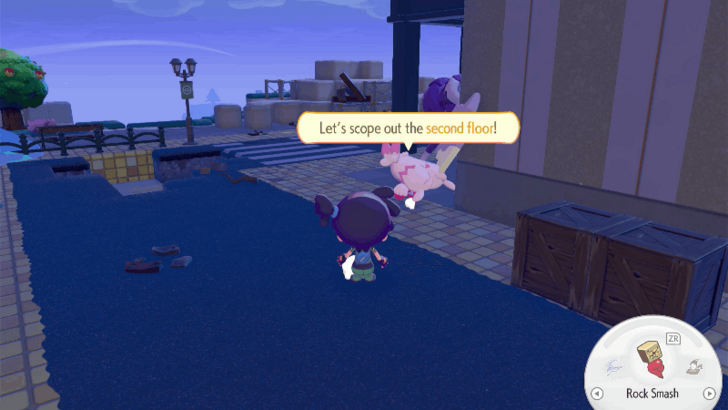 Follow Tinkmaster and investigate the huge building. He will stop on each floor from the second floor onwards to check the inside of the building. Follow him for a while and listen to what he has to say. |
| 19 |
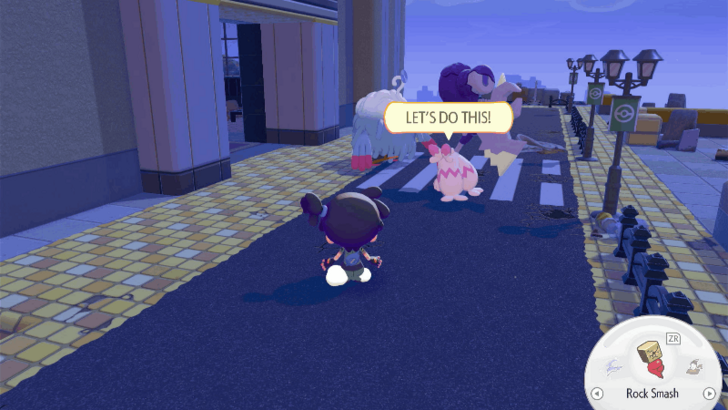 Once you have finished scouting each floor, return to the front of the huge building and talk to Tinkmaster to receive the important request: Rebuild the Huge Building! |
Rebuild the Huge Building! Request Walkthrough
| # | Step by Step Objectives |
|---|---|
| 1 |
 Gather the materials and Pokemon needed to build the second floor of the building. You need 25 Concrete, 10 Glass, 5 Pokemetal, 10 Iron Ingots, and 6 Pokemon to help out. To make glass, put either Volcanic Ash, Sand, or Sandstone inside a Furnace and have a Pokemon with Burn Specialty, such as Vulpix, light the fire. 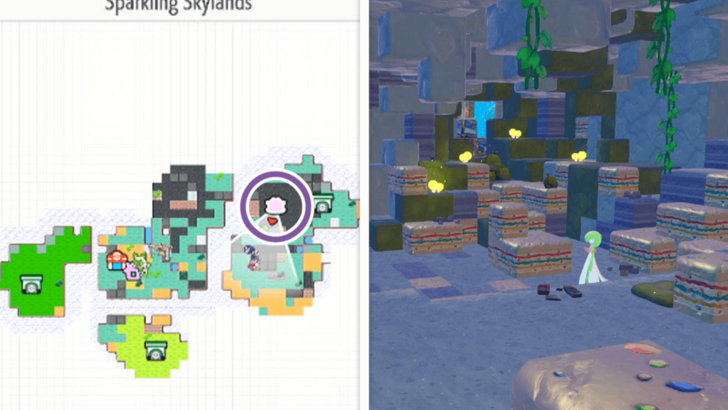 |
| 2 |
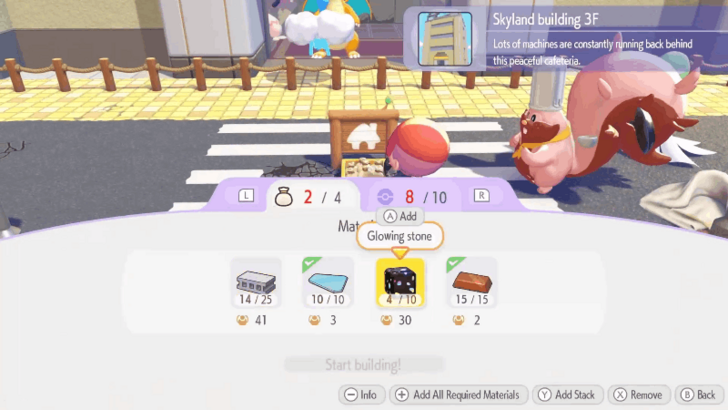 Gather materials and Pokemon to build the third floor of the building. You need 25 Concrete, 10 Glass, 10 Shiny Stones, and 10 Copper Ingots. 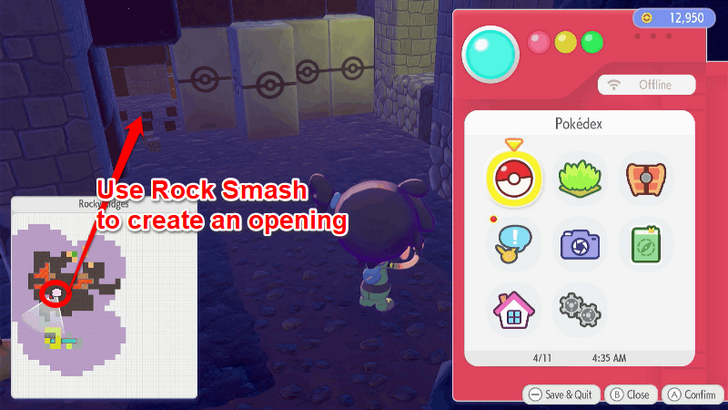 |
| 3 |
 You will need Chef Dente's help to build the third floor of the building. Go to Rocky Ridges and have him follow you to Sparkling Skylands. If you have a house in both Rocky Ridges and Sparkling Skylands, you can fast travel to skip going to Bleak Beach. Chef Dente will teleport next to you. |
| 4 |
 Gather materials and Pokemon to build the fourth floor of the building. You need 40 Concrete, 15 Glass, 10 Paper, 10 Bricks, and 20 Lumber. You will need 15 Pokemon to help build the fourth floor. |
| 5 |
 Go to Bleak Beach and ask for Peakychu's help. Have him follow you to Sparkling Skylands. |
| 6 |
 To obtain the Paper, you need to build the Professor's Apprentice Program habitat. This requires 1 Whiteboard, 1 Jumbled Cords, 1 Table, and 1 Laptop. |
| 7 |
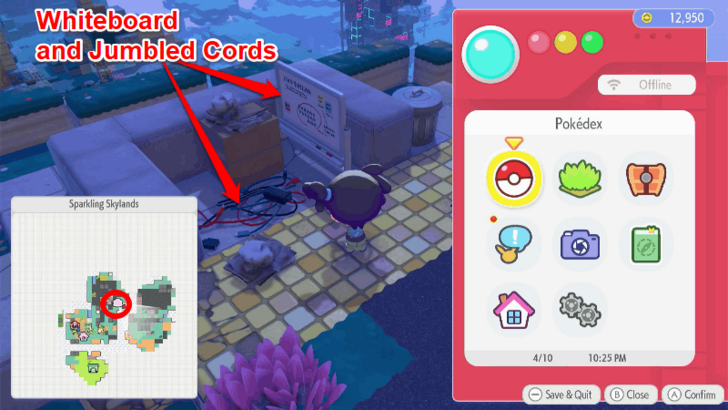 Collect the Jumbled Cords and Whiteboard on the cliff located east of the building entrance. |
| 8 |
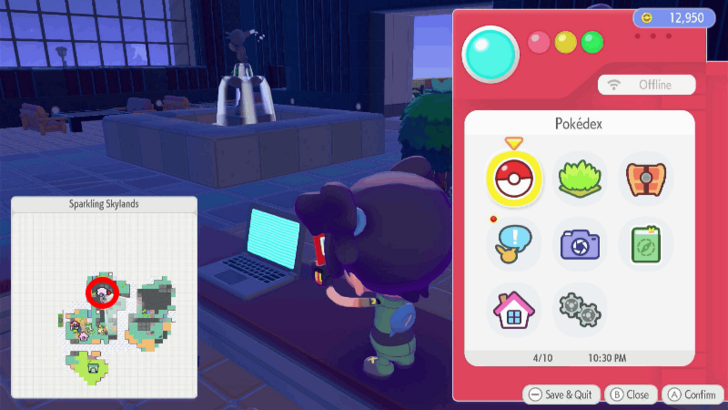 Collect the Laptop on the first floor of the building. |
| 9 |
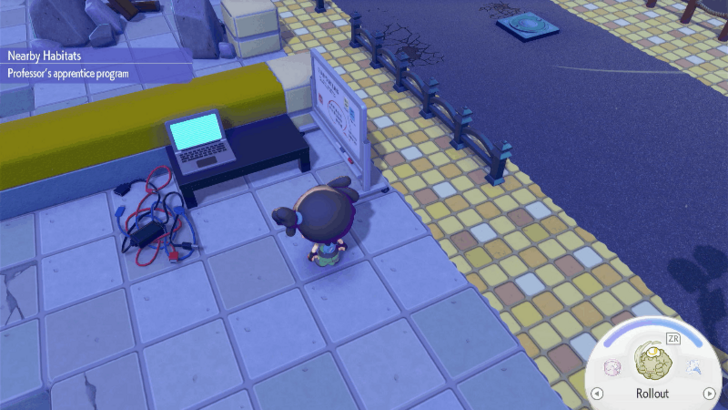 Place the Professor's Apprentice Program habitat in front of the building entrance and wait for a few minutes in order for Metang to appear. |
| 10 |
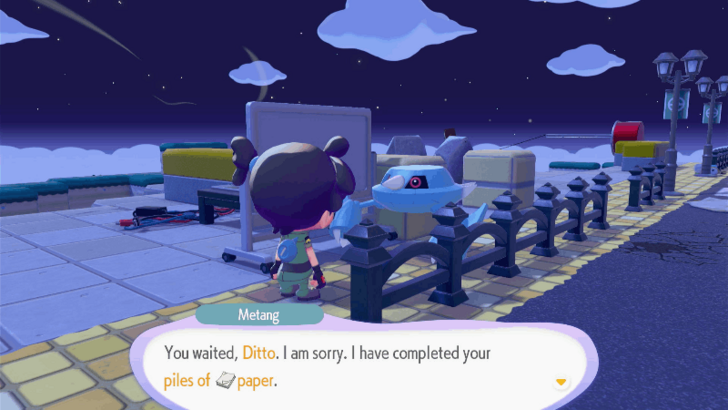 Talk to Metang to have him convert the Wastepaper into Paper. You can find Wastepaper scattered all over the area. |
| 11 |
 After completing the fourth floor of the building, take the elevator inside to reach the rooftop. Examine the Master Ball to raise your Trainer Rank to Master. |
| 12 |
 After examining the Master Ball, return to the entrance of the building and speak with Professor Tangrowth to complete the important request. |
| 13 |
 Examine the gate on the island east of the building. Remove the blocks in front of the gate and examine it again to open it. This allows you to access Sparkling Skylands from Withered Wasteland. |
Reach the End Credits
| # | Step by Step Objectives |
|---|---|
| 1 |
 Once you have completed the main request in Sparkling Skylands, you can start completing all the remaining important quests for each area. This includes completing the Team Initiation Challenges, rebuilding the Pokemon Centers, and raising the Environment Level to 5. ▶︎ List of All Requests |
| 2 |
 After completing all the important requests, the ending scene and credits will play and the game will be cleared. ▶︎ Postgame Guide |
Sparkling Skylands Walkthrough
How to Progress the Story
Complete All Important Requests to Reach the End Credits
Each area in Pokopia has important requests that you need to complete to progress towards the end credits.
This includes the main important request that varies each area, rebuilding that area's Pokemon Center, and raising that Environment Level to Level 5. Doing so unlocks the special item that you need to complete the Team Initiation Challenges.
Completing all Team Initiation Challenges for all areas unlocks the end credits.
Talk to the Pokemon with Yellow Speech Bubbles
To progress the main story, find and talk to Pokemon with Yellow speech bubbles above them. This speech bubble's subtle yellow outline indicates that talking to the Pokemon will advance the main story.
Review Progress with Professor Tangrowth

If you want a reminder of your current requests or what you need to do to move forward, you can talk to Professor Tangrowth. They will remind you what needs to be done if you have an active request.
See List of Requests in the Request Menu
You can also check the menu to see all your requests. Simply open your Pokedex, and you should see the request button among the options. Tap it to see a list of all your active requests so far.
Pokemon Pokopia Related Guides

Pokemon Pokopia Guides by Category
 Walkthrough Walkthrough
|
 Pokemon Pokemon |
 News and Game Info News and Game Info |
 Habitat Habitat |
 Crafting Crafting |
 Tips and Tricks Tips and Tricks |
 Moves Moves |
 Materials Materials |
 Items Items |
 NPCs NPCs |
 Areas and Biomes Areas and Biomes |
 Requests Requests |
 Specialties Specialties |
 Ancient Artifacts Ancient Artifacts |
 Human Records Human Records |
 Highlight Reels Highlight Reels |
 Events Events |
- |
Message Boards
| Cloud Island Sharing Board | - |
Comment
Author

Pokopia Walkthrough Guide
Rankings
- We could not find the message board you were looking for.

Gaming News


![Nova Roma Review [Early Access] | Newer, Better, and More Confusing](https://img.game8.co/4455512/2cbf8926e9a1c72a3ff056088f801ef4.png/thumb)
Popular Games

Genshin Impact Walkthrough & Guides Wiki
Umamusume: Pretty Derby Walkthrough & Guides Wiki
Crimson Desert Walkthrough & Guides Wiki
Monster Hunter Stories 3: Twisted Reflection Walkthrough & Guides Wiki
Honkai: Star Rail Walkthrough & Guides Wiki
Pokemon Pokopia Walkthrough & Guides Wiki
The Seven Deadly Sins: Origin Walkthrough & Guides Wiki
Wuthering Waves Walkthrough & Guides Wiki
Zenless Zone Zero Walkthrough & Guides Wiki
Arknights: Endfield Walkthrough & Guides Wiki


Recommended Games
Fire Emblem Heroes (FEH) Walkthrough & Guides Wiki
Diablo 4: Vessel of Hatred Walkthrough & Guides Wiki
Cyberpunk 2077: Ultimate Edition Walkthrough & Guides Wiki
Yu-Gi-Oh! Master Duel Walkthrough & Guides Wiki
Super Smash Bros. Ultimate Walkthrough & Guides Wiki
Pokemon Brilliant Diamond and Shining Pearl (BDSP) Walkthrough & Guides Wiki
Elden Ring Shadow of the Erdtree Walkthrough & Guides Wiki
Monster Hunter World Walkthrough & Guides Wiki
The Legend of Zelda: Tears of the Kingdom Walkthrough & Guides Wiki
Persona 3 Reload Walkthrough & Guides Wiki


All rights reserved
©2025 Pokémon. ©1995–2025 Nintendo / Creatures Inc. / GAME FREAK inc. ©KOEI TECMO GAMES
The copyrights of videos of games used in our content and other intellectual property rights belong to the provider of the game.
The contents we provide on this site were created personally by members of the Game8 editorial department.
We refuse the right to reuse or repost content taken without our permission such as data or images to other sites.