Combat Guide: Basics of Combat Explained
★ All Updates for Patch 5
☆ Beginner Guides for All Starter Players
★ Simple Character Creation Guide for beginners
☆ A Full Guide to Multiclassing
★ All Side Quests and Event Points
☆ All Races and Subraces
This is a beginner's guide to combat in Baldur's Gate 3 (BG 3)! Read on to know everything you need to know about mechanics in combat like turns, actions, movement, dice rolls, and more!
List of Contents
Combat Guide: Mechanics Explained
Turns and Initiative
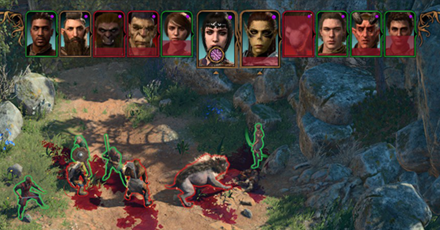
The red bar overlay on a unit's portrait signifies how much damage it has taken.
Combat in Baldur's Gate 3 uses a turn-based system in contrast to the realtime action state of exploration. Entering combat will force the game into a turn-based mode.
Every decision made during combat is influenced by pre-determined stats and dice rolls. When expecting a combat situation, stats of visible enemies can be checked by selecting them and choosing Examine. Use this feature to check for enemy stats and plan accordingly.
There are two ways to enter combat: either combat is initiated by being within an enemy's line of sight or using the element of Surprise.
Initiative Influences Turn Order
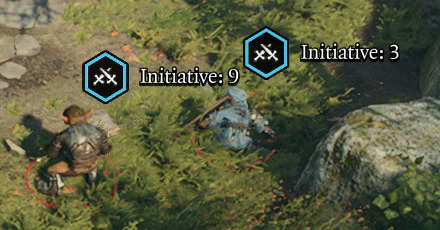
When combat begins, each involved unit rolls an Initiative. An Initiative Roll is determined by a 20-sided die plus the unit's respective Dexterity modifier.
The unit with the highest dice roll result will be the first to act in a turn. Similarly, the unit with the lowest result will be the last.
The higher the unit's Dexterity, the higher the chances that unit will be placed in the first turn of combat.
Adjacent Members Fight Together
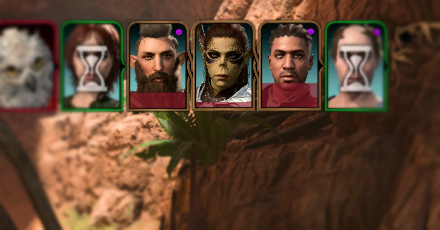
Unit members who are positioned side-by-side in the order can all act in the same turn.
For your party members, this means you can cycle between them while giving them orders if they are beside each other in the Turn Order.
Use this to your advantage when making decisions that require synergy among members of your party.
Surprise Gives a Free Turn
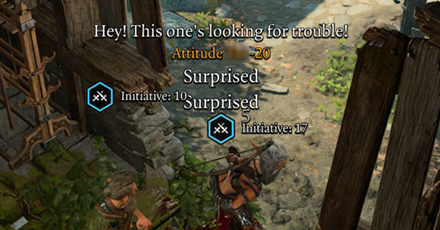
Unsuspecting enemies can be robbed of their first turn through a mechanic called Surprise.
Surprise occurs when making an action on an unsuspecting enemy outside of combat. This means, for example, attacking an unaware enemy from behind while Hidden or Invisible.
When an enemy has been surprised, Initiative is rolled for all involved units in the area and turn order is calculated normally. But enemies will be unable to act during the first round. This gives all party members who entered combat a free turn. After the first round, combat will proceed normally.
Actions and Movement
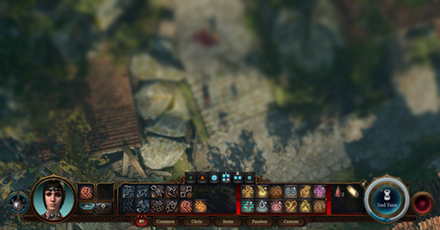
All actions a unit can make is found at the bottom of the screen.
During a turn in combat, an active unit can make various actions from attacking and casting spells to moving and using items. In addition, Passive moves like Opportunity Attacks can also be set. All available actions can be made until End Turn is chosen.
Actions: Primary Moves
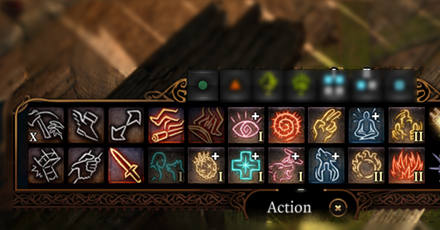
Actions, symbolized by a green circle, are primary moves that can be made in combat such as Main Hand Attacks and Throws.
This is a unit's main tool kit. Basic attacks and spells can be found here.
Bonus Actions: Secondary Moves
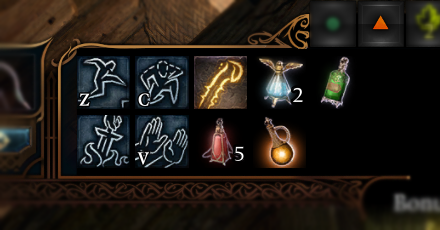
Bonus Actions, symbolized by an orange triangle, are secondary moves that can be used on top of regular actions. These are often indicated as icons with a bluish hue background, some examples being Jump and Hide.
Some Bonus Actions are useful in and out of combat. Shove can be used to push objects and enemies off a cliff. Throw can be used as a ranged alternative in attacking an enemy without a bow.
Movement: Unit Traversal
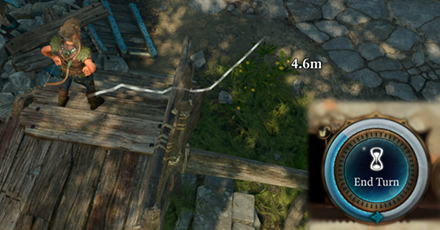
Movement is symbolized by the path drawn from one point to the character, and the bluish ring around the End Turn icon. Movement is influenced by unit's Movement Speed stat and a metre resource.
How much distance is covered by movement depends on various factors such as the remaining metre resource plus any range demands of Bonus Actions like Jump.
Combat Dice Rolls
| Important Dice Rolls | |
|---|---|
| Attack Roll | Roll 1d20 + Ability Modifier + Proficiency Bonus |
| Saving Throw | Roll 1d20 + Ability Modifier Spell Ability Modifiers: Wisdom, Intelligence, Charisma |
| Advantage | Roll 2d20. Dice with the highest result is picked. |
| Disadvantage | Roll 2d20. Dice with the lowest result is picked. |
Dice Rolls are notated as (x)d(y), where x = number of dice and y = sides on a die. In-game, they are, in most cases, interpreted as the percentage chance.
Dice Rolls are heavily involved in the success and failures on an action in combat. Some dice rolls are better than others thanks to extra points from the likes of Proficiency Bonuses.
Attack Rolls and Saving Throws
Attack Rolls determine the chance of a physical attack or spell succeeding. The success of this roll is all depends on receiving target's Armor Class. Failed attack rolls constitute a miss.
Saving Throws determine a unit's chances of being unaffected by spells, traps, ailments, and similar status effects. These are often caused by spells and are affected by a Difficulty Class.
Critical Hits and Critical Misses
Critical Hits occur when an Attack Roll result is 20. When this happens, the attack is always a guaranteed hit and damage is doubled.
Critical Misses are made when an Attack Roll result is 1. This will always result in a miss even when additional modifiers like proficiency will pass the armor class of the receiving target.
Advantage and Disadvantage
On top of Ability Modifiers, Advantage and Disadvantage are major influences to combat. Unlike modifiers which add or subtract roll results, these add an extra dice roll.
Advantage occurs in situations like stealth attacks, perception checks, and similar actions. Dice is rolled twice and the higher value of the two are chosen.
Disadvantage happens in cases such as attacking with weapons where a unit is not proficient in, attacking in the dark without Darkvision, or similar. Dice is rolled twice but the lowest value of two is chosen.
Advantage and Disadvantage Guide
End of Combat
Combat ends when either all enemies have been defeated by reducing their HP to zero, or all members have managed to flee from the combat area after a set distance.
Unfortunately, combat cannot be ended by waiting out on active enemies in situations such as stealth.
Once combat has ended, the game will exit out of turn-based mode. Use this opportunity to pick up any unchecked loot!
Is Combat Always the Answer?
Know Your Enemies
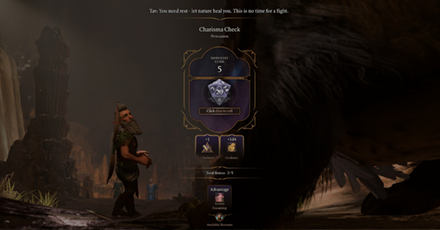
While combat is a huge part of Baldur's Gate 3 gameplay, it is not always the solution to every situation.
Adventurers will come face to face with enemies or odds that may not be in their favor. Furthermore, some clever or diplomatic methods that do not involve long, drawn-out fights may offer better rewards in the long run.
Make sure to check every possibility in a situation before engaging in combat since repeated combat encounters can wear down an unprepared party.
All Beginner Guides
Baldur's Gate 3 Related Guides

| List of Categories | |
|---|---|
 Main Campaign Main Campaign |
 Beginner Guides Beginner Guides |
 Classes Classes |
 Character Creation Character Creation |
 Legendaries Legendaries |
 Weapons Weapons |
 Armor Armor |
 Accessories Accessories |
 Items Items |
 Actions Actions |
 Spells Spells |
 Illithid Powers Illithid Powers |
 Origin Characters Origin Characters |
 Maps Maps |
 News News |
 Bosses Bosses |
Comment
Author
Combat Guide: Basics of Combat Explained
improvement survey
03/2026
improving Game8's site?

Your answers will help us to improve our website.
Note: Please be sure not to enter any kind of personal information into your response.

We hope you continue to make use of Game8.
Rankings
- We could not find the message board you were looking for.
Gaming News
Popular Games

Genshin Impact Walkthrough & Guides Wiki

Honkai: Star Rail Walkthrough & Guides Wiki

Umamusume: Pretty Derby Walkthrough & Guides Wiki

Pokemon Pokopia Walkthrough & Guides Wiki

Resident Evil Requiem (RE9) Walkthrough & Guides Wiki

Monster Hunter Wilds Walkthrough & Guides Wiki

Wuthering Waves Walkthrough & Guides Wiki

Arknights: Endfield Walkthrough & Guides Wiki

Pokemon FireRed and LeafGreen (FRLG) Walkthrough & Guides Wiki

Pokemon TCG Pocket (PTCGP) Strategies & Guides Wiki
Recommended Games

Diablo 4: Vessel of Hatred Walkthrough & Guides Wiki

Fire Emblem Heroes (FEH) Walkthrough & Guides Wiki

Yu-Gi-Oh! Master Duel Walkthrough & Guides Wiki

Super Smash Bros. Ultimate Walkthrough & Guides Wiki

Pokemon Brilliant Diamond and Shining Pearl (BDSP) Walkthrough & Guides Wiki

Elden Ring Shadow of the Erdtree Walkthrough & Guides Wiki

Monster Hunter World Walkthrough & Guides Wiki

The Legend of Zelda: Tears of the Kingdom Walkthrough & Guides Wiki

Persona 3 Reload Walkthrough & Guides Wiki

Cyberpunk 2077: Ultimate Edition Walkthrough & Guides Wiki
All rights reserved
© 2023 Larian Studios. All rights reserved. Larian Studios is a registered trademark of arrakis nv, affiliate of Larian Studios Games ltd. All company names, brand names, trademarks and logos are the property of their respective owners. © 2020 Wizards of the coast. All rights reserved. Wizards of the coast, Baldur’s Gate, Dungeons & Dragons, D&D, and their respective logos. Are registered trademarks of wizards of the coast LLC
The copyrights of videos of games used in our content and other intellectual property rights belong to the provider of the game.
The contents we provide on this site were created personally by members of the Game8 editorial department.
We refuse the right to reuse or repost content taken without our permission such as data or images to other sites.


![Monster Hunter Stories 3 Review [First Impressions] | Simply Rejuvenating](https://img.game8.co/4438641/2a31b7702bd70e78ec8efd24661dacda.jpeg/thumb)


