Help the Cursed Monk
★ All Updates for Patch 5
☆ Beginner Guides for All Starter Players
★ Simple Character Creation Guide for beginners
☆ A Full Guide to Multiclassing
★ All Side Quests and Event Points
☆ All Races and Subraces

Help the Cursed Monk is a side quest in Baldur's Gate 3 (BG3). Read on for a detailed walkthrough for Help the Cursed Monk, its location, and the rewards you'll get for completing this side quest!
List of Contents
Side Quest Details
| Journal Entry | |
|---|---|
| Help the Cursed Monk We read the journal of a Dark Justiciar. He mentioned an amulet of great power that also made the wearer laugh. It was cast into the lava. |
|
| Recommended Level | Level 6 |
| Rewards | ・Tasha's Hideous Laughter Spell (if you agreed to receive the curse) ・Sentient Amulet (if you refused to receive the curse) |
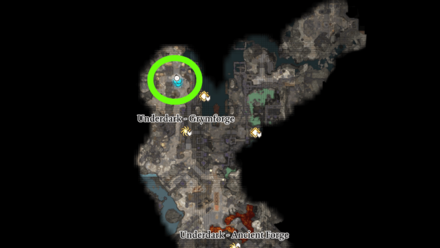
| Starting Location | |
| Grymforge - 2nd Level to the west of where your boat is docked. | |
 View Full Image View Full Image |
|
Help the Cursed Monk Walkthrough
| Help the Cursed Monk Guide | |
|---|---|
| 1 | |
| 2 | |
| 3 | |
| 4 | |
| 5 | |
| 6 | |
| 7 |
Read the Dark Justiciar's Journal
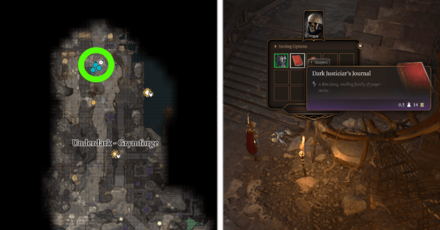
To begin the Help the Cursed Monk quest, read the Dark Justiciar's Journal which you can loot from a Dark Justiciar skeleton on the 2nd level to the west of where your boat is docked in Grymforge.
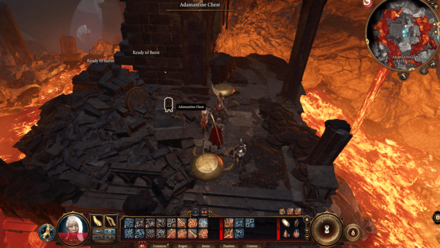
Retrieve the Sentient Amulet

The Sentient Amulet is located deep down the lava levels of the Grymforge. Follow our steps below to get there:
- Begin at the Cave-In rubble and jump over to the platforms to the east leading up to the Ancient Forge waypoint.
- From the waypoint, go down the stairs that leads to the Adamantine Forge.
- Jump over the gap to the southwest to reach the stairs and keep going until you reach the area filled with bursting lava.
- At the middle of the lava, you'll find an Adamantine Chest on a platform that contains the Sentient Amulet. Make your way there while hopping from one platform to another to avoid being damaged by the lava.
Defeat or Avoid the Lava Elemental
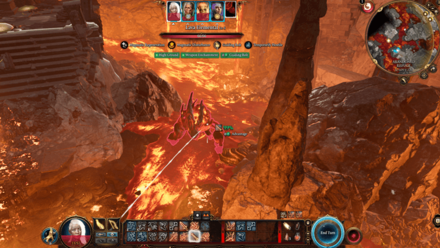
A Lava Elemental will be patrolling the area where the Adamantine Chest is located. You can choose to let it pass by until the path leading to the chest is clear, or you can choose to fight it.
If you decide to kill it, hop on one of the platforms to gain the High Ground advantage, then cast out your spells to deal with it quickly. You will have to beat it in one turn as it regenerates to full HP each round. Refrain from using any fire spells as the Lava Elemental is completely immune to fire.
Some good spells to use here would be Guiding Bolt to open up the fight, and Thunderwave if the Lava Elemental gets close to you. This should damage it enough for the other non-spellcasting party members to use bow attacks to finish it off!
Speak to the Cursed Monk
Open the Adamantine chest using lockpick (DC 20), then take the Sentient Amulet inside.
A trapped monk will emerge from the amulet and wishes to return to her granddaughter, Shirra Clarwen, at the Open Hand Temple near Wyrm's Crossing in Baldur's Gate.
Sentient Amulet Abilities and Side Effects
When equipping the Sentient Amulet, you'll gain access to the Shatter Spell and Ki Restoration.
However, the downside to this is that you'll be sufferring from the High Spirits condition where you must succeed a Wisdom Saving Throw each time you use one of the amulet's unique abilities, otherwise the wearer becomes Hysterical.
Travel to the Open Hand Temple
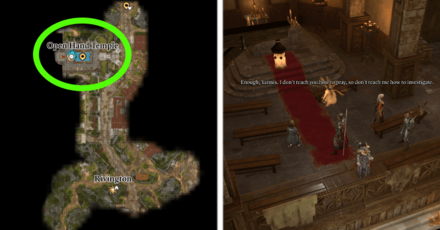
As soon as you arrive in Rivington at the beginning of Act 3, go past the waypoint and follow the main path to your left until you reach the Open Hand Temple (X: -48, Y: -3).
Speak to Sister Yannis and ask her about Shirra Clarwen's whereabouts. She'll inform you that Shirra had passed away a year ago and her body is buried in a crypt under the temple.
You'll also begin the Solve the Open Hand Temple Murders after the conversation with her.
Enter the Crypt
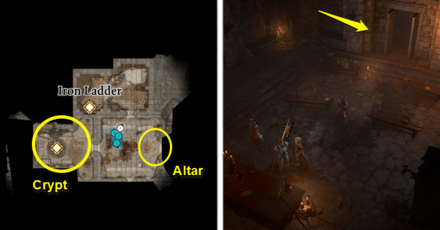
Go to the temple's kitchen by going through the doors on the right side of the temple. Enter the Ornate Wooden Hatch to find yourself in the temple's tunnels, then follow the path until you reach an altar with two statues behind it. The entrance to the crypt is located just across the altar.
Open Shirra Clarwen's Sarcophagus
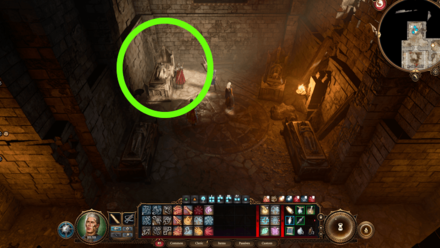
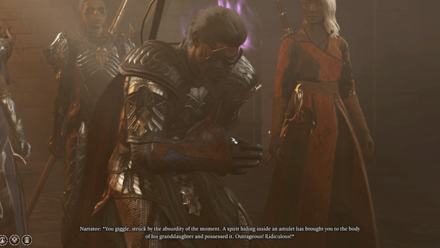
There will be four sarcophagi inside the crypt. Read the plaque of Shirra Clarwen on the northwestern corner of the room first, then open the sarcophagus. The cursed monk will then take over her granddaughter's corpse to speak with you.
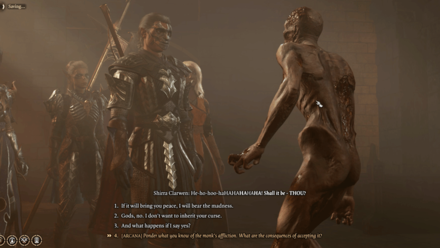
Accept or Refuse the Monk's Curse
| Accept or Refuse the Curse | |
|---|---|
| Accepting the Curse | Refusing the Curse |
The monk's initial plan was to pass the curse to his supposed living granddaughter, but due to her untimely passing, the monk then asks if you would be willing to receive the curse instead.
Accepting the Curse
Once you accept the curse, the laughter will begin to take control of you, and you'll have to pass two Wisdom or Constitution dialogue checks with a DC of 15 to resist it. Alternatively, you can also choose not to resist the curse and let it take over you.
Do note that whether you succeed or fail the skill checks, you'll still succumb to the madness either way. After this, you'll receive the Tasha's Hideous Laughter spell and lose -2 Wisdom to your ability score.
Refusing the Curse

Refusing to receive the curse will anger the monk and the other corpses would rise from their tombs to fight you.
You'll only need to target and defeat the cursed monk during this fight so focus solely on him. Once he's been dealt with, he'll accept his fate of forever being cursed and the quest will end there.
You won't be receiving the Tasha's Hideous Laughter if you chose to go with this route, but on the bright side, your Wisdom ability score won't receive that -2 penalty and you'll get to keep the Sentient Amulet without its Hysterical side effects.
Help the Cursed Monk Rewards
Tasha's Hideous Laughter Spell
Accepting the curse will grant you the ability to use the Tasha's Hideous Laughter spell. This spell leaves a target Prone due to laughter. This requires the caster's Concentration and can only be used once per Long Rest.
Tasha's Hideous Laughter Spell Guide and Effects
Sentient Amulet
Refusing the curse will reward you with the Sentient Amulet. When equipped, you'll gain access to the Shatter Spell and Ki Restoration.
Sentient Amulet: Accessory Guide and How to Get
Baldur's Gate 3 Related Guides

Prologue Side Quests
| All Prologue Side Quests | |
|---|---|
| How to Free the Intellect Devourer | How to Free Shadowheart |
Act 1 Side Quests
Druid's Grove Quests
The Risen Road Quests
| The Risen Road Quests | |
|---|---|
| Find the Missing Shipment | How to Rescue the Grand Duke |
| Rescue the Trapped Man | How to Free Oskar Fevras |
Blighted Village Quests
Goblin Camp Quests
| Goblin Camp Quests | |
|---|---|
| How to Get Volo's Ersatz Eye | Defiled Temple Puzzle |
| Find the Nightsong | Ask the Goblin Priestess for Help |
Nautiloid Crash Region Quests
Underdark Quests
Mountain Pass Quests
| Mountain Pass Quests | ||
|---|---|---|
| Steal a Githyanki Egg | How to Beat Gremishkas | How to Access Guardian of Faith Room |
| Dawnmaster Puzzle Guide | Where to Find the Githyanki Creche | - |
This section is currently under construction. Check back later for updates!
Act 2 Side Quests
Last Light Inn Quests
Gauntlet of Shar Quests
| Gauntlet of Shar Quests | |
|---|---|
| Gauntlet of Shar: All Trials and Umbral Gems | Kill Raphael's Old Enemy |
Mind Flayer Colony Quests
| Mind Flayer Colony Quests |
|---|
| How to Solve the Necrotic Laboratory |
Act 3 Side Quests
Rivington Quests
| Rivington Quests | ||
|---|---|---|
| Investigate the Suspicious Toys | Solve the Open Hand Temple Murders | Find the Missing Letters |
| How to Get to Wyrm's Rock Fortress | How to Find Dribbles the Clown | - |
Lower City Quests
| Lower City Quests | ||
|---|---|---|
| How to Get to the House of Hope | How to Get to Cazador's Palace | Rescue Orin's Victim |
| Aid the Underduke | How to Get to the House of Grief | Investigate the Murders |
Author

Help the Cursed Monk
Rankings
Gaming News


Popular Games

Genshin Impact Walkthrough & Guides Wiki
Honkai: Star Rail Walkthrough & Guides Wiki
Arknights: Endfield Walkthrough & Guides Wiki
Umamusume: Pretty Derby Walkthrough & Guides Wiki
Wuthering Waves Walkthrough & Guides Wiki
Pokemon TCG Pocket (PTCGP) Strategies & Guides Wiki
Abyss Walkthrough & Guides Wiki
Zenless Zone Zero Walkthrough & Guides Wiki
Digimon Story: Time Stranger Walkthrough & Guides Wiki
Clair Obscur: Expedition 33 Walkthrough & Guides Wiki


Recommended Games
Fire Emblem Heroes (FEH) Walkthrough & Guides Wiki
Pokemon Brilliant Diamond and Shining Pearl (BDSP) Walkthrough & Guides Wiki
Diablo 4: Vessel of Hatred Walkthrough & Guides Wiki
Super Smash Bros. Ultimate Walkthrough & Guides Wiki
Yu-Gi-Oh! Master Duel Walkthrough & Guides Wiki
Elden Ring Shadow of the Erdtree Walkthrough & Guides Wiki
Monster Hunter World Walkthrough & Guides Wiki
The Legend of Zelda: Tears of the Kingdom Walkthrough & Guides Wiki
Persona 3 Reload Walkthrough & Guides Wiki
Cyberpunk 2077: Ultimate Edition Walkthrough & Guides Wiki


All rights reserved
© 2023 Larian Studios. All rights reserved. Larian Studios is a registered trademark of arrakis nv, affiliate of Larian Studios Games ltd. All company names, brand names, trademarks and logos are the property of their respective owners. © 2020 Wizards of the coast. All rights reserved. Wizards of the coast, Baldur’s Gate, Dungeons & Dragons, D&D, and their respective logos. Are registered trademarks of wizards of the coast LLC
The copyrights of videos of games used in our content and other intellectual property rights belong to the provider of the game.
The contents we provide on this site were created personally by members of the Game8 editorial department.
We refuse the right to reuse or repost content taken without our permission such as data or images to other sites.
In the part where it says: "Do note that whether you succeed or fail the skill checks, you'll still succumb to the madness either way. After this, you'll receive the Tasha's Hideous Laughter spell and lose -2 Wisdom to your ability score." If you succeed the two wisdom checks, you will NOT get the -2 in the Wisdom.