Find the Nightsong
★ All Updates for Patch 5
☆ Beginner Guides for All Starter Players
★ Simple Character Creation Guide for beginners
☆ A Full Guide to Multiclassing
★ All Side Quests and Event Points
☆ All Races and Subraces

This is a walkthrough for the sidequest Find the Nightsong in Baldur's Gate 3. Read on to learn how to unlock the quest, where to find the Nightsong, and what are the rewards for killing or sparing Nightsong and its effect on Shadowheart's questline.
List of Contents
Side Quest Details
| Journal Entry | |
|---|---|
| Investigate the temple A wizard in Baldur's Gate is offering a huge sum of money to anyone who brings him the 'Nightsong'. |
|
| Recommended Level | Level 5 |
| Rewards | ・Progress in Infiltrate Moonrise Towers ・Progress in Shadowheart's questline ・Progress in Astarion's questline. ・Moonlight Glaive or Shar's Spear of Evening |
| Starting Location | |
| Defiled Temple | |
 |
|
How to Start Find the Nightsong
Get Information from Aradin
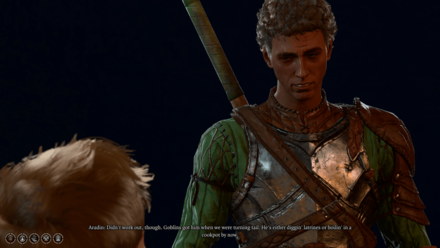
You can start the quest by getting information from Aradin, the human that the Tiefling Zevlor was having an argument with in the Druid Grove.
Asking him about a job from a Wizard in Baldur's Gate will cause him to give you the Stamped Handbill, which starts the quest.
Get Information from Liam
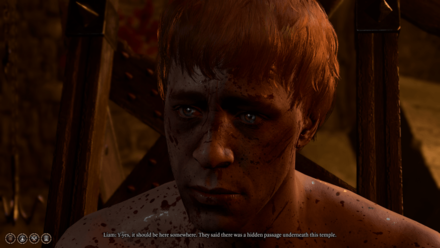
If Aradin died during the initial Goblin assult in the Druid Grove, you can also start the quest by getting information from Liam in the Shattered Sanctum, and adventurer being tortured by Torturer Spike.
Free him and exhaust his dialogue and he'll mention the Nightsong.
After Rescuing Halsin

Alternatively, you can get the quest after rescuing the druid Halsin from the Shattered Sanctum as part of his quest and Save the Refugees.
After making camp and celebrating with the Tiefling refugees, talk to him and exhaust his dialogue and he'll mention the Nightsong when talking about Moonrise Towers.
Find the Nightsong Walkthrough
| Find the Nightsong Walkthrough Guide |
|---|
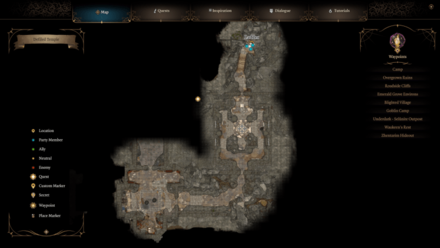
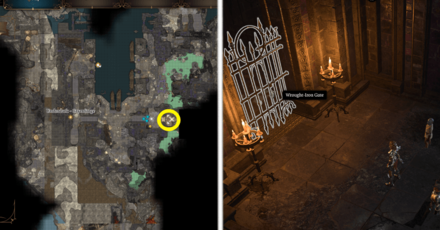
Enter the Defiled Temple
Head to the Shattered Sanctum which is the interior building in the Goblin Camp and head inside the Defiled Temple. The door is located on the south western side of the sanctum just past the Goblin Priestess Gut.
There are several ways to get inside the Defiled Temple. You can either sneak into the room or just enter if you already took care of the Goblin Leaders. Alternatively, Priestess Gut will let you in the Defiled Temple if you ask her to heal you.
Note: If you didn't enter the Defiled Temple with Priestess Gut, you'll need to persuade her Ogre Bodyguard Polma to let you safely in. Alternatively, you may simply kill her.
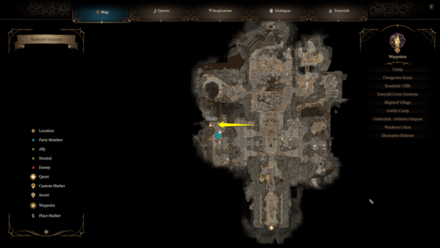
Solve the Defiled Temple Puzzle

Once inside, you'll need to solve the Defiled Temple's puzzle to access the Underdark by rotating the Stone Discs in the right order.
Alternatively, by passing a Perception check, you can simply lockpick a lever to bypass the puzzle. Regardless of your choice, once you have access, climb down the ladder to the Underdark.
How to Solve the Moon Puzzle
Selúnite Outpost
You'll arrive at the Selúnite Outpost and a minotaur will charge at the portcullis and will be incinerated by the outpost's magical defenses. To exit the outpost safely, you'll need to shoot the glowing Moonstone to disable the defenses.
Once destroyed, pull the lever northeast of the central statue to open the portcullis.
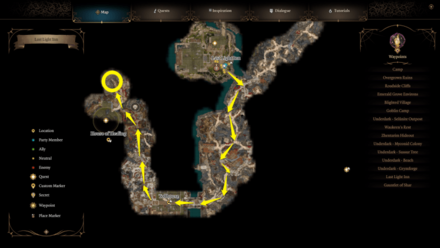
The Underdark
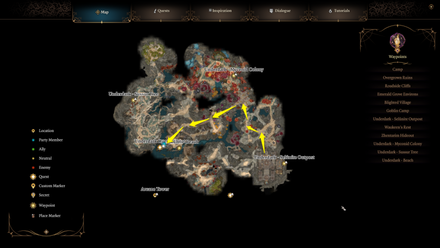
The Underdark has several sidequests you can accomplish, but to progress this quest, you'll need to head to the Underdark Beach on the central western side of the map and use the Underdark Duergar Boat to access the Grymforge. There are several ways you can go about this.
| The Underdark Options | ||
|---|---|---|
| Find the Missing Boots | Wipe Out the Duergar Slavers | |
Find the Missing Boots
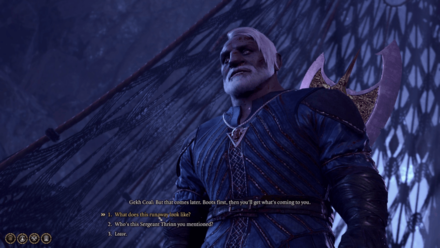
Bypassing a Perception as you near the Underdark Beach, you'll encounter the Duergar Gekh Coal. If you manage to convice them that you mean no harm, you can offer your services to help them retrieve a pair of boots from a runaway Deep Gnome. This starts the Find the Missing Boots sidequest.
This forces you to potentially wipe out the Myconid Colony in the north eastern part of Underdark, which is very difficult to do and can potentially lock you out of several sidequests.
Regardless, if you return the boots to Gekh Coal, you'll be able to use the Duergar Boat to travel to the Grymforge safely.
Wipe Out the Duergar Slavers
Alternatively, you can simply wipe out the Gekh Coal and his forces as soon as you reach the area, which also nets you some rewards from the Sovereign Spawn in the Myconid Colony.
Keep in mind that if you wipe out Gekh Coal's forces, you'll need to deceive or convince a Duergar patrol once you board the boat and travel the waters. Pass this check and you'll make it safely to the Grymforge.
The Grymforge
The Grymforge has its own sets of sidequests, but your goal here is to find the lift to the surface. Head east to the small alcove across the waypont where a Deep Gnome named Stickpit is wandering around. He'll mention that the lift will take you to the shadow-cursed lands, but you'll need a Moonlantern to travel safely.
True Soul Nere has a broken Moonlantern and is currently trapped in the rubble in the southern part of the Grymforge. If you free him, you can kill him to retrieve the broken Moonlantern though it won't be any use in the shadow-cursed lands in its current state.
The Shadow-Cursed Lands
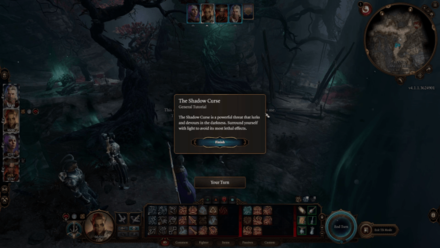
The Shadow-Cursed Lands are enveloped by shadows that will constantly sap your life force unless you have a source of light like a Torch or can cast Dancing Lights Cantrip.
Shadowheart is immune to the shadow curse unless you delve into very thick shadows, so having her in your party is ideal so you have one party member who can attack without equipping a torch.
How to Get to the Shadow-Cursed Lands
Help the Harpers
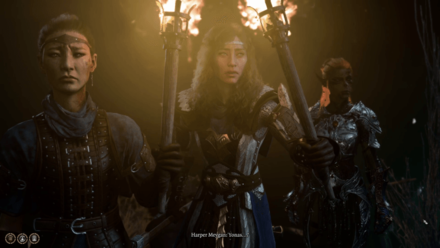
Follow the path southwest and head to the Ruined Battlefield for a cutscene involving The Harpers, You'll need to help the Harpers defeat the newly manifested Shadows
You'll need to keep Harper Lassandra alive so she can tell you the location of the Last Light Inn, the only safe place in the Shadow-Cursed Lands and where you can get partial immunity to the shadows in this area.
Get Selûne's Blessing
Head to the Last Light Inn located in the north eastern corner of the map and you'll be confronted by Jaheira. After convincing her that you're not a threat, she'll direct you to head upstairs in the inn to talk to Isobel, a priestess of Selûne. She can provide a blessing that can protect you from most of the curse's effects.
Take note that after receiving the blessing, you will immediately get attacked by True Soul Marcus. Defeat him and his Winged Horrors and Jaheira will ask you to help the Harpers ambush a convoy who have something that can protect you from the deeper shadows.
Obtaining the Moonlantern
Speak to Harper Branthos on the bridge just outside the Last Light Inn and he'll say that he needs help getting a relic from a convoy that will allow you to pass through the deep shadows unscathed. Accept his offer and he'll lead you to the ambush point.
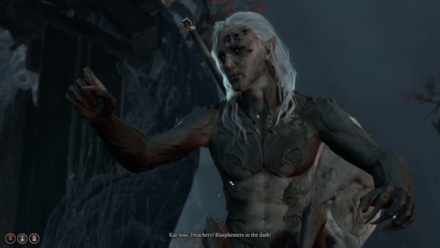
Once at the ambush point, talk to Branthos again for a cutscene where you'll see the drider Kar'niss holding an intact moonlantern. You may deceive Kar'niss into giving up the lantern or simply attack him.
Freeing the Pixie
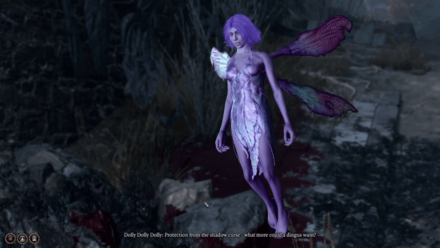
Regardless of your choice, the pixie inside the lantern called Dolly Dolly Dolly will beg you to release them as the contraption holding her is painful. If you decide to free her, you'll get a permanent Pixie's blessing which grants you complete immunity to the shadow curse.
We recommend this option since it means you don't need to hold onto the moonlantern to stay safe from the shadows, allowing you two-handed weapons without getting damaged.
Head to the Thorm Mausoleum
Head to the northwestern side of the map through the Tollhouse to find the entrance to the Thorm Mausoleum.
Raphael will speak to you once you're close to the mausoleum. After his dialogue, head inside through the destroyed large doors.
The Thorm Mausoleum Paintings
Once inside, head to the back of the mausoleum to find an open tomb and three murals. You need to press the buttons at the base of each painting in the right order to open the hidden doorway.
It's a good idea to ungroup your party here and have just one character press the buttons as the area near the paintings have many traps, though you can easily sidestep them if you don't have a Trap Disarm with you. Press the following murals in the correct order:
- Splendor, the southwestern mural which depicts the Moonrise Towers
- Tragedy, the southeastern mural which depicts General Thorm
- Infamy, the central mural which depicts General Thorn sitting on a throne.
Once solved, enter the hidden passage and ride the elevator to enter the Gauntlet of Shar.
Thorm Mausoleum Painting Puzzle Solution
The Gauntlet of Shar

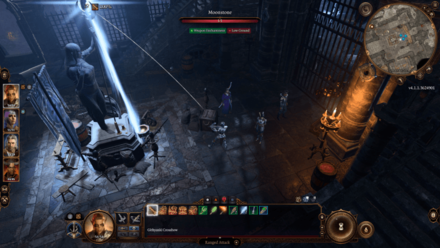
Head through the doors and into the central area with the statue at the center surrounded by glyphs. Getting too close to the statue will cause you to get violently knocked back though it deals no damage.
To solve this puzzle, you need to pull the 4 levers in the each of the alcoves in the area. There is no particular order of levers to pull, but you need to avoid stepping on traps in the areas near the alcove to avoid unleashing darkness that will cause untargetable rats that will quickly reduce your HP.
Pulling the levers causes a a brazier to descend from the ceiling that you need to interact with to dim the lights and prevent from getting knocked back by the statue.
How to Solve the Statue of Shar Puzzle
Disarming the Traps
It's a good idea to ungroup your party and have one person with high perception such as Astarion to pull the levers. If you don't have a Trap Disarm in your inventory, you can simply jump over the rectangular trap at the entrance of every alcove to avoid it.
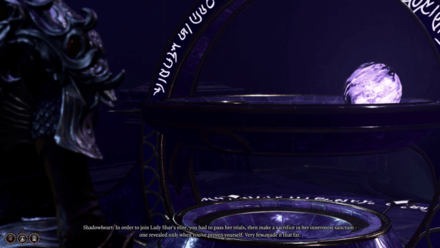
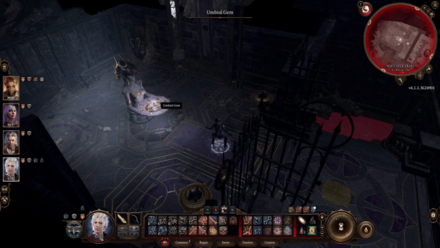
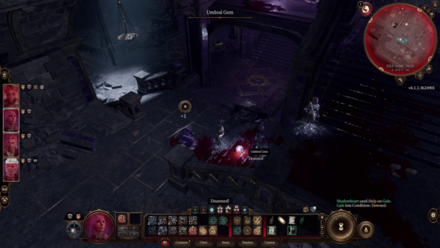
Once you're done pulling the levers and putting out the lights of the brazier, sneak towards the center of statue, making ssure to enter the inner area through the space between the glyphs and interact with the Umbral Gem at the center. This unlocks the Stone Door at the back of the room.
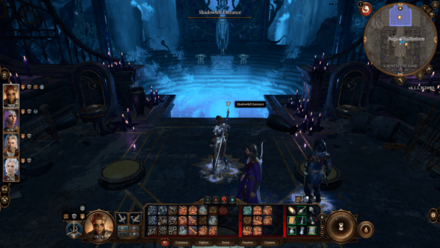
The Inner Sanctum
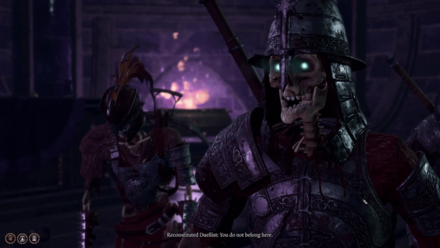
Proceed through the Stone Door and into the passageway for a cutscene where you'll encounter Reconstituted Duellists. Progress the dialogue and you will be attacked by several undead Justiciar Soulhunters and Umbral Tremors. The Reconstituted Duellists will side with you during this battle.
Priotize taking out the Umbral Tremors as they will constantly respawn defeated Soulhunters that can quickly overwhelm you.
Talk to Balthazar
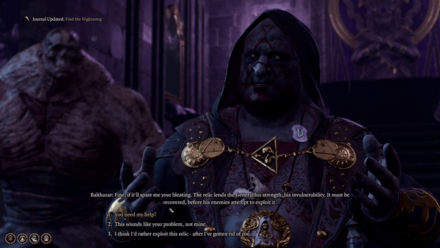
After the battle, head west where the Reconstituted Duellists are telling you to go. Near the end of the hallway, you will be attacked by Umbral Tremors and Justiciar Soulhunters. Prioritze taking out the tremors and after the battle, enter the door and speak with Balthazar.
He will ask you to assist him in finding tbe relic within the Gauntlet of Shar. Passing a Persusion check will cause him to give you a bell that you can use to summon Flesh, a large undead creature that can help you fight during battles.
The Trials of Shar
This part of the quest requires Shadowheart in your party as she's integral to activating the trials within the sanctum. Once you have her in your party, head back to the center of the sanctum and inspect the Ancient Altar to the north.
Shadowheart will explain that you need to finish several trials to activate the Altar which requires Umbral Gems to operate. Once you're ready, head to the corridor north of the waypoint
Soft-Step Trial
Head to the corridor north of the waypoint and open the first set of bulky doors to enter the Soft-Step Trial room. Use Shadowheart and interact with the sacrificial altar to start the trial.
This requires you to sneak through a maze, avoiding traps and patrolling shadows to reach the statue at the end holding an Umbral Gem.
Characters with high sneak such as Astarion or can cast Invisibility can easily sneak through the entire maze without being seen by the patrolling shadows.
How to Solve the Soft-Step Trial
Self-Same Trial
Head to the next set of bulky doors north of the Soft-Step Trial room to enter the Self-Same Trial room and use Shadowheart to activate the sacrificial altar.
Once inside, head to the upper area to confront duplicates of your current. Each character should attack their duplicates as attacking another character's duplicate will inflict a debuff that lowers their ability scores.
Alternatively, you can simply have your strongest character help defeat the duplicates and just take a Long Rest after the battle to remove the debuff. Once you defeat the last duplicate, it will drop an Umbral Gem.
How to Solve the Self-Same Trial
Faith-Leap Trial
Head down the stairs past the doors to the Self-Same Trial and open the first set of bulky doors to enter the Faith-Leap Trial, and have Shadowheart activate the sacrificial altar.
This trial requires you to jump across platforms to reach the end where the Umbral Gem is located. These platforms are obscured by darkness, so it's a good idea to have a Wizard like Gale infuse a character with light so that you can better see the outlines of each platform.
Lae'zel is one of the best characters for this trial since can use Misty Step as a cantrip at Level 5 to just teleport to the platforms. Alternatively, you can use a Scroll of Flight to traverse the chasm though keep in mind this will run out eventually.
How to Solve the Faith-Leap Trial
The Silent Library
Head to end of the corridor and you'll see an open area with an Umbral Tremor in the middle. This is the Silent Library and will prevent spellcasters from using spells within the area until you defeat the Umbral Tremor.
Head inside and defeat the Umbral Tremors and Justiciars. Once that's done, disarm the southeastern bookcase's trap and loot the book Teachings of Loss: The Nightsinger.
Once looted, unlock the large iron doors and place the book in the central plinth to unlock the doors and loo the Spear of Night from the table. You may also grab the Dark Justiciar Half-Plate
How to Solve the Silent Library Puzzle
The Orthon
The last Umbral Gem is located in the northeastern part of the central area. Follow the path and you'll see a Displacer that you'll need to follow. Jump across the gap and follow the beast into a room full of bones.
Once inside, a cutscene starts where you'll be confonted by the Yurgir the Orthon who is the demon that Raphael wants you to deal with. There are several ways to deal with him, with the non-violent one requiring an Insight check during the dialogue.
Tricking Yurgir
Use a character with a high insight in Arcana such as Gale and talk to the Orthon. Tell him to repeat his contract and an Insight check will occur which, when successfull, will reveal that Raphael's contract is a trick.
You can then persuade Yurgir to kill his followers, kill the displacer beast, and then kill himself to fulfill the contract. You can then loot his ashes for the Hellstalker Crossbow and the Umbral Gem near the pile of bones.
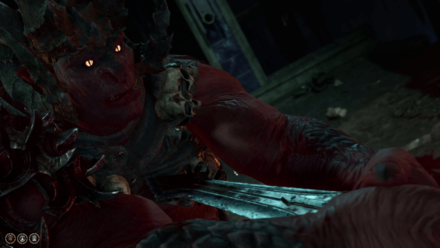
Kill Yurgir
If you fail, you'll need to defeat Yurgir along side his displacer beast and his minions. This is a very difficult battle since they are on a ledge with an Advantage against you so rest up before entering the room.
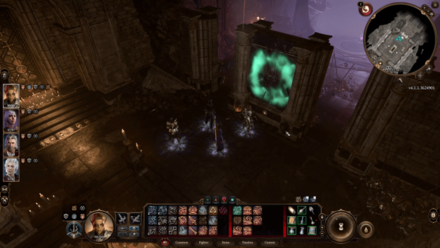
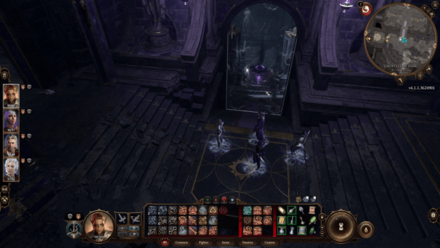
The Shadowfell Entrance
With all Umbral Gems in hand, head into the central chamber and place the first Umbral Gem in the pedestal. This will summon a floating platform that will take you down by clicking the right Traversel Gem.
Place the remaining three Umbral Gems on the Ancient Altar to unlock the chamber into the Shadowfell Entrance. Take note that this is a point of no return and you won't be able to complete the missions in Act II anymore if you proceed. This includes rescuing the Tieflings in Moonrise Towers and meeting the Githyanki Creche.
Optional: Kill Balthazar
Heading in the Shadowfell Entrance without killing Balthazar beforehand will cause him to fight you in the Shadowfell. It's significantly harder to fight him here than in the Gauntlet of Shar as he is accompanied by powerful undead that can push your characters off the chasm.
It's recommended to simply kill Balthazar while he's in his room in the Gauntlet of Shar since he's only accompanied by Ghouls and Flesh, who is afraid of fire.
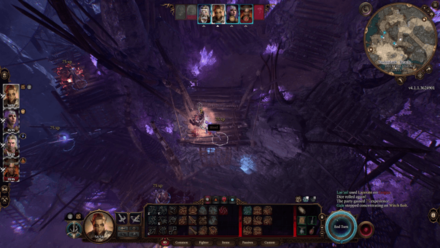
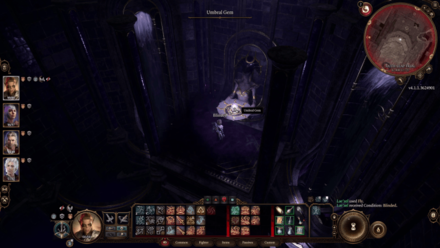
Deciding the Nightsong's Fate
Head down the Shadowfell, hopping to each section of rock. Don't worry about injuring your characters as you won't cause damage jumping down from a tall height.
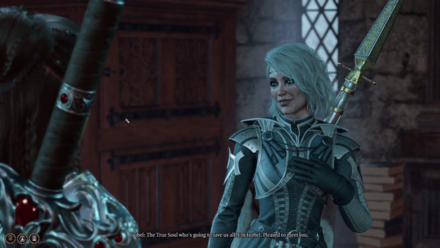
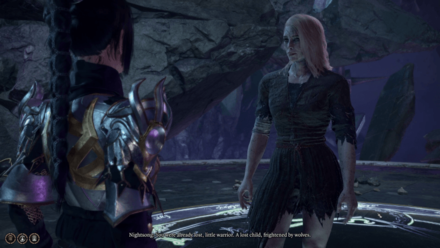
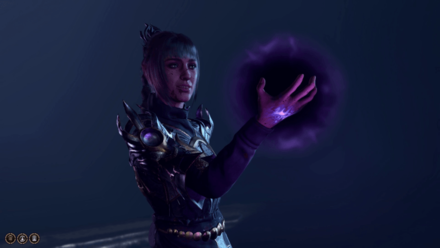
Head down into the central area and you'll discover that the Nightsong isn't a relic but is in fact a person and who is unwillingly fuelling General Thorm's immortality. Shadowheart will insist killing her, but you can also persuade her into sparing her.
Sparing the Nightsong
If you plan to spare the Nightsong, you will need to pass a very difficult 30 Persuasion check to convince Shadowheart not to kill the Nightsong.
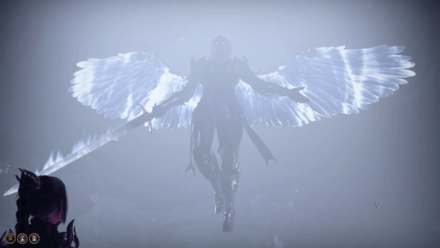
Successfully convincing her causes the Nightsong to receive her full powers from Selúne and will greatly weaken General Thorm. Sparing her also prevents the residents of the Last Light Inn from dying.
Kill the Nightsong
If you kill the Nightsong, Shadowheart fully embraces her destiny as a disciple of Shar and the dark goddess will turn her pain into her power.
This choice will cause drastic changes in the Shadow-cursed lands, and will lock you out of several questlines as her death will cause the deaths of residents of the Last Light Inn.
Find the Nightsong Rewards
Rewards for Sparing the Nightsong
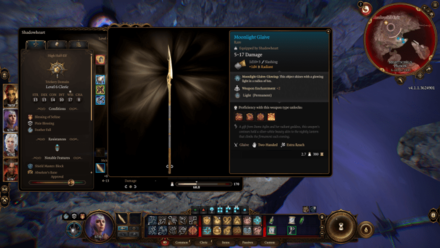
Sparing the Nightsong will reward you with the Moonlight Glaive, a powerful spear that Shadowheart can use that comes with the Moonlight Butterflies spell.
Sparing the Nightsong also spare the lives of the residents of Last Light Inn and will also cause the Nightsong herself to appear and help you during General Thorm's boss battle.
How to Get the Moonlight Glaive
Rewards for Killing the Nightsong
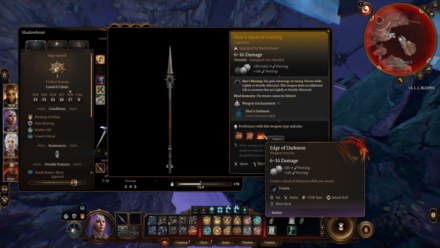
Killing the Nightsong will reward you with Shar's Spear of Evening, a powerful spear that Shadowheart can use that comes with the Edge of Darkness skill.
Killing the Nightsong will also cause the deaths of the residents of the Last Light Inn including important characters tied your other companion's questlines.
| NPC | Questline |
|---|---|
| Dammon | His death will prevent you from advancing Karlach's questline and you will not be able to use Infernal Alloy to cure her condition. |
| Jaheira | Her death prevents you from recruitng her as a possible companion. |
| Art Cullagh | His death prevents you from permanently recruiting Halsin as a companion |
How to Get Shar's Spear of Evening
Baldur's Gate 3 Related Guides
Prologue Side Quests
| All Prologue Side Quests | |
|---|---|
| How to Free the Intellect Devourer | How to Free Shadowheart |
Act 1 Side Quests
Druid's Grove Quests
The Risen Road Quests
| The Risen Road Quests | |
|---|---|
| Find the Missing Shipment | How to Rescue the Grand Duke |
| Rescue the Trapped Man | How to Free Oskar Fevras |
Blighted Village Quests
Goblin Camp Quests
| Goblin Camp Quests | |
|---|---|
| How to Get Volo's Ersatz Eye | Defiled Temple Puzzle |
| Find the Nightsong | Ask the Goblin Priestess for Help |
Nautiloid Crash Region Quests
Underdark Quests
Mountain Pass Quests
| Mountain Pass Quests | ||
|---|---|---|
| Steal a Githyanki Egg | How to Beat Gremishkas | How to Access Guardian of Faith Room |
| Dawnmaster Puzzle Guide | Where to Find the Githyanki Creche | - |
This section is currently under construction. Check back later for updates!
Act 2 Side Quests
Last Light Inn Quests
Gauntlet of Shar Quests
| Gauntlet of Shar Quests | |
|---|---|
| Gauntlet of Shar: All Trials and Umbral Gems | Kill Raphael's Old Enemy |
Mind Flayer Colony Quests
| Mind Flayer Colony Quests |
|---|
| How to Solve the Necrotic Laboratory |
Act 3 Side Quests
Rivington Quests
| Rivington Quests | ||
|---|---|---|
| Investigate the Suspicious Toys | Solve the Open Hand Temple Murders | Find the Missing Letters |
| How to Get to Wyrm's Rock Fortress | How to Find Dribbles the Clown | - |
Lower City Quests
| Lower City Quests | ||
|---|---|---|
| How to Get to the House of Hope | How to Get to Cazador's Palace | Rescue Orin's Victim |
| Aid the Underduke | How to Get to the House of Grief | Investigate the Murders |
Comment
Author
Find the Nightsong
Rankings
Gaming News


Popular Games

Genshin Impact Walkthrough & Guides Wiki
Honkai: Star Rail Walkthrough & Guides Wiki
Arknights: Endfield Walkthrough & Guides Wiki
Umamusume: Pretty Derby Walkthrough & Guides Wiki
Wuthering Waves Walkthrough & Guides Wiki
Pokemon TCG Pocket (PTCGP) Strategies & Guides Wiki
Abyss Walkthrough & Guides Wiki
Zenless Zone Zero Walkthrough & Guides Wiki
Digimon Story: Time Stranger Walkthrough & Guides Wiki
Clair Obscur: Expedition 33 Walkthrough & Guides Wiki


Recommended Games
Fire Emblem Heroes (FEH) Walkthrough & Guides Wiki
Pokemon Brilliant Diamond and Shining Pearl (BDSP) Walkthrough & Guides Wiki
Diablo 4: Vessel of Hatred Walkthrough & Guides Wiki
Super Smash Bros. Ultimate Walkthrough & Guides Wiki
Yu-Gi-Oh! Master Duel Walkthrough & Guides Wiki
Elden Ring Shadow of the Erdtree Walkthrough & Guides Wiki
Monster Hunter World Walkthrough & Guides Wiki
The Legend of Zelda: Tears of the Kingdom Walkthrough & Guides Wiki
Persona 3 Reload Walkthrough & Guides Wiki
Cyberpunk 2077: Ultimate Edition Walkthrough & Guides Wiki


All rights reserved
© 2023 Larian Studios. All rights reserved. Larian Studios is a registered trademark of arrakis nv, affiliate of Larian Studios Games ltd. All company names, brand names, trademarks and logos are the property of their respective owners. © 2020 Wizards of the coast. All rights reserved. Wizards of the coast, Baldur’s Gate, Dungeons & Dragons, D&D, and their respective logos. Are registered trademarks of wizards of the coast LLC
The copyrights of videos of games used in our content and other intellectual property rights belong to the provider of the game.
The contents we provide on this site were created personally by members of the Game8 editorial department.
We refuse the right to reuse or repost content taken without our permission such as data or images to other sites.