This survey will take about 1 minute.
Your answers will help us to improve our website.
Star Wars Jedi Survivor
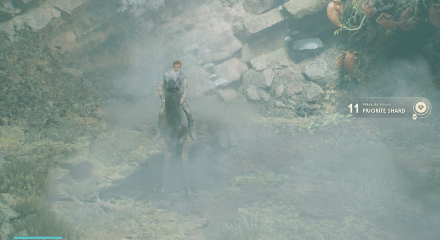
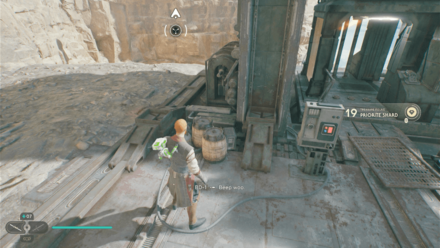
All Priorite Shard Locations
★ Find out what gets carried over to New Game Plus!
☆ Learn how to get Beskar Steel and all weapon materials!
★ Make sure to get all the BD-1 Upgrades to help in combat!
☆ Get Map Upgrades to make hunting Collectibles easier!
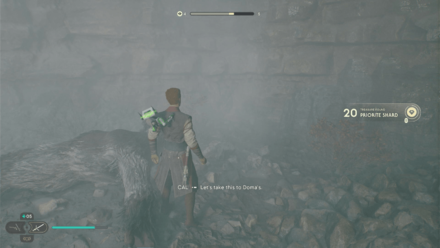
Priorite Shards are a type of currency you can use to purchase cosmetics from Doma in Star Wars Jedi Survivor. Read on to learn more about Priorite Shards, where you can get them, and what you can trade them for.
List of Contents
All Priorite Shards Locations
| ▼ Jump to a planet! | |||||
|---|---|---|---|---|---|
| Coruscant | Koboh | Nova Garon | |||
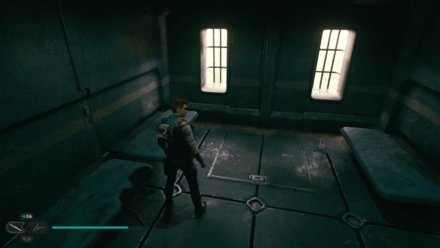
All Coruscant Priorite Shard Locations
| All Coruscant Priorite Shard Locations | |
|---|---|
| Rooftops | Renovation Site 4733 |
| Hangar 2046-C | Undercity Meats |
Rooftops
| Map Location | In-game Location |
|---|---|
 |
 |
| Area: Rooftops
Where to Find: From the Rooftops Meditation Point, use the nearby wall to climb up and go around the area to reach the shard. |
|
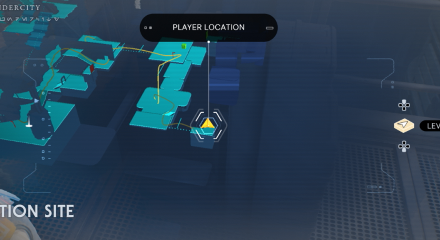
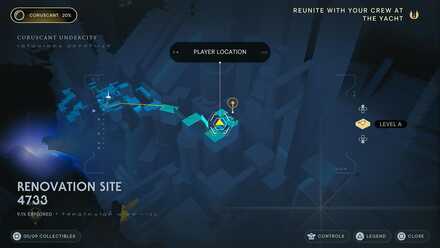
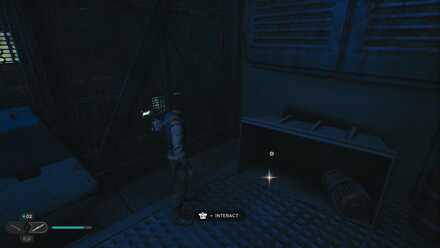
Renovation Site 4733
| Map Location | In-game Location |
|---|---|
 |
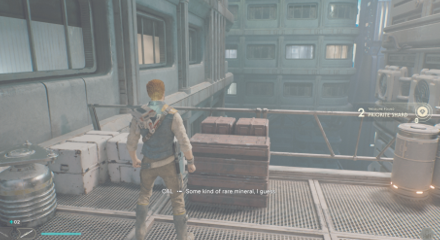 |
| Area: Renovation Site 4733
Where to Find: After falling down the pipe into group of Stormtroopers, go up the stairs and cross the gap on the left. You'll find the Shard at the end. |
|
 |
 |
| Area: Renovation Site 4733
Where to Find: This shard can be found on the left side of the slippery ramp after meeting up with Bode. |
|
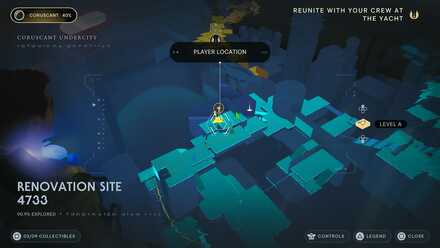 |
 |
| Area: Renovation Site 4733
Where to Find: You can find this shard under a ramp as you follow your objective towards the Yacht. |
|
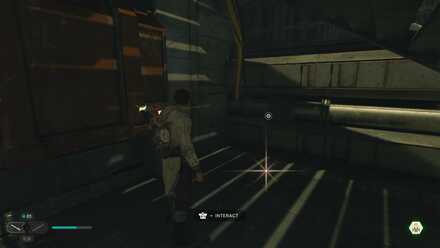
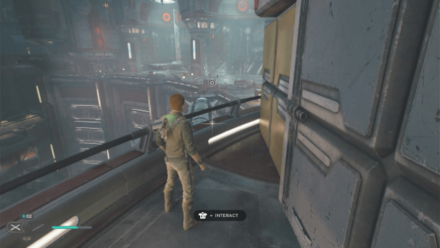
Hangar 2046-C
| Map Location | In-game Location |
|---|---|
 |
 |
| Area: Hangar 2046-C
Where to Find: At the start of the area by a door after climbing the rope and crossing two ziplines. |
|
 |
 |
| Area: Hangar 2046-C
Where to Find: Can be found on a digging droid near the Mantis that you'll have to kill. |
|
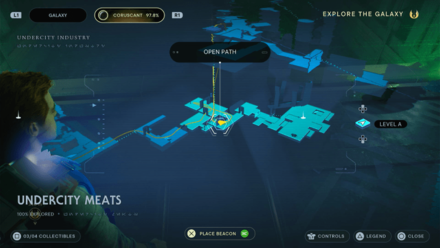
Undercity Meats
| Map Location | In-game Location |
|---|---|
 |
 |
| Area: Undercity Meats
Where to Find: Found underneath the elevator platform that requires you to pass through a green laser gate to reach. Dash out of the elevator once it starts rising. |
|
All Koboh Priorite Shard Locations
Basalt Rift
| Map Location | In-game Location |
|---|---|
 |
 |
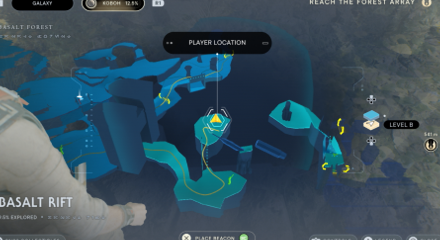
| Area: Basalt Rift
Where to Find: Wall run your way to the left platform and destroy the farthest pillar and the Shard will drop from there. |
|
 |
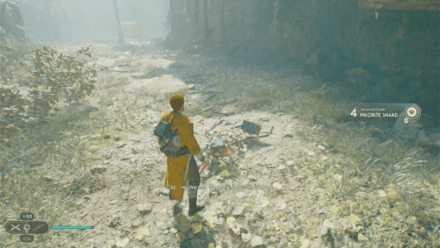 |
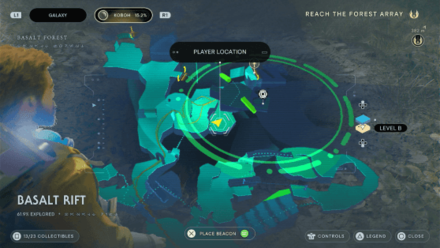
| Area: Basalt Rift
Where to Find: From the Meditation Point, head past the archway and the Stormtroopers all the way to the lowest level and take a right before the sleeping Bilemaw. You'll find a Scavanger Droid that drops the Shard. |
|
 |
 |
| Area: Basalt Rift
Where to Find: From the Meditation Point, backtrack to the entrance until you reach the narrow passageway and climb the vines on your left. You'll find the shard on the platform above. |
|
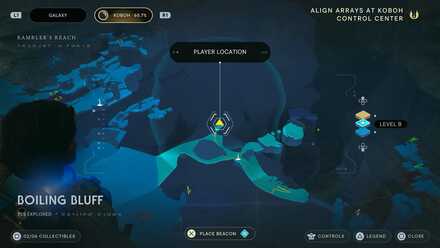
Boiling Bluff
| Map Location | In-game Location |
|---|---|
 |
 |
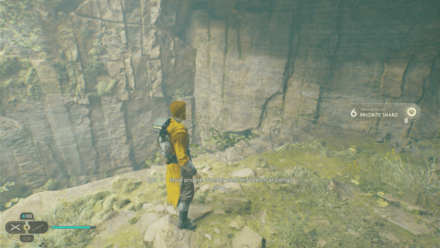
| Area: Boiling Bluff
Where to Find: From the Meditation Point, ride a Nekko and use it to jump to past the wall in the map image. The shard will be next to a skull. |
|
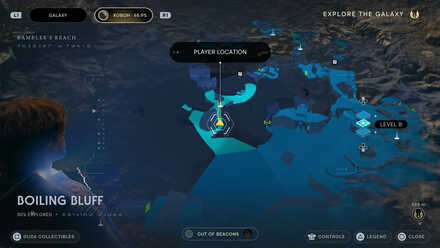 |
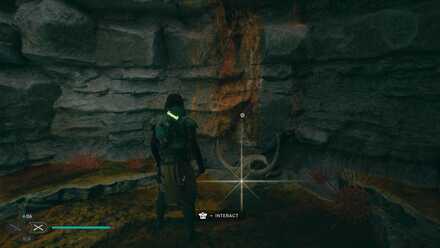
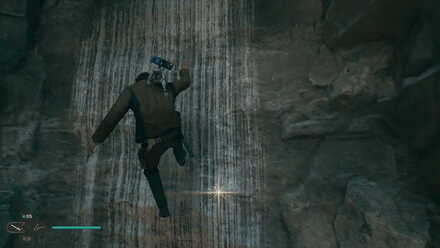 |
| Area: Boiling Bluff
Where to Find: From the Meditation Point, ride a Nekko and use it to jump to up a singular pillar. Jump with the Nekko, then jump from the Nekko, then dash to the wall. Climb-jump until you reach the top. |
|
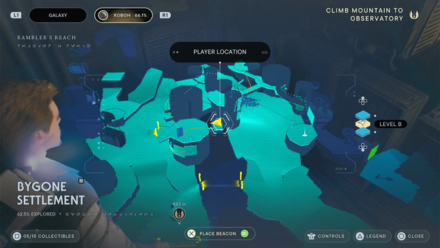
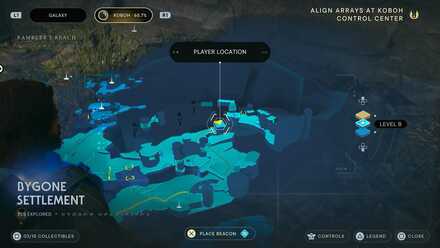
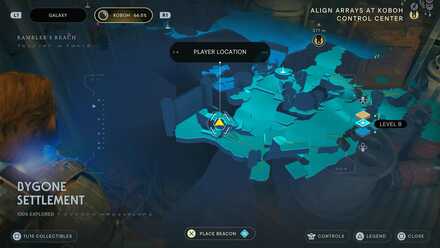
Bygone Settlement
| Map Location | In-game Location |
|---|---|
 |
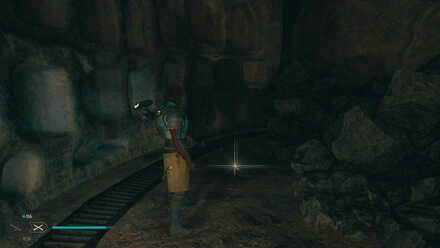 |
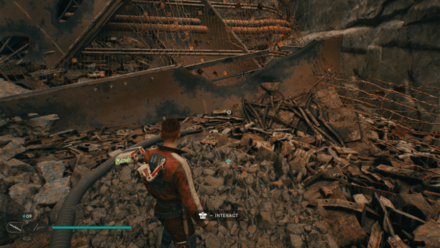
| Area: Bygone Settlement
Where to Find: From the Meditation Point, wall run your way up the buildings and you'll find the chest on your right inside a house full of debris. |
|
 |
 |
| Area: Bygone Settlement
Where to Find: From the Meditation Point, wall run your way up the buildings and keeping following the path until you climb onto a room with two droids and a Raider nearby. Defeat them and you'll find the Shard inside the narrow pathway. |
|
 |
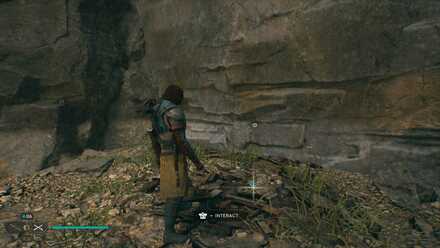 |
| Area: Bygone Settlement
Where to Find: From the Meditation Point, get on a Nekko and continue forward. Jump up from the Nekko to reach the shard.' |
|
 |
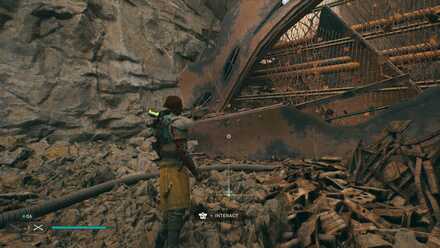 |
| Area: Bygone Settlement
Where to Find: On the way to the platform where you recruit the Jawas, slip through the narrow crack in the wall to get the shard. |
|
 |
 |
| Area: Bygone Settlement
Where to Find: On the platform where you recruit the Jawas, the shard is just located on the other side of the room. |
|
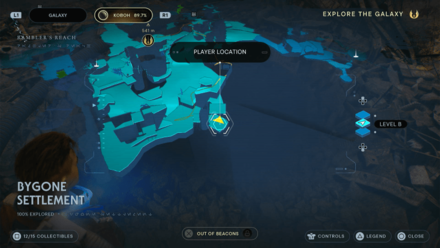 |
 |
| Area: Bygone Settlement
Where to Find: In the area where you recruit the Jawas, there's a narrow path you can squeeze through that will lead to the shard. |
|
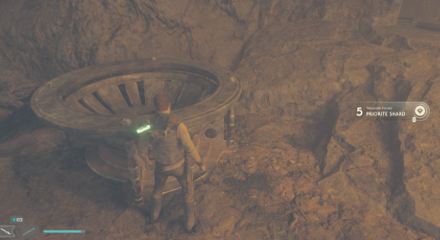
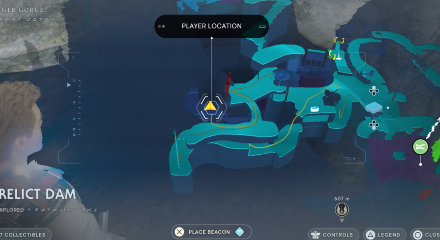
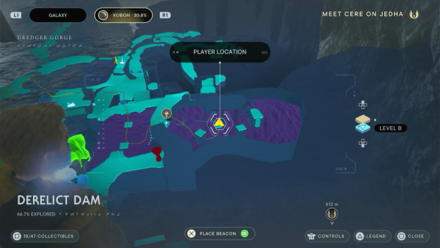
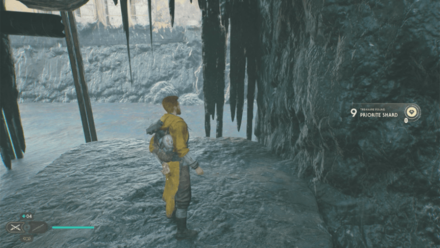
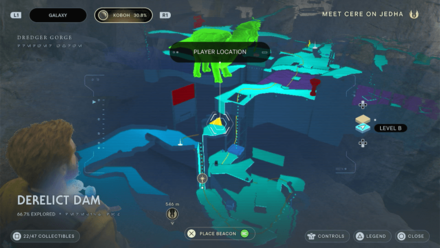
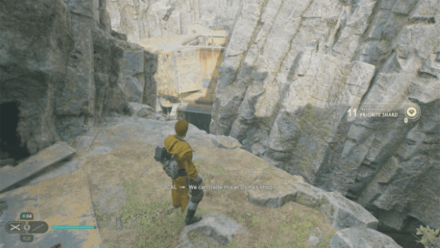
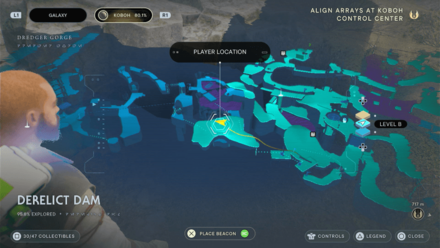
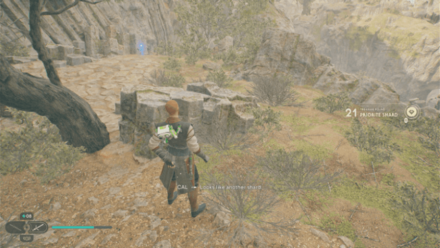
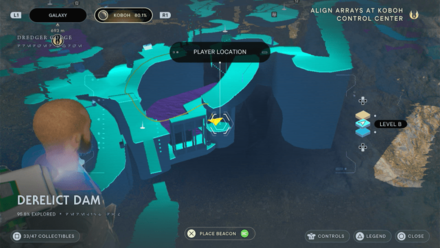
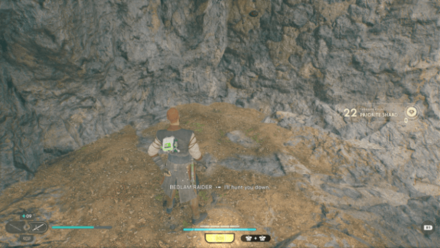
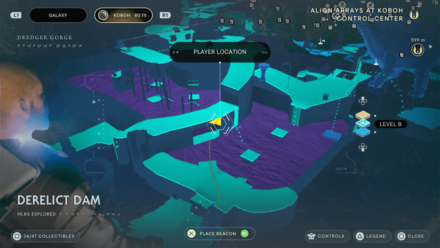
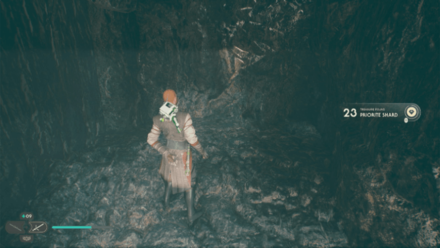
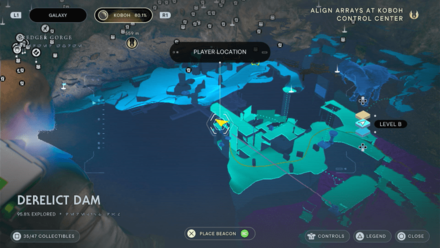
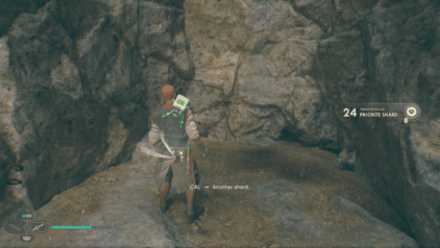
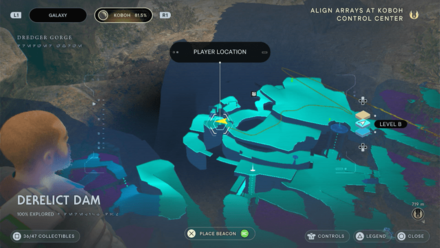
Derelict Dam
| Map Location | In-game Location |
|---|---|
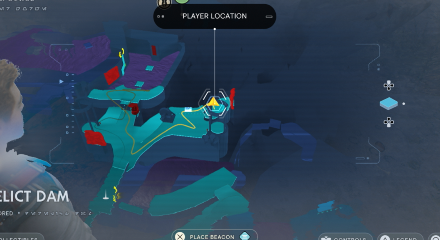 |
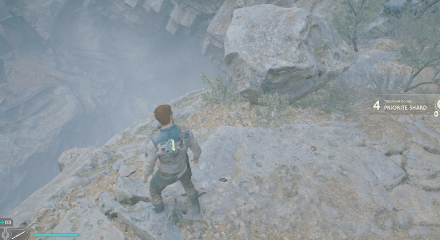 |
| Area: Derelict Dam
Where to Find: From the Meditation Point, take the road that forks to the right and drop down from the cliff. You'll find the Shard next to a rock. |
|
 |
 |
| Area: Derelict Dam
Where to Find: Inside a large empty brazier past a BX Droid inside a cave. |
|
 |
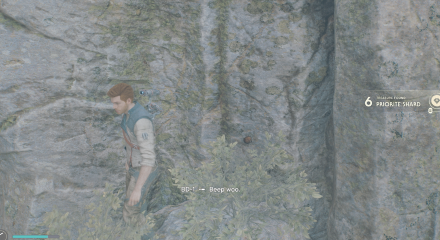 |
| Area: Derelict Dam
Where to Find: Once you've blown a hole in the cave, lure the Roller Mine towards the road to the right past the broken elevator and throw it to the tarred wall below. Follow the path, climb the rope, and you'll find the Shard on your left by the rock below. |
|
 |
 |
| Area: Derelict Dam
Where to Find: Once you've blown up a hole in the Dam, climb it and cross the platforms on the other side past a B1 Battle Droid and Raider Grunt. You'll find the Shard at the left of the first platform. |
|
 |
 |
| Area: Derelict Dam
Where to Find: From the Southern Reach Meditation Point, wall jump up past the hole and you'll find the Shard on top. |
|
 |
 |
| Area: Derelict Dam
Where to Find: After defeating the Gorocco Matriarch, head past the balloons and you'll find the Shard at the area above beside a tree. |
|
 |
 |
| Area: Derelict Dam
Where to Find: From the Meditation Point, cross the bridge beside you and drop down to the platform below. You'll find the Shard on the ground. |
|
 |
 |
| Area: Derelict Dam
Where to Find: Once you've blown up the Dam, head inside the hole and you'll find the Shard on your right inside a small cave. |
|
 |
 |
| Area: Derelict Dam
Where to Find: At the Yellow Platform Puzzle, for the first Coupler and climb the walls. You'll find the Shard on the platform above. |
|
 |
 |
| Area: Derelict Dam
Where to Find: Take the giant bird at Boiling Bluff and head towards the west side of the area. You'll find a Scavanger Droid on an area below that drops the Shard. |
|
Flooded Bunker
| Map Location | In-game Location |
|---|---|
 |
 |
| Area: Flooded Bunker
Where to Find: You can get this shard inside a bunker past the Southern Reach. A droid with energy shields will be guarding the area. |
|
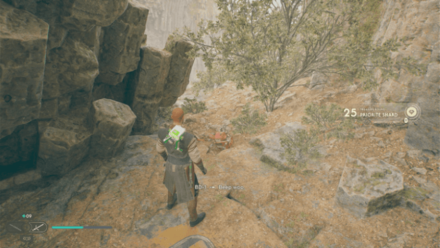
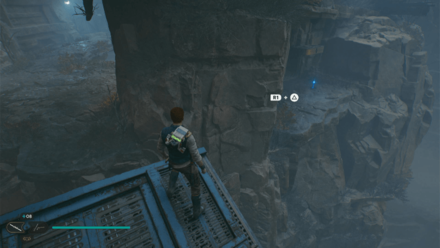
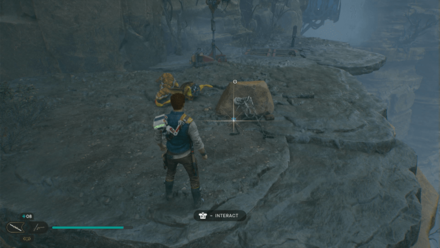
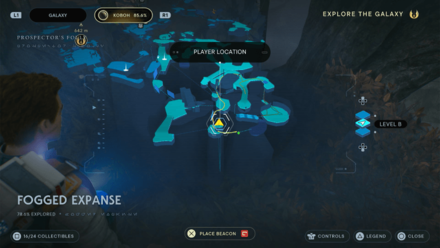
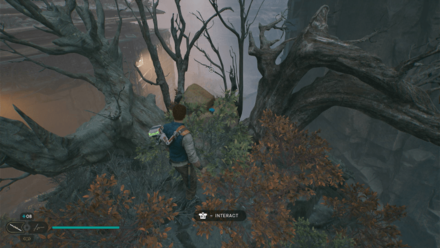
Fogged Expanse
| Map Location | In-game Location |
|---|---|
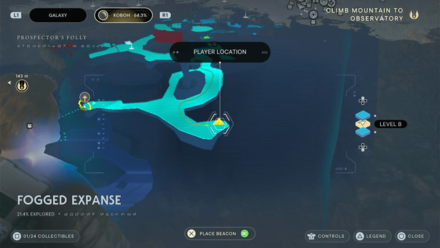 |
 |
| Area: Fogged Expanse
Where to Find: From the Meditation Point, follow the path forward and hug the path to your left. You'll find the Shard on the floor that you need to use Lift on. |
|
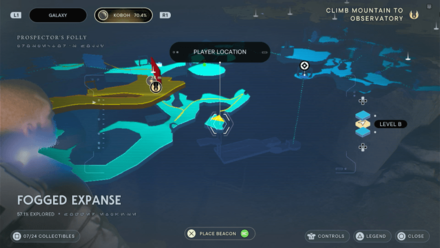 |
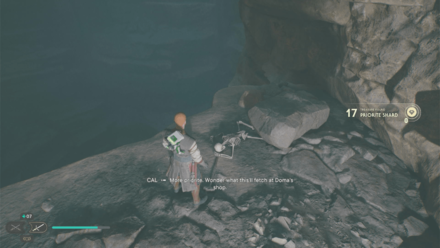 |
| Area: Fogged Expanse
Where to Find: From the Meditation Point, head forward and enter the cave on the left. Jump across the gap and you'll find the Shard by a skeleton. |
|
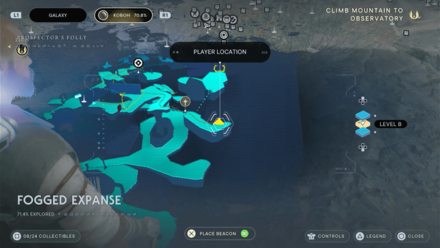 |
 |
| Area: Fogged Expanse
Where to Find: Once you've activated the charge to move the wall, wall run past it and head up the bridge and grapple towards the platform above. You'll find the Scavanger Droid that drops the Shard. |
|
 |
 |
| Area: Fogged Expanse
Where to Find: After wall running from the meditation point, look back and use the same structure after it moved to wall run again to a small isolated area. Look down to find the shard that will need Force lift, and an essence. |
|
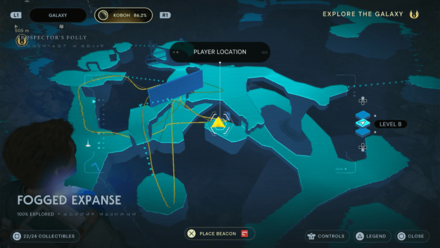
 |
 |
| Area: Fogged Expanse
Where to Find: Found near the outdoor elevator along with 6 Koboh Spiker seeds. |
|
 |
 |
| Area: Fogged Expanse
Where to Find: After grabbing on to the balloon, look back to find a small area you can jump to. |
|
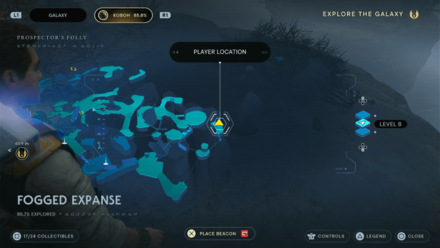 |
 |
| Area: Fogged Expanse
Where to Find: Found after jumping from the balloon along with 3 Koboh Spikers. |
|
Foothill Falls
| Map Location | In-game Location |
|---|---|
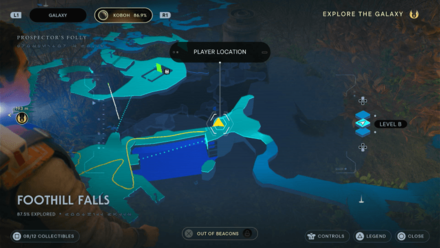 |
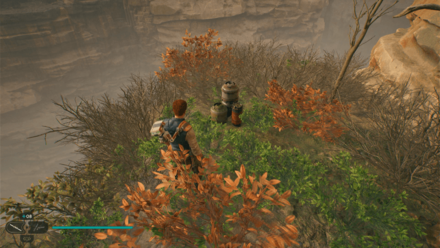 |
| Area: Foothill Falls
Where to Find: Walk across the falls to reach the area where the shard is. |
|
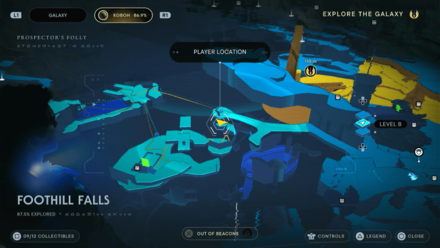 |
 |
| Area: Foothill Falls
Where to Find: After riding the Relter, turn left to a narrow path that will lead to a cave. Use the Nekko to wall run to a high point in the cave where you'll find the shard. |
|
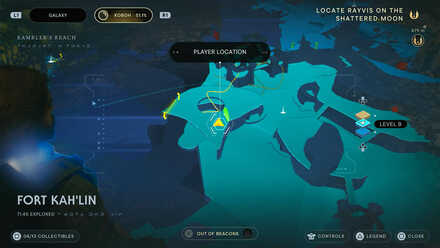
Fort Kah'lin
| Map Location | In-game Location |
|---|---|
 |
 |
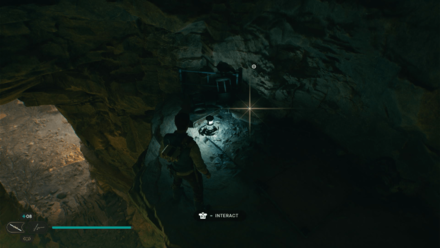
| Area: Fort Kah'lin
Where to Find: Found inside the Spawn of Oggdo combat arena. Pick it up after defeating the Oggdo. |
|
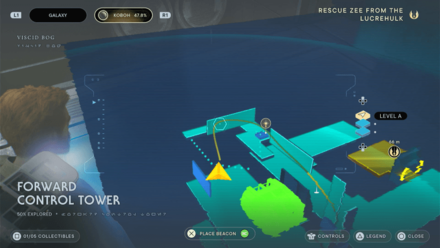
Forward Control Tower
| Map Location | In-game Location |
|---|---|
 |
 |
| Area: Forward Control Tower
Where to Find: After the cutscene with Dagan Gera and Rayvis, turn around and bring down the center wall. Climb it and bring the wall back up. Wall run your way through and you'll come across the Shard at the last wall. |
|
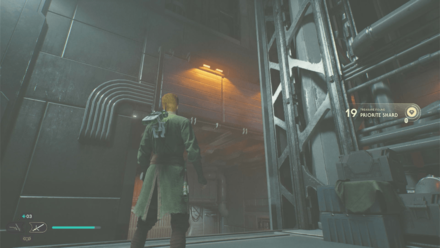
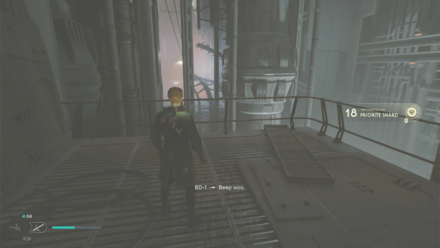
Generator Underbelly
| Map Location | In-game Location |
|---|---|
 |
 |
| Area: Generator Underbelly
Where to Find: By the first shortcut, there's two scalable scaffoldings nearby. Cross them and you'll find the Shard on your left by the railings. |
|
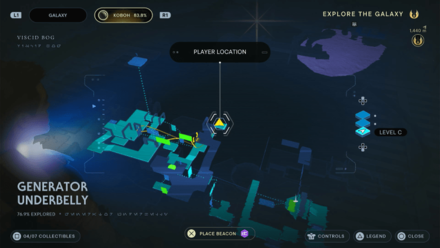 |
 |
| Area: Generator Underbelly
Where to Find: After the wall running section head left to a dark section. The shard will be found at the end of the path. |
|
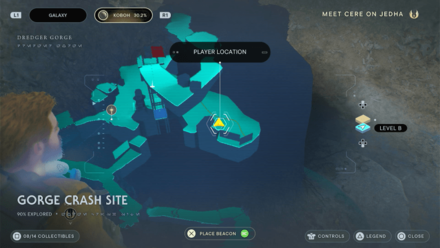
Gorge Crash Site
| Map Location | In-game Location |
|---|---|
 |
 |
| Area: Gorge Crash Site
Where to Find: After crossing the bridge past the Meditation Point, you'll find the Shard on your left inside a small cave. |
|
 |
 |
| Area: Gorge Crash Site
Where to Find: From the Meditation Point, go past the small lake and wall run your way up to the right. You'll find the chest by a nest on top. |
|
Harvest Ridge
| Map Location | In-game Location |
|---|---|
 |
 |
| Area: Harvest Ridge
Where to Find: From the Meditation Point, take the Reltor and fly towards the large rock on the right. You'll find the Shard behind the top wall you can run on. |
|
Hunter's Quarry
| Map Location | In-game Location |
|---|---|
 |
 |
| Area: Hunter's Quarry
Where to Find: Found inside the building on top of the scalable wall on the far side of Hunter's Quarry. |
|
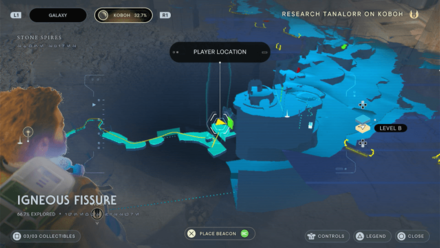
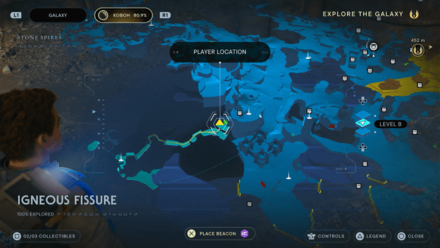
Igneous Fissure
| Map Location | In-game Location |
|---|---|
 |
 |
| Area: Igneous Fissure
Where to Find: From the Meditation Point, turn around and wall run towards the platform across. Walk past the beams, follow the path forward and climb the vines up top. You'll find the Shard on your left just by the door. |
|
 |
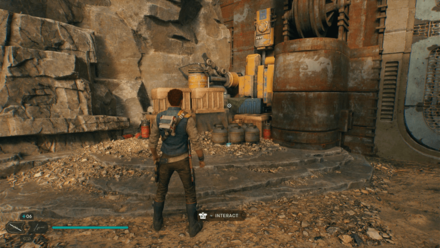 |
| Area: Igneous Fissure
Where to Find: From the Meditation Point, wall run into the cave and follow the path until you reach a large door. The shard will be on the left side of the door. |
|
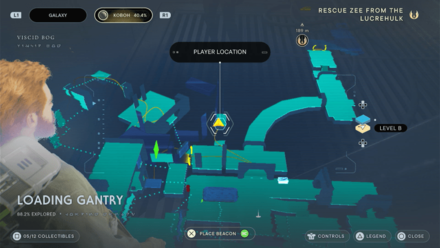
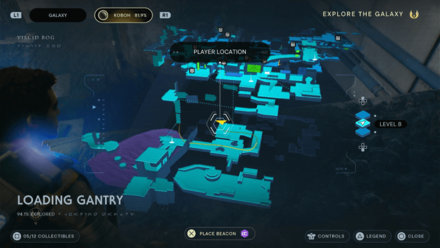
Loading Gantry
| Map Location | In-game Location |
|---|---|
 |
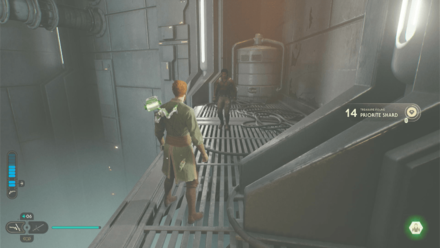 |
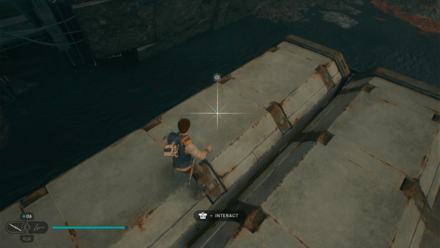
| Area: Loading Gantry
Where to Find: Once you've reunited with Bode, go back to the door you've unlocked and facing the green laser wall, you'll find the Shard to your right by the edge. |
|
 |
 |
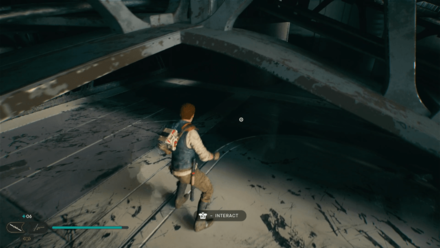
| Area: Loading Gantry
Where to Find: Reach the boat in the area by jumping on the crate in the middle of the tar pit. The shard can be found on top of one of the crates on the boat. |
|
 |
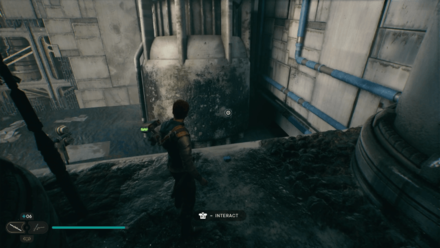 |
| Area: Loading Gantry
Where to Find: From the Meditation Point, pass through the broken door. Head straight to the end of the area and walk up the slanted platforms. The shard can be found behind the storage tanks. |
|
 |
 |
| Area: Loading Gantry
Where to Find: Found underneath the slanted platforms in the area. |
|
Lucrehulk Core
| Map Location | In-game Location |
|---|---|
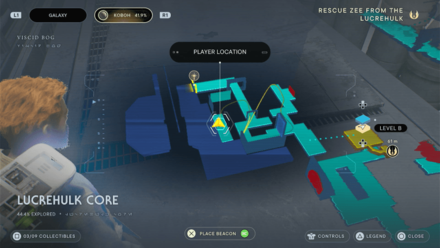 |
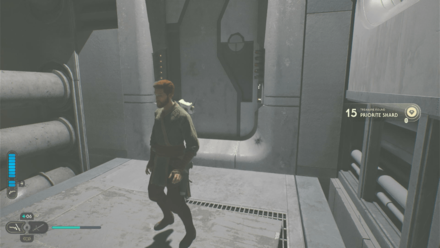 |
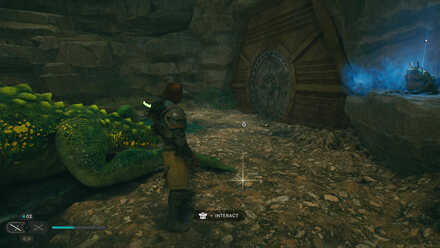
| Area: Lucrehulk Core
Where to Find: On the bridge with the two shielded turrets, jump and dash to the platform on the left and you'll find the Shard by the floor. |
|
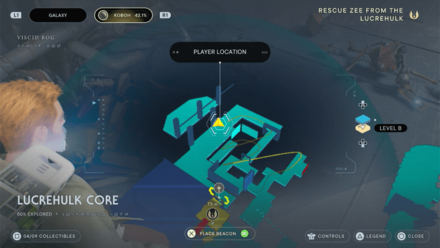 |
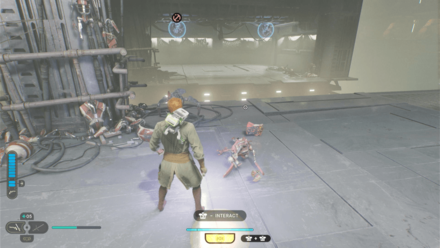 |
| Area: Lucrehulk Core
Where to Find: Go past the bridge with two shielded turrets and you'll find a Scavenger Droid infront of you that drops the Shard. |
|
Marl Cavern
| Map Location | In-game Location |
|---|---|
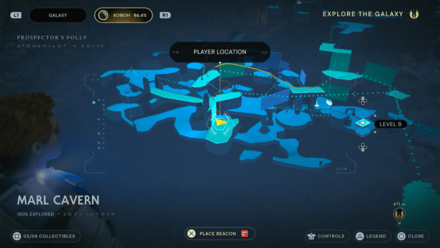 |
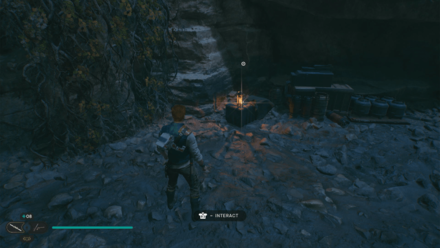 |
| Area: Marl Cavern
Where to Find: When you reach the cavern with wall run platforms, drop down to find the shard. |
|
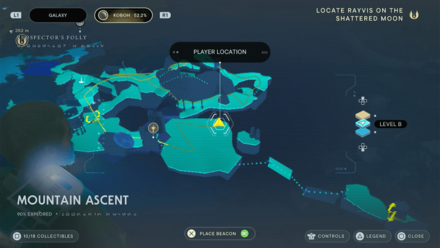
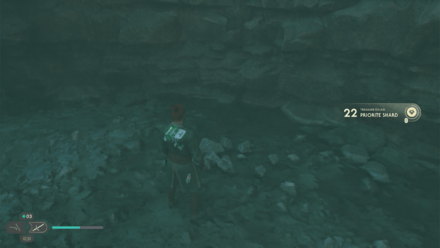
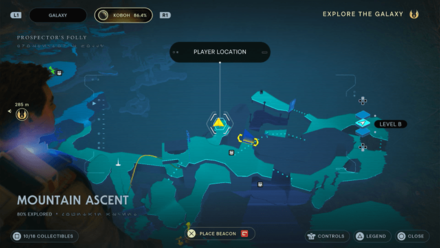
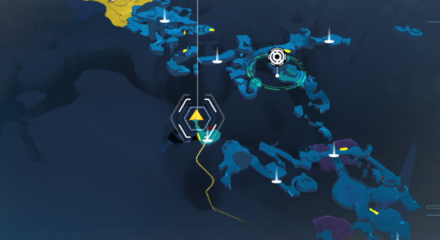
Mountain Ascent
| Map Location | In-game Location |
|---|---|
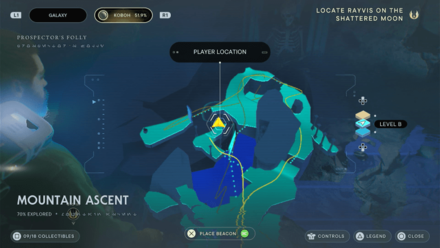 |
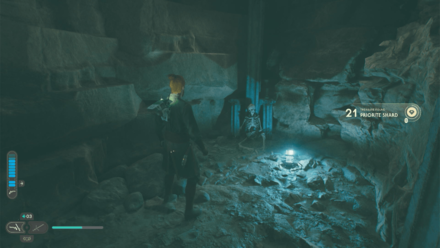 |
| Area: Mountain Ascent
Where to Find: Before the shortcut back down, head right, jump and dash across and you'll find the Shard at the end of the cave. |
|
 |
 |
| Area: Mountain Ascent
Where to Find: In the area where you have to fight two Bilemaws, use Lift and Slam on a nearby burrow and the Shard will pop out. |
|
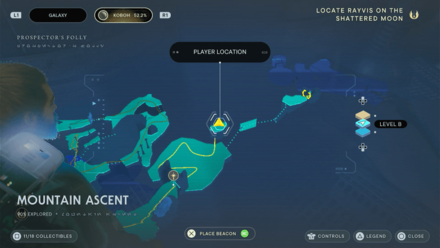 |
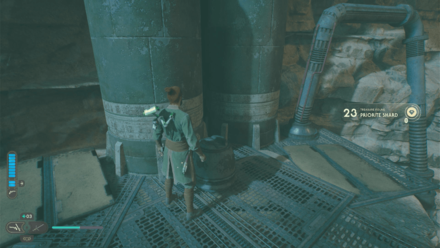 |
| Area: Mountain Ascent
Where to Find: In the area where you have to fight two Bilemaws, grapple up the nearby ledge and you'll find the Shard on top. |
|
 |
 |
| Area: Mountain Ascent
Where to Find: From the Meditation Point, head left. Jump towards the falls to the left and to the next platform to find the shard. |
|
Nekko Pools
| Map Location | In-game Location |
|---|---|
 |
 |
| Area: Nekko Pools
Where to Find: Found in an isolated section of the area you'll need a Nekko to access. |
|
 |
 |
| Area: Nekko Pools
Where to Find: Can be found in a swampy section of the area. |
|
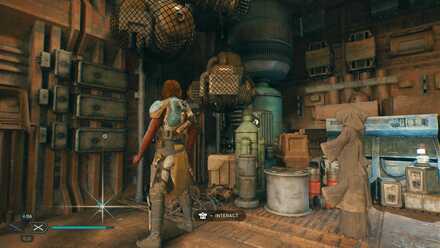
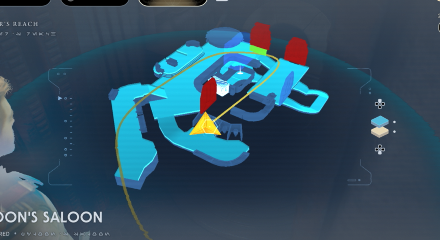
Pyloon's Saloon
| Map Location | In-game Location |
|---|---|
 |
 |
| Area: Pyloon's Saloon
Where to Find: Enter the saloon and take the path on your right towards the bathroom. You'll find the Shard just by the toilet. |
|
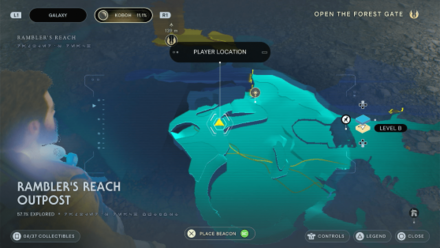
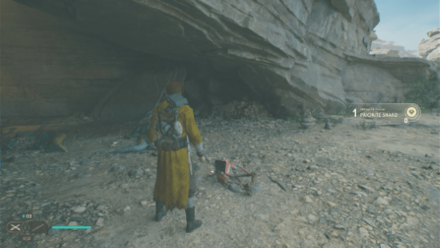
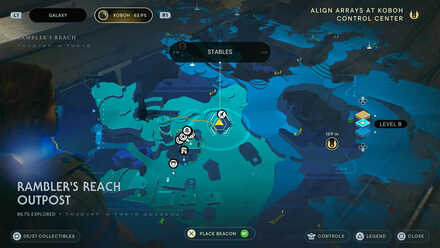
Rambler's Reach Outpost
| Map Location | In-game Location |
|---|---|
 |
 |
| Area: Rambler's Reach Outpost
Where to Find: Head north past the Stables towards the broken drawbridge and you'll find a Scavenger Droid nearby that drops this. |
|
 |
 |
| Area: Rambler's Reach Outpost
Where to Find: Head west of the Stables towards the ship and you'll find a Scavanger Droid that drops a Shard near a den of Gorgers. |
|
 |
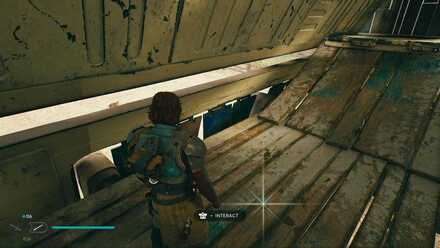 |
| Area: Rambler's Reach Outpost
Where to Find: Use a Nekko to double jump to the second floor of the Stables. The shard will be located on one of the paths. |
|
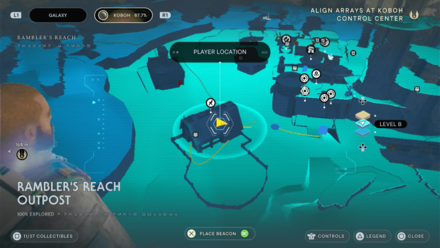 |
 |
| Area: Rambler's Reach Outpost
Where to Find: Bring a bright colored Nekko to the Stables and put it in a stall. Rest and you'll find the Shard by the Nekko's stall. |
|
 |
 |
| Area: Rambler's Reach Outpost
Where to Find: From the rooftop garden, climb up the tower and take the Reltor towards the outer building near the lake. You'll find the Shard on the roof. |
|
Riverbed Watch
| Map Location | In-game Location |
|---|---|
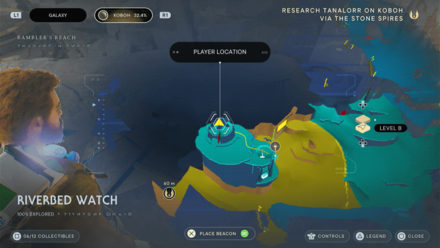 |
 |
| Area: Riverbed Watch
Where to Find: From the Riverbed Watch Meditation Point, head inside the building and climb up to the very top, defeat the group of droids and enter the building forward. You'll find the Shard by the edge. |
|
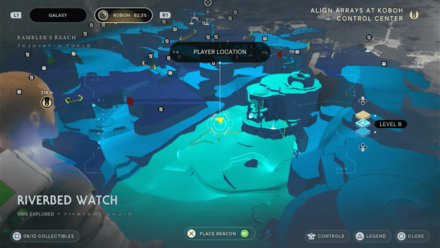 |
 |
| Area: Riverbed Watch
Where to Find: From the Meditation Point, head for the rock in the middle of the river and you'll find the Scavenger Droid that drops the Shard. |
|
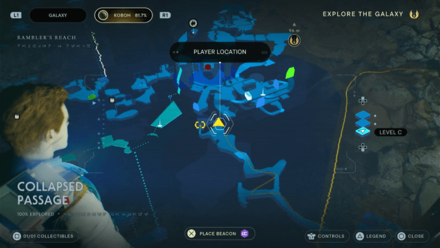
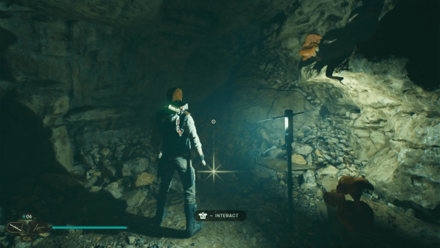
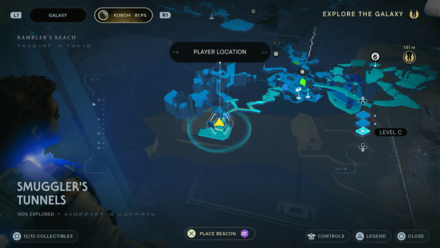
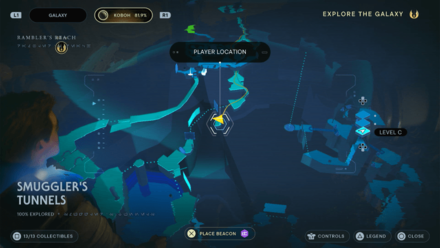
Smuggler's Tunnel
| Map Location | In-game Location |
|---|---|
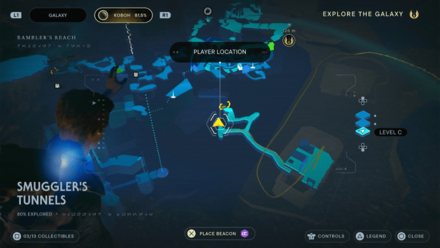 |
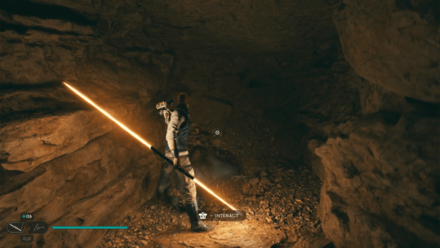 |
| Area: Smuggler's Tunnel
Where to Find: Use a Nekko to reach the roof of the building near the river in Rambler's Reach Outpost. This will lead to an alternate route to the Smuggler's Tunnel. The shard will be on the left side of the first split route you encounter. |
|
 |
 |
| Area: Smuggler's Tunnel
Where to Find: Use a Nekko to reach the roof of the building near the river in Rambler's Reach Outpost. This will lead to an alternate route to the Smuggler's Tunnel. The shard will be near the end of the tunnel. |
|
 |
 |
| Area: Smuggler's Tunnel
Where to Find: Use a Nekko to reach the roof of the building near the river in Rambler's Reach Outpost. |
|
 |
 |
| Area: Smuggler's Tunnel
Where to Find: Use a Nekko to reach the roof of the building near the river in Rambler's Reach Outpost. This will lead to an alternate route to the Smuggler's Tunnel. The shard is found deep within the tunnel to the left of the green laser gate in a vase you need to break. |
|
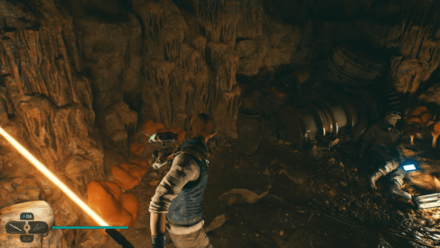
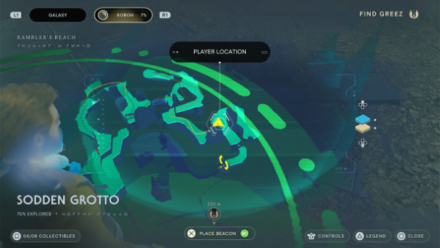
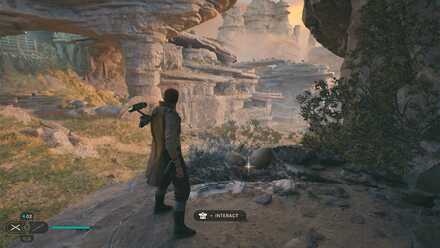
Sodden Grotto
| Map Location | In-game Location |
|---|---|
 |
 |
| Area: Sodden Grotto
Where to Find: Dropped by a Scavenger Droid inside the cave. |
|
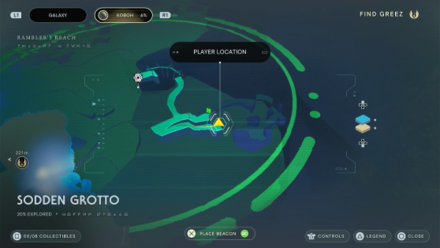 |
 |
| Area: Sodden Grotto
Where to Find: Once inside the cave, follow the road down and take the path leading downwards. You'll find the Shard by a dark corner near the ledge. |
|
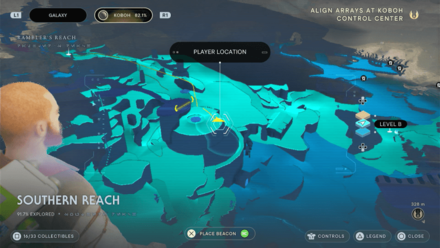
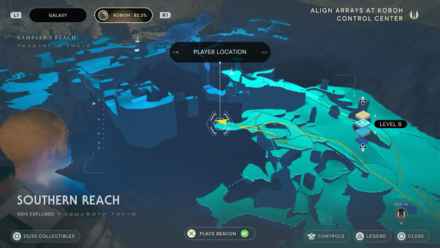
Southern Reach
| Map Location | In-game Location |
|---|---|
 |
 |
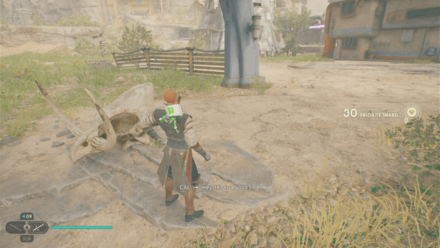
| Area: Southern Reach
Where to Find: Can be picked up from the top of the scalable wall on the right side of the plain as you descend from Mosey's shack. |
|
 |
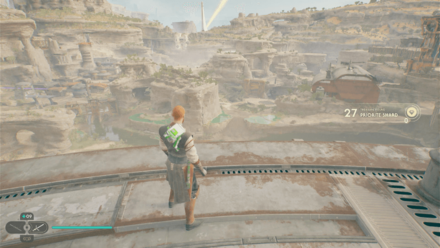 |
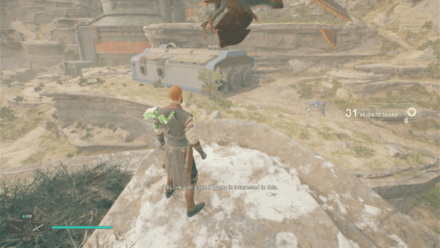
| Area: Southern Reach
Where to Find: Head towards the large silo and climb on top of it. You'll find the Shard by the edge. |
|
 |
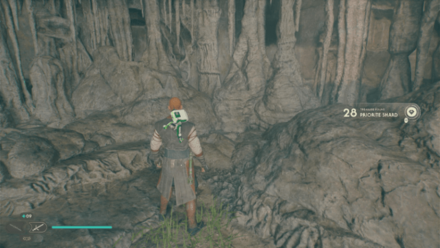 |
| Area: Southern Reach
Where to Find: From the roof of the silo, turn around and climb the cascading rocks and you'll find the Shard inside the cave entrance. |
|
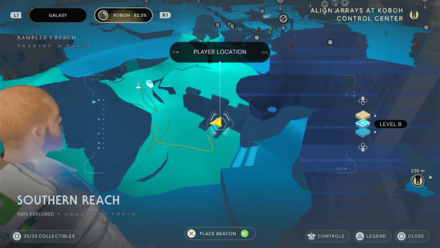 |
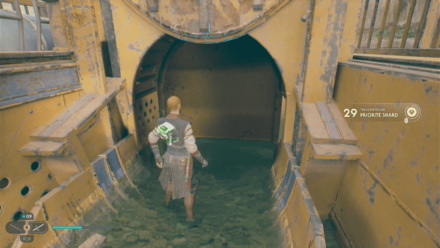 |
| Area: Southern Reach
Where to Find: From the Rambler's Reach Outpost Meditation Point, head towards the nearby sewers and use Life to open up the gate. You'll find the Shard inside. |
|
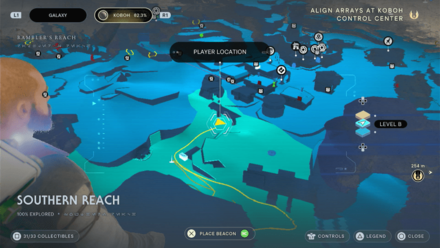 |
 |
| Area: Southern Reach
Where to Find: From the Rambler's Reach Outpost Meditation Point, head towards the archway and use force pull on the skull on top. The Shard will drop down with it. |
|
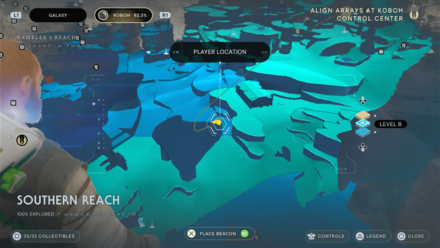 |
 |
| Area: Southern Reach
Where to Find: From the Southern Reach Meditation Point, take the nearby Reltor and fly towards the large rock beside the Rambler's Reach Outpost Meditation Point. You'll find the Shard beneath the nearby Reltor. |
|
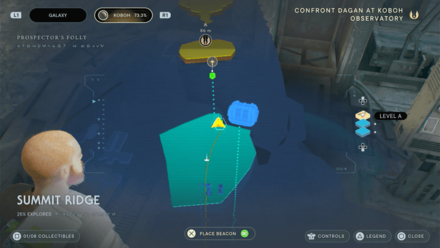
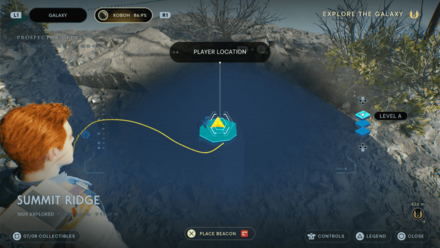
Summit Ridge
| Map Location | In-game Location |
|---|---|
 |
 |
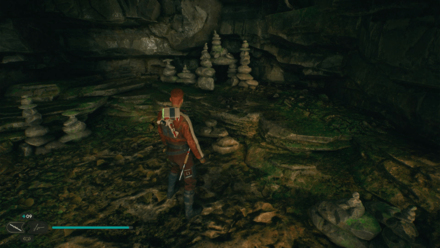
| Area: Summit Ridge
Where to Find: Found just infront of the Meditation Point beside the elevator. |
|
 |
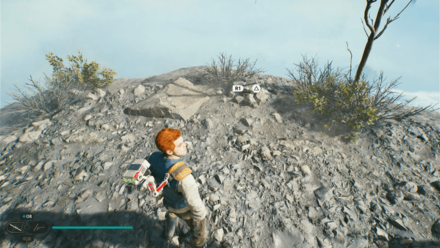 |
| Area: Summit Ridge
Where to Find: Found on one of the areas you can reach by using force pull and push on a balloon. |
|
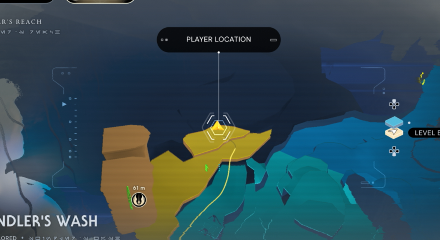
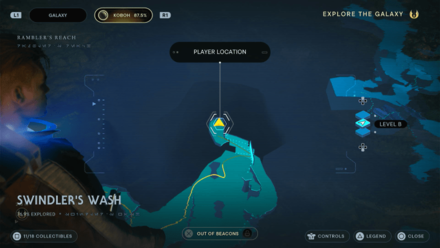
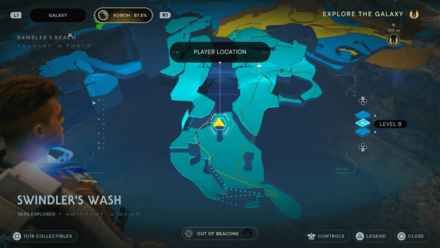
Swindler's Wash
| Map Location | In-game Location |
|---|---|
 |
 |
| Area: Swindler's Wash
Where to Find: From the Meditation Point, go around to the other side of the bridge and climb the ledge past the Droids that drop down. You'll find the Shard past the ponds inside a small cave opening. |
|
 |
 |
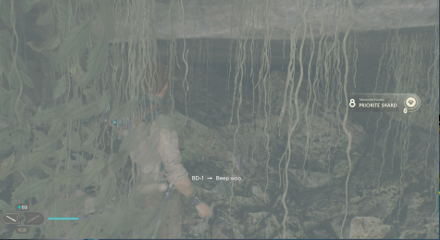
| Area: Swindler's Wash
Where to Find: Found in the area with the Bilemaw. Head to the end of the area and wall run to reach the high point on the left. |
|
 |
 |
| Area: Swindler's Wash
Where to Find: Found in the area with the Bilemaw. Head to the end of the area and wall run to reach the high point on the right. Then jump to the raised surface in the middle. |
|
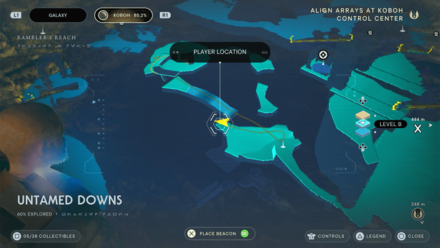
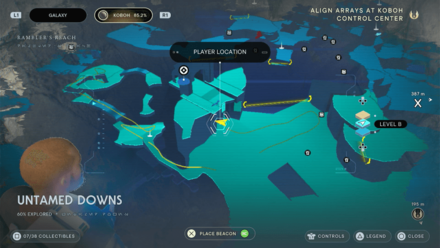
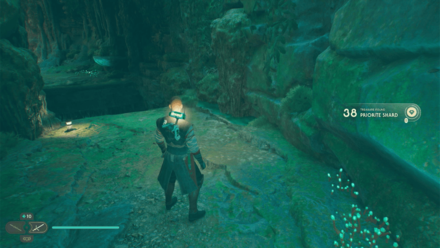
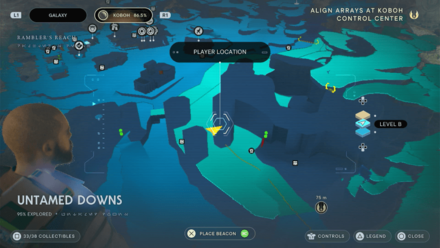
Untamed Downs
| Map Location | In-game Location |
|---|---|
 |
 |
| Area: Untamed Downs
Where to Find: Found just below the Meditation Point behind the waterfall. |
|
 |
 |
| Area: Untamed Downs
Where to Find: Outside the Meditation Point infront of some old ruins. |
|
 |
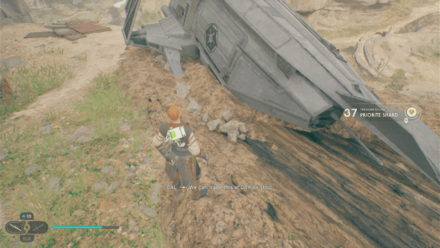 |
| Area: Untamed Downs
Where to Find: Found beside crashed ship in the middle of the area. |
|
 |
 |
| Area: Untamed Downs
Where to Find: Inside the cave, climb up the vines and turn around. You'll find the Shard on the platform across. |
|
 |
 |
| Area: Untamed Downs
Where to Find: Climb up using the Nekko and dash inside the green laser wall. Climb up the walls and dash towards the platform below. You'll find the Shard by the edge. |
|
 |
 |
| Area: Untamed Downs
Where to Find: Found on a high platform by a pillar overlooking Harvest Ridge. |
|
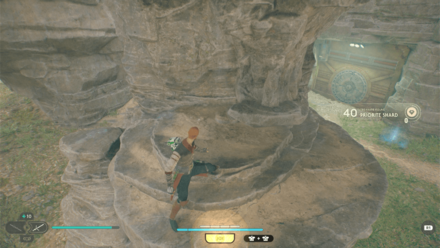
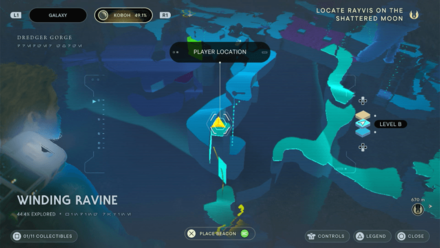
Winding Ravine
| Map Location | In-game Location |
|---|---|
 |
 |
| Area: Winding Ravine
Where to Find: Wall run through the gorge and once you've reach the platform across, wall run again on your right and you'll find the Shard on a platform above. |
|
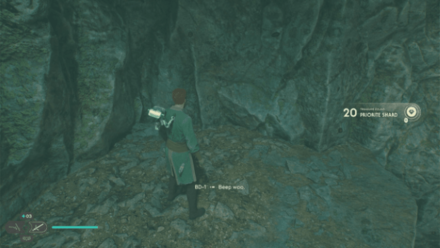
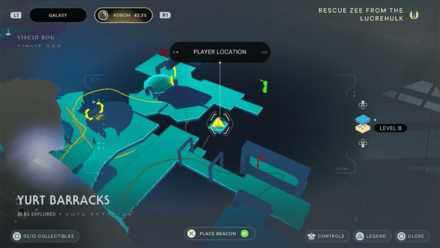
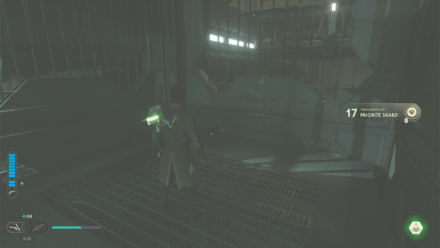
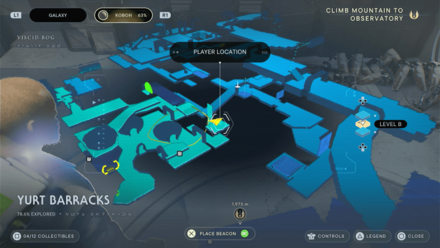
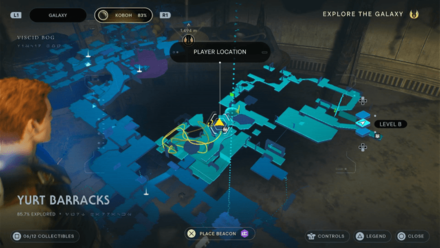
Yurt Barracks
| Map Location | In-game Location |
|---|---|
 |
 |
| Area: Yurt Barracks
Where to Find: At the second part of the raider's Living Quarters, after crossing the gap and defeating the nearby raiders, move forward a bit and enter the path to your right. You'll find the shard on a platform hidden on your left. |
|
 |
 |
| Area: Yurt Barracks
Where to Find: From the Lucrehulk Core Meditation Point, take the path down on the left and circle around the hut on your left. Go through the narrow path and climb up the wall and jump and dash to your right. You'll find the Shard on the platform. |
|
 |
 |
| Area: Yurt Barracks
Where to Find: Found in the shack on the second level of the area. This part can be accessed by jumping on the roofs of the shacks on the ground floor. |
|
All Nova Garon Priorite Shard Locations
| All Coruscant Priorite Shard Locations | ||
|---|---|---|
| Central Command | Hangar Bay | Hangar Bay Exterior |
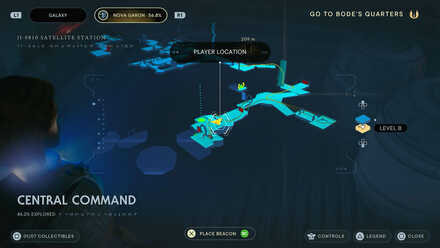
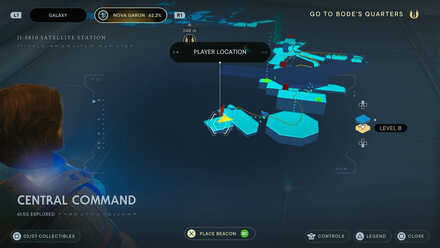
Central Command
| Map Location | In-game Location |
|---|---|
 |
 |
| Area: Central Command
Where to Find: Found after jump climbing one of the walls in the left most room of the Central Command. |
|
 |
 |
| Area: Central Command
Where to Find: Found in an elevated platform past the revolving red electron walls. |
|
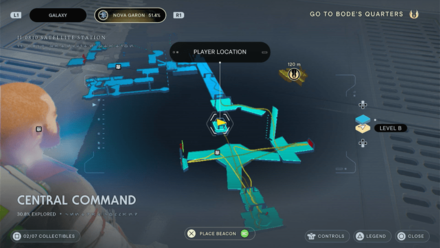 |
 |
| Area: Central Command
Where to Find: From the center, head for the doorway across the huge gap and you'll find the Shard on the floor. |
|
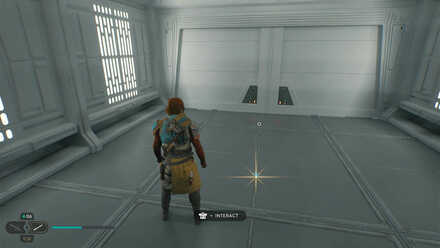
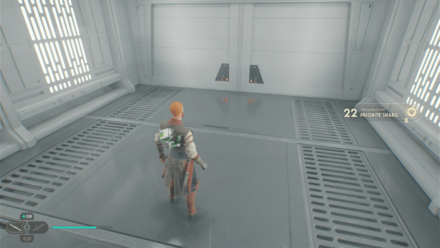
Hangar Bay
| Map Location | In-game Location |
|---|---|
 |
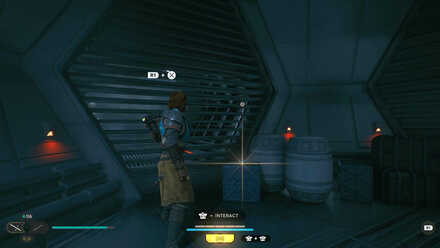 |
| Area: Hangar Bay
Where to Find: When you pass through the first electron wall, take a right and the shard will be in the adjacent room. |
|
Hangar Bay Exterior
| Map Location | In-game Location |
|---|---|
 |
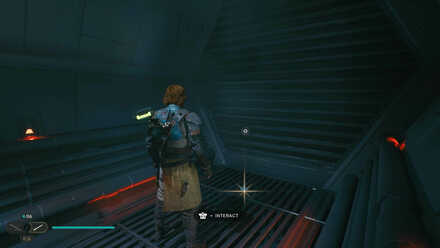 |
| Area: Hangar Bay Exterior
Where to Find: From the Hangar Bay, take the right at the first intersection, then a left at the next intersection. The shard will be on top of an elevated platform you can reach by doublejumping. |
|
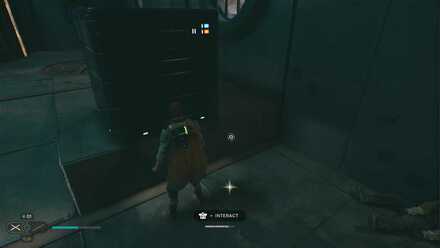
Priorite Shards Collection Rewards
Unique Tradeable Resource
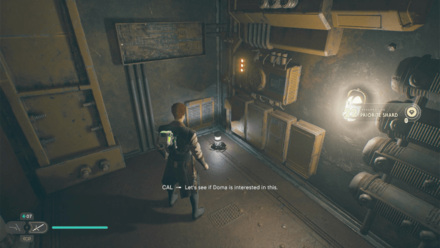
Priorite Shards are a unique treasure you can use as trade items with Doma in Koboh in exchange for cosmetic items such as hairstyles, outfits, and even songs which some NPC will ask from you in side quests.
All Outfits and Cosmetics Guide
Are Priorite Shards Missable?
Not Completely Missable
There are only a set number of Priorite Shards in the game. Acquiring all would mean that you will be able to purchase all of Doma's wares. However, since you can carry over all cosmetics you have purchased, you can still pick up the shards you missed in your previous run.
Star Wars Jedi Survivor Related Guides

All Collectibles
| All Collectible Types | |
|---|---|
| Chests | Stim Upgrades |
| Perks | Skill Points |
| Perk Slots | BD-1 Scans |
| Force Echoes | Seeds and Plants |
| Priorite Shards | Datadiscs |
| Jedha Scrolls | Essences |
| Force Essences | Health Essences |
| Treasures | Fish |
| Recruits | Force Tears |
| BD-1 Upgrades | - |
Collectibles by Planet
| All Planets | |
|---|---|
| Coruscant | Koboh |
| Jedha | Shattered Moon |
| Nova Garon | Tanalorr |
Author

All Priorite Shard Locations
Please participate in our site
improvement survey
03/2026
improvement survey
03/2026
Would you assist in
improving Game8's site?
improving Game8's site?

×
We are listening to our users' valuable opinions and discussing how to act on them.
The information collected through this survey will be used for the purpose of improving our services. In addition, the information will only be disclosed a part of a statistic in a format that will not allow identification of personal information.
Begin Survey
Not Now
×
Please rate each item regarding Game8.co's Advertisements.
Amount of Ads
Very Dissatisfied
Somewhat Dissatisfied
Fine
Somewhat Satisfied
Highly Satisfied
Placement of Ads
Timing of Ad Display
Ad Loading Speed
Safeness of Ads
Content of Ads
×
Please rate each item regarding Game8.co's Quality of Articles.
Amount of information
Very Dissatisfied
Somewhat Dissatisfied
Fine
Somewhat Satisfied
Highly Satisfied
Frequency of updates
Speed of new information
Accuracy of articles
Understandibility of articles
Readability of sentences
×
Please rate each item regarding Game8.co's Usability of the Site.
Ease of finding information
Very Dissatisfied
Somewhat Dissatisfied
Fine
Somewhat Satisfied
Highly Satisfied
Loading Speed
Use of Color
Font Size
Visibility of Images
Easy to Understand Layout
×
Please rate each item regarding Game8.co's Message Boards, Comments.
Ease of Writing
Very Dissatisfied
Somewhat Dissatisfied
Fine
Somewhat Satisfied
Highly Satisfied
Readability
Ease in Finding Information
Comment Quality
Comment Quantity
Admin Response
×
Please rate each item regarding Game8.co's Site's new design.
Please rate our site's new design
Very Dissatisfied
Somewhat Dissatisfied
Fine
Somewhat Satisfied
Highly Satisfied
Do you think that the website's design change makes the site easier to use?
Has the new design made it easier for you to find information on the site?
Has the new design improved the overall visual appeal of the site?
How would you rate your overall satisfaction with the new design of the site?
×
How likely are you to recommend Game8 to someone you know?
Very Unlikely
0
1
2
3
4
5
6
7
8
9
10
Very Likely
If you have other opinions regarding potential improvement to the website, please share them with us. We would appreciate your honest opinion.
Note: This is a free response section, so you can proceed without entering anything.
Note: Please be sure not to enter any kind of personal information into your response.
Note: Please be sure not to enter any kind of personal information into your response.
×
Thank You
×
Thank you for participating in our survey! Your answers will help us to improve the quality of our website and services.
We hope you continue to make use of Game8.
We hope you continue to make use of Game8.
Close
Rankings
- We could not find the message board you were looking for.
Gaming News


![Everwind Review [Early Access] | The Shaky First Step to A Very Long Journey](https://img.game8.co/4440226/ab079b1153298a042633dd1ef51e878e.png/thumb)

![Monster Hunter Stories 3 Review [First Impressions] | Simply Rejuvenating](https://img.game8.co/4438641/2a31b7702bd70e78ec8efd24661dacda.jpeg/thumb)
Popular Games

Genshin Impact Walkthrough & Guides Wiki
Honkai: Star Rail Walkthrough & Guides Wiki
Umamusume: Pretty Derby Walkthrough & Guides Wiki
Pokemon Pokopia Walkthrough & Guides Wiki
Resident Evil Requiem (RE9) Walkthrough & Guides Wiki
Monster Hunter Wilds Walkthrough & Guides Wiki
Wuthering Waves Walkthrough & Guides Wiki
Arknights: Endfield Walkthrough & Guides Wiki
Pokemon FireRed and LeafGreen (FRLG) Walkthrough & Guides Wiki
Pokemon TCG Pocket (PTCGP) Strategies & Guides Wiki


Recommended Games
Diablo 4: Vessel of Hatred Walkthrough & Guides Wiki
Fire Emblem Heroes (FEH) Walkthrough & Guides Wiki
Yu-Gi-Oh! Master Duel Walkthrough & Guides Wiki
Super Smash Bros. Ultimate Walkthrough & Guides Wiki
Pokemon Brilliant Diamond and Shining Pearl (BDSP) Walkthrough & Guides Wiki
Elden Ring Shadow of the Erdtree Walkthrough & Guides Wiki
Monster Hunter World Walkthrough & Guides Wiki
The Legend of Zelda: Tears of the Kingdom Walkthrough & Guides Wiki
Persona 3 Reload Walkthrough & Guides Wiki
Cyberpunk 2077: Ultimate Edition Walkthrough & Guides Wiki


All rights reserved
© 2023 Electronic Arts Inc.
The copyrights of videos of games used in our content and other intellectual property rights belong to the provider of the game.
The contents we provide on this site were created personally by members of the Game8 editorial department.
We refuse the right to reuse or repost content taken without our permission such as data or images to other sites.
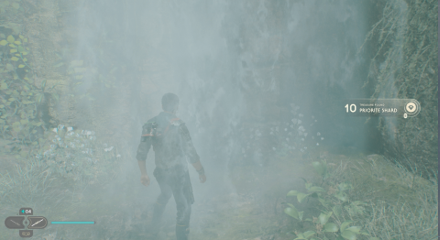
There are no shards in the forest array BTW. Now sure what this person was smoking.