This survey will take about 1 minute.
Your answers will help us to improve our website.
Star Wars Jedi Survivor
Best Stance and All Lightsaber Stances Ranked
★ Find out what gets carried over to New Game Plus!
☆ Learn how to get Beskar Steel and all weapon materials!
★ Make sure to get all the BD-1 Upgrades to help in combat!
☆ Get Map Upgrades to make hunting Collectibles easier!
The Single stance is the best stance as it is the most mobile among all other stances, making it great for new and seasoned players. Learn what the best stance and best secondary stances are, how to upgrade the best stances, and all lightsaber stances ranked!
List of Contents
Best Lightsaber Stance
Single Stance

The Single stance is the best lightsaber stance because of its mobility and overall versatility.
High Mobility
This stance has the highest mobility among all the stances since it has three mobile skills; Lunging Strike, Dash Strike, and Aerial Dash Strike. These skills allow you to surprise the enemy by quickly closing the distance. They also deal significant block damage.
Best Versatility
It is also the most versatile stance because it can be used in almost any situation. It can be used to fight against bosses thanks to it being decently quick and dealing respectable damage. The skills Charged Throw and Twofold Reflection also offer reasonable damage against large groups of enemies.
Despite its lack of specialty, it is competent in all areas and players can complete the game with just this stance. The Single stance is a jack of all trades, master of none, but usually better than a master of one.
Best Upgrades For Single Stance
Best Single Skills
| Skill | Effect & Reason |
|---|---|
 Improved Footwork Improved Footwork |
Effect: Lunging Strike now reaches further. Reason for Unlocking: ・Closes a large distance between you and your enemy ・Useful against stronger enemies or bosses where you need to keep distance ・Lunging deals good block damage |
 Cyclone Slash Cyclone Slash |
Effect: Hold Attack button after a basic attack to perform a powerful overhead swing. Reason for Unlocking: ・Increases overall basic combo damage ・Useful tool to break the enemy's guard |
 Dash Strike Dash Strike |
Effect: Hold Parry/Block button and press Attack button to dash and strike a target out of normal melee range. Reason for Unlocking: ・Allows you to quickly attack when enemy is recovering ・Excellent for extending combo with your basic combo or with Lunging Strike |
All Lightsaber Stances Ranked
| S Rank | ||
|---|---|---|
 Single Blade Single Blade |
||
| A Rank | ||
 Blaster Blaster |
 Dual Wield Dual Wield |
 Crossguard Crossguard |
| B Rank | ||
 Double Blade Double Blade |
||
Lightsaber Stances Ranking Criteria
The team considered the following factors below for the creation of this ranking list. Please do note that this tier list is very subjective since it is based on the team's experience with the game.
| ① Ease of Use Some stances take more effort to learn to use effectively. Stances that are easy to use and just as effective in battle are ranked higher. |
| ② Overall Versatility Another important factor we considered for this list is a Stance's overall versatility. The stance's skills and passives that are useful for both single target enemies and large groups are ranked higher. |
| ③ Damage & Survivability Stances should let you deal the highest amount of damage in the safest way possible. Therefore, stances that are efficient in dealing damage while also helping the player survive throughout the fight are ranked higher. |
Best Secondary Stance
Blaster Stance
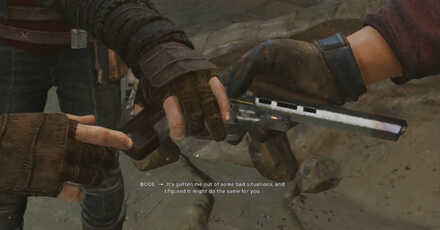
The Blaster stance is the perfect secondary stance for the single stance since it has a long range that can synergize well with the single stance's mobility. After whittling down the enemy's block meter with blaster shots, you can switch to the single stance to close the gap and deal a lot of damage.
It is also a good defensive stance since it lets you shoot your blaster from a safe distance while blocking.
Best Blaster Stance Skills
| Skill | Effect & Reason |
|---|---|
 Blaster Cooldown Blaster Cooldown |
Effect: Gain additional ammunition each time you strike an enemy with the lightsaber. Reason for Unlocking: ・Excellent synergy with the Single stance ・Naturally gain ammo as you fight in any stance |
 Improved Clip Improved Clip |
Effect: Increases Maximum Blaster Ammunition by three. Reason for Unlocking: ・Allows you to shoot more blaster shots ・Stay in a safer distance for longer |
 Efficient Heat Transfer Efficient Heat Transfer |
Effect: Reduces time required to fully charge a blaster shot. Reason for Unlocking: ・Shoot charged blaster shots quicker ・Use charged blaster shots against bosses and enemies with strong ranged attacks without getting interrupted |
Best Force Abilities to Use With Stances
Jedi Concentration
The Single stance uses a lot of Force for its skills. It is recommended to upgrade the Jedi Concentration tree to increase your Force meter and Force regeneration.
| Best Jedi Concentration Skills | |
|---|---|
| Skill | Effect & Reason |
 Channelled Energy Channelled Energy |
Effect: Cal regains more Force when he defeats an enemy, and regains some Force when he hits a blocking enemy. Reason for Unlocking: ・Great tool for regenerating your Force Meter quickly ・Single stance skills can regain some Force back as you use them |
 Enlightened Attunement Enlightened Attunement |
Effect: Cal's Maximum Force is further increased. Reason for Unlocking: ・Can create longer combo chains with Single stance skills that use Force |
How to Change Lightsaber Stances
Go to a Meditation Point
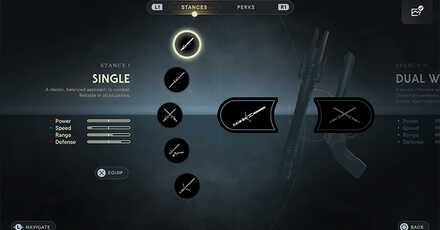
Players can change Cal's lightsaber stance by going to a meditation point. While meditating, select the Stances option and you will be able to change your primary and secondary stances through the menu.
Best Stance Combo
Dual Wield and Crossguard Stance
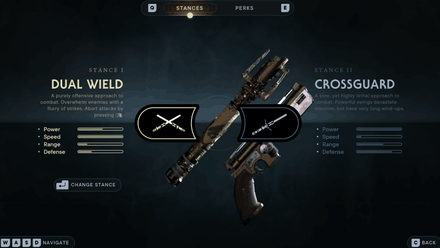
The Dual Blade stance allows you to play aggressively and deal as much damage as possible when you have the opportunity because of its speed. It is best paired with the Crossguard stance to make up for the lack of defensive capabilities and shield penetration of the Dual Blade stance.
How to Get Crossguard Lightsaber Stance
Crossguard to Destroy Shields
Even though the Dual Blade stance is the best offensive stance available, it can be difficult to break enemy shields and barriers. But with the Crossguard stance, you can easily destroy these shields with just one swoop. You can switch out your Dual Blade stance mid-combo to reflect incoming attacks or to penetrate shields.
How to Disable Droideka Shields
More Stamina for Parrying and Blocking
If you have the Dual Blade stance equipped, you only have 4 bars of stamina for parrying and blocking enemy attacks. But if you are using any other stance, you will have 5 bars of stamina. It is best that you switch out your Dual Blade stance if you are playing defensively to avoid taking damage.
Dark Side Ability Uses the Single Blade Stance
Using your Dark Side ability forces you to use the Single Blade stance. This is immediately available once you've completed Nova Garon.
Star Wars: Jedi Survivor Guides

Tips and Tricks
Comment
Author

Best Stance and All Lightsaber Stances Ranked
Please participate in our site
improvement survey
03/2026
improvement survey
03/2026
Would you assist in
improving Game8's site?
improving Game8's site?

×
We are listening to our users' valuable opinions and discussing how to act on them.
The information collected through this survey will be used for the purpose of improving our services. In addition, the information will only be disclosed a part of a statistic in a format that will not allow identification of personal information.
Begin Survey
Not Now
×
Please rate each item regarding Game8.co's Advertisements.
Amount of Ads
Very Dissatisfied
Somewhat Dissatisfied
Fine
Somewhat Satisfied
Highly Satisfied
Placement of Ads
Timing of Ad Display
Ad Loading Speed
Safeness of Ads
Content of Ads
×
Please rate each item regarding Game8.co's Quality of Articles.
Amount of information
Very Dissatisfied
Somewhat Dissatisfied
Fine
Somewhat Satisfied
Highly Satisfied
Frequency of updates
Speed of new information
Accuracy of articles
Understandibility of articles
Readability of sentences
×
Please rate each item regarding Game8.co's Usability of the Site.
Ease of finding information
Very Dissatisfied
Somewhat Dissatisfied
Fine
Somewhat Satisfied
Highly Satisfied
Loading Speed
Use of Color
Font Size
Visibility of Images
Easy to Understand Layout
×
Please rate each item regarding Game8.co's Message Boards, Comments.
Ease of Writing
Very Dissatisfied
Somewhat Dissatisfied
Fine
Somewhat Satisfied
Highly Satisfied
Readability
Ease in Finding Information
Comment Quality
Comment Quantity
Admin Response
×
Please rate each item regarding Game8.co's Site's new design.
Please rate our site's new design
Very Dissatisfied
Somewhat Dissatisfied
Fine
Somewhat Satisfied
Highly Satisfied
Do you think that the website's design change makes the site easier to use?
Has the new design made it easier for you to find information on the site?
Has the new design improved the overall visual appeal of the site?
How would you rate your overall satisfaction with the new design of the site?
×
How likely are you to recommend Game8 to someone you know?
Very Unlikely
0
1
2
3
4
5
6
7
8
9
10
Very Likely
If you have other opinions regarding potential improvement to the website, please share them with us. We would appreciate your honest opinion.
Note: This is a free response section, so you can proceed without entering anything.
Note: Please be sure not to enter any kind of personal information into your response.
Note: Please be sure not to enter any kind of personal information into your response.
×
Thank You
×
Thank you for participating in our survey! Your answers will help us to improve the quality of our website and services.
We hope you continue to make use of Game8.
We hope you continue to make use of Game8.
Close
Rankings
- We could not find the message board you were looking for.
Gaming News


![Everwind Review [Early Access] | The Shaky First Step to A Very Long Journey](https://img.game8.co/4440226/ab079b1153298a042633dd1ef51e878e.png/thumb)

![Monster Hunter Stories 3 Review [First Impressions] | Simply Rejuvenating](https://img.game8.co/4438641/2a31b7702bd70e78ec8efd24661dacda.jpeg/thumb)
Popular Games

Genshin Impact Walkthrough & Guides Wiki
Honkai: Star Rail Walkthrough & Guides Wiki
Umamusume: Pretty Derby Walkthrough & Guides Wiki
Pokemon Pokopia Walkthrough & Guides Wiki
Resident Evil Requiem (RE9) Walkthrough & Guides Wiki
Monster Hunter Wilds Walkthrough & Guides Wiki
Wuthering Waves Walkthrough & Guides Wiki
Arknights: Endfield Walkthrough & Guides Wiki
Pokemon FireRed and LeafGreen (FRLG) Walkthrough & Guides Wiki
Pokemon TCG Pocket (PTCGP) Strategies & Guides Wiki


Recommended Games
Diablo 4: Vessel of Hatred Walkthrough & Guides Wiki
Fire Emblem Heroes (FEH) Walkthrough & Guides Wiki
Yu-Gi-Oh! Master Duel Walkthrough & Guides Wiki
Super Smash Bros. Ultimate Walkthrough & Guides Wiki
Pokemon Brilliant Diamond and Shining Pearl (BDSP) Walkthrough & Guides Wiki
Elden Ring Shadow of the Erdtree Walkthrough & Guides Wiki
Monster Hunter World Walkthrough & Guides Wiki
The Legend of Zelda: Tears of the Kingdom Walkthrough & Guides Wiki
Persona 3 Reload Walkthrough & Guides Wiki
Cyberpunk 2077: Ultimate Edition Walkthrough & Guides Wiki


All rights reserved
© 2023 Electronic Arts Inc.
The copyrights of videos of games used in our content and other intellectual property rights belong to the provider of the game.
The contents we provide on this site were created personally by members of the Game8 editorial department.
We refuse the right to reuse or repost content taken without our permission such as data or images to other sites.