This survey will take about 1 minute.
Your answers will help us to improve our website.
Star Wars Jedi Survivor
All Koboh Collectibles
★ Find out what gets carried over to New Game Plus!
☆ Learn how to get Beskar Steel and all weapon materials!
★ Make sure to get all the BD-1 Upgrades to help in combat!
☆ Get Map Upgrades to make hunting Collectibles easier!
Koboh is one of the planets you can roam and visit in Star Wars Jedi: Survivor. Read on to learn more about all the collectibles that can be found on this planet, and more!
| Planet Walkthroughs | Planet Collectibles |
|---|---|
| Koboh Walkthrough Koboh Part 2 Koboh Part 3 Koboh Part 4 Koboh Part 5 |
Koboh Collectibles |
List of Contents
All Koboh Collectibles
| All Koboh Collectibles | ||
|---|---|---|
| Chests | Stim Upgrades | BD-1 Scans |
| Force Echoes | Seeds and Plants | Fish |
| Datadiscs | Priorite Shards | Health Essences |
| Force Essences | Skill Points | |
Chests
| In-game Location | Map Location |
|---|---|
 |
 |
|
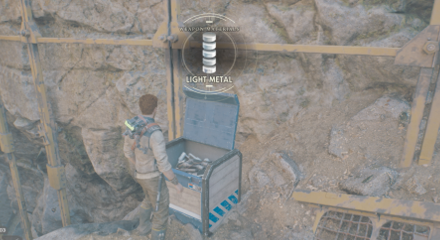
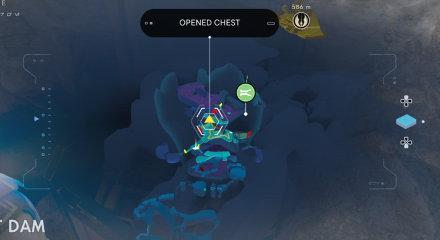
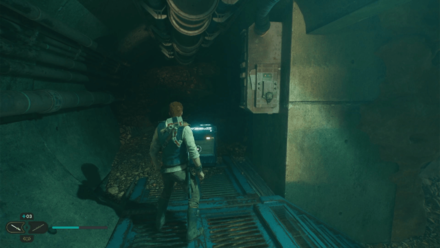
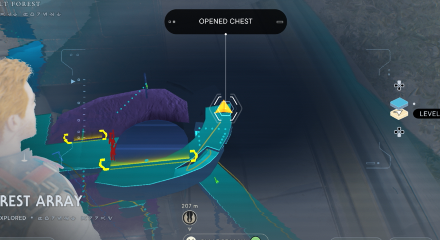
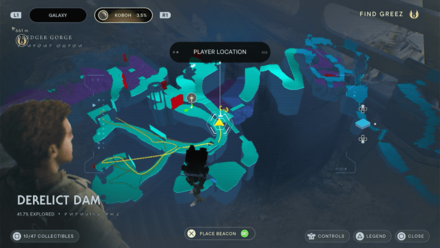
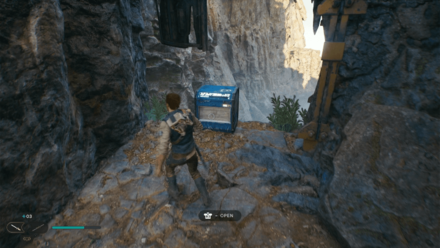
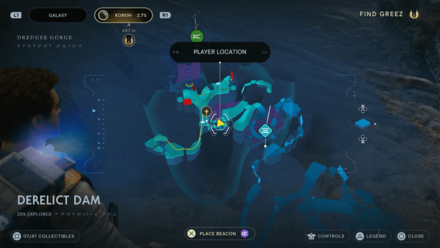
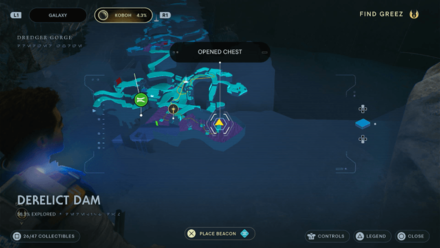
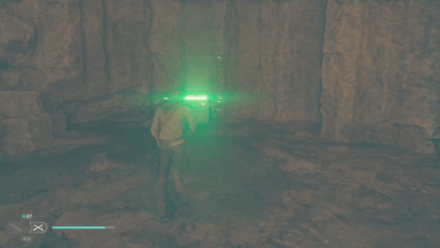
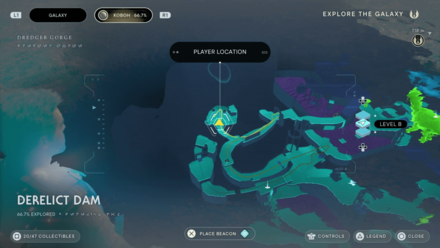
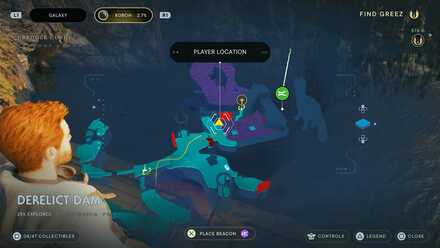
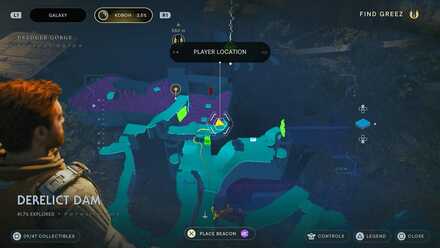
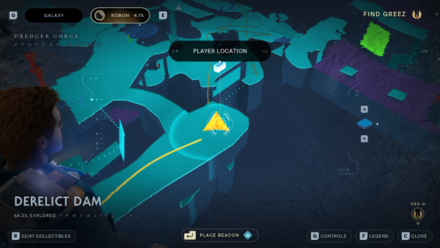
Collectible: Light Metal Type: Weapon Cosmetic Area: Derelict Dam Where to Find: Past the broken elevator and to the lower left of the broken bridge full of tar. |
|
 |
 |
|
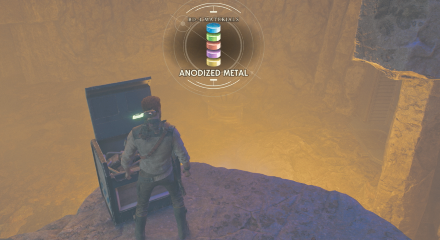
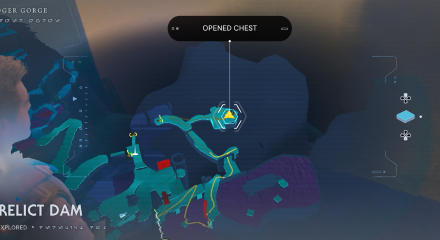
Collectible: Anodized Metal Type: BD-1 Cosmetic Area: Derelict Dam Where to Find: Can be found on a high ledge inside a cave with some braziers past the Commando Droid. |
|
 |
 |
|
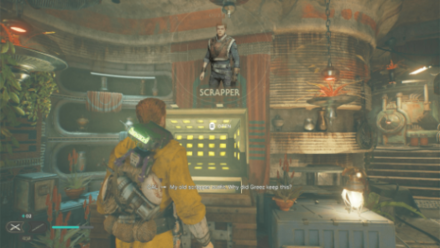
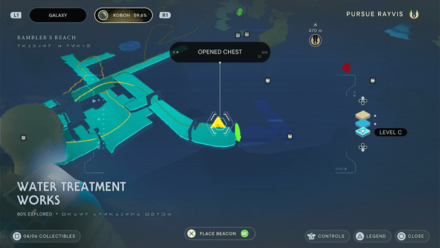
Collectible: Scrapper Type: Cal Cosmetic Area: Water Treatment Works Where to Find: Head to the high point at the center of Southern reach until you find a tunnel. |
|
 |
 |
|
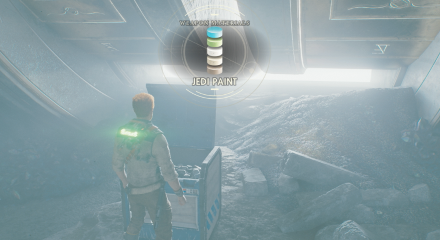
Collectible: Jedi Paint Type: Weapon Cosmetic Area: Chamber of Duality Where to Find: Place the two Orbs to create a bridge and cross it to find a wall you can run on your left. You'll find the chest by the platform below. |
|
 |
 |
|
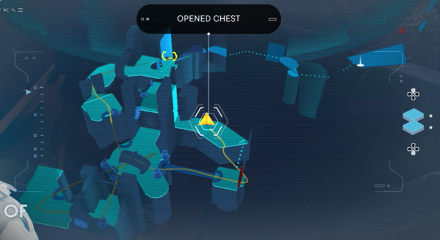
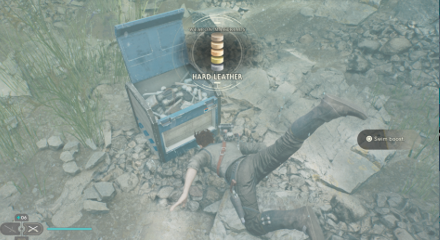
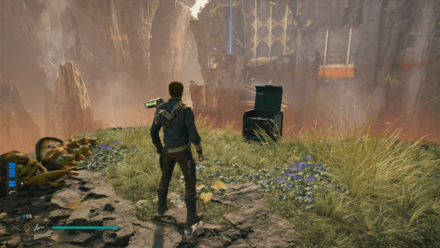
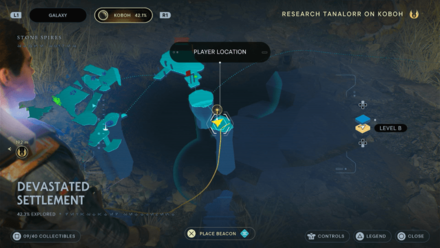
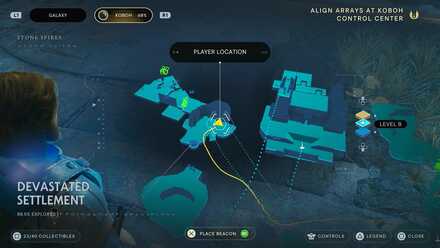
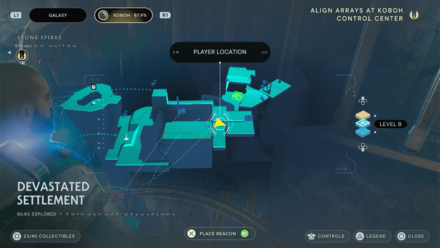
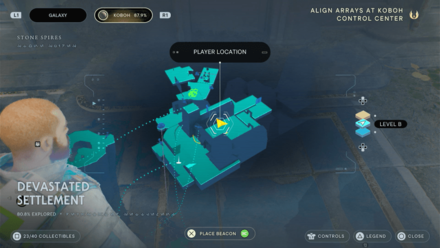
Collectible: Hard Leather Type: Weapon Cosmetic Area: Devastated Settlement Where to Find: From the Grand Courtyard Meditation Point, take the Reltor and fly towards the rock with a pond in the middle. Dive in and you'll find the chest at the bottom. |
|
 |
 |
|
Collectible: Scrapyard Type: BD-1 Cosmetic Area: Derelict Dam Where to Find: Use the force to move the block and climb it to wall run up to the ledge and you'll find the chest on top. |
|
 |
 |
|
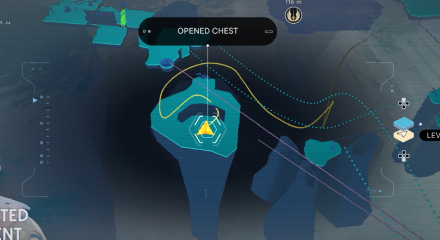
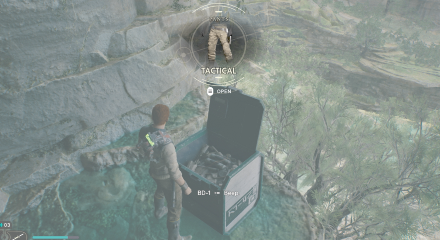
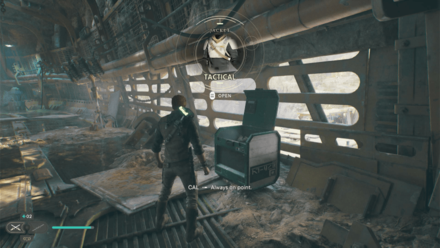
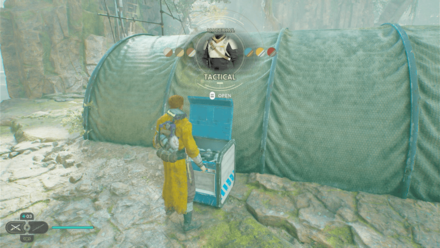
Collectible: Tactical Type: Cal Cosmetic Area: Swindler's Wash Where to Find: From the Meditation Point, take the road upwards and climb the ledges on the left past the B2 Battle Droid and you'll find the chest on your left behind the narrow passageway. |
|
 |
 |
|
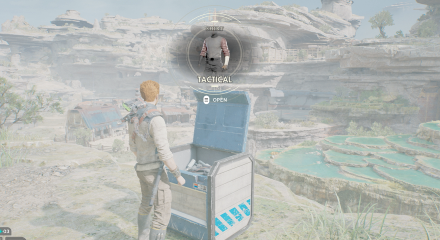
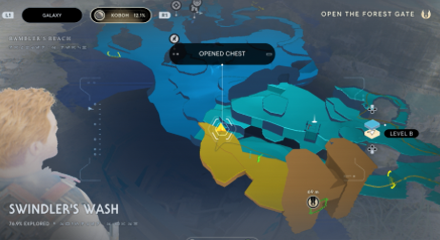
Collectible: Tactical Type: Cal Cosmetic Area: Swindler's Wash Where to Find: From the Meditation Point, go around to the other side of the bridge and climb the ledge past the Droids that drop down. You'll find the chest on your right by the edge. |
|
 |
 |
|
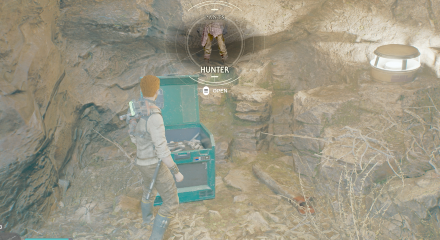
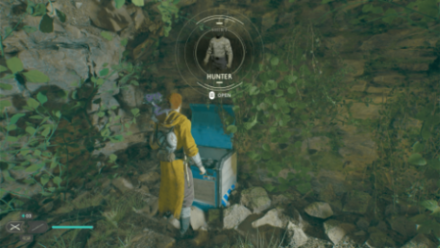
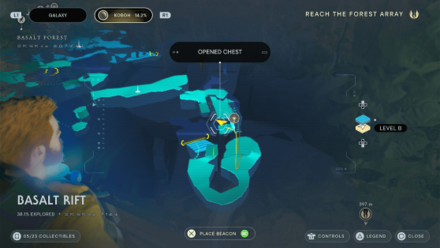
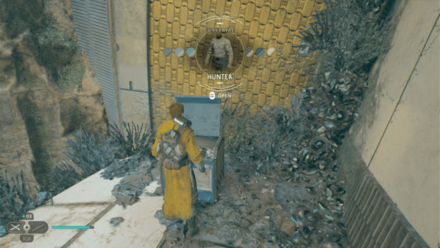
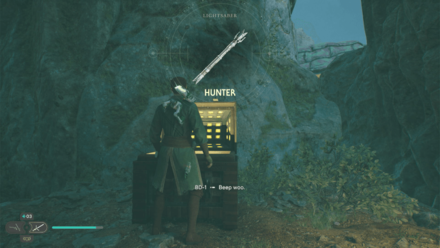
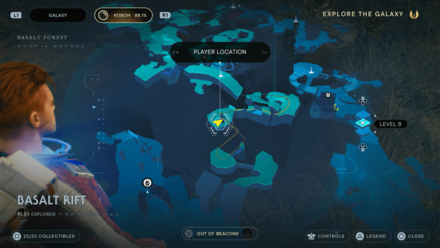
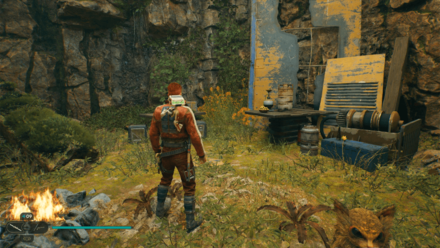
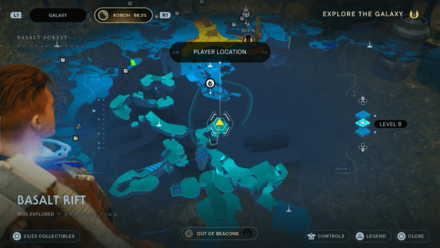
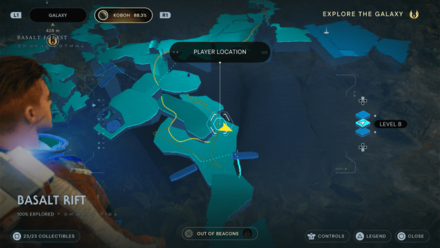
Collectible: Hunter Type: Cal Cosmetic Area: Basalt Rift Where to Find: Next to the Shortcut back to the Meditation Point, slide down the ramp and defeat the nearby Bilemaw. You'll find the chest inside the cave where the Bilemaw came from. |
|
 |
 |
|
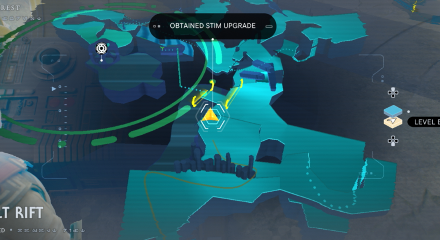
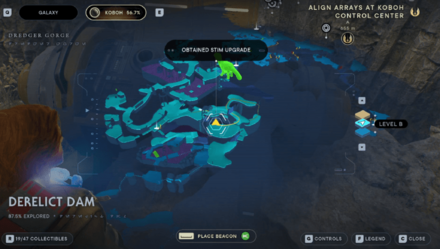
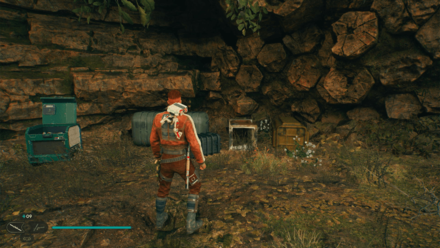
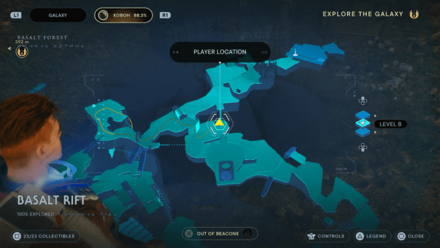
Collectible: Stim Upgrade Area: Basalt Rift Where to Find: From the Meditation Point, go past the archway and take the road up past the rock blocking the path. Take a left past the Mogu and wall run your way up the wall. You'll find the chest on your right by the cliff. |
|
 |
 |
|
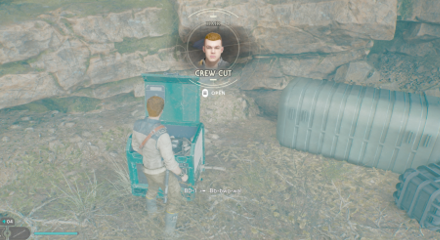
Collectible: Crew Cut Type: Cal Cosmetic Area: Basalt Rift Where to Find: From the Meditation Point, head past the archway and down into the group of Stormtroopers. You'll find the chest nearby next to some crates. |
|
 |
 |
|
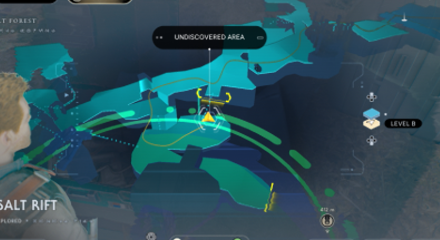
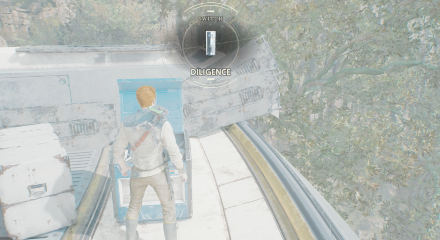
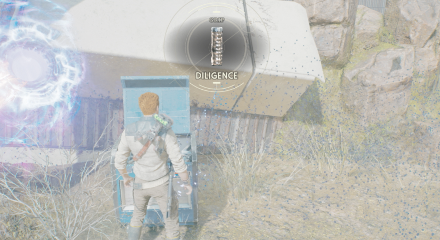
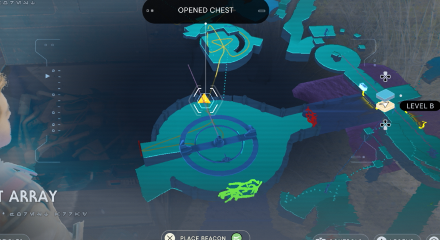
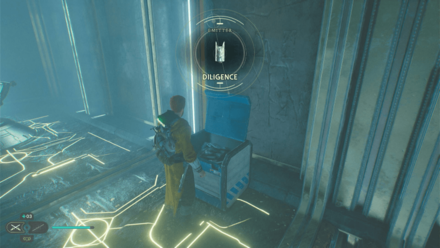
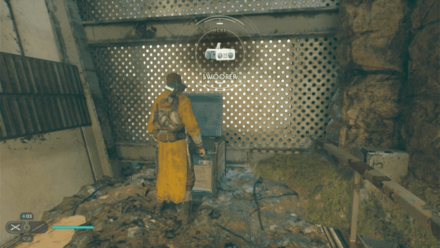
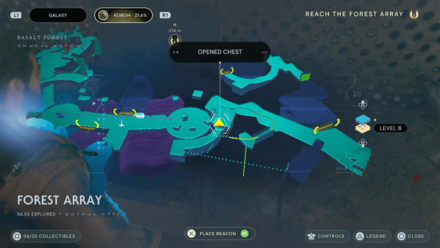
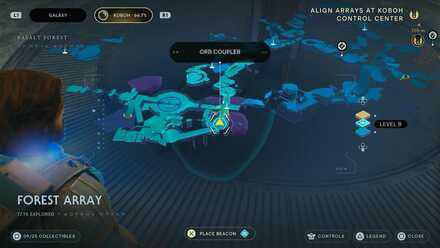
Collectible: Diligence Type: Lightsaber Cosmetic Area: Forest Array Where to Find: From the Meditation Point, head to your right after opening the Orb Coupler and climb the platforms to the top. You'll find the chest by the edge. |
|
 |
 |
|
Collectible: Tactical Type: Cal Cosmetic Area: Derelict Dam Where to Find: Head inside the cave and drop down the hole past the Raider and a BX Droid. You'll find the chest down the hall to your right. |
|
 |
 |
|
Collectible: Diligence Type: Lightsaber Cosmetic Area: Forest Array Where to Find: From the center, set the Orb Couplerto face towards the east opening. Walk across and you'll find the chest infront of you. |
|
 |
 |
|
Collectible: Hunter Type: Cal Cosmetic Area: Forest Array Where to Find: From the center, set the Orb Coupler to face towards the west opening. Walk across and climb up and you'll find the chest below the far end of the railings. |
|
 |
 |
|
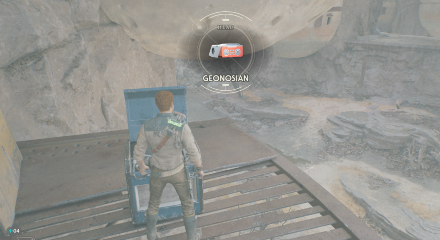
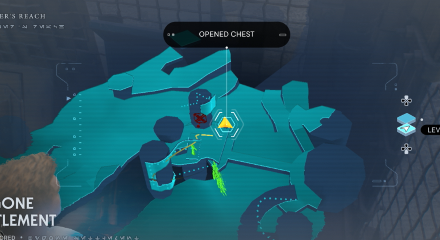
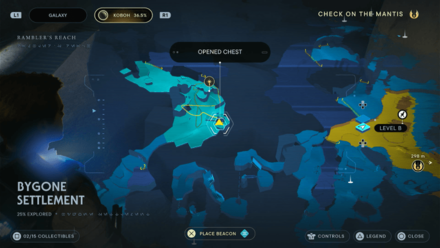
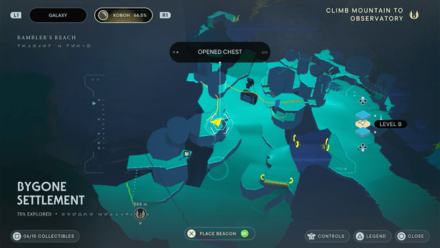
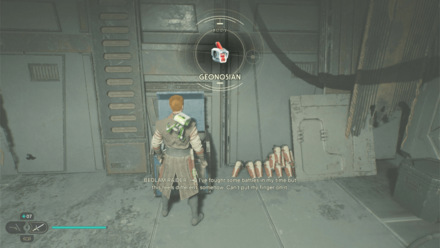
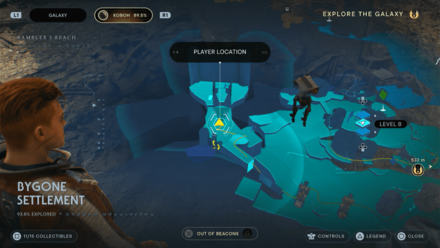
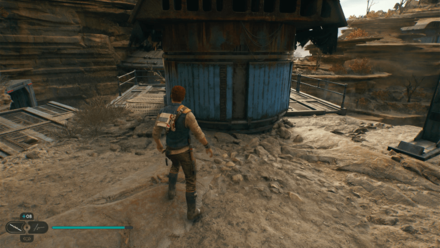
Collectible: Geonosian Type: BD-1 Cosmetic Area: Bygone Settlement Where to Find: In the area where the Jawa helps you cross, drop down to a zipline below and cross it. Wall run your way through and you'll find the chest at the end of the path next to a Reltor. |
|
 |
 |
|
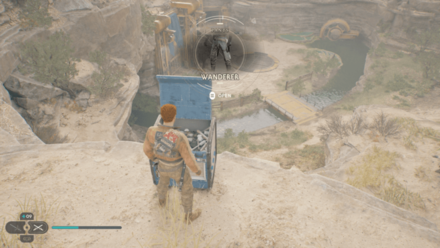
Collectible: Wanderer Type: Cal Cosmetic Area: Bygone Settlement Where to Find: From the Bygone Settlement meditation point, jump to the wall you can run on and from there, continue along the platforming route to reach this chest at the end. |
|
 |
 |
|
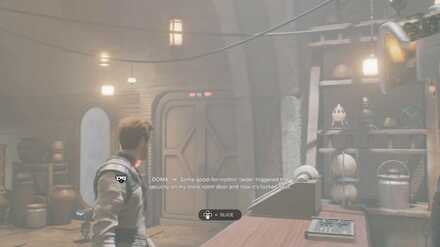
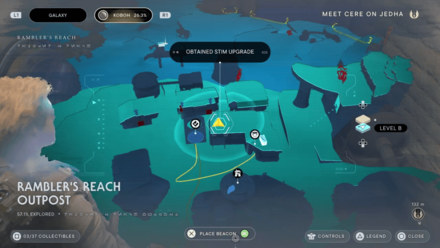
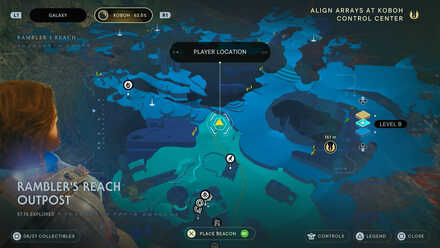
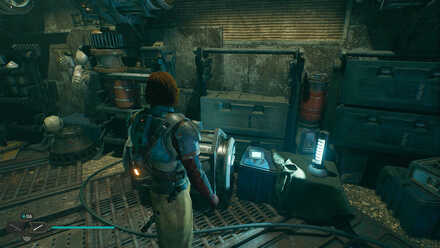
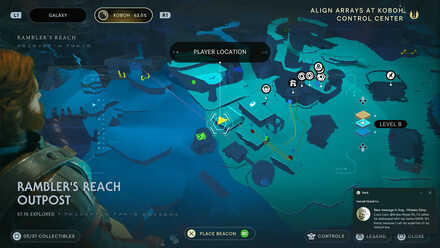
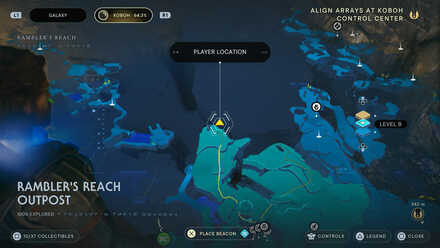
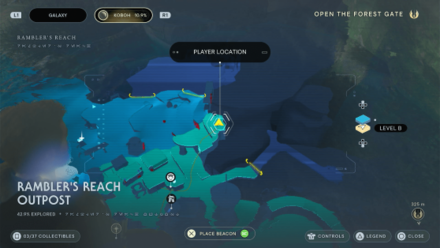
Collectible: Stim Upgrade Area: Rambler's Reach Outpost Where to Find: Have BD-1 slice open the door to Doma's right using the mysterious keycode. You can purchase the Mysterious Keycode for 10 Priorite Shards in Doma's Outpost Commodities on the planet Koboh. |
|
 |
 |
|
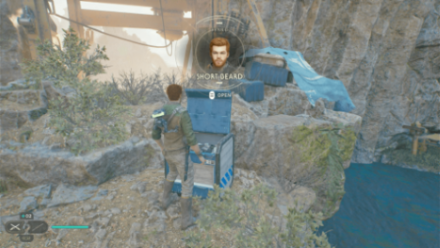
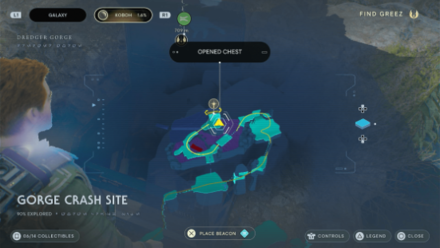
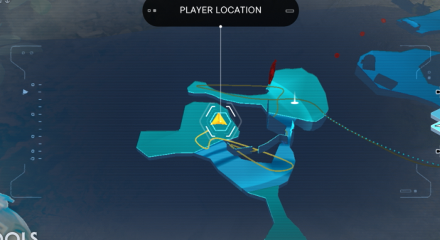
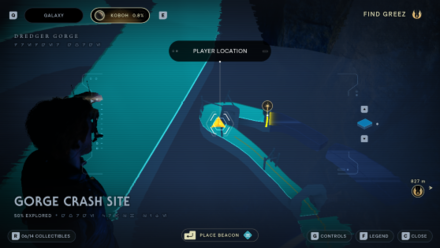
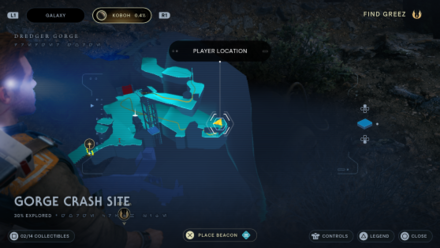
Collectible: Short Beard Type: Cal Cosmetic Area: Gorge Crash Site Where to Find: Behind some bushes past the tar pit and a kid drioid. |
|
 |
 |
|
Collectible: Scrapyard Type: BD-1 Cosmetic Area: Gorge Crash Site Where to Find: On top of a ledge near the first Meditation Point. |
|
 |
 |
|
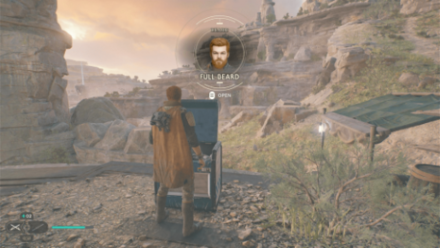
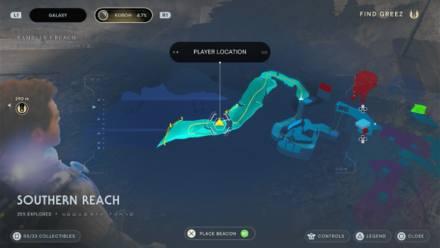
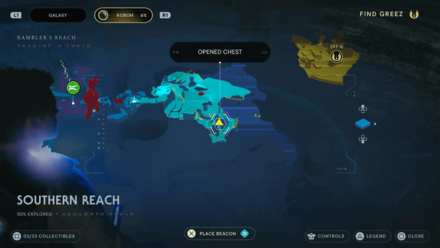
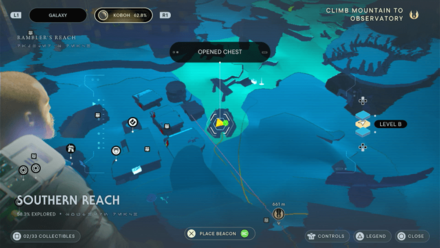
Collectible: Full Beard Type: Cal Cosmetic Area: Southern Reach Where to Find: Just behind Mosey's shack by the bushes. |
|
 |
 |
|
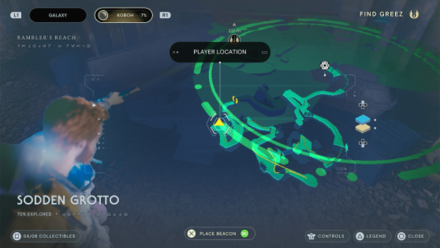
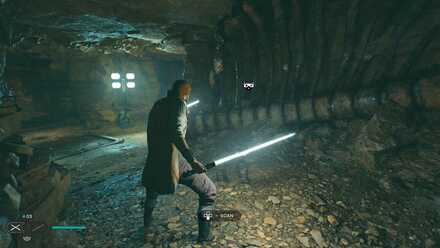
Collectible: Scrapyard Type: BD-1 Cosmetic Area: Sodden Grotto Where to Find: Just after the Shiverpede, enter the small passage on his left and you'll find the chest at the end of the dark path on your right. |
|
 |
 |
|
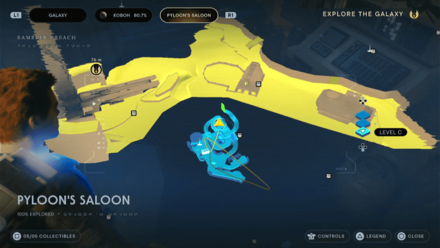
Collectible: Scrapper Type: Cal Cosmetic Area: Pyloon's Saloon Where to Find: Just beside the Meditation Point. |
|
 |
 |
|
Collectible: Scrapyard Type: BD-1 Cosmetic Area: Derelict Dam Where to Find: To the right after going down the vines. |
|
 |
 |
|
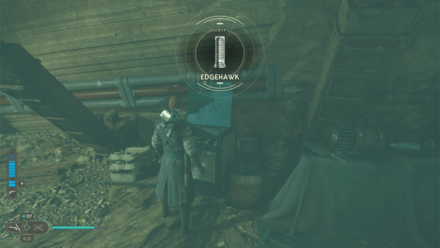
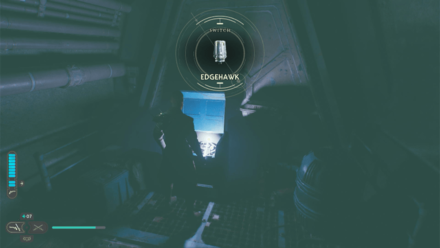
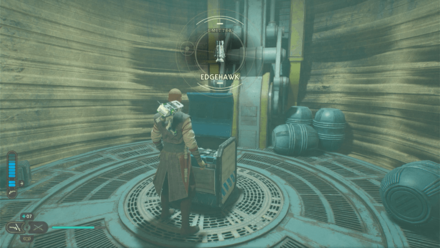
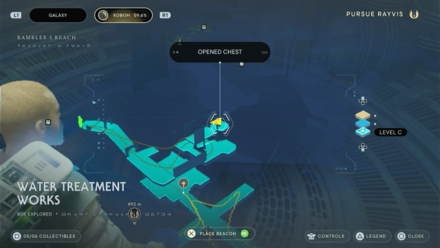
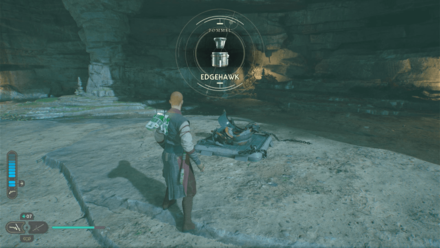
Collectible: Edgehawk Type: Lightsaber Cosmetic Area: Water Treatment Works Where to Find: Past some rocks blocking the way and you'll find the chest along the path on your left. |
|
 |
 |
|
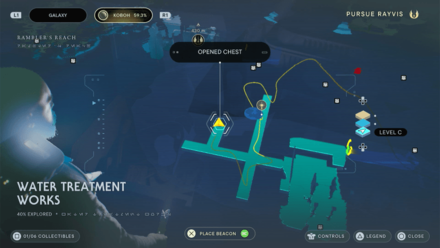
Collectible: Edgehawk Type: Lightsaber Cosmetic Area: Water Treatment Works Where to Find: Head down the sewers, turn around and slash through the pipes. You'll find the chest on the path to the right. |
|
 |
 |
|
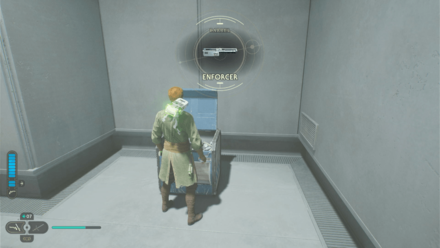
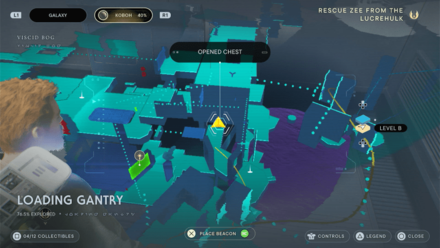
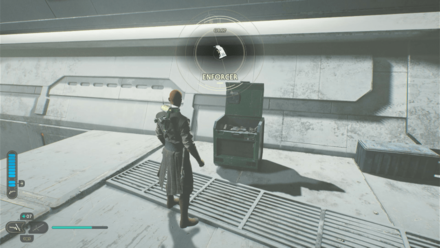
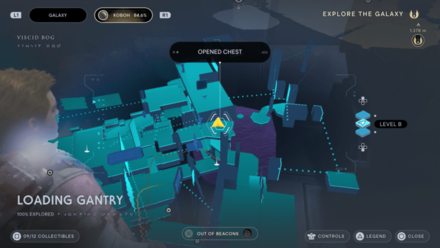
Collectible: Enforcer Type: Blaster Cosmetic Area: Loading Gantry Where to Find: From the white laser wall, head down the stairs on the right and follow the path. You'll find the chest on the right by the wall. |
|
 |
 |
|
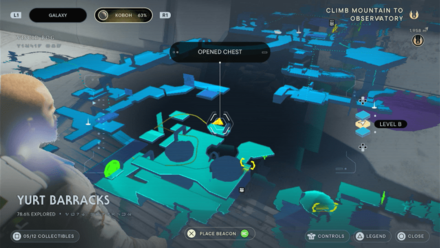
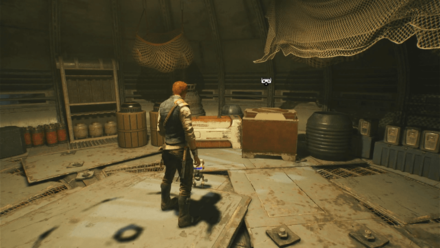
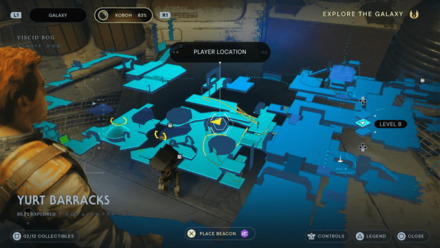
Collectible: Enforcer Type: Blaster Cosmetic Area: Yurt Barracks Where to Find: From the Lucrehulk Core Meditation Point, take the path down on the left and circle around the hut on your left. Go through the narrow path and climb up the wall and jump and dash across. You'll find the chest in the platform to your left. |
|
 |
 |
|
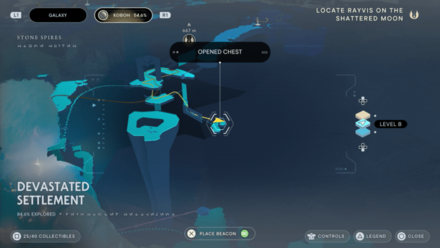
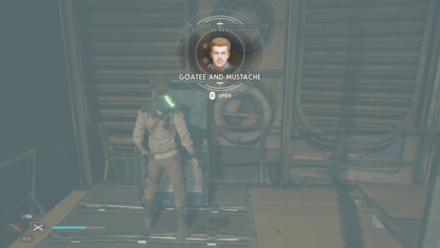
Collectible: Full Goatee and Mustache Type: Cal Cosmetic Area: Devastated Settlement Where to Find: From the Grand Courtyard Meditation Point, head for the cave across the gap to the right and enter the cave at the lower platform. You'll find the chest across the gap. |
|
 |
 |
|
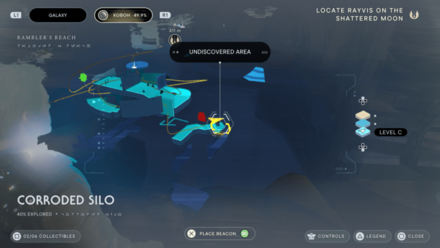
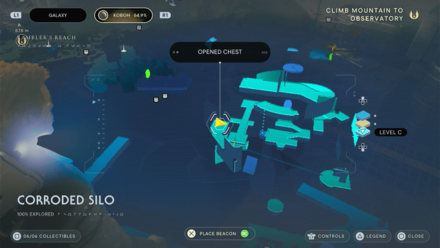
Collectible: Goatee and Mustache Type: Cal Cosmetic Area: Corroded Silo Where to Find: Follow the path forward and drop down on a bridge with a patroling droid, kill it and you'll find the chest by the wall. |
|
 |
 |
|
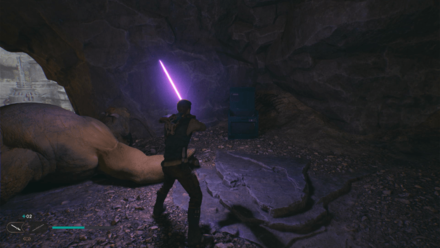
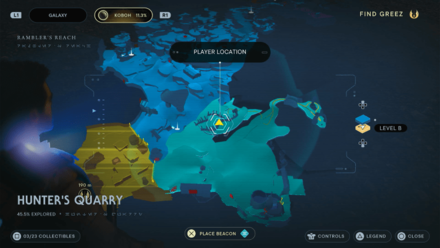
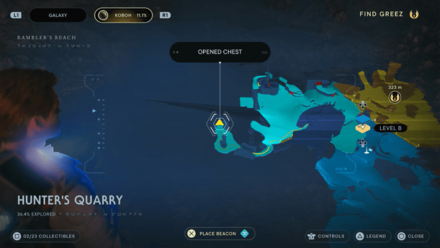
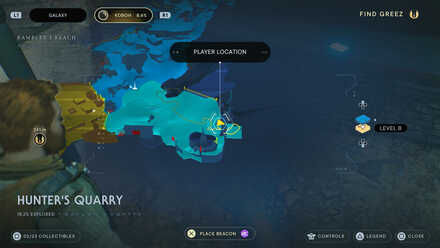
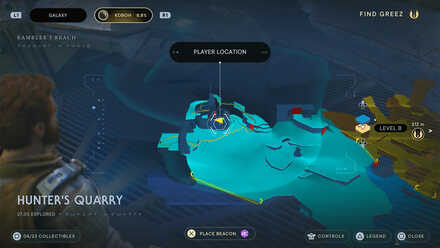
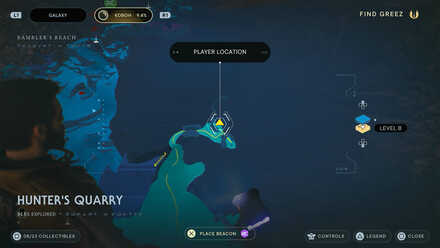
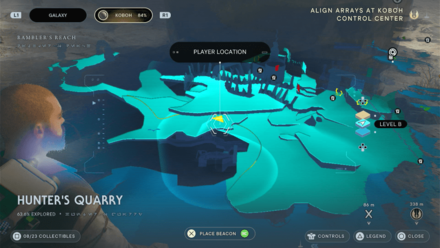
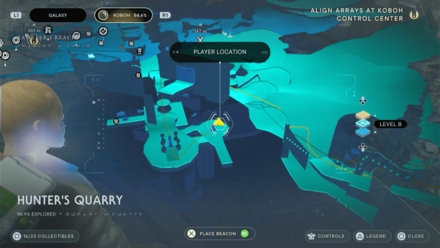
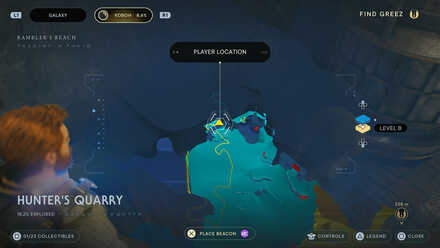
Collectible: Hunter Type: Cal Cosmetic Area: Hunter's Quarry Where to Find: Reach the high point of the area where you'll encounter a Gorocco. |
|
 |
 |
|
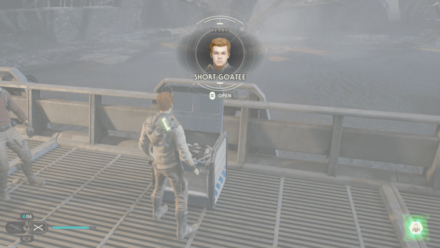
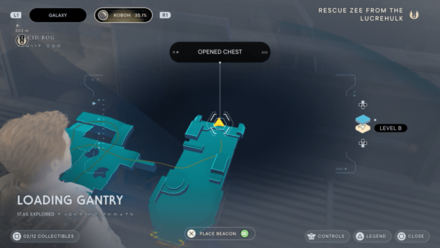
Collectible: Short Goatee Type: Cal Cosmetic Area: Loading Gantry Where to Find: After Bode lowers the crate to help you cross, fight through the group of droids and you'll find the chest up the ramp. |
|
 |
 |
|
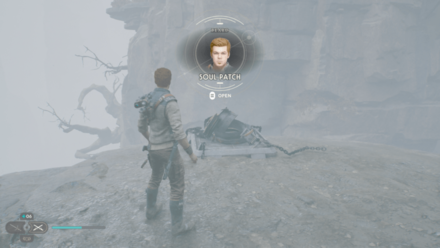
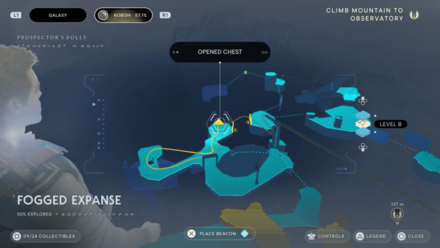
Collectible: Soul Patch Type: Cal Cosmetic Area: Fogged Expanse Where to Find: Before the door with a Mogul inside, head to the left and you'll find the chest by the edge guarded by a group of Roller Mines. |
|
 |
 |
|
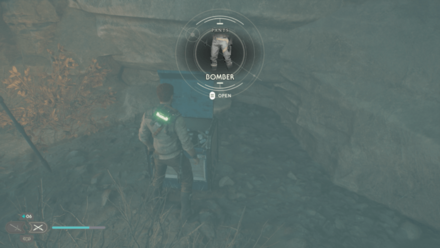
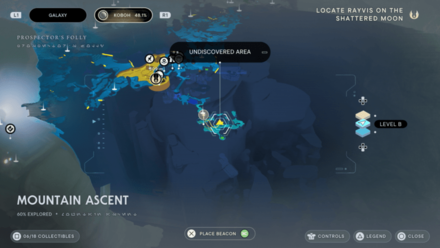
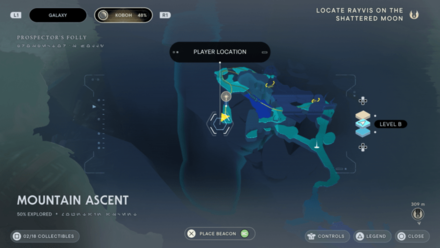
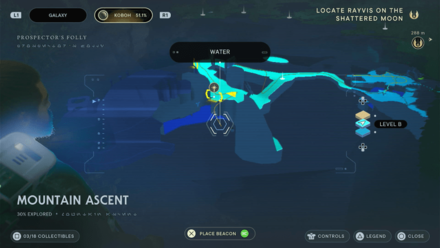
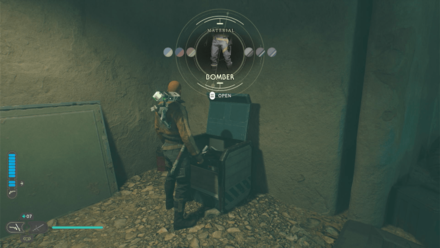
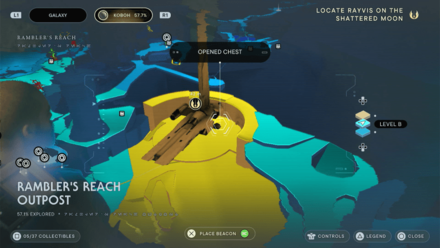
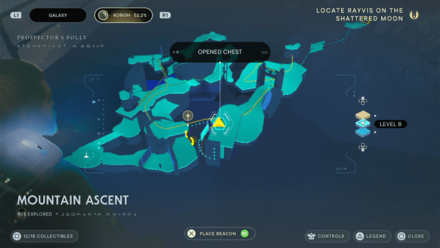
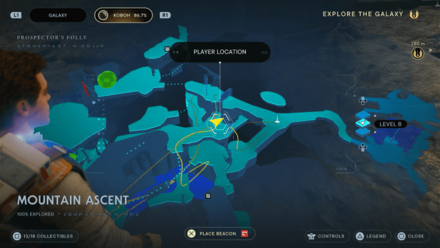
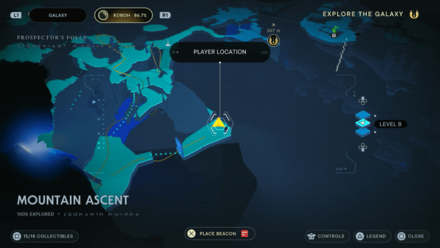
Collectible: Bomber Type: Cal Cosmetic Area: Mountain Ascent Where to Find: From the Meditation Point, go past the green laster walls to the right and then jump across towards the platform below. You'll find the chest across the water by some bushes. |
|
 |
 |
|
Collectible: Edgehawk Type: Lightsaber Cosmetic Area: Water Treatment Works Where to Find: Facing the entrance blocke by rocks, turn left, jump and dash towards the platform across and you'll find the chest ahead. |
|
 |
 |
|
Collectible: Mullet Type: Cal Cosmetic Area: Derelict Dam Where to Find: Head to the right far side of the area with the tar past the platforms until you find a scalable wall. Climb the wall. |
|
 |
 |
|
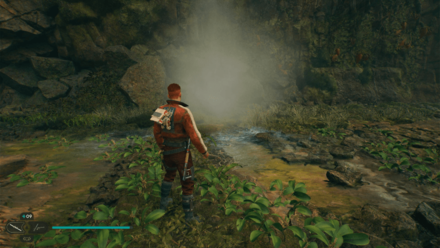
Collectible: Kashyyyk Paint Type: Weapon Cosmetic Area: Southern Reach Where to Find: Enter the cave area where you have to cut some vines to get through. It will be behind the falls after jumping over the ravine. |
|
 |
 |
|
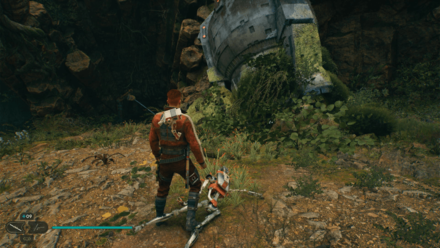
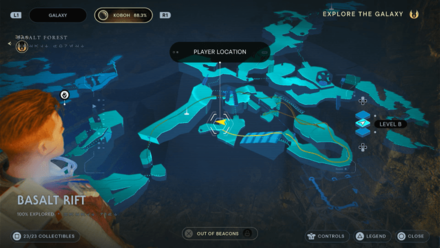
Collectible: Hunter Type: Cal Cosmetic Area: Basalt Rift Where to Find: Cross the broken bridge and past the Droids and Raiders, grapple your way up the vines and climb the ceiling. Drop down and grapple towards the vines underneath and you'll find the chest on a platform below. |
|
 |
 |
|
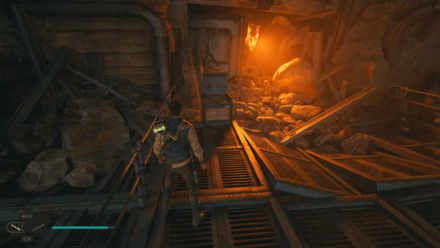
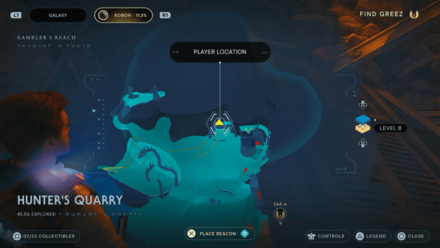
Collectible: Bomber Type: Cal Cosmetic Area: Hunter's Quarry Where to Find: Reach the end of the cave at the far end side of the area. |
|
 |
 |
|
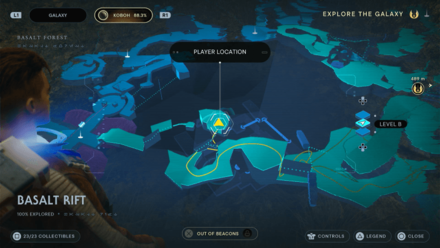
Collectible: Diligence Type: Lightsaber Cosmetic Area: Basalt Rift Where to Find: From the Meditation Point, head past the archway and the Stormtroopers all the way to the lowest level and take a left before the sleeping Bilemaw. You'll find the chest inside a cave on your right. |
|
 |
 |
|
Collectible: Light Metal Type: BD-1 Cosmetic Area: Hunter's Quarry Where to Find: Chest can be found in the garage area protected by droids. |
|
 |
 |
|
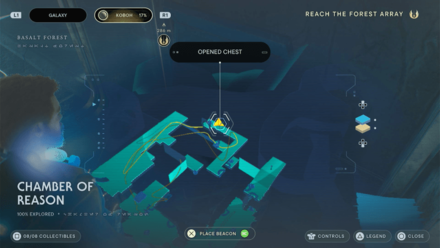
Collectible: Diligence Type: Lightsaber Cosmetic Area: Chamber of Reasons Where to Find: After taking the "Dead End" Force Echo, stay near the Orb and pull the lever to bring the elevator up. Cross the bridge and head towards the second Orb you got and bring it back with to. Head back to the bridge and throw the Orb to the opening above the bridge. You'll find the chest inside on your right. |
|
 |
 |
|
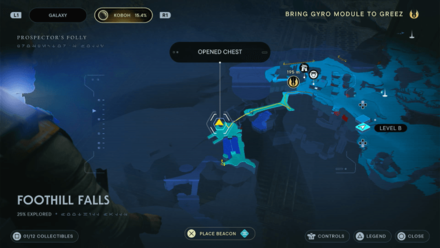
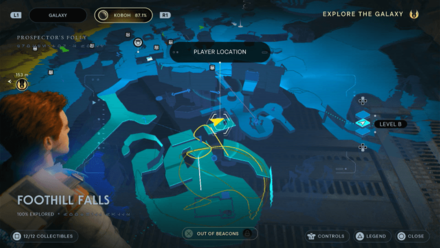
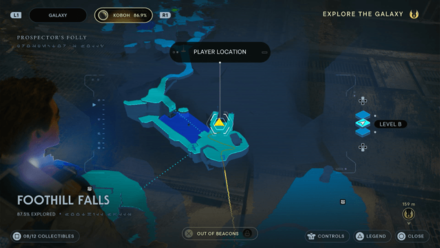
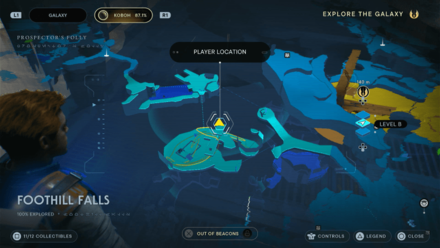
Collectible: Slicked Back Type: Cal Cosmetic Area: Foothill Falls Where to Find: Found behind the shack to the right after going up the zipline. |
|
 |
 |
|
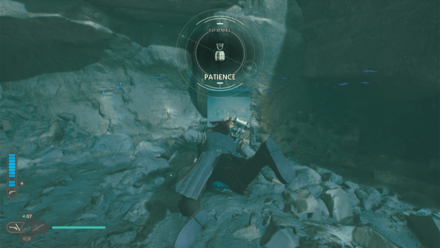
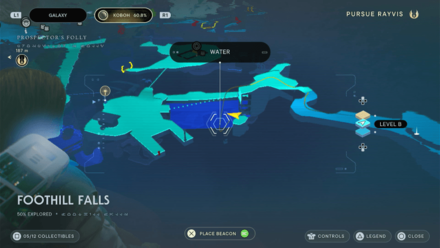
Collectible: Patience Type: Lightsaber Cosmetic Area: Foothill Falls Where to Find: From the Mountain Ascent Meditation Point, turn around and head towards the pond. Dive in and you'll find the chest at the bottom. |
|
 |
 |
|
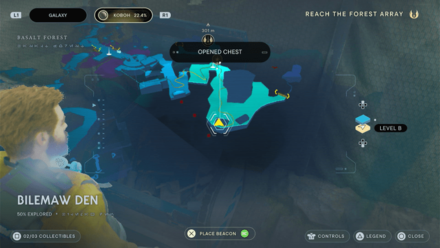
Collectible: Tactical Type: Cal Cosmetic Area: Bilemaw Den Where to Find: Head inside the cave and down the hole and you'll find the chest in your right down the hall. |
|
 |
 |
|
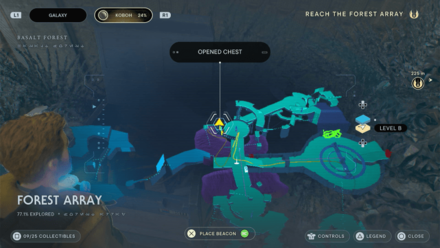
Collectible: Swooper Type: BD-1 Cosmetic Area: Forest Array Where to Find: Head to the right past the Heavy Assault Trooper across a cut bridge and you'll see a narrow passageway to your right. Enter it and you'll find the chest just across. |
|
 |
 |
|
Collectible: Hunter Type: Cal Cosmetic Area: Forest Array Where to Find: From the Meditation Point, look towards the area with Koboh Dusts and a grappable railing. Drop down and grapple towards the railing as soon as you can. Climb up and you'll find the chest by a small platform you can drop down on. |
|
 |
 |
|
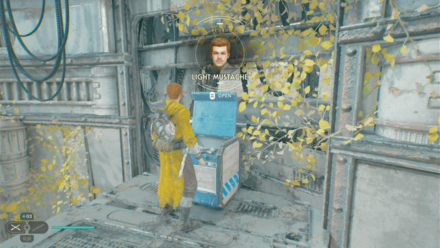
Collectible: Light Mustache Type: Cal Cosmetic Area: Forest Array Where to Find: From the center, set the Orb Coupler to face towards the west opening. Walk across, climb the railings and drop down. Wall run across and climb the lamp and platform and you'll find the chest on top. |
|
 |
 |
|
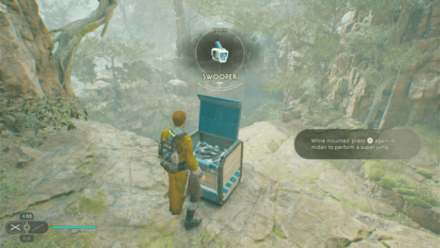
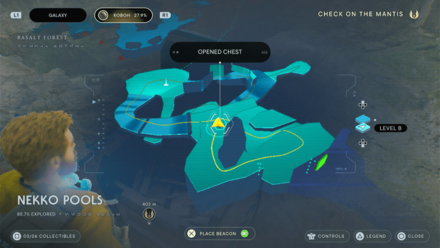
Collectible: Swooper Type: BD-1 Cosmetic Area: Nekko Pools Where to Find: After acquiring the Nekko Mount, head on over to a nearby locked door. On your right, you'll find a high ledge you can double jump on. You'll find the chest inside the area to your right by the edge. |
|
 |
 |
|
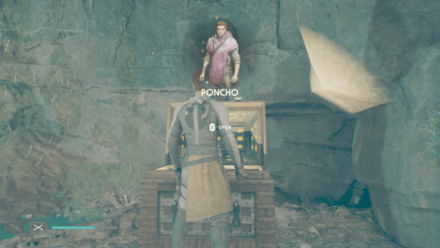
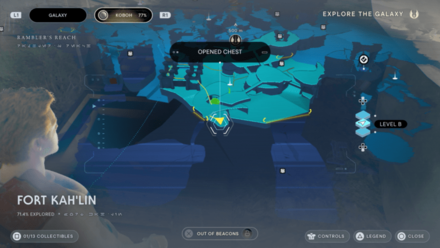
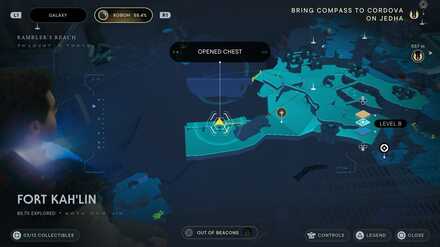
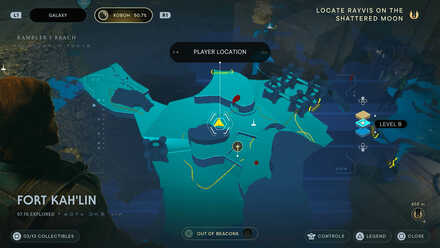
Collectible: Poncho Type: Cal Cosmetic Area: Fort Kah'lin Where to Find: Found in the cave after falling from a hatch in the area where you'll also find the Spawn of Oggdo optional boss. |
|
 |
 |
|
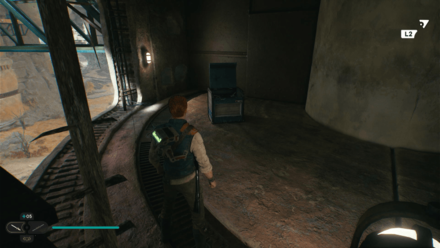
Collectible: Choppy Forward Type: Cal Cosmetic Area: Bygone Settlement Where to Find: Found in one of the spaces above the area, accessed after force pulling and swinging on a rope. |
|
 |
 |
|
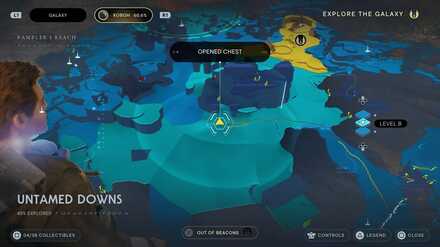
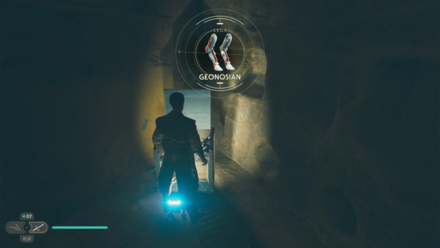
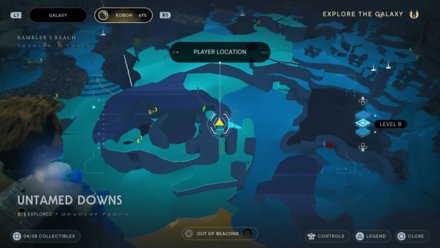
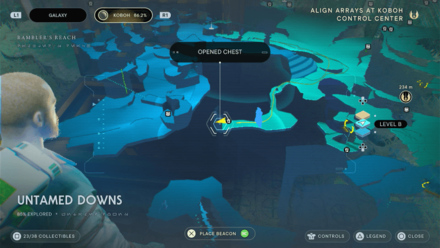
Collectible: Geonosian Type: BD-1 Cosmetic Area: Untamed Downs Where to Find: Found at the end of the path that begins with a cave you'll need a mount to access. |
|
 |
 |
|
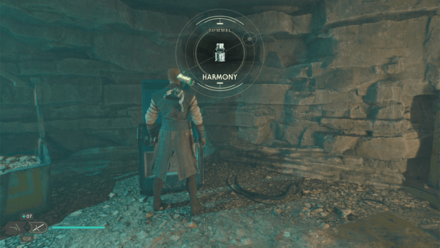
Collectible: Harmony Type: Lightsaber Cosmetic Area: Alignment Control Center Where to Find: Enter the cave past the Mogul and drop down inside the hole to your right. You'll find the chest inside the room below. |
|
 |
 |
|
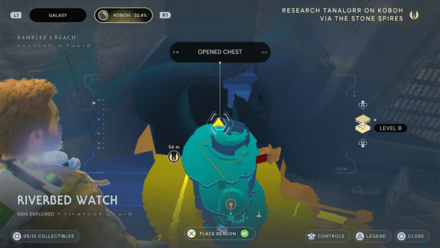
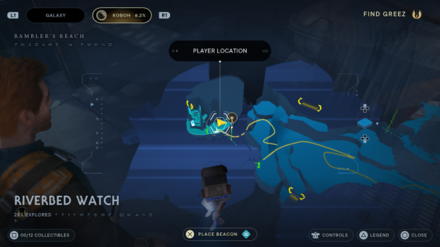
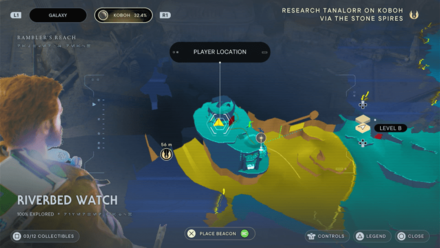
Collectible: Bun Type: Cal Cosmetic Area: Riverbed Watch Where to Find: From the Riverbed Watch Meditation Point, head inside the building and climb up to the very top and defeat the group of droids and climb the building infront. You'll find the chest on your right by the edge. |
|
 |
 |
|
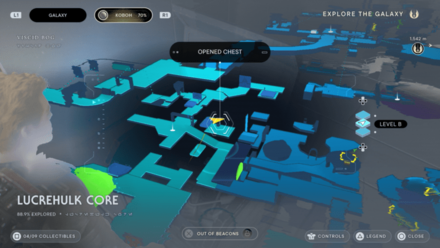
Collectible: Geonosian Type: BD-1 Cosmetic Area: Lucrehulk Core Where to Find: From the Meditation Point, use Life and Slam on the platforms to your left and climb to the top. Wait for the platform to go back up and you'll find the chest behind you by the wall. |
|
 |
 |
|
Collectible: Harmony Type: BD-1 Cosmetic Area: Devastated Settlement Where to Find: Once you unseal the second updraft, use it to fly towards the area with small ground spaces. |
|
 |
 |
|
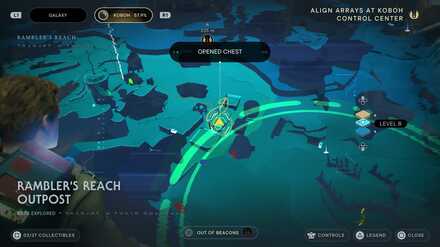
Collectible: Mustache and Patch Type: Cal Cosmetic Area: Mountain Ascent Where to Find: On the way to the Chamber of Detachment. |
|
 |
 |
|
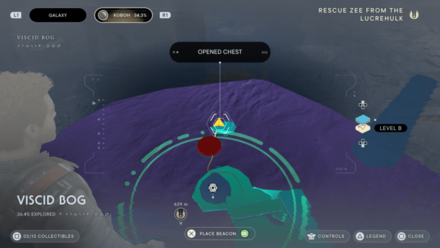
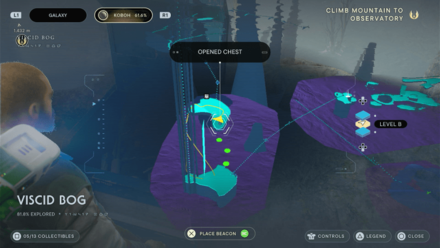
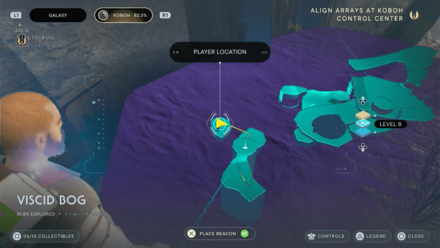
Collectible: Drifter Type: Cal Cosmetic Area: Viscid Bog Where to Find: On a platform in the swamp across from the hut where Vini and Zygg are found. |
|
 |
 |
|
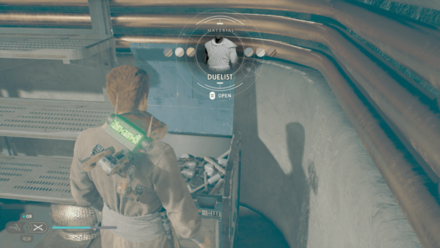
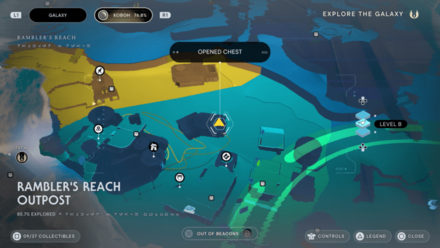
Collectible: Duelist Type: Cal Cosmetic Area: Rambler's Reach Outpost Where to Find: After recruiting T-1N8, go to the house on the map and talk to T-1N8. Go inside and find it in the chest. |
|
 |
 |
|
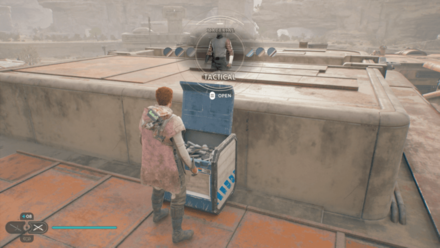
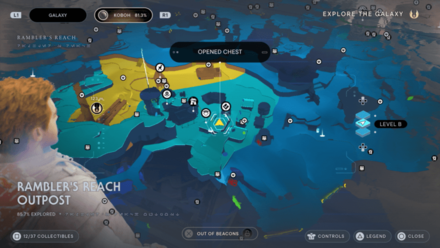
Collectible: Tactical Type: Cal Cosmetic Area: Rambler's Reach Outpost Where to Find: On top of Doma's shop; grapple up to get there. |
|
 |
 |
|
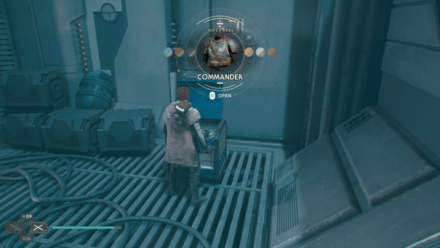
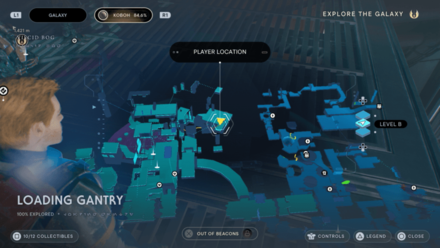
Collectible: Commander Type: Cal Cosmetic Area: Loading Gantry Where to Find: From the Hangar Rafters meditation point, go through the door ahead on the right, turn right, and jump across the gap to the climbable wall and then through the green laser gate. Climb up the blue wall, and go through the orange door at the top. Climb across the walls ahead to reach the chest. |
|
 |
 |
|
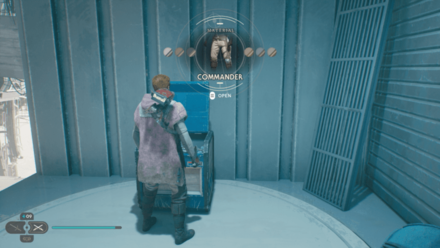
Collectible: Commander Type: Cal Cosmetic Area: Loading Gantry Where to Find: From the Hangar Rafters meditation point, shoot the blue tube with the Electro Bolt, then go up through the window on the right to find the chest. |
|
 |
 |
|
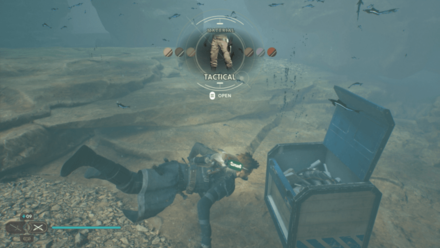
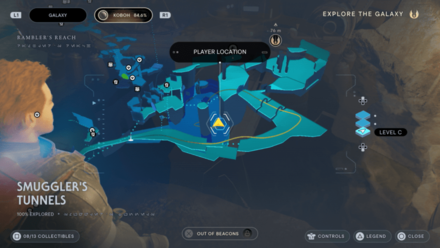
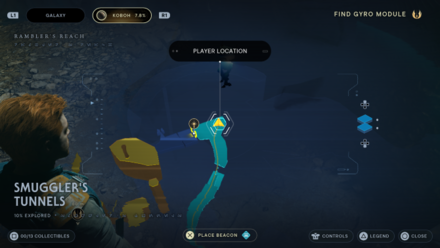
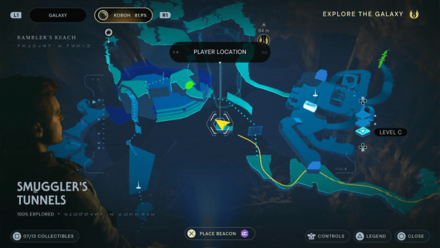
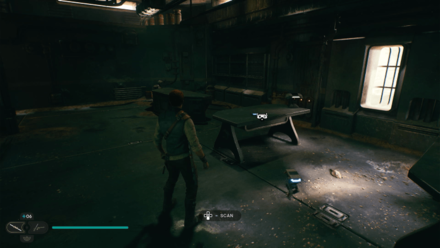
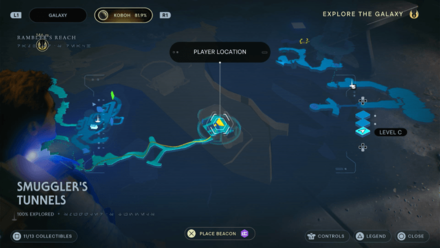
Collectible: Tactical Type: Cal Cosmetic Area: Smuggler's Tunnels Where to Find: In the lake in the middle of the cavern, dive underwater from the platform where Skoova is to find the chest. |
|
 |
 |
|
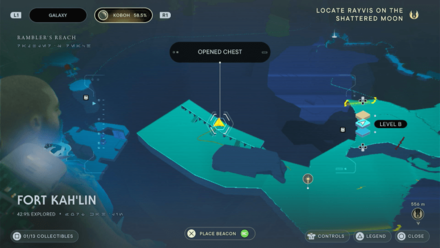
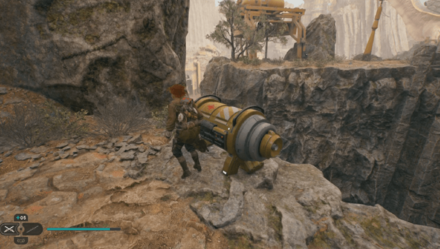
Collectible: Bomber Type: Cal Cosmetic Area: Fort Kah'lin Where to Find: From the Fort Kah'lin meditation point, a huge droid ship is immediately visible. Run past it and into the garage to find the chest. |
|
 |
 |
|
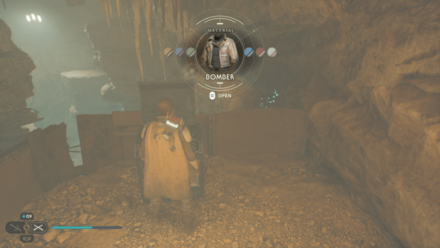
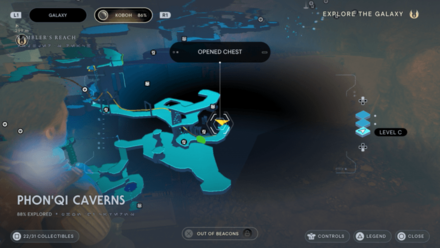
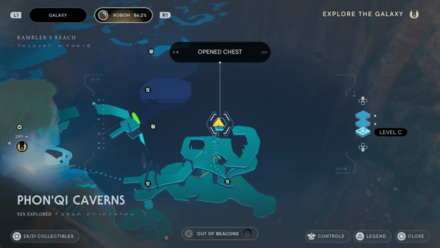
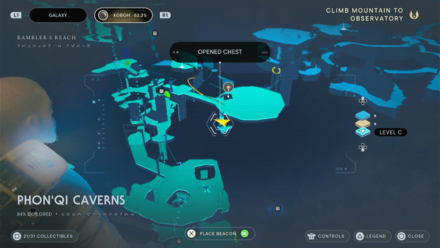
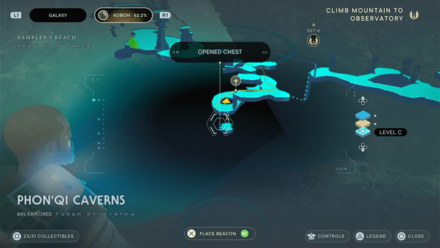
Collectible: Bomber Type: Cal Cosmetic Area: Phon'Qi Caverns Where to Find: From the meditation point, go ahead to the right, then Lift the object blocking the hole and go in. Take the door ahead to the right, and go down the hole on the right side. Find the chest at the end of the walkway. |
|
 |
 |
|
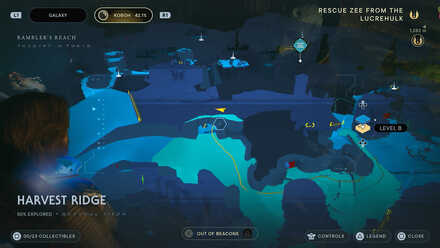
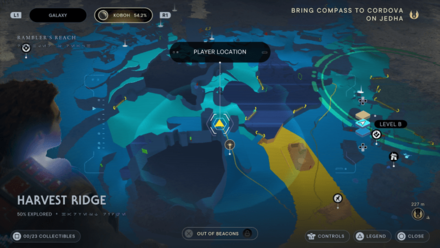
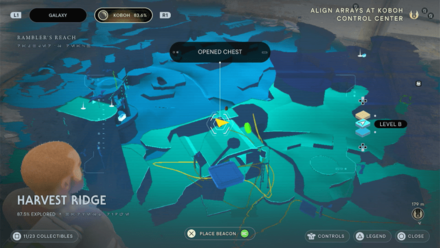
Collectible: Wanderer Type: Cal Cosmetic Area: Harvest Ridge Where to Find: From the large circle on the map where you recruit Ashe Javi and DD-EC, ride a Nekko and super jump up to the vines. Platform across the walls above to reach the chest. |
|
 |
 |
|
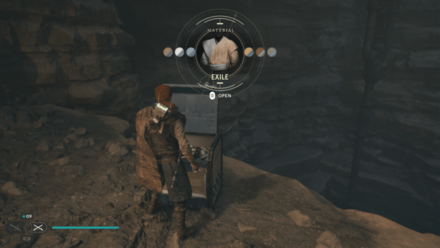
Collectible: Exile Type: Cal Cosmetic Area: Fogged Expanse Where to Find: From the Fogged Expanse meditation point, follow the path on the map to the chest. |
|
 |
 |
|
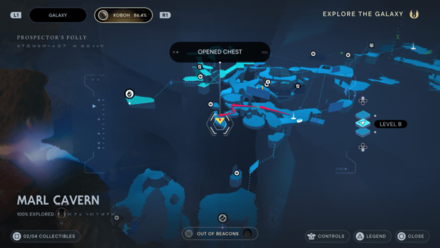
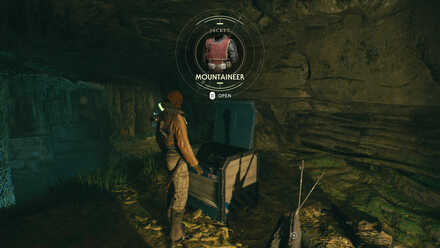
Collectible: Mountaineer Type: Cal Cosmetic Area: Untamed Downs Where to Find: Find the large cave in the Untamed Downs. Defeat the Bilemaw guarding the area. Climb the vines in the central pillar. Jump towards the chest where an alien is sitting on top. Use your Jedi powers to convince Garra to move and claim the contents of the chest. |
|
 |
 |
|
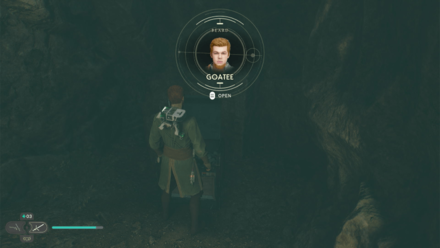
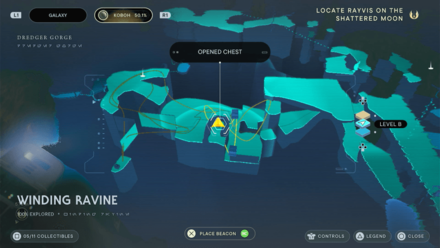
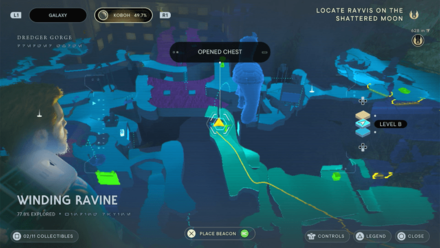
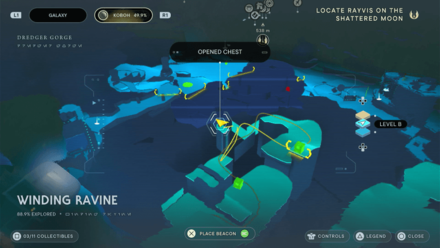
Collectible: Goatee Type: Cal Cosmetic Area: Winding Ravine Where to Find: Requires you to stack two cubes on top to climb the ledge past the nearby Essence to the left. |
|
 |
 |
|
Collectible: Light Mustache and Patch Type: Cal Cosmetic Area: Mountain Ascent Where to Find: From the Meditation Point, go past the green laser walls on the right and keeping moving forward until you reach the lake. Dive in the water and you'll find the chest at the bottom. |
|
 |
 |
|
Collectible: Bomber Type: Cal Cosmetic Area: Rambler's Reach Outpost Where to Find: Found beneath where the Mantis is parked behind a door that requires the Lift and Slam upgrade. |
|
 |
 |
|
Collectible: Hunter Type: Lightsaber Cosmetic Area: Winding Ravine Where to Find: Past the two Gorocco, use the flying mount to cross to the farthest platform and you'll find the chest near the shortcut. |
|
 |
 |
|
Collectible: Warm Metal Type: Weapon Cosmetic Area: Winding Ravine Where to Find: Move the cube towards the ledge on the other side and climb up. Follow the path and while you're wall running, enter the hole on the left and you'll find the chest at the end. |
|
 |
 |
|
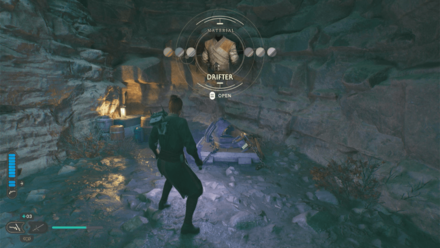
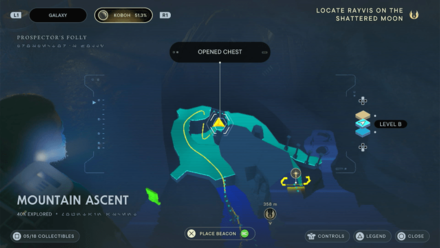
Collectible: Drifter Type: Cal Cosmetic Area: Mountain Ascent Where to Find: Found near the Crashed Tie Fighter Force Echo. Requires the Lift and Slam upgrade. |
|
 |
 |
|
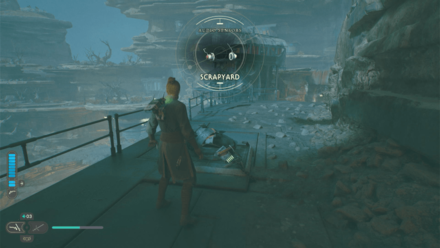
Collectible: Scrapyard Type: BD-1 Cosmetic Area: Mountain Ascent Where to Find: Near the door that you have to force push a wheel to open, turn around and wall run through on the left. You'll find the chest up top that requires you to use Lift and Slam. |
|
 |
 |
|
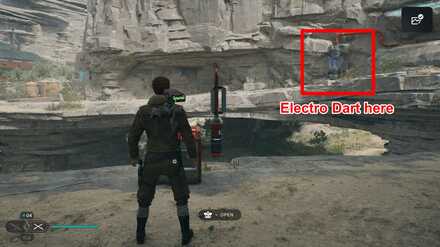
Collectible: Hunter Type: Cal Cosmetic Area: Untamed Downs Where to Find: On a cliff in Untamed Downs, overlooking Harvest Ridge. The jacket material is in a red chest, which requires you to use an Electro Dart on the mechanism to its right. |
|
 |
 |
|
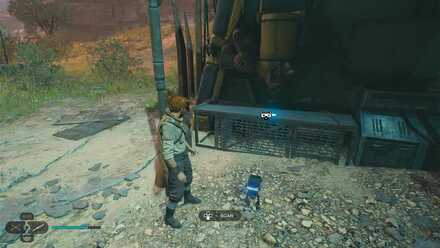
Collectible: Mountaineer Type: Cal Cosmetic Area: Fort Kah'lin Where to Find: Behind the droid tank in front of the Fort Kah'lin meditation circle. |
|
 |
 |
|
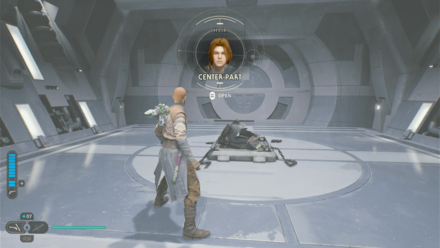
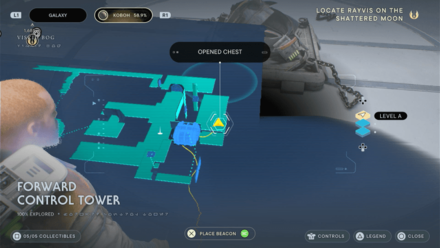
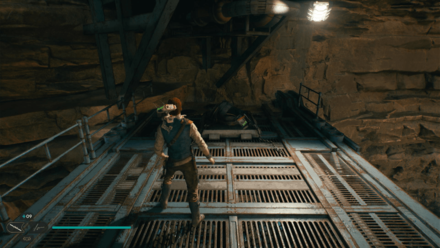
Collectible: Center Part Type: Cal Cosmetic Area: Forward Control Tower Where to Find: From the Lucrehulk Core Meditation Point, use Life and Slam to bring the platform down infront and climb up. Follow the path up the stairs into the elevator and you'll find the chest up top. |
|
 |
 |
|
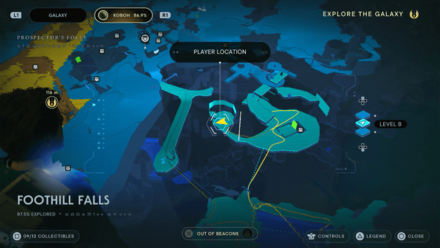
Collectible: Droid Paint Type: Weapon Cosmetic Area: Foothill Falls Where to Find: After riding the Relter, reach the highest point of the area using a Nekko and the balloon. Use force lift and slam to get the Weapon Material |
|
 |
 |
|
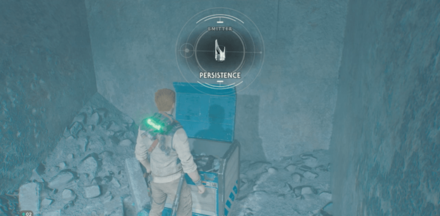
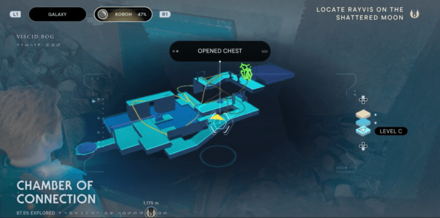
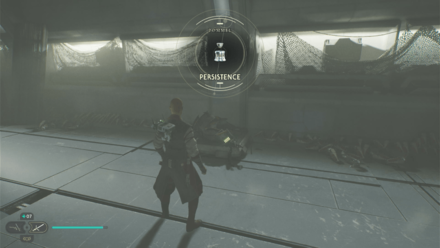
Collectible: Persistence Type: Lightsaber Cosmetic Area: Chamber of Connection Where to Find: In the Chamber of Connection, in a room blocked by vines. After the point where you use the switches to close the doors on the walls and lead the Koboh Matter across the wall, lead the Koboh Matter across the floor to the opposite door to open it and reveal this chest. |
|
 |
 |
|
Collectible: Persistence Type: Lightsaber Cosmetic Area: Loading Gantry Where to Find: From the Hangar Rafters meditation point, go through the door ahead on the right, turn right, and jump across the gap to the climbable wall and then through the green laser gate. Climb up the blue wall to find this chest. |
|
 |
 |
|
Collectible: Duelist Type: Lightsaber Cosmetic Area: Phon'Qi Caverns Where to Find: Behind a purple door, which you must blow up by force pushing one of the exploding plants with mouths. After entering, climb up the walls to reach this chest. |
|
 |
 |
|
Collectible: Duelist Type: Lightsaber Cosmetic Area: Phon'Qi Caverns Where to Find: Behind a purple door, which you must blow up by force pushing one of the exploding plants with mouths (Bramliks). |
|
 |
 |
|
Collectible: Unique Metal Type: BD-1 Cosmetic Area: Rambler's Reach Outpost Where to Find: First, unlock Lift in the Koboh Part 3 story chapter. Then, go to the Rooftop Garden, then climb up the vines and ride the Reltor towards the barn. Be sure to dive by holding R2 (on PS5), or you'll fly too high. Aim for the window on the second floor. Inside, use Lift to open the floor and get the chest. |
|
 |
 |
|
Collectible: Edgehawk Type: Lightsaber Cosmetic Area: Rambler's Reach Outpost Where to Find: Head towards the Rooftop Garden and climb the vines. Use the Reltor the fly towards the high platform behind the Rooftop Garden and climb up. You'll find the chest up top next to a group of Reltors. |
|
 |
 |
|
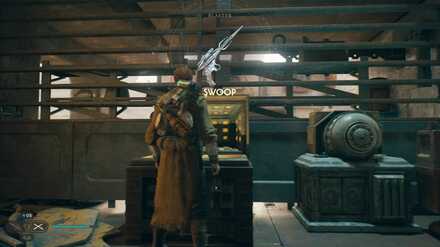
Collectible: Swoop Type: Blaster Cosmetic Area: Rambler's Reach Outpost Where to Find: Shoot an Electro Dart at the generator in Rambler's Reach Outpost then enter the door that opens up. You need to complete the Jawa Rumor first. |
|
 |
 |
|
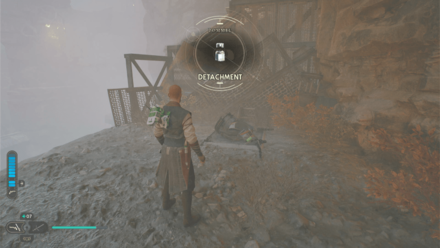
Collectible: Detachment Type: Lightsaber Cosmetic Area: Fogged Expanse Where to Find: Open the door with a Mogu inside and defeat it. Follow the path forward and you'll find the chest below the ceiling vines. |
|
 |
 |
|
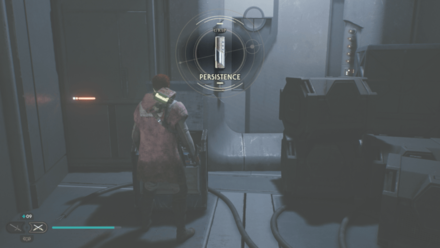
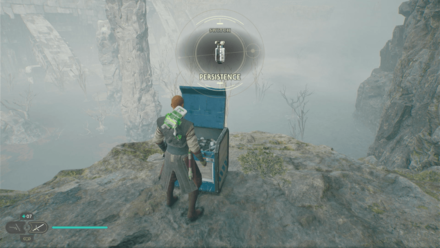
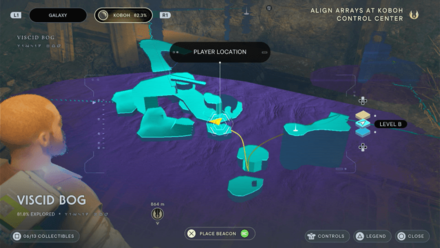
Collectible: Persistence Type: Lightsaber Cosmetic Area: Viscid Bog Where to Find: From the Gorge Crash Site Meditation Point, turn around and Life and Slam the door open. Follow the path through and half-way through the elevator, exit through the hole on the side and you'll find the chest by the edge of the cliff. |
|
 |
 |
|
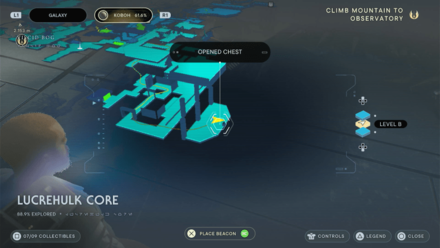
Collectible: Persistence Type: Lightsaber Cosmetic Area: Lucrehulk Core Where to Find: In the room with some traveling large crates, jump across and the platform and destroy 4 ceiling turrets. You'll find the chest infront that requires you to use Life and Slam. |
|
 |
 |
|
Collectible: Duelist Type: Lightsaber Cosmetic Area: Phon'Qi Caverns Where to Find: Inside the room where you fight Sebb Eshan, Life and Slam the large rock that's nearest to the entrance and you'll find the chest down the hole. |
|
 |
 |
|
Collectible: Stim Upgrade Area: Derelict Dam Where to Find: On the edge of the cliff where you have to beat the Legendary Enemy - Gorocco Matriarch. |
|
 |
 |
|
Collectible: Duelist Type: Lightsaber Cosmetic Area: Phon'Qi Caverns Where to Find: Past the room where you fight a Rancor, drop down to the bottom floor past the Cavern Fungus and some exploding droids. Dive into the well and you'll find the chest at the bottom. |
|
 |
 |
|
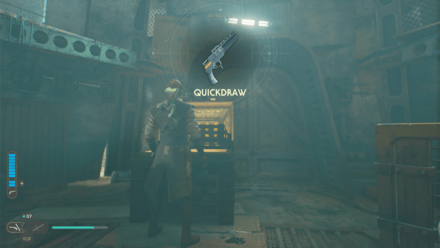
Collectible: Quickdraw Type: Blaster Cosmetic Area: Southern Reach Where to Find: Head above the cave blocked with Koboh Matter and drop down inside. Move forward on to the platform in the center and bring the Orb on the side back to coupler. Follow the laser until the end and use the Koboh Grinder to make a path inside the nearby hut and have it explode. You'll find the chest inside the hut. |
|
 |
 |
|
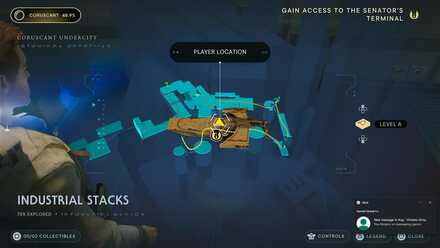
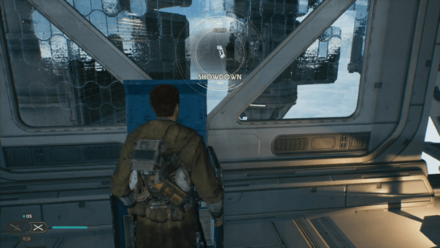
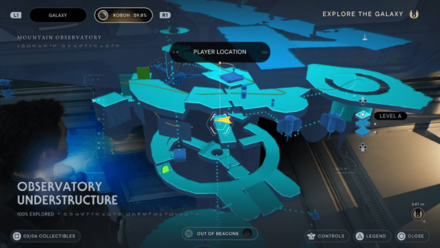
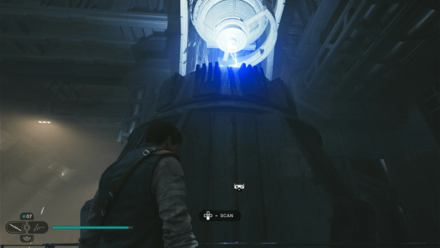
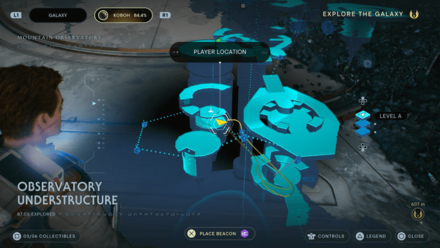
Collectible: Showdown Type: Blaster Cosmetic Area: Observatory Understructure Where to Find: Drop down to a hidden platform in the middle layer of the Observatory Understructure |
|
 |
 |
|
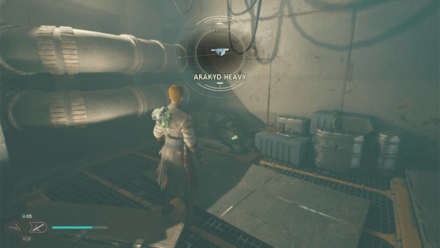
Collectible: Arakyd Heavy Type: Blaster Cosmetic Area: Rambler's Reach Outpost Where to Find: Grapple on to some vines at the edge of a high platform and you'll find chest near the ponds at the edge. |
|
 |
 |
|
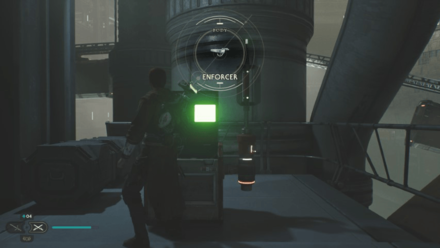
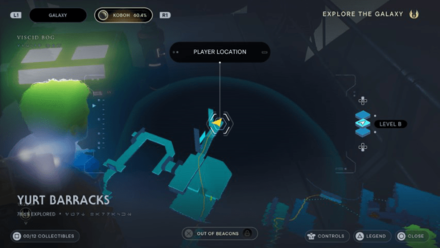
Collectible: Enforcer Type: Blaster Cosmetic Area: Yurt Barracks Where to Find: On the platform left of the Yurt Barracks droid tanks. You have to use an Electro Dart on the machine across the red chest to open the chest. |
|
 |
 |
|
Collectible: Bumpy Rubber Type: Weapon Cosmetic Area: Corroded Silo Where to Find: From the Southern Reach Meditation Point, take the flying mount and fly towards the roof of the large silo on the right. Use Lift and Slam to open the hole and drop down. Follow the path and when you reach a zip, take it and climb up the platform just above the end of it. You'll find the chest under you. |
|
 |
 |
|
Collectible: Arakyd Heavy Type: Blaster Cosmetic Area: Corroded Silo Where to Find: From the Southern Reach Meditation Point, take the flying mount and fly towards the roof of the large silo on the right. Use Lift and Slam to open the hole and drop down. Follow the path, take the zip, and wall run towards the platform above. You'll find the chest by the corner. |
|
 |
 |
|
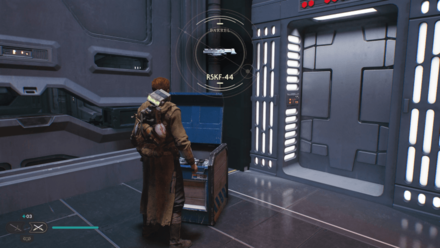
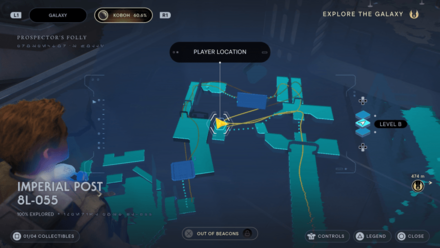
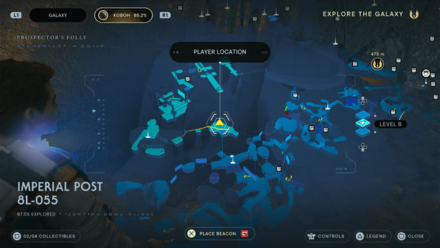
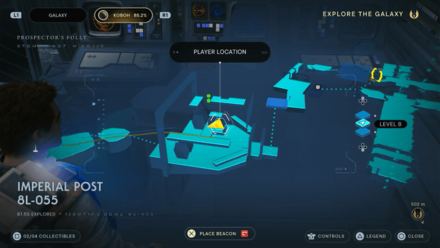
Collectible: RSKF-44 Type: Blaster Cosmetic Area: Imperial Post 8L-055 Where to Find: Across the giant gap lit up by red lights. |
|
 |
 |
|
Collectible: Arakyd Heavy Type: Blaster Cosmetic Area: Untamed Downs Where to Find: Turn left in Untamed Downs when coming from Bygone Settlement meditation circle. The red chest is on a cliff facing Harvest Ridge. Shoot an Electro Dart at the machine underneath the red chest. |
|
 |
 |
|
Collectible: Geonosian Type: BD-1 Cosmetic Area: Bygone Settlement Where to Find: From the Meditation Point, wall run on the side and climb up. Keep following the path and then a Jawa will help you cross to the other side. Cross it and head for the room on the left, you'll find the chest inside. |
|
 |
 |
|
Collectible: Geonosian Type: BD-1 Cosmetic Area: Yurt Barracks Where to Find: From the Lucrehulk Core Meditation Point, head down to the barracks and from the large gap, jump and dash towards the platform on your right. You'll find the chest inside. |
|
 |
 |
|
Collectible: Swooper Type: BD-1 Cosmetic Area: Untamed Downs Where to Find: Located inside the locked door in the elevated ridge in between Untamed Downs and Harvest Ridge. Head to the right of the door then use the Electro Dart on the machine inside. Head inside the door and open the chest. |
|
 |
 |
|
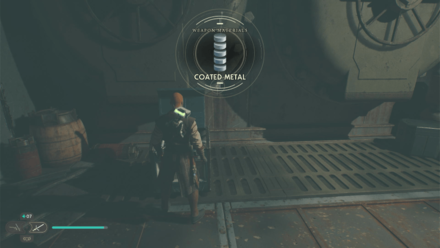
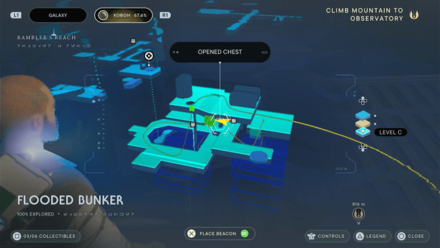
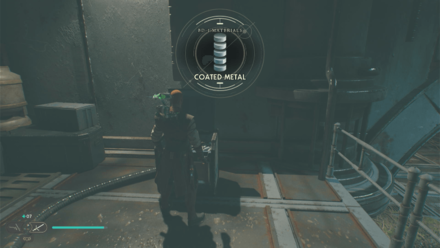
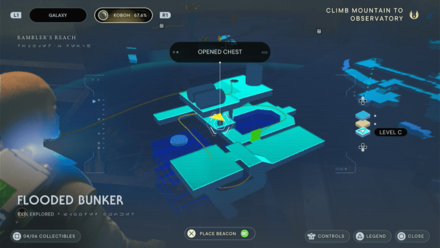
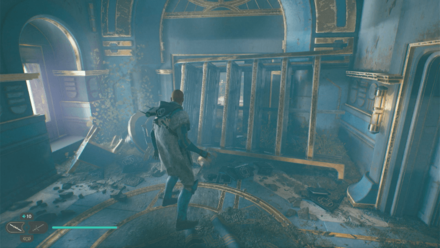
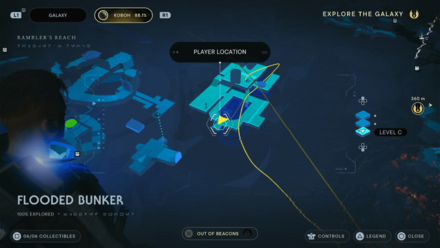
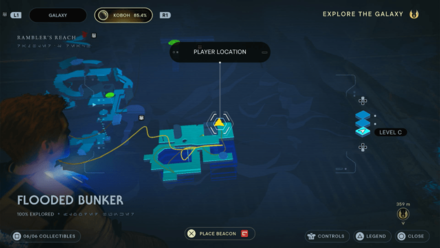
Collectible: Coated Metal Type: Weapon Cosmetic Area: Flooded Bunker Where to Find: From the Rambler's Reach Outpost Meditation Point, head up the hill and into the Flooded Bunker. Dive into the water and through the pipes, resurface and Lift and Slam and platform in the middle. You'll find the chest across beside another chest. |
|
 |
 |
|
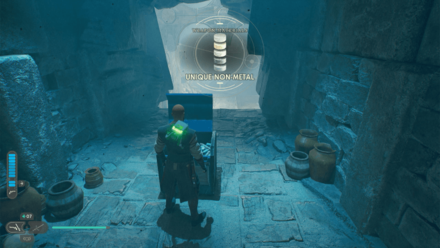
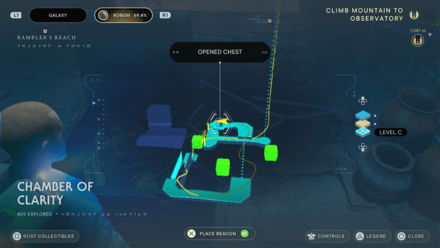
Collectible: Unique Non-Metal Type: Weapon Cosmetic Area: Chamber of Clarity Where to Find: From the entrance, force pull the cube below and enter the path behind it. Follow through and cross the huge gap by force pulling the two cubes on the sides. You'll find the chest at the end of the path. |
|
 |
 |
|
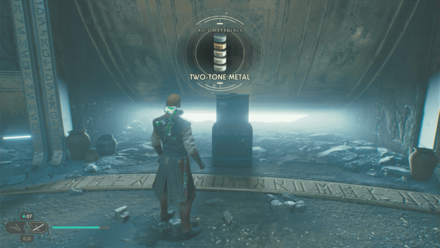
Collectible: Two-Tone Metal Type: Weapon Cosmetic Area: Derelict Dam Where to Find: Use the Electro Dart at Vashtan Wolfe's door in Derelict Dam. |
|
 |
 |
|
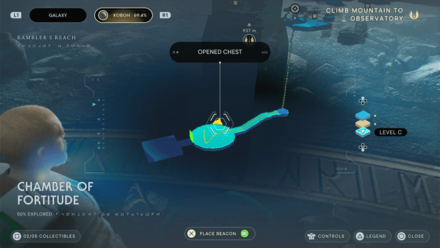
Collectible: Two-Tone Metal Type: BD-1 Cosmetic Area: Chamber of Fortitude Where to Find: Head inside the Correded Silo and enter the Chamber of Fortitude. You'll find the chest by the side after defeating Anoth Estra. |
|
 |
 |
|
Collectible: Coated Metal Type: BD-1 Cosmetic Area: Flooded Bunker Where to Find: From the Rambler's Reach Outpost Meditation Point, head up the hill and into the Flooded Bunker. Dive into the water and through the pipes, resurface and Lift and Slam and platform in the middle. You'll find the chest across beside another chest. |
|
 |
 |
|
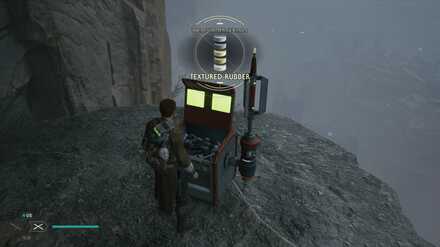
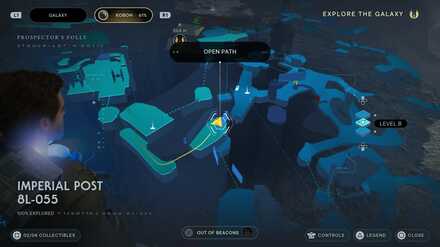
Collectible: Textured Rubber Type: Weapon Cosmetic Area: Imperial Post 8L-055 Where to Find: Drop down the left of the Imperial Post 8L-055 meditation circle then follow the path to the red chest. Use the Electro Dart to open the red chest. |
|
 |
 |
|
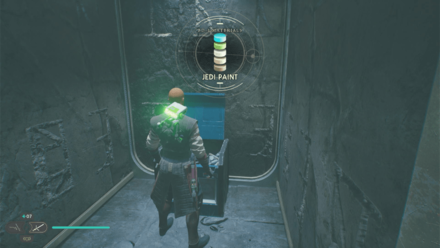
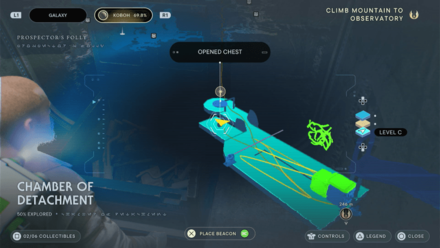
Collectible: Jedi Paint Type: BD-1 Cosmetic Area: Chamber of Detachment Where to Find: Found inside the Chamber of Detachment behind the second cube you need to pull out. |
|
 |
 |
|
Collectible: Stim Upgrade Area: Observatory Understructure Where to Find: After crossing the rotating Ascension Cable with an electric wall in the way, enter the narrow pathway and throw a High Altitude Research up top and grapple your way to the second floor. You'll find the chest nearby. |
|
 |
 |
|
Collectible: Stim Upgrade Area: Foothill Falls Where to Find: Destroy the door inside the Bedlam Raiders house using the exploding droid. The chest will be on the other side of the door |
|
 |
 |
|
Collectible: Stim Upgrade Area: Viscid Bog Where to Find: Cross the bog by force pulling pillars. Drop down to the arena where you'll face the Mire Terror. |
|
 |
 |
|
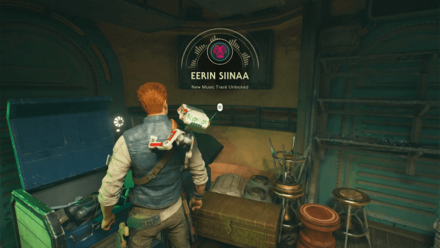
Collectible: Eerin Siinaa Type: Music Track Area: Pyloon's Saloon Where to Find: Talk to Moran 7 times to gain access to his room. Exit the saloon every time a conversation ends. |
|
 |
 |
|
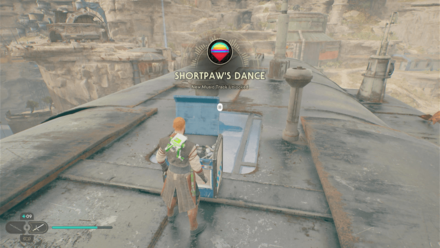
Collectible: Shortpaw's Dance Type: Music Track Area: Harvest Ridge Where to Find: Found at the rooftop of the red barn. |
|
 |
 |
|
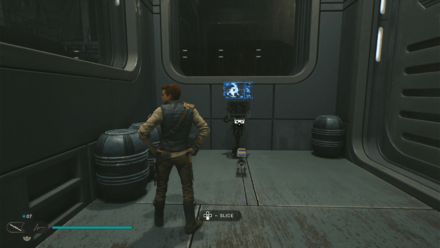
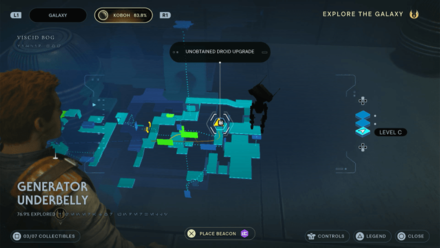
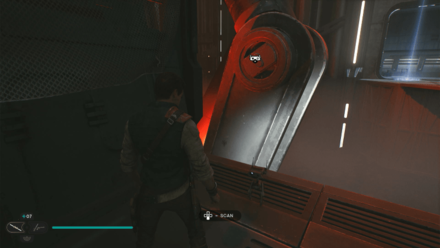
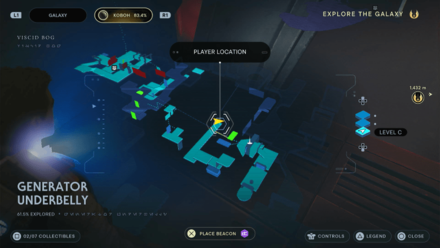
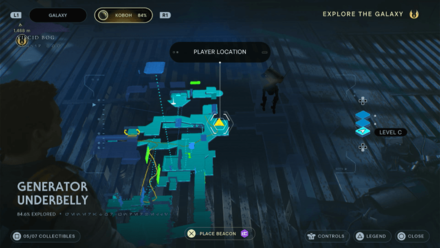
Collectible: Slice: Bx Droids Area: Generator Underbelly Where to Find: In the wall running section that will lead to the next Meditation Point, wall run to the opposite direction to reach a platform above. |
|
 |
 |
|
Collectible: Map Upgrade: Upgrades Area: Alignment Control Center Where to Find: Found beside the Meditation Point after completing all 7 Jedi Chambers. |
|
 |
 |
|
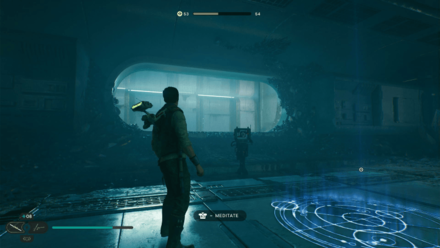
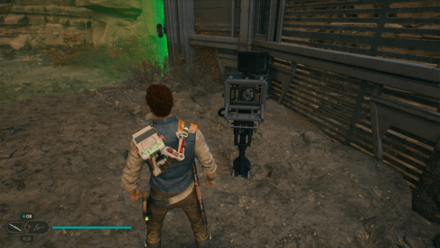
Collectible: Slice: Security Droid Area: Mountain Ascent Where to Find: From the Meditation Point, head right towards the green laser gate. |
|
 |
 |
|
Collectible: Santari Khri Type: Lightsaber Cosmetic Area: Untamed Downs Where to Find: Bring the roller mine from the hangar towards the cave nearby and destroy the door. You'll find the chest inside. |
|
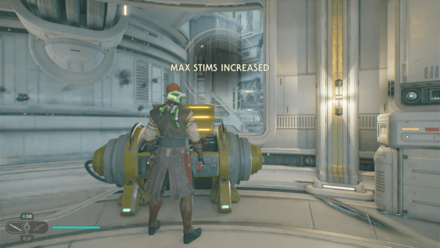
Stim Upgrades
| In-game Location | Map Location |
|---|---|
|
|
|
Collectible: Stim Upgrade Area: Basalt Rift Where to Find: From the Meditation Point, go past the archway and take the road up past the rock blocking the path. Take a left past the Mogu and wall run your way up the wall. You'll find the chest on your right by the cliff. |
|
|
|
|
Collectible: Stim Upgrade Area: Rambler's Reach Outpost Where to Find: Have BD-1 slice open the door to Doma's right using the mysterious keycode. You can purchase the Mysterious Keycode for 10 Priorite Shards in Doma's Outpost Commodities on the planet Koboh. |
|
|
|
|
Collectible: Stim Upgrade Area: Derelict Dam Where to Find: On the edge of the cliff where you have to beat the Legendary Enemy - Gorocco Matriarch. |
|
|
|
|
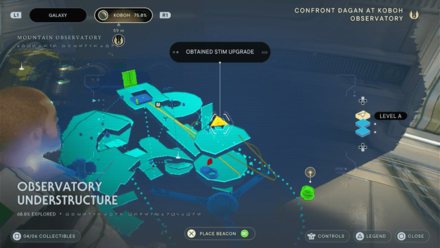
Collectible: Stim Upgrade Area: Observatory Understructure Where to Find: After crossing the rotating Ascension Cable with an electric wall in the way, enter the narrow pathway and throw a High Altitude Research up top and grapple your way to the second floor. You'll find the chest nearby. |
|
|
|
|
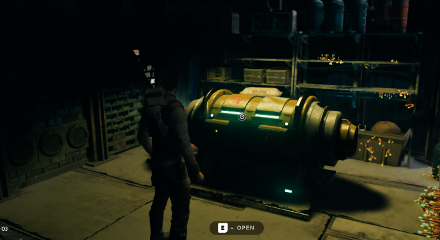
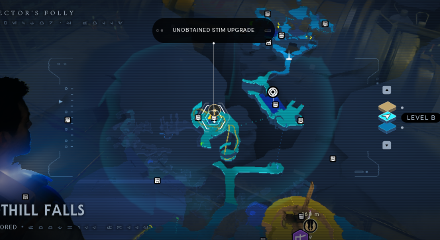
Collectible: Stim Upgrade Area: Foothill Falls Where to Find: Destroy the door inside the Bedlam Raiders house using the exploding droid. The chest will be on the other side of the door |
|
|
|
|
Collectible: Stim Upgrade Area: Viscid Bog Where to Find: Cross the bog by force pulling pillars. Drop down to the arena where you'll face the Mire Terror. |
|
BD-1 Scans
| In-game Location | Map Location |
|---|---|
 |
 |
|
Collectible: Turgle's Shiny Shell Area: Rambler's Reach Outpost Where to Find: Found by a bridge when you go straight then veer to the left from the landing pad. Databank Entry: Outpost residents will wearily attest to Turgle's elation at having found a particularly remarkable shell, and his subsequent despair at having lost it. This appears to be that shell, though it is by no means provable, nor worthy of further investigation. |
|
 |
 |
|
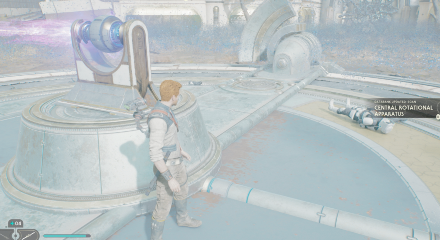
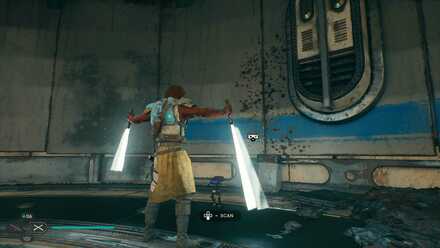
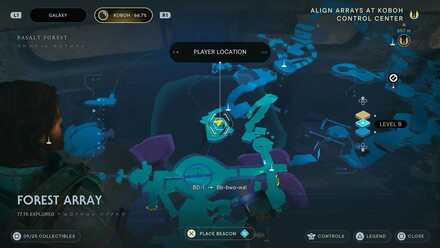
Collectible: Central Rotaional Apparatus Area: Forest Array Where to Find: Found at the middle of the area surrounded by Koboh Matter. Databank Entry: The complexity of the subterranean mechanisms operating the Array's above-ground ionic beams is difficult to imagine. While the apparatus has clearly not been moved in years, a way to control it must still exist. |
|
 |
 |
|
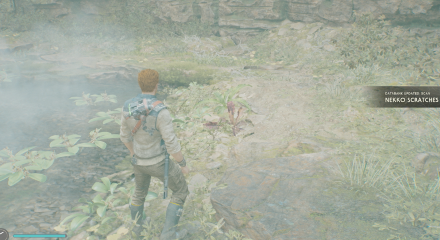
Collectible: Nekko Scratches Area: Nekko Pools Where to Find: Found in a swampy section of the area you'll need a Nekko to access. |
|
 |
 |
|
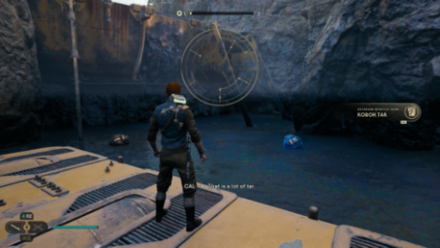
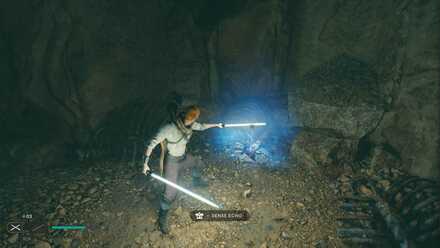
Collectible: Koboh Tar Area: Gorge Crash Site Where to Find: Found when you first encounter the Koboh Tar Databank Entry: The tar pits of Koboh are vast, and numerous. Presumably, they existed long before any prospector first settled on Koboh, as their crude dams and reservoirs exist primarily to funnel tar awy from potential prospecting sites. |
|
 |
 |
|
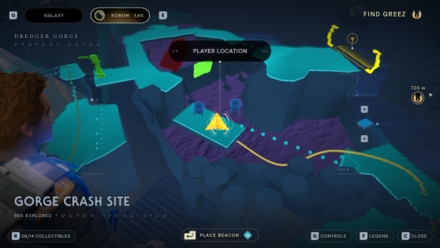
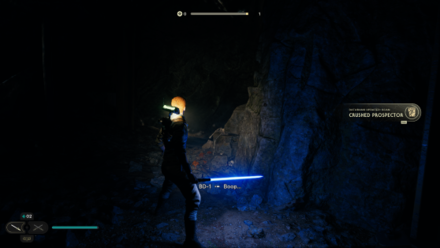
Collectible: Crushed Prospector Area: Gorge Crash Site Where to Find: Can be scanned by the skeleton in the Gorge Crash Site Mining Cave Databank Entry: At least one prospector - perhaps searching for priorite amongst the rubble- was crushed by failing rocks in a hastily dug and improperly secured cave. |
|
 |
 |
|
Collectible: Broken Mining Droid Area: Gorge Crash Site Where to Find: Found at the dead end to the right of the Gorge Crash Site Meditation Point Databank Entry: Droids are commonly used for manual labor across the galaxy, aiding the toil of organic workers, and Koboh is no exception. Nor isi t any exception that, when the work is finished, they are left ignominiously to rust |
|
 |
 |
|
Collectible: Bedlam Raider Yurt Area: Yurt Barracks Where to Find: Found in one of the shacks in the area. |
|
 |
 |
|
Collectible: Gorocco Nest Area: Derelict Dam Where to Find: Head further into the lair of the Gorocco after slaying it in battle. Databank Entry: The gorocco - a large, easily incensed predator - found plentiful prey in the prospectors and raiders that came to their hunting grounds. Scattered remains, though impossible to identify fully, indicate that the gorocco are not short on meals. |
|
 |
 |
|
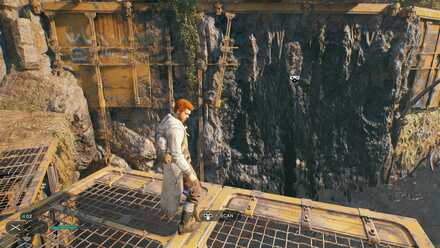
Collectible: Crumbling Dam Wall Area: Derelict Dam Where to Find: This can be scanned as you make your way to Greez in the Derelict Dam past the Meditation Point. Databank Entry: A lack of maintenance, and the relentless creep of time, has visiblyt worn many of the gorge's dams down to a dangerous state - cracks and leaks can be seen everywhere across their aging surfaces. |
|
 |
 |
|
Collectible: Dam Flow Pipes Area: Derelict Dam Where to Find: This can be scanned to your right when you make up to the elevated platform past the Meditation Point in the Derelict Dam. Databank Entry: The positioning of this flow pipe across two reservoirs indicates that it was used to control the movement of tar between the dams, in order to maintain a safe level for prospectors to work. |
|
 |
 |
|
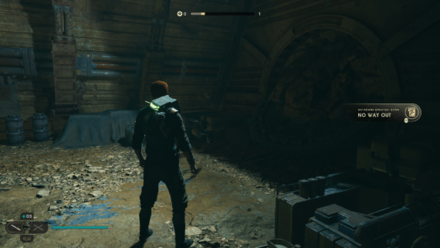
Collectible: No Way Out Area: Smuggler's Tunnels Where to Find: Can be scanned as you progress through the tunnel system under the Pyloon's Saloon. Databank Entry: One of several tunnels routing beneath Pyloon's Saloon. Proximity to the landing pad would have made the passage ideal for smuggling goods in and out of the cantina, hidden from prying and curious eyes. |
|
 |
 |
|
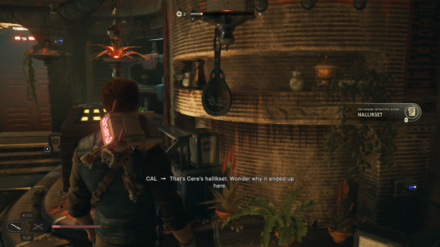
Collectible: Hallikset Area: Pyloon's Saloon Where to Find: Can be scanned in the basement of the Pyloon's Saloon near the Meditation Point in your resting area. Databank Entry: This seven-stringed hallikset once belonged to the Jedi Cere Junda, who composed music with it. Using psychimetry, Cal was also able to play it, which is perhaps why Cere left it with him after she departed the Mantis. |
|
 |
 |
|
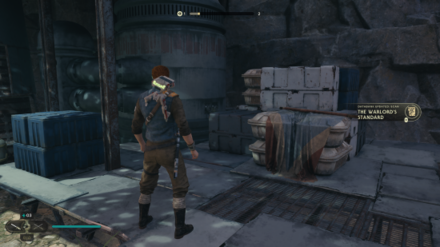
Collectible: The Warlord's Standard Area: Riverbed Watch Where to Find: Found just beside the Meditation Point by some crates. Databank Entry: A broken standard, seeming to indicate that this tower was once under the commands of someone known as the 'Warlord of the Tower.' That such a name would belong originally to a Bedlam Raider seems unlikely, given their subservience to Rayvis. |
|
 |
 |
|
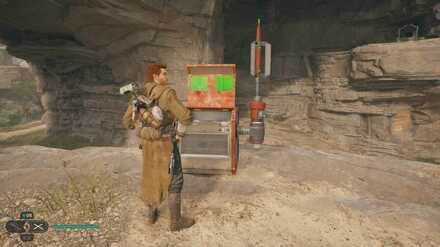
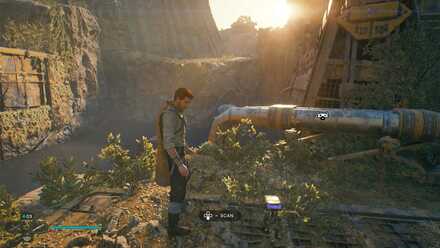
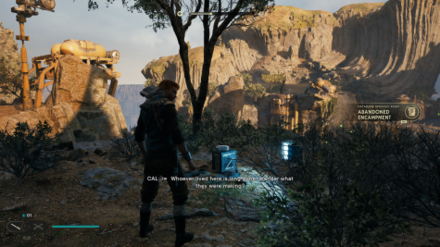
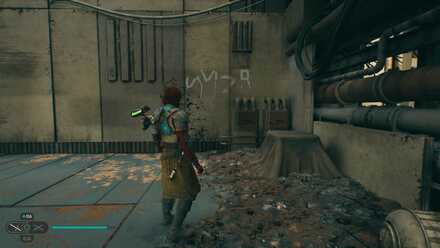
Collectible: Abandoned Encampment Area: Derelict Dam Where to Find: Once you've blown a hole in the cave, lure the Roller Mine towards the road to the right past the broken elevator and throw it to the tarred wall below. Follow the path, climb the rope, walk forward a bit, and you'll find the Scan infront by edge. Databank Entry: The scattered debris of a rudimentary encampment. Whoever was here possessed some mechanical ability, but no evidence of their work remains. |
|
 |
 |
|
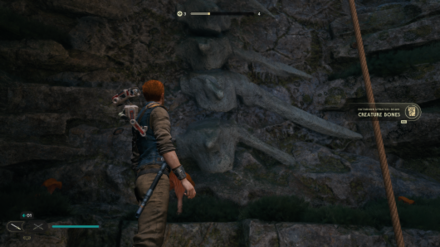
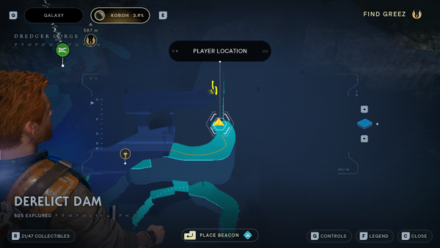
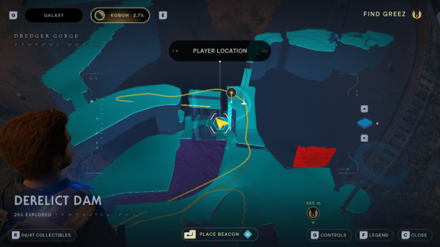
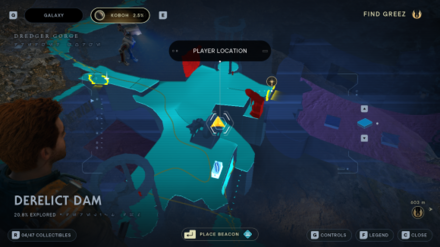
Collectible: Creature Bones Area: Derelict Dam Where to Find: Once you've blown a hole in the cave, lure the Roller Mine towards the road to the right past the broken elevator and throw it to the tarred wall below. Follow the path and you'll find the Scan at the end before ziplining up. Databank Entry: The bones of some ancient creature partially exposed by excavation. It must date back several centuries. |
|
 |
 |
|
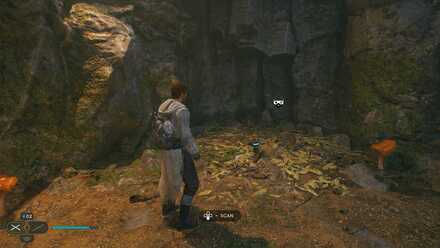
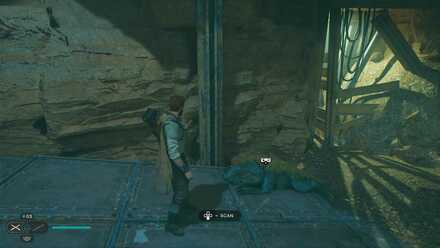
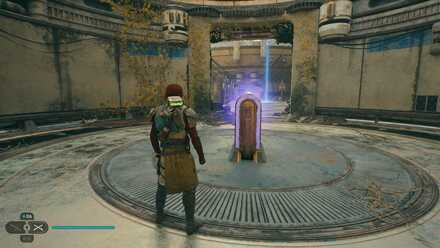
Collectible: Destroyed Dam Area: Derelict Dam Where to Find: From the Meditation Point, head down the vines and you right by the edge and you'll find the Scan on your right. Databank Entry: As a result of what looks like deliberate sabotage, the dam wall has split, allowing huge amounts of tar to spill through the breach and onto whatever lies below. |
|
 |
 |
|
Collectible: Dead Bedlam Raider Area: Derelict Dam Where to Find: From the Meditation Point, head down the path in the middle and you'll find the Scan by the dead body. Databank Entry: The body of a long-dead Bedlam Raider, clearly killed by blaster bolts, which mark the body indiscriminately. |
|
 |
 |
|
Collectible: Dead Gorgers Area: Sodden Grotto Where to Find: You can scan this dead gorger on a catwalk platform as you explore the depths of the Sodden Grotto. Databank Entry: A string of gorgers, all of which were felled in an orderly manner, suggesting the intervention of prospectors and not some hungry beast. |
|
 |
 |
|
Collectible: Massive Ribcage Area: Sodden Grotto Where to Find: Head deeper into the cave system of the Sodden Grotto. The ribcage will be near the area where you must face the Rancor. Databank Entry: The exposed ribcage of an enormous creature. Markings on the bone structures indicate this was picked clean by some ravenous predator. |
|
 |
 |
|
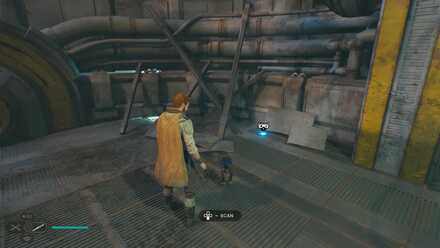
Collectible: A New Beginning Area: Hunter's Quarry Where to Find: Head to the far end of the Hunter's Quarry guarded by several droids and Bedlam Raiders. The item to be scanned will be on one of the tables. Databank Entry: A Datapad entry, detailing a prospector's fresh arrival on Koboh: ^ ^“Planetside at last. I was eager ot land, but tried to stay patient - he couldn't sit still at all, though. I suppose it is understandable; we have come from nothing - less than nothing - and this 'Koboh is certainly a gamble. The planet is unusual, but the potential is exciting. We are ready to see what there is to offer!” |
|
 |
 |
|
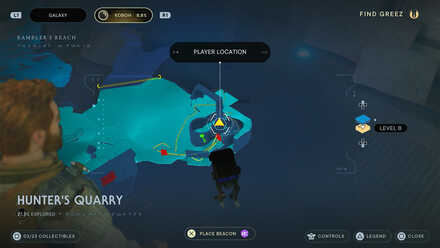
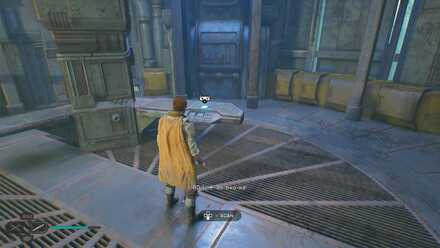
Collectible: A Mechanical Touch Area: Hunter's Quarry Where to Find: Found inside the building on top of the scalable wall on the far side of Hunter's Quarry. Databank Entry: “The outpost is small, but continuing to grow. The development means my knack for mechanics has attracted attention - I was asked to help. He did not want me to, but I did. I think by automating some of the spherical grenades, we could figure something out. ” |
|
 |
 |
|
Collectible: A Gift Revoked Area: Hunter's Quarry Where to Find: Found inside the building on top of the scalable wall on the far side of Hunter's Quarry. Databank Entry: “The others dig too much. They damage the cubes. Enough. Enough. The spheres will stop them. They will stay away from the cubes. Or else.” |
|
 |
 |
|
Collectible: The Wise Hunters Area: Hunter's Quarry Where to Find: This item can be found inside a cavern in the Hunter's Quarry. Databank Entry: Gorgers scour in packs, a strategy that has seved them well the often desperate and hapless prospectors came to Koboh. A single Hunter poses no problem to a prospector with a blaster, but when lured into a nest full of the beasts, the situation rapidly deteriorates. |
|
 |
 |
|
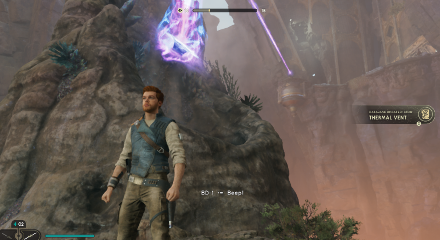
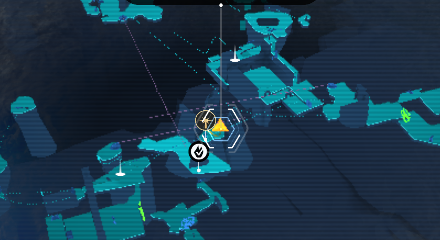
Collectible: Thermal Vent Area: Devastated Settlement Where to Find: Found in the one of the central platforms in the middle of the Devastated Settlement accessible only by Relters. Databank Entry: In the wake of Koboh's catastrophe, thermal activity surged. The surface cracked and lava flowed freely. Pressure vented through naturally-formed fissures, only to be held back by now-untamed Koboh matter. |
|
 |
 |
|
Collectible: Disaster Area: Chamber of Duality Where to Find: Can be scanned near the end of the platforming route of the Chamber of Duality. Databank Entry: Huge masses of rock fell through the roof and slammed into this subterranean sanctuary, indicating intense seismic activity above ground. |
|
 |
 |
|
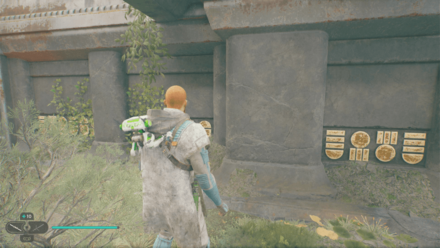
Collectible: Forever Curious Area: Rambler's Reach Outpost Where to Find: Could be found in Soont Madas' shop. You will need Merrin's Charm and Force Lift to reach his shop. Databank Entry: “These monoliths...I cannot figure them out, which is always compelling. The locals say some ancient treasure is hidden inside, but nobody has been able to crack them. He is much more interested than I am, however, which is becoming something of a concern.” |
|
 |
 |
|
Collectible: Obsession Area: Rambler's Reach Outpost Where to Find: Could be found in Soont Madas' shop. You will need Merrin's Charm and Force Lift to reach his shop. Databank Entry: “I will crack them. I will dig in. Find their treasures. No matter what. I will get in.” |
|
 |
 |
|
Collectible: Chamber Mural Area: Devastated Settlement Where to Find: Scan the mural on one of the platforms in the area. From the Meditation Point, take a Relter and glide towards the central thermal vent to push you upward. Steer to the right and the scannable wall will be there. Databank Entry: A mural across the exterior wall of a meditation chamber, reading: ^ ^“Those who ask find answers, ^Those who combat falsehoods find the truth, ^And those who see inside themselves will know the path ahead.” |
|
 |
 |
|
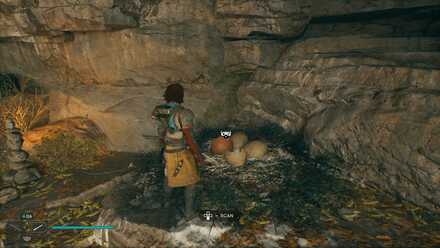
Collectible: Relter Egg Area: Rambler's Reach Outpost Where to Find: Climb the vines of the Pyloon's Saloon past the rooftop garden. Jump and dash to the platform overlooking the landing pad. The eggs can be scanned nearby the cave. Databank Entry: Typically, relters do not leave their eggs unguarded for long. However, with the rise of the Bedlam Raiders on Koboh, the valley ecosystem has caused relters to fly further, and longer, in search of food. |
|
 |
 |
|
Collectible: Devastated Remains Area: Devastated Settlement Where to Find: From the Grand Courtyard Meditation Point, enter the building infront and you'll find the Scan to the left past the door. Databank Entry: Although some structures were spared total annihilation, nothing survived intact. Strewn debris and overgrown nature speak to a world first devastated, then abandoned. |
|
 |
 |
|
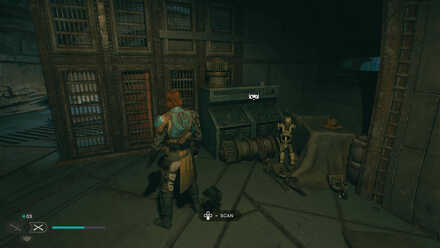
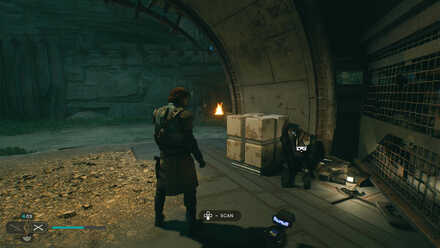
Collectible: Bandit Camp Area: Fort Kah'lin Where to Find: Look for the broken droid inside a shack to the right of the Meditation Point. Databank Entry: Before the Bedlam Raiders came to prominence, Koboh's locals were bothered by various bandit groups. Though not as unified and organized as Rayvis' army-to-be, it was nevertheless advisable to stay away from their territory. |
|
 |
 |
|
Collectible: Past Signs of Life Area: Fort Kah'lin Where to Find: Look for the broken droid inside a shack to the left of the Meditation Point. Databank Entry: The evidence suggests that Fort Kah'lin was once a hub of activity for a local bandit gang. Although now it is still occupied by Bedlam Raider soldiers and battle droids, these abandoned items speak to a more active base, made sparse by some past incident. |
|
 |
 |
|
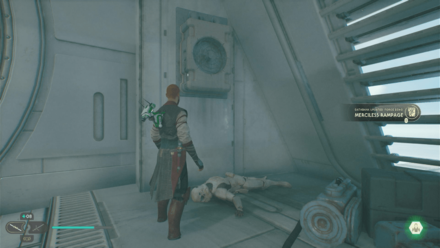
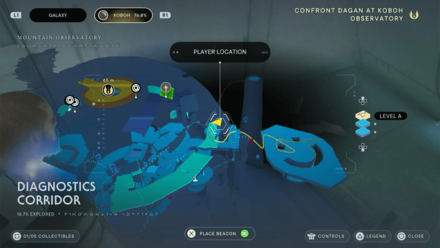
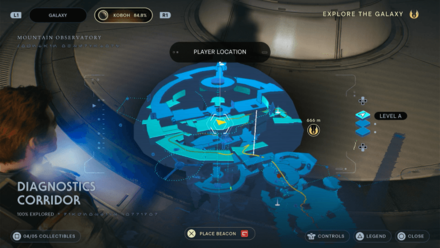
Collectible: Merciless Rampage Area: Diagnostics Corridor Where to Find: Once you've reunited with Bode, head for the platform above the Lift the opening. You'll fin the Force Echo on your left by the corner. Databank Entry: Dagan Gera spare no foe on his tear towards the Observatory above the clouds. |
|
 |
|
|
Collectible: Moran's Possessions Area: Pyloon's Saloon Where to Find: Talk to Moran 7 times to gain access to his room. Exit the saloon every time a conversation ends. |
|
 |
 |
|
Collectible: Jailbreak Inventory Area: Smuggler's Tunnel Where to Find: Use a Nekko to reach the roof of the building near the river in Rambler's Reach Outpost. This will lead to an alternate route to the Smuggler's Tunnel. The scan will be near the end of the tunnel. |
|
 |
 |
|
Collectible: One Last Victory Area: Smuggler's Tunnel Where to Find: Use a Nekko to reach the roof of the building near the river in Rambler's Reach Outpost. This will lead to an alternate route to the Smuggler's Tunnel. The scan is found deep within the tunnel to the left of the green laser gate. |
|
 |
 |
|
Collectible: List of Grievances Area: Smuggler's Tunnel Where to Find: Use a Nekko to reach the roof of the building near the river in Rambler's Reach Outpost. |
|
 |
 |
|
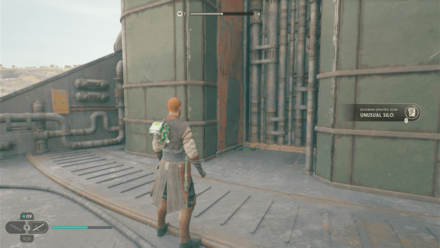
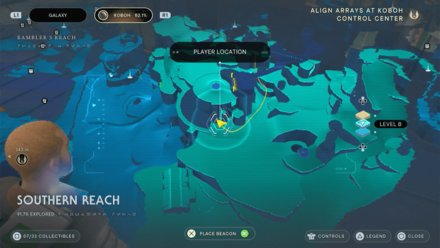
Collectible: Unusual Silo Area: Southern Reach Where to Find: From the Meditaiton Point, head towards the large silo and you'll find the Scan just by the base of it. Databank Entry: Looming over the nearby outpost and the valley, this enormous silo is a mystery to the residents of Rambler's Reach, who know only that it was constructed by a strange and reclusive prospector some time ago. None of them have ever dared to try and venture within. |
|
 |
 |
|
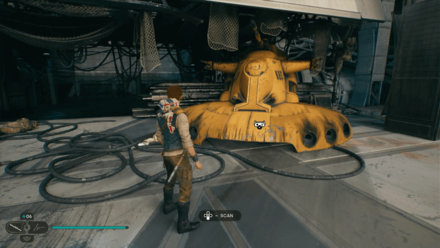
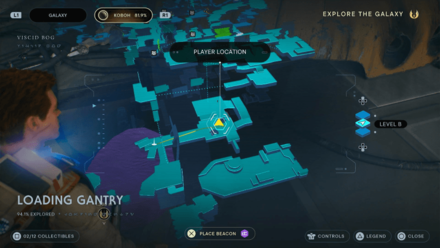
Collectible: Sunken Aat Area: Loading Gantry Where to Find: From the Meditation Point, enter through the broken door and the scan will be on the far left. |
|
 |
 |
|
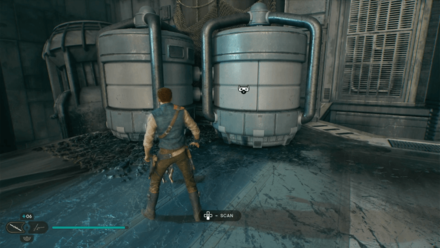
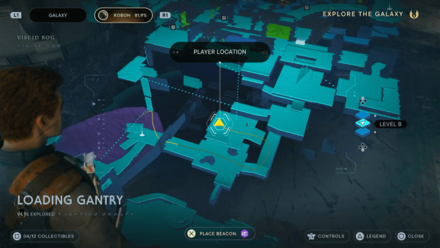
Collectible: Storage Tanks Area: Loading Gantry Where to Find: From the Meditation Point, pass through the broken door. Head straight to the end of the area and walk up the slanted platforms. |
|
 |
 |
|
Collectible: Crashed Vulture Droid Area: Viscid Bog Where to Find: On a platform with a chest near the Meditation Point. Databank Entry: Manufactured in the catherdral factories of Xi Char, the Variable Geometry Self-Propelled Battle Droid was the main starfighter support of the Separatist forces in the Clone Wars. The swamp surround the Lucrehulk is littered with them, suggesting they were thrown clear during the battleship's descent to Koboh. |
|
 |
 |
|
Collectible: Hastily Abandoned Site Area: Viscid Bog Where to Find: From the Meditation Point, turn around and cross the rock platform towards the cave below. You'll find the Scan inside on your right by the wall. Databank Entry: Whatever prospectors were doing her, it seems either the nearby Raider presence of the Swamp tar proved to be too much. This prospective site has been abandoned, and seemingly in a hurry. |
|
 |
 |
|
Collectible: Landing Hydraulics Area: Generator Underbelly Where to Find: From the Meditation Point, zipline across the area but drop immediately on the next platform. The scan will be on the right side. Databank Entry: A Lucrehulk-class battleship is designed so the central sphere can detach and land independently. As such, the core is equipped with several massive landing struts, the gigantic hydraulics of which take up a large chunk of the core's interior. |
|
 |
 |
|
Collectible: Power Generator Area: Generator Underbelly Where to Find: Found in the section with large machines conducting electrical currents. Databank Entry: The lower levels of a Lucrehulk core house landing logistics and power generation. Though they were likely disabled during the ship's landing, it seems that Rayvis - or some resourceful Raider - has coaxed the systems back to life, powering the ship once more. |
|
 |
 |
|
Collectible: Erratic Dust Area: Observatory Understructure Where to Find: From the Meditation Point, head down the stairs. Databank Entry: Some Republic scientists believed that destabilized Koboh dust housed tremendous potential energy - experiments on the moon facility had already yielded exciting results worth iterating upon. |
|
 |
 |
|
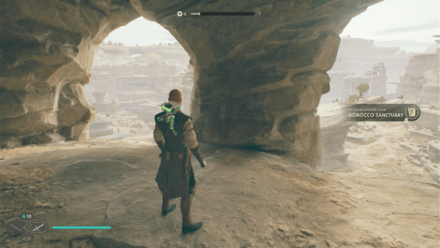
Collectible: Gorocco Sanctuary Area: Hunter's Quarry Where to Find: Found in the Gorocco nest just by the wall. Databank Entry: Gorocco construct nests in the most advantageous areas - protected from the harsh elements, and with as wide and visible an approach as possible. Typically, only the female gorocco remains in the nest, to rest and protect any young, while the male spends time hunting for food. |
|
 |
 |
|
Collectible: The Koboh Emergence Area: Hunter's Quarry Where to Find: From inside the ruins, bring the Orb towards the Coupler in the other room and you'll find the Scan nearby. Databank Entry: An entry from Jedi Master Pyt'r Stevar: ^ “The Sky is aflame. The moon, I think, was destroyed. It is hard to tell. The shuttles are leaving, but we are trapped. The Padawans are afriad, and I cannot leave them. Whatever out fate on Koboh may be, we entrust it now to the Force.” |
|
 |
 |
|
Collectible: Minor Oculus Area: Diagnostics Corridor Where to Find: Found in the room with the rotating walls that are activated by the Electro Dart. Databank Entry: This rotating oculus is powered by the same Koboh matter as the Forest Array. This larger model indicates that Republic scientists created the prototype for later designs focusing on compactness and efficiency. |
|
 |
 |
|
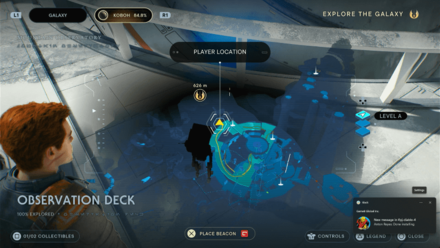
Collectible: Grand Oculus Area: Observation Deck Where to Find: Once outside of the Observation Deck, before grappling to go higher, look to your left to see a small area where you'll find the scan. Databank Entry: High Republic-era scientists constructed the Grand Oculus to not only observe the Koboh Abyss, but to track and predict spikes in its energy fields. Its last calibration tracked a seismic shift in Koboh's stratosphere. |
|
 |
 |
|
Collectible: Abandoned Prospector Equipment Area: Imperial Post 8L-055 Where to Find: From the Meditation Point, make your way through the next 2 platforms. Databank Entry: By the time of the Empire, prospectors had long left the mountain, due either to failure or Raider insistence. Their equipment, however, remains scattered across the peaks. |
|
 |
 |
|
Collectible: Docking Clamp Overrides Area: Imperial Post 8L-055 Where to Find: After ziplining to the Imperial Post, take the next left on the path to find the scan. Databank Entry: Release controls for docked imperial fighters is granted by operational control. However, they can also be released via manual override console, situated next to the clamp mechanism. Such controls require specific clearance codes. |
|
 |
 |
|
Collectible: Damage Assessment Area: Flooded Bunker Where to Find: Found in a corner after entering the bunker. Databank Entry: A databank entry of Domo Dendra assessing the damage to the old water treatment shed: 'That backup from Dredger Gorge has shot the whole system. Burst pipes, collapsed beams...it's all no good. We'll have to get our water from the river now. Folks'll have to get used to it tasting a little strange, I suppose...' |
|
 |
 |
|
Collectible: Abandoned Water Filtration System Area: Flooded Bunker Where to Find: Found in the next room in the bunker Databank Entry: The early prospectors built complex systems to provide the outpost and their prospecting sites with fresh water. However, after the supply became contaminated, and their prospecting efforts began to falter, such systems were abandoned to time and the elements. |
|
 |
 |
|
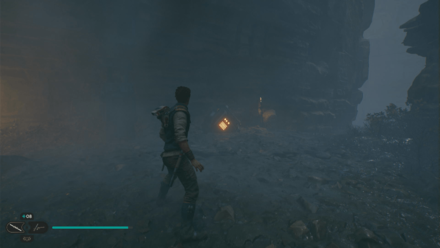
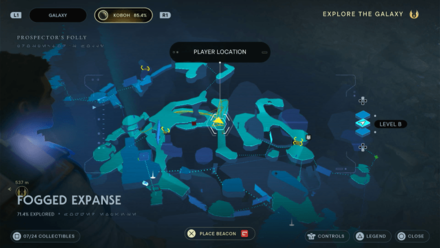
Collectible: Monitoring Equipment Area: Fogged Expanse Where to Find: Look for an orange light in the fog and follow it. Databank Entry: A seismic detector that used small pulses to locate hidden objects. It also had the unfortunate side effect of agitating and attracting local wildlife. Time and the elements have since rendered it inoperable. |
|
 |
 |
|
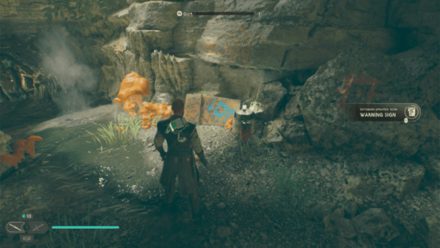
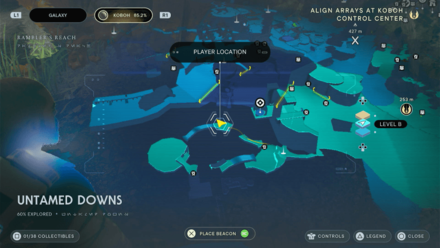
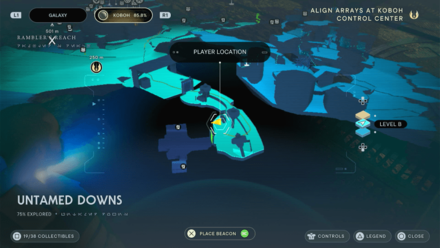
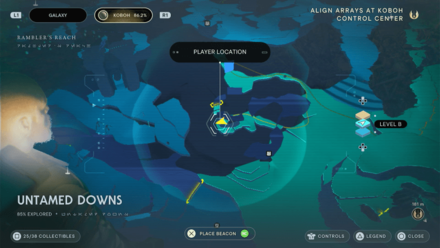
Collectible: Warning Sign Area: Untamed Downs Where to Find: Found just across the Meditation Point. Databank Entry: A crude sign that attempts to ward off any who would seek to delve further into the cave: “Stay out! Danger within! No priorite!” |
|
 |
 |
|
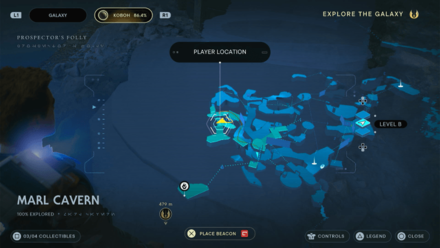
Collectible: Storage Tanks Area: Marl Cavern Where to Find: When you reach the cavern with wall run platforms, look to the right to find the scan. Databank Entry: Long-rusted and abandoned, the storage tanks that dot the mountain were used for storing water, and pumping out of flodded areas via myriad connected pipes. |
|
 |
 |
|
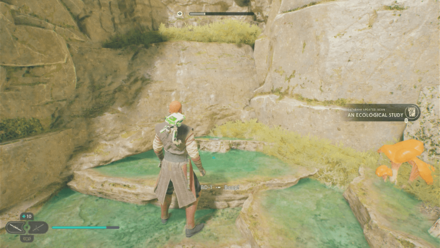
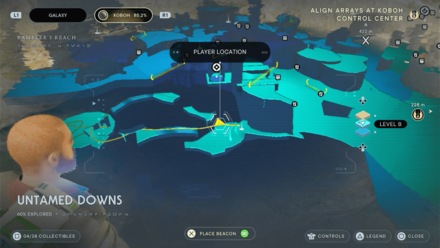
Collectible: An Ecological Study Area: Untamed Downs Where to Find: Found just below the Meditation Point by the pond. Databank Entry: A datapad from a curious Koboh local, studying the interior of this cave: “I cannot progress further without specialized equipment. I should turn back, but the sounds from within draw me further. What manner of cave is home to such myriad noises? My curiosity cannot be so easily satisfied.” |
|
 |
 |
|
Collectible: Ancient Architecture Area: Bygone Settlement Where to Find: From the Meditation Point, wall run the follow the platform until you can swing to the other side of the raised platforms. Scan the inside of one of the rooms. Databank Entry: Buildings on the outskirts of the Basalt Forest, partly built directly into the cliffsides. Their construction - a mizture of stone and mud - ages them as older than any other structure on the planet, predating even the Republic settlements. Little is known about that time. |
|
 |
 |
|
Collectible: Digger Crawler Area: Bygone Settlement Where to Find: On the platform where you recruit the Jawas, scan the crawler. Databank Entry: The enormous crawler vehicles were originally created as a mobile mining and smelting factories, designed to withstand the harsher conditions of frontier planets. Over time, however, they became favorites of the Jawa species native to Tatooine, who used their vast space to store their wares as well as house their entire clan. The Jawas who found their way to Koboh built a crawler in the style of the ones they remebered from their home. |
|
 |
 |
|
Collectible: Mountainside Hut Area: Mountain Ascent Where to Find: From the Meditation Point, head to the left and ride the cable if you've already unlocked that shortcut. If not, you can reach the area from the section where you can wall run. Databank Entry: In search of riches, prospectors fanned out, putting down roots across Koboh. As a result, the mountain - now considered the jackpot - soon saw its foothills covered in small but functional homes. |
|
 |
 |
|
Collectible: Shiverpede Nest Area: Mountain Ascent Where to Find: Found inside the cave where you'll need to force lift the door to gain access. Databank Entry: Shiverpedes hunt in small packs, but nest en masse, performing intricate mating rituals that, shudderingly, involve their sharpened forceps. |
|
 |
 |
|
Collectible: Orb Amplifier Area: Forest Array Where to Find: Story-related databank entry. This can be scanned when you use the Koboh orb to clear the Koboh material to the Meditation Point. Databank Entry: A curious fixture of High Republic-era Jedi technology that stabilizes, focuses, and magnifies the erratic potential energy stored in Koboh orbs. |
|
 |
 |
|
Collectible: High Altitude Research Area: Summit Ridge Where to Find: The scan is the balloon you can force pull. Databank Entry: These Republic devices were used to read atmospheric pressure patterns unique to Koboh. Their latching mechanisms allowed them to be bundled together, and reeled in during adverse weather. |
|
 |
 |
|
Collectible: Indomitable Area: Forest Array Where to Find: Scan the shield by the wall located in the area where you fight multiple Stormtroopers near the Bilemaw Den Meditation Point. Databank Entry: These reinforced shields - dispensed to Imperial riot forces - were designed to sustain heavy, destructive assaults and have even proven resistant to lightsaber strikes. The standard armor of the trooper wielding this shield, however offered no such additional benefits. |
|
 |
 |
|
Collectible: Epic Moltings Area: Forest Array Where to Find: Found under the area where the giant bird is perched when you first arrive in the Forest Array. It is also accessible from the Forest Array Meditation Point through platforming to the indicated location. Databank Entry: The piasa reigns over the skeis and plains as one of Koboh's apex preadators - a terror to any creature caught in its sights. The nomadic creature rarely perches, and its temporary habitation of the Forest Array may indicate either injury or distress. |
|
 |
 |
|
Collectible: Auxiliary Array Telescope Area: Forest Array Where to Find: Found just before the scalable wall that will allow you to reach the Orb Amplifier on the way to the Meditation Point. Databank Entry: The generators charge the air with highly-excited energy currents, similar in both power and danger to interstellar ionic storms. From the looks of the structure's rampant rust and overgrowth, it hasn't been put to use in several decades. |
|
 |
 |
|
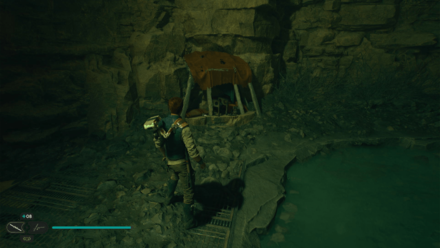
Collectible: Cargo Elevator Area: Foothill Falls Where to Find: Found in the large cave near Skoova. Databank Entry: The prospectors envisioned many grand projects for Koboh. Most were never realized, but an elevator for transporting hauls from the mountain summit was somehow completed successfully. |
|
 |
 |
|
Collectible: Child's Hideaway Area: Foothill Falls Where to Find: After riding the Relter, turn left to a narrow path that will lead to a cave. Databank Entry: This area has clearly been fashioned into a hideaway for a small child, perhaps that they might while away the time as their guardians toiled the nearby caverns. |
|
 |
 |
|
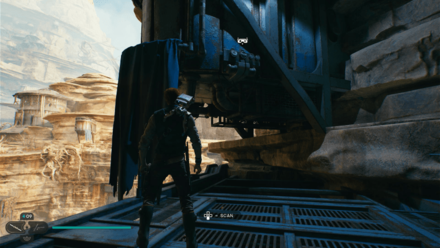
Collectible: Prospecting Network Area: Foothill Falls Where to Find: After riding the Relter, reach the highest point of the area using a Nekko and the balloon. Databank Entry: Prospectors on Koboh constructed lattice-like series of rafters and buildings, all intricately - and perilously - connecting their network of dig sites. They appear to outsiders to grow from the very rocks. |
|
 |
 |
|
Collectible: Basalt Pillars Area: Basalt Rift Where to Find: At the end of the first zipline you'll encounter from the entrance of the Basalt Rift. Databank Entry: Huge pillars of brittle, heavy rock populate the Basalt Forest, Seismic activity deep beneath the planet's crust 'unroots' these stone trees, forcing the structures to erupt in their fully grown form. While the stone is no longer growing, its porous surface provides a scaffolding for rudimentary organic lifeforms to take root. Scholars refer to these structures as “stone sentinels.” |
|
 |
 |
|
Collectible: Turf Wars Area: Basalt Rift Where to Find: From the Meditation Point, cross the broken bridge on the right. Databank Entry: A drop pod from a Lucrehulk-class battleship, used to transport battle droids and other separatist forces to the filed during the Clone Wars. Destination coordinates typically ensure safe landings, but this pod was overridden and fired in the general area of the Basalt Rift. |
|
 |
 |
|
Collectible: Bilemaw's Revenge Area: Basalt Rift Where to Find: Found in the same area as the Bilemaw. Databank Entry: Bilemaws have a notoriously bad temper, often trampling, crushing, or pulverizing those caught in their rampage. Even trained imperial soldiers stand little chance against a bilemaw defending its den. |
|
 |
 |
|
Collectible: Risk and Research Area: Basalt Rift Where to Find: Found in a camp in the area. Databank Entry: There's enough rations and supplies here to sustain a rigorous multi-day journey. Various scientific instruments and cartography tools were also laboriously packed for the trip. |
|
 |
 |
|
Collectible: The Short Straw Area: Basalt Rift Where to Find: Found past the metal arc and by crossing two narrow logs. Databank Entry: Imperial supplies addressed to Squadron 013. The shipment was meager in the first place - the rations already exhausted. These troops were disorganized, disengaged, and desperate. |
|
 |
 |
|
Collectible: Bilemaw Pools Area: Basalt Rift Where to Find: Found at a low level of the area where you'll find a Bilemaw sleeping. Databank Entry: The pools are filled with volcanic mud that bubbles up through fissures from deep beneath the surface. Bilemaws frequently lounge in these pools, becoming covered in, and fortified by, the substance. This second skin in very similar to the basalt columns that define the landscape. |
|
 |
 |
|
Collectible: Koboh Dust Area: Basalt Rift Where to Find: Found in an area with blue dust scattered. Databank Entry: Highly volatile matter unique to this system of the galaxy. Without further analysis, the elements comprising this gaseous substance remain a mystery. |
|
 |
 |
|
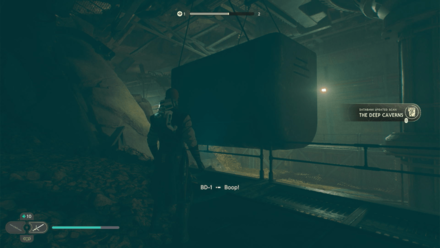
Collectible: The Deep Caverns Area: Untamed Downs Where to Find: Found at the end of the small hangar past the green laser wall. Databank Entry: Ambitious, but ill-fated, the gondola carts were intended to plumb deep into Koboh's subterranean network in search of priorite and other treasures. The cost, however, proved too exorbitant, and when the roller mines bega bizarrely malfunctioning, the operation was seized and abandoned. |
|
 |
 |
|
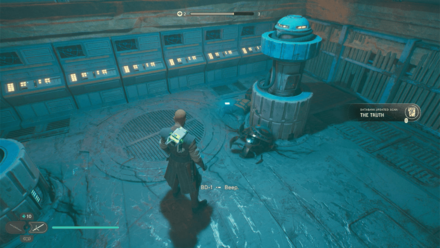
Collectible: The Truth Area: Untamed Downs Where to Find: Found on your right after defeating E3-VE3. Databank Entry: "Filias. Brother. I am sorry. You cannot stop me. I do not want to do it. But I am right. When I crack the cubes. You'll see. no more now, brother. No more. |
|
 |
 |
|
Collectible: Gift of Fire Area: Untamed Downs Where to Find: Found inside a small room after defeating E3-VE3. Databank Entry: “I brought the new roller mines to the others, and they were delighted. He has become interested in the planet's strange cubes, however, so I will need to split my attention. I admit, they are compelling...” |
|
 |
 |
|
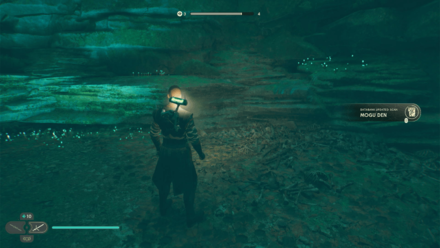
Collectible: Mogu Den Area: Untamed Downs Where to Find: Found inside a cave above a high ledge. Databank Entry: Generally, though not always, a mogu will incapacitate its prey before dragging it back to its den, where they can be preserved and devoured at the mogu's leisure. The mogu of this cave has clearly hunted well. |
|
 |
 |
|
Collectible: Bilemaw Burrow Area: Untamed Downs Where to Find: Inside a cave by the Harvest Ridge lake. Databank Entry: The bilemaw can be a vicious creature, but mostly in defense of its territory. They find shelter from the elements, but only build nests in order to give birth and rear their young. Any interloper who would intrude on that space is therefore fair game. |
|
 |
 |
|
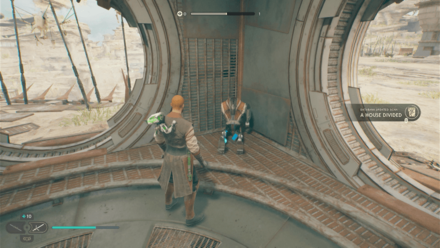
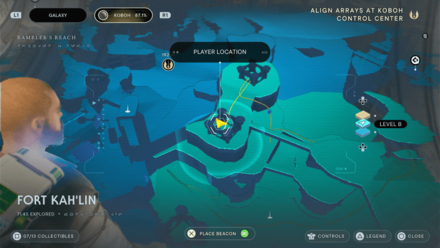
Collectible: A House Divided Area: Fort Kah'lin Where to Find: Found inside a building at the top floor. Databank Entry: A datapad entry from a leader of the bandit camp, detailing growing discontent: “The offer was brought to us by the Gen'Dai, but not every corner of the camp seemed pleased. Some accuse us of trading our freedom for just another hand around our throats. If they won't come willingly, then I'll have no choice but to force them...” |
|
 |
 |
|
Collectible: Central Manse Area: Devastated Settlement Where to Find: From the Grand Courtyard Meditation Point, take the alleyway left and you'll find the Scan by the wall. Databank Entry: The settlement's structure served as a central point for the Jedi on Koboh, its spires deliberately calling back to the disctinctive towers of the Jedi Temple on Coruscant. |
|
 |
 |
|
Collectible: Training Courtyard Area: Devastated Settlement Where to Find: From the Grand Courtyard Meditation Point, enter the building infront and you'll find the Scan on your left by the door. Databank Entry: The manse was built around a large central courtyard, clearly intended for Jedi training. Ample room was provided for sparring, meditation, or simple yet productive discussion between peers. |
|
 |
 |
|
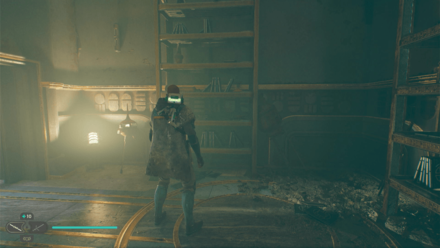
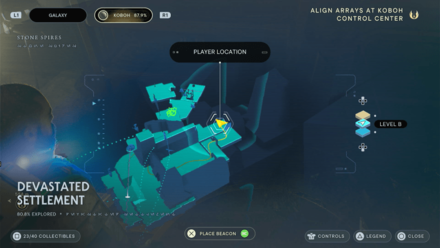
Collectible: Theses of Yaddle Area: Devastated Settlement Where to Find: Found infront of a shelf past the door. Databank Entry: A tome by Jedi Master Yaddle, detailing little known Jedi arts. Unfortunately, her notes on both are incomplete and - perhaps deliberately - vague. |
|
 |
 |
|
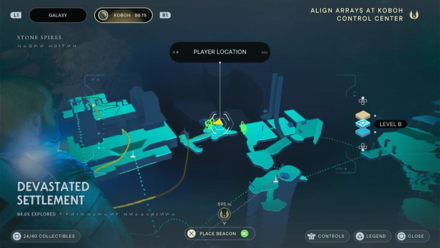
Collectible: Fallen Padawan Area: Devastated Settlement Where to Find: From the Grand Courtyard Meditation Point, take the Reltor and fly around towards the left into the cave below across another island. You'll find the Scan inside. Databank Entry: The Emergence on Koboh devastated the planet, and the High Republic settlement was no exception. As the ground beneath them gave way, many were caught in the erupting earth and crushed beneath the mighty masonry erected for their own betterment. |
|
Force Echoes
| In-game Location | Map Location |
|---|---|
 |
 |
|
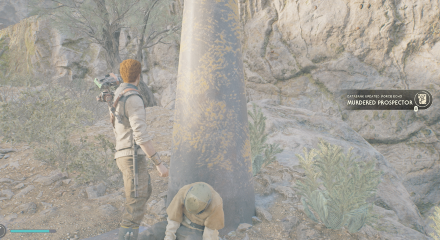
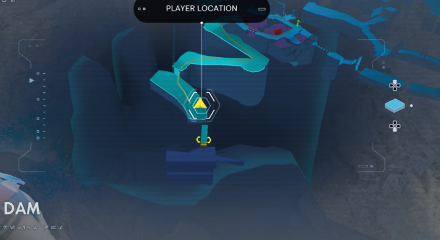
Collectible: Murdered Prospector Area: Derelict Dam Where to Find: Just before the bridge to the Meditation Point after fighting a Raider Grunt and a B2 Battle Droid. |
|
 |
 |
|
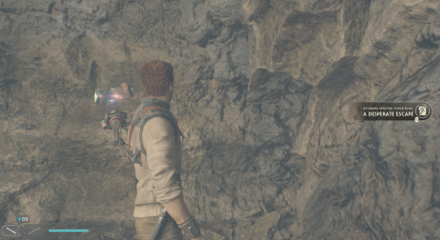
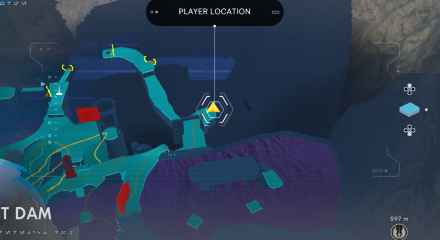
Collectible: A Desperate Escape Area: Derelict Dam Where to Find: Inside a cave to the right past the bridge with a Raider and some Droids. Databank Entry: A prospector was held up by Bedlam Raiders, who claimed the valley as their territory. The prospector ran, and the raiders gave chase. |
|
 |
 |
|
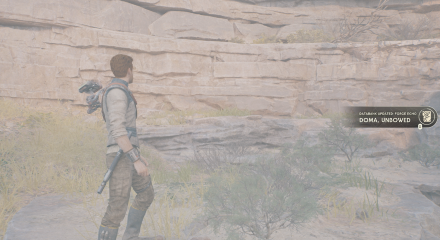
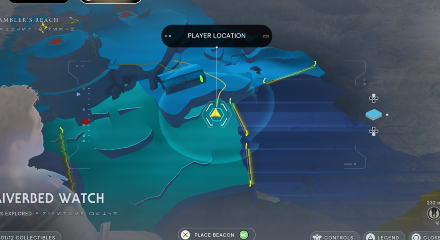
Collectible: Doma, Unbowed Area: Riverbed Watch Where to Find: This echo can be collected from a corpse in the Riverbed Watch just near the herd of nekkos. Databank Entry: As the Raiders began their ascendance, Doma found it necessary to personally make it clear that the outpost was defended, and not to be messed with. |
|
 |
 |
|
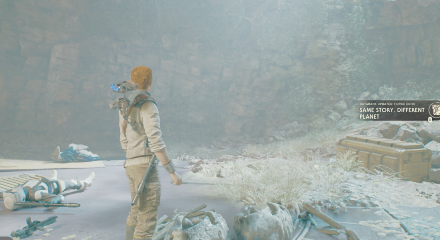
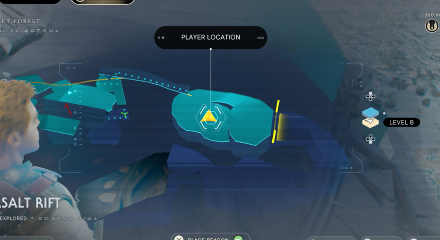
Collectible: Same Story, Different Planet Area: Basalt Rift Where to Find: Cross the broken bridge and past the Droids and Raiders, grapple your way up the vines and climb the ceiling and you'll find the Force Echo surrounded by three Stormtroopers. Databank Entry: Rawka are aggressive, belligerent creatures - never more so than when defending their nests. This forest variant incubates their eggs for a dozen Koboh moon cycles, and each member defends the clutch as if it was their own. This generation of eggs, however, did not survive the planet's harsh realities. |
|
 |
 |
|
Collectible: Beyond the Abyss Area: Rehabilitation Wing Where to Find: After defeating Dagan Gera, cross the ledge to your left and you'll find the Force Echo just ahead. Databank Entry: Grief-stricken yet hopeful, Santari Khri gazed up at the Koboh Abyss, not knowing if she would ever see the world that lay beyond it every again. |
|
 |
 |
|
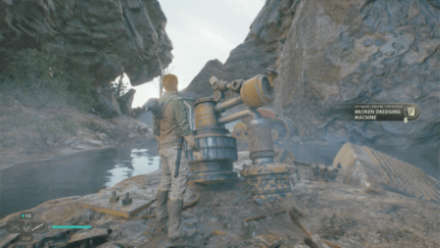
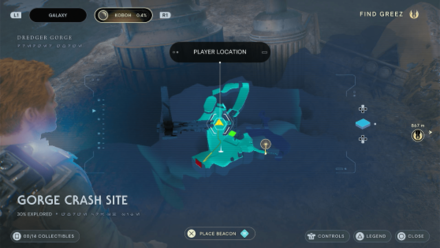
Collectible: Broken Dredging Machine Area: Gorge Crash Site Where to Find: Near the first Meditation Point by a small lake Databank Entry: Makeshift machines, thrown together in a hurry, are often prone to failure when they are invariably pushed past their limits, as the prospectors of Koboh Learned. |
|
 |
 |
|
Collectible: Dead Researcher Area: Sodden Grotto Where to Find: After crossing the rock you pushed, take a left past a small passage and you'll find it next to a Bramlik. Databank Entry: A researcher was trapped down in the caves after the collapse of a tunnel. She wandere for days before succumbing to thrist and fatigue. |
|
 |
 |
|
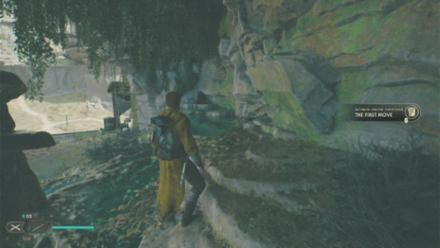
Collectible: The First Move Area: Rambler's Reach Outpost Where to Find: Head behind the Shop and grapple to the ledge on top and you'll find the Force Echo by small pond behind a pillar. Databank Entry: Gulu and Gido meet for what will be te start of a highly unconventional but extremely long-lasting relationship. |
|
 |
 |
|
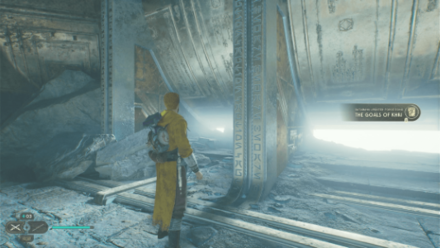
Collectible: The Goals of Khri Area: Chamber of Reasons Where to Find: Place the Orb on the stand to connect the bridge and cross it. You'll find the Force Echo on your left by the corner. Databank Entry: Two Republic Jedi muse on Santari Khri and her aims. They seem particularly impressed by her zeal for this mission. |
|
 |
 |
|
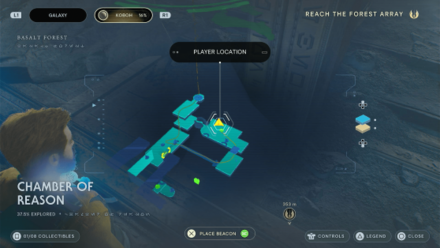
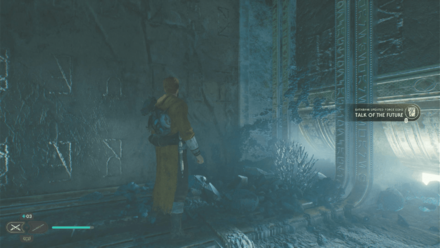
Collectible: Talk of the Future Area: Chamber of Reasons Where to Find: Past the "The Goals of Khri" Force Echo, take the elevator up and you'll find the Force Echo on your left by the corner. Databank Entry: Two Jedi discuss the burgeoning Abyss project, and whether its success will merit the current investment into Koboh. |
|
 |
 |
|
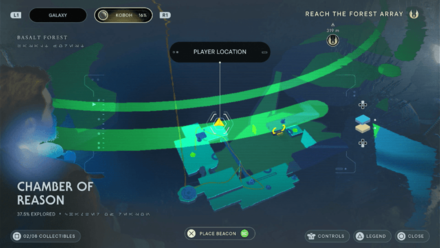
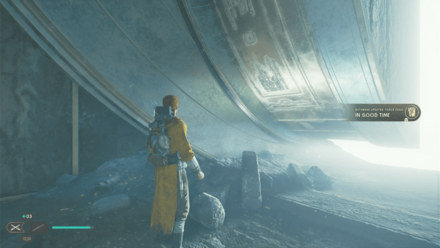
Collectible: In Good Time Area: Chamber of Reasons Where to Find: Switch the bridge, cross it and force pull the breakable wall to reveal the second Orb. Bring the Orb back and switch the bridge to the left, cross it and take the elevator up to place the second Orb on the nearby stand. Cross the bridge, wall run your way up, and you'll find the Force Echo on your right by the corner. Databank Entry: Two Jedi Knights discuss their struggling student, and the nature of growth. |
|
 |
 |
|
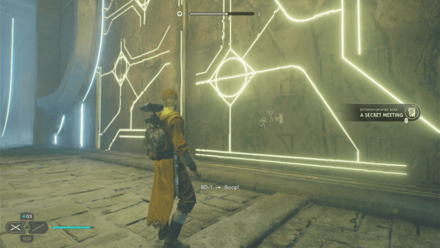
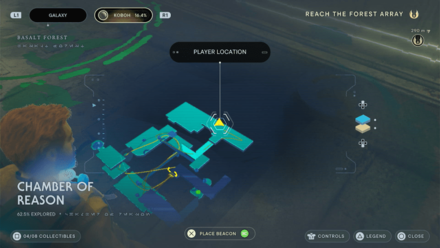
Collectible: A Secret Meeting Area: Chamber of Reasons Where to Find: Near the "In Good Time" Force Echo, turn around and move forward a bit and you'll find the Force Echo on your right by the wall. Databank Entry: Scratchy writing on a wall, written in a hasty and easily-translated childish cipher: “Meet at the usual place later?” |
|
 |
 |
|
Collectible: Dead End Area: Chamber of Reasons Where to Find: Near the "Talk of the Future" Force Echo, switch the bridge to the farther platform and while crossing it, force pull the first Orb and place it on the stand across the bridge. You'll find the Force Echo across the new bridge you just made. Databank Entry: A Padawan, trying to think their way out of a puzzle, becomes briefly frustrated. |
|
 |
 |
|
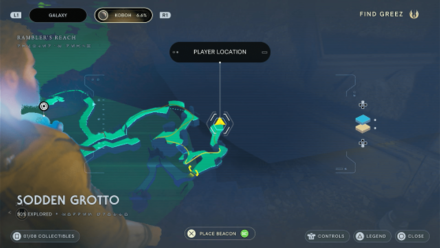
Collectible: Prospector Remains Area: Sodden Grotto Where to Find: You can claim the echo in a corpse near the Meditation Point inside the Sodden Grotto. Databank Entry: A prospector was hunting for treasure down in the caves, but ran into something large |
|
 |
 |
|
Collectible: A Task Too Far Area: Hunter's Quarry Where to Find: Head to the far end of the Hunter's Quarry guarded by several droids and Bedlam Raiders. Databank Entry: Prospectors on Koboh were interested in the fastest - and easiest - ways of getting paid. Requests to investigate mysterious and seemingly impossible-to-enter monoliths, therefore, were met with swift denials. |
|
 |
 |
|
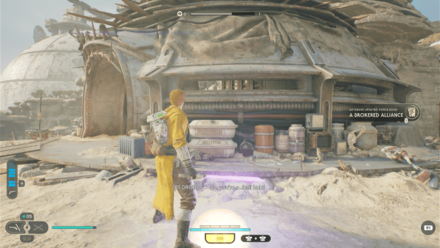
Collectible: A Brokered Alliance Area: Riverbed Watch Where to Find: From the Riverbed Watch Meditation Point, head inside the building and climb up to the very top and defeat the group of droids. You'll find the Force Echo beside the building by its entrance. Databank Entry: The Bedlam Raiders were formed of many disparate groups of bandits, miscreants and blasters-for-hire. One by one, Rayvis brought them into the fold through silver-tongued diplomacy, and blood-soaked persuasion. |
|
 |
 |
|
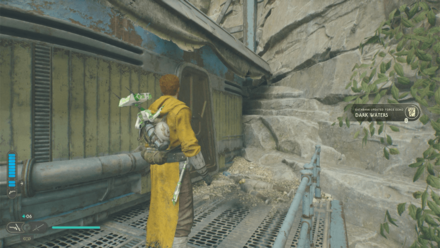
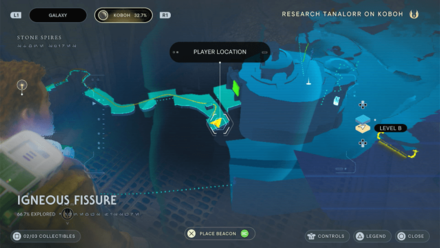
Collectible: Dark Waters Area: Igneous Fissure Where to Find: From the Meditation Point, turn around and wall run towards the platform across. Walk past the beams and follow the path forward. You'll find the Force Echo behind the small house. Databank Entry: Turgle and a Raider get into an accidental altercation, the result of which is a stain on Turgle's conscience that cannot be easily erased. |
|
 |
 |
|
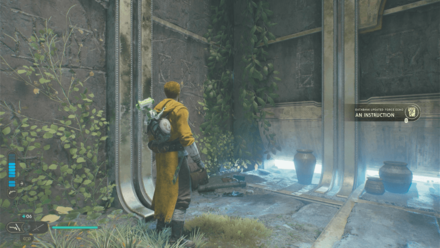
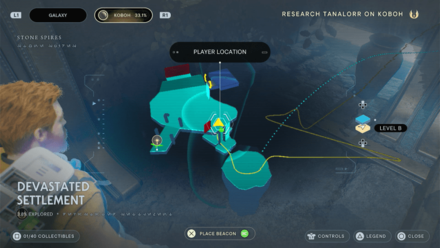
Collectible: An Instruction Area: Devastated Settlement Where to Find: After defeating Korej Lim, grapple up the ledge and enter the small temple. You'll find the Force Echo on your right by the corner. Databank Entry: The Jedi saw oppoturnities in all things - even a harsh world like Koboh. To truly understand the ever-expanding Republic, the Jedi needed to absorb all they could, and teach their Padawans the same. |
|
 |
 |
|
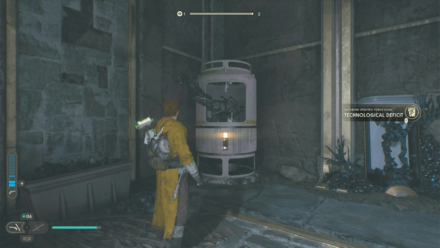
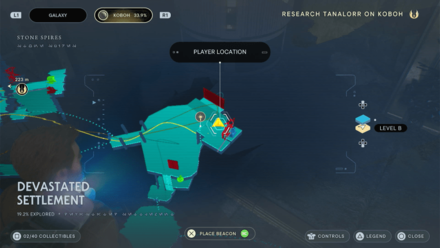
Collectible: Technological Deficit Area: Devastated Settlement Where to Find: From the Meditation Point, grapple up on your left, climb the wall and jump across. You'll find the Force Echo inside the cave infront guarded by a BX Droid (Hybrid). Databank Entry: As the centuries passed since the Republic abandoned Koboh, so too did the knowledge of its specialized technology. To newcomers, such objects were unknowable. |
|
 |
 |
|
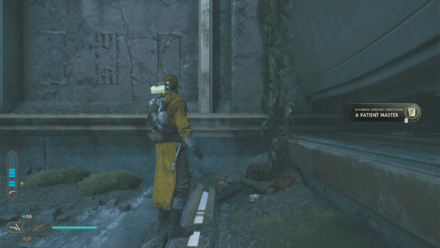
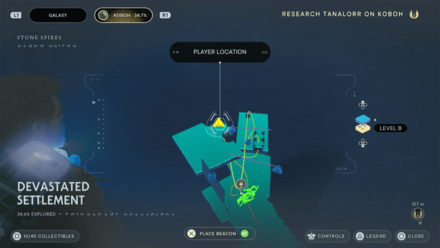
Collectible: A Patient Master Area: Devastated Settlement Where to Find: From the Meditation Point, grapple up on your left, climb the wall and jump across. Head inside the cave, past the narrow passageway, and use the large cube to climb on the platform. You'll find the Force Echo on your left by the corner. Databank Entry: A Padawan asks to be excused from training. They do not explain themselves, but the master displays restraint and allows them to go. |
|
 |
 |
|
Collectible: Idle Talk Area: Devastated Settlement Where to Find: After unlocking the Koboh Grinder, bring the orb with you and head back past the waterfall opening. Place the Orb on the nearby Coupler and use the Koboh Grinder to trace it and destroy the Koboh Matter. Climb the wall up and you'll find the Force Echo on your right just by the edge. Databank Entry: A Padawan brings some news they've overheard to their master, who dismisses it and chides them for engaging in idle gossip. |
|
 |
 |
|
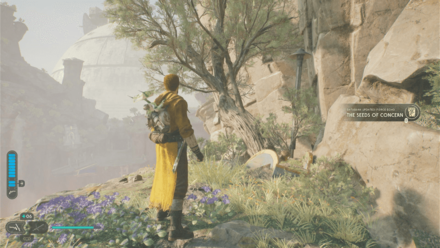
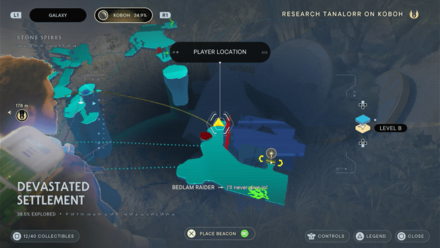
Collectible: The Seeds of Concern Area: Devastated Settlement Where to Find: After opening the second updraft, use the mount to fly across towards the next objective and you'll find the Force Echo on your left by the corner. Databank Entry: Though bound to Koboh by purpose, the Jedi nevertheless begin the harbout misgivings about the ways in which their mission is proceeding. |
|
 |
 |
|
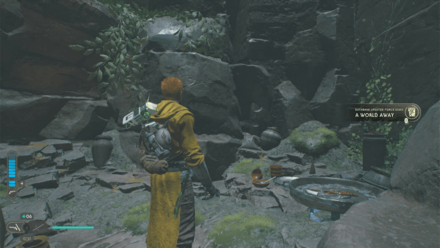
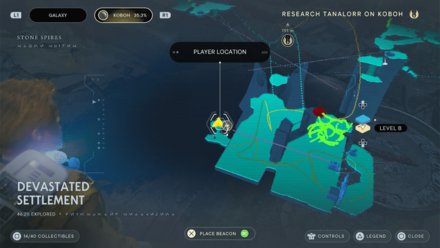
Collectible: A World Away Area: Devastated Settlement Where to Find: At the third objective, use the large cube to block the door from closing and enter the narrow passageway. Bring the Orb outside and place it on the Coupler. Go through the narrow passageway and use the Koboh Grinder to trace and destroy the Koboh Matter. You'll find the Force Echo inside on top of a ledge. Databank Entry: The rigors of daily training exact a toll on Padawan, who seek for themselves islands of peace and leisure, away from their master's watchful eyes. |
|
 |
 |
|
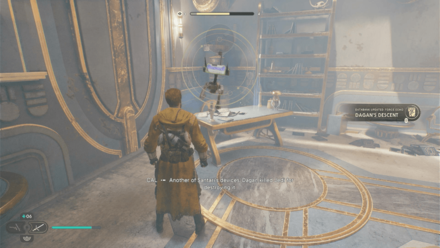
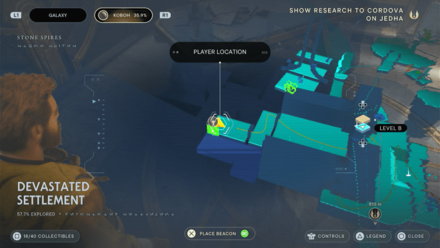
Collectible: Dagan's Decent Area: Devastated Settlement Where to Find: After defeating Tague Louesh, follow the path towards the objective and interact with the table. Databank Entry: Two Jedi destroy a device as Dagan Gera arrives, too late to stop them. In a fit of rage and revenge, Dagan kills both Jedi in cold blood. |
|
 |
 |
|
Collectible: Cataclysm Area: Devastated Settlement Where to Find: After obtaining the "Dagan's Decent" Force Echo, unlock the door and follow the path. Just before grappling up, you'll find the Force Echo on your left. Databank Entry: When struck by calamity, the evacuation of Koboh began swiftly. Some, however, thought first to defend their work. Despite their efforts, such attempts were ultimately futile. |
|
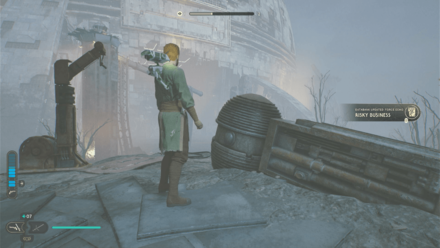 |
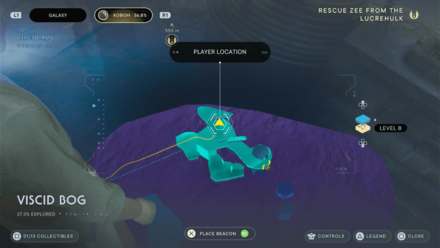 |
|
Collectible: Risky Business Area: Viscid Bog Where to Find: Use the flying mount to cross past the archway with an updraft and land on the rock with an archway. You'll find the Force Echo on your left by the edge. Databank Entry: Two prospectors were investigating the swamp, seeing if they could haul chunks of the broken Lucrehulk away to sell, and risking the ire of the Raiders in doing so. |
|
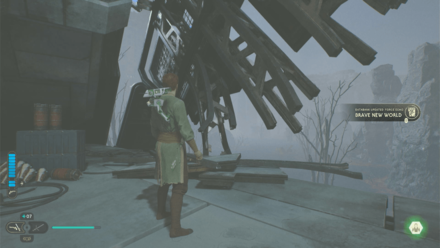 |
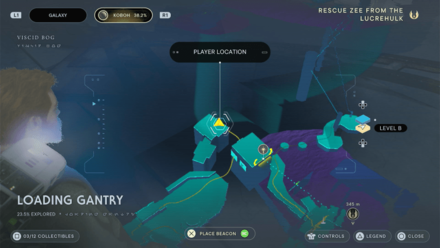 |
|
Collectible: Brave New World Area: Loading Gantry Where to Find: After defeating the group of droids, head up the ramp on the opposite side and grapple towards the climbable wall. Climb up, turn around, and dash across and you'll find the Force Echo on your right by the corner. |
|
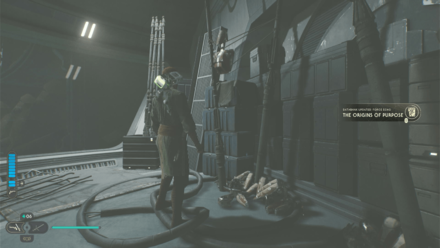 |
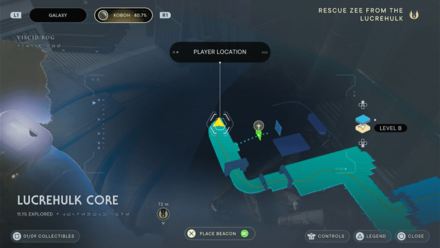 |
|
Collectible: The Origins of Purpose Area: Loading Gantry Where to Find: After separating from Bode again, you'll find the Force Echo at the end of the hall. Databank Entry: Within the newly claimed Lucrehulk, Yupah and Rayvis take stock of the army that they have uncovered, and what ends they could achieve with it. |
|
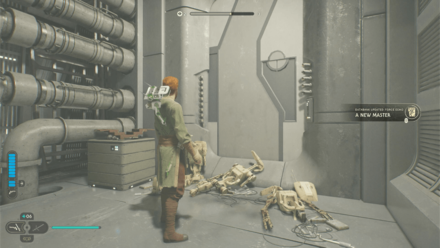 |
 |
|
Collectible: A New Master Area: Lucrehulk Core Where to Find: From the Meditation Point, head down the path on the right and you'll find the Force Echo at the end past the locked door. Databank Entry: Within the abandoned Lucrehulk, Ravis found himself a dormant army. All he needed to do was reprogram it to serve him. |
|
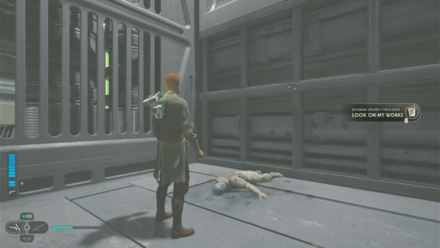 |
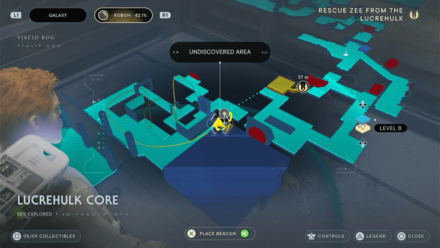 |
|
Collectible: Look On My Works Area: Lucrehulk Core Where to Find: In the room with moving crates and two shielded turrets on the other side, keep following the path down on your side and you'll find the Force Echo at the end. Databank Entry: Upon reprogramming the Lucrehulk's army to serve him, Rayvis then sought to test whether his work had been fully successful. |
|
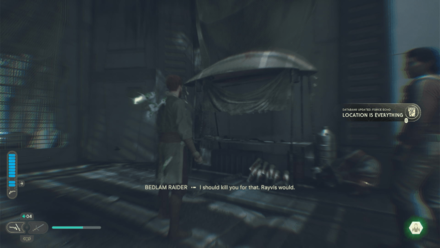 |
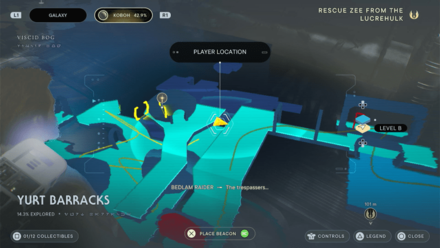 |
|
Collectible: Location is Everything Area: Yurt Barracks Where to Find: By the raider's Living Quarters, head past the building on your right and you'll find the Force Echo at the end beside by a table. Databank Entry: Though it was never built for creature comfort, the Raiders were nevertheless determined to transform the Lucrehulk into a space they could live, as well as wage war. |
|
 |
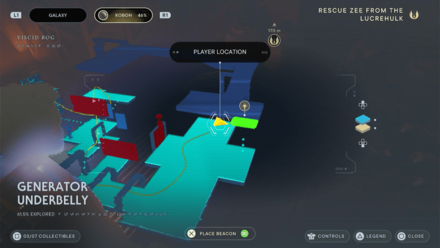 |
|
Collectible: A Droid Reborn Area: Generator Underbelly Where to Find: Past the first shortcut, bring down the platform, cross it and climb up the to the ledge. You'll find the Force Echo ahead under the ceiling turret. Databank Entry: To the talented and determined mechanic, even a wrecked droid can find a new purpose. A gun platform can be fashioned, for instance, from a droideka's pneumatic blaster arms. |
|
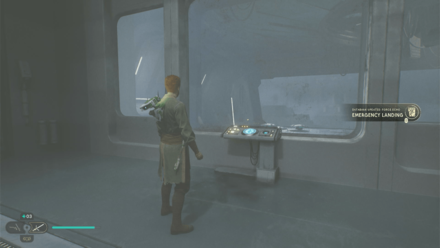 |
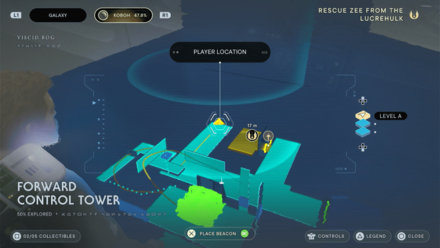 |
|
Collectible: Emergency Landing Area: Forward Control Tower Where to Find: From the Forward Control Tower Meditation Point, turn around the you'll find the Force Echo on at the end of the path to your right. Databank Entry: The Lucrehulk 'Primacy', having entered the Koboh system too close to the Abyss, began being pulled apart by its gravitational forces. In a last-ditch moves, the remaining bridge crew detached the core, planning to emergency land on the planet below. |
|
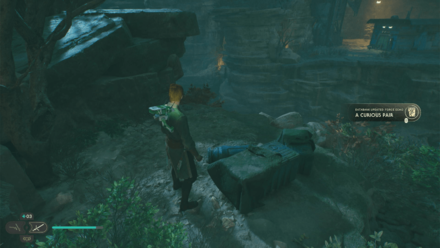 |
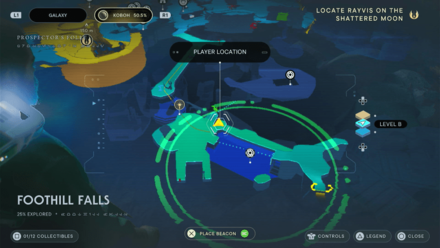 |
|
Collectible: A Curious Pair Area: Winding Ravine Where to Find: Found beside the first time you meet Skoova near the edge of the cliff. Databank Entry: Two prospectors are gazing over the waterfall. One slips and is saved by the other. They shake it off before heading on. |
|
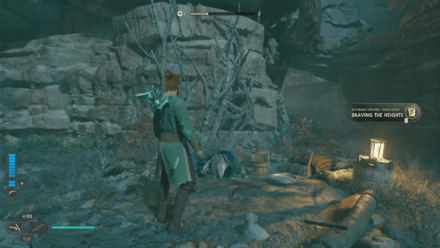 |
 |
|
Collectible: Braving the Heights Area: Mountain Ascent Where to Find: From the Mountain Ascent Meditation Point, walk down the path infront and you'll find the Force Echo by the edge. Databank Entry: Two prospectors, determined to push on into the mountain's more treacherous climes, survey what lies ahead of them. |
|
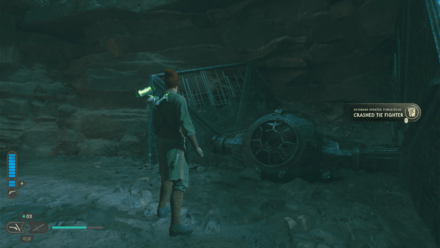 |
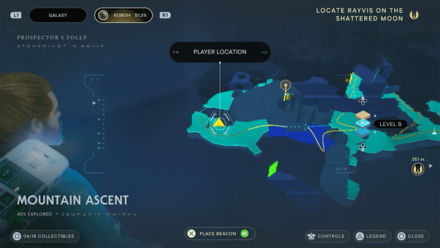 |
|
Collectible: Crashed Tie Fighter Area: Mountain Ascent Where to Find: Past the green laser walls and some droids, grapple on to the wall and run through. You'll find the Force Echo below by a crash TIE Fighter. Databank Entry: The wreckage of an Imperial TIE Fighter, seemingly shot down during a routine patrol by what seemed to be a ship from the Clone Wars. |
|
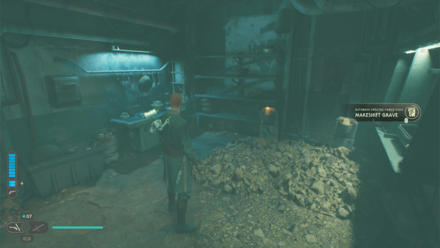 |
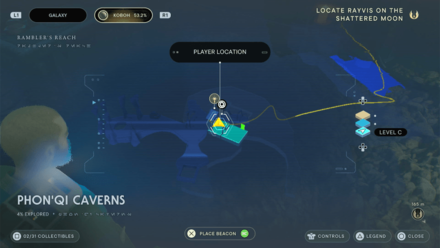 |
|
Collectible: Makeshift Grave Area: Phon'Qi Caverns Where to Find: From the Mountain Ascent Meditation Point, backtrack past the pond and take the mount on the right to fly across. Defeat the enemies and drop down the hole next to the hut. You'll find the Force Echo nearby. |
|
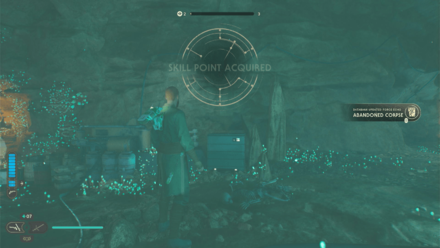 |
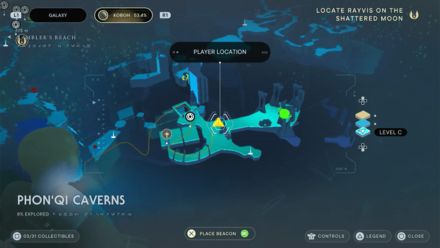 |
|
Collectible: Abandoned Corpse Area: Phon'Qi Caverns Where to Find: Head inside past the narrow passageway and you'll find the Force Echo along the path forking right. Databank Entry: The prospectors who tried exploring this cavern met unfortunate ends. One,caught by some peril deeper into the cave network, managed to crawl back before succuming to their wounds, just meters from the entrance. |
|
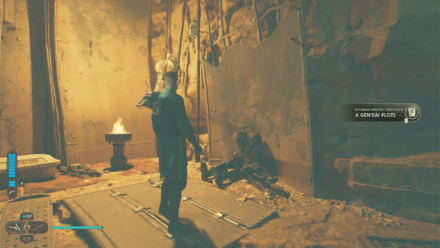 |
 |
|
Collectible: A Gen'Dai Plots Area: Phon'Qi Caverns Where to Find: Cross the broken bridge and you'll find the Force Echo inside the room full of BX Droids. Databank Entry: Rayvis ordered the Raiders to occupy the cave network. He believedd, instinct if nothing else, that the place held some information as to his missing master's whereabouts. |
|
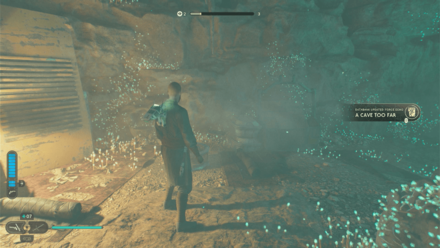 |
 |
|
Collectible: A Cave Too Far Area: Phon'Qi Caverns Where to Find: Found inside the room where you fight a Rancor next to a lamp. Databank Entry: Two prospectors, despite the odds, made it deep into the cave networks. However, they find themselves trapped, and lament that this may be their end... |
|
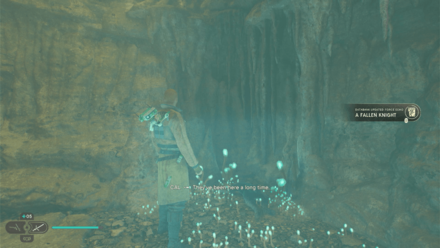 |
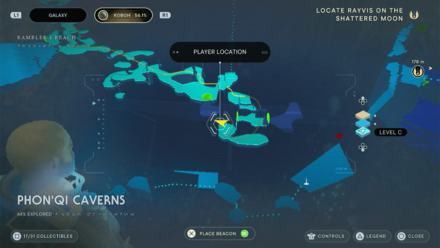 |
|
Collectible: A Fallen Knight Area: Phon'Qi Caverns Where to Find: Once you fall down the pitfall trap, climb up the scalable wall and dash through the green laser vent and destroy the electric junk infront with the Cavern Fungus. You'll find the Force Echo in the room inside. Databank Entry: The body of a Jedi Knight, brutally ambushed by some unknown force before being unceremoniously discarded in the bowels of the cave. |
|
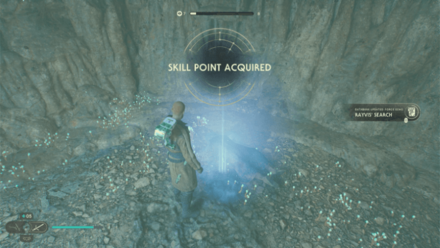 |
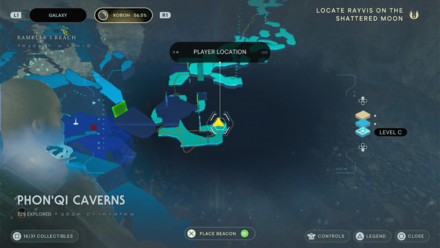 |
|
Collectible: Rayvis' Search Area: Phon'Qi Caverns Where to Find: After beating the three bosses, unlock the door and you'll find the Force Echo inside. Databank Entry: Rayvis, loyal lieutant of Dagan, scours Koboh in search of his missing master. Any Jedi he encounters are potential informants, and inevitable victims. |
|
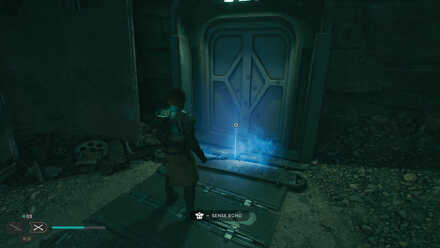 |
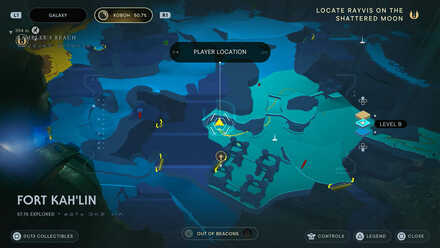 |
|
Collectible: Victorious Surrender Area: Fort Kah'lin Where to Find: Form the Fort Kah'lin Meditation Point, go right until you find the door with the Sense Echo. Databank Entry: In the aftermath of a small but brutal civil war that tore this settlement apart, the bandit leaders pledge themselves to Rayvis, and become part of his newly-formed Bedlam Raiders. Those who would not kneel, however, were exiled. |
|
 |
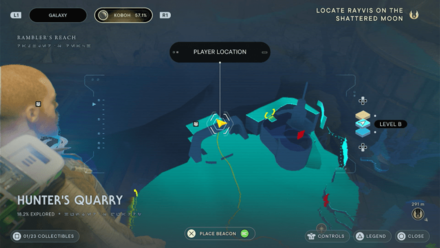 |
|
Collectible: A Task Too Far Area: Hunter's Quarry Where to Find: Found inside a hangar withe a group of droids fight against some Gorgers. Databank Entry: Prospectors on Koboh were intereseted in the fastest - and easiest - ways of getting paid. Requests to investigate myserious and seemingly impossible-to-enter monoliths, therefore, were met with swift details. |
|
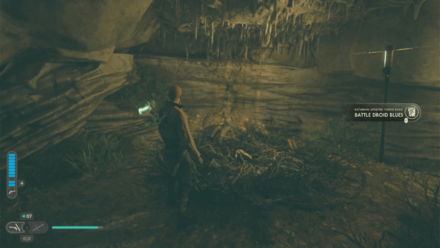 |
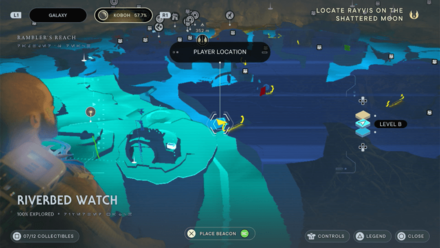 |
|
Collectible: Battle Droid Blues Area: Riverbed Watch Where to Find: Found inside a nest across the water in a small cave. Databank Entry: Zygg Soza is not somebody who can say no to a little mechanical tinkering. As such, she has found herself repairing things that most likely should not - such as old Spearatist battle droids. |
|
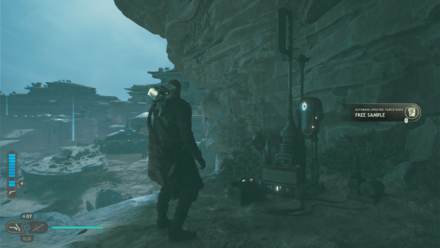 |
 |
|
Collectible: Free Sample Area: Hunter's Quarry Where to Find: After defeating the two Gorocco, you'll find the Force Echo at the edge near the Relter. Databank Entry: Ashe Javi and their faithful DJ droid, DD-EC, are some of Koboh's more eccentric newcomers. It is not unheard of for them to be found in often-unsafe locations around the valley, sampling whatever sounds catch their curiosity. |
|
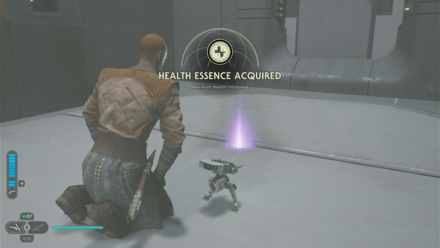 |
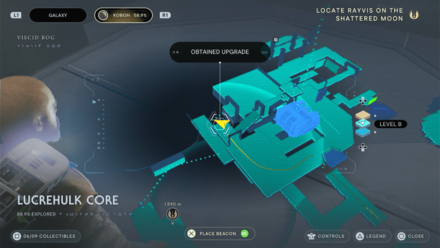 |
|
Collectible: Health Essence Area: Lucrehulk Core Where to Find: From the Meditation Point, bring down the platform and climb it. You'll find the Essence inside the room to the left past the stairs. |
|
 |
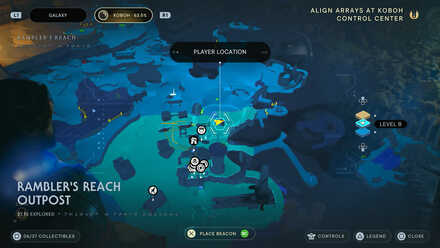 |
|
Collectible: Death in the Family Area: Rambler's Reach Outpost Where to Find: Could be found in the basement of Soont Madas' shop. You will need Merrin's Charm and Force Lift to reach his shop. Talk to Soont to gain access to the basement and it will be the corpse of his brother. Databank Entry: A pair of inventor prospectors - brothers - disagree over where their priorities should lie on Koboh. One, in a flash of obsession, strikes out, and in so doing fatally wounds his kin. |
|
 |
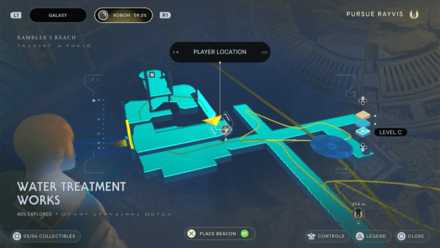 |
|
Collectible: Lawful Good Area: Water Treatment Works Where to Find: Head up the stairs and wall run across, you'll find the chest on your left by the corner. Databank Entry: The Rambler's Reach Outpost was a prime target for those looking to pull a quick heist. Unfortunately for them, Doma Dendra was determined, in those early days, to see that at least a modicum of law was upheld. |
|
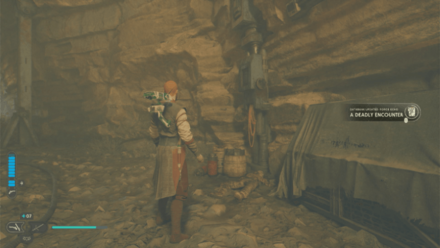 |
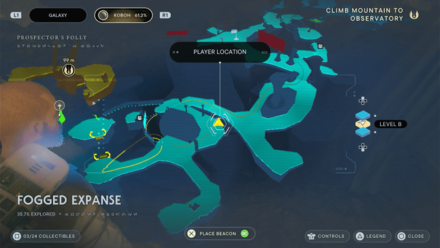 |
|
Collectible: A Deadly Encounter Area: Fogged Expanse Where to Find: Found past the door with a Mogu inside. Databank Entry: While struggling further up the mountain, two prospectors encounter a ravenous mogu that stalks the mists, looking for any morsel that stumbles into its hunting grounds. |
|
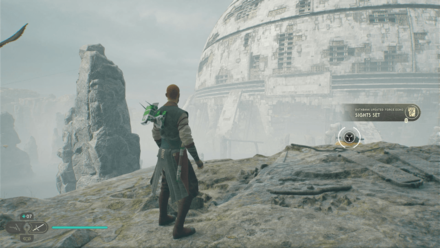 |
 |
|
Collectible: Sight Set Area: Viscid Bog Where to Find: Head down the long elevator and jump out of the hole midway. Follow the path past the balloons and you'll find the Force Echo by the edge of the cliff. Databank Entry: Rayvis looks out over the Swamp at the Lucrehulk beyond, his curiosity piqued, and a plan beginning to form. |
|
 |
 |
|
Collectible: One Man's Junk Area: Yurt Barracks Where to Find: From the Lucrehulk Core Meditation Point, take the path down on the left and circle around the hut on your left. Go through the narrow path and climb up the wall and jump and dash to your left. You'll find the Force Echo on the platform. Databank Entry: For his new purpose, Rayvis forged an army of roids and Raiders, discarding those of no use to him. Others, however, saw potential in the broken parts left behind. |
|
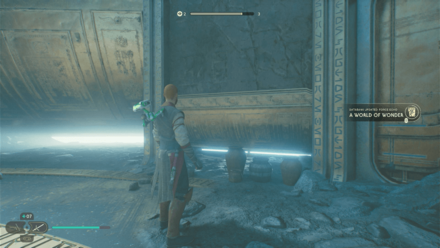 |
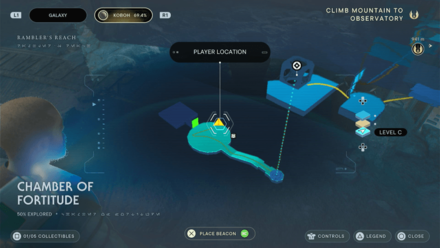 |
|
Collectible: A World of Wonder Area: Chamber of Fortitude Where to Find: Defeat Anoth Estra and you'll find the Force Echo next to a closed door. Databank Entry: Although the meditation chambers were a Jedi-made wonder of Koboh, there were yet other secretive layers to the planet, and the Republic was determined to study them all. |
|
 |
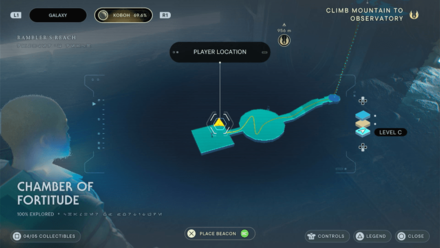 |
|
Collectible: Hand in Hand Area: Chamber of Fortitude Where to Find: Defeat Anoth Estra and you'll find the Force Echo in the next room by the corner. Databank Entry: A Republic scientist is given a tour of the Jedi chambers by an attending Knight, as they discuss ways in which they may better aid one another in their shared endeavors. |
|
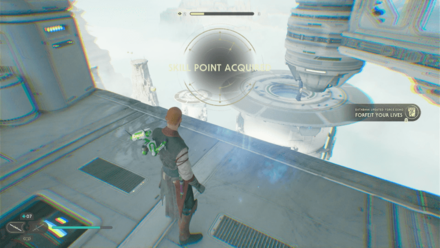 |
 |
|
Collectible: Forfeit Your Lives Area: Observatory Understructure Where to Find: After Bode helps destroy some droids along the way, cross the gap and you'll find the Force Echo on your left by the edge. Databank Entry: The Imperial garrison stationed near the Observatory were no match for Dagan Gera and the full force of the Bedlam Raiders. |
|
 |
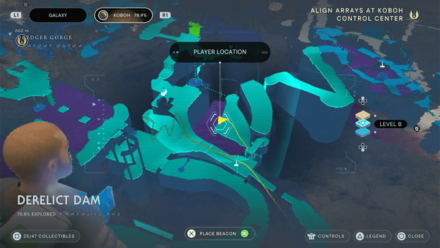 |
|
Collectible: Drowned Prospector Area: Derelict Dam Where to Find: From the Meditation Point, head down the vines and your left and follow the path forward. You'll find the Force Echo by the edge near the tar pit. Databank Entry: The remains of a prospector, who stumbled into a tar reservoir. They panicked and slipped into the pit, where the sucking tar caught fast and sealed their fate. |
|
 |
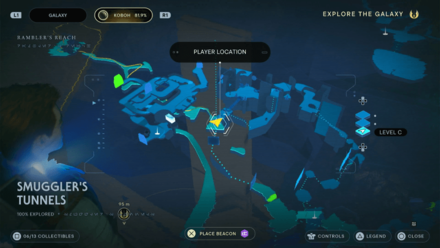 |
|
Collectible: Death in the Dark Area: Smuggler's Tunnel Where to Find: Use a Nekko to reach the roof of the building near the river in Rambler's Reach Outpost. This will lead to an alternate route to the Smuggler's Tunnel. The echo is found after the narrow path at the end of the tunnel. |
|
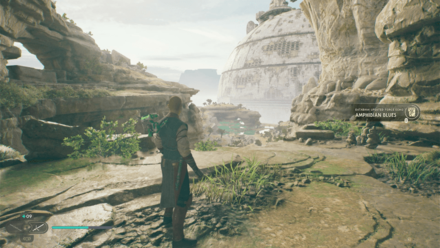 |
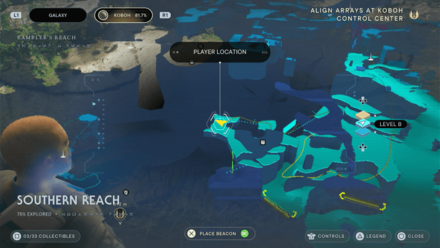 |
|
Collectible: Amphibian Blues Area: Southern Reach Where to Find: Head inside the cave to the east and you'll find the Force Echo just infront of the waterfall. Databank Entry: A rock-hopping Turgle finds himself lamenting his sorry lot in life. Even here, on a new planet, he finds himself isolated and alone. |
|
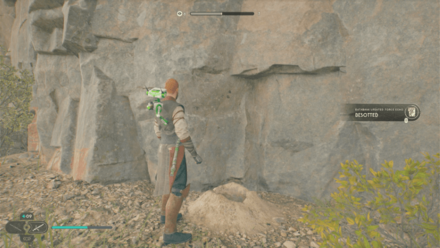 |
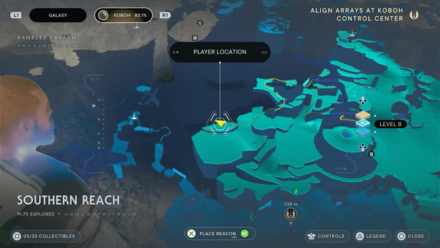 |
|
Collectible: Besotted Area: Southern Reach Where to Find: Head past the cave to the east all the way to the high rock full of Boglings. You'll find the Force Echo on your right by the wall. Databank Entry: Boglings were an accidental and invasive addition to the Koboh ecosystem, but not all of the planet's residents looked upon them with disdain. |
|
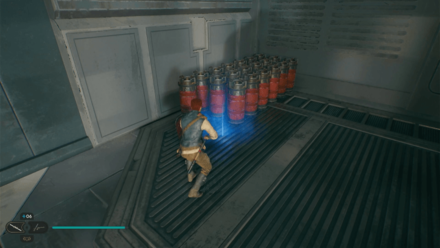 |
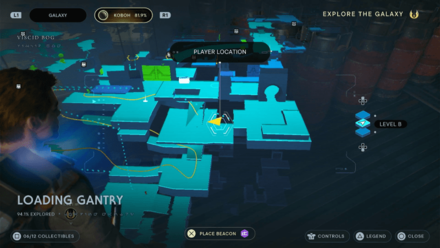 |
|
Collectible: Brothers Area: Loading Gantry Where to Find: Near the Hangar Rafters Meditation Point. |
|
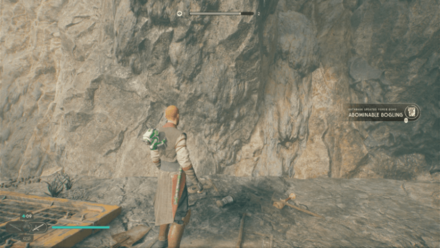 |
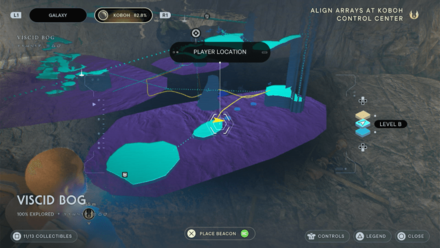 |
|
Collectible: Abominable Bogling Area: Viscid Bog Where to Find: From the Meditation Point, take the zipline and follow the path forward. Use Life on the nearby platforms to cross and you'll find the Force Echo by the platform ahead. Databank Entry: From the dark of the swamp's seemingly endless tar pits came a creature so mysterious and terrifying, it caused prospectors to flee. In reality, it's just a sticky bogling. |
|
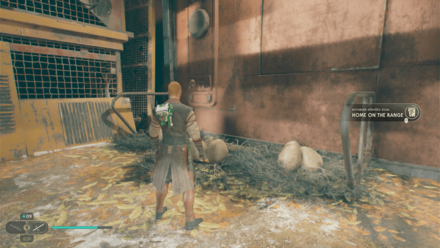 |
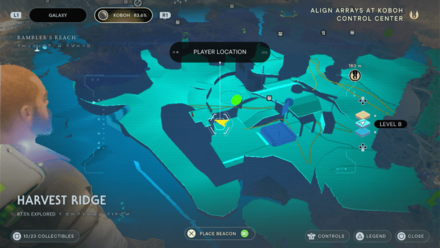 |
|
Collectible: Home on the Range Area: Harvest Ridge Where to Find: Found inside the red barn by some eggs. Databank Entry: There were those on Koboh who chose a more pastoral life, away from the sharp toil of excavating priorite. Yet the Raiders, when they came, were indiscriminate in their presecution of the populace. |
|
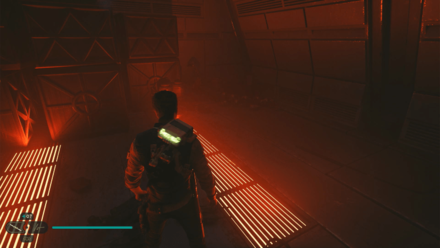 |
 |
|
Collectible: A Droid Reborn Area: Generator Underbelly Where to Find: After the wall climbing section with walls you need to move with Force, follow the path and turn left. The echo will be at the end around some boxes. |
|
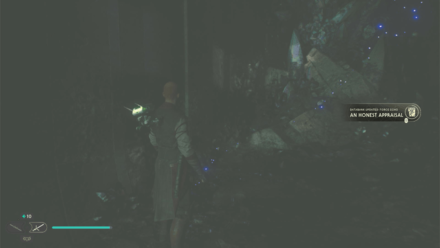 |
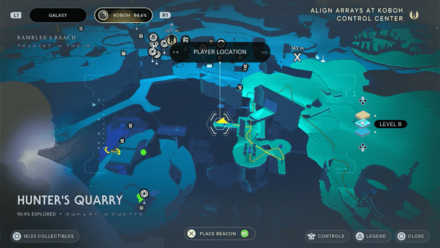 |
|
Collectible: An Honest Appraisal Area: Hunter's Quarry Where to Find: From inside the ruins, head towards the Orb's initial Coupler and you'll find the Force Echo behind it. Databank Entry: Two Jedi assess their fate, in the wake of the devastation on Koboh. The sobering conclusion is that no help will be coming for them. |
|
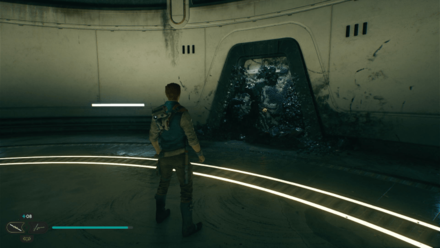 |
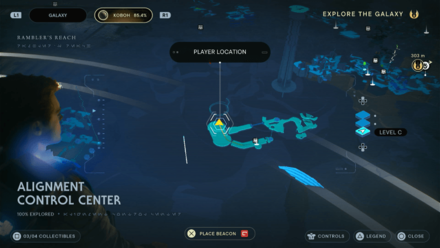 |
|
Collectible: Patience Area: Alignment Control Center Where to Find: From the Meditation Point, head to the next room. The echo will be on the far side of the area. Databank Entry: Dagan Gera and Santari Khri discuss their plans for Tanalorr - Dagan expresses frustration that such vital work is being delayed too much. |
|
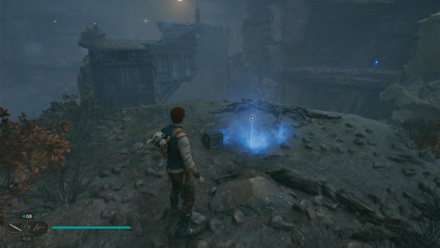 |
 |
|
Collectible: Forging Forward Alone Area: Fogged Expanse Where to Find: After wall running from the meditation point, look back and use the same structure after it moved to wall run again to a small isolated area that will lead to the echo. Databank Entry: A prospector, battered by the mountain's dangers, tries to struggle on up the mountain alone. |
|
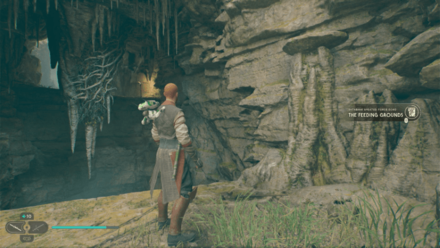 |
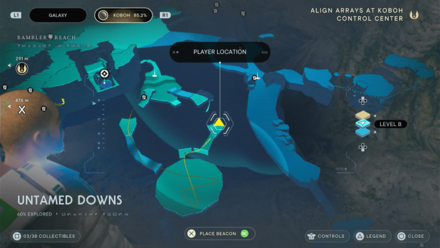 |
|
Collectible: The Feeding Grounds Area: Untamed Downs Where to Find: After defeating the three large creatures, climb up the vines and you'll find the Force Echo by the edge. Databank Entry: By some twist of geography or fate, three of Koboh's greatest predators are repeatedly drawn to this feeding ground. Perhaps the prospensity of smaller creatures, or foolhardly prospectors, brought them, but what is certain is that these three apex beasts will feed, no matter what. |
|
 |
 |
|
Collectible: A Small Mercy Area: Untamed Downs Where to Find: Found just outside the Meditation Point inside a small cave. Databank Entry: Mosey and her faithful Nekko, Leo, get into a scrape from which of them cannot recover. Mosey does what needs to be done with a solemn understanding, and as much compassion as she can muster. |
|
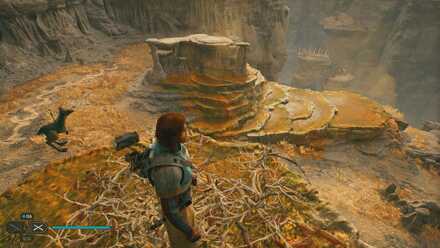 |
 |
|
Collectible: The Wheel Turns Area: Boiling Bluff Where to Find: From the Meditation Point, get on a Nekko to jump to one of the higher platforms on your right going back down to the Untamed Downs Databank Entry: Although Mosey is known as a hunter, she is not without a respect and understanding for the equilibrium of the planet and the natural order of things. |
|
 |
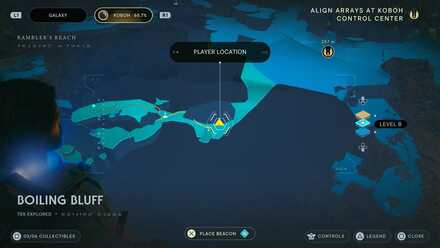 |
|
Collectible: Turgle, Saved Area: Boiling Bluff Where to Find: From the Meditation Point, continue forward. The force echo is hardly missable. Databank Entry: Doma's first encounter with Turgel was one of rescue, saving him from a self-inflicted blunder. He was attached to her from that point on. |
|
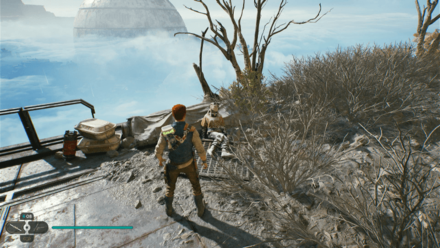 |
 |
|
Collectible: Journey's End Area: Summit Ridge Where to Find: From the Meditation Point, approach the elevator. The echo will on the right. Databank Entry: Having finally reached the mountain summit in search of treasures, a grievously tired prospector takes in the view, and considers their journey. |
|
 |
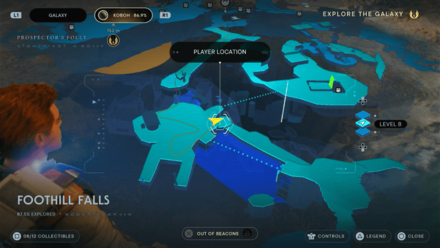 |
|
Collectible: A Curious Pair Area: Foothill Falls Where to Find: Found behind Skoova beside the falls. Databank Entry: Two prospectors are gazing over the waterfall. One slips and is saved by the other. They shake it off before heading on. |
|
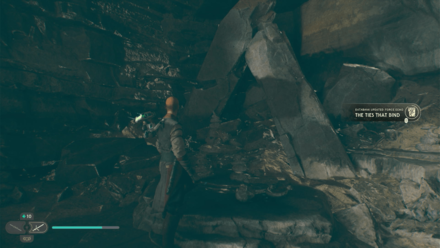 |
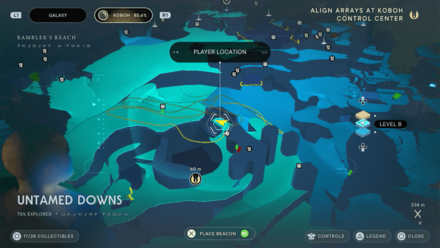 |
|
Collectible: The Ties That Bind Area: Untamed Downs Where to Find: From the crashed ship, climb up and cross towards the area above. Move forward and climb up some more and drop down below the large tower. You'll find the Force Echo inside a cave. Databank Entry: Doma, long-lived matriarch of the outpost, did not come to Koboh alone. However, the planet's unforgiving nature did not spare the partner she travelled with. Now, only this unassuming grave, and Doma's memories, are a testament to their existence. |
|
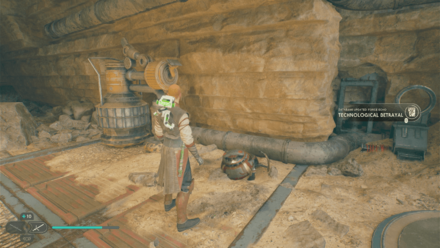 |
 |
|
Collectible: Technological Betrayal Area: Untamed Downs Where to Find: Found inside a small hangar, outside the green laser wall. Databank Entry: The prospectors, grown used to the aid of their roller mines, were surprised and horrified when one day they suddenly turned against them - with catastrophic results. |
|
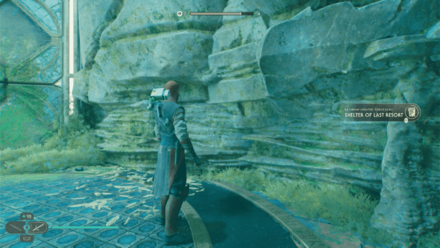 |
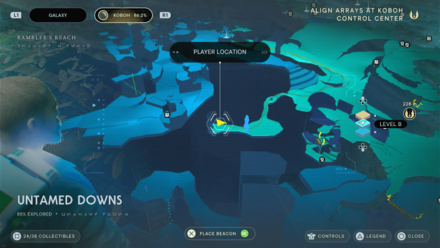 |
|
Collectible: Shelter of Last Resort Area: Untamed Downs Where to Find: Bring the roller mine from the hangar towards the cave nearby and destroy the door. You'll find the Force Echo inside. Databank Entry: As the sky rained fire from above, several stranded Jedi took refure within one of their meditation chambers. |
|
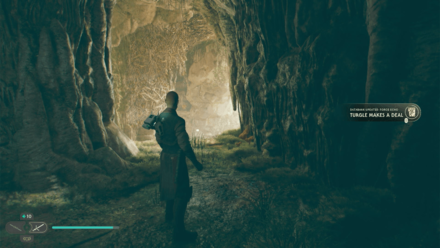 |
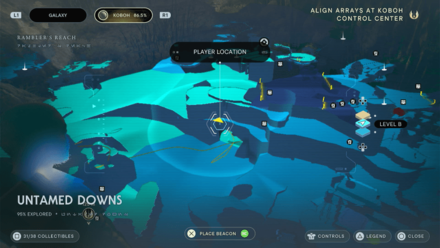 |
|
Collectible: Turgle Makes a Deal Area: Untamed Downs Where to Find: Inside a cave by the Harvest Ridge lake by a high platform to your left. Databank Entry: Turgle, having crossed the ruthless Bedlam Raiders, attempts to take shelter in a nearby cave. Failing to shake his pursuers, however, he begs for his life, making a dark bargain he will later come to regret. |
|
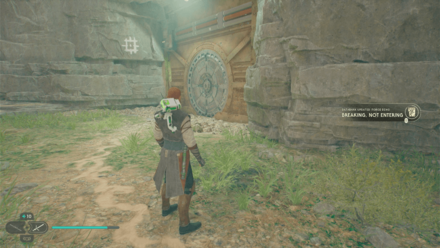 |
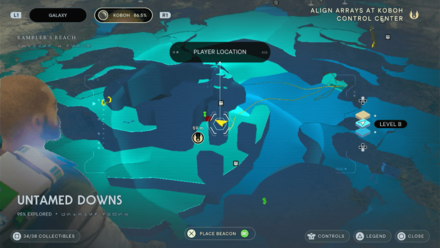 |
|
Collectible: Breaking, Not Entering Area: Untamed Downs Where to Find: Next to a locked door near the cliff overlooking Harvest Ridge. Databank Entry: A group of prospectors attempt to gain access to the sealed facility in the center of Rambler's Reach Valley. However, they are frustrated and humiliated by failure. |
|
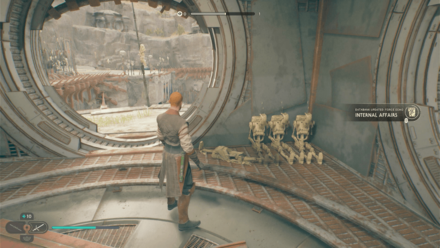 |
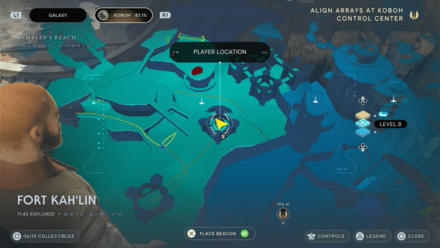 |
|
Collectible: Internal Affairs Area: Fort Kah'lin Where to Find: Found inside a building at the top floor. Databank Entry: The small-time bandits who used Koboh as a refugre were offered a choice - one that split the group in two. The resolution to this dispute was decided in conflict. |
|
Seeds and Plants
| In-game Location | Map Location |
|---|---|
 |
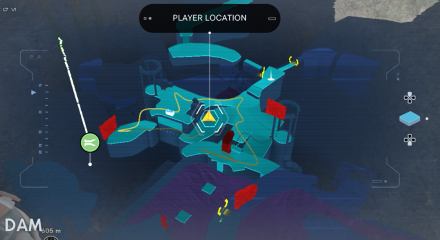 |
|
Collectible: Cactus Ball Area: Derelict Dam Where to Find: From the Meditation Point, head down the path in the middle and you'll find the Seed next to a large plant. |
|
 |
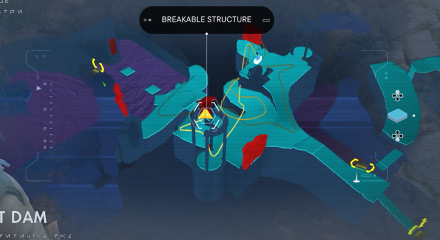 |
|
Collectible: Fire Pineapple Area: Derelict Dam Where to Find: From the Meditation Point, head straight and down the small gap under the short bridge. You'll find the Seed beside some solidifed tar. |
|
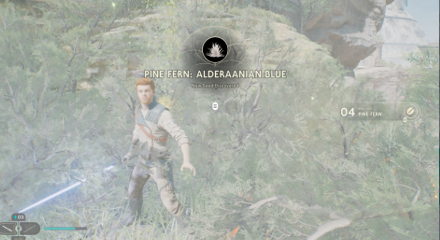 |
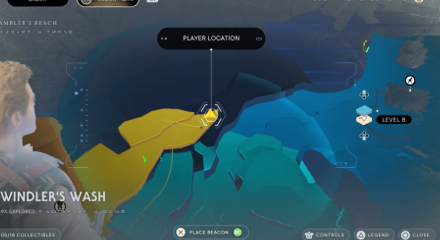 |
|
Collectible: Pine Fern Area: Swindler's Wash Where to Find: From the Meditation Point, go around to the other side of the bridge and climb the ledge past the Droids that drop down. You'll find the Seed on your right by the edge. |
|
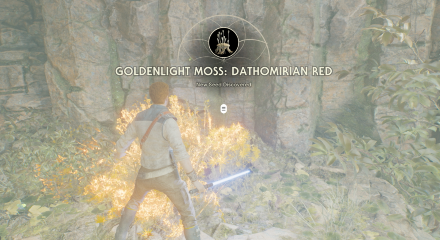 |
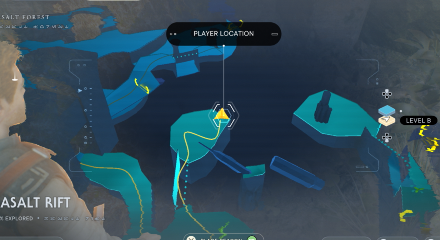 |
|
Collectible: Goldenlight Moss Area: Basalt Rift Where to Find: Midway through the zipline, jump towards the area on the left and you'll find the Seed to your right by the edge. |
|
 |
 |
|
Collectible: Goldenlight Moss Area: Basalt Rift Where to Find: Found in the area where you find Toa just by the wall. |
|
 |
 |
|
Collectible: Bluebell Squish Area: Nekko Pools Where to Find: 2 seeds can be found in a swampy section of the area you'll need a Nekko to access. |
|
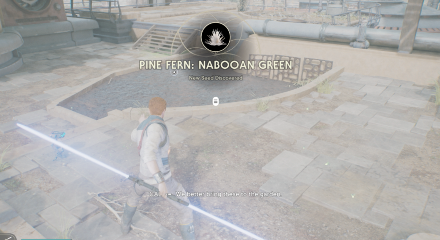 |
 |
|
Collectible: Pine Fern Area: Rambler's Reach Outpost Where to Find: Found at the rooftop garden above Pyloon's Saloon. |
|
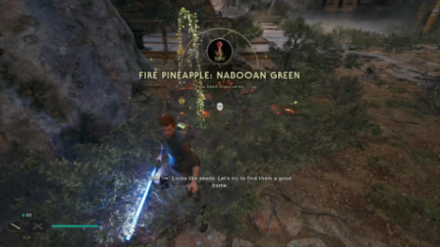 |
 |
|
Collectible: Fire Pineapple Area: Gorge Crash Site Where to Find: Found just near the Meditation Point beside the elevator by some bushes. |
|
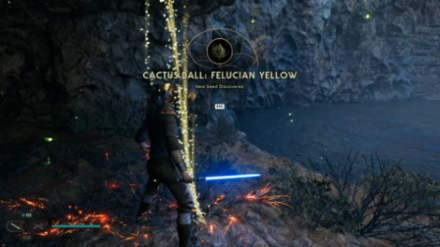 |
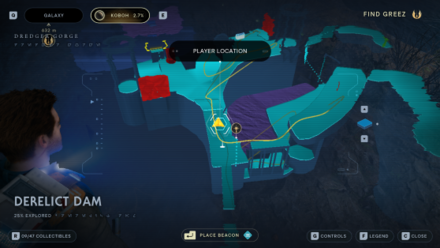 |
|
Collectible: Cactus Ball Area: Derelict Dam Where to Find: From the Meditation Point, drop down the nearby vines and defeat the Shiverpedes on the left. You'll find the Seed nearby. |
|
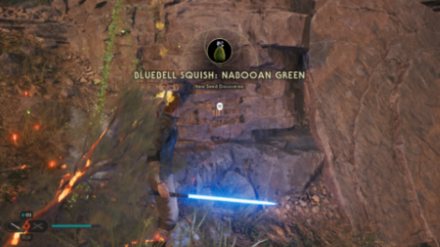 |
 |
|
Collectible: Bluebell Squish Area: Southern Reach Where to Find: From the Meditation Point, head down the path and you'll find the seed on your left by the bush. |
|
 |
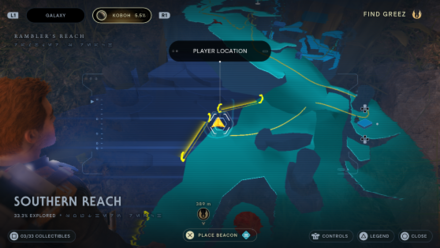 |
|
Collectible: Tuber Maw Area: Southern Reach Where to Find: From the Meditation Point, head down towards Mosey's shack and cross towards the east. You'll find the Seed below a small ledge. |
|
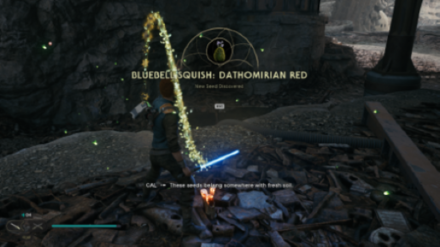 |
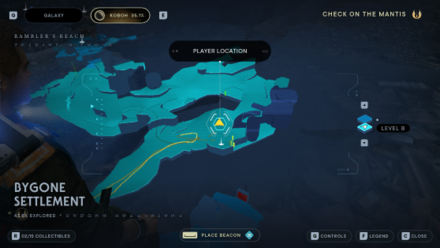 |
|
Collectible: Bluebell Squish Area: Bygone Settlement Where to Find: Found at the edge of the Bygone Settlement near the bridge with Jawas |
|
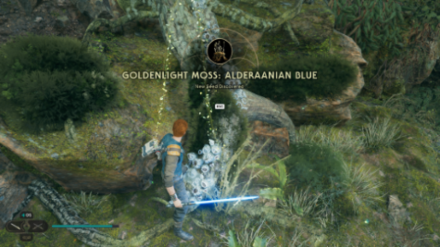 |
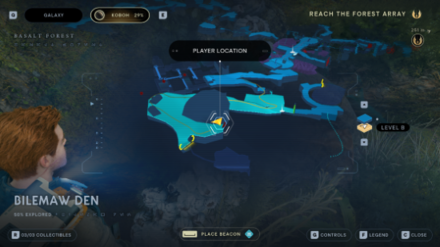 |
|
Collectible: Goldenlight Moss Area: Bilemaw Den Where to Find: Found at the dead-end cliff at the end of Bilemaw Den behind some pots |
|
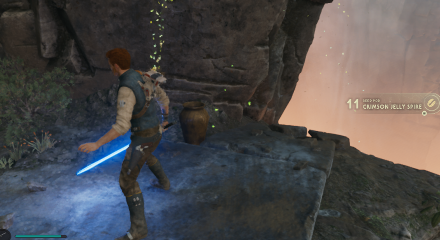 |
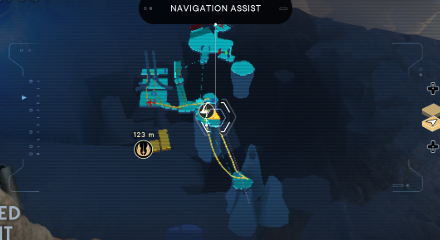 |
|
Collectible: Crimson Jelly Spire Area: Devastated Settlement Where to Find: From the Meditation Point, turn around and head back across the gap. Drop down on the ledge to your right and you'll find the Seed by the edge of the cliff. |
|
 |
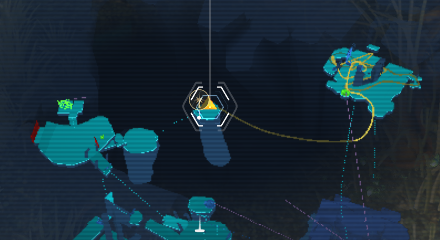 |
|
Collectible: Crimson Jelly Spire Area: Devastated Settlement Where to Find: From the Grand Courtyard Meditation Point, take the Reltor and head towards the island to the right of the first Meditation Point. You'll find the Seed by the edge. |
|
 |
 |
|
Collectible: Spine Fluff Area: Devastated Settlement Where to Find: From the Grand Courtyard Meditation Point, turn around and take the Reltor to the island on your right with a lake in the middle. You'll find the Seed nearby by the edge. |
|
 |
 |
|
Collectible: Crimson Jelly Spire Area: Devastated Settlement Where to Find: From the Grand Courtyard, take the Reltor at the top of the building and head for the island on the left. You'll find the Seed nearby. |
|
 |
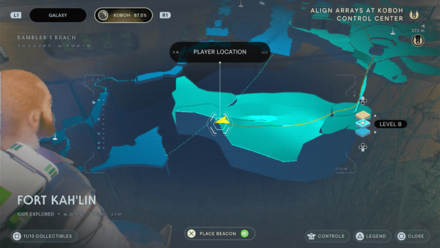 |
|
Collectible: Goldenlight Moss Area: Fort Kah'lin Where to Find: Cross the vines and head up the stream. You'll find the Seed by the wall. |
|
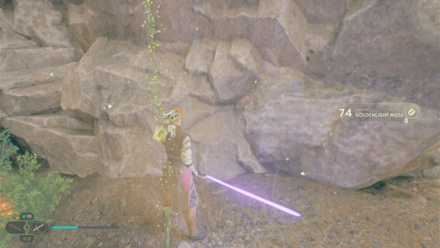 |
 |
|
Collectible: Goldenlight Moss Area: Fort Kah'lin Where to Find: Cross the vines and follow the stream to the right. You'll find the Seed at the end. |
|
 |
 |
|
Collectible: Goldenlight Moss Area: Fort Kah'lin Where to Find: Cross the vines and you'll find the Seed on your right next to the stream. |
|
 |
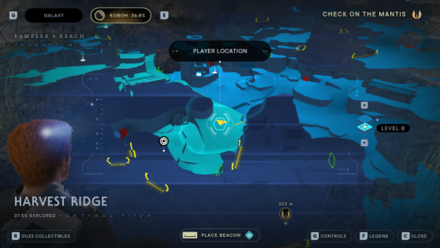 |
|
Collectible: Palm Fruit Shell Area: Harvest Ridge Where to Find: Fond near the slope to get to Harvest Ridge |
|
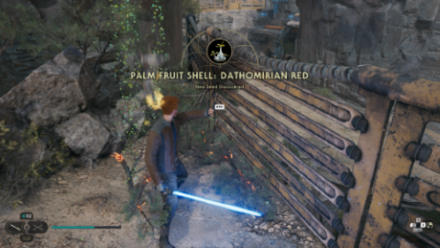 |
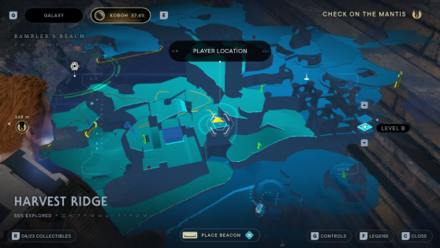 |
|
Collectible: Palm Fruit Shell Area: Harvest Ridge Where to Find: Found at the left side of the entrace to the red barn |
|
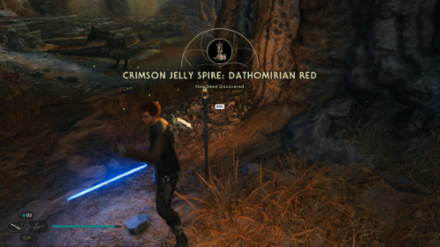 |
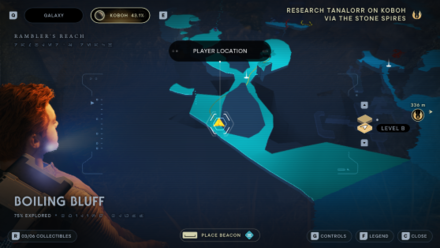 |
|
Collectible: Crimson Jelly Spire Area: Boiling Bluff Where to Find: Found near the Boiling Bluff Meditation point next to a yellow lamp post |
|
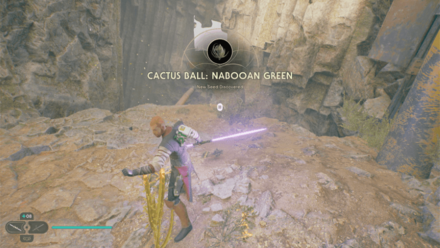 |
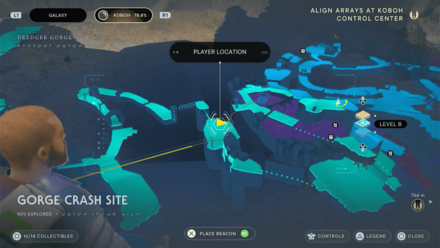 |
|
Collectible: Cactus Ball Area: Gorge Crash Site Where to Find: Take the zip down near the tar pit and you'll find the Seed next to the cliff. |
|
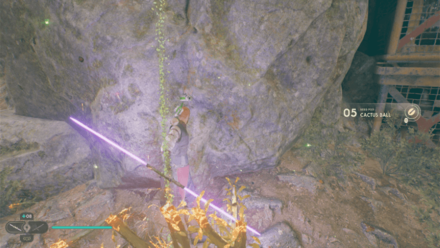 |
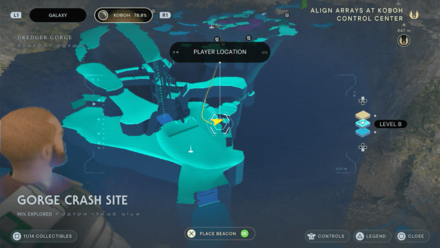 |
|
Collectible: Cactus Ball Area: Gorge Crash Site Where to Find: Found just near the Meditation Point below the cliff with a chest on top. |
|
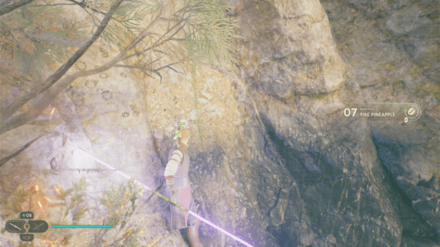 |
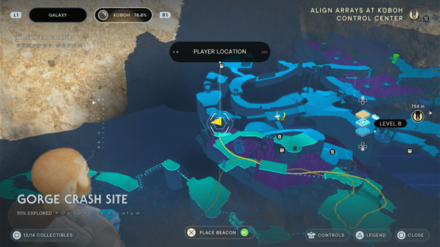 |
|
Collectible: Fire Pineapple Area: Gorge Crash Site Where to Find: Found at the edge of the tar pit behind the droid. |
|
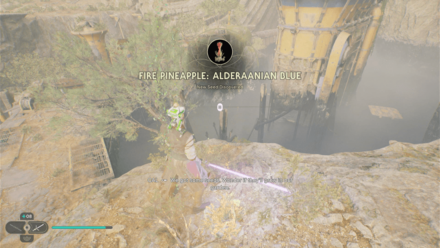 |
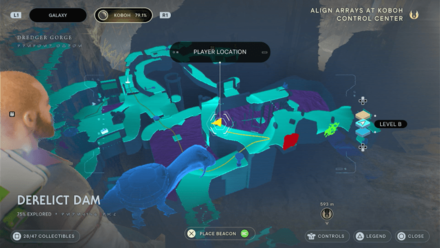 |
|
Collectible: Fire Pineapple Area: Derelict Dam Where to Find: Head past the dam until you reach the large friendly creature on the right. Take a left and use Lift and Slam on the platform to climb up. You'll find the Seed on your left at the edge of the cliff. |
|
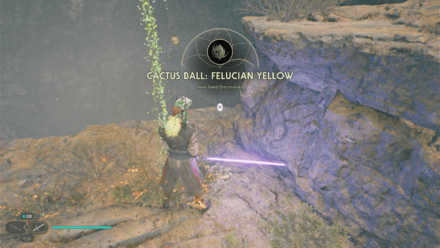 |
 |
|
Collectible: Cactus Ball Area: Derelict Dam Where to Find: Drop down the vines on the edge and follow the path forward. You'll find the Seed just before the rope by the huge gap. |
|
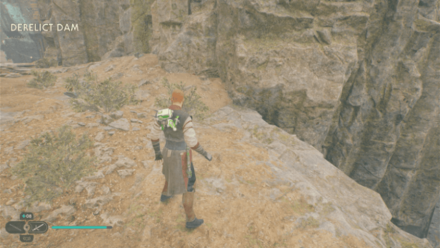 |
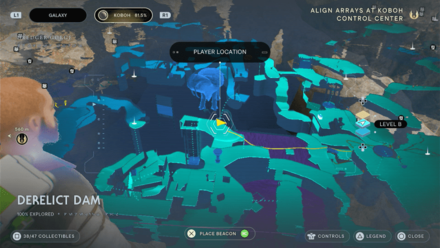 |
|
Collectible: Fire Pineapple Area: Derelict Dam Where to Find: Head past the dam and you'll find the Seed near the large friendly creature. |
|
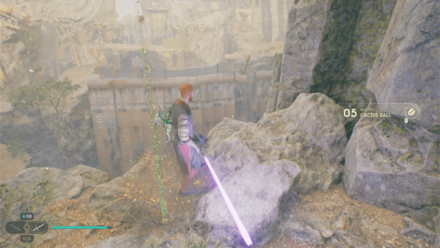 |
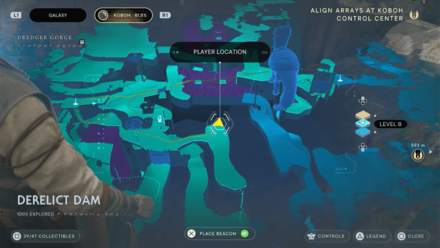 |
|
Collectible: Cactus Ball Area: Derelict Dam Where to Find: Once you've blown a hole in the cave, lure the Roller Mine towards the road to the right past the broken elevator and throw it to the tarred wall below. Follow the path, climb the rope, and walk forward a bit. You'll find the Seed infront at the edge of the cliff. |
|
 |
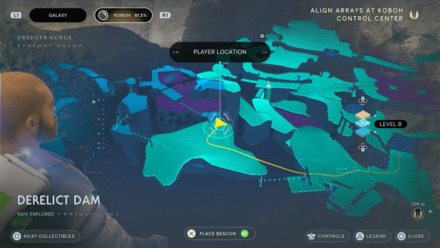 |
|
Collectible: Fire Pineapple Area: Derelict Dam Where to Find: After defeating the Gorocco Matriarch, head past the balloons and you'll find the Seed at the area above on your right. |
|
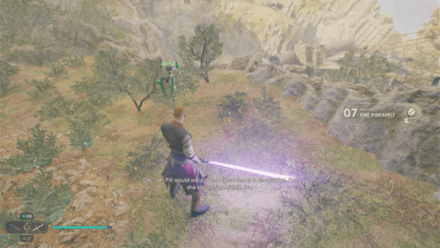 |
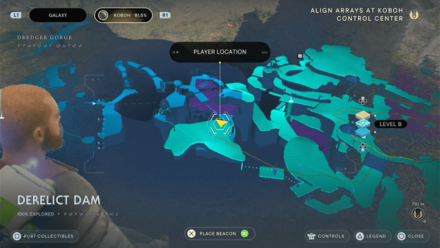 |
|
Collectible: Fire Pineapple Area: Derelict Dam Where to Find: After defeating the Gorocco Matriarch, head past the balloons and you'll find the Seed at the area above on your right. |
|
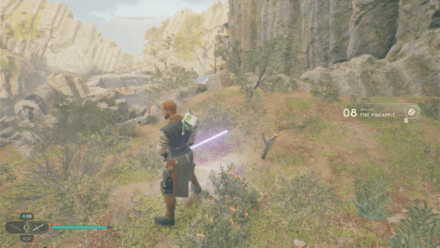 |
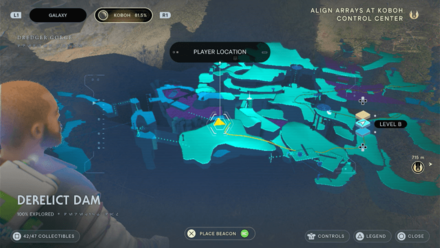 |
|
Collectible: Fire Pineapple Area: Derelict Dam Where to Find: After defeating the Gorocco Matriarch, head past the balloons and you'll find the Seed at the area above on your right. |
|
 |
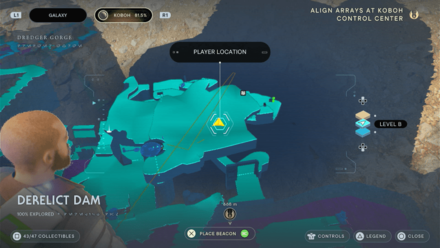 |
|
Collectible: Fire Pineapple Area: Derelict Dam Where to Find: Take the giant bird at Boiling Bluff, and you'll find the Seed on your right by a bush. |
|
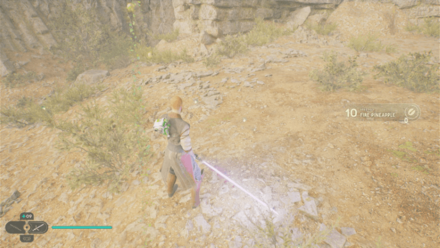 |
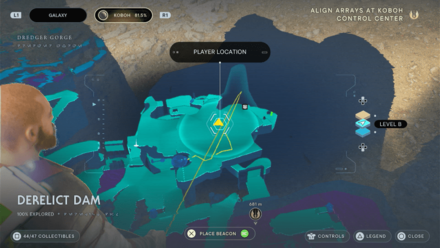 |
|
Collectible: Fire Pineapple Area: Derelict Dam Where to Find: Take the giant bird at Boiling Bluff, and you'll find the Seed at the center next to a rock. |
|
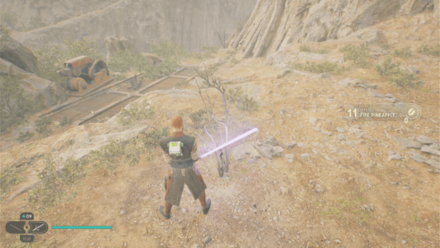 |
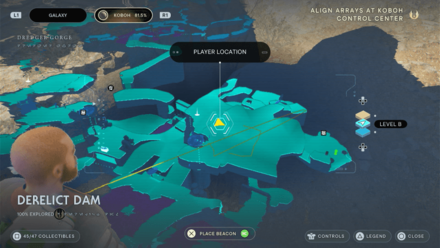 |
|
Collectible: Fire Pineapple Area: Derelict Dam Where to Find: Take the giant bird at Boiling Bluff, and you'll find the Seed on the right by the ledge. |
|
 |
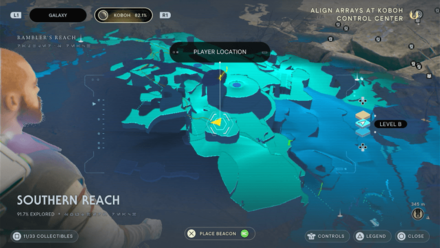 |
|
Collectible: Tuber Maw Area: Southern Reach Where to Find: Head inside the cave to the east and once you've found the rope, swing across to the nearby rock. You'll find the Seed on top. |
|
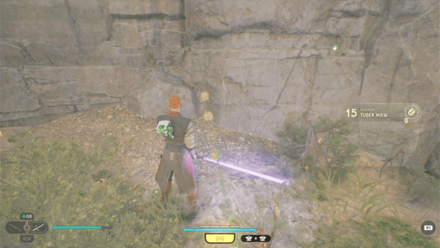 |
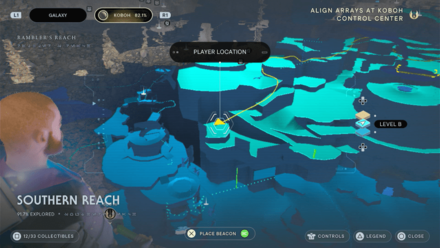 |
|
Collectible: Tuber Maw Area: Southern Reach Where to Find: Head inside the cave to the east and in the area with some Boglings, drop down to your left on two BX Droids and you'll find the Seed nearby. |
|
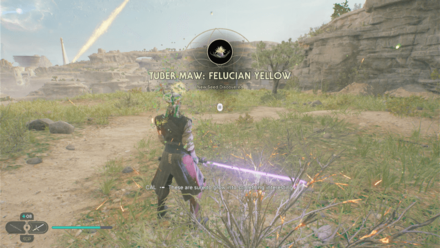 |
 |
|
Collectible: Tuber Maw Area: Southern Reach Where to Find: Head past the underpass to the east and you'll find the Seed out in the open. |
|
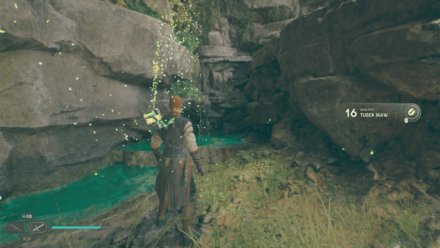 |
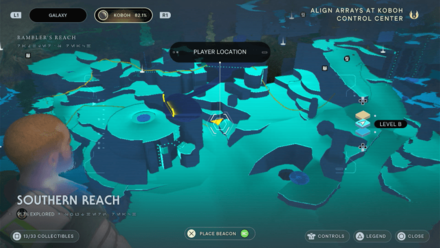 |
|
Collectible: Tuber Maw Area: Southern Reach Where to Find: Head towards the underpass to the east and you'll find the Seed on your right by a small pond. |
|
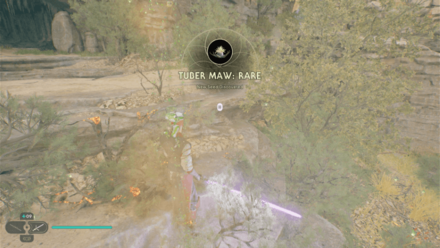 |
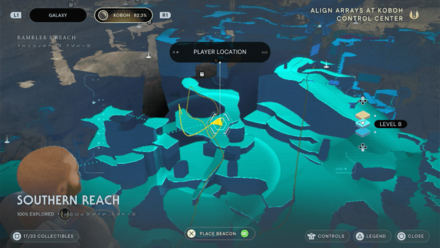 |
|
Collectible: Tuber Maw Area: Southern Reach Where to Find: From the roof of the silo, turn around and climb the cascading rocks until you reach a small cave entrance with a hole infront. You'll find the Seed nearby. |
|
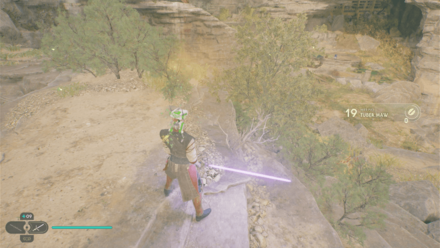 |
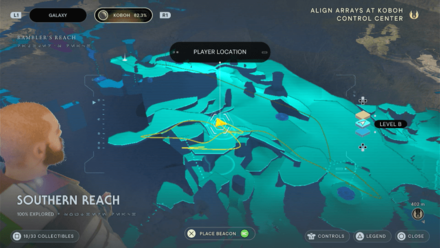 |
|
Collectible: Tuber Maw Area: Southern Reach Where to Find: From the roof of the silo, turn around and climb the cascading rocks until you reach a small cave entrance with a hole infront. You'll find the Seed nearby. |
|
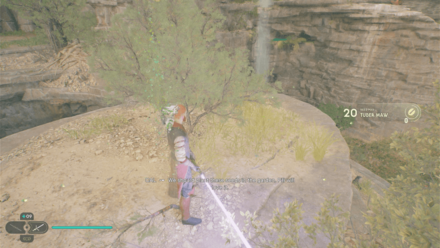 |
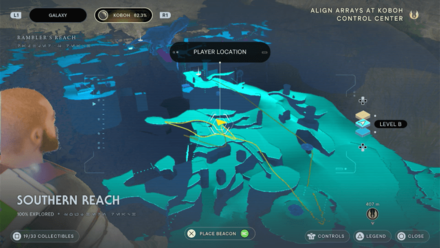 |
|
Collectible: Tuber Maw Area: Southern Reach Where to Find: From the roof of the silo, turn around and climb the cascading rocks until you reach a small cave entrance with a hole infront. You'll find the Seed nearby. |
|
 |
 |
|
Collectible: Tuber Maw Area: Southern Reach Where to Find: From the roof of the silo, turn around and climb the cascading rocks until you reach a small cave entrance with a hole infront. You'll find the Seed nearby. |
|
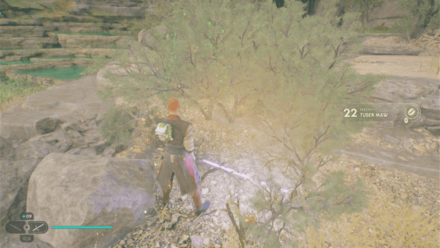 |
 |
|
Collectible: Tuber Maw Area: Southern Reach Where to Find: From the roof of the silo, turn around and climb the cascading rocks until you reach a small cave entrance with a hole infront. You'll find the Seed nearby. |
|
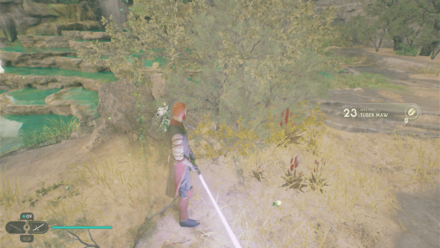 |
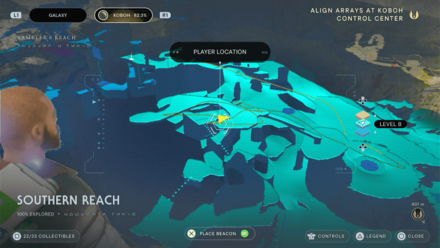 |
|
Collectible: Tuber Maw Area: Southern Reach Where to Find: From the roof of the silo, turn around and climb the cascading rocks until you reach a small cave entrance with a hole infront. You'll find the Seed nearby. |
|
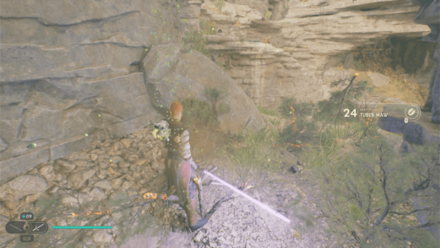 |
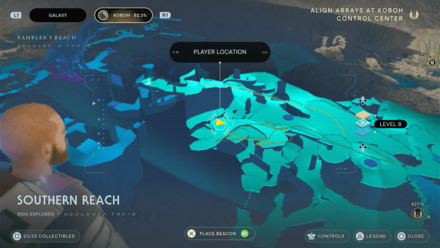 |
|
Collectible: Tuber Maw Area: Southern Reach Where to Find: From the roof of the silo, turn around and climb the cascading rocks until you reach a small cave entrance with a hole infront. You'll find the Seed nearby. |
|
 |
 |
|
Collectible: Tuber Maw Area: Southern Reach Where to Find: From the roof of the silo, turn around and climb the cascading rocks until you reach a small cave entrance with a hole infront. You'll find the Seed nearby. |
|
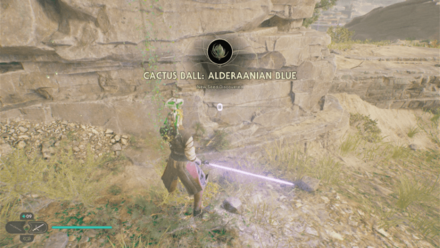 |
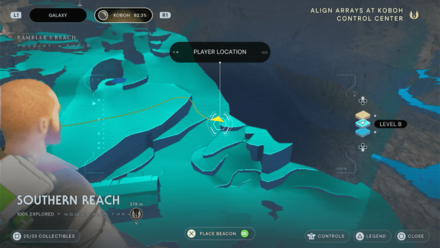 |
|
Collectible: Cactus Ball Area: Southern Reach Where to Find: From the Meditation Point, follow the path down and you'll find the Seed on your left by a bush. |
|
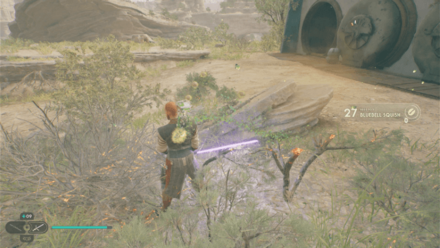 |
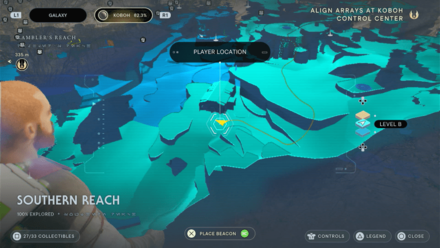 |
|
Collectible: Bluebell Squish Area: Southern Reach Where to Find: From the Meditation Point, follow the path down and you'll find the Seed on your left infront of a building. |
|
 |
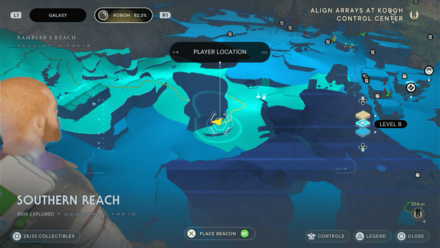 |
|
Collectible: Spine Fluff Area: Southern Reach Where to Find: From the Rambler's Reach Outpost Meditation Point, head towards the rocky archway and you'll find the Seed by the ponds. |
|
 |
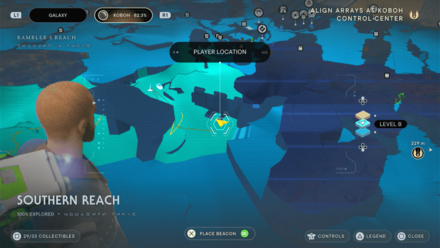 |
|
Collectible: Spine Fluff Area: Southern Reach Where to Find: From the Rambler's Reach Outpost Meditation Point, head towards the nearby lake and you'll find the Seed next to the sewers. |
|
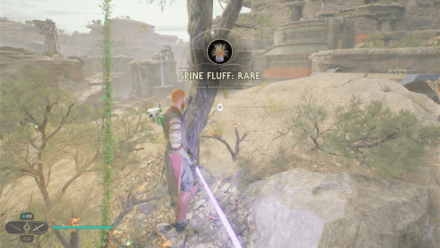 |
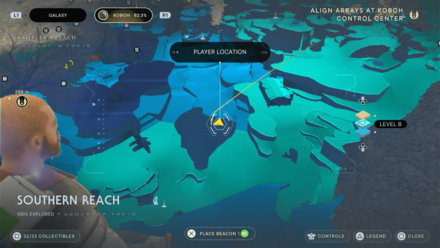 |
|
Collectible: Spine Fluff Area: Southern Reach Where to Find: From the Southern Reach Meditation Point, take the nearby Reltor and fly towards the large rock beside the Rambler's Reach Outpost Meditation Point. You'll find the Seed on top. |
|
 |
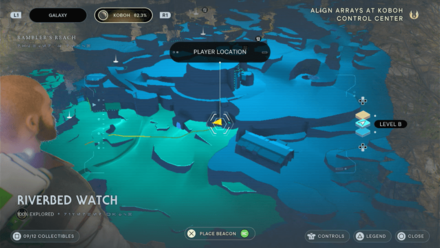 |
|
Collectible: Tuber Maw Area: Riverbed Watch Where to Find: Head past the door and you'll find the Seed on your left by the bushes. |
|
 |
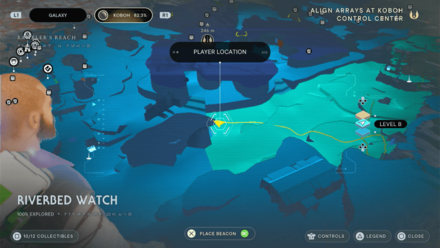 |
|
Collectible: Spine Fluff Area: Riverbed Watch Where to Find: Found by the edge of the river near the sewers. |
|
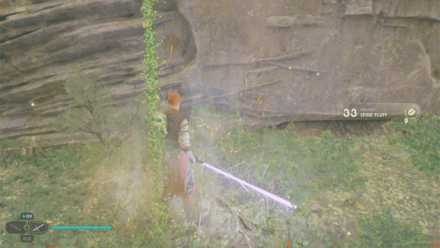 |
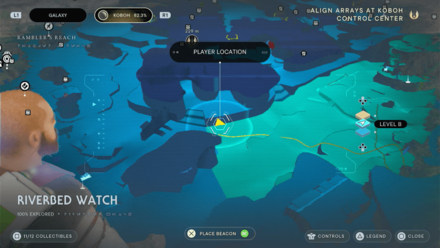 |
|
Collectible: Spine Fluff Area: Riverbed Watch Where to Find: Found by the edge of the river near the sewers. |
|
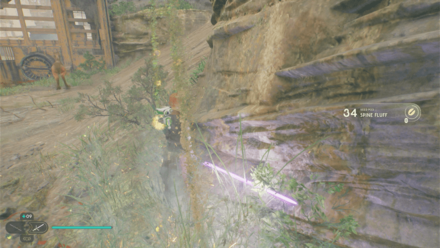 |
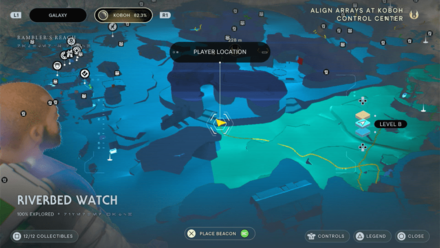 |
|
Collectible: Spine Fluff Area: Riverbed Watch Where to Find: Found by the edge of the river near the sewers. |
|
 |
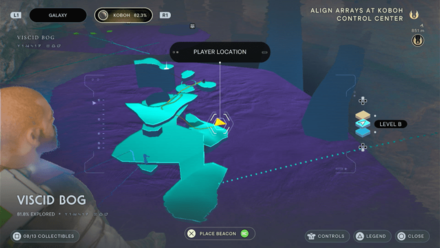 |
|
Collectible: Crimson Jelly Spire Area: Viscid Bog Where to Find: Head for the island behind the Meditation Point and you'll find the Seed on a lower platform by the edge of the lava. |
|
 |
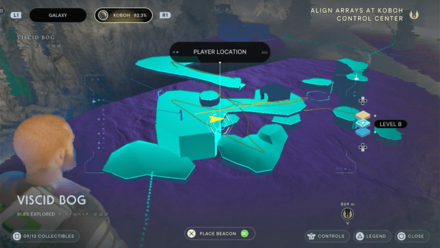 |
|
Collectible: Crimson Jelly Spire Area: Viscid Bog Where to Find: Head for the island behind the Meditation Point and move to the other end. You'll find the Seed on your left near the brazier. |
|
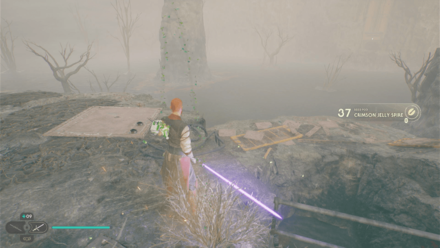 |
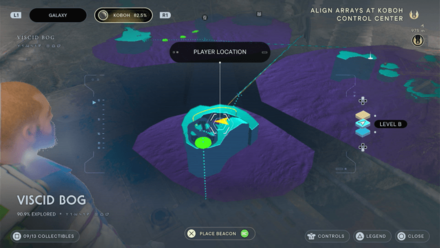 |
|
Collectible: Crimson Jelly Spire Area: Viscid Bog Where to Find: Found just infront of the Chamber of Connection entrance. |
|
 |
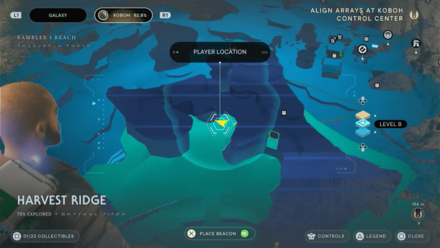 |
|
Collectible: Palm Fruit Shell Area: Harvest Ridge Where to Find: From the Rambler's Reach Outpost Meditation Point, head towards Harvest Ridge and you'll find the Seed under the large rock formation. |
|
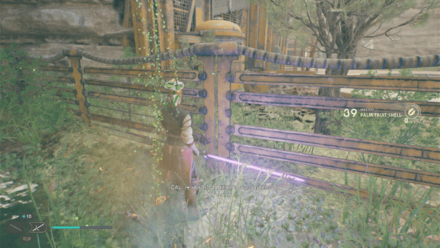 |
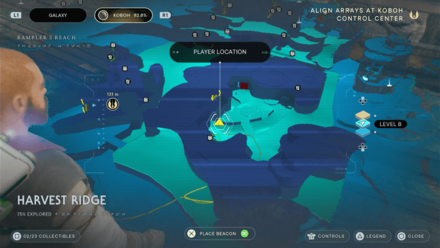 |
|
Collectible: Palm Fruit Shell Area: Harvest Ridge Where to Find: Head towards the center area and you'll find the Seed by the river. |
|
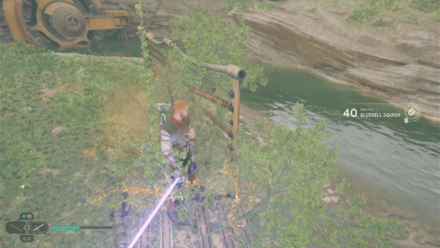 |
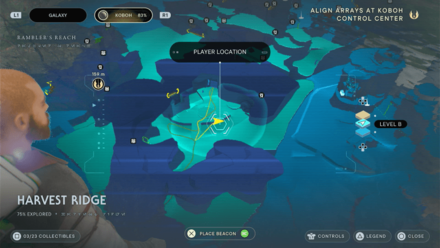 |
|
Collectible: Bluebell Squish Area: Harvest Ridge Where to Find: Head towards the center area and you'll find the Seed by the river next to a broken fence. |
|
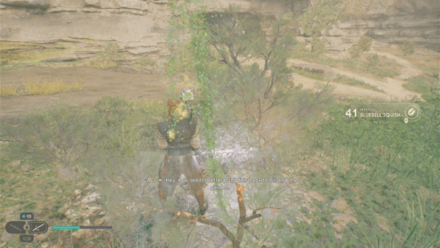 |
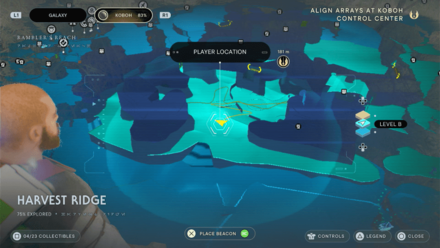 |
|
Collectible: Bluebell Squish Area: Harvest Ridge Where to Find: Head towards the center area and you'll find the Seed on your right before the river by the bushes. |
|
 |
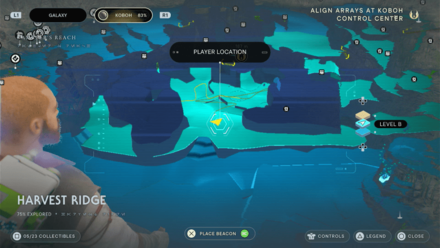 |
|
Collectible: Palm Fruit Shell Area: Harvest Ridge Where to Find: Head towards the center area and you'll find the Seed on your right before the river by the bushes. |
|
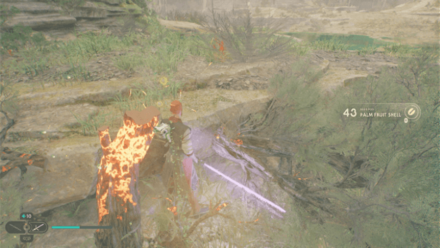 |
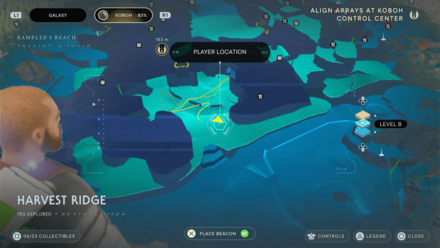 |
|
Collectible: Palm Fruit Shell Area: Harvest Ridge Where to Find: Head towards the center area and you'll find the Seed on your right before the river by the bushes. |
|
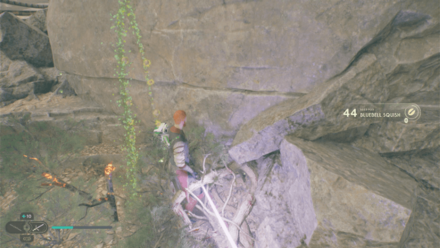 |
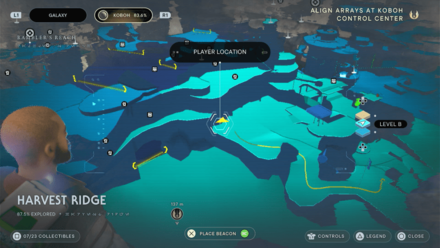 |
|
Collectible: Bluebell Squish Area: Harvest Ridge Where to Find: From the Moldy Depths exit, follow the path to your right and you'll find the Seed next to a pole near the fences. |
|
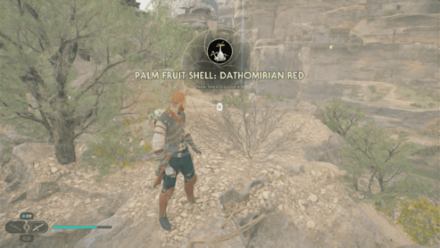 |
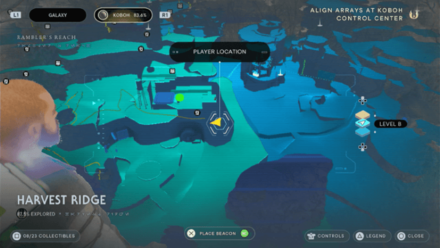 |
|
Collectible: Palm Fruit Shell Area: Harvest Ridge Where to Find: Found just beside the red barn by a ledge. |
|
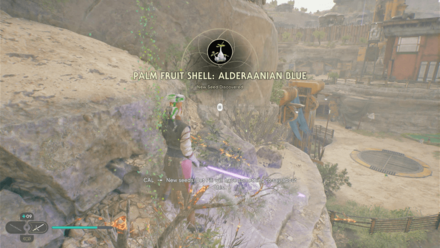 |
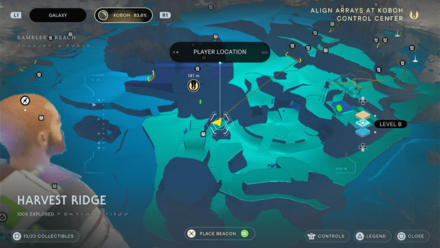 |
|
Collectible: Palm Fruit Shell Area: Harvest Ridge Where to Find: From the Meditation Point, take the Reltor and fly towards the large rock on the right. You'll find the Seed by the edge of the rock. |
|
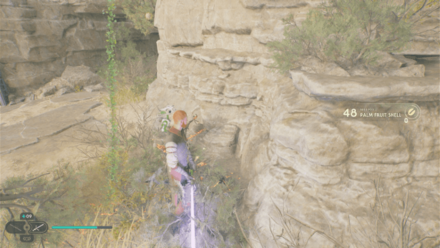 |
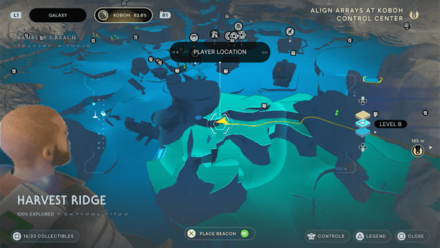 |
|
Collectible: Palm Fruit Shell Area: Harvest Ridge Where to Find: From the Meditation Point, take the Reltor and fly towards the large rock on the right. You'll find the Seed near the walls you can run on. |
|
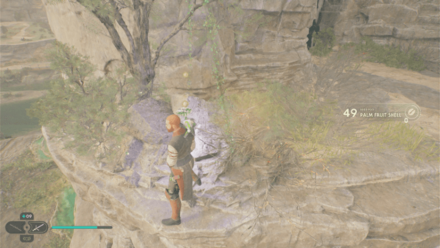 |
 |
|
Collectible: Palm Fruit Shell Area: Harvest Ridge Where to Find: From the Meditation Point, take the Reltor and fly towards the large rock on the right. You'll find the Seed near the walls you can run on. |
|
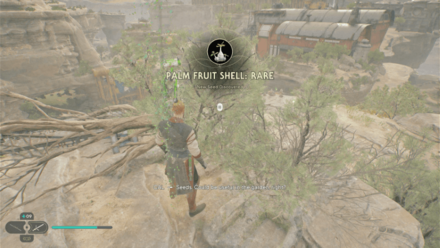 |
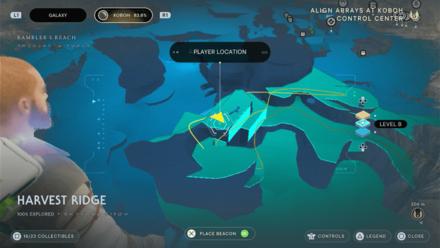 |
|
Collectible: Palm Fruit Shell Area: Harvest Ridge Where to Find: From the Meditation Point, take the Reltor and fly towards the large rock on the right. You'll find the Seed on top of the walls you can run on. |
|
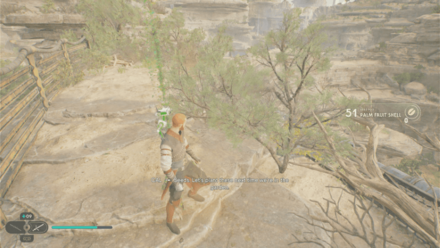 |
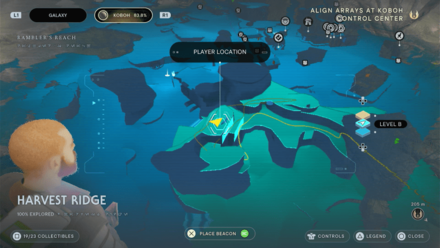 |
|
Collectible: Palm Fruit Shell Area: Harvest Ridge Where to Find: From the Meditation Point, take the Reltor and fly towards the large rock on the right. You'll find the Seed on top of the walls you can run on. |
|
 |
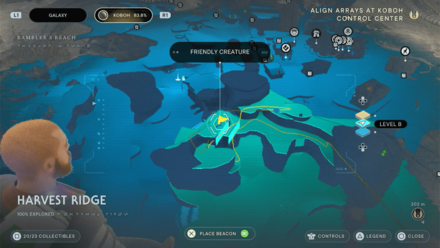 |
|
Collectible: Palm Fruit Shell Area: Harvest Ridge Where to Find: From the Meditation Point, take the Reltor and fly towards the large rock on the right. You'll find the Seed on top of the walls you can run on. |
|
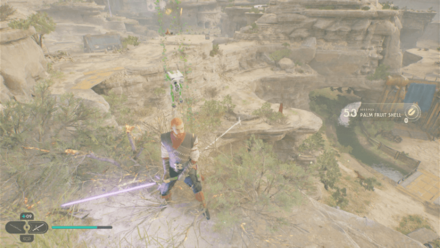 |
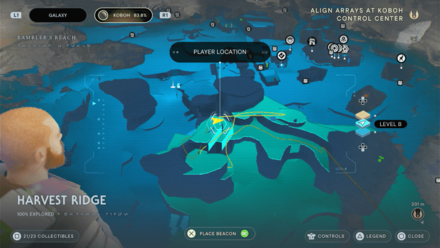 |
|
Collectible: Palm Fruit Shell Area: Harvest Ridge Where to Find: From the Meditation Point, take the Reltor and fly towards the large rock on the right. You'll find the Seed on top of the walls you can run on. |
|
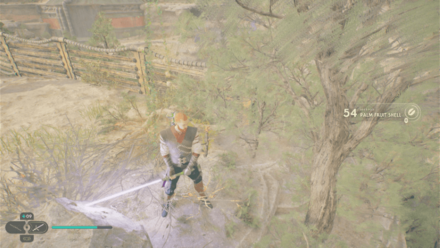 |
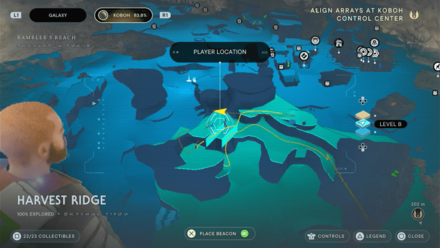 |
|
Collectible: Palm Fruit Shell Area: Harvest Ridge Where to Find: From the Meditation Point, take the Reltor and fly towards the large rock on the right. You'll find the Seed on top of the walls you can run on. |
|
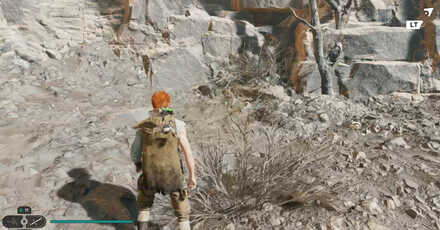 |
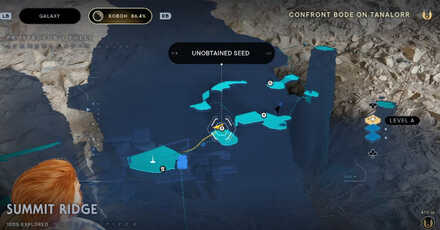 |
|
Collectible: Koboh Spiker Area: Summit Ridge Where to Find: From the Summit Ridge meditation point, use the upgraded ascension cable to zip across the platform ahead. The plant should be on the left as you land. |
|
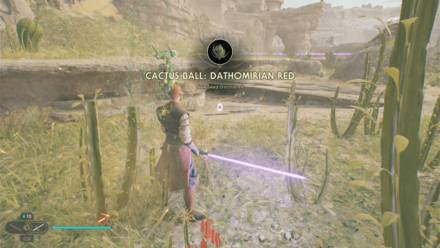 |
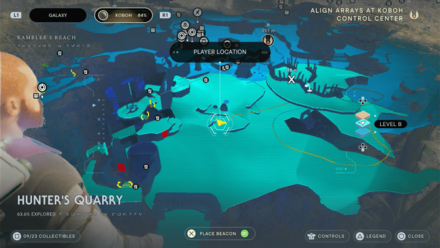 |
|
Collectible: Cactus Ball Area: Hunter's Quarry Where to Find: Found at the center of the map area. |
|
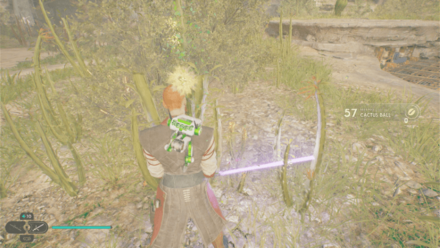 |
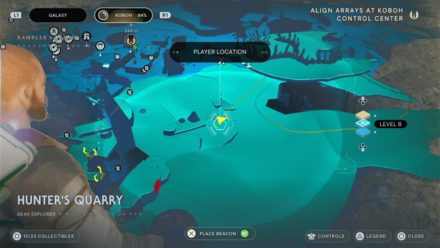 |
|
Collectible: Cactus Ball Area: Hunter's Quarry Where to Find: Found at the center of the map area. |
|
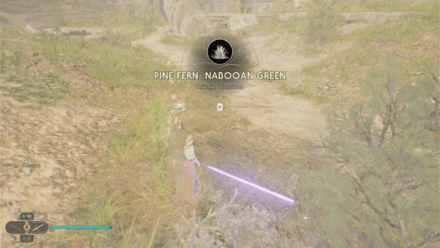 |
 |
|
Collectible: Pine Fern Area: Hunter's Quarry Where to Find: Found near the entrance to the cave on the east side of the area. |
|
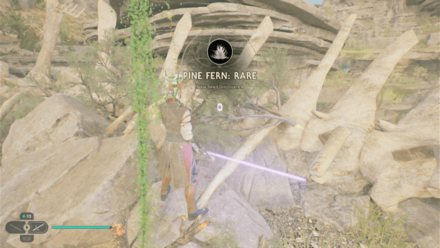 |
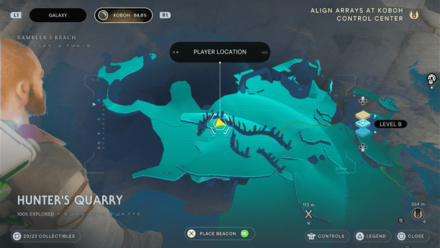 |
|
Collectible: Pine Fern Area: Hunter's Quarry Where to Find: From the area above the ruins, take the balloons back and across towards the large bones. You'll find the Seed just by the head. |
|
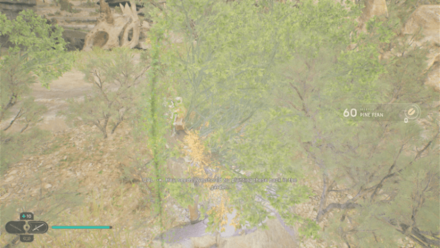 |
 |
|
Collectible: Pine Fern Area: Hunter's Quarry Where to Find: From the area above the ruins, take the balloons back and across towards the large bones. You'll find the Seed nearby. |
|
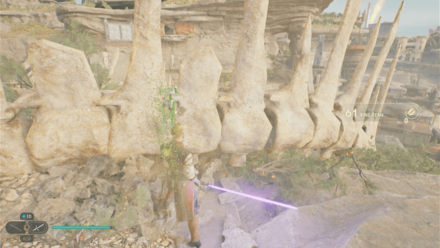 |
 |
|
Collectible: Pine Fern Area: Hunter's Quarry Where to Find: From the area above the ruins, take the balloons back and across towards the large bones. You'll find the Seed nearby. |
|
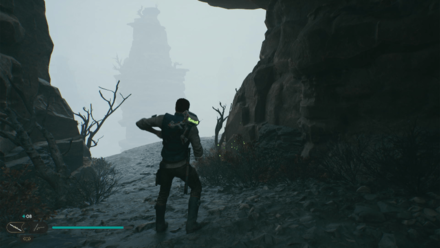 |
 |
|
Collectible: Koboh Spiker Area: Fogged Expanse Where to Find: Found near the outdoor elevator along with 5 other Koboh Spiker seeds. |
|
 |
 |
|
Collectible: Koboh Spiker Area: Fogged Expanse Where to Find: 3 Koboh Spikers along with a Priorite Shard can be found after jumping from the balloon. |
|
 |
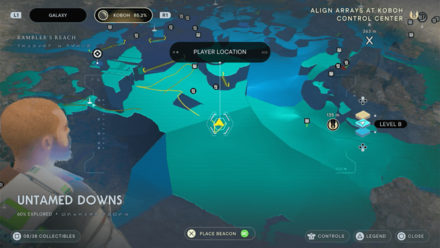 |
|
Collectible: Bluebell Squish Area: Untamed Downs Where to Find: Found in the middle of the area. |
|
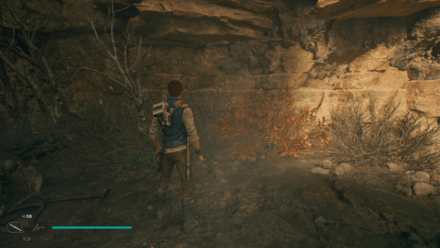 |
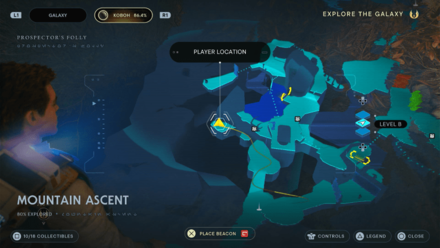 |
|
Collectible: Koboh Spiker Area: Mountain Ascent Where to Find: From the Meditation Point, head left. Jump towards the falls to the left and to the next platform to find the seed. |
|
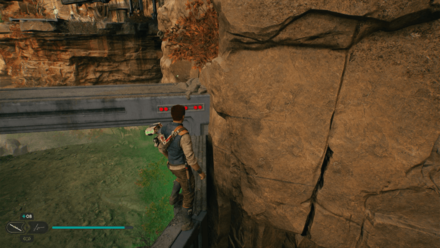 |
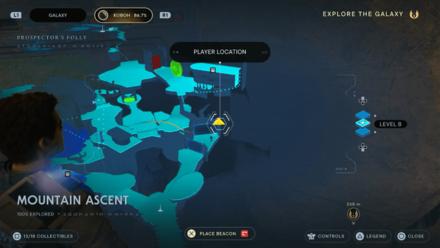 |
|
Collectible: Koboh Spiker Area: Mountain Ascent Where to Find: Find a way to walk above the green laser gates. |
|
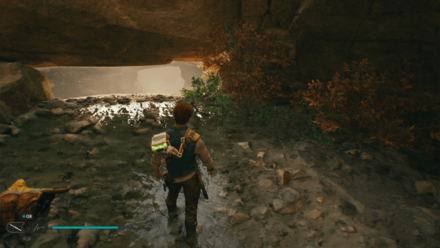 |
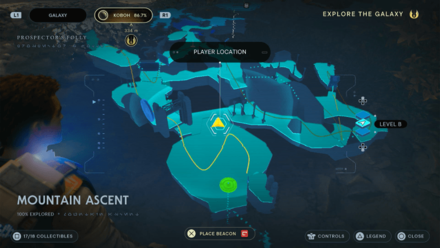 |
|
Collectible: Koboh Spiker Area: Mountain Ascent Where to Find: Found In the area where you have to fight two Bilemaws. |
|
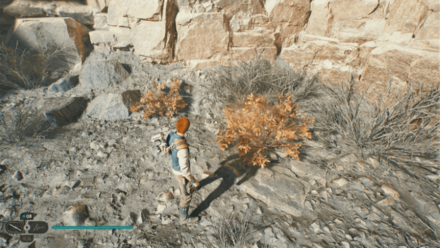 |
 |
|
Collectible: Koboh Spiker Area: Summit Ridge Where to Find: At the opposite end from the balloon you can force pull. |
|
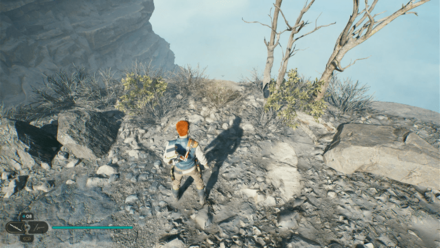 |
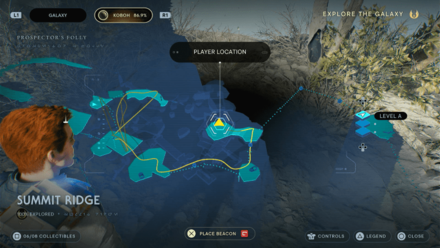 |
|
Collectible: Koboh Spiker Area: Summit Ridge Where to Find: Found in the area you can reach by force pulling a balloon twice. |
|
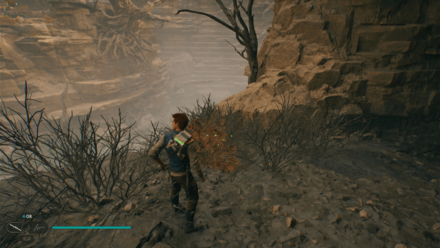 |
 |
|
Collectible: Koboh Spiker Area: Foothill Falls Where to Find: From the falls, ride the Relter to the next area. The seed can be found on the edge of the cliff with the second seed found on the opposite side of the shack. |
|
 |
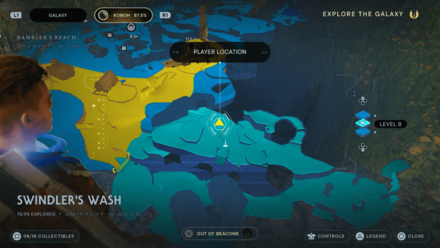 |
|
Collectible: Goldenlight Moss Area: Swindler's Wash Where to Find: From the Meditation Point, approach the nearby gate. A second seed can be found by the water. |
|
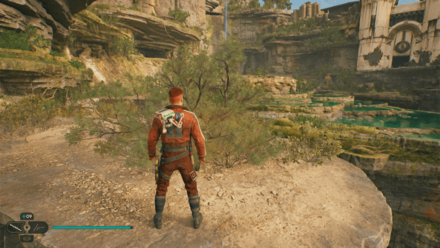 |
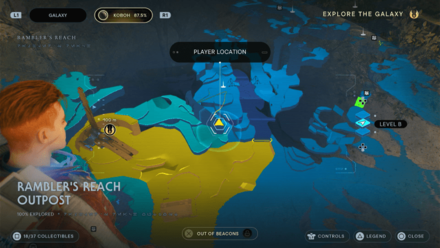 |
|
Collectible: Goldenlight Moss Area: Swindler's Wash Where to Find: Found across the ponds. |
|
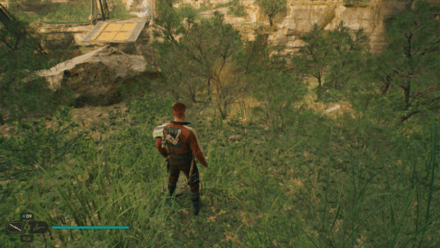 |
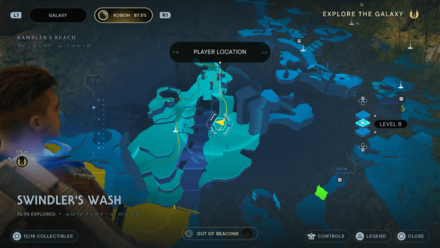 |
|
Collectible: Goldenlight Moss Area: Swindler's Wash Where to Find: From the Meditation point, cross the broken bridge and look the left. |
|
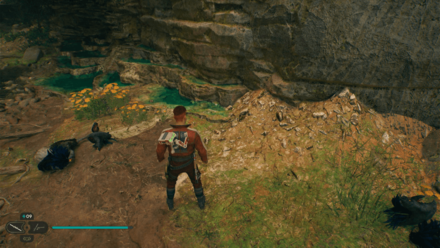 |
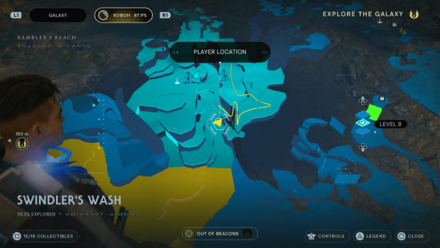 |
|
Collectible: Spine Fluff Area: Swindler's Wash Where to Find: From the Meditation point, drop in between the broken bridge and head to the right. A second seed can be found nearby under the bridge. |
|
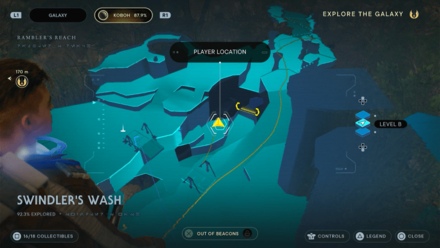 |
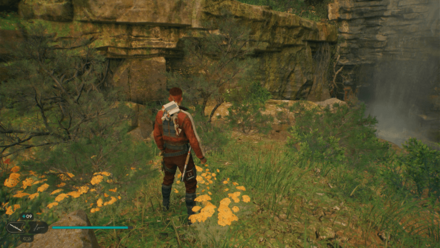 |
|
Collectible: Spine Fluff Area: Swindler's Wash Where to Find: From the Meditation point, drop in between the broken bridge and head to the left. |
|
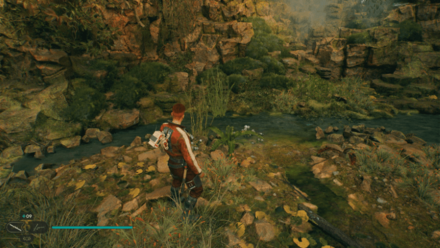 |
 |
|
Collectible: Goldenlight Moss Area: Basalt Rift Where to Find: At the end of the first zipline you'll encounter from the entrance of the Basalt Rift. |
|
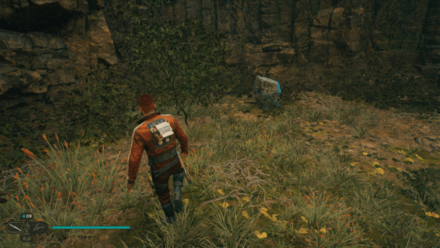 |
 |
|
Collectible: Goldenlight Moss Area: Basalt Rift Where to Find: 2 seeds can be found at a low level of the area where you'll find a Bilemaw sleeping. |
|
 |
 |
|
Collectible: Bluebell Squish Area: Bygone Settlement Where to Find: Found near a Mogu. |
|
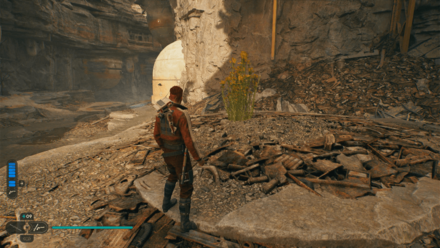 |
 |
|
Collectible: Spine Fluff Area: Bygone Settlement Where to Find: Found on an elevated ground that you'll need a Nekko to reach. |
|
 |
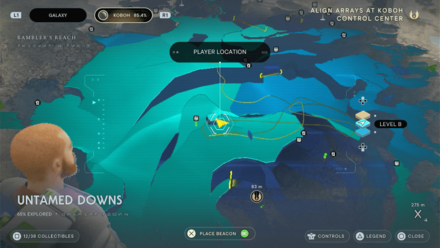 |
|
Collectible: Bluebell Squish Area: Untamed Downs Where to Find: From the crashed ship, climb up and cross towards the area above. Move forward and climb up some more and you'll find the Seed by the edge of the cliff. |
|
|
|
|
Collectible: Bluebell Squish Area: Untamed Downs Where to Find: From the crashed ship, climb up and cross towards the area above. Move forward and climb up some more and you'll find the Seed by the edge of the cliff. |
|
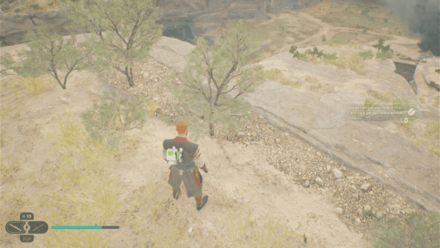 |
|
|
Collectible: Bluebell Squish Area: Untamed Downs Where to Find: From the crashed ship, climb up and cross towards the area above. Move forward and climb up some more and you'll find the Seed by the edge of the cliff. |
|
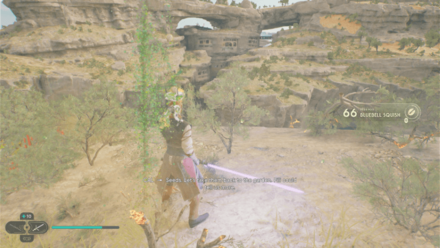 |
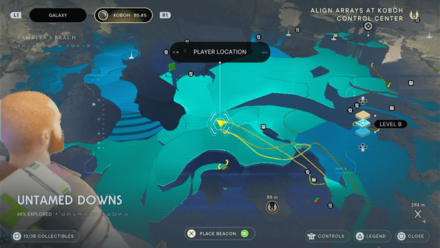 |
|
Collectible: Bluebell Squish Area: Untamed Downs Where to Find: From the crashed ship, climb up and cross towards the area above. Move forward and climb up some more and you'll find the Seed by the edge of the cliff. |
|
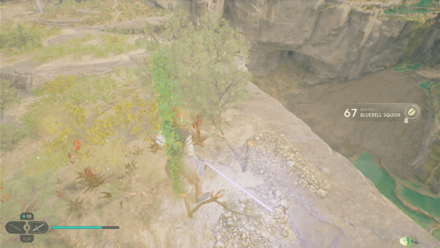 |
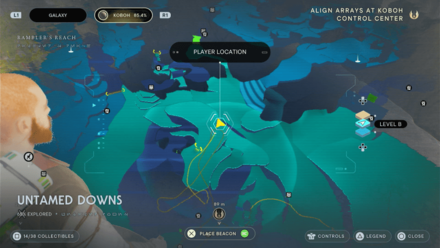 |
|
Collectible: Bluebell Squish Area: Untamed Downs Where to Find: From the crashed ship, climb up and cross towards the area above. Move forward and climb up some more and you'll find the Seed by the edge of the cliff. |
|
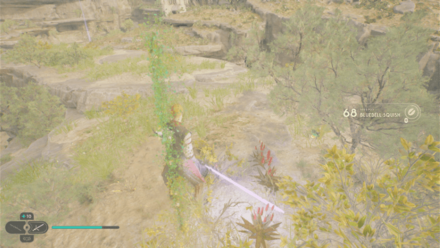 |
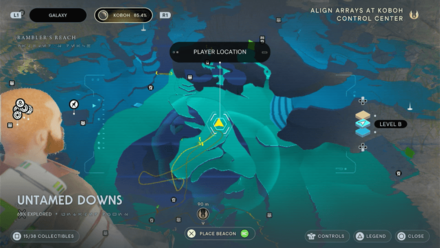 |
|
Collectible: Bluebell Squish Area: Untamed Downs Where to Find: From the crashed ship, climb up and cross towards the area above. Move forward and climb up some more and you'll find the Seed by the edge of the cliff. |
|
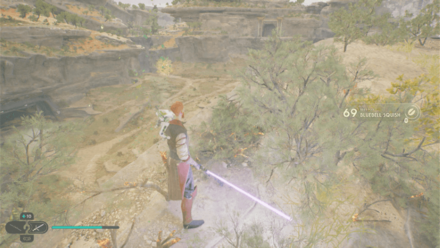 |
 |
|
Collectible: Bluebell Squish Area: Untamed Downs Where to Find: From the crashed ship, climb up and cross towards the area above. Move forward and climb up some more and you'll find the Seed by the edge of the cliff. |
|
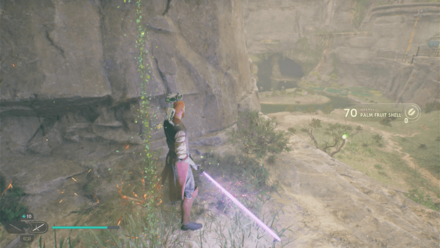 |
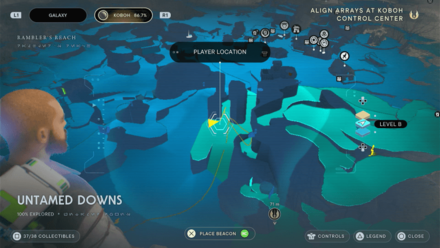 |
|
Collectible: Palm Fruit Shell Area: Untamed Downs Where to Find: On a cliff in Untamed Downs, overlooking Harvest Ridge. |
|
 |
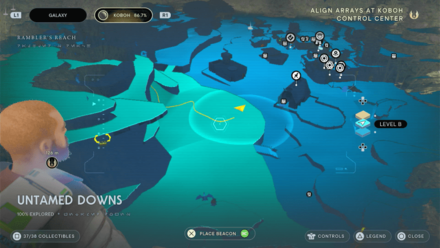 |
|
Collectible: Spine Fluff Area: Untamed Downs Where to Find: Past the river just across the stables. |
|
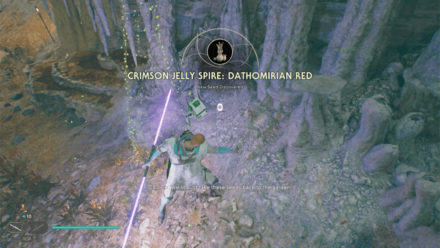 |
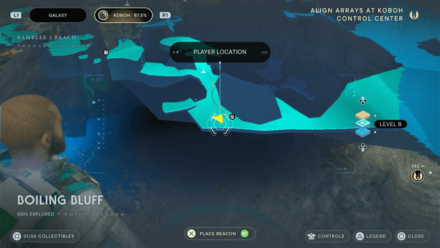 |
|
Collectible: Crimson Jelly Spire Area: Boiling Bluff Where to Find: From the Meditation Point, circle around the back and you'll find the Seed on the side across a Force Echo. |
|
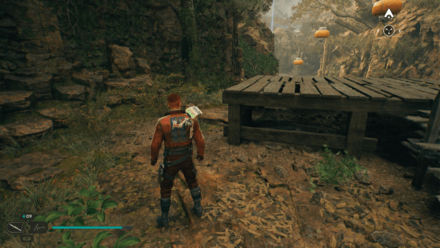 |
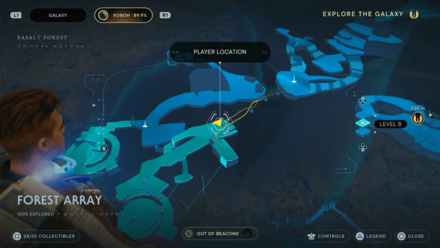 |
|
Collectible: Goldenlight Moss Area: Forest Array Where to Find: From the Nekko Pools Meditation Point, use the nearby balloons to reach the Forest Array section with the seed. |
|
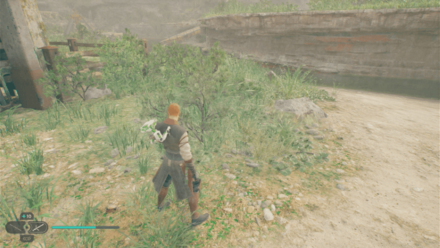 |
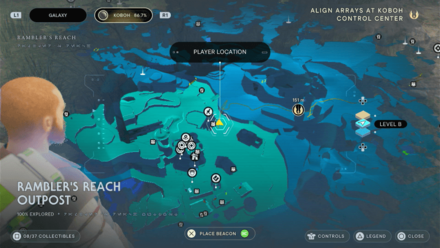 |
|
Collectible: Bluebell Squish Area: Rambler's Reach Outpost Where to Find: Found just beside the Stables. |
|
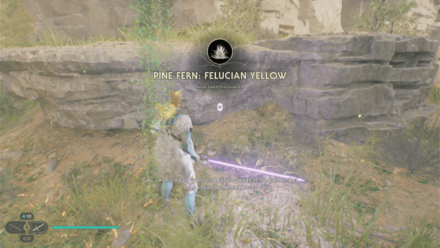 |
 |
|
Collectible: Pine Fern Area: Rambler's Reach Outpost Where to Find: Found just behind a building next to a ledge. |
|
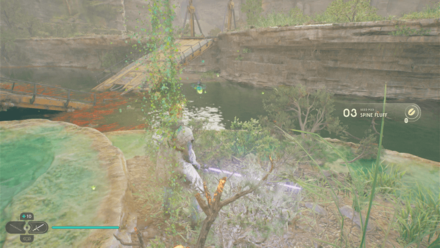 |
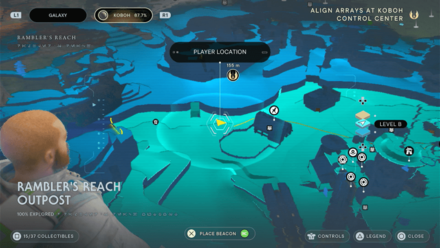 |
|
Collectible: Spine Fluff Area: Rambler's Reach Outpost Where to Find: Found by the river behind the Stables. |
|
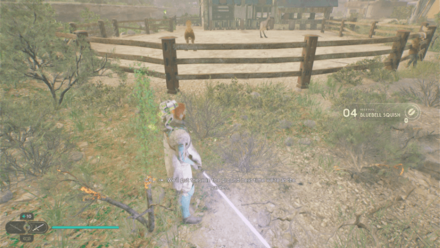 |
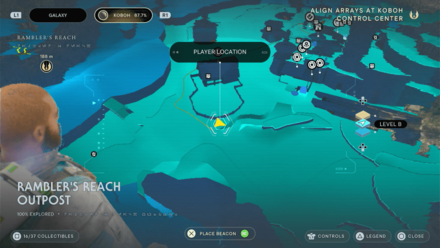 |
|
Collectible: Bluebell Squish Area: Rambler's Reach Outpost Where to Find: Found just outside the Stables by the fences. |
|
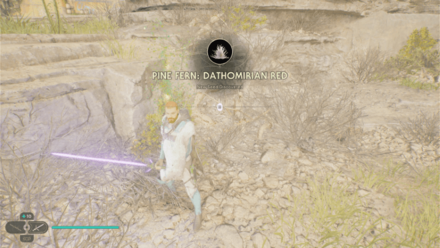 |
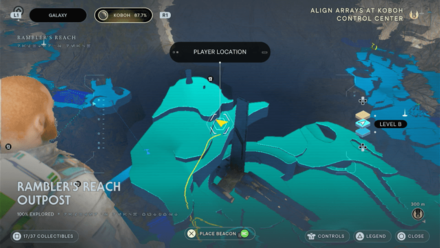 |
|
Collectible: Pine Fern Area: Rambler's Reach Outpost Where to Find: Found on the area above the Mantis just behind it. |
|
 |
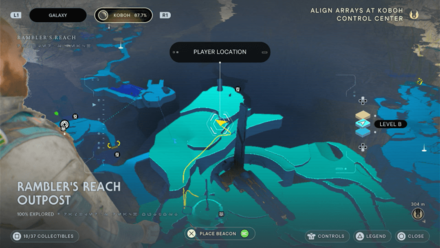 |
|
Collectible: Pine Fern Area: Rambler's Reach Outpost Where to Find: Found on the area above the Mantis just behind it. |
|
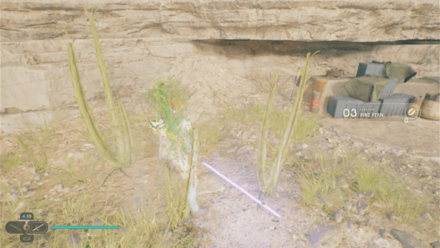 |
 |
|
Collectible: Pine Fern Area: Rambler's Reach Outpost Where to Find: Found on the area above the Mantis just behind it. |
|
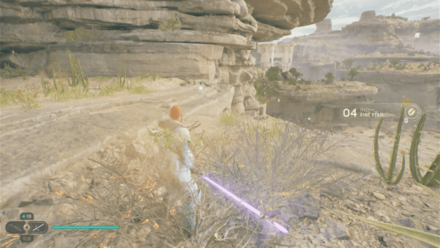 |
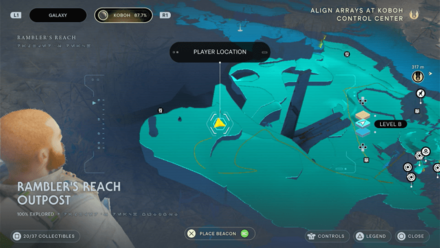 |
|
Collectible: Pine Fern Area: Rambler's Reach Outpost Where to Find: Found on the area above the Mantis just behind it. |
|
 |
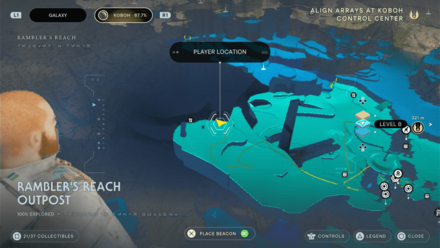 |
|
Collectible: Pine Fern Area: Rambler's Reach Outpost Where to Find: Found on the area above the Mantis just behind it. |
|
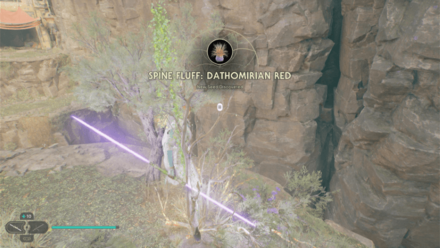 |
 |
|
Collectible: Spine Fluff Area: Devastated Settlement Where to Find: From the Grand Courtyard Meditation Point, turn around and take the Reltor to the island on your right with a lake in the middle. You'll find the Seed nearby by the edge. |
|
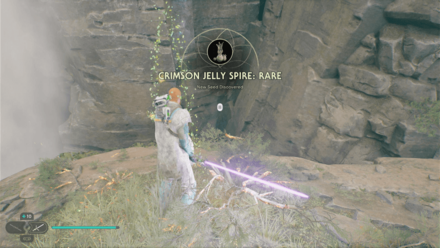 |
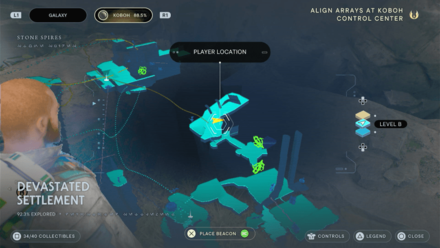 |
|
Collectible: Crimson Jelly Spire Area: Devastated Settlement Where to Find: From the Grand Courtyard, take the Reltor at the top of the building and head for the island on the left. You'll find the Seed nearby. |
|
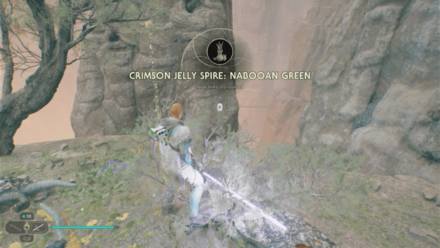 |
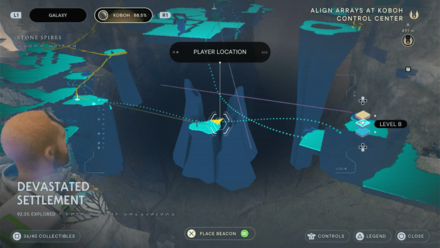 |
|
Collectible: Crimson Jelly Spire Area: Devastated Settlement Where to Find: From the Meditation Point, head towards the island infront and you'll find the Seed by the edge. |
|
Fish
| World View | Map View |
|---|---|
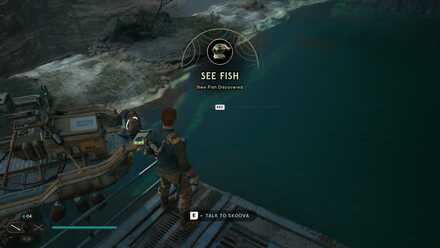 |
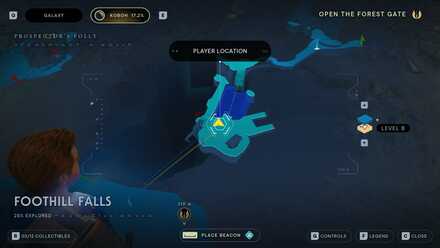 |
| Details | |
| Fish Name: See Fish Location: Foothill Falls How to Get: Go back and speak to Skoova right where you first met him in Footthill Falls |
|
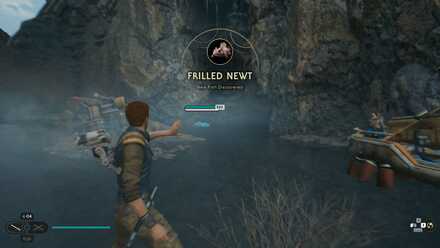 |
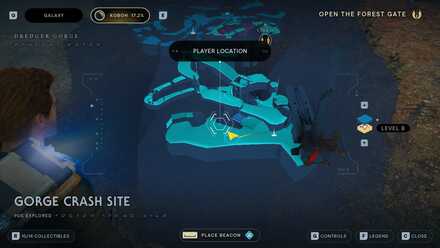 |
| Details | |
| Fish Name: Frilled Newt Location: Gorge Crash Site How to Get: Find Skoova near the Gorge Crash Site Meditation Point |
|
 |
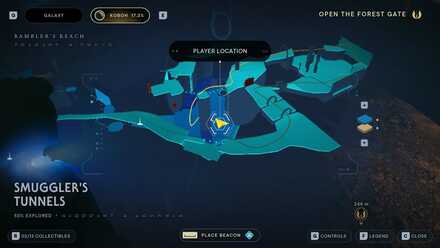 |
| Details | |
| Fish Name: Barbed Hookfish Location: Smuggler's Tunnels How to Get: Drop down to the body of water in Smuggler's Tunnels |
|
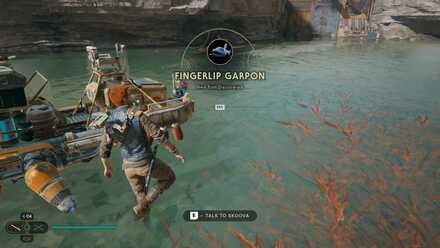 |
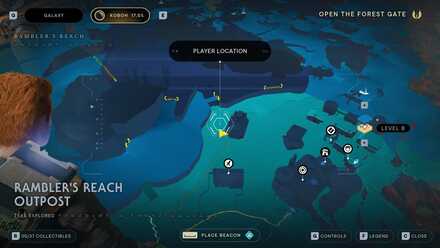 |
| Details | |
| Fish Name: Fingerlip Garpon Location: Rambler's Reach Outpost How to Get: Find Skoova at the riverbank in Rambler's Reach Outpost |
|
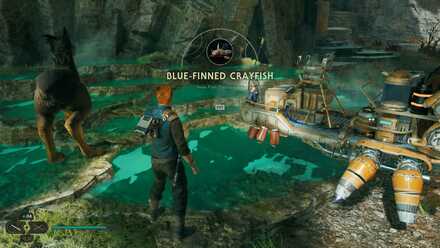 |
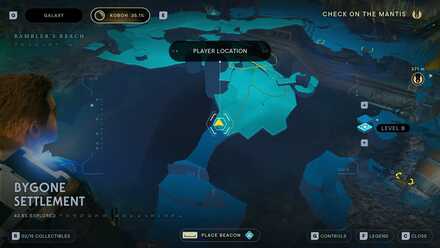 |
| Details | |
| Fish Name: Blue-Finned Crayfish Location: Bygone Settlment How to Get: Found near the entrance of the Bygone Settlment coming from the Nekko Pools |
|
 |
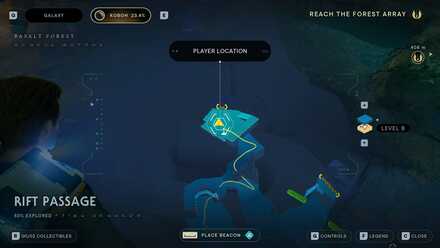 |
| Details | |
| Fish Name: Big-Mouth Faa Location: Rift Passage How to Get: Found in the rooft passage by the square pool |
|
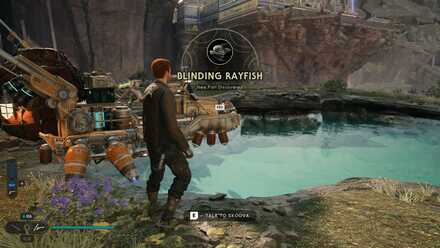 |
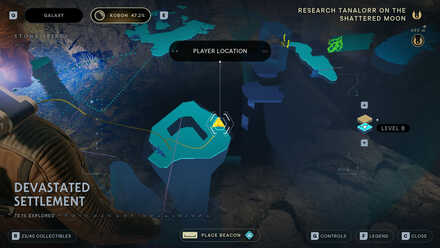 |
| Details | |
| Fish Name: Blinding Rayfish Location: Devastated Settlement How to Get: Found in a small pool near the Devastated Settlement Meditation Point. You will need to ride a Nekko to get there |
|
 |
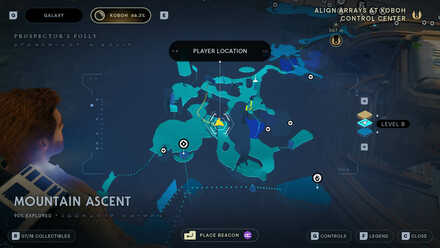 |
| Details | |
| Fish Name: Mee Fish Location: Mountain Ascent How to Get: From the Mountain Ascent Meditation point, go past the two Green Gates until you reach the waterfall where Skoova will be located |
|
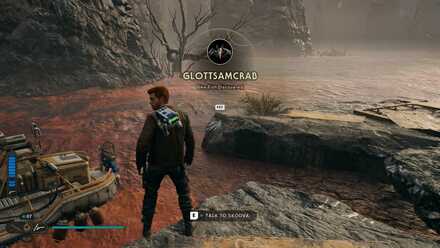 |
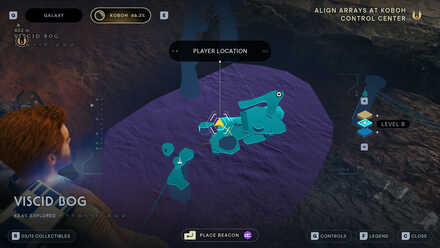 |
| Details | |
| Fish Name: Glottsamcrab Location: Viscid Bog How to Get: From the Viscid Bog Meditation Point, go to the hut where Zygg and Wini are and look down to see Skoova by the tar |
|
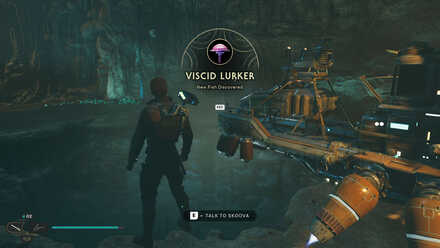 |
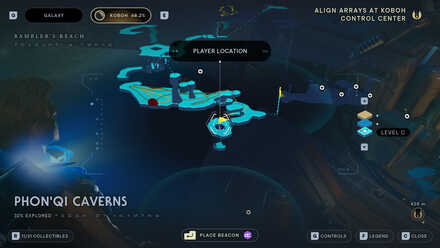 |
| Details | |
| Fish Name: Viscid Lurker Location: Phon'Qi Caverns How to Get: Found in Phon'Qi Caverns, past the area where you fight the Rancor and meet "Prince" Patren, jump down to the clusters of exploding fungi to find Skoova over a small pool |
|
Datadiscs
| In-game Location | Map Location |
|---|---|
 |
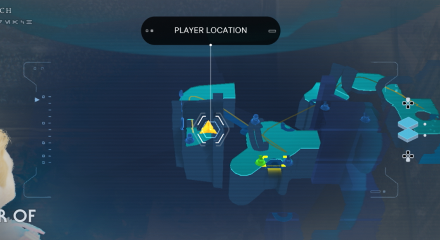 |
|
Area: Chamber of Duality Where to Find: Set the Orb to activate the bridge on your right. Cross it then use the force pull on the pullcord and place it on a stand to open the door and you'll find the Datadisc inside the room. |
|
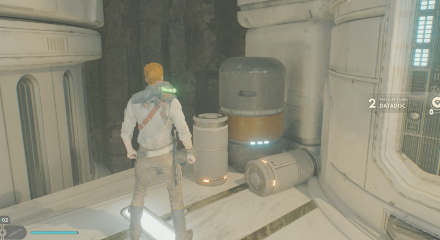 |
 |
|
Area: Rift Passage Where to Find: From the Meditation Point, take the zipline and you'll find the Disc at an elevated platform infront. |
|
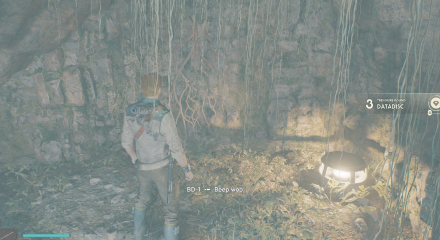 |
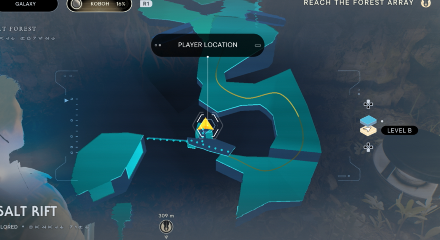 |
|
Area: Basalt Rift Where to Find: At the area full of Koboh Dust, hug the wall right and climb the vines. You'll find the Disc on your right. |
|
 |
 |
|
Area: Forest Array Where to Find: From the center, set the Orb Couplerto face towards the Meditation Point. Walk across and you'll find the Disc just by the archway. |
|
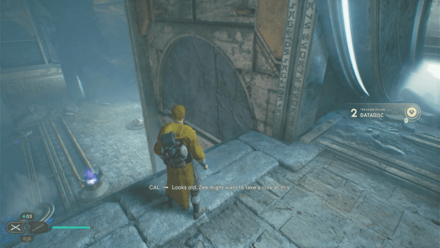 |
 |
|
Area: Chamber of Reasons Where to Find: Past the "A Secret Meeting" Force Echo, move forward and you'll find the Disc on your left by the edge. |
|
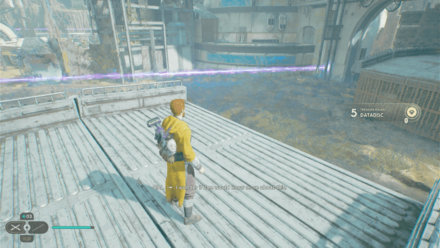 |
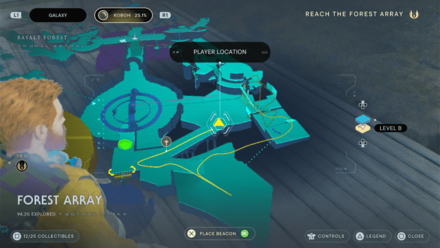 |
|
Area: Forest Array Where to Find: From the center, set the Orb Coupler to face towards the west opening. Walk across, climb the railings, fly using the mount, and go up the stairs. Face towards the railings you climbed and you'll find the Disc at the end of the platform. |
|
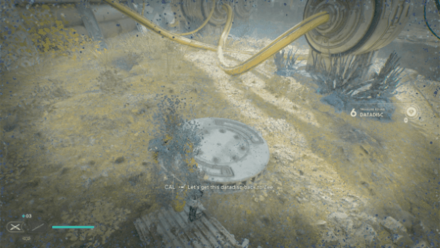 |
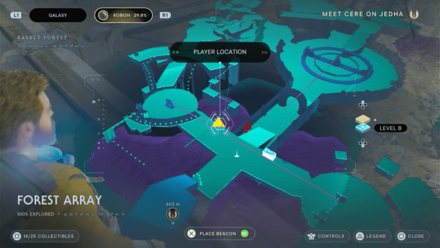 |
|
Area: Forest Array Where to Find: From the Meditation Point, look towards the area with Koboh Dusts and some platforms. Drop down and you'll find the Disc on the ground. |
|
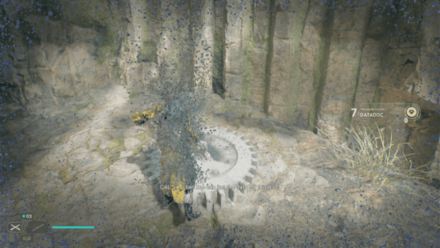 |
 |
|
Area: Forest Array Where to Find: From the Meditation Point, face towards the empty Koboh Dust pit with a grappable railing on the side. Drop down and you'll find the Disc on top of a gear. |
|
 |
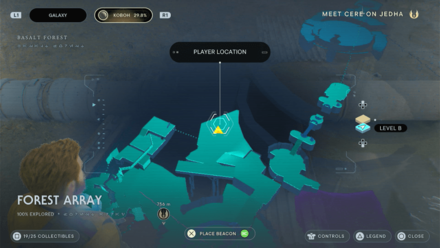 |
|
Area: Forest Array Where to Find: From the center, set the Orb Coupler to face towards the west opening. Walk across, climb the railings and drop down. Fly with the mount and you'll find the Disc hidden among the Koboh Dust near the Bilemaw. |
|
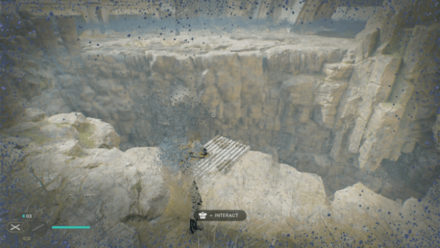 |
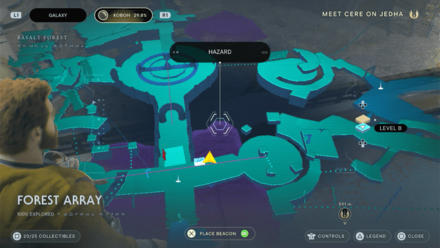 |
|
Area: Forest Array Where to Find: From the Meditation Point, face towards the nearby workbench and drop down to the Koboh Dust. You'll find the Disc at the edge by a piece of metal. |
|
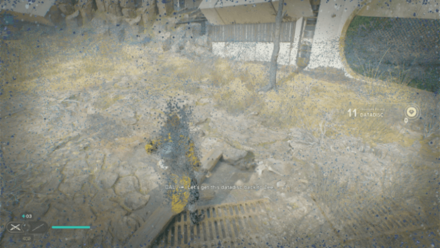 |
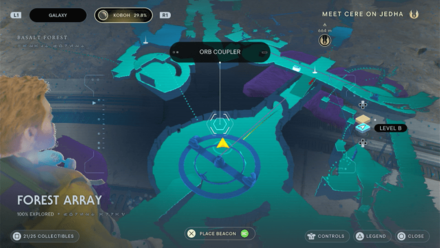 |
|
Area: Forest Array Where to Find: From the center, face between the Meditation Point and some rocks on the left. Cross the Koboh Dust a bit and you'll find the Disc nearby. |
|
 |
 |
|
Area: Basalt Rift Where to Find: From the Meditation Point, go past the archway and take the road up past the rock blocking the path. Take a left past the Mogu and wall run your way up the wall. You'll find the Disc on your left by the edge. |
|
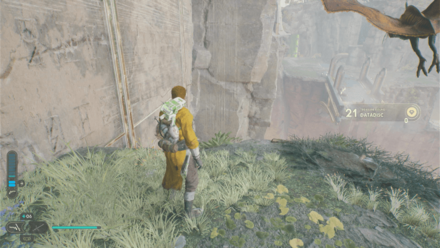 |
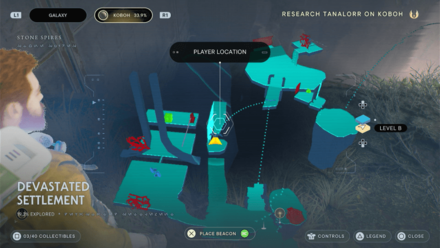 |
|
Area: Devastated Settlement Where to Find: From the Meditation Point, grapple up on your left, climb the wall and jump across. Follow the path right past the waterfall and you'll find the Disc on a climable wall. |
|
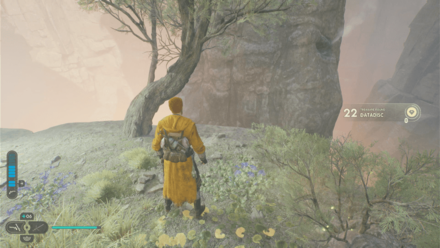 |
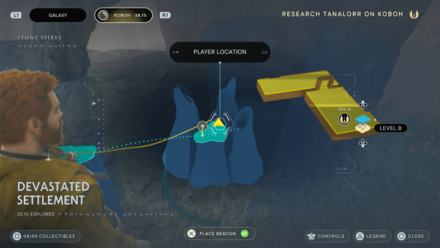 |
|
Area: Devastated Settlement Where to Find: From the Meditation Point, use the mount to fly across and drop down on the small island rock. You'll find the Disc by the edge. |
|
 |
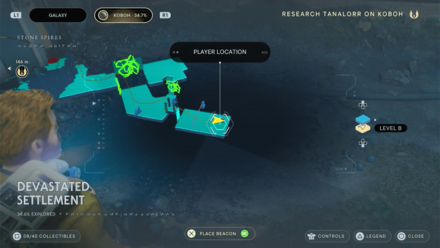 |
|
Area: Devastated Settlement Where to Find: After unlocking the Koboh Grinder, use it to trace a path towards the Koboh Matter high on the wall and the Disc will drop. |
|
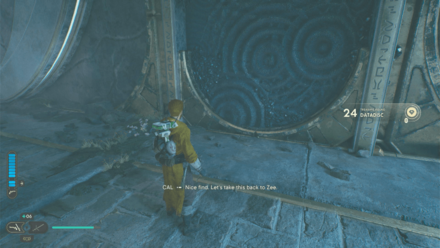 |
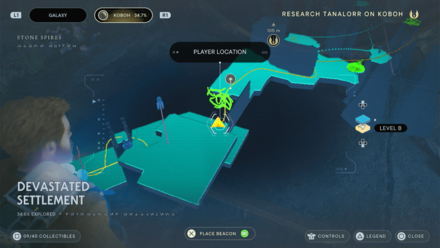 |
|
Area: Devastated Settlement Where to Find: After unlocking the Koboh Grinder, bring the orb with you and head back past the waterfall opening. Place the Orb on the nearby Coupler and use the Koboh Grinder to trace it along the Koboh Matter and the Disc will drop. |
|
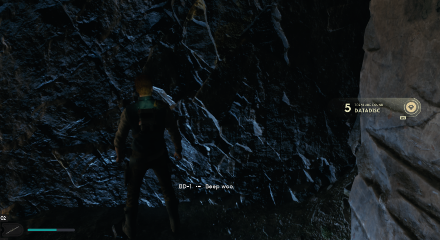 |
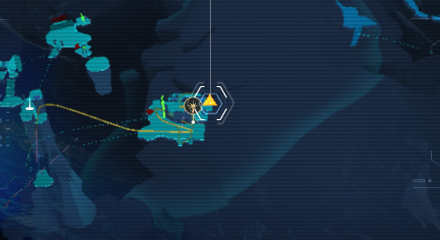 |
|
Area: Devastated Settlement Where to Find: Pull down the Cube by the wall and climb up. You'll find the Disc inside. |
|
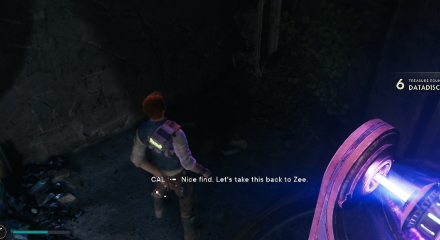 |
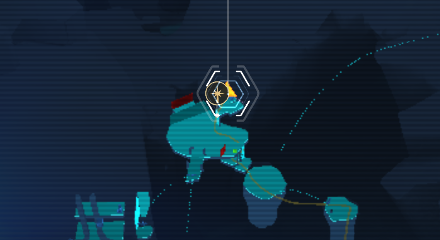 |
|
Area: Devastated Settlement Where to Find: From the Meditation Point, turn around the head back across the gap. Climb up the nearby ledge on the right and you'll find the Disc just behind the Coupler. |
|
 |
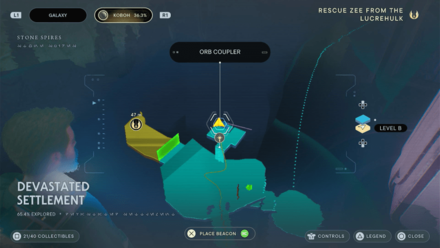 |
|
Area: Devastated Settlement Where to Find: From the Meditation Point, backtrack towards the green laser wall and climb up the ledge on the right. Use the Koboh Grinder to destroy the blocking Koboh Matter and you'll find the Disc next to the Coupler. |
|
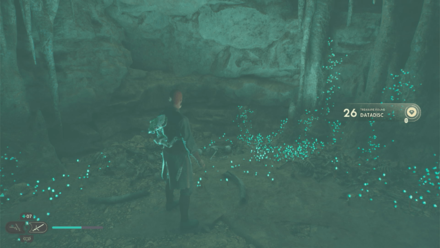 |
 |
|
Area: Phon'Qi Caverns Where to Find: Found inside the room where you fight a Rancor next to a lamp. |
|
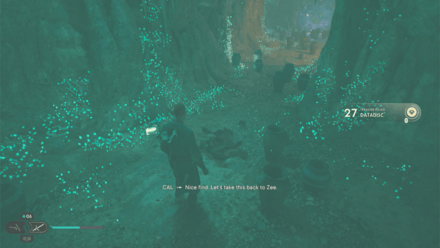 |
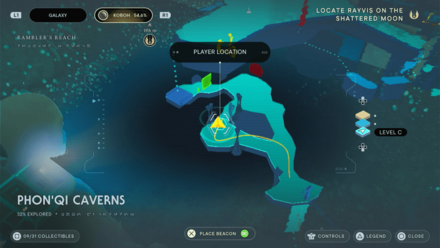 |
|
Area: Phon'Qi Caverns Where to Find: Past the room full of Cavern Fungus, go down the fork on the left and defeat the Magnaguard. You'll find the Disc drop after destroying one of the vases. |
|
 |
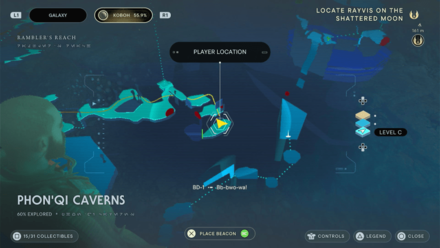 |
|
Area: Phon'Qi Caverns Where to Find: Once you fall down the pitfall trap, climb up the scalable wall and dash through the green laser vent. You'll find the Disc on floor. |
|
 |
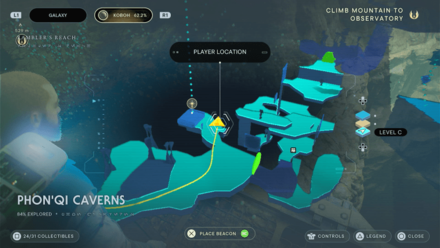 |
|
Area: Phon'Qi Caverns Where to Find: Destroy one of the vases near the elevator by the ledge. |
|
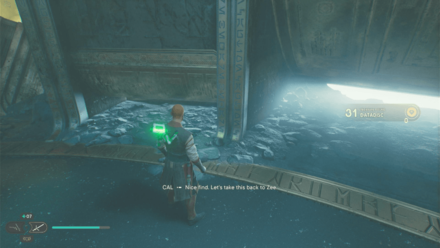 |
 |
|
Area: Chamber of Fortitude Where to Find: Defeat Anoth Estra and you'll find the Disc by destroying one of the vases in the room. |
|
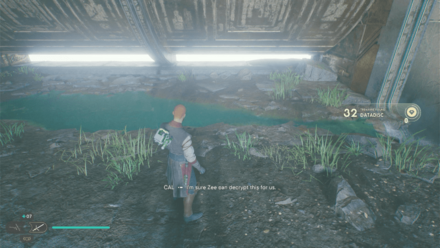 |
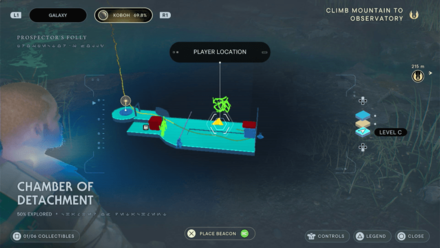 |
|
Area: Chamber of Detachment Where to Find: Get the Orb from behind the cube and place it on the Coupler nearby. use the Koboh Grinder to remove Koboh Matter high up by the wall. The Disc will drop from there. |
|
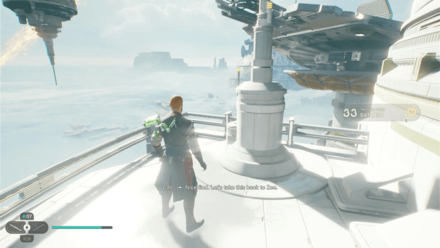 |
 |
|
Area: Observatory Understructure Where to Find: From the Meditation Point, climb up and climb on your right. You'll find the Disc at the end of the path. |
|
 |
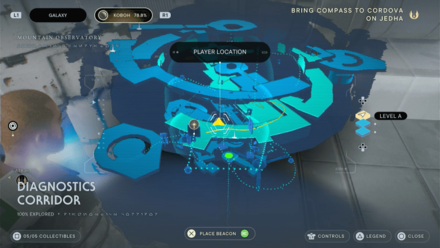 |
|
Area: Diagnostics Corridor Where to Find: Rotate the Minor Oculus twice and follow the path forward. Bring the balloon outside and cross towards the other balloon on the right. Enter the green laser wall and you'll find the Disc by some crates. |
|
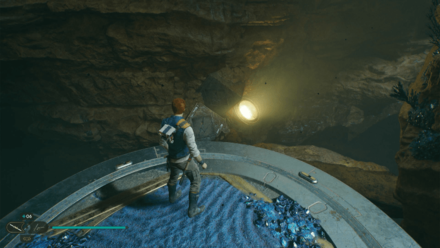 |
 |
|
Area: Collapsed Passage Where to Find: After the wall jump section of the area, look back and you'll find a platform hanging off the edge. Head towards it and jump to the area with a bluish surface, and walk to the end of it. |
|
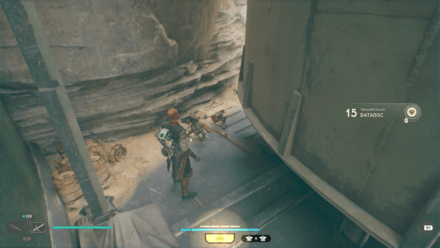 |
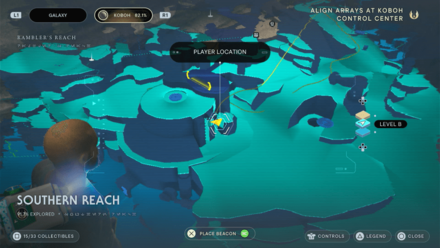 |
|
Area: Southern Reach Where to Find: Head towards the large silo and you'll find the Scavenger Droid just behind a smaller silo that drops the Disc. |
|
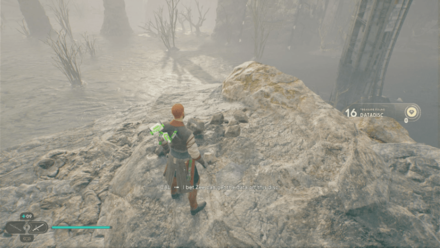 |
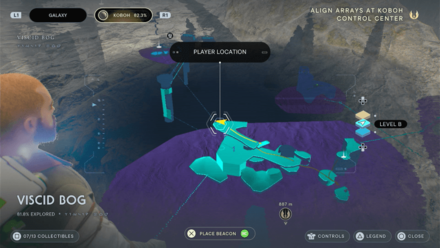 |
|
Area: Viscid Bog Where to Find: From the Meditation Point, turn around and grapply towards the nearby island. You'll find the Disc on the edge of a high rock. |
|
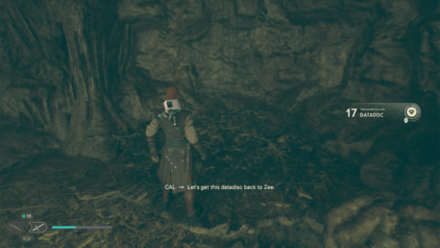 |
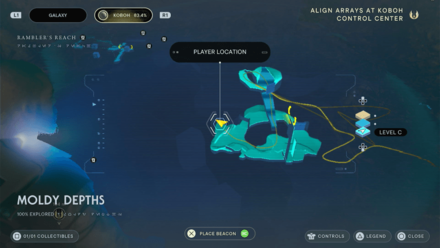 |
|
Area: Moldy Depths Where to Find: Head for the center area in Harvest Ridge and enter the cave there behind the door. Slide down and drop down to the right path. You'll find the Disc in that area by a nest. |
|
 |
 |
|
Area: Observatory Understructure Where to Find: Once you reach the largest structure, turn left. The Datadisc will be found on a digging droid. |
|
 |
 |
|
Area: Hunter's Quarry Where to Find: Take the balloons outside the entrance and you'll find the Disc above the ruins. |
|
 |
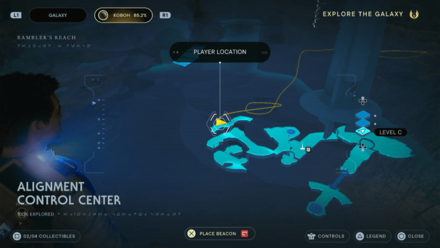 |
|
Area: Alignment Control Center Where to Find: You can see the Datadisc from the top of the cave that leads to the Alignment Control Center. |
|
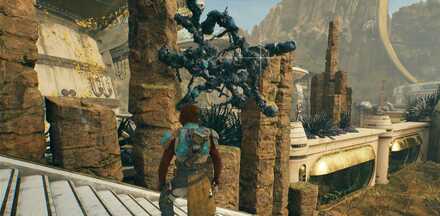 |
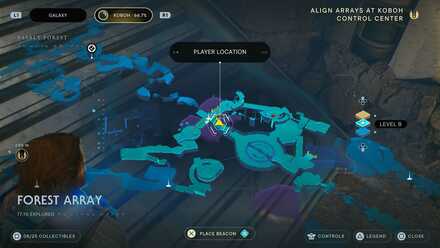 |
|
Area: Forest Array Where to Find: Use the laser from the Meditation Point and BD-1's Koboh Grinder to get the datadisc trapped in the material. |
|
 |
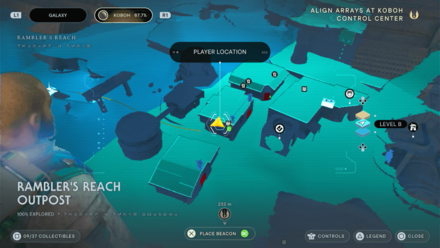 |
|
Area: Rambler's Reach Outpost Where to Find: From the Meditation Point, head straight past the entrance and you'll find the Disc on your left inside the building. Requires you to recruit Jawa first. |
|
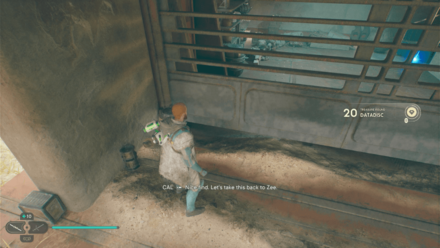 |
 |
|
Area: Rambler's Reach Outpost Where to Find: From the Meditation Point, head straight past the entrance and you'll find the Disc on your right by the door. Requires you to recruit Jawa first. |
|
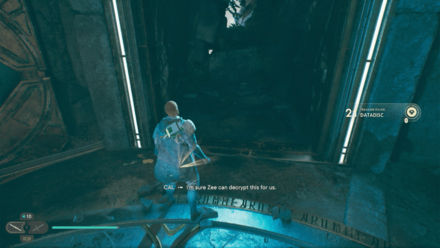 |
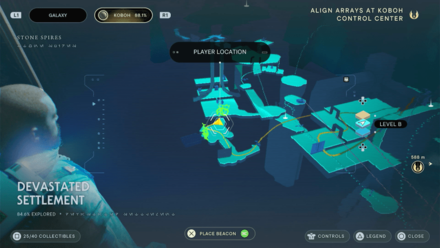 |
|
Area: Devastated Settlement Where to Find: From the Grand Courtyard Meditation Point, take the Reltor and fly around towards the left into the cave below across another island. You'll find the Disc inside. |
|
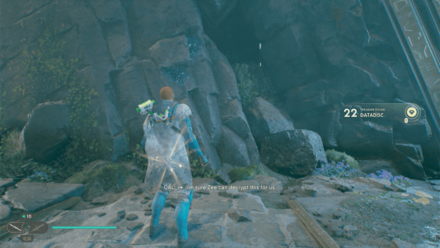 |
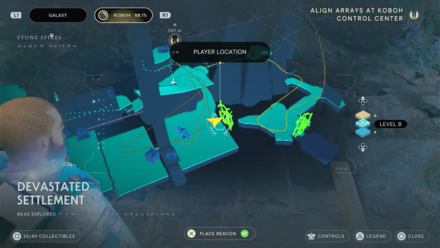 |
|
Area: Devastated Settlement Where to Find: From the Meditation Point, climb up and head inside the nearby Temple and place the Orb on the Coupler at the other side. Rotate the object in the middle and use the Koboh Grinder to remove the Koboh Matter. The Disc will drop from there. |
|
Priorite Shards
| In-game Location | Map Location |
|---|---|
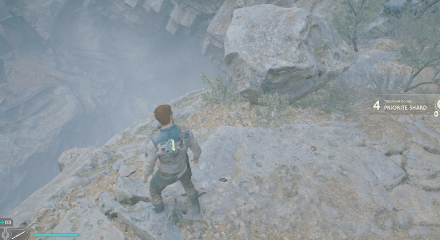 |
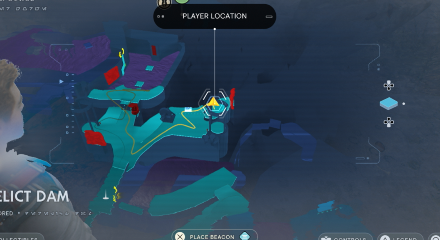 |
|
Area: Derelict Dam Where to Find: From the Meditation Point, take the road that forks to the right and drop down from the cliff. You'll find the Shard next to a rock. |
|
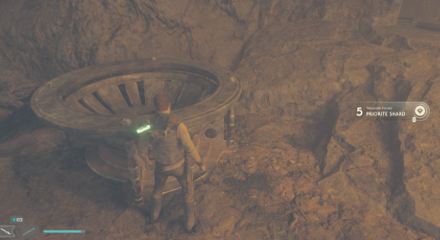 |
 |
|
Area: Derelict Dam Where to Find: Inside a large empty brazier past a BX Droid inside a cave. |
|
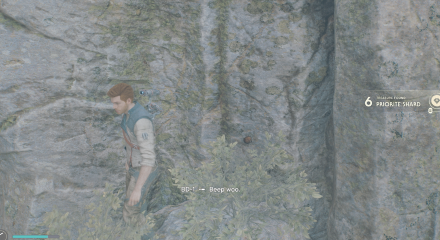 |
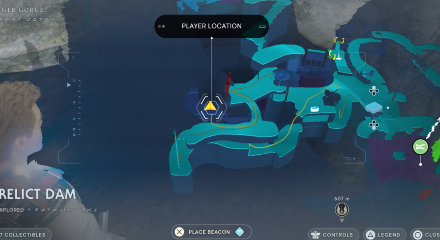 |
|
Area: Derelict Dam Where to Find: Once you've blown a hole in the cave, lure the Roller Mine towards the road to the right past the broken elevator and throw it to the tarred wall below. Follow the path, climb the rope, and you'll find the Shard on your left by the rock below. |
|
 |
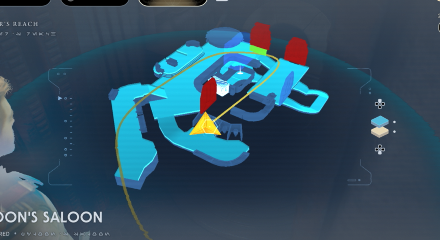 |
|
Area: Pyloon's Saloon Where to Find: Enter the saloon and take the path on your right towards the bathroom. You'll find the Shard just by the toilet. |
|
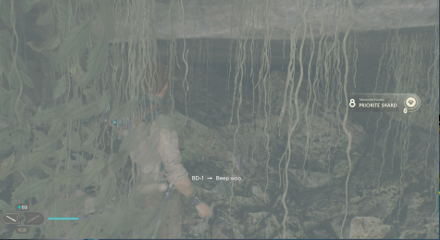 |
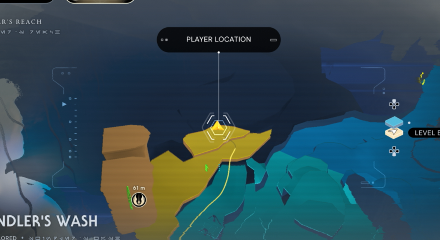 |
|
Area: Swindler's Wash Where to Find: From the Meditation Point, go around to the other side of the bridge and climb the ledge past the Droids that drop down. You'll find the Shard past the ponds inside a small cave opening. |
|
 |
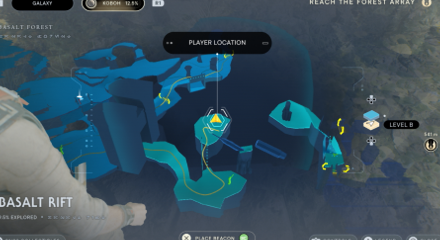 |
|
Area: Basalt Rift Where to Find: Wall run your way to the left platform and destroy the farthest pillar and the Shard will drop from there. |
|
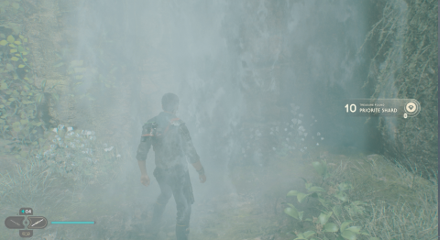 |
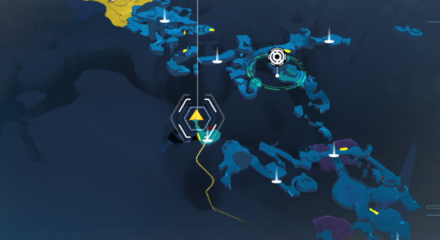 |
|
Area: Nekko Pools Where to Find: Found in an isolated section of the area you'll need a Nekko to access. |
|
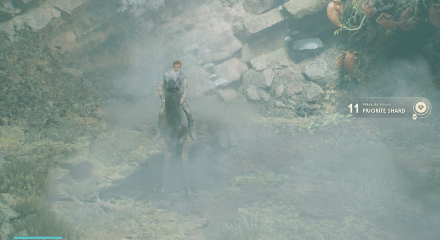 |
 |
|
Area: Nekko Pools Where to Find: Can be found in a swampy section of the area. |
|
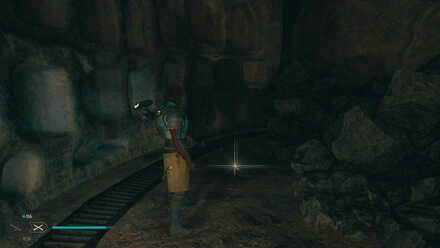 |
 |
|
Area: Bygone Settlement Where to Find: From the Meditation Point, wall run your way up the buildings and you'll find the chest on your right inside a house full of debris. |
|
 |
 |
|
Area: Gorge Crash Site Where to Find: After crossing the bridge past the Meditation Point, you'll find the Shard on your left inside a small cave. |
|
 |
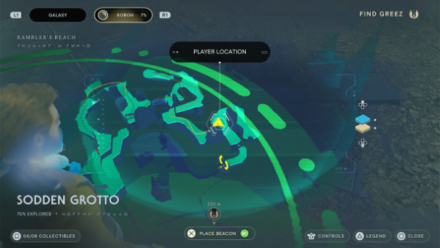 |
|
Area: Sodden Grotto Where to Find: Dropped by a Scavenger Droid inside the cave. |
|
 |
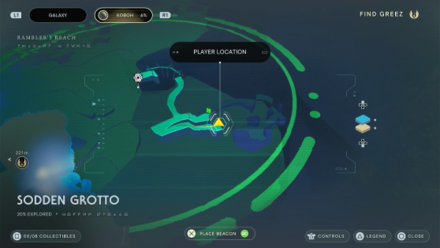 |
|
Area: Sodden Grotto Where to Find: Once inside the cave, follow the road down and take the path leading downwards. You'll find the Shard by a dark corner near the ledge. |
|
 |
 |
|
Area: Rambler's Reach Outpost Where to Find: Head north past the Stables towards the broken drawbridge and you'll find a Scavenger Droid nearby that drops this. |
|
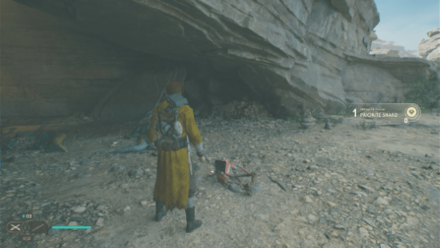 |
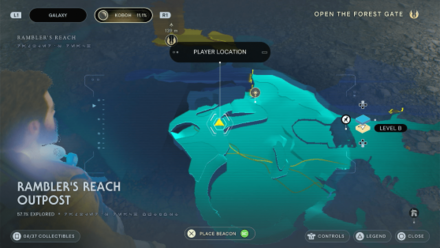 |
|
Area: Rambler's Reach Outpost Where to Find: Head west of the Stables towards the ship and you'll find a Scavanger Droid that drops a Shard near a den of Gorgers. |
|
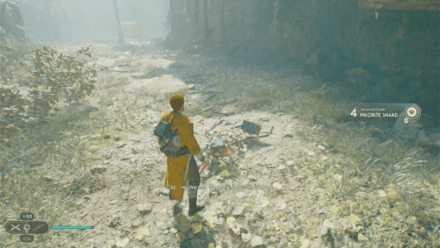 |
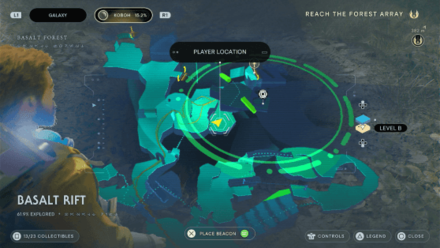 |
|
Area: Basalt Rift Where to Find: From the Meditation Point, head past the archway and the Stormtroopers all the way to the lowest level and take a right before the sleeping Bilemaw. You'll find a Scavanger Droid that drops the Shard. |
|
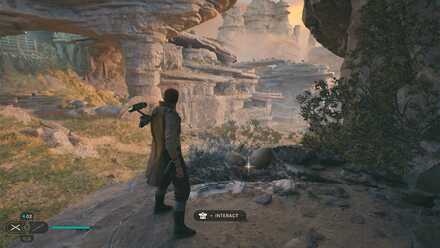 |
 |
|
Area: Southern Reach Where to Find: Can be picked up from the top of the scalable wall on the right side of the plain as you descend from Mosey's shack. |
|
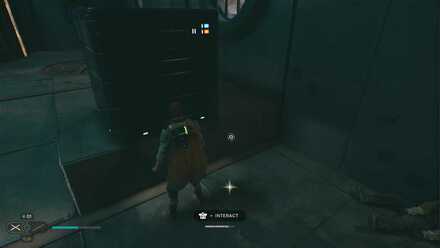 |
 |
|
Area: Flooded Bunker Where to Find: You can get this shard inside a bunker past the Southern Reach. A droid with energy shields will be guarding the area. |
|
 |
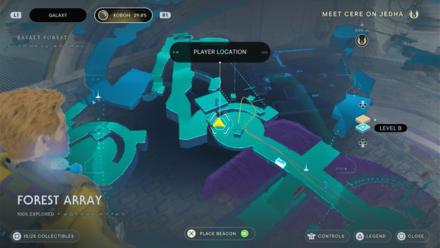 |
|
Area: Forest Array Where to Find: From the Meditation Point, take a right past the nearby workbench and climb the elevated platform. Swing the first lamp and turn around to swing the second lamp above. You'll find the Shard two platforms ahead. |
|
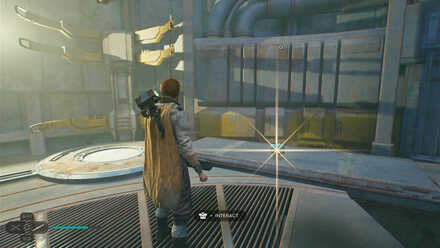 |
 |
|
Area: Hunter's Quarry Where to Find: Found inside the building on top of the scalable wall on the far side of Hunter's Quarry. |
|
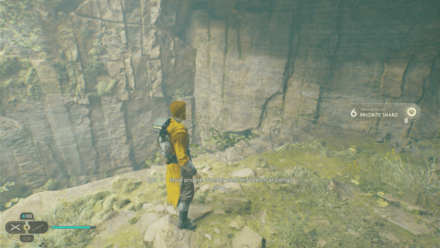 |
 |
|
Area: Basalt Rift Where to Find: From the Meditation Point, backtrack to the entrance until you reach the narrow passageway and climb the vines on your left. You'll find the shard on the platform above. |
|
 |
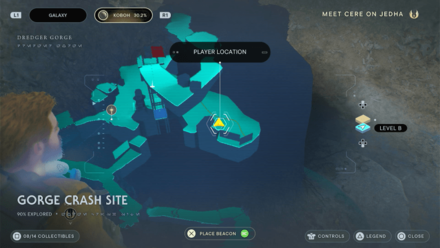 |
|
Area: Gorge Crash Site Where to Find: From the Meditation Point, go past the small lake and wall run your way up to the right. You'll find the chest by a nest on top. |
|
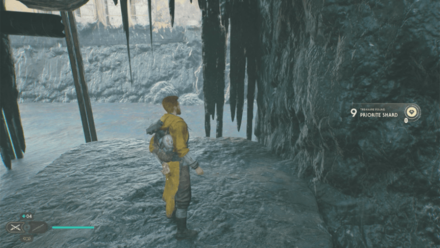 |
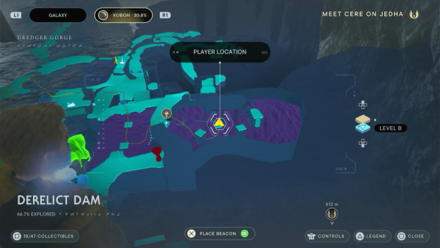 |
|
Area: Derelict Dam Where to Find: Once you've blown up a hole in the Dam, climb it and cross the platforms on the other side past a B1 Battle Droid and Raider Grunt. You'll find the Shard at the left of the first platform. |
|
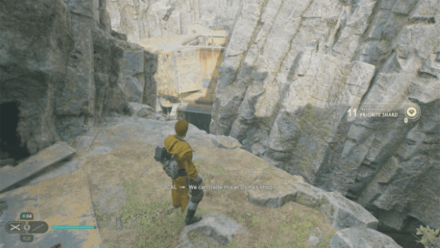 |
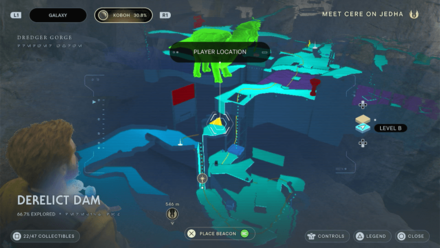 |
|
Area: Derelict Dam Where to Find: From the Southern Reach Meditation Point, wall jump up past the hole and you'll find the Shard on top. |
|
 |
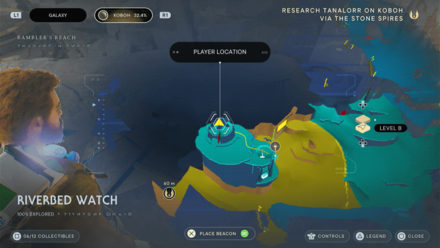 |
|
Area: Riverbed Watch Where to Find: From the Riverbed Watch Meditation Point, head inside the building and climb up to the very top, defeat the group of droids and enter the building forward. You'll find the Shard by the edge. |
|
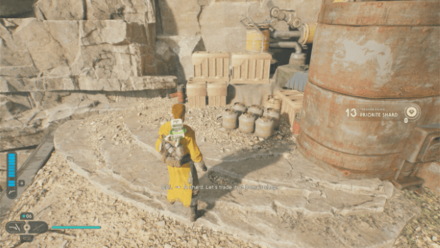 |
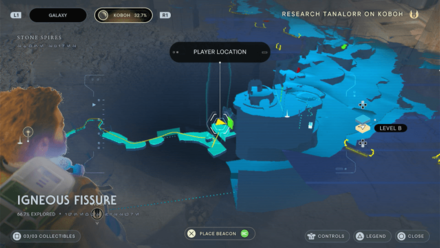 |
|
Area: Igneous Fissure Where to Find: From the Meditation Point, turn around and wall run towards the platform across. Walk past the beams, follow the path forward and climb the vines up top. You'll find the Shard on your left just by the door. |
|
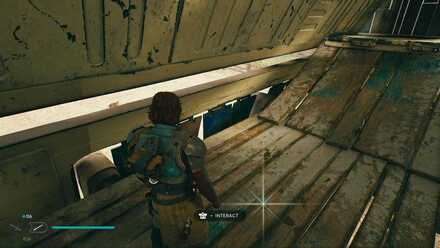 |
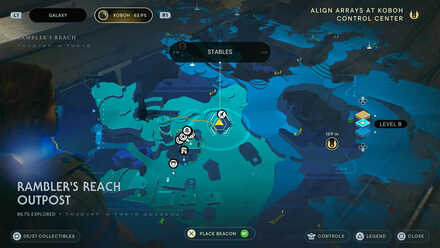 |
|
Area: Rambler's Reach Outpost Where to Find: Use a Nekko to double jump to the second floor of the Stables. The shard will be located on one of the paths. |
|
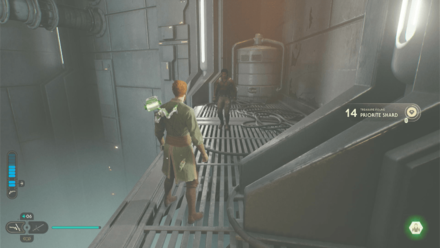 |
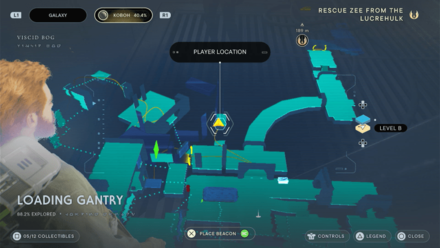 |
|
Area: Loading Gantry Where to Find: Once you've reunited with Bode, go back to the door you've unlocked and facing the green laser wall, you'll find the Shard to your right by the edge. |
|
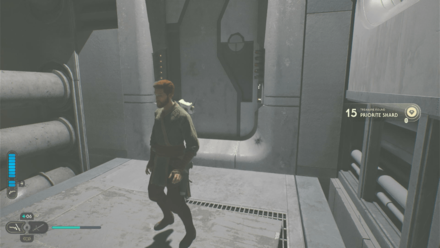 |
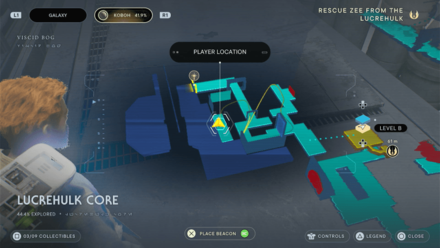 |
|
Area: Lucrehulk Core Where to Find: On the bridge with the two shielded turrets, jump and dash to the platform on the left and you'll find the Shard by the floor. |
|
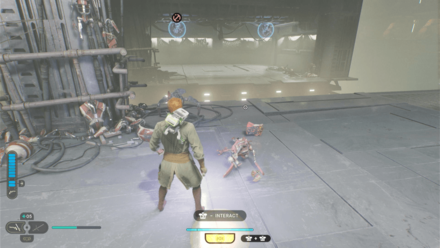 |
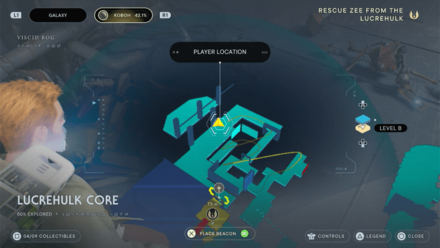 |
|
Area: Lucrehulk Core Where to Find: Go past the bridge with two shielded turrets and you'll find a Scavenger Droid infront of you that drops the Shard. |
|
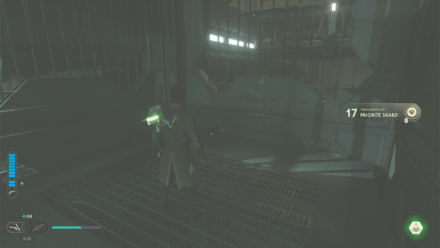 |
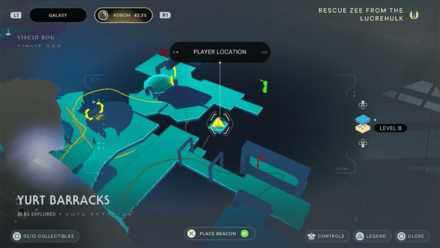 |
|
Area: Yurt Barracks Where to Find: At the second part of the raider's Living Quarters, after crossing the gap and defeating the nearby raiders, move forward a bit and enter the path to your right. You'll find the shard on a platform hidden on your left. |
|
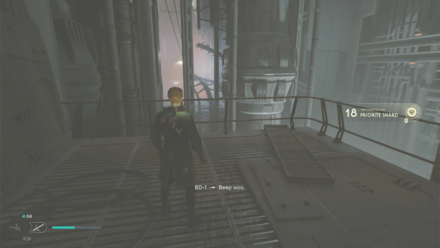 |
 |
|
Area: Generator Underbelly Where to Find: By the first shortcut, there's two scalable scaffoldings nearby. Cross them and you'll find the Shard on your left by the railings. |
|
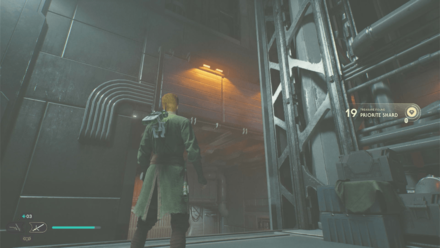 |
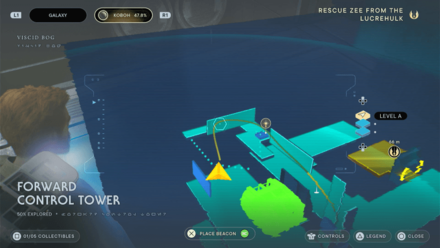 |
|
Area: Forward Control Tower Where to Find: After the cutscene with Dagan Gera and Rayvis, turn around and bring down the center wall. Climb it and bring the wall back up. Wall run your way through and you'll come across the Shard at the last wall. |
|
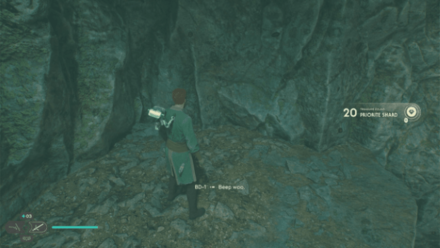 |
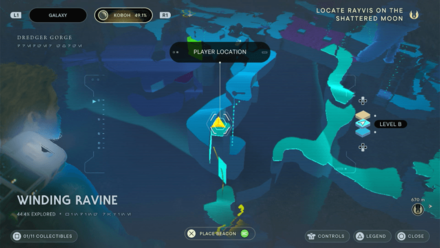 |
|
Area: Winding Ravine Where to Find: Wall run through the gorge and once you've reach the platform across, wall run again on your right and you'll find the Shard on a platform above. |
|
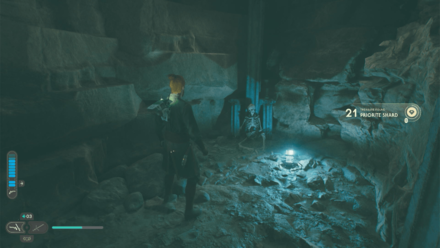 |
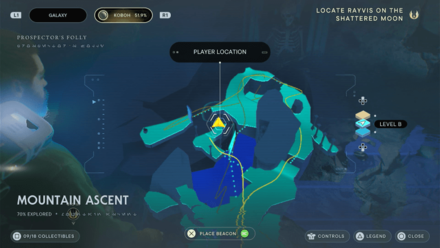 |
|
Area: Mountain Ascent Where to Find: Before the shortcut back down, head right, jump and dash across and you'll find the Shard at the end of the cave. |
|
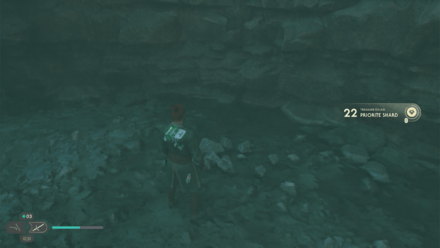 |
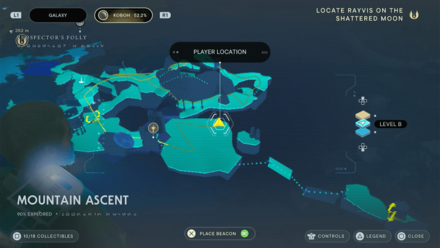 |
|
Area: Mountain Ascent Where to Find: In the area where you have to fight two Bilemaws, use Lift and Slam on a nearby burrow and the Shard will pop out. |
|
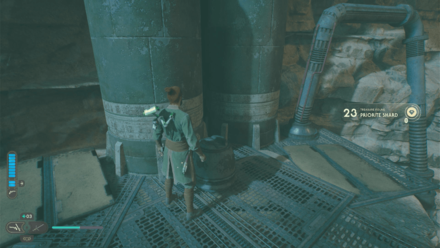 |
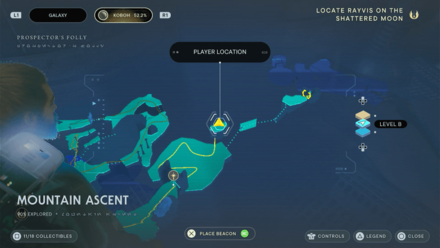 |
|
Area: Mountain Ascent Where to Find: In the area where you have to fight two Bilemaws, grapple up the nearby ledge and you'll find the Shard on top. |
|
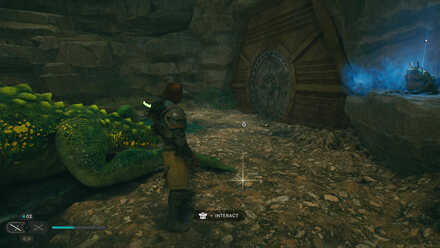 |
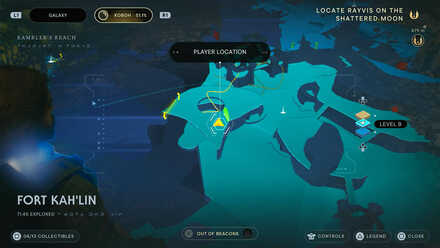 |
|
Area: Fort Kah'lin Where to Find: Found inside the Spawn of Oggdo combat arena. Pick it up after defeating the Oggdo. |
|
 |
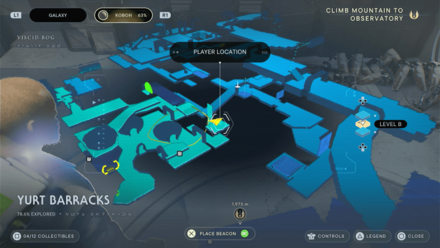 |
|
Area: Yurt Barracks Where to Find: From the Lucrehulk Core Meditation Point, take the path down on the left and circle around the hut on your left. Go through the narrow path and climb up the wall and jump and dash to your right. You'll find the Shard on the platform. |
|
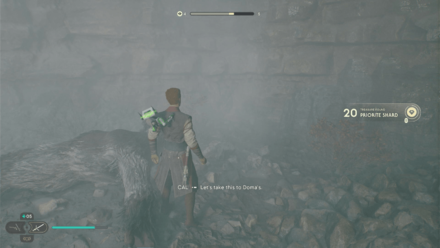 |
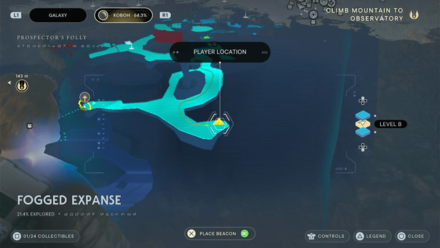 |
|
Area: Fogged Expanse Where to Find: From the Meditation Point, follow the path forward and hug the path to your left. You'll find the Shard on the floor that you need to use Lift on. |
|
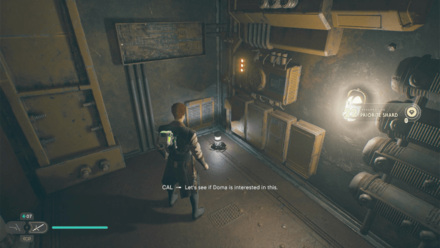 |
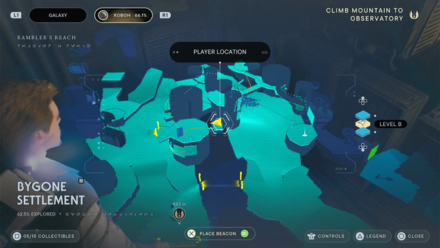 |
|
Area: Bygone Settlement Where to Find: From the Meditation Point, wall run your way up the buildings and keeping following the path until you climb onto a room with two droids and a Raider nearby. Defeat them and you'll find the Shard inside the narrow pathway. |
|
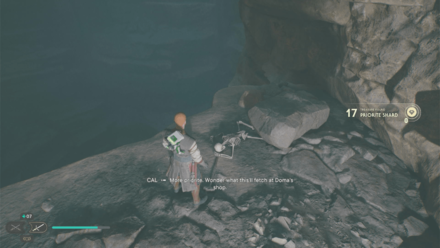 |
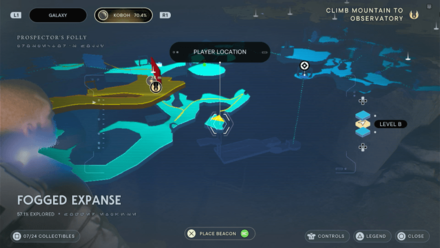 |
|
Area: Fogged Expanse Where to Find: From the Meditation Point, head forward and enter the cave on the left. Jump across the gap and you'll find the Shard by a skeleton. |
|
 |
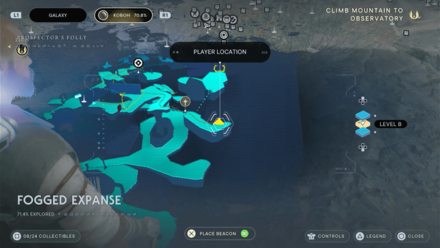 |
|
Area: Fogged Expanse Where to Find: Once you've activated the charge to move the wall, wall run past it and head up the bridge and grapple towards the platform above. You'll find the Scavanger Droid that drops the Shard. |
|
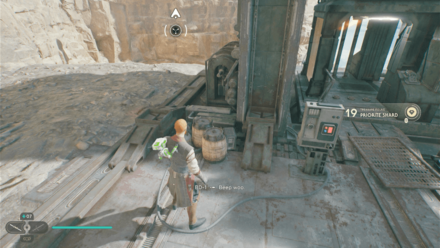 |
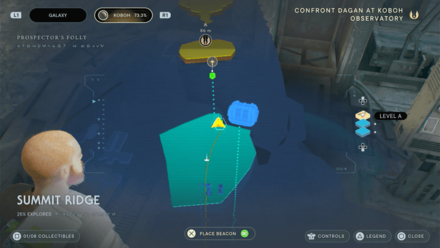 |
|
Area: Summit Ridge Where to Find: Found just infront of the Meditation Point beside the elevator. |
|
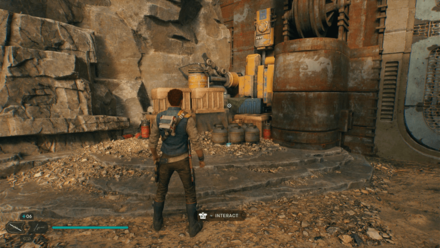 |
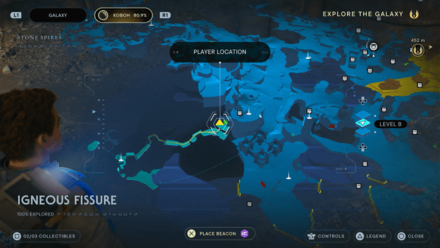 |
|
Area: Igneous Fissure Where to Find: From the Meditation Point, wall run into the cave and follow the path until you reach a large door. The shard will be on the left side of the door. |
|
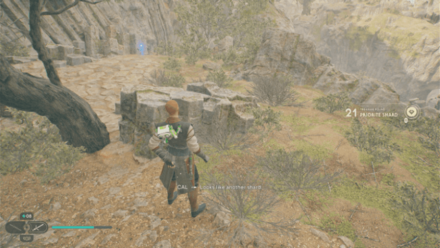 |
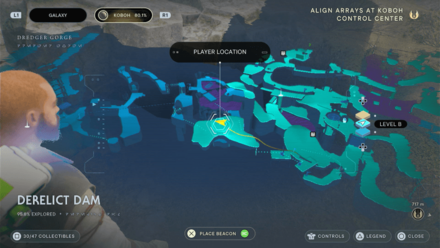 |
|
Area: Derelict Dam Where to Find: After defeating the Gorocco Matriarch, head past the balloons and you'll find the Shard at the area above beside a tree. |
|
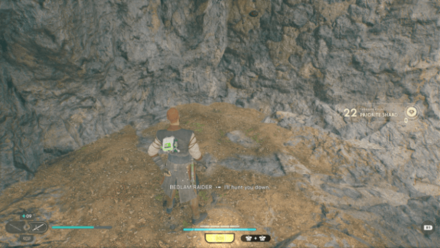 |
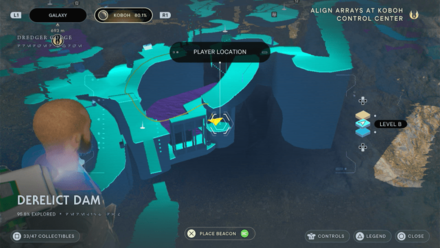 |
|
Area: Derelict Dam Where to Find: From the Meditation Point, cross the bridge beside you and drop down to the platform below. You'll find the Shard on the ground. |
|
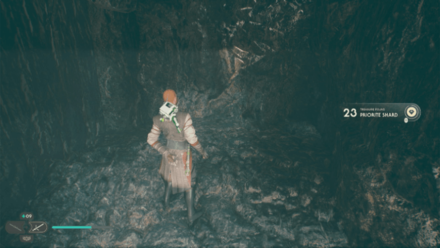 |
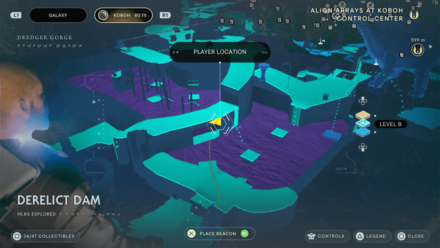 |
|
Area: Derelict Dam Where to Find: Once you've blown up the Dam, head inside the hole and you'll find the Shard on your right inside a small cave. |
|
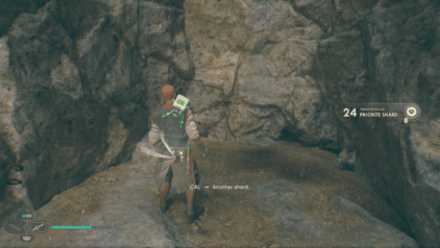 |
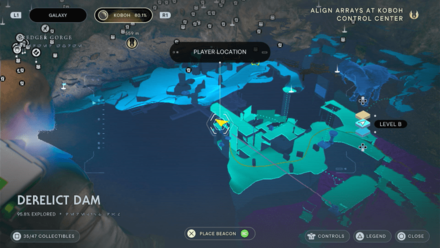 |
|
Area: Derelict Dam Where to Find: At the Yellow Platform Puzzle, for the first Coupler and climb the walls. You'll find the Shard on the platform above. |
|
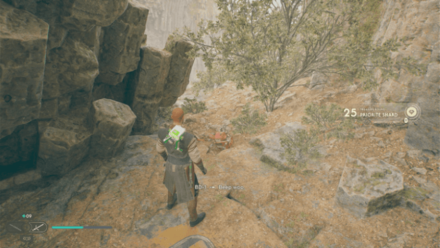 |
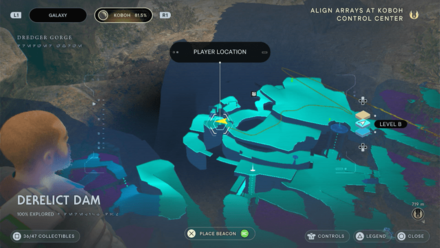 |
|
Area: Derelict Dam Where to Find: Take the giant bird at Boiling Bluff and head towards the west side of the area. You'll find a Scavanger Droid on an area below that drops the Shard. |
|
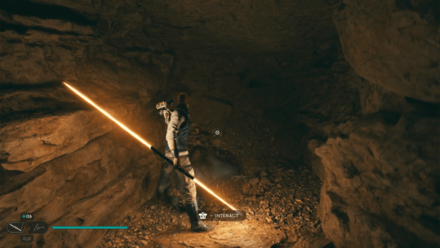 |
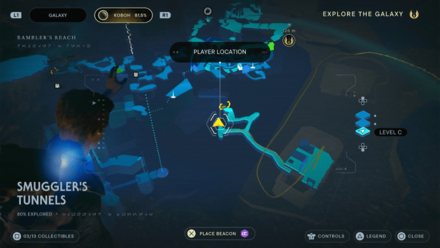 |
|
Area: Smuggler's Tunnel Where to Find: Use a Nekko to reach the roof of the building near the river in Rambler's Reach Outpost. This will lead to an alternate route to the Smuggler's Tunnel. The shard will be on the left side of the first split route you encounter. |
|
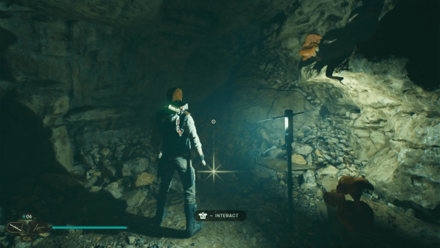 |
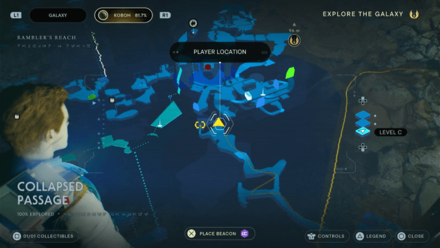 |
|
Area: Smuggler's Tunnel Where to Find: Use a Nekko to reach the roof of the building near the river in Rambler's Reach Outpost. This will lead to an alternate route to the Smuggler's Tunnel. The shard will be near the end of the tunnel. |
|
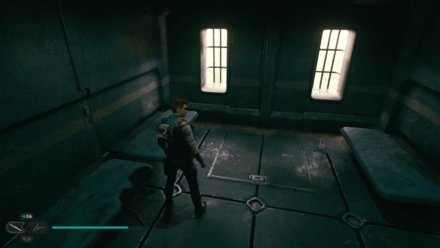 |
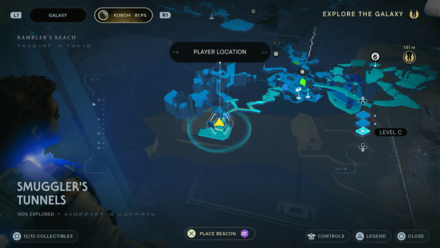 |
|
Area: Smuggler's Tunnel Where to Find: Use a Nekko to reach the roof of the building near the river in Rambler's Reach Outpost. |
|
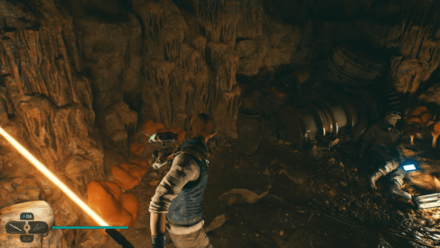 |
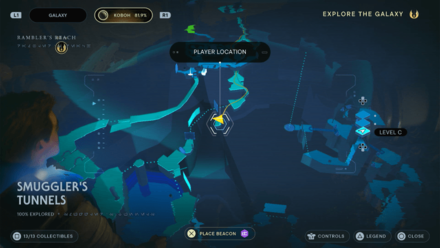 |
|
Area: Smuggler's Tunnel Where to Find: Use a Nekko to reach the roof of the building near the river in Rambler's Reach Outpost. This will lead to an alternate route to the Smuggler's Tunnel. The shard is found deep within the tunnel to the left of the green laser gate in a vase you need to break. |
|
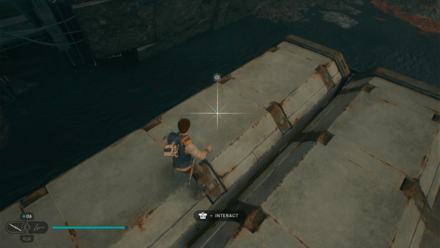 |
 |
|
Area: Loading Gantry Where to Find: Reach the boat in the area by jumping on the crate in the middle of the tar pit. The shard can be found on top of one of the crates on the boat. |
|
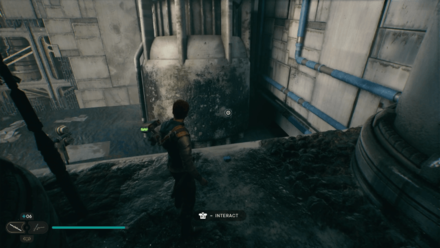 |
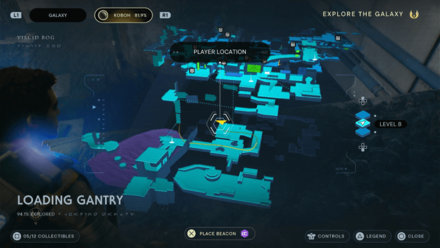 |
|
Area: Loading Gantry Where to Find: From the Meditation Point, pass through the broken door. Head straight to the end of the area and walk up the slanted platforms. The shard can be found behind the storage tanks. |
|
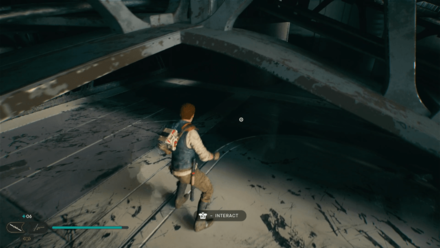 |
 |
|
Area: Loading Gantry Where to Find: Found underneath the slanted platforms in the area. |
|
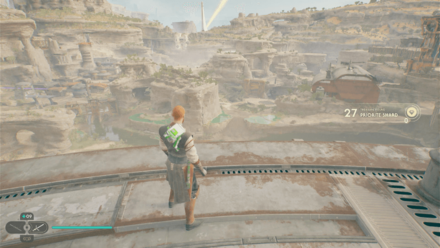 |
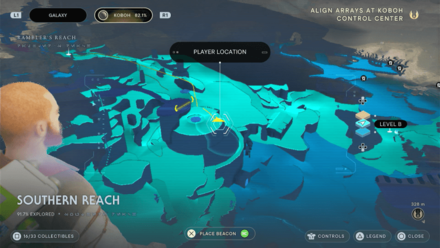 |
|
Area: Southern Reach Where to Find: Head towards the large silo and climb on top of it. You'll find the Shard by the edge. |
|
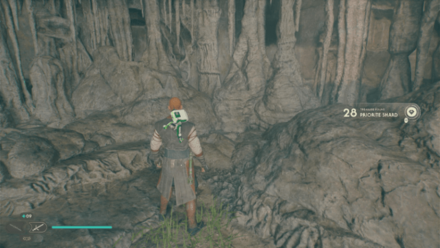 |
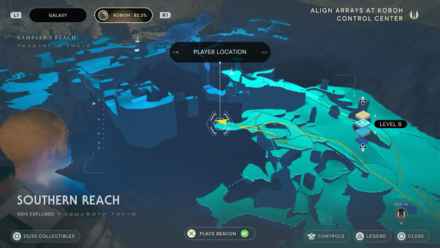 |
|
Area: Southern Reach Where to Find: From the roof of the silo, turn around and climb the cascading rocks and you'll find the Shard inside the cave entrance. |
|
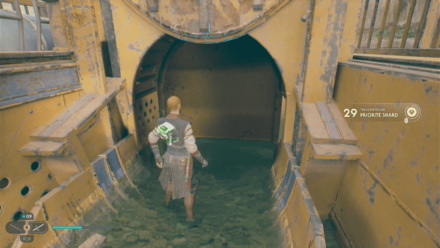 |
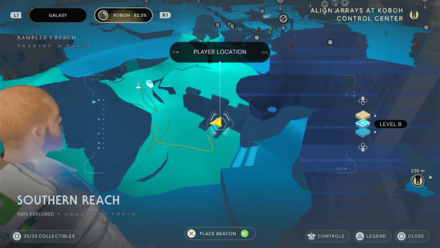 |
|
Area: Southern Reach Where to Find: From the Rambler's Reach Outpost Meditation Point, head towards the nearby sewers and use Life to open up the gate. You'll find the Shard inside. |
|
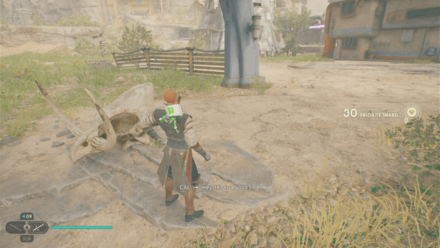 |
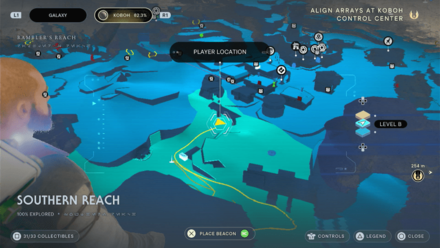 |
|
Area: Southern Reach Where to Find: From the Rambler's Reach Outpost Meditation Point, head towards the archway and use force pull on the skull on top. The Shard will drop down with it. |
|
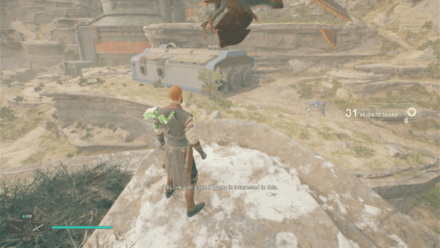 |
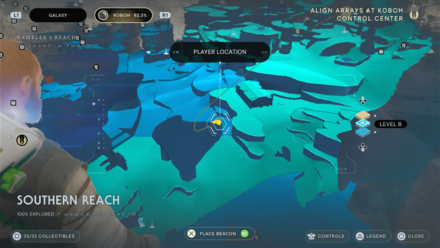 |
|
Area: Southern Reach Where to Find: From the Southern Reach Meditation Point, take the nearby Reltor and fly towards the large rock beside the Rambler's Reach Outpost Meditation Point. You'll find the Shard beneath the nearby Reltor. |
|
 |
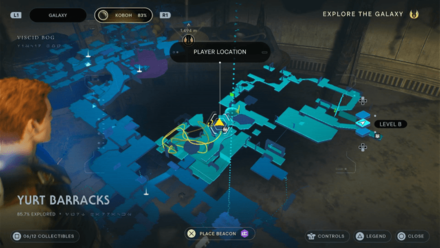 |
|
Area: Yurt Barracks Where to Find: Found in the shack on the second level of the area. This part can be accessed by jumping on the roofs of the shacks on the ground floor. |
|
 |
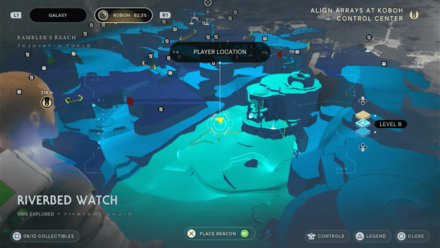 |
|
Area: Riverbed Watch Where to Find: From the Meditation Point, head for the rock in the middle of the river and you'll find the Scavenger Droid that drops the Shard. |
|
 |
 |
|
Area: Harvest Ridge Where to Find: From the Meditation Point, take the Reltor and fly towards the large rock on the right. You'll find the Shard behind the top wall you can run on. |
|
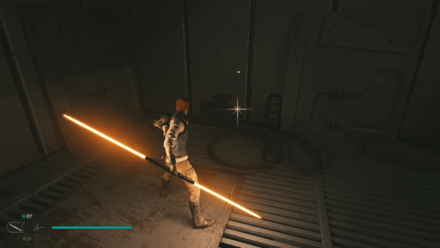 |
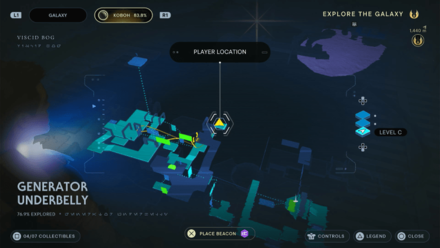 |
|
Area: Generator Underbelly Where to Find: After the wall running section head left to a dark section. The shard will be found at the end of the path. |
|
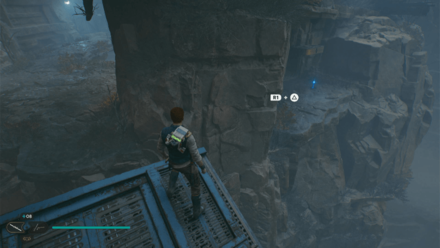 |
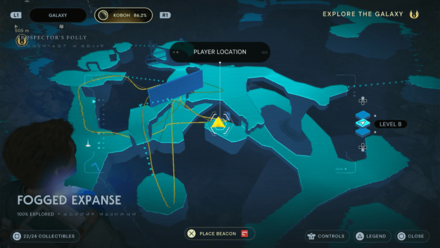 |
|
Area: Fogged Expanse Where to Find: After wall running from the meditation point, look back and use the same structure after it moved to wall run again to a small isolated area. Look down to find the shard that will need Force lift, and an essence. |
|
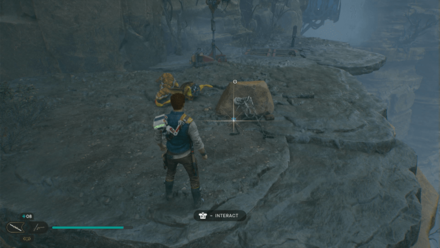 |
 |
|
Area: Fogged Expanse Where to Find: Found near the outdoor elevator along with 6 Koboh Spiker seeds. |
|
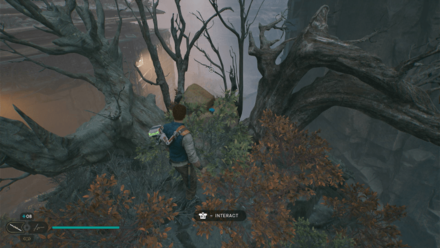 |
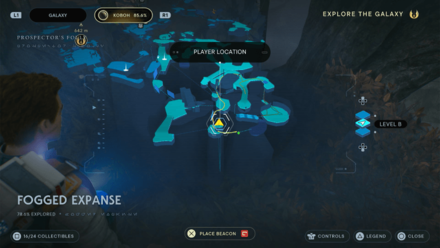 |
|
Area: Fogged Expanse Where to Find: After grabbing on to the balloon, look back to find a small area you can jump to. |
|
 |
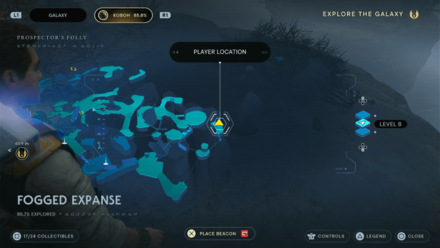 |
|
Area: Fogged Expanse Where to Find: Found after jumping from the balloon along with 3 Koboh Spikers. |
|
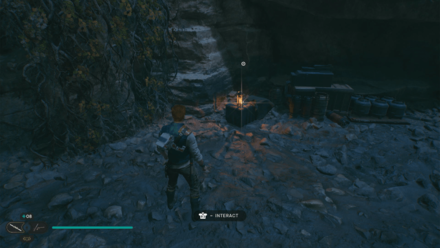 |
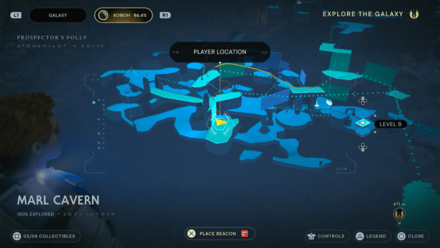 |
|
Area: Marl Cavern Where to Find: When you reach the cavern with wall run platforms, drop down to find the shard. |
|
 |
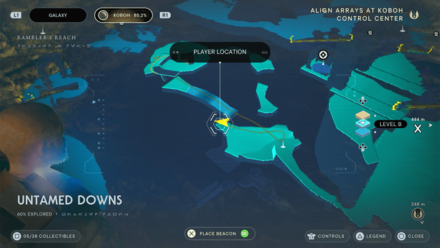 |
|
Area: Untamed Downs Where to Find: Found just below the Meditation Point behind the waterfall. |
|
 |
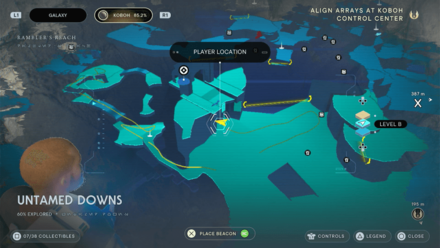 |
|
Area: Untamed Downs Where to Find: Outside the Meditation Point infront of some old ruins. |
|
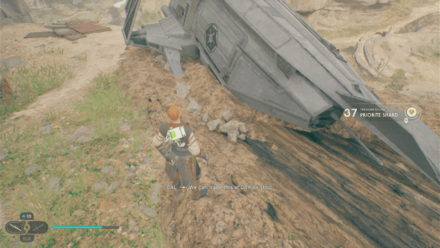 |
 |
|
Area: Untamed Downs Where to Find: Found beside crashed ship in the middle of the area. |
|
 |
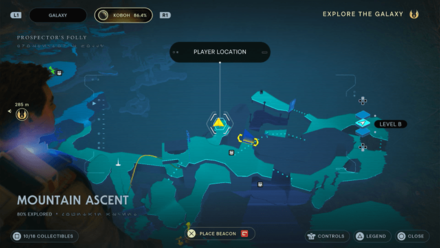 |
|
Area: Mountain Ascent Where to Find: From the Meditation Point, head left. Jump towards the falls to the left and to the next platform to find the shard. |
|
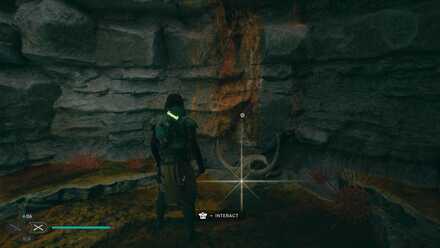 |
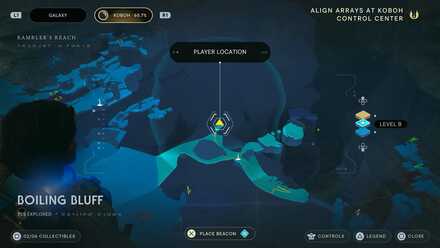 |
|
Area: Boiling Bluff Where to Find: From the Meditation Point, ride a Nekko and use it to jump to past the wall in the map image. The shard will be next to a skull. |
|
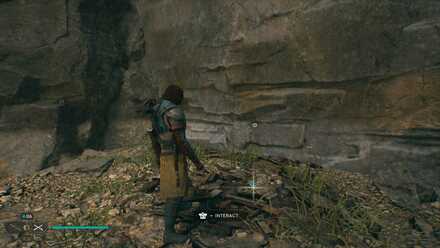 |
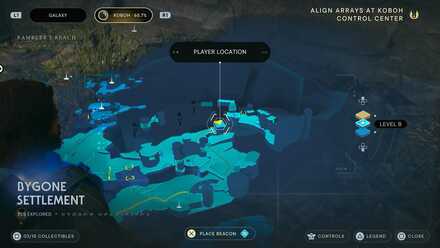 |
|
Area: Bygone Settlement Where to Find: From the Meditation Point, get on a Nekko and continue forward. Jump up from the Nekko to reach the shard.' |
|
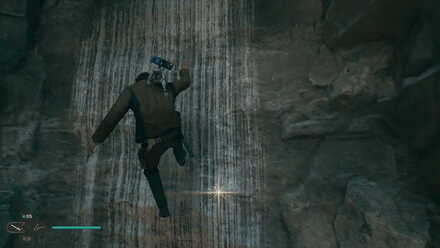 |
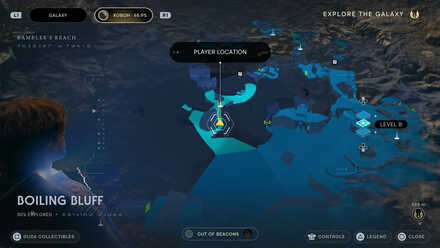 |
|
Area: Boiling Bluff Where to Find: From the Meditation Point, ride a Nekko and use it to jump to up a singular pillar. Jump with the Nekko, then jump from the Nekko, then dash to the wall. Climb-jump until you reach the top. |
|
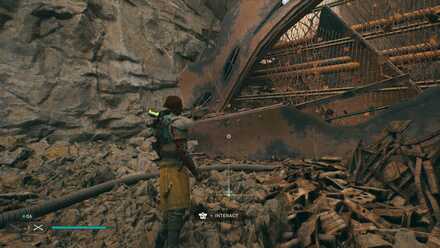 |
 |
|
Area: Bygone Settlement Where to Find: On the way to the platform where you recruit the Jawas, slip through the narrow crack in the wall to get the shard. |
|
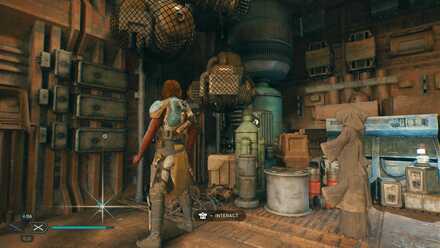 |
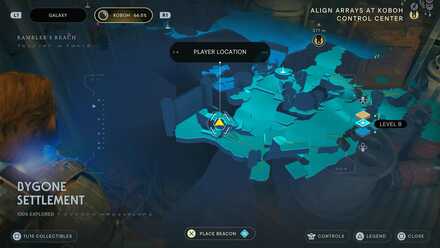 |
|
Area: Bygone Settlement Where to Find: On the platform where you recruit the Jawas, the shard is just located on the other side of the room. |
|
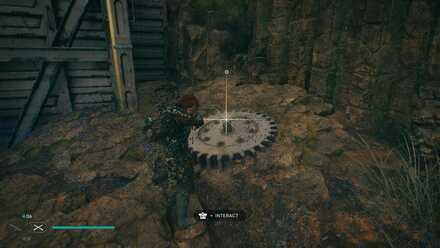 |
 |
|
Area: Forest Array Where to Find: From the Meditation Point, there will be a shard on the distance in the middle of the hazard. You can run and jump towards it to claim it. Even if you died, you will be able to gain the shard. |
|
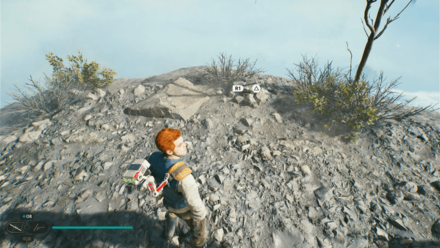 |
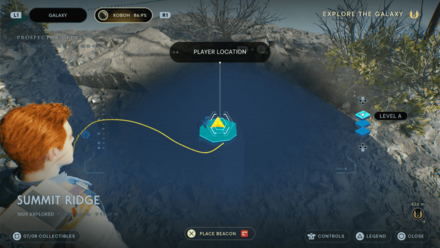 |
|
Area: Summit Ridge Where to Find: Found on one of the areas you can reach by using force pull and push on a balloon. |
|
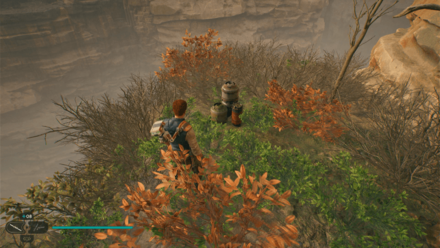 |
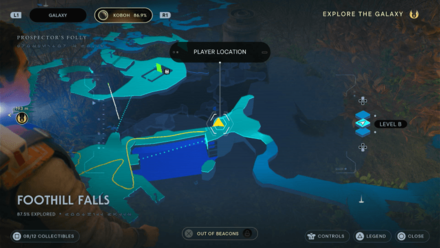 |
|
Area: Foothill Falls Where to Find: Walk across the falls to reach the area where the shard is. |
|
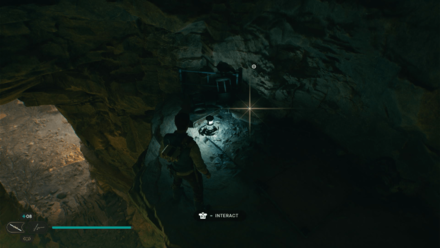 |
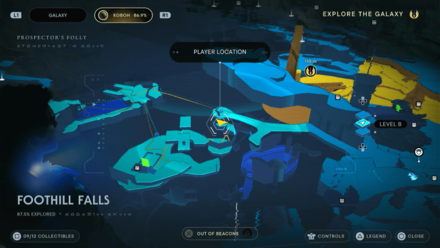 |
|
Area: Foothill Falls Where to Find: After riding the Relter, turn left to a narrow path that will lead to a cave. Use the Nekko to wall run to a high point in the cave where you'll find the shard. |
|
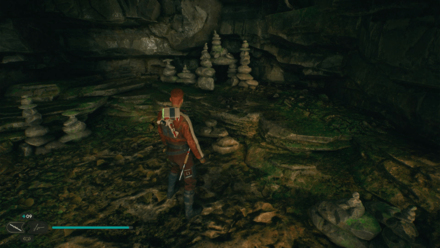 |
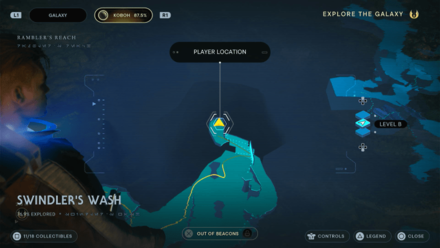 |
|
Area: Swindler's Wash Where to Find: Found in the area with the Bilemaw. Head to the end of the area and wall run to reach the high point on the left. |
|
 |
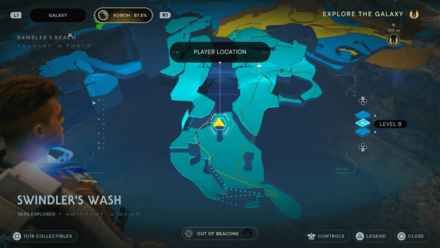 |
|
Area: Swindler's Wash Where to Find: Found in the area with the Bilemaw. Head to the end of the area and wall run to reach the high point on the right. Then jump to the raised surface in the middle. |
|
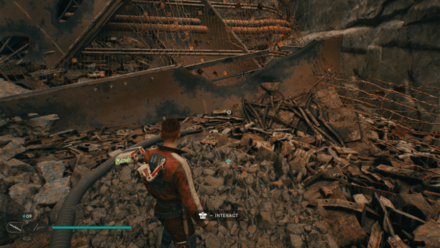 |
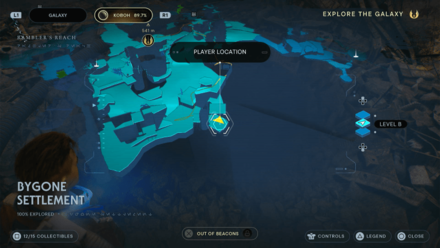 |
|
Area: Bygone Settlement Where to Find: In the area where you recruit the Jawas, there's a narrow path you can squeeze through that will lead to the shard. |
|
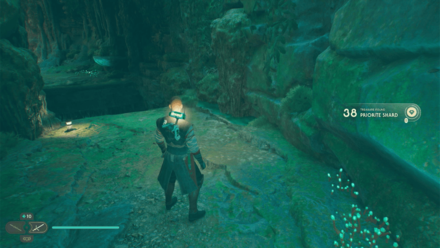 |
 |
|
Area: Untamed Downs Where to Find: Inside the cave, climb up the vines and turn around. You'll find the Shard on the platform across. |
|
 |
 |
|
Area: Untamed Downs Where to Find: Climb up using the Nekko and dash inside the green laser wall. Climb up the walls and dash towards the platform below. You'll find the Shard by the edge. |
|
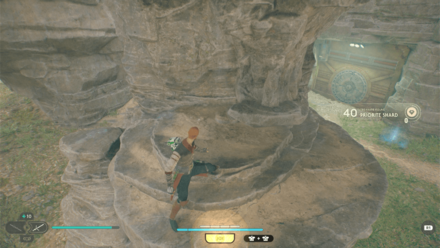 |
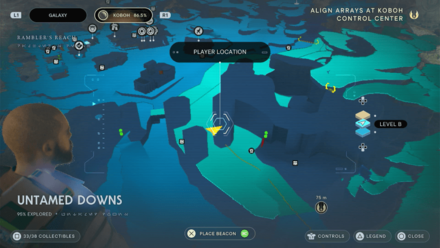 |
|
Area: Untamed Downs Where to Find: Found on a high platform by a pillar overlooking Harvest Ridge. |
|
 |
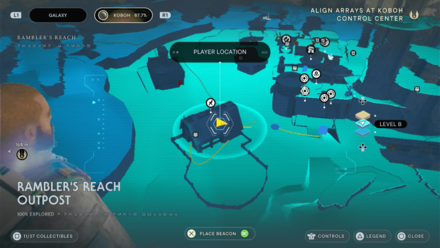 |
|
Area: Rambler's Reach Outpost Where to Find: Bring a bright colored Nekko to the Stables and put it in a stall. Rest and you'll find the Shard by the Nekko's stall. |
|
 |
 |
|
Area: Rambler's Reach Outpost Where to Find: From the rooftop garden, climb up the tower and take the Reltor towards the outer building near the lake. You'll find the Shard on the roof. |
|
Health Essences
| Map Location | In-game Location |
|---|---|
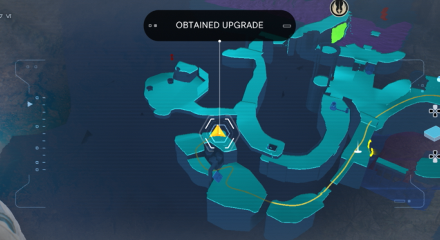 |
 |
|
Area: Derelict Dam
Where to Find: After defeating the Gorocco, pull the hatch nearby and you'll find the Essence near a small nest. |
|
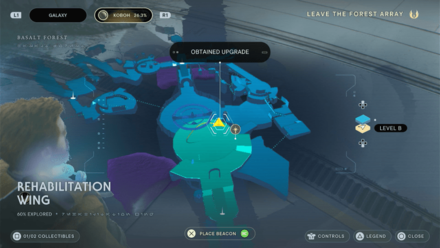 |
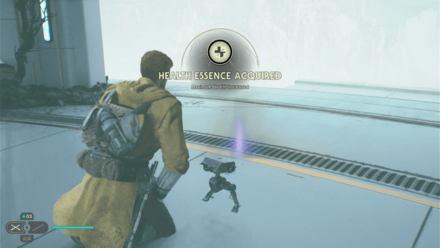 |
|
Area: Rehabilitation Wing
Where to Find: After defeating Dagan Gera, you'll find the Essence just beside you. |
|
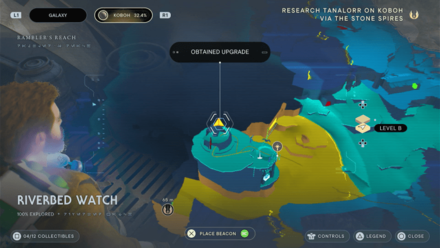 |
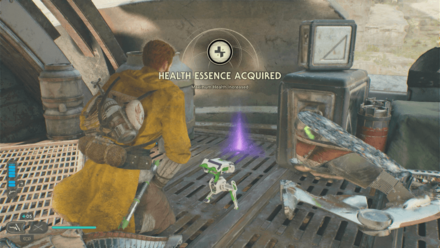 |
|
Area: Riverbed Watch
Where to Find: From the Riverbed Watch Meditation Point, head inside the building and climb up to the very top and defeat the group of droids and climb the building infront. You'll find the chest on at the opposite side. |
|
 |
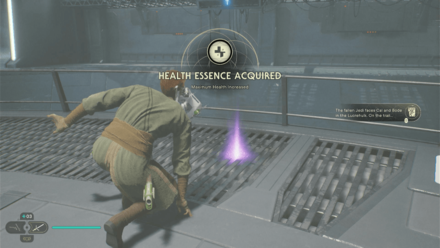 |
|
Area: Forward Control Tower
Where to Find: Found in the area where first fight Dagan Gera. |
|
|
|
|
Area: Lucrehulk Core
Where to Find: From the Meditation Point, bring down the platform and climb it. You'll find the Essence inside the room to the left past the stairs. |
|
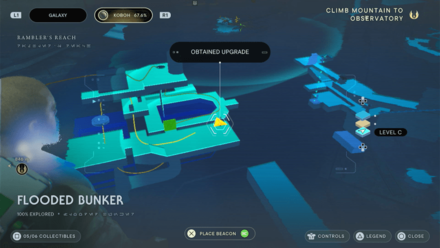 |
 |
|
Area: Flooded Bunker
Where to Find: Dive into the water and enter the pipes. Resurface and you'll find the chest past the door across the room. |
|
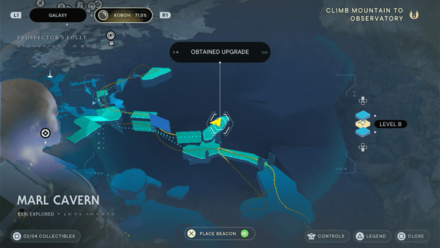 |
 |
|
Area: Fogged Expanse
Where to Find: Head inside the Marl Cavern, and activate the charge to wall run your way through. Follow the path until you reach another charge and wall run past it. You'll find the Essence by a platform at the end. |
|
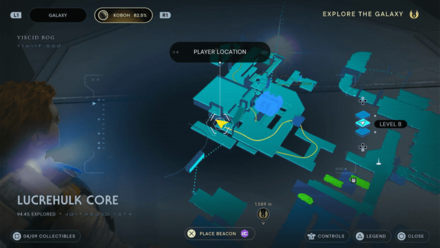 |
 |
|
Area: Lucrehulk Core
Where to Find: Found on the area to the left of the platform you'll need to Force Slam. |
|
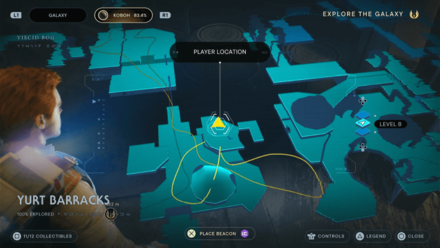 |
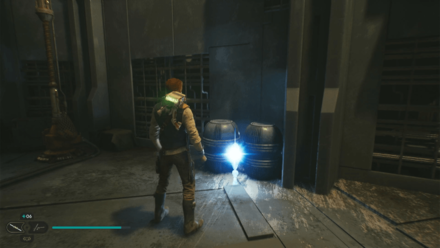 |
|
Area: Yurt Barracks
Where to Find: Found on the second floor of the second area with shacks. |
|
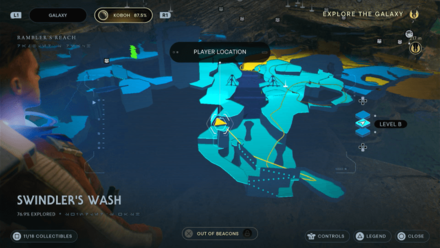 |
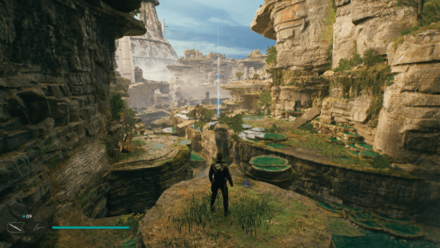 |
|
Area: Swindler's Wash
Where to Find: Found in the area with the Bilemaw. Head to the end of the area and wall run to reach the high point on the right. |
|
Force Essences
| Map Location | In-game Location |
|---|---|
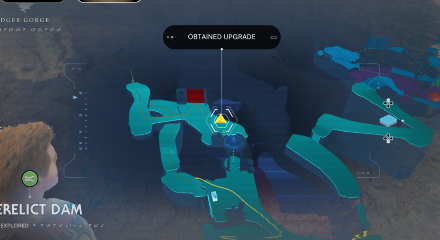 |
 |
|
Area: Derelict Dam
Where to Find: Once you've blown a hole in the cave, lure the Roller Mine towards the road to the right past the broken elevator and throw it to the tarred wall below. Follow the path, climb the rope, and you'll find the chest above near the elevator. |
|
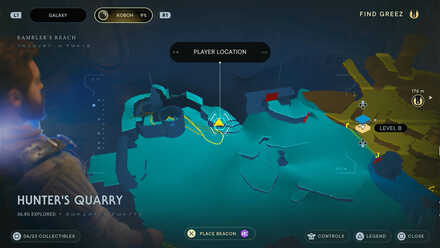 |
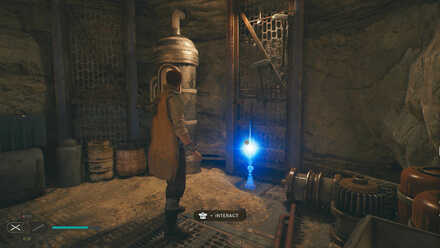 |
|
Area: Hunter's Quarry
Where to Find: This essence can be found behind a destructible wall. Acquire a roller mine from the nearby building to get this essence. |
|
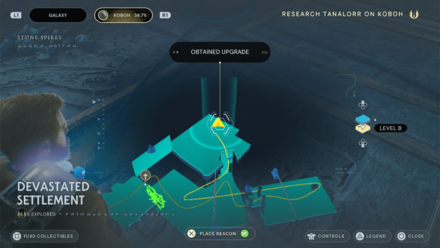 |
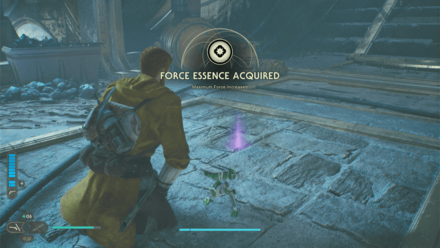 |
|
Area: Devastated Settlement
Where to Find: After unlocking the Koboh Grinder, bring the orb with you and head back past the waterfall opening. Place the Orb on the nearby Coupler and use the Koboh Grinder to trace it and destroy the Koboh Matter. Climb the wall up and you'll find the Essence on your right. |
|
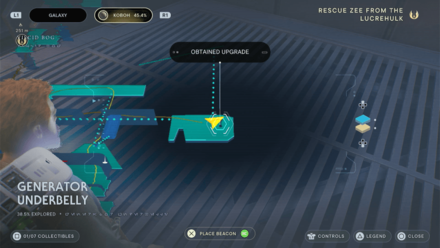 |
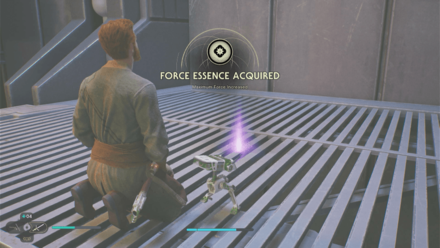 |
|
Area: Generator Underbelly
Where to Find: From the Meditation Point, bring up the platform infront and head for the bridge. Take the path left and climb up the climable wall on the left above. Bring down the platform from above and wall run your way through. You'll find the Essence at the end. |
|
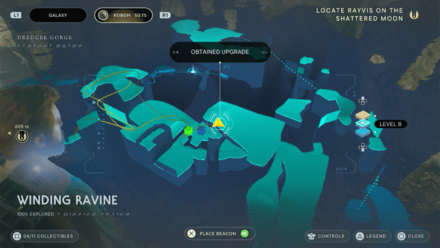 |
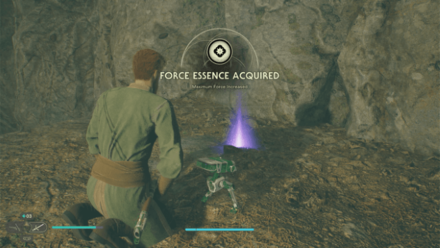 |
|
Area: Winding Ravine
Where to Find: Place one cube in the middle of the two platforms and push the other cube across it. Climb up and you'll find the Essence on top of the ledge. |
|
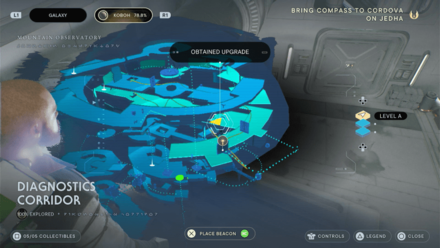 |
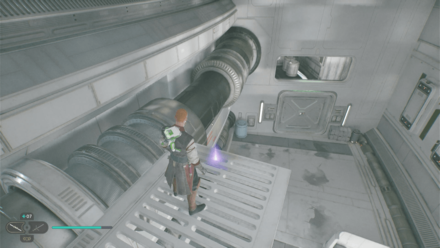 |
|
Area: Diagnostics Corridor
Where to Find: Rotate the Minor Oculus twice and follow the path forward. Bring the balloon outside and cross towards the other balloon on the right. Enter the green laser wall and you'll find the Essence on a high platform. |
|
Skill Points
| Map Location | In-game Location |
|---|---|
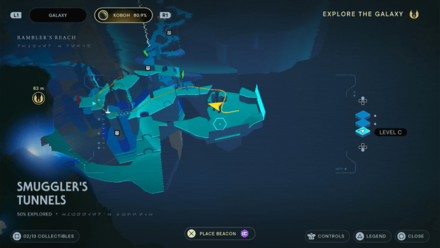 |
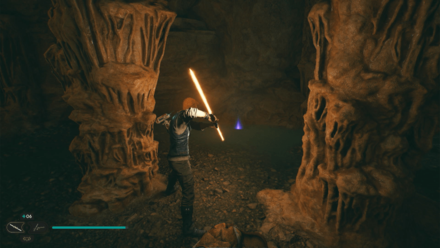 |
|
Area: Smuggler's Tunnels
Where to Find: After jumping past the falls, on the left side of the green laser gate, you'll find a tunnel. Go through the tunnel and the essence can be found on the lower ground. |
|
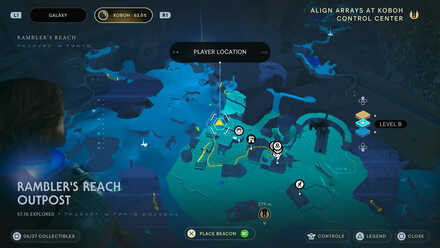 |
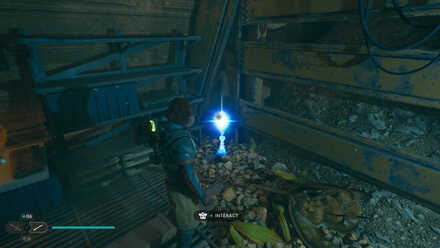 |
|
Area: Rambler's Reach Outpost
Where to Find: Could be found in the basement of Soont Madas' shop. You will need Merrin's Charm and Force Lift to reach his shop. Talk to Soont to gain access to the basement and it will be past the corpse. |
|
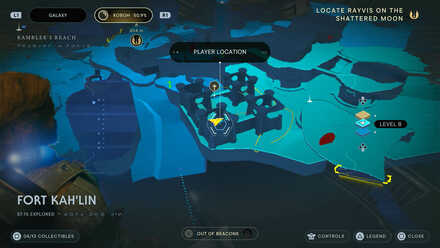 |
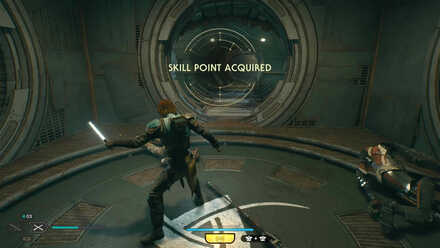 |
|
Area: Fort Kah'lin
Where to Find: Get to the elevated towers in Fort Kahlin and eliminate the droids and Bedlam Raiders there. You will be rewarded a Skill Point upon beating the third tower. |
|
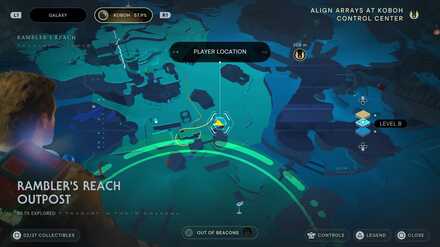 |
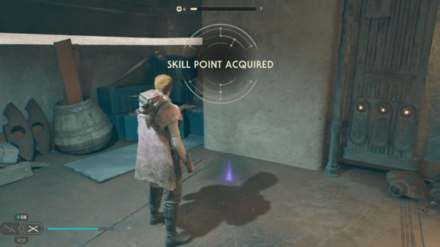 |
|
Area: Rambler's Reach Outpost
Where to Find: Shoot an Electro Dart at the generator in Rambler's Reach Outpost, then reattach the rope to the adjacent house's generator. You need to complete the Jawa Rumor first. |
|
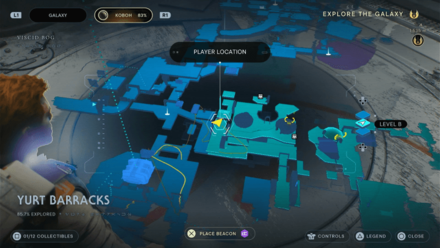 |
 |
|
Area: Yurt Barracks
Where to Find: After climbing a blue wall in the area, look back to see the room containing the Skill Point. |
|
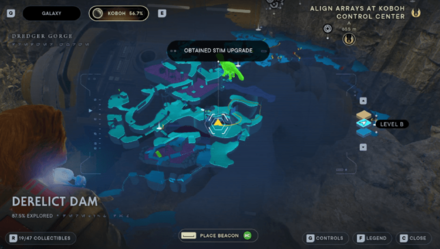 |
 |
|
Area: Derelict Dam
Where to Find: Near the cliff after crossing the ledge using the Ascension Cable Balloons. |
|
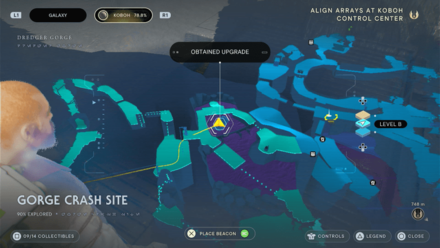 |
 |
|
Area: Gorge Crash Site
Where to Find: Use Lift on the sunken ship to bring it out of the tar pit. You'll find the Essence on the platform. |
|
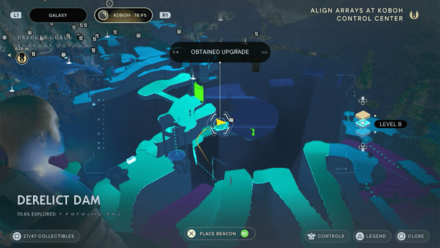 |
 |
|
Area: Derelict Dam
Where to Find: From the Meditation Point, head down the vines and your left and follow the path forward. Swing and wall run across and you'll find the Essence on your left. |
|
 |
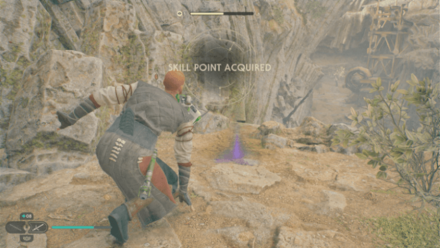 |
|
Area: Derelict Dam
Where to Find: After defeating the Gorocco Matriarch, head past the balloons and you'll find the Essence at the area above. |
|
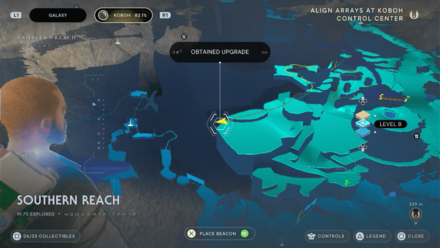 |
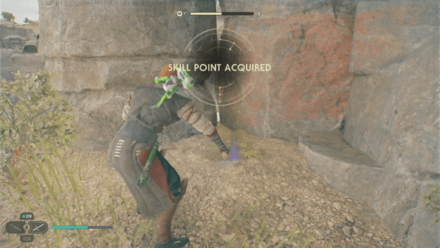 |
|
Area: Southern Reach
Where to Find: Head to the far east of the area past the cave and you'll find the Essence by the edge near a large rock. |
|
 |
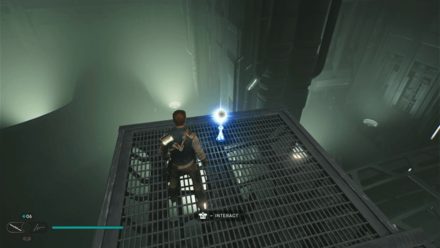 |
|
Area: Lucrehulk Core
Where to Find: Found at the end of a hallway where you'll need to Force Lift a door. |
|
 |
 |
|
Area: Yurt Barracks
Where to Find: Found on the right side of the room after Force Lifting a door. |
|
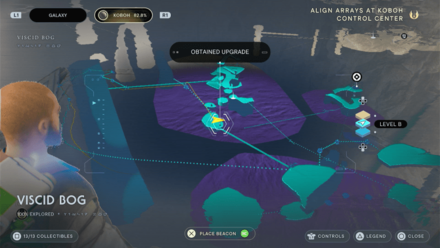 |
 |
|
Area: Viscid Bog
Where to Find: From the Meditation Point, head towards the long elevator and take it. Go through the hole midway and take the first set of balloons. Use the Reltor to fly across hugging your left side until you reach some balloons you can grapple on. Take the series of balloons and you'll find the Essence at the end by a platform. |
|
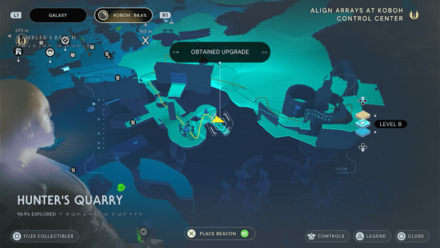 |
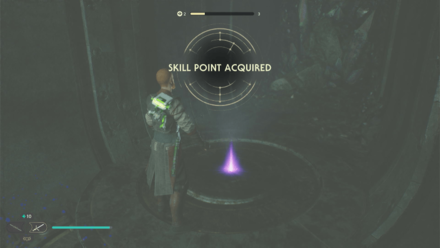 |
|
Area: Hunter's Quarry
Where to Find: From inside the ruins, bring the Orb towards the Coupler in the other room and you'll find the Essence nearby. |
|
 |
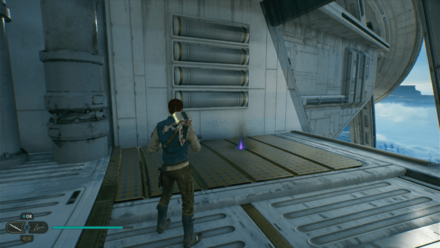 |
|
Area: Observation Deck
Where to Find: When you reach the end of the Observation deck that requires a wall jump, climb the wall. At the top, head to the left to find a long room with the Skill point. |
|
|
|
|
Area: Fogged Expanse
Where to Find: After wall running from the meditation point, look back and use the same structure after it moved to wall run again to a small isolated area. Look down to find the essence along with a shard. |
|
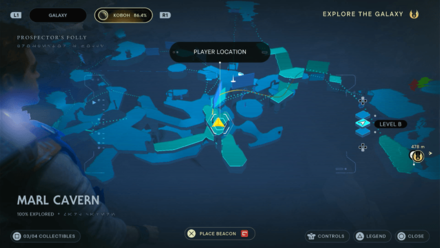 |
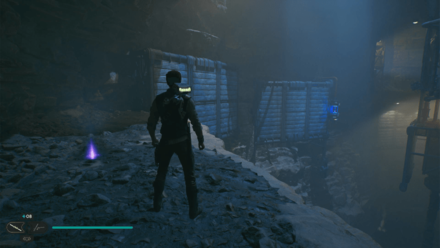 |
|
Area: Marl Cavern
Where to Find: After wall running to the two structures in the cavern, wall run back to reach the essence. |
|
 |
 |
|
Area: Untamed Downs
Where to Find: From the Meditation Point, cross to the platform and you'll find the Essence on your left behind the waterfall. |
|
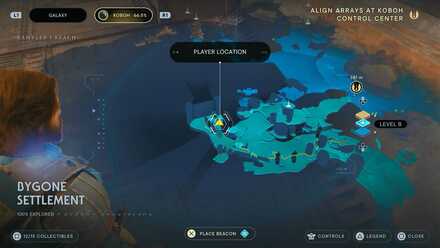 |
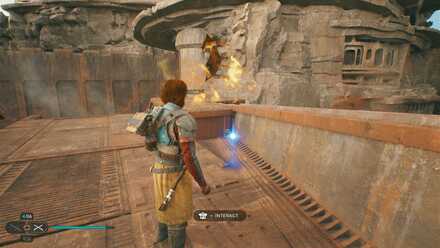 |
|
Area: Bygone Settlement
Where to Find: On the room of the platform where you recruit the Jawas, you will have to access the back of the crawler and up the roof to get the essence. |
|
 |
 |
|
Area: Summit Ridge
Where to Find: Once you reach the area where you can force pull a balloon, don't drop down. Force pull a balloon and turn back. Use the balloon to reach a high point on the wall to the right. |
|
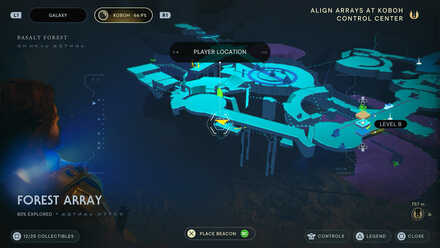 |
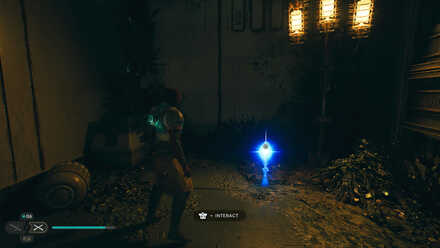 |
|
Area: Forest Array
Where to Find: On the walkway where you face a Mogu, find the narrow beam by the end of the walkway. Jump towards under the bridge. The essence will be on the other side. Climb and cross through the underceiling of the bridge. |
|
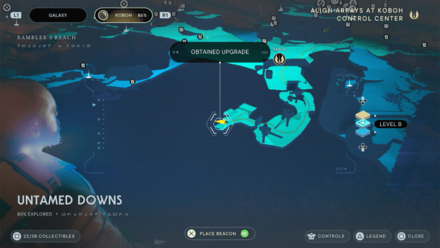 |
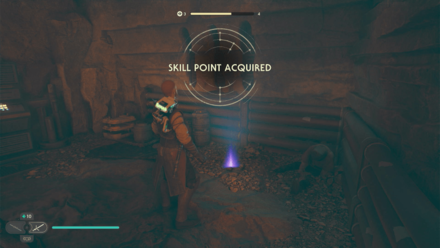 |
|
Area: Untamed Downs
Where to Find: Found inside a small room after defeating E3-VE3. |
|
 |
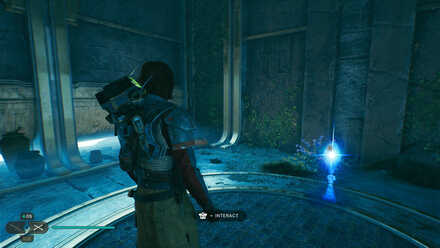 |
|
Area: Devastated Settlement
Where to Find: From the area where you fight the Grocco and Bramlik, jump-climb to the opening to the right of the large green gate. There you will find a Koboh orb, use the Force to take it back to the starting level, go down and you will find a small room where you can place the orb. Another room will open up and you will be able to get the Skill Point. |
|
Star Wars Jedi Survivor Related Guides

All Collectibles
Collectibles by Planet
| All Planets | |
|---|---|
| Coruscant | Koboh |
| Jedha | Shattered Moon |
| Nova Garon | Tanalorr |
Comment
Author

All Koboh Collectibles
Please participate in our site
improvement survey
03/2026
improvement survey
03/2026
Would you assist in
improving Game8's site?
improving Game8's site?

×
We are listening to our users' valuable opinions and discussing how to act on them.
The information collected through this survey will be used for the purpose of improving our services. In addition, the information will only be disclosed a part of a statistic in a format that will not allow identification of personal information.
Begin Survey
Not Now
×
Please rate each item regarding Game8.co's Advertisements.
Amount of Ads
Very Dissatisfied
Somewhat Dissatisfied
Fine
Somewhat Satisfied
Highly Satisfied
Placement of Ads
Timing of Ad Display
Ad Loading Speed
Safeness of Ads
Content of Ads
×
Please rate each item regarding Game8.co's Quality of Articles.
Amount of information
Very Dissatisfied
Somewhat Dissatisfied
Fine
Somewhat Satisfied
Highly Satisfied
Frequency of updates
Speed of new information
Accuracy of articles
Understandibility of articles
Readability of sentences
×
Please rate each item regarding Game8.co's Usability of the Site.
Ease of finding information
Very Dissatisfied
Somewhat Dissatisfied
Fine
Somewhat Satisfied
Highly Satisfied
Loading Speed
Use of Color
Font Size
Visibility of Images
Easy to Understand Layout
×
Please rate each item regarding Game8.co's Message Boards, Comments.
Ease of Writing
Very Dissatisfied
Somewhat Dissatisfied
Fine
Somewhat Satisfied
Highly Satisfied
Readability
Ease in Finding Information
Comment Quality
Comment Quantity
Admin Response
×
Please rate each item regarding Game8.co's Site's new design.
Please rate our site's new design
Very Dissatisfied
Somewhat Dissatisfied
Fine
Somewhat Satisfied
Highly Satisfied
Do you think that the website's design change makes the site easier to use?
Has the new design made it easier for you to find information on the site?
Has the new design improved the overall visual appeal of the site?
How would you rate your overall satisfaction with the new design of the site?
×
How likely are you to recommend Game8 to someone you know?
Very Unlikely
0
1
2
3
4
5
6
7
8
9
10
Very Likely
If you have other opinions regarding potential improvement to the website, please share them with us. We would appreciate your honest opinion.
Note: This is a free response section, so you can proceed without entering anything.
Note: Please be sure not to enter any kind of personal information into your response.
Note: Please be sure not to enter any kind of personal information into your response.
×
Thank You
×
Thank you for participating in our survey! Your answers will help us to improve the quality of our website and services.
We hope you continue to make use of Game8.
We hope you continue to make use of Game8.
Close
Rankings
- We could not find the message board you were looking for.
Gaming News


![Monster Hunter Stories 3 Review [First Impressions] | Simply Rejuvenating](https://img.game8.co/4438641/2a31b7702bd70e78ec8efd24661dacda.jpeg/thumb)
Popular Games

Genshin Impact Walkthrough & Guides Wiki
Honkai: Star Rail Walkthrough & Guides Wiki
Umamusume: Pretty Derby Walkthrough & Guides Wiki
Pokemon Pokopia Walkthrough & Guides Wiki
Resident Evil Requiem (RE9) Walkthrough & Guides Wiki
Monster Hunter Wilds Walkthrough & Guides Wiki
Wuthering Waves Walkthrough & Guides Wiki
Arknights: Endfield Walkthrough & Guides Wiki
Pokemon FireRed and LeafGreen (FRLG) Walkthrough & Guides Wiki
Pokemon TCG Pocket (PTCGP) Strategies & Guides Wiki


Recommended Games
Diablo 4: Vessel of Hatred Walkthrough & Guides Wiki
Cyberpunk 2077: Ultimate Edition Walkthrough & Guides Wiki
Fire Emblem Heroes (FEH) Walkthrough & Guides Wiki
Yu-Gi-Oh! Master Duel Walkthrough & Guides Wiki
Super Smash Bros. Ultimate Walkthrough & Guides Wiki
Pokemon Brilliant Diamond and Shining Pearl (BDSP) Walkthrough & Guides Wiki
Elden Ring Shadow of the Erdtree Walkthrough & Guides Wiki
Monster Hunter World Walkthrough & Guides Wiki
The Legend of Zelda: Tears of the Kingdom Walkthrough & Guides Wiki
Persona 3 Reload Walkthrough & Guides Wiki


All rights reserved
© 2023 Electronic Arts Inc.
The copyrights of videos of games used in our content and other intellectual property rights belong to the provider of the game.
The contents we provide on this site were created personally by members of the Game8 editorial department.
We refuse the right to reuse or repost content taken without our permission such as data or images to other sites.