This survey will take about 1 minute.
Your answers will help us to improve our website.
Star Wars Jedi Survivor
All BD-1 Scan Locations
★ Find out what gets carried over to New Game Plus!
☆ Learn how to get Beskar Steel and all weapon materials!
★ Make sure to get all the BD-1 Upgrades to help in combat!
☆ Get Map Upgrades to make hunting Collectibles easier!
In Star Wars Jedi Survivor, BD-Scans are collectibles that provide XP and information about Eno Cordova's studies and other lore-related information. Read on to learn all the BD-1 Scan locations in Star Wars Jedi Survivor, what they are, their rewards, and if they are missable.
List of Contents
All BD-1 Scan Locations
| ▼ Jump to a planet! | |
|---|---|
| Coruscant | Koboh |
| Jedha | Shattered Moon |
| Nova Garon | Tanalorr |
All Coruscant BD-1 Scan Locations
| All Coruscant BD Scan Locations | ||
|---|---|---|
| Rooftops | Renovation Site 4733 | Industrial Stacks |
| Undercity Meats | Skylane Regulation Station | Hangar 2046-C |
| Freight Handling Depot | ||
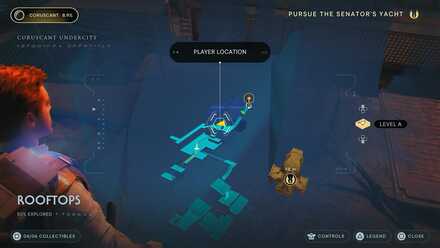
Rooftops
| Map Location | In-game Location |
|---|---|
 Enlarge Enlarge |
 Enlarge Enlarge |
| Collectible: Squatter Camp Type: BD-1 Scans Area: Rooftops Where to Find: Past the first Meditation point you encounter as you progress the introduction. Information: The underworld of Coruscant is an unforgiving place, but a refuge for the destitute and dispossessed. Hovels and camps in the streets and alleys are not uncommon, and a sign of the inequality that yet festers |
|
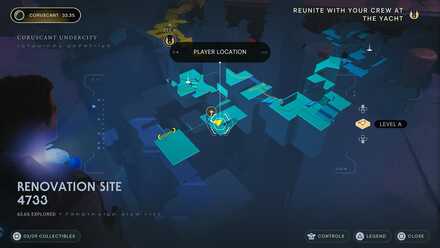
Renovation Site 4733
| Map Location | In-game Location |
|---|---|
 Enlarge Enlarge |
 Enlarge Enlarge |
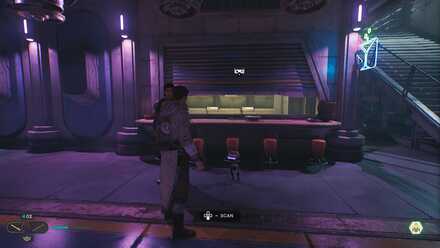
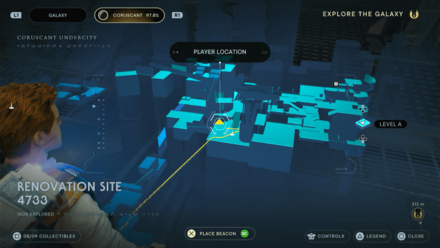
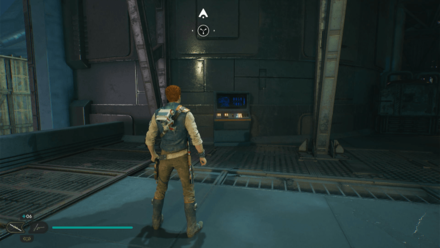
| Collectible: Desi's Noodles Type: BD-1 Scans Area: Renovation Site 4733 Where to Find: You will come across this as you go through Renovation Site 4733. A droid will be patrolling the nearby area. Information: Desi's Noodles, a popular chain in the Coruscant underworld. There are few legitimate reasons to venture down to the lower levels, but popular opinion declares that Desi's is one of them. |
|
 Enlarge Enlarge |
 Enlarge Enlarge |
| Collectible: Local Directory Type: BD-1 Scans Area: Renovation Site 4733 Where to Find: Found near the Renovation Site 4733 Meditation Point, to the left of the stairs. Information: Directories help organize and visualize the flow of goods through the planet. Currently, Imperial expansion has impacted the import business, resulting in shortages throughout the Coruscant underworld. |
|
Industrial Stacks
| Map Location | In-game Location |
|---|---|
 Enlarge Enlarge |
 Enlarge Enlarge |
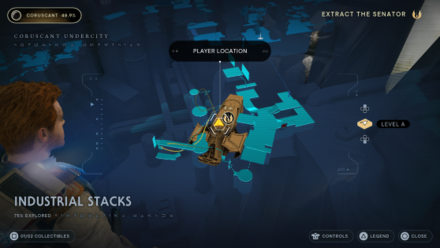
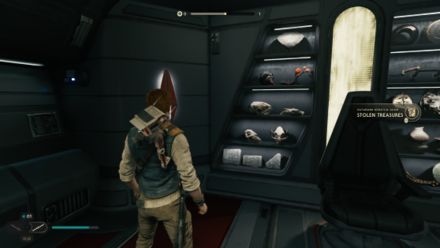
| Collectible: Stolen Treasures Type: BD-1 Scans Area: Industrial Stacks Where to Find: Can be scanned behind the Senator Seja's table when you capture him in his Yacht |
|
Undercity Meats
| Map Location | In-game Location |
|---|---|
 Enlarge Enlarge |
 Enlarge Enlarge |
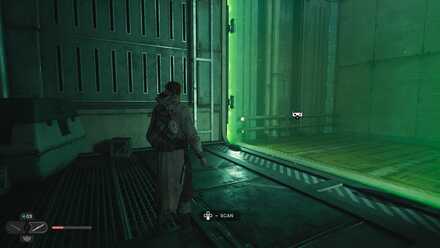
| Collectible: Laser Gate Type: BD-1 Scans Area: Undercity Meats Where to Find: You wil first encounter this laser gate when you reach past the Meditation Point in the Undercity. Unfortunately you will not be able to pass through it for now. Information: A barrier of energy, similar to ray shields utilized extensively in the Clone Wars. They are resistant to nearly all forms of matter, making it almost impossible to break through them without destroying or deactivating their power source. |
|
Skylane Regulation Station
| Map Location | In-game Location |
|---|---|
 Enlarge Enlarge |
 Enlarge Enlarge |
| Collectible: Gonk Droid Type: BD-1 Scans Area: Skylane Regulation Station Where to Find: You can scan this droid in the room past the Meditation Point after defeating the Ninth Sister. Information: The GNK-series power droid is renowned as an excellent portable battery unit. They are nicknamed “Gonk” droids both in reference to their series classification, and their signature, baritone vocalization. |
|
Hangar 2046-C
| Map Location | In-game Location |
|---|---|
 Enlarge Enlarge |
 Enlarge Enlarge |
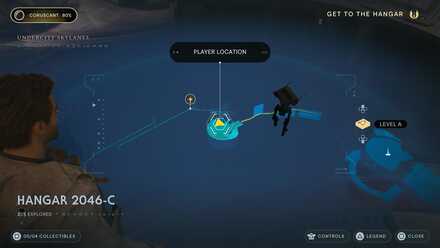
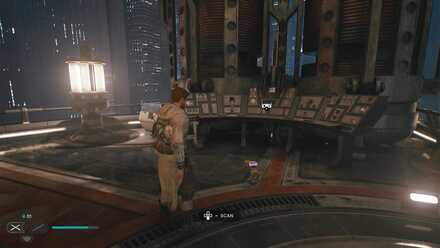
| Collectible: Air Traffic Control Perch Type: BD-1 Scans Area: Hangar 2046-C Where to Find: You can scan this terminal as you make your way through Hangar 2046-C. Information: Skylane perch used by Coruscant Security Forces to monitor traffic flow and enforce regulations. |
|
Freight Handling Depot
| Map Location | In-game Location |
|---|---|
 Enlarge Enlarge |
 Enlarge Enlarge |
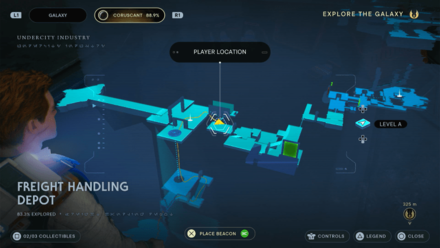
| Collectible: Turbo Dogs Type: BD-1 Scans Area: Freight Handling Depot Where to Find: From the Freight Handling Depot Meditation Point, drop to the bottom of the section where you can wall run. Information: Turbo Dogs, a local favorite. Several exposes have attempted to shed light on the popular product's meat sourcing, but this has done nothing to dampen its appeal. |
|
All Koboh BD-1 Scan Locations
Gorge Crash Site
| Map Location | In-game Location |
|---|---|
 Enlarge Enlarge |
 Enlarge Enlarge |
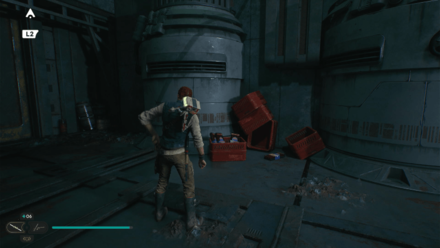
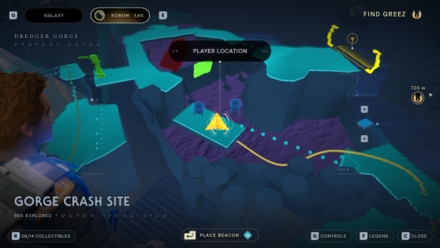
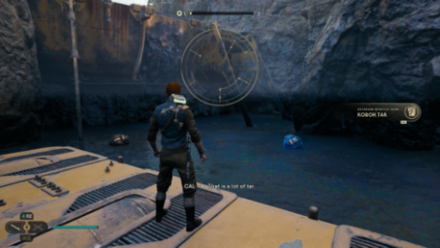
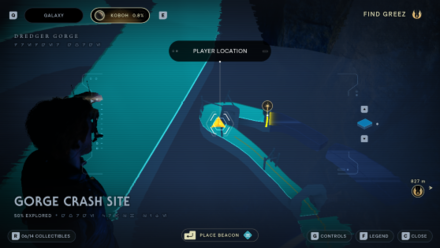
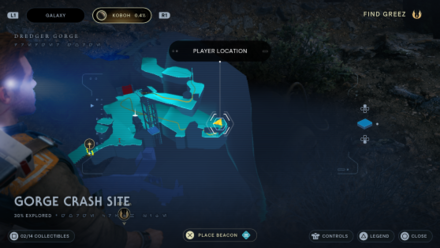
| Collectible: Koboh Tar Type: BD-1 Scans Area: Gorge Crash Site Where to Find: Found when you first encounter the Koboh Tar Information: The tar pits of Koboh are vast, and numerous. Presumably, they existed long before any prospector first settled on Koboh, as their crude dams and reservoirs exist primarily to funnel tar awy from potential prospecting sites. |
|
 Enlarge Enlarge |
 Enlarge Enlarge |
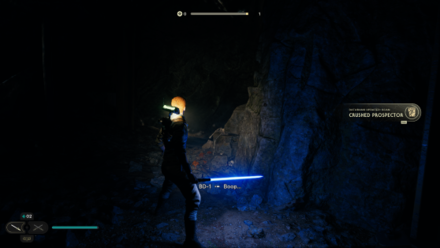
| Collectible: Crushed Prospector Type: BD-1 Scans Area: Gorge Crash Site Where to Find: Can be scanned by the skeleton in the Gorge Crash Site Mining Cave Information: At least one prospector - perhaps searching for priorite amongst the rubble- was crushed by failing rocks in a hastily dug and improperly secured cave. |
|
 Enlarge Enlarge |
 Enlarge Enlarge |
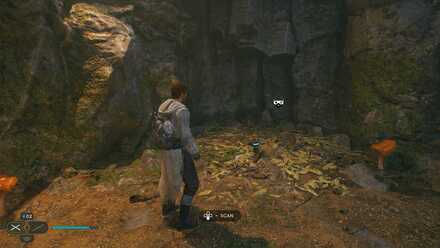
| Collectible: Broken Mining Droid Type: BD-1 Scans Area: Gorge Crash Site Where to Find: Found at the dead end to the right of the Gorge Crash Site Meditation Point Information: Droids are commonly used for manual labor across the galaxy, aiding the toil of organic workers, and Koboh is no exception. Nor isi t any exception that, when the work is finished, they are left ignominiously to rust |
|
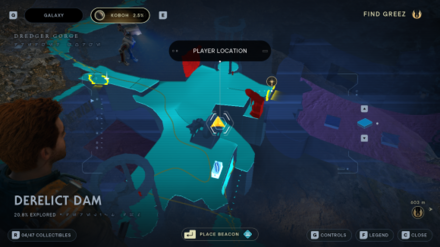
Derelict Dam
| Map Location | In-game Location |
|---|---|
 Enlarge Enlarge |
 Enlarge Enlarge |
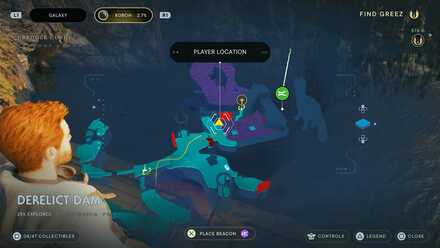
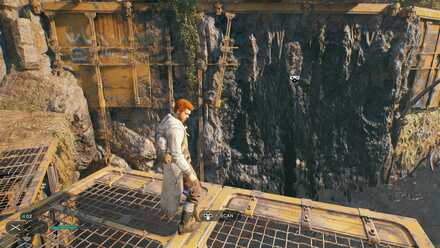
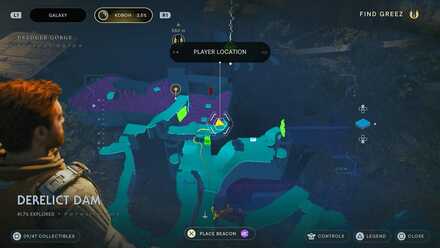
| Collectible: Gorocco Nest Type: BD-1 Scans Area: Derelict Dam Where to Find: Head further into the lair of the Gorocco after slaying it in battle. Information: The gorocco - a large, easily incensed predator - found plentiful prey in the prospectors and raiders that came to their hunting grounds. Scattered remains, though impossible to identify fully, indicate that the gorocco are not short on meals. |
|
 Enlarge Enlarge |
 Enlarge Enlarge |
| Collectible: Crumbling Dam Wall Type: BD-1 Scans Area: Derelict Dam Where to Find: This can be scanned as you make your way to Greez in the Derelict Dam past the Meditation Point. Information: A lack of maintenance, and the relentless creep of time, has visiblyt worn many of the gorge's dams down to a dangerous state - cracks and leaks can be seen everywhere across their aging surfaces. |
|
 Enlarge Enlarge |
 Enlarge Enlarge |
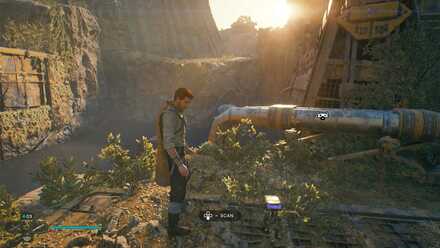
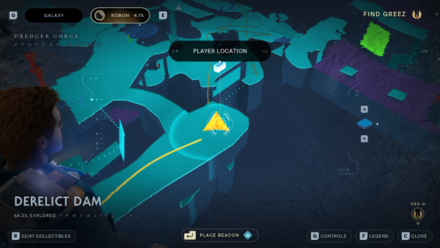
| Collectible: Dam Flow Pipes Type: BD-1 Scans Area: Derelict Dam Where to Find: This can be scanned to your right when you make up to the elevated platform past the Meditation Point in the Derelict Dam. Information: The positioning of this flow pipe across two reservoirs indicates that it was used to control the movement of tar between the dams, in order to maintain a safe level for prospectors to work. |
|
 Enlarge Enlarge |
 Enlarge Enlarge |
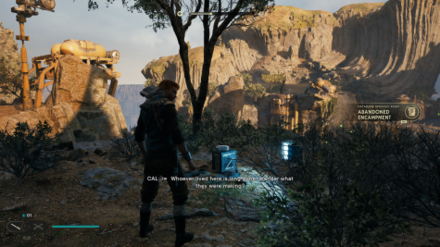
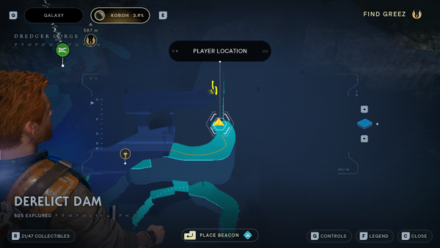
| Collectible: Abandoned Encampment Type: BD-1 Scans Area: Derelict Dam Where to Find: Once you've blown a hole in the cave, lure the Roller Mine towards the road to the right past the broken elevator and throw it to the tarred wall below. Follow the path, climb the rope, walk forward a bit, and you'll find the Scan infront by edge. Information: The scattered debris of a rudimentary encampment. Whoever was here possessed some mechanical ability, but no evidence of their work remains. |
|
 Enlarge Enlarge |
 Enlarge Enlarge |
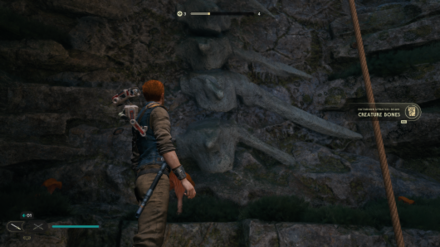
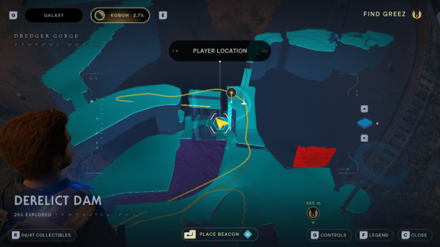
| Collectible: Creature Bones Type: BD-1 Scans Area: Derelict Dam Where to Find: Once you've blown a hole in the cave, lure the Roller Mine towards the road to the right past the broken elevator and throw it to the tarred wall below. Follow the path and you'll find the Scan at the end before ziplining up. Information: The bones of some ancient creature partially exposed by excavation. It must date back several centuries. |
|
 Enlarge Enlarge |
 Enlarge Enlarge |
| Collectible: Destroyed Dam Type: BD-1 Scans Area: Derelict Dam Where to Find: From the Meditation Point, head down the vines and you right by the edge and you'll find the Scan on your right. Information: As a result of what looks like deliberate sabotage, the dam wall has split, allowing huge amounts of tar to spill through the breach and onto whatever lies below. |
|
 Enlarge Enlarge |
 Enlarge Enlarge |
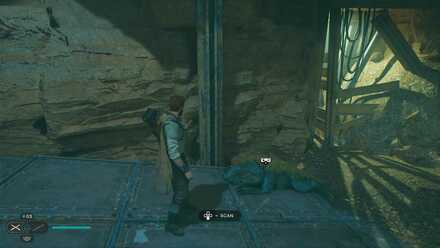
| Collectible: Dead Bedlam Raider Type: BD-1 Scans Area: Derelict Dam Where to Find: From the Meditation Point, head down the path in the middle and you'll find the Scan by the dead body. Information: The body of a long-dead Bedlam Raider, clearly killed by blaster bolts, which mark the body indiscriminately. |
|
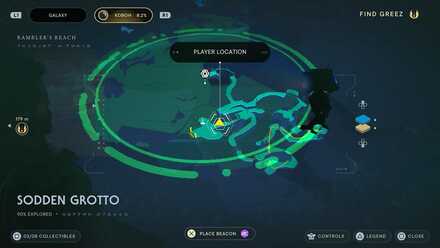
Sodden Grotto
| Map Location | In-game Location |
|---|---|
 Enlarge Enlarge |
 Enlarge Enlarge |
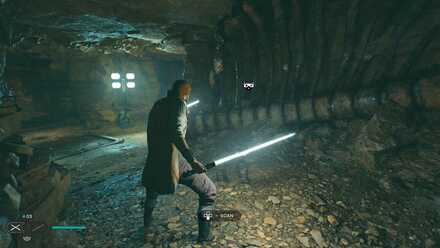
| Collectible: Dead Gorgers Type: BD-1 Scans Area: Sodden Grotto Where to Find: You can scan this dead gorger on a catwalk platform as you explore the depths of the Sodden Grotto. Information: A string of gorgers, all of which were felled in an orderly manner, suggesting the intervention of prospectors and not some hungry beast. |
|
 Enlarge Enlarge |
 Enlarge Enlarge |
| Collectible: Massive Ribcage Type: BD-1 Scans Area: Sodden Grotto Where to Find: Head deeper into the cave system of the Sodden Grotto. The ribcage will be near the area where you must face the Rancor. Information: The exposed ribcage of an enormous creature. Markings on the bone structures indicate this was picked clean by some ravenous predator. |
|
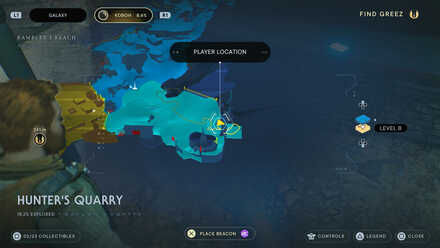
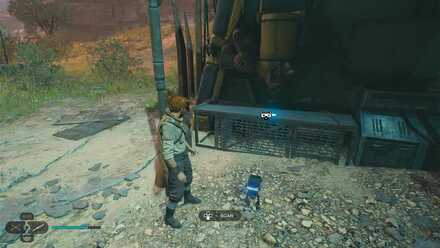
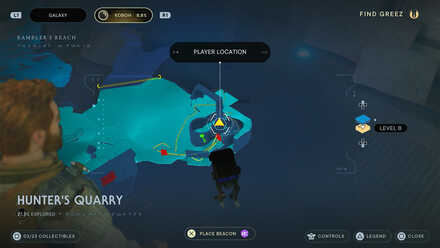
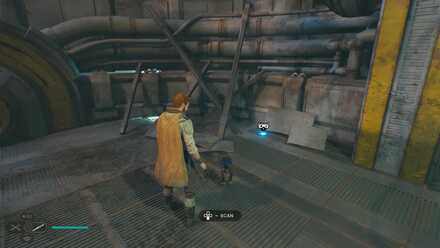
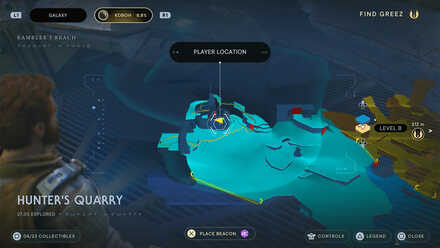
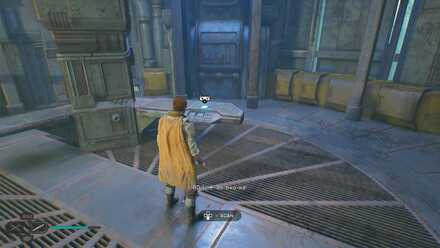
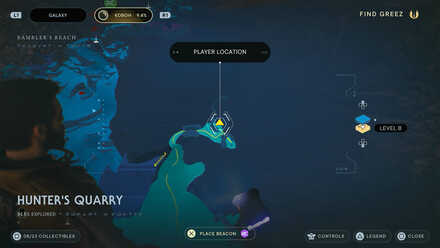
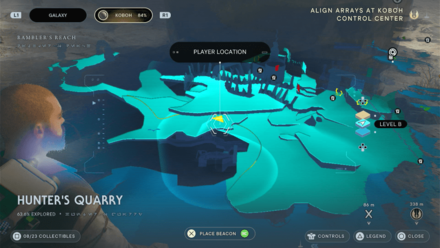
Hunter's Quarry
| Map Location | In-game Location |
|---|---|
 Enlarge Enlarge |
 Enlarge Enlarge |
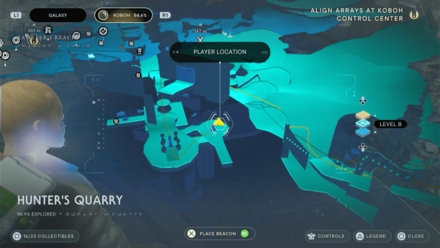
| Collectible: A New Beginning Type: BD-1 Scans Area: Hunter's Quarry Where to Find: Head to the far end of the Hunter's Quarry guarded by several droids and Bedlam Raiders. The item to be scanned will be on one of the tables. Information: A Datapad entry, detailing a prospector's fresh arrival on Koboh: “Planetside at last. I was eager ot land, but tried to stay patient - he couldn't sit still at all, though. I suppose it is understandable; we have come from nothing - less than nothing - and this 'Koboh is certainly a gamble. The planet is unusual, but the potential is exciting. We are ready to see what there is to offer!” |
|
 Enlarge Enlarge |
 Enlarge Enlarge |
| Collectible: A Mechanical Touch Type: BD-1 Scans Area: Hunter's Quarry Where to Find: Found inside the building on top of the scalable wall on the far side of Hunter's Quarry. Information: “The outpost is small, but continuing to grow. The development means my knack for mechanics has attracted attention - I was asked to help. He did not want me to, but I did. I think by automating some of the spherical grenades, we could figure something out. ” |
|
 Enlarge Enlarge |
 Enlarge Enlarge |
| Collectible: A Gift Revoked Type: BD-1 Scans Area: Hunter's Quarry Where to Find: Found inside the building on top of the scalable wall on the far side of Hunter's Quarry. Information: “The others dig too much. They damage the cubes. Enough. Enough. The spheres will stop them. They will stay away from the cubes. Or else.” |
|
 Enlarge Enlarge |
 Enlarge Enlarge |
| Collectible: The Wise Hunters Type: BD-1 Scans Area: Hunter's Quarry Where to Find: This item can be found inside a cavern in the Hunter's Quarry. Information: Gorgers scour in packs, a strategy that has seved them well the often desperate and hapless prospectors came to Koboh. A single Hunter poses no problem to a prospector with a blaster, but when lured into a nest full of the beasts, the situation rapidly deteriorates. |
|
 Enlarge Enlarge |
 Enlarge Enlarge |
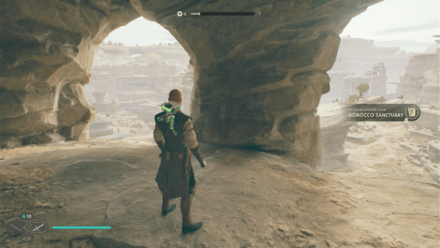
| Collectible: Gorocco Sanctuary Type: BD-1 Scans Area: Hunter's Quarry Where to Find: Found in the Gorocco nest just by the wall. Information: Gorocco construct nests in the most advantageous areas - protected from the harsh elements, and with as wide and visible an approach as possible. Typically, only the female gorocco remains in the nest, to rest and protect any young, while the male spends time hunting for food. |
|
 Enlarge Enlarge |
 Enlarge Enlarge |
| Collectible: The Koboh Emergence Type: BD-1 Scans Area: Hunter's Quarry Where to Find: From inside the ruins, bring the Orb towards the Coupler in the other room and you'll find the Scan nearby. Information: An entry from Jedi Master Pyt'r Stevar: “The Sky is aflame. The moon, I think, was destroyed. It is hard to tell. The shuttles are leaving, but we are trapped. The Padawans are afriad, and I cannot leave them. Whatever out fate on Koboh may be, we entrust it now to the Force.” |
|
Chamber of Duality
| Map Location | In-game Location |
|---|---|
 Enlarge Enlarge |
 Enlarge Enlarge |
| Collectible: Disaster Type: BD-1 Scans Area: Chamber of Duality Where to Find: Can be scanned near the end of the platforming route of the Chamber of Duality. Information: Huge masses of rock fell through the roof and slammed into this subterranean sanctuary, indicating intense seismic activity above ground. |
|
Fort Kah'lin
| Map Location | In-game Location |
|---|---|
 Enlarge Enlarge |
 Enlarge Enlarge |
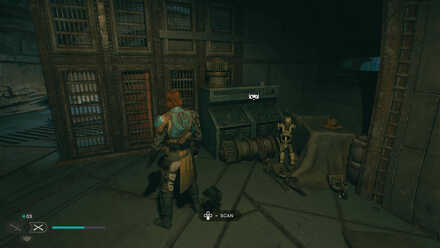
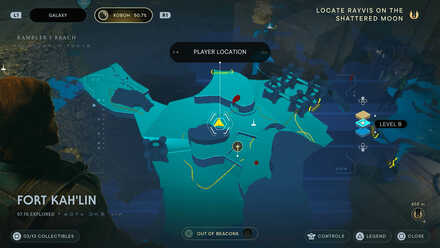
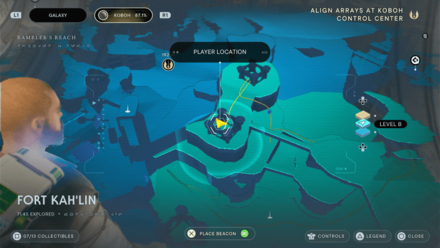
| Collectible: Bandit Camp Type: BD-1 Scans Area: Fort Kah'lin Where to Find: Look for the broken droid inside a shack to the right of the Meditation Point. Information: Before the Bedlam Raiders came to prominence, Koboh's locals were bothered by various bandit groups. Though not as unified and organized as Rayvis' army-to-be, it was nevertheless advisable to stay away from their territory. |
|
 Enlarge Enlarge |
 Enlarge Enlarge |
| Collectible: Past Signs of Life Type: BD-1 Scans Area: Fort Kah'lin Where to Find: Look for the broken droid inside a shack to the left of the Meditation Point. Information: The evidence suggests that Fort Kah'lin was once a hub of activity for a local bandit gang. Although now it is still occupied by Bedlam Raider soldiers and battle droids, these abandoned items speak to a more active base, made sparse by some past incident. |
|
 Enlarge Enlarge |
 Enlarge Enlarge |
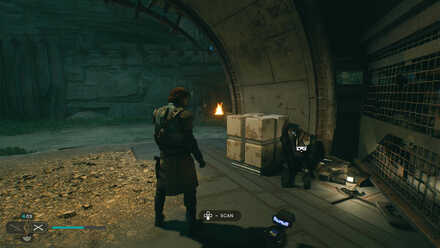
| Collectible: A House Divided Type: BD-1 Scans Area: Fort Kah'lin Where to Find: Found inside a building at the top floor. Information: A datapad entry from a leader of the bandit camp, detailing growing discontent: “The offer was brought to us by the Gen'Dai, but not every corner of the camp seemed pleased. Some accuse us of trading our freedom for just another hand around our throats. If they won't come willingly, then I'll have no choice but to force them...” |
|
Rambler's Reach Outpost
| Map Location | In-game Location |
|---|---|
 Enlarge Enlarge |
 Enlarge Enlarge |
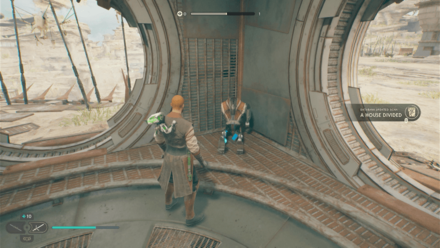
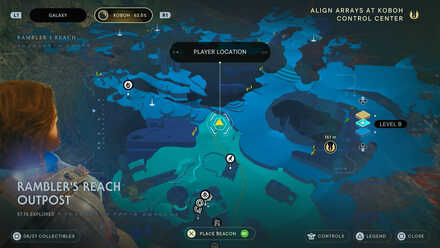
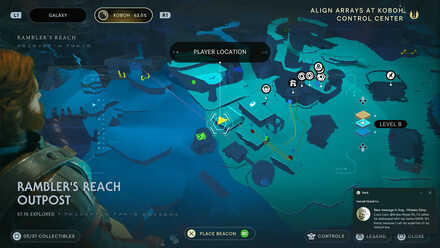
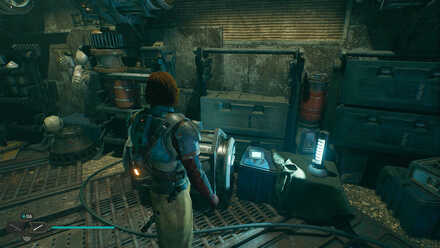
| Collectible: Turgle's Shiny Shell Type: BD-1 Scans Area: Rambler's Reach Outpost Where to Find: Found by a bridge when you go straight then veer to the left from the landing pad. Information: Outpost residents will wearily attest to Turgle's elation at having found a particularly remarkable shell, and his subsequent despair at having lost it. This appears to be that shell, though it is by no means provable, nor worthy of further investigation. |
|
 Enlarge Enlarge |
 Enlarge Enlarge |
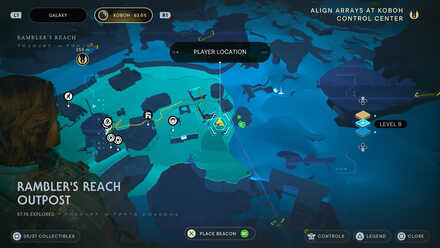
| Collectible: Forever Curious Type: BD-1 Scans Area: Rambler's Reach Outpost Where to Find: Could be found in Soont Madas' shop. You will need Merrin's Charm and Force Lift to reach his shop. Information: “These monoliths...I cannot figure them out, which is always compelling. The locals say some ancient treasure is hidden inside, but nobody has been able to crack them. He is much more interested than I am, however, which is becoming something of a concern.” |
|
 Enlarge Enlarge |
 Enlarge Enlarge |
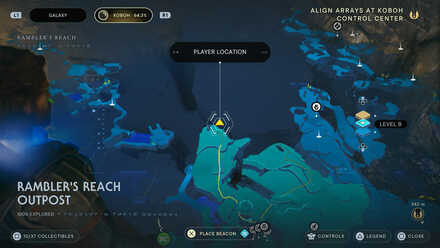
| Collectible: Obsession Type: BD-1 Scans Area: Rambler's Reach Outpost Where to Find: Could be found in Soont Madas' shop. You will need Merrin's Charm and Force Lift to reach his shop. Information: “I will crack them. I will dig in. Find their treasures. No matter what. I will get in.” |
|
 Enlarge Enlarge |
 Enlarge Enlarge |
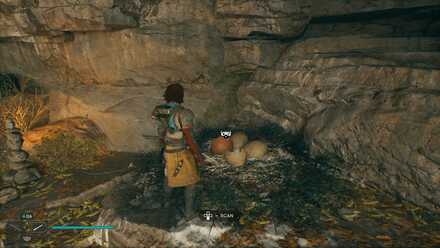
| Collectible: Relter Egg Type: BD-1 Scans Area: Rambler's Reach Outpost Where to Find: Climb the vines of the Pyloon's Saloon past the rooftop garden. Jump and dash to the platform overlooking the landing pad. The eggs can be scanned nearby the cave. Information: Typically, relters do not leave their eggs unguarded for long. However, with the rise of the Bedlam Raiders on Koboh, the valley ecosystem has caused relters to fly further, and longer, in search of food. |
|
Forest Array
| Map Location | In-game Location |
|---|---|
 Enlarge Enlarge |
 Enlarge Enlarge |
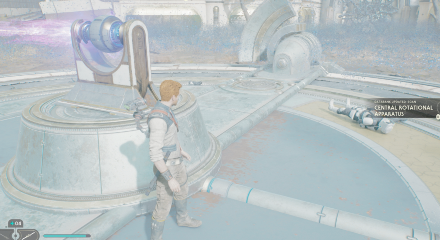
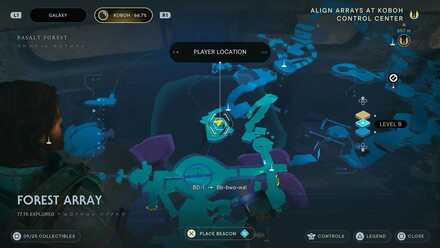
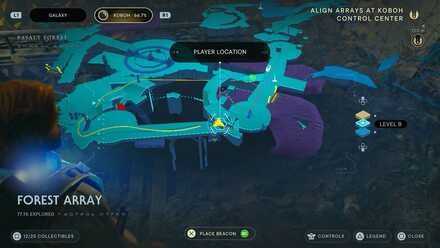
| Collectible: Central Rotaional Apparatus Type: BD-1 Scans Area: Forest Array Where to Find: Found at the middle of the area surrounded by Koboh Matter. Information: The complexity of the subterranean mechanisms operating the Array's above-ground ionic beams is difficult to imagine. While the apparatus has clearly not been moved in years, a way to control it must still exist. |
|
 Enlarge Enlarge |
 Enlarge Enlarge |
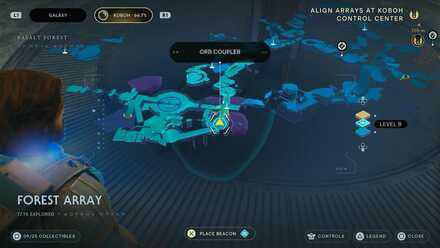
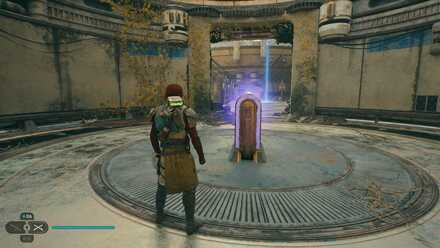
| Collectible: Orb Amplifier Type: BD-1 Scans Area: Forest Array Where to Find: Story-related databank entry. This can be scanned when you use the Koboh orb to clear the Koboh material to the Meditation Point. Information: A curious fixture of High Republic-era Jedi technology that stabilizes, focuses, and magnifies the erratic potential energy stored in Koboh orbs. |
|
 Enlarge Enlarge |
 Enlarge Enlarge |
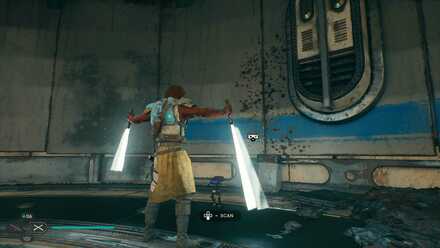
| Collectible: Indomitable Type: BD-1 Scans Area: Forest Array Where to Find: Scan the shield by the wall located in the area where you fight multiple Stormtroopers near the Bilemaw Den Meditation Point. Information: These reinforced shields - dispensed to Imperial riot forces - were designed to sustain heavy, destructive assaults and have even proven resistant to lightsaber strikes. The standard armor of the trooper wielding this shield, however offered no such additional benefits. |
|
 Enlarge Enlarge |
 Enlarge Enlarge |
| Collectible: Epic Moltings Type: BD-1 Scans Area: Forest Array Where to Find: Found under the area where the giant bird is perched when you first arrive in the Forest Array. It is also accessible from the Forest Array Meditation Point through platforming to the indicated location. Information: The piasa reigns over the skeis and plains as one of Koboh's apex preadators - a terror to any creature caught in its sights. The nomadic creature rarely perches, and its temporary habitation of the Forest Array may indicate either injury or distress. |
|
 Enlarge Enlarge |
 Enlarge Enlarge |
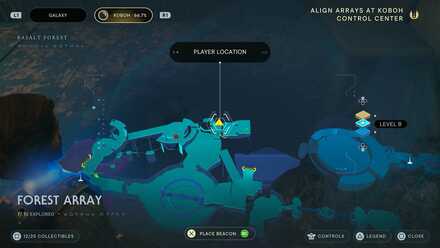
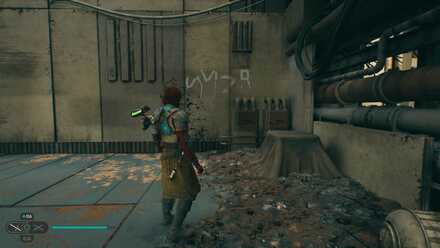
| Collectible: Auxiliary Array Telescope Type: BD-1 Scans Area: Forest Array Where to Find: Found just before the scalable wall that will allow you to reach the Orb Amplifier on the way to the Meditation Point. Information: The generators charge the air with highly-excited energy currents, similar in both power and danger to interstellar ionic storms. From the looks of the structure's rampant rust and overgrowth, it hasn't been put to use in several decades. |
|
Nekko Pools
| Map Location | In-game Location |
|---|---|
 Enlarge Enlarge |
 Enlarge Enlarge |
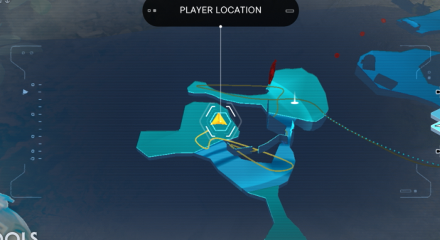
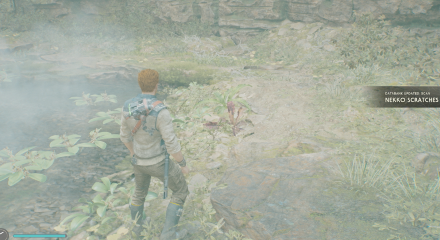
| Collectible: Nekko Scratches Type: BD-1 Scans Area: Nekko Pools Where to Find: Found in a swampy section of the area you'll need a Nekko to access. |
|
Yurt Barracks
| Map Location | In-game Location |
|---|---|
 Enlarge Enlarge |
 Enlarge Enlarge |
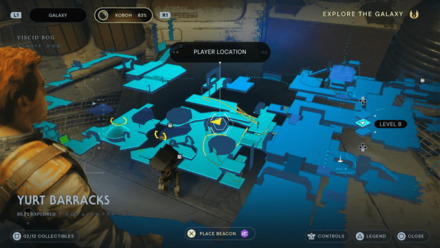
| Collectible: Bedlam Raider Yurt Type: BD-1 Scans Area: Yurt Barracks Where to Find: Found in one of the shacks in the area. |
|
Smuggler's Tunnels
| Map Location | In-game Location |
|---|---|
 Enlarge Enlarge |
 Enlarge Enlarge |
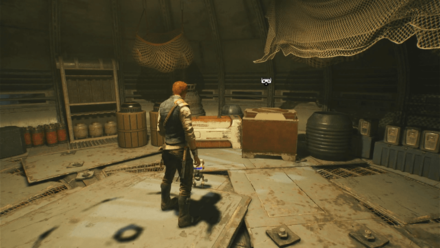
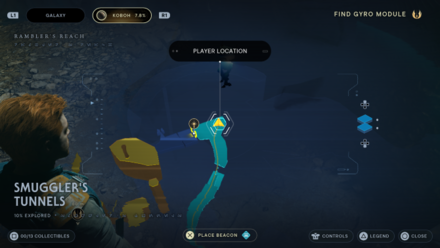
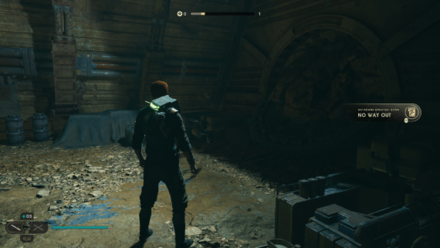
| Collectible: No Way Out Type: BD-1 Scans Area: Smuggler's Tunnels Where to Find: Can be scanned as you progress through the tunnel system under the Pyloon's Saloon. Information: One of several tunnels routing beneath Pyloon's Saloon. Proximity to the landing pad would have made the passage ideal for smuggling goods in and out of the cantina, hidden from prying and curious eyes. |
|
Pyloon's Saloon
| Map Location | In-game Location |
|---|---|
 Enlarge Enlarge |
 Enlarge Enlarge |
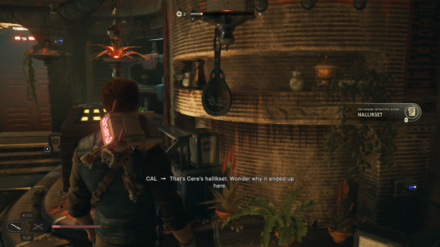
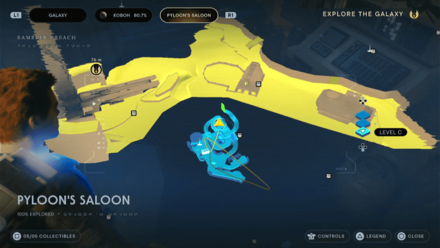
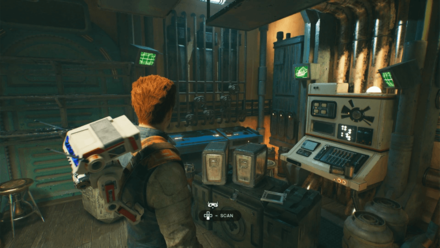
| Collectible: Hallikset Type: BD-1 Scans Area: Pyloon's Saloon Where to Find: Can be scanned in the basement of the Pyloon's Saloon near the Meditation Point in your resting area. Information: This seven-stringed hallikset once belonged to the Jedi Cere Junda, who composed music with it. Using psychimetry, Cal was also able to play it, which is perhaps why Cere left it with him after she departed the Mantis. |
|
 Enlarge Enlarge |
 Enlarge Enlarge |
| Collectible: Moran's Possessions Type: BD-1 Scans Area: Pyloon's Saloon Where to Find: Talk to Moran 7 times to gain access to his room. Exit the saloon every time a conversation ends. |
|
Riverbed Watch
| Map Location | In-game Location |
|---|---|
 Enlarge Enlarge |
 Enlarge Enlarge |
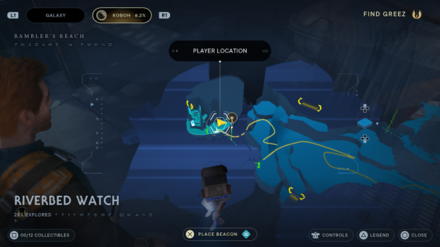
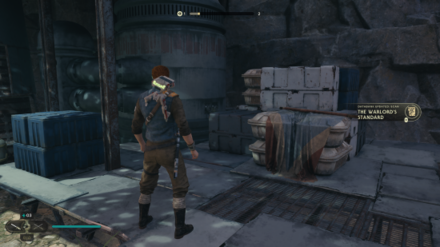
| Collectible: The Warlord's Standard Type: BD-1 Scans Area: Riverbed Watch Where to Find: Found just beside the Meditation Point by some crates. Information: A broken standard, seeming to indicate that this tower was once under the commands of someone known as the 'Warlord of the Tower.' That such a name would belong originally to a Bedlam Raider seems unlikely, given their subservience to Rayvis. |
|
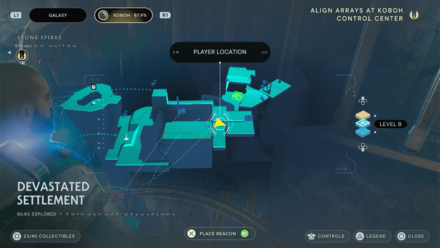
Devastated Settlement
| Map Location | In-game Location |
|---|---|
 Enlarge Enlarge |
 Enlarge Enlarge |
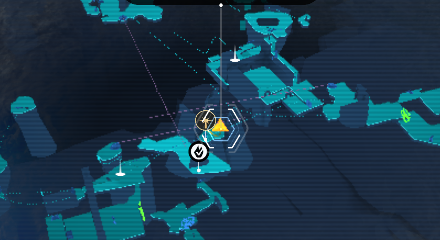
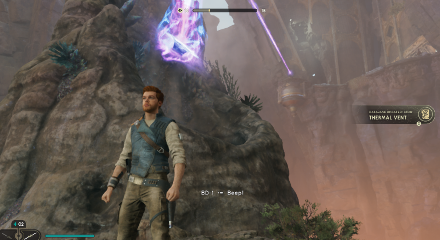
| Collectible: Thermal Vent Type: BD-1 Scans Area: Devastated Settlement Where to Find: Found in the one of the central platforms in the middle of the Devastated Settlement accessible only by Relters. Information: In the wake of Koboh's catastrophe, thermal activity surged. The surface cracked and lava flowed freely. Pressure vented through naturally-formed fissures, only to be held back by now-untamed Koboh matter. |
|
 Enlarge Enlarge |
 Enlarge Enlarge |
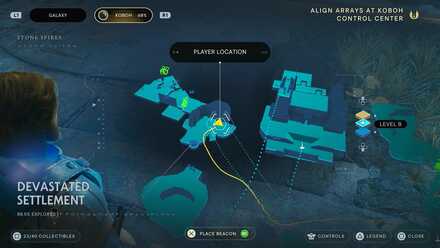
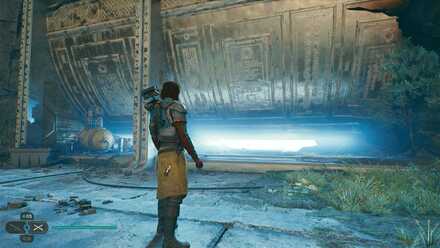
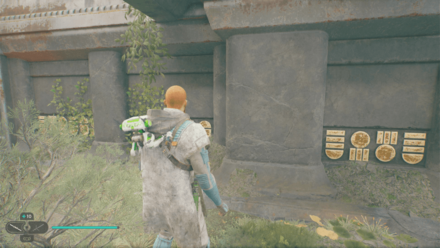
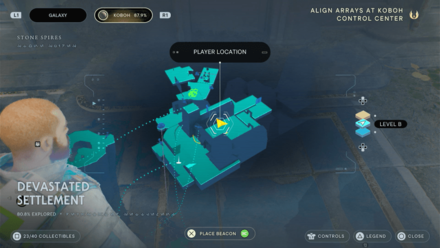
| Collectible: Chamber Mural Type: BD-1 Scans Area: Devastated Settlement Where to Find: Scan the mural on one of the platforms in the area. From the Meditation Point, take a Relter and glide towards the central thermal vent to push you upward. Steer to the right and the scannable wall will be there. Information: A mural across the exterior wall of a meditation chamber, reading: “Those who ask find answers, Those who combat falsehoods find the truth, And those who see inside themselves will know the path ahead.” |
|
 Enlarge Enlarge |
 Enlarge Enlarge |
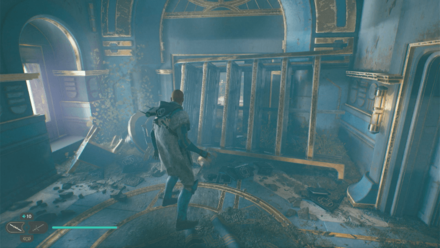
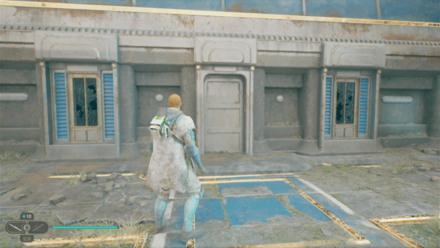
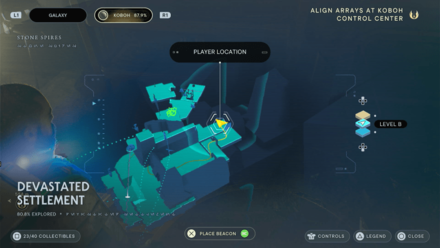
| Collectible: Devastated Remains Type: BD-1 Scans Area: Devastated Settlement Where to Find: From the Grand Courtyard Meditation Point, enter the building infront and you'll find the Scan to the left past the door. Information: Although some structures were spared total annihilation, nothing survived intact. Strewn debris and overgrown nature speak to a world first devastated, then abandoned. |
|
 Enlarge Enlarge |
 Enlarge Enlarge |
| Collectible: Central Manse Type: BD-1 Scans Area: Devastated Settlement Where to Find: From the Grand Courtyard Meditation Point, take the alleyway left and you'll find the Scan by the wall. Information: The settlement's structure served as a central point for the Jedi on Koboh, its spires deliberately calling back to the disctinctive towers of the Jedi Temple on Coruscant. |
|
 Enlarge Enlarge |
 Enlarge Enlarge |
| Collectible: Training Courtyard Type: BD-1 Scans Area: Devastated Settlement Where to Find: From the Grand Courtyard Meditation Point, enter the building infront and you'll find the Scan on your left by the door. Information: The manse was built around a large central courtyard, clearly intended for Jedi training. Ample room was provided for sparring, meditation, or simple yet productive discussion between peers. |
|
 Enlarge Enlarge |
 Enlarge Enlarge |
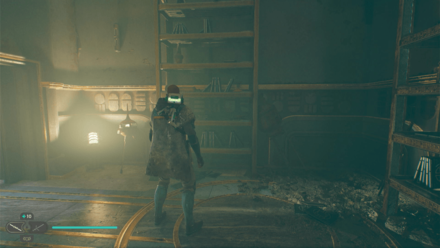
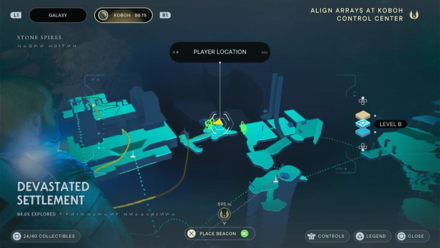
| Collectible: Theses of Yaddle Type: BD-1 Scans Area: Devastated Settlement Where to Find: Found infront of a shelf past the door. Information: A tome by Jedi Master Yaddle, detailing little known Jedi arts. Unfortunately, her notes on both are incomplete and - perhaps deliberately - vague. |
|
 Enlarge Enlarge |
 Enlarge Enlarge |
| Collectible: Fallen Padawan Type: BD-1 Scans Area: Devastated Settlement Where to Find: From the Grand Courtyard Meditation Point, take the Reltor and fly around towards the left into the cave below across another island. You'll find the Scan inside. Information: The Emergence on Koboh devastated the planet, and the High Republic settlement was no exception. As the ground beneath them gave way, many were caught in the erupting earth and crushed beneath the mighty masonry erected for their own betterment. |
|
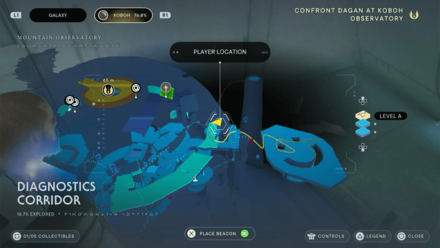
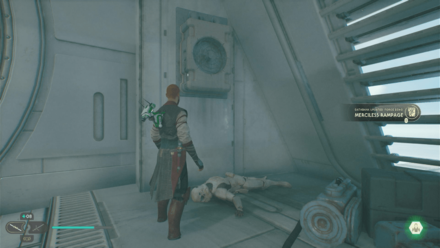
Diagnostics Corridor
| Map Location | In-game Location |
|---|---|
 Enlarge Enlarge |
 Enlarge Enlarge |
| Collectible: Merciless Rampage Type: BD-1 Scans Area: Diagnostics Corridor Where to Find: Once you've reunited with Bode, head for the platform above the Lift the opening. You'll fin the Force Echo on your left by the corner. Information: Dagan Gera spare no foe on his tear towards the Observatory above the clouds. |
|
 Enlarge Enlarge |
 Enlarge Enlarge |
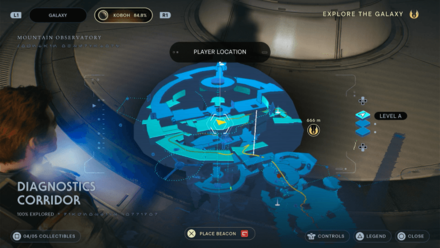
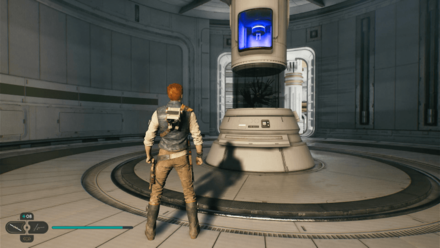
| Collectible: Minor Oculus Type: BD-1 Scans Area: Diagnostics Corridor Where to Find: Found in the room with the rotating walls that are activated by the Electro Dart. Information: This rotating oculus is powered by the same Koboh matter as the Forest Array. This larger model indicates that Republic scientists created the prototype for later designs focusing on compactness and efficiency. |
|
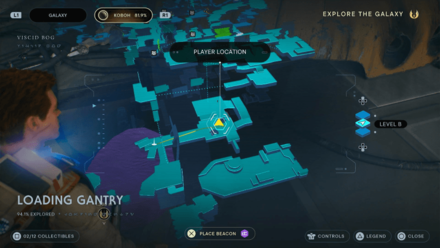
Loading Gantry
| Map Location | In-game Location |
|---|---|
 Enlarge Enlarge |
 Enlarge Enlarge |
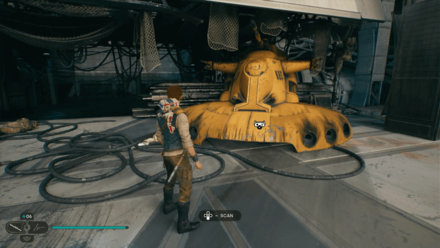
| Collectible: Sunken Aat Type: BD-1 Scans Area: Loading Gantry Where to Find: From the Meditation Point, enter through the broken door and the scan will be on the far left. |
|
 Enlarge Enlarge |
 Enlarge Enlarge |
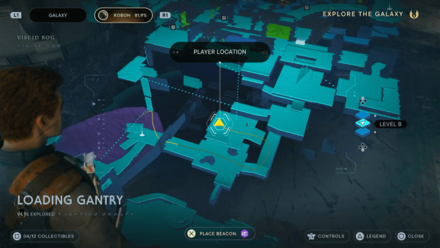
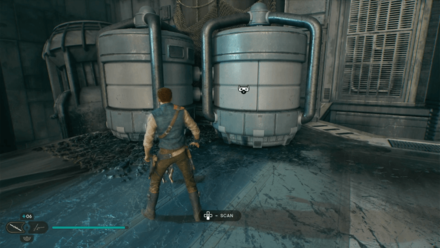
| Collectible: Storage Tanks Type: BD-1 Scans Area: Loading Gantry Where to Find: From the Meditation Point, pass through the broken door. Head straight to the end of the area and walk up the slanted platforms. |
|
Viscid Bog
| Map Location | In-game Location |
|---|---|
 Enlarge Enlarge |
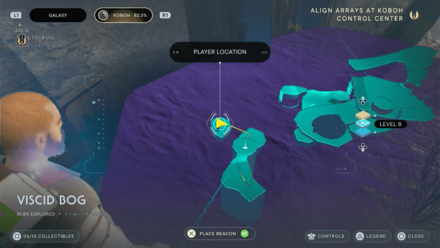
 Enlarge Enlarge |
| Collectible: Crashed Vulture Droid Type: BD-1 Scans Area: Viscid Bog Where to Find: On a platform with a chest near the Meditation Point. Information: Manufactured in the catherdral factories of Xi Char, the Variable Geometry Self-Propelled Battle Droid was the main starfighter support of the Separatist forces in the Clone Wars. The swamp surround the Lucrehulk is littered with them, suggesting they were thrown clear during the battleship's descent to Koboh. |
|
 Enlarge Enlarge |
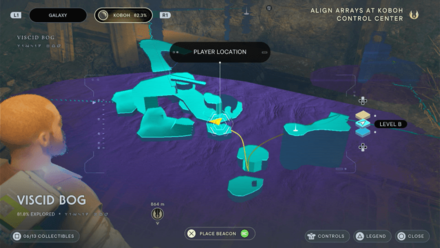
 Enlarge Enlarge |
| Collectible: Hastily Abandoned Site Type: BD-1 Scans Area: Viscid Bog Where to Find: From the Meditation Point, turn around and cross the rock platform towards the cave below. You'll find the Scan inside on your right by the wall. Information: Whatever prospectors were doing her, it seems either the nearby Raider presence of the Swamp tar proved to be too much. This prospective site has been abandoned, and seemingly in a hurry. |
|
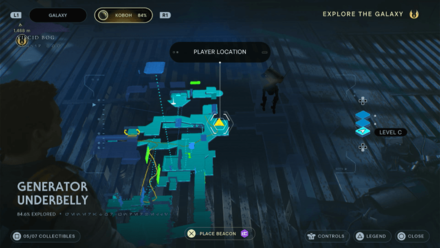
Generator Underbelly
| Map Location | In-game Location |
|---|---|
 Enlarge Enlarge |
 Enlarge Enlarge |
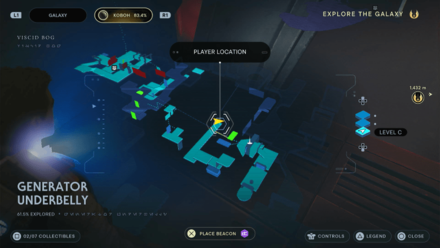
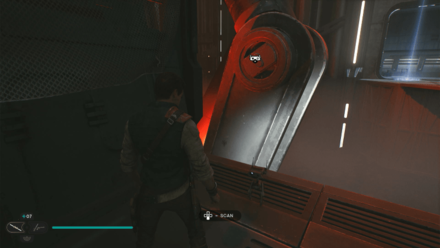
| Collectible: Landing Hydraulics Type: BD-1 Scans Area: Generator Underbelly Where to Find: From the Meditation Point, zipline across the area but drop immediately on the next platform. The scan will be on the right side. Information: A Lucrehulk-class battleship is designed so the central sphere can detach and land independently. As such, the core is equipped with several massive landing struts, the gigantic hydraulics of which take up a large chunk of the core's interior. |
|
 Enlarge Enlarge |
 Enlarge Enlarge |
| Collectible: Power Generator Type: BD-1 Scans Area: Generator Underbelly Where to Find: Found in the section with large machines conducting electrical currents. Information: The lower levels of a Lucrehulk core house landing logistics and power generation. Though they were likely disabled during the ship's landing, it seems that Rayvis - or some resourceful Raider - has coaxed the systems back to life, powering the ship once more. |
|
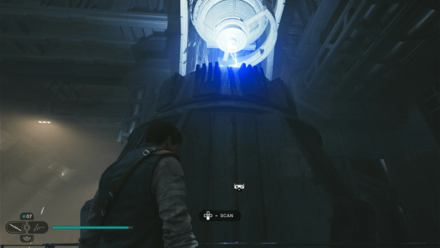
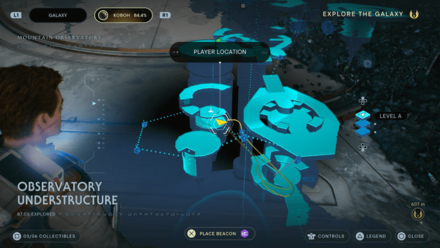
Observatory Understructure
| Map Location | In-game Location |
|---|---|
 Enlarge Enlarge |
 Enlarge Enlarge |
| Collectible: Erratic Dust Type: BD-1 Scans Area: Observatory Understructure Where to Find: From the Meditation Point, head down the stairs. Information: Some Republic scientists believed that destabilized Koboh dust housed tremendous potential energy - experiments on the moon facility had already yielded exciting results worth iterating upon. |
|
Diagnostics Corridor
| Map Location | In-game Location |
|---|---|
| Enlarge |
Enlarge |
| Collectible: Merciless Rampage Type: BD-1 Scans Area: Diagnostics Corridor Where to Find: Once you've reunited with Bode, head for the platform above the Lift the opening. You'll fin the Force Echo on your left by the corner. Information: Dagan Gera spare no foe on his tear towards the Observatory above the clouds. |
|
| Enlarge |
Enlarge |
| Collectible: Minor Oculus Type: BD-1 Scans Area: Diagnostics Corridor Where to Find: Found in the room with the rotating walls that are activated by the Electro Dart. Information: This rotating oculus is powered by the same Koboh matter as the Forest Array. This larger model indicates that Republic scientists created the prototype for later designs focusing on compactness and efficiency. |
|
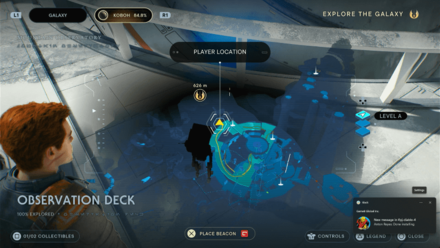
Observation Deck
| Map Location | In-game Location |
|---|---|
 Enlarge Enlarge |
 Enlarge Enlarge |
| Collectible: Grand Oculus Type: BD-1 Scans Area: Observation Deck Where to Find: Once outside of the Observation Deck, before grappling to go higher, look to your left to see a small area where you'll find the scan. Information: High Republic-era scientists constructed the Grand Oculus to not only observe the Koboh Abyss, but to track and predict spikes in its energy fields. Its last calibration tracked a seismic shift in Koboh's stratosphere. |
|
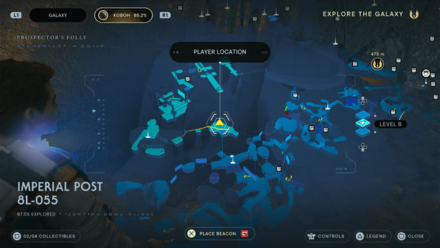
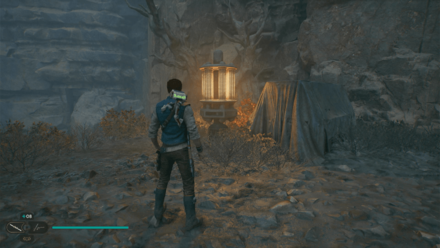
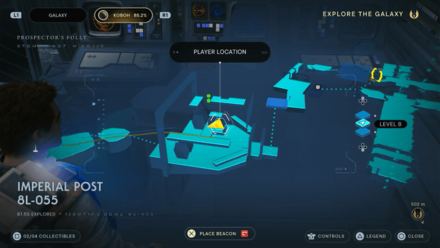
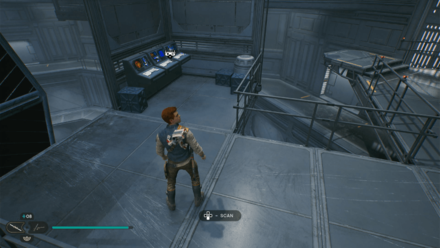
Imperial Post 8L-055
| Map Location | In-game Location |
|---|---|
 Enlarge Enlarge |
 Enlarge Enlarge |
| Collectible: Abandoned Prospector Equipment Type: BD-1 Scans Area: Imperial Post 8L-055 Where to Find: From the Meditation Point, make your way through the next 2 platforms. Information: By the time of the Empire, prospectors had long left the mountain, due either to failure or Raider insistence. Their equipment, however, remains scattered across the peaks. |
|
 Enlarge Enlarge |
 Enlarge Enlarge |
| Collectible: Docking Clamp Overrides Type: BD-1 Scans Area: Imperial Post 8L-055 Where to Find: After ziplining to the Imperial Post, take the next left on the path to find the scan. Information: Release controls for docked imperial fighters is granted by operational control. However, they can also be released via manual override console, situated next to the clamp mechanism. Such controls require specific clearance codes. |
|
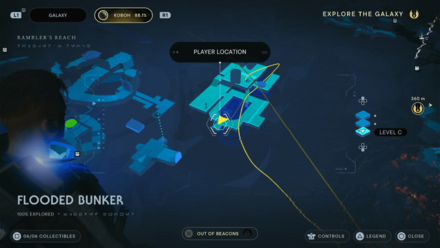
Flooded Bunker
| Map Location | In-game Location |
|---|---|
 Enlarge Enlarge |
 Enlarge Enlarge |
| Collectible: Damage Assessment Type: BD-1 Scans Area: Flooded Bunker Where to Find: Found in a corner after entering the bunker. Information: A databank entry of Domo Dendra assessing the damage to the old water treatment shed: 'That backup from Dredger Gorge has shot the whole system. Burst pipes, collapsed beams...it's all no good. We'll have to get our water from the river now. Folks'll have to get used to it tasting a little strange, I suppose...' |
|
 Enlarge Enlarge |
 Enlarge Enlarge |
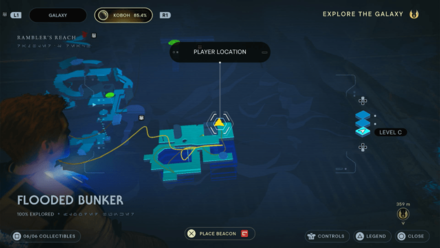
| Collectible: Abandoned Water Filtration System Type: BD-1 Scans Area: Flooded Bunker Where to Find: Found in the next room in the bunker Information: The early prospectors built complex systems to provide the outpost and their prospecting sites with fresh water. However, after the supply became contaminated, and their prospecting efforts began to falter, such systems were abandoned to time and the elements. |
|
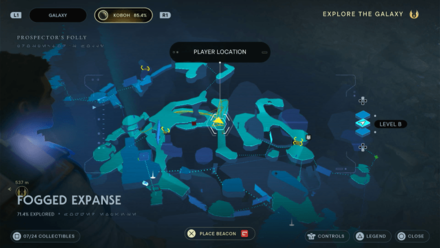
Fogged Expanse
| Map Location | In-game Location |
|---|---|
 Enlarge Enlarge |
 Enlarge Enlarge |
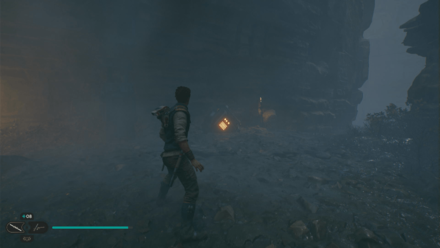
| Collectible: Monitoring Equipment Type: BD-1 Scans Area: Fogged Expanse Where to Find: Look for an orange light in the fog and follow it. Information: A seismic detector that used small pulses to locate hidden objects. It also had the unfortunate side effect of agitating and attracting local wildlife. Time and the elements have since rendered it inoperable. |
|
Untamed Downs
| Map Location | In-game Location |
|---|---|
 Enlarge Enlarge |
 Enlarge Enlarge |
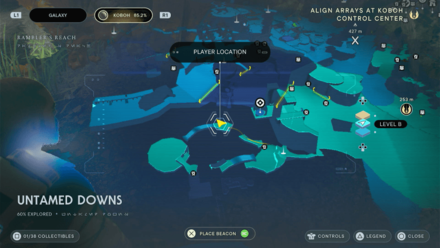
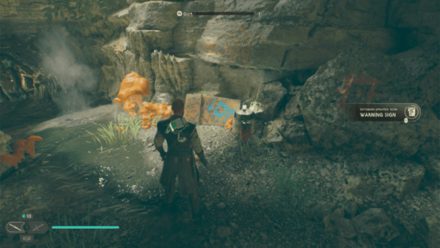
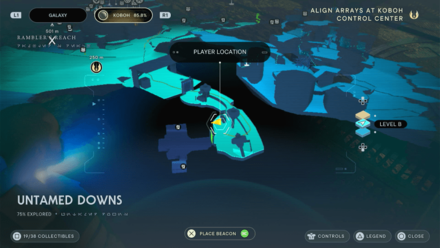
| Collectible: Warning Sign Type: BD-1 Scans Area: Untamed Downs Where to Find: Found just across the Meditation Point. Information: A crude sign that attempts to ward off any who would seek to delve further into the cave: “Stay out! Danger within! No priorite!” |
|
 Enlarge Enlarge |
 Enlarge Enlarge |
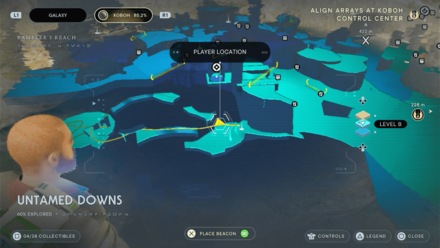
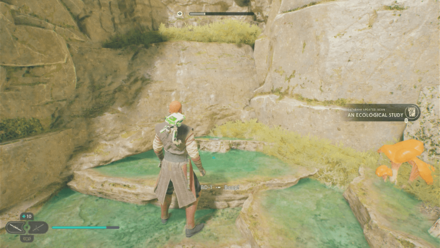
| Collectible: An Ecological Study Type: BD-1 Scans Area: Untamed Downs Where to Find: Found just below the Meditation Point by the pond. Information: A datapad from a curious Koboh local, studying the interior of this cave: “I cannot progress further without specialized equipment. I should turn back, but the sounds from within draw me further. What manner of cave is home to such myriad noises? My curiosity cannot be so easily satisfied.” |
|
 Enlarge Enlarge |
 Enlarge Enlarge |
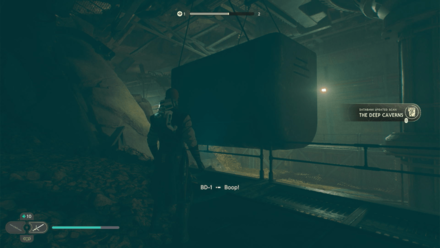
| Collectible: The Deep Caverns Type: BD-1 Scans Area: Untamed Downs Where to Find: Found at the end of the small hangar past the green laser wall. Information: Ambitious, but ill-fated, the gondola carts were intended to plumb deep into Koboh's subterranean network in search of priorite and other treasures. The cost, however, proved too exorbitant, and when the roller mines bega bizarrely malfunctioning, the operation was seized and abandoned. |
|
 Enlarge Enlarge |
 Enlarge Enlarge |
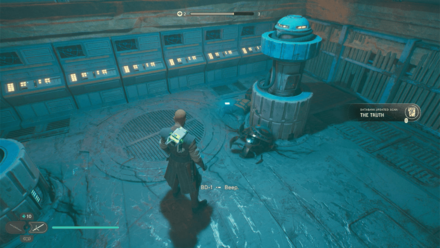
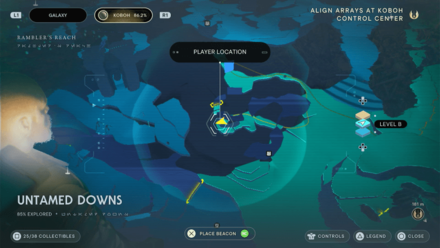
| Collectible: The Truth Type: BD-1 Scans Area: Untamed Downs Where to Find: Found on your right after defeating E3-VE3. no implicit conversion of SyntaxError into String |
|
 Enlarge Enlarge |
 Enlarge Enlarge |
| Collectible: Gift of Fire Type: BD-1 Scans Area: Untamed Downs Where to Find: Found inside a small room after defeating E3-VE3. Information: “I brought the new roller mines to the others, and they were delighted. He has become interested in the planet's strange cubes, however, so I will need to split my attention. I admit, they are compelling...” |
|
 Enlarge Enlarge |
 Enlarge Enlarge |
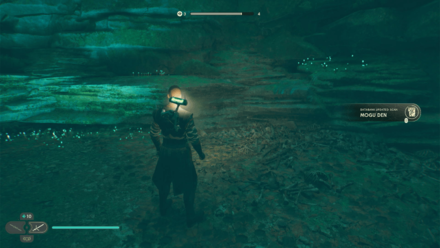
| Collectible: Mogu Den Type: BD-1 Scans Area: Untamed Downs Where to Find: Found inside a cave above a high ledge. Information: Generally, though not always, a mogu will incapacitate its prey before dragging it back to its den, where they can be preserved and devoured at the mogu's leisure. The mogu of this cave has clearly hunted well. |
|
 Enlarge Enlarge |
 Enlarge Enlarge |
| Collectible: Bilemaw Burrow Type: BD-1 Scans Area: Untamed Downs Where to Find: Inside a cave by the Harvest Ridge lake. Information: The bilemaw can be a vicious creature, but mostly in defense of its territory. They find shelter from the elements, but only build nests in order to give birth and rear their young. Any interloper who would intrude on that space is therefore fair game. |
|
Marl Cavern
| Map Location | In-game Location |
|---|---|
 Enlarge Enlarge |
 Enlarge Enlarge |
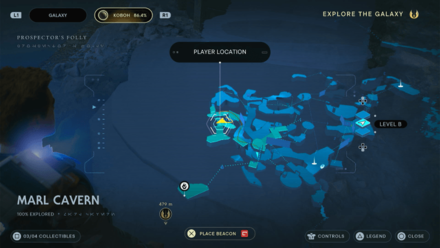
| Collectible: Storage Tanks Type: BD-1 Scans Area: Marl Cavern Where to Find: When you reach the cavern with wall run platforms, look to the right to find the scan. Information: Long-rusted and abandoned, the storage tanks that dot the mountain were used for storing water, and pumping out of flodded areas via myriad connected pipes. |
|
Bygone Settlement
| Map Location | In-game Location |
|---|---|
 Enlarge Enlarge |
 Enlarge Enlarge |
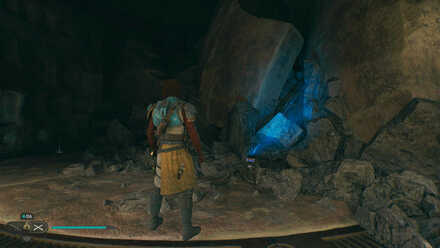
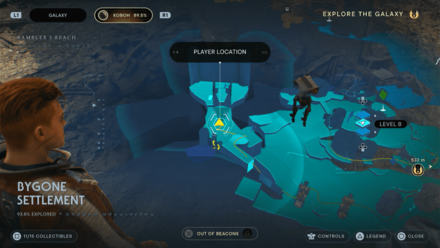
| Collectible: Ancient Architecture Type: BD-1 Scans Area: Bygone Settlement Where to Find: From the Meditation Point, wall run the follow the platform until you can swing to the other side of the raised platforms. Scan the inside of one of the rooms. Information: Buildings on the outskirts of the Basalt Forest, partly built directly into the cliffsides. Their construction - a mizture of stone and mud - ages them as older than any other structure on the planet, predating even the Republic settlements. Little is known about that time. |
|
 Enlarge Enlarge |
 Enlarge Enlarge |
| Collectible: Digger Crawler Type: BD-1 Scans Area: Bygone Settlement Where to Find: On the platform where you recruit the Jawas, scan the crawler. Information: The enormous crawler vehicles were originally created as a mobile mining and smelting factories, designed to withstand the harsher conditions of frontier planets. Over time, however, they became favorites of the Jawa species native to Tatooine, who used their vast space to store their wares as well as house their entire clan. The Jawas who found their way to Koboh built a crawler in the style of the ones they remebered from their home. |
|
Mountain Ascent
| Map Location | In-game Location |
|---|---|
 Enlarge Enlarge |
 Enlarge Enlarge |
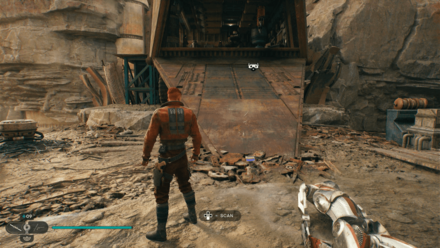
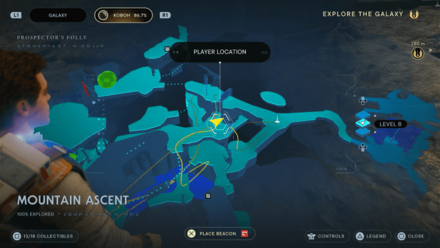
| Collectible: Mountainside Hut Type: BD-1 Scans Area: Mountain Ascent Where to Find: From the Meditation Point, head to the left and ride the cable if you've already unlocked that shortcut. If not, you can reach the area from the section where you can wall run. Information: In search of riches, prospectors fanned out, putting down roots across Koboh. As a result, the mountain - now considered the jackpot - soon saw its foothills covered in small but functional homes. |
|
 Enlarge Enlarge |
 Enlarge Enlarge |
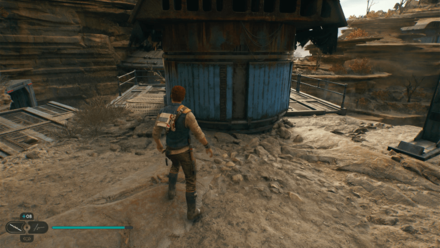
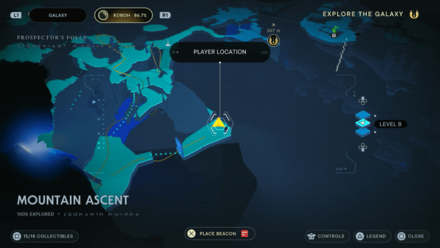
| Collectible: Shiverpede Nest Type: BD-1 Scans Area: Mountain Ascent Where to Find: Found inside the cave where you'll need to force lift the door to gain access. Information: Shiverpedes hunt in small packs, but nest en masse, performing intricate mating rituals that, shudderingly, involve their sharpened forceps. |
|
Summit Ridge
| Map Location | In-game Location |
|---|---|
 Enlarge Enlarge |
 Enlarge Enlarge |
| Collectible: High Altitude Research Type: BD-1 Scans Area: Summit Ridge Where to Find: The scan is the balloon you can force pull. Information: These Republic devices were used to read atmospheric pressure patterns unique to Koboh. Their latching mechanisms allowed them to be bundled together, and reeled in during adverse weather. |
|
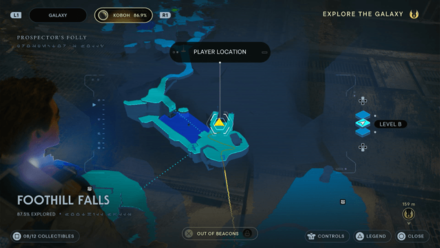
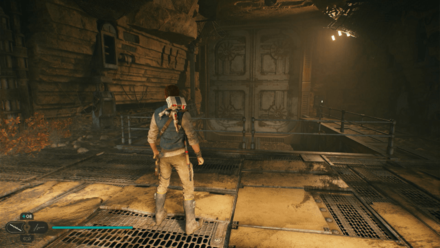
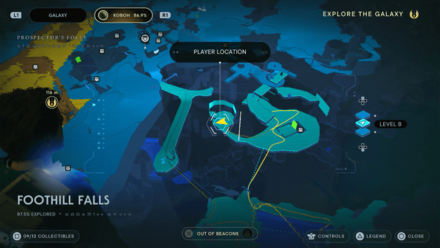
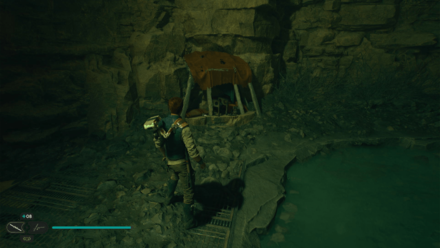
Foothill Falls
| Map Location | In-game Location |
|---|---|
 Enlarge Enlarge |
 Enlarge Enlarge |
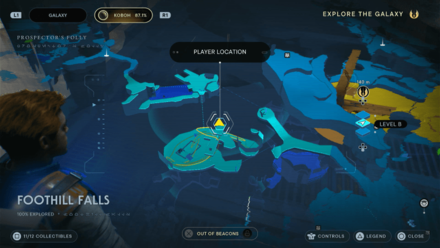
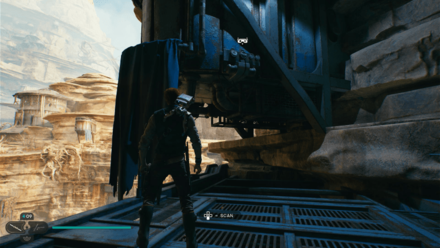
| Collectible: Cargo Elevator Type: BD-1 Scans Area: Foothill Falls Where to Find: Found in the large cave near Skoova. Information: The prospectors envisioned many grand projects for Koboh. Most were never realized, but an elevator for transporting hauls from the mountain summit was somehow completed successfully. |
|
 Enlarge Enlarge |
 Enlarge Enlarge |
| Collectible: Child's Hideaway Type: BD-1 Scans Area: Foothill Falls Where to Find: After riding the Relter, turn left to a narrow path that will lead to a cave. Information: This area has clearly been fashioned into a hideaway for a small child, perhaps that they might while away the time as their guardians toiled the nearby caverns. |
|
 Enlarge Enlarge |
 Enlarge Enlarge |
| Collectible: Prospecting Network Type: BD-1 Scans Area: Foothill Falls Where to Find: After riding the Relter, reach the highest point of the area using a Nekko and the balloon. Information: Prospectors on Koboh constructed lattice-like series of rafters and buildings, all intricately - and perilously - connecting their network of dig sites. They appear to outsiders to grow from the very rocks. |
|
Basalt Rift
| Map Location | In-game Location |
|---|---|
 Enlarge Enlarge |
 Enlarge Enlarge |
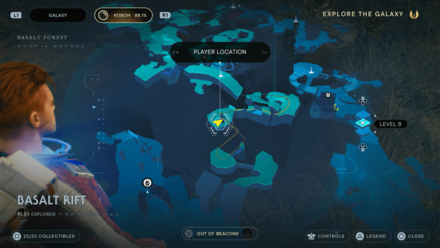
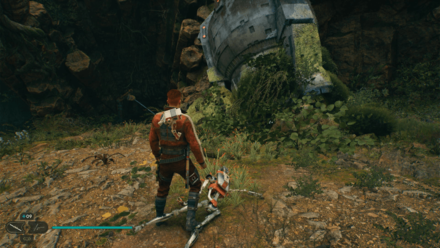
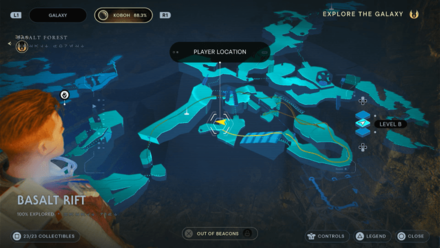
| Collectible: Basalt Pillars Type: BD-1 Scans Area: Basalt Rift Where to Find: At the end of the first zipline you'll encounter from the entrance of the Basalt Rift. Information: Huge pillars of brittle, heavy rock populate the Basalt Forest, Seismic activity deep beneath the planet's crust 'unroots' these stone trees, forcing the structures to erupt in their fully grown form. While the stone is no longer growing, its porous surface provides a scaffolding for rudimentary organic lifeforms to take root. Scholars refer to these structures as “stone sentinels.” |
|
 Enlarge Enlarge |
 Enlarge Enlarge |
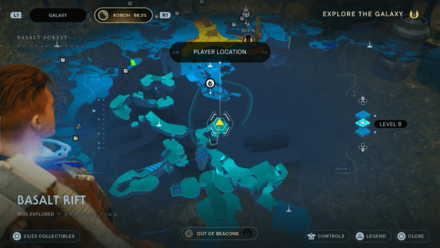
| Collectible: Turf Wars Type: BD-1 Scans Area: Basalt Rift Where to Find: From the Meditation Point, cross the broken bridge on the right. Information: A drop pod from a Lucrehulk-class battleship, used to transport battle droids and other separatist forces to the filed during the Clone Wars. Destination coordinates typically ensure safe landings, but this pod was overridden and fired in the general area of the Basalt Rift. |
|
 Enlarge Enlarge |
 Enlarge Enlarge |
| Collectible: Bilemaw's Revenge Type: BD-1 Scans Area: Basalt Rift Where to Find: Found in the same area as the Bilemaw. Information: Bilemaws have a notoriously bad temper, often trampling, crushing, or pulverizing those caught in their rampage. Even trained imperial soldiers stand little chance against a bilemaw defending its den. |
|
 Enlarge Enlarge |
 Enlarge Enlarge |
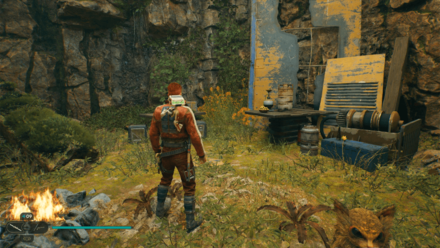
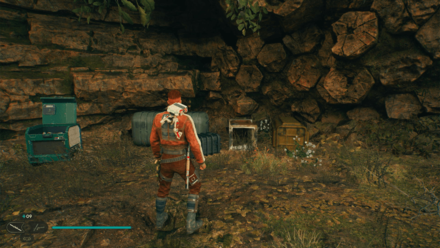
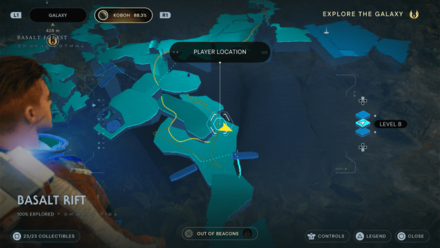
| Collectible: Risk and Research Type: BD-1 Scans Area: Basalt Rift Where to Find: Found in a camp in the area. Information: There's enough rations and supplies here to sustain a rigorous multi-day journey. Various scientific instruments and cartography tools were also laboriously packed for the trip. |
|
 Enlarge Enlarge |
 Enlarge Enlarge |
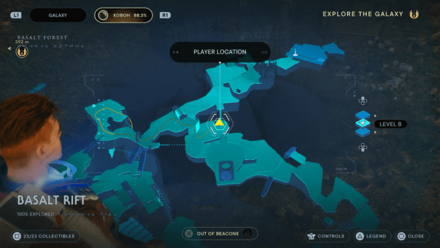
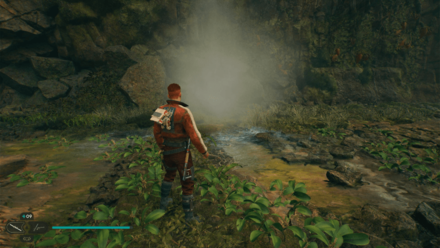
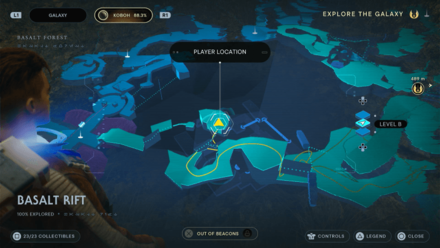
| Collectible: The Short Straw Type: BD-1 Scans Area: Basalt Rift Where to Find: Found past the metal arc and by crossing two narrow logs. Information: Imperial supplies addressed to Squadron 013. The shipment was meager in the first place - the rations already exhausted. These troops were disorganized, disengaged, and desperate. |
|
 Enlarge Enlarge |
 Enlarge Enlarge |
| Collectible: Bilemaw Pools Type: BD-1 Scans Area: Basalt Rift Where to Find: Found at a low level of the area where you'll find a Bilemaw sleeping. Information: The pools are filled with volcanic mud that bubbles up through fissures from deep beneath the surface. Bilemaws frequently lounge in these pools, becoming covered in, and fortified by, the substance. This second skin in very similar to the basalt columns that define the landscape. |
|
 Enlarge Enlarge |
 Enlarge Enlarge |
| Collectible: Koboh Dust Type: BD-1 Scans Area: Basalt Rift Where to Find: Found in an area with blue dust scattered. Information: Highly volatile matter unique to this system of the galaxy. Without further analysis, the elements comprising this gaseous substance remain a mystery. |
|
All Jedha BD-1 Scan Locations
| All Jedha BD Scan Locations | ||
|---|---|---|
| Trailhead Pantheon | Blustery Mesa | Crypt of Uhrma |
| Monastery Walls | Halls of Ranvell | Arid Flats |
| Buried Refuge | ||
Trailhead Pantheon
| Map Location | In-game Location |
|---|---|
 Enlarge Enlarge |
 Enlarge Enlarge |
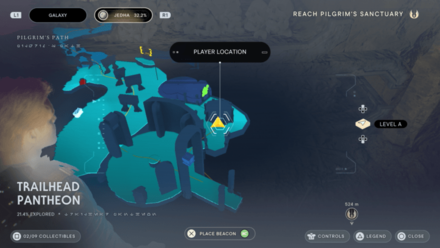
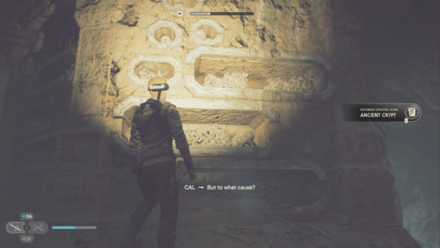
| Collectible: Ancient Crypt Type: BD-1 Scans Area: Trailhead Pantheon |
|
 Enlarge Enlarge |
 Enlarge Enlarge |
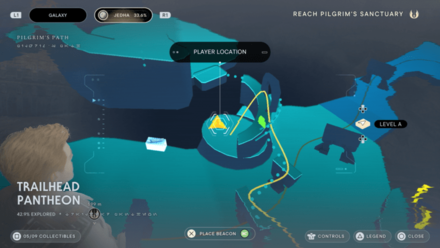
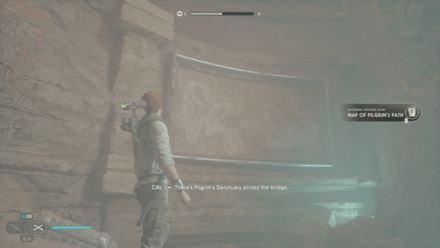
| Collectible: Map of Pilgrim's Path Type: BD-1 Scans Area: Trailhead Pantheon |
|
 Enlarge Enlarge |
 Enlarge Enlarge |
| Collectible: The Path Type: BD-1 Scans Area: Trailhead Pantheon Where to Find: Can be scanned from the second rectangular stone structure Information: An ancient script welcomes travelers to the beginning of 'The Pilgrim's Path', a long-walked route for those devoted to the worship of the Force. |
|
 Enlarge Enlarge |
 Enlarge Enlarge |
| Collectible: Meditation Hall Type: BD-1 Scans Area: Trailhead Pantheon Where to Find: From the Crypt of Uhrma Meditation Point, go to the circular room to find the scan on the walls Information: An invitation for travelers to find stillness along the Path. Though the journey carries Pilgrims forward, direction can only be found in taking stock of the route. |
|
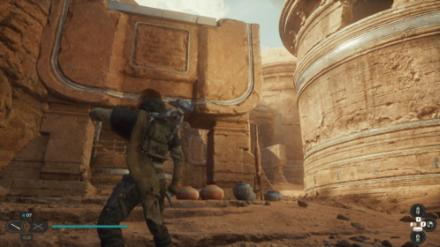
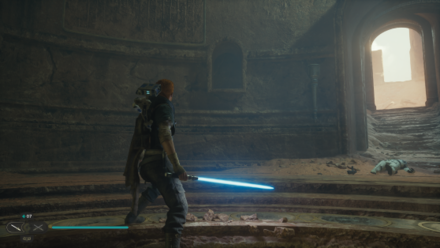
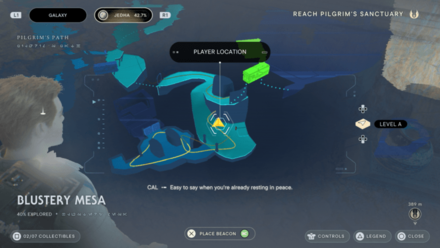
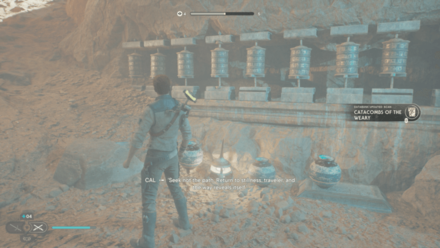
Blustery Mesa
| Map Location | In-game Location |
|---|---|
 Enlarge Enlarge |
 Enlarge Enlarge |
| Collectible: Catacombs of the Weary Type: BD-1 Scans Area: Blustery Mesa |
|
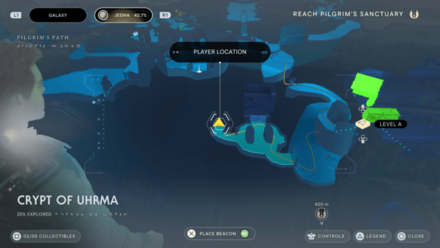
Crypt of Uhrma
| Map Location | In-game Location |
|---|---|
 Enlarge Enlarge |
 Enlarge Enlarge |
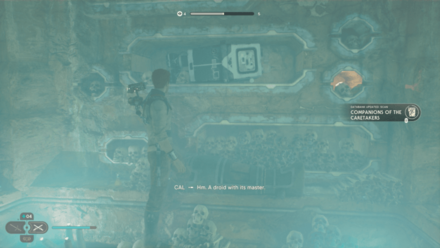
| Collectible: Companions of the Caretakers Type: BD-1 Scans Area: Crypt of Uhrma |
|
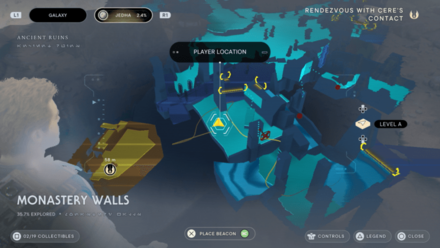
Monastery Walls
| Map Location | In-game Location |
|---|---|
 Enlarge Enlarge |
 Enlarge Enlarge |
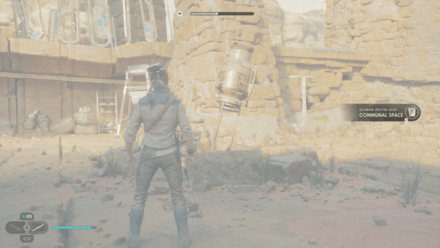
| Collectible: Communal Space Type: BD-1 Scans Area: Monastery Walls Where to Find: Past the Monastery Walls Workbench, drop down the area with a group of Hardshells. In that area scan the tilted metal pot. |
|
 Enlarge Enlarge |
 Enlarge Enlarge |
| Collectible: Prayer Wheel Type: BD-1 Scans Area: Monastery Walls Where to Find: From the Monastery Walls Meditation Point, look right to see the Prayer Wheels between two Columns Information: A tool used by pilgrims to profess their faith by spinning the wheel while repeating an invocation to the Force. |
|
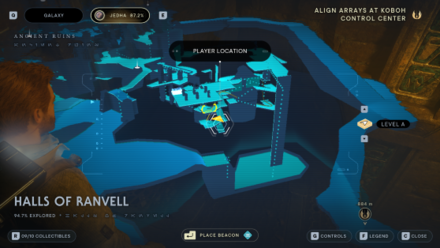
Halls of Ranvell
| Map Location | In-game Location |
|---|---|
 Enlarge Enlarge |
 Enlarge Enlarge |
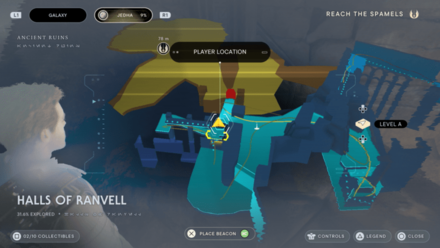
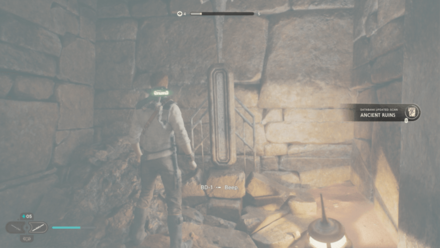
| Collectible: Ancient Ruins Type: BD-1 Scans Area: Halls of Ranvell Where to Find: From the Halls of Ranvell Meditaion point, jump down and continue along the path until you reach down the end of the staircase. Look left and scan the sculpture. |
|
 Enlarge Enlarge |
 Enlarge Enlarge |
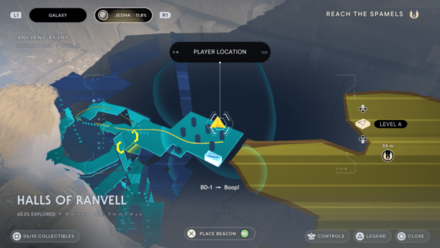
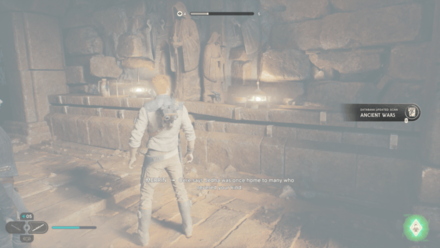
| Collectible: Ancient Wars Type: BD-1 Scans Area: Halls of Ranvell Where to Find: In the Halls of Ranvell Workbench room, scan the wall art with candles |
|
 Enlarge Enlarge |
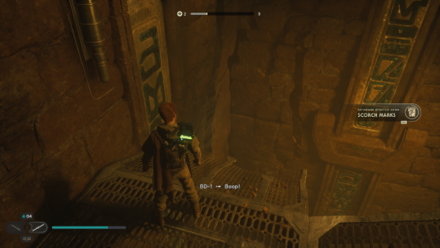 Enlarge Enlarge |
| Collectible: Scorch Marks Type: BD-1 Scans Area: Halls of Ranvell Where to Find: From the room with the Workbench, drop down one level until you see a spiraling platform. Walk down to the end of it to see the Scan Information: These scars bear the hallmarks of a lightsaber. Perhaps the ancient people succeeded in inviting Jedit to their planet. |
|
Arid Flats
| Map Location | In-game Location |
|---|---|
 Enlarge Enlarge |
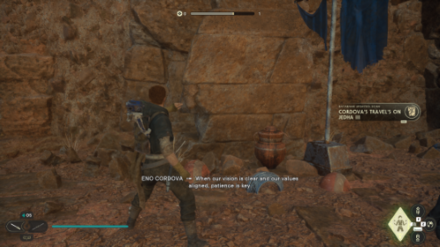 Enlarge Enlarge |
| Collectible: Cordova's Travel's on Jedha III Type: BD-1 Scans Area: Arid Flats Where to Find: In the area just before the Path of Conviction, grapple to a drone on the left-hand side to access the ledge above you. Information: Eno Cordova considers Jedha's mysteries as they relate to his own personal journey. |
|
Buried Refuge
| Map Location | In-game Location |
|---|---|
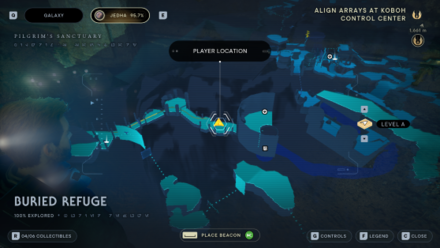 Enlarge Enlarge |
 Enlarge Enlarge |
| Collectible: Hidden Path, Exposed Type: BD-1 Scans Area: Buried Refuge Where to Find: Look for the skeleton at the left-hand side of the tunnel leading out of the room with water. Information: In the abrupt evacuation, all manner of personal belongings were left behind, a tableau of the lives that were lived before |
|
All Shattered Moon BD-1 Scan Locations
| All Shattered Moon BD Scan Locations | |
|---|---|
| Automated Forge | Assembly Staging |
| Array Channel | Republic Research Laboratory |
Automated Forge
| Map Location | In-game Location |
|---|---|
 Enlarge Enlarge |
 Enlarge Enlarge |
| Collectible: Monitoring Station Type: BD-1 Scans Area: Automated Forge Where to Find: Found near the Force Tear in the Automated Forge. Information: A station teeming with droid activity must be run efficiently, or... |
|
 Enlarge Enlarge |
 Enlarge Enlarge |
| Collectible: Droid Recharging Station Type: BD-1 Scans Area: Automated Forge Where to Find: Found in the area with a lot of charging droids. Information: An entire room was dedicated to the recharging of the facility's myriad maintenance droids. Since the Raider occupation, however, the battery station has been repurposed for battle droid use. |
|
Assembly Staging
| Map Location | In-game Location |
|---|---|
 Enlarge Enlarge |
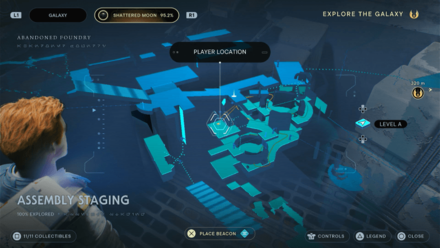
 Enlarge Enlarge |
| Collectible: Lifter Droid Type: BD-1 Scans Area: Assembly Staging Where to Find: After falling down the pit full of Shiverpedes, grapple on to the flying droids and climb up the wall. You'll find the Scan on the corner. Information: When maintenance droids saw to the regulation of the factory's systems, lifter droids took on the role of manual laborers, heaving construction materials to wherever they were needed. |
|
 Enlarge Enlarge |
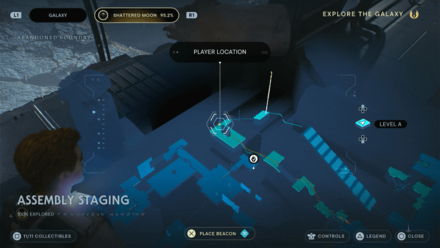
 Enlarge Enlarge |
| Collectible: Destroyed Wall Type: BD-1 Scans Area: Assembly Staging Where to Find: Found after the jumping upward puzzle with moving electric currents. Information: The calamity that struck Koboh also ripped its moon apart. Racked by quakes and subsidence, sections of the facility were torn from their foundation and strewn about the interstellar flotsam. |
|
Array Channel
| Map Location | In-game Location |
|---|---|
 Enlarge Enlarge |
 Enlarge Enlarge |
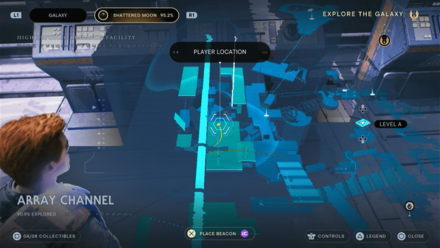
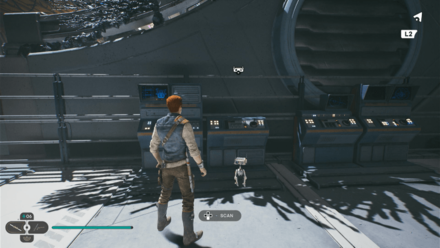
| Collectible: Wavelength Honing Controls Type: BD-1 Scans Area: Array Channel Where to Find: Once you enter the large area with a beam, the Scan can be found on your right. Information: As the Array beam reaches the emitter, several checks are initiated to focus the beam, calibrating its wavelength before it is directed at a target. |
|
 Enlarge Enlarge |
 Enlarge Enlarge |
| Collectible: Ionizing Calibrators Type: BD-1 Scans Area: Array Channel Where to Find: Found after the section where you'll need to wall jump on wall with an electric current. Information: Although shrouded in some mystery, it is believed the Array displaces Koboh Matter by ionizing energy fired through it. Stations throughout the beam chamber monitor the process. |
|
Republic Research Laboratory
| Map Location | In-game Location |
|---|---|
 Enlarge Enlarge |
 Enlarge Enlarge |
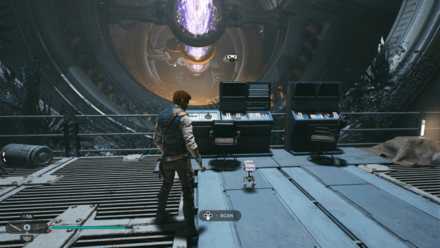
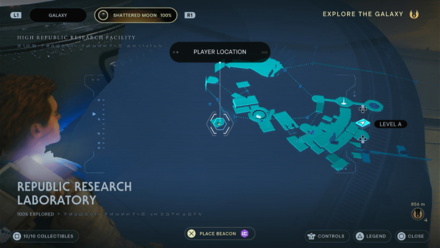
| Collectible: Laboratory Thermoregulator Type: BD-1 Scans Area: Republic Research Laboratory Where to Find: Beside the Meditation Point. Information: To control tests effectively, the inner laboratory's temperature is strictly regulated by a master control unit in the laboratory's atrium. |
|
 Enlarge Enlarge |
 Enlarge Enlarge |
| Collectible: Stabilizer Beam Type: BD-1 Scans Area: Republic Research Laboratory Where to Find: Found on the lowest platform in the area. Information: A series of modules ring the laboratory, feeding energy down ito the array's initializing chamber. Maintaining a constant flow of energy is seemingly vital to ensuring the entire array remains stable. |
|
 Enlarge Enlarge |
 Enlarge Enlarge |
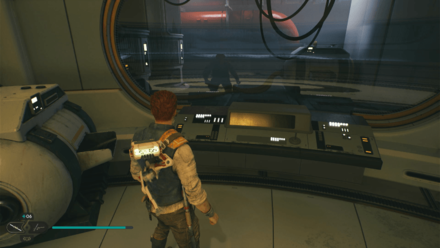
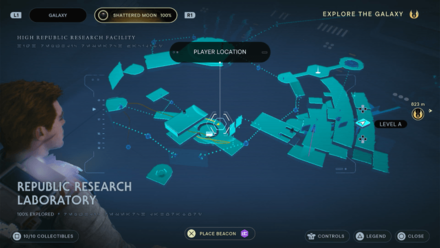
| Collectible: Inoperable Console Type: BD-1 Scans Area: Republic Research Laboratory Where to Find: Found just outside the workbench in the area. Information: Rendered inoperable by time or sabotage, the proximity of these consoles to the innermost laboratory nevertheless guarantees that whatever information they held was likely of the most sensitive nature. |
|
All Nova Garon BD-1 Scan Locations
| All Nova Garon BD Scan Locations | |
|---|---|
| Hangar Bay Exterior | Hangar Bay |
| Officer's Quarters | Central Command |
Hangar Bay Exterior
| Map Location | In-game Location |
|---|---|
 Enlarge Enlarge |
 Enlarge Enlarge |
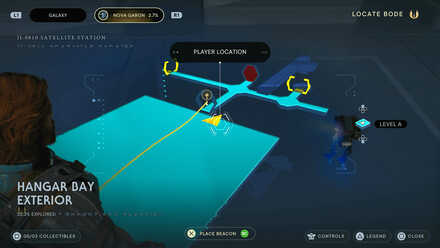
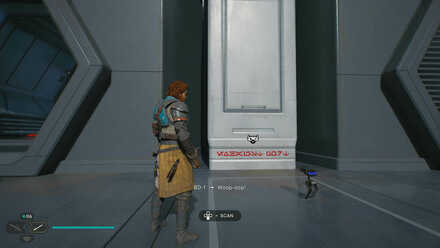
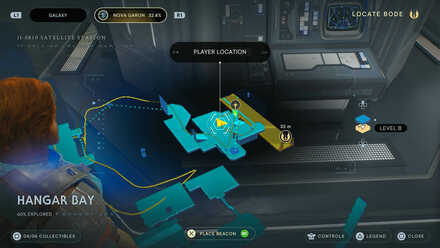
| Collectible: ISB Base Structure Type: BD-1 Scans Area: Hangar Bay Exterior Where to Find: Found in the Hangar Bay Information: Buried in the center of a frozen asteroid cluster, the Imperial Security Bureau established a listening post and operations hub - where better to remain out of sight? |
|
Hangar Bay
| Map Location | In-game Location |
|---|---|
 Enlarge Enlarge |
 Enlarge Enlarge |
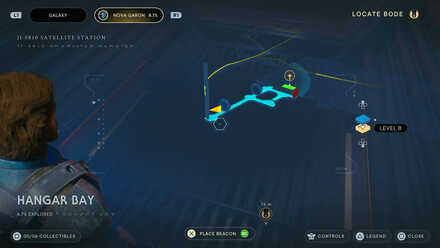
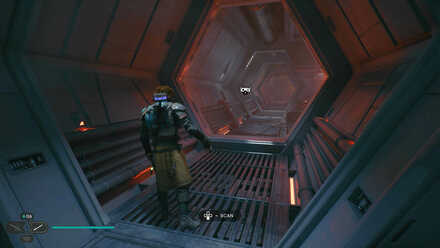
| Collectible: Electron Wall Type: BD-1 Scans Area: Hangar Bay Where to Find: Found as you drop down to the Hangar Bay. Information: Used in high security Imperial bases, an electron wall only allows non-organics to pass through unharmed. Anything else is painfully admonished. |
|
 Enlarge Enlarge |
 Enlarge Enlarge |
| Collectible: Back-Up Servers Type: BD-1 Scans Area: Hangar Bay Where to Find: From the Force Echo in the last room, slash the tubes and drop down from the beam. After eliminating the enemies in the area, you can scan the server at the center of the room. Information: Security protocols dictate multiple, closed-network abackup servers in case of unexpected power loss or enemy incursion. |
|
Officer's Quarters
| Map Location | In-game Location |
|---|---|
 Enlarge Enlarge |
 Enlarge Enlarge |
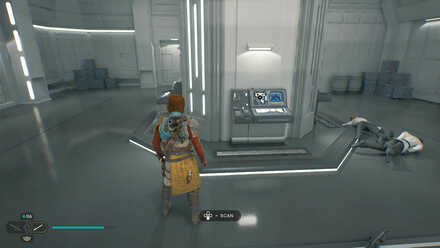
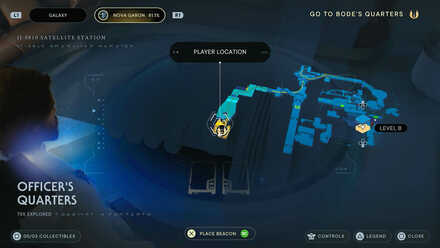
| Collectible: Espionage Data And Tracker Type: BD-1 Scans Area: Officer's Quarters Where to Find: Found in Bode Akuna's room in the Officer's Quarters. Information: Evidence of how vast Bode's information collection and espionage missionwas. Information deatilling the Jedha Archive, Koboh, and the Mantis. |
|
 Enlarge Enlarge |
 Enlarge Enlarge |
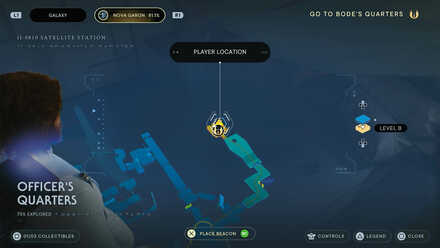
| Collectible: Audio Message Type: BD-1 Scans Area: Officer's Quarters Where to Find: Found in Bode Akuna's room in the Officer's Quarters. Information: An audio message from Bode to Kata, timestamp unknown, where he promises to be home soon with a gift. |
|
Central Command
| Map Location | In-game Location |
|---|---|
 Enlarge Enlarge |
 Enlarge Enlarge |
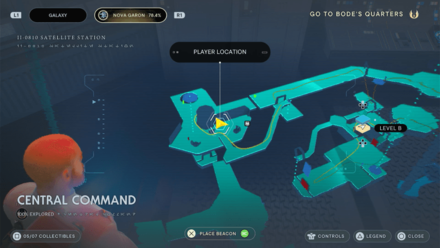
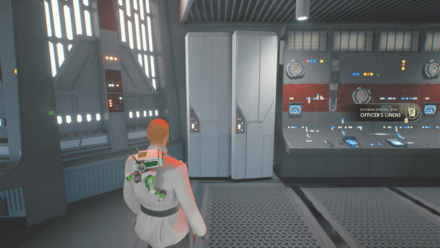
| Collectible: Officer's Linens Type: BD-1 Scans Area: Central Command Where to Find: After the cutscene with Denvik, you'll find the Scan by some lockers. Information: The outfit of an ISB officer. While known for being terrifyingly formal, Imperial attire is not know for being comfortable. |
|
 Enlarge Enlarge |
 Enlarge Enlarge |
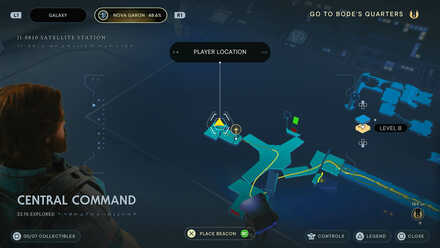
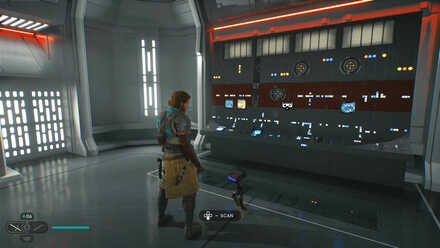
| Collectible: Credential's Checkpoint Type: BD-1 Scans Area: Central Command Where to Find: Found in the far end room of the Central Command, the central room next to the rotating platform. Information: Imperial security checkpoints are equipped with security protocol scanners designed to prevent unauthorized personnel from entering. |
|
All Tanalorr BD-1 Scan Locations
| All Tanalorr BD Scan Locations | ||
|---|---|---|
| Haven's Edge | Verdant Gardens | Audience Chamber |
Haven's Edge
| Map Location | In-game Location |
|---|---|
 Enlarge Enlarge |
 Enlarge Enlarge |
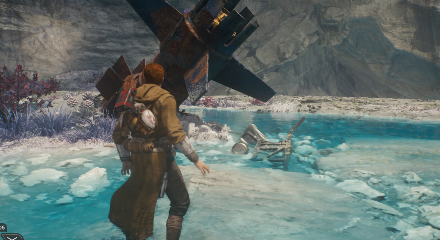
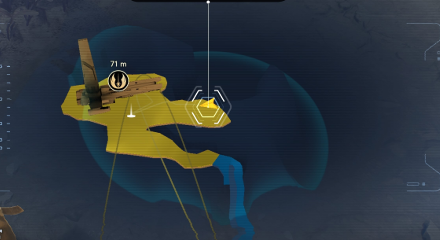
| Collectible: Jedi Meditation Spot Type: BD-1 Scans Area: Haven's Edge Where to Find: Found left of Mantis Information: Overlooking a natural vista, Jedi of old often frequented this spot to clear their minds and find a calm within themselves. |
|
 Enlarge Enlarge |
 Enlarge Enlarge |
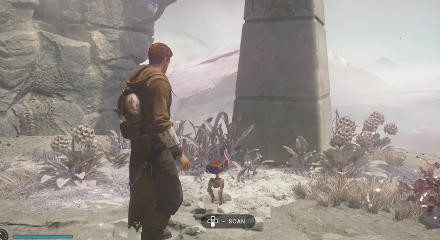
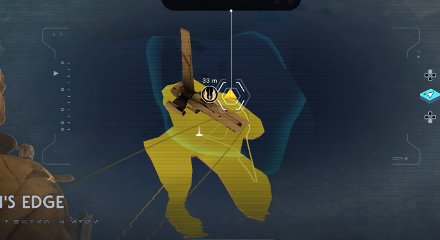
| Collectible: High Republic Droids Type: BD-1 Scans Area: Haven's Edge Where to Find: Found behind Mantis Information: A now-obsolete Republic droid, fallen during battle with the Nihil invaders of Tanalorr. The droid gave a valiant defense of the planet. |
|
Verdant Gardens
| Map Location | In-game Location |
|---|---|
 Enlarge Enlarge |
 Enlarge Enlarge |
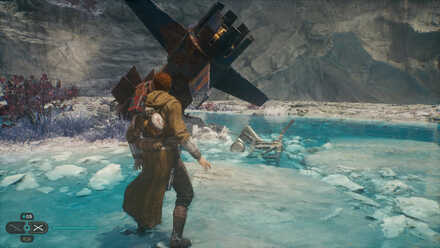
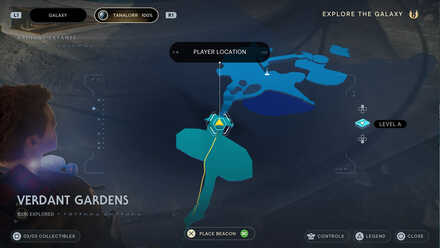
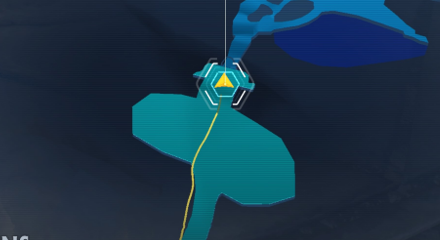
| Collectible: Buried Invasion Type: BD-1 Scans Area: Verdant Gardens Where to Find: Found to the right after entering Verdant Gardens Information: The unexpected invasion of Tanalorr forced the ORder to flee their new sanctuary. How the Nihil discovered Tanalorr remains a mystery. |
|
 Enlarge Enlarge |
 Enlarge Enlarge |
| Collectible: Ceremonial Fountain Type: BD-1 Scans Area: Verdant Gardens Where to Find: In front of the Temple Atrium Information: A tri-pointed water feature, built to symbolize the three core pillars of the Jedi Order - The Force, knowledge and self-discipline. Jedi strive at all times to gain mastery over all three. |
|
Audience Chamber
| Map Location | In-game Location |
|---|---|
 Enlarge Enlarge |
 Enlarge Enlarge |
| Collectible: Jedi Order Edict Type: BD-1 Scans Area: Audience Chamber Where to Find: Facing the entrance on the lower level of the Audience Chamber. Information: A Jedi edict on the foundation of the temple on Tanalorr: The Jedi stand, ever-ready, watch over the galaxy. |
|
Encrypted Log Collection Rewards
XP and Lore
Scanning relevant objects in Jedi: Fallen Order for BD-1 Scan will always provide XP and a story behind the object or area. The stories are told by Eno Cordova in audio form.
How to Find BD-1 Scans
Follow BD-1 When He Dismounts
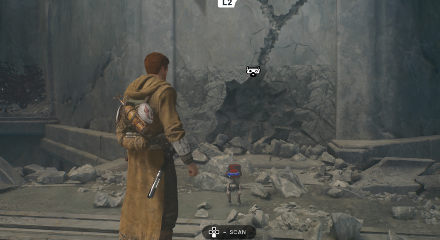
In Jedi: Fallen Order, when you're near an object with an Encrypted Log, BD-1 will dismount from your shoulder and call attention to the object by staring at it. If you go near BD-1, a button prompt will appear that will have BD-1 scan a specific area or object to play the log. If you stray away too far away from the area without scanning, BD-1 will return to Cal's shoulder.
Are BD-1 Scan Missable?
Return to Planets for Missed BD-1 Scan
In the first game, Jedi: Fallen Order, you can use the Mantis to return to planets to reexplore them during the playthrough and after the main story. You can retrieve any BD-1 Scan you missed when you revisit planets. Players can expect the same for the sequel, Jedi Survivor.
They Don't Carry Over to New Game Plus
In the first game, Jedi: Fallen Order, if you start a New Game Plus playthrough, all the BD-1 Scan will have to be collected again and will still provide XP. Players can expect the same for the sequel, Jedi Survivor.
What are BD-1 Scans?
Collectibles that Provide Additional Lore
In Jedi: Fallen Order, BD-1 Scan are recordings in BD-1 that contain additional information about the studies of Eno Cordova, Cere Junda's master. In addition, BD-1 Scan also provide the player with XP. They are found all over the different areas of the game and can be found with BD-1's help.
Star Wars Jedi Survivor Related Guides

All Collectibles
| All Collectible Types | |
|---|---|
| Chests | Stim Upgrades |
| Perks | Skill Points |
| Perk Slots | BD-1 Scans |
| Force Echoes | Seeds and Plants |
| Priorite Shards | Datadiscs |
| Jedha Scrolls | Essences |
| Force Essences | Health Essences |
| Treasures | Fish |
| Recruits | Force Tears |
| BD-1 Upgrades | - |
Collectibles by Planet
| All Planets | |
|---|---|
| Coruscant | Koboh |
| Jedha | Shattered Moon |
| Nova Garon | Tanalorr |
Comment
Author

All BD-1 Scan Locations
Please participate in our site
improvement survey
03/2026
improvement survey
03/2026
Would you assist in
improving Game8's site?
improving Game8's site?

×
We are listening to our users' valuable opinions and discussing how to act on them.
The information collected through this survey will be used for the purpose of improving our services. In addition, the information will only be disclosed a part of a statistic in a format that will not allow identification of personal information.
Begin Survey
Not Now
×
Please rate each item regarding Game8.co's Advertisements.
Amount of Ads
Very Dissatisfied
Somewhat Dissatisfied
Fine
Somewhat Satisfied
Highly Satisfied
Placement of Ads
Timing of Ad Display
Ad Loading Speed
Safeness of Ads
Content of Ads
×
Please rate each item regarding Game8.co's Quality of Articles.
Amount of information
Very Dissatisfied
Somewhat Dissatisfied
Fine
Somewhat Satisfied
Highly Satisfied
Frequency of updates
Speed of new information
Accuracy of articles
Understandibility of articles
Readability of sentences
×
Please rate each item regarding Game8.co's Usability of the Site.
Ease of finding information
Very Dissatisfied
Somewhat Dissatisfied
Fine
Somewhat Satisfied
Highly Satisfied
Loading Speed
Use of Color
Font Size
Visibility of Images
Easy to Understand Layout
×
Please rate each item regarding Game8.co's Message Boards, Comments.
Ease of Writing
Very Dissatisfied
Somewhat Dissatisfied
Fine
Somewhat Satisfied
Highly Satisfied
Readability
Ease in Finding Information
Comment Quality
Comment Quantity
Admin Response
×
Please rate each item regarding Game8.co's Site's new design.
Please rate our site's new design
Very Dissatisfied
Somewhat Dissatisfied
Fine
Somewhat Satisfied
Highly Satisfied
Do you think that the website's design change makes the site easier to use?
Has the new design made it easier for you to find information on the site?
Has the new design improved the overall visual appeal of the site?
How would you rate your overall satisfaction with the new design of the site?
×
How likely are you to recommend Game8 to someone you know?
Very Unlikely
0
1
2
3
4
5
6
7
8
9
10
Very Likely
If you have other opinions regarding potential improvement to the website, please share them with us. We would appreciate your honest opinion.
Note: This is a free response section, so you can proceed without entering anything.
Note: Please be sure not to enter any kind of personal information into your response.
Note: Please be sure not to enter any kind of personal information into your response.
×
Thank You
×
Thank you for participating in our survey! Your answers will help us to improve the quality of our website and services.
We hope you continue to make use of Game8.
We hope you continue to make use of Game8.
Close
Rankings
- We could not find the message board you were looking for.
Gaming News


![Everwind Review [Early Access] | The Shaky First Step to A Very Long Journey](https://img.game8.co/4440226/ab079b1153298a042633dd1ef51e878e.png/thumb)

![Monster Hunter Stories 3 Review [First Impressions] | Simply Rejuvenating](https://img.game8.co/4438641/2a31b7702bd70e78ec8efd24661dacda.jpeg/thumb)
Popular Games

Genshin Impact Walkthrough & Guides Wiki
Honkai: Star Rail Walkthrough & Guides Wiki
Umamusume: Pretty Derby Walkthrough & Guides Wiki
Pokemon Pokopia Walkthrough & Guides Wiki
Resident Evil Requiem (RE9) Walkthrough & Guides Wiki
Monster Hunter Wilds Walkthrough & Guides Wiki
Wuthering Waves Walkthrough & Guides Wiki
Arknights: Endfield Walkthrough & Guides Wiki
Pokemon FireRed and LeafGreen (FRLG) Walkthrough & Guides Wiki
Pokemon TCG Pocket (PTCGP) Strategies & Guides Wiki


Recommended Games
Diablo 4: Vessel of Hatred Walkthrough & Guides Wiki
Fire Emblem Heroes (FEH) Walkthrough & Guides Wiki
Yu-Gi-Oh! Master Duel Walkthrough & Guides Wiki
Super Smash Bros. Ultimate Walkthrough & Guides Wiki
Pokemon Brilliant Diamond and Shining Pearl (BDSP) Walkthrough & Guides Wiki
Elden Ring Shadow of the Erdtree Walkthrough & Guides Wiki
Monster Hunter World Walkthrough & Guides Wiki
The Legend of Zelda: Tears of the Kingdom Walkthrough & Guides Wiki
Persona 3 Reload Walkthrough & Guides Wiki
Cyberpunk 2077: Ultimate Edition Walkthrough & Guides Wiki


All rights reserved
© 2023 Electronic Arts Inc.
The copyrights of videos of games used in our content and other intellectual property rights belong to the provider of the game.
The contents we provide on this site were created personally by members of the Game8 editorial department.
We refuse the right to reuse or repost content taken without our permission such as data or images to other sites.