This survey will take about 1 minute.
Your answers will help us to improve our website.
Star Wars Jedi Survivor
All Jedha Collectibles
★ Find out what gets carried over to New Game Plus!
☆ Learn how to get Beskar Steel and all weapon materials!
★ Make sure to get all the BD-1 Upgrades to help in combat!
☆ Get Map Upgrades to make hunting Collectibles easier!
Jedha is one of the planets you can roam and visit in Star Wars Jedi: Survivor. Read on to learn more about all the collectibles that can be found on this planet, and more!
| Planet Walkthrough | Planet Collectibles |
|---|---|
| Jedha Walkthrough Jedha Part 2 |
Jedha Collectibles |
List of Contents
All Jedha Collectibles
| All Jedha Collectibles | ||
|---|---|---|
| Chests | Stim Upgrades | BD-1 Scans |
| Force Echoes | Health Essences | Force Essences |
| Jedha Scrolls | Fish | Purchasable Collectibles |
Chests
| In-game Location | Map Location |
|---|---|
 |
 |
|
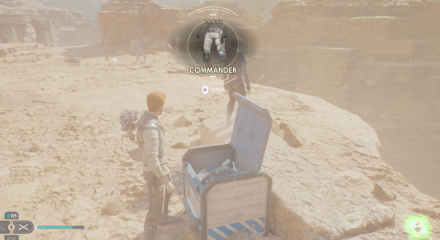
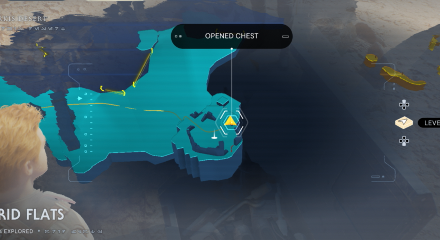
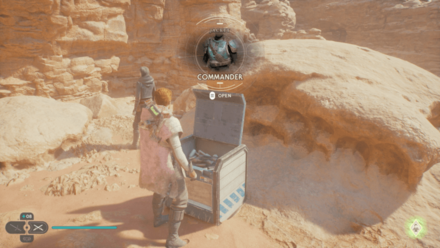
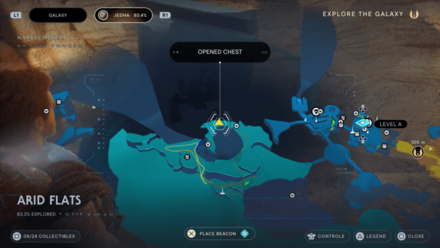
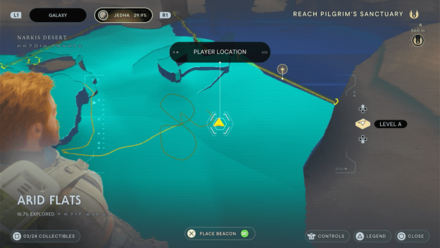
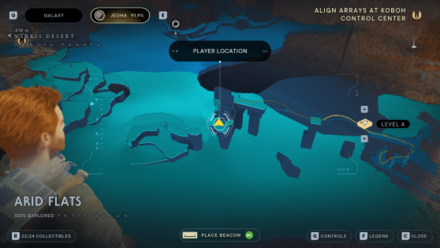
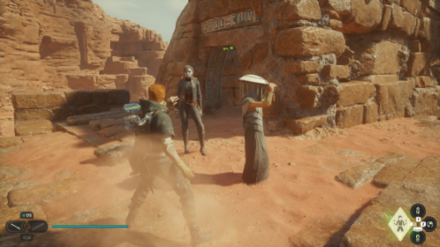
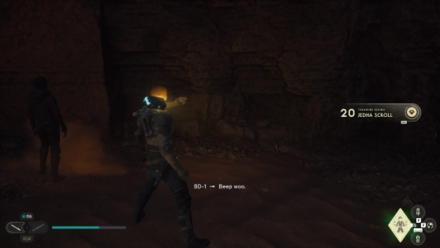
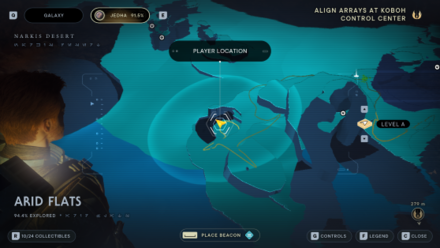
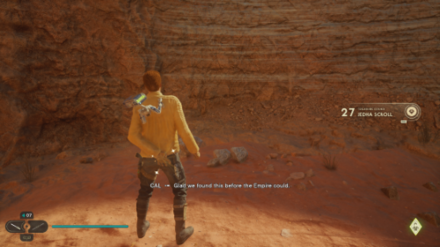
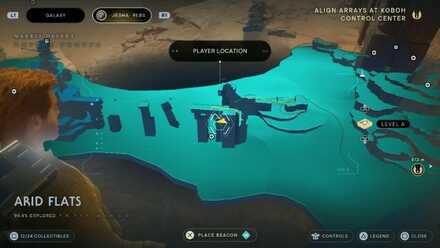
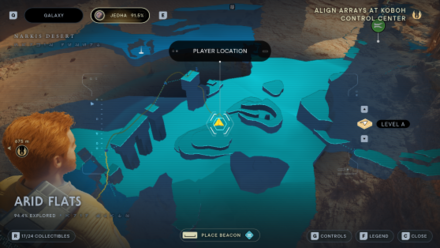
Collectible: Commander Type: Cal Cosmetic Area: Arid Flats Where to Find: Found at the high point at the edge of the area. |
|
 |
 |
|
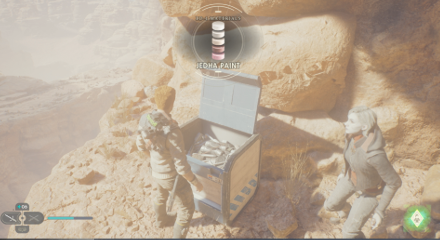
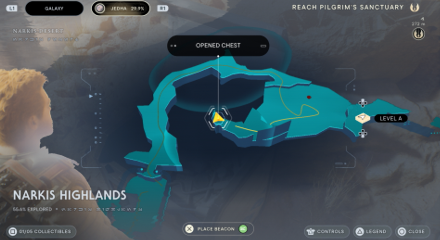
Collectible: Jedha Paint Type: BD-1 Cosmetic Area: Narkis Highland Where to Find: Found near the area where you fight a regular Skriton. Jump up the ledge at the side of the area and you'll find the chest at the end of the path. |
|
 |
 |
|
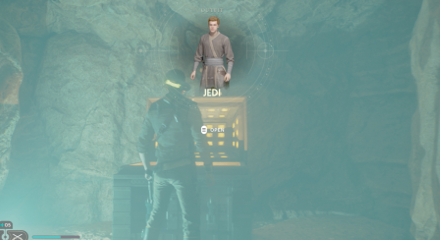
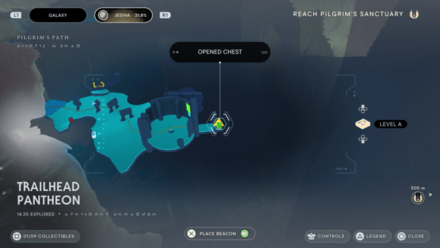
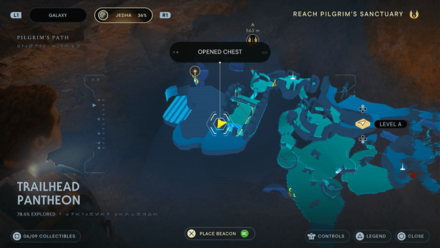
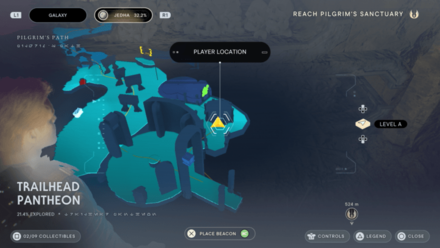
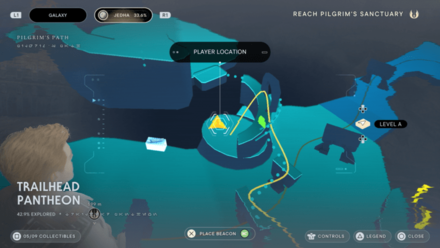
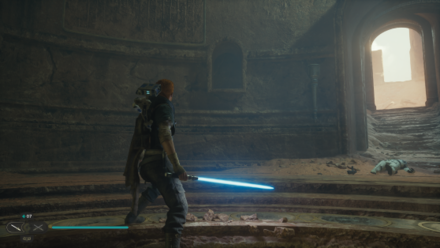
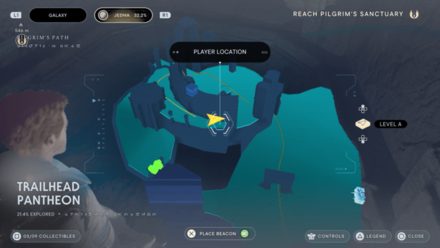
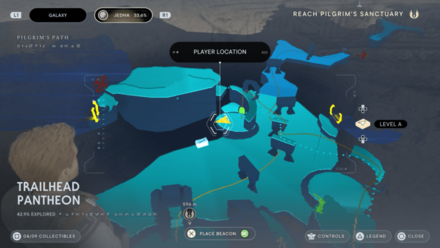
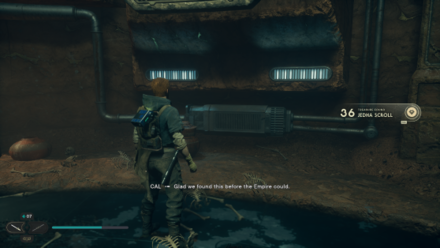
Collectible: Jedi Type: Cal Cosmetic Area: Trailhead Pantheon Where to Find: Chest can be found past the wall running section after climbing up the stairs in the area. |
|
 |
 |
|
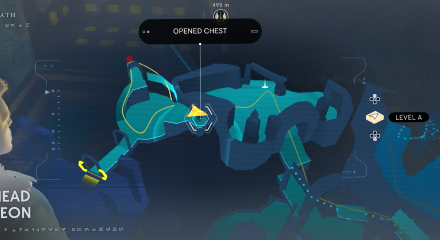
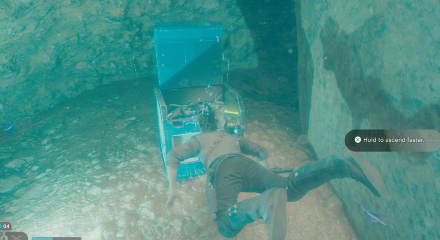
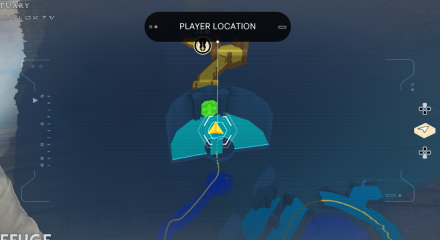
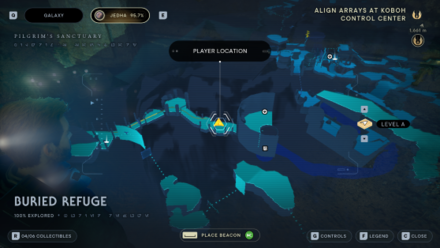
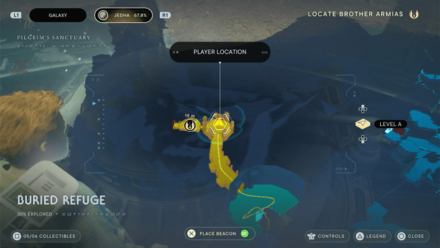
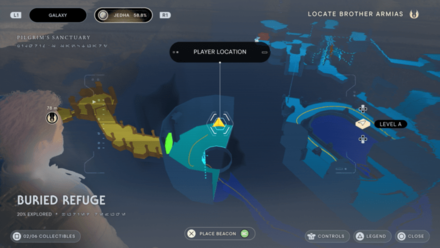
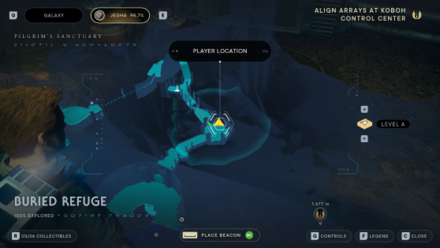
Collectible: Kaminoan Type: BD-1 Cosmetic Area: Buried Refuge Where to Find: Found at the bottom of the end of the path underwater just before rising up the last time. |
|
 |
 |
|
Collectible: Justice Type: Lightsaber Cosmetic Area: Trailhead Pantheon Where to Find: Force pull the cord to open the door. Let go of the cord and pull the large cube just below the door to stop it from closing. You'll find the chest inside. |
|
 |
 |
|
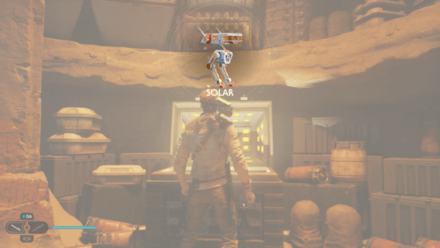
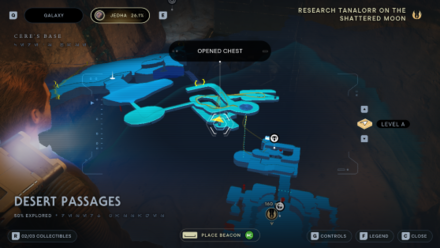
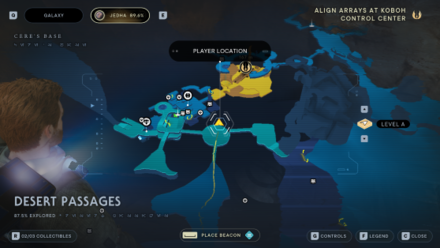
Collectible: Solar Type: BD-1 Cosmetic Area: Desert Passages Where to Find: From the Meditation Point, head up the path and take the elevator on your left. Follow the path down and enter the first red door you see. You'll find the chest to the right of the door. |
|
 |
 |
|
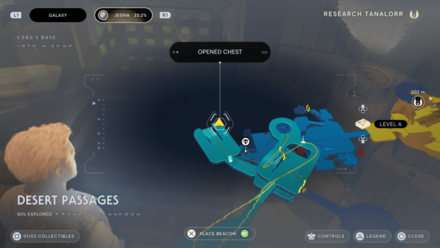
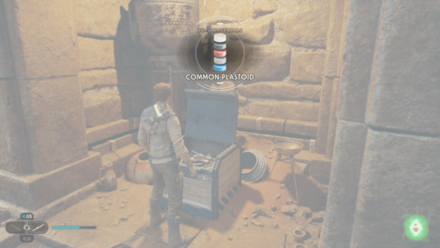
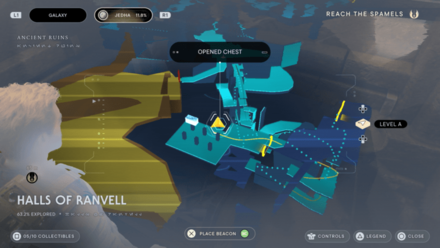
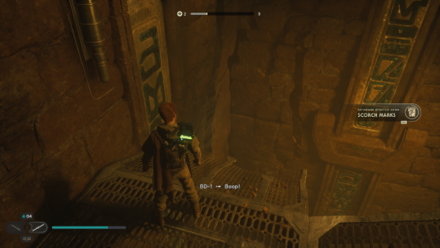
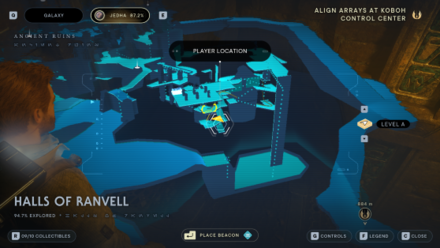
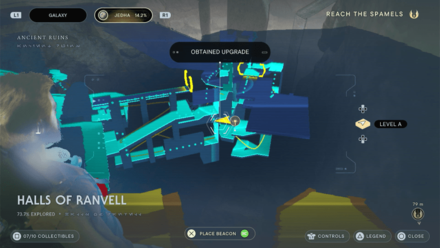
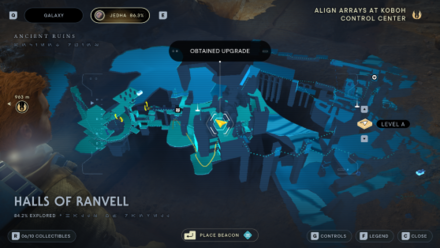
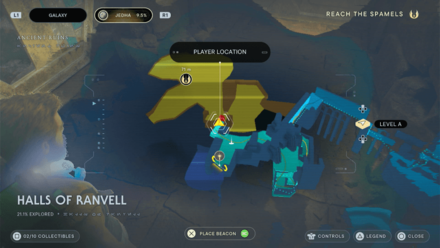
Collectible: Common Plastoid Type: BD-1 Cosmetic Area: Halls of Ranvell Where to Find: Enter the room full of Stormtroopers and pillars and you'll find the chest just beside the workbench. |
|
 |
 |
|
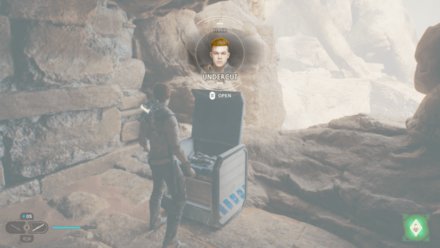
Collectible: Undercut Type: Cal Cosmetic Area: Halls of Ranvell Where to Find: From the Halls of Ranvell Meditation point, jump down to the platform and continue along the path. Run along the first wall, turn around and then run alng the second wall. |
|
 |
 |
|
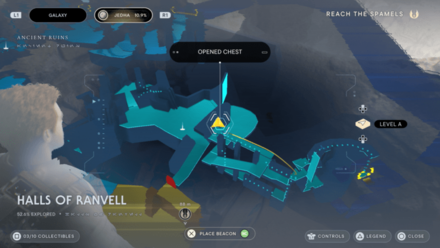
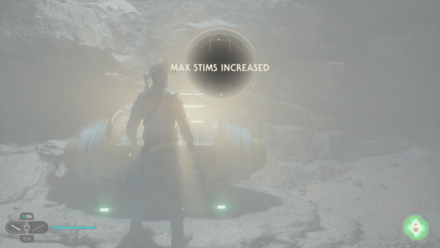
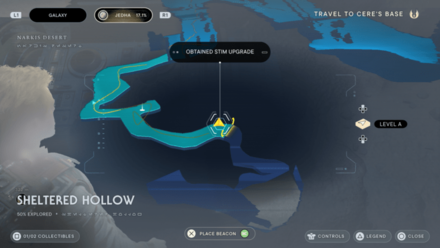
Collectible: Stim Upgrade Area: Sheltered Hollow Where to Find: From the Meditation Point, walk down the path and you'll find it on your left by the wall. |
|
 |
 |
|
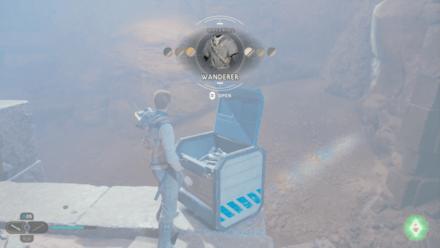
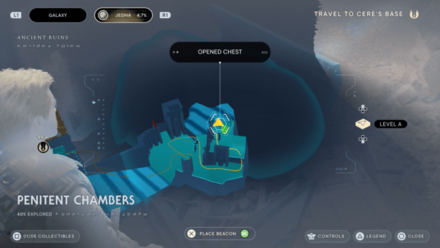
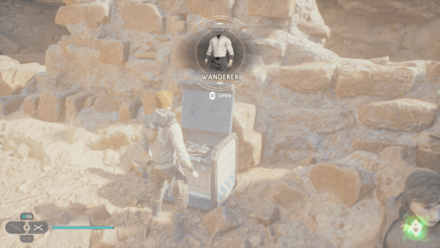
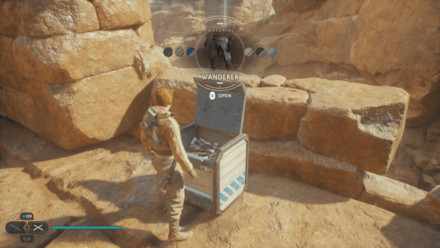
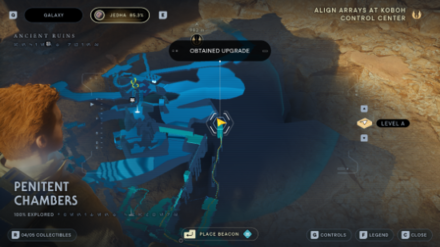
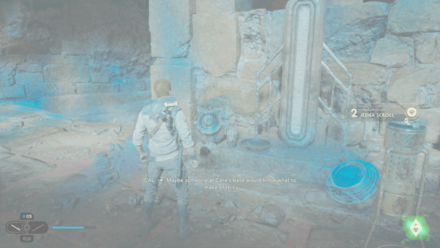
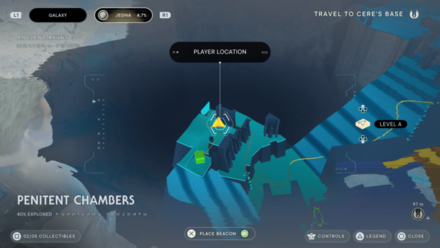
Collectible: Wanderer Type: Cal Cosmetic Area: Penitent Chambers Where to Find: Found at the highest point in the area that you'll need to wall jump to access after meeting with Merrin. |
|
 |
 |
|
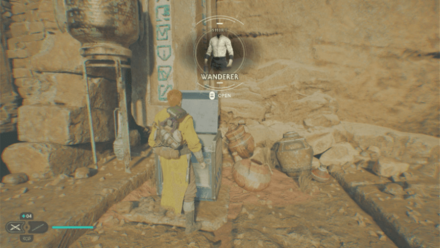
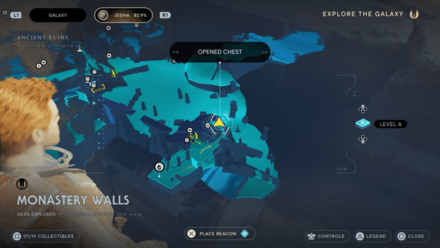
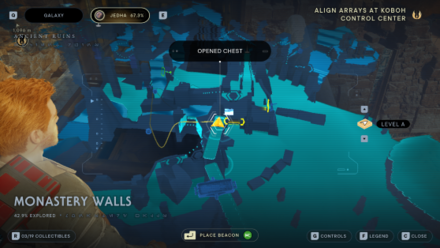
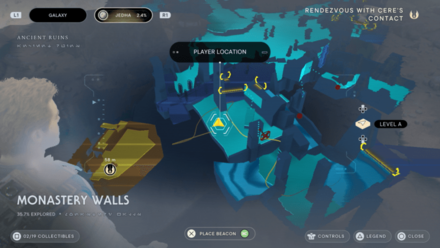
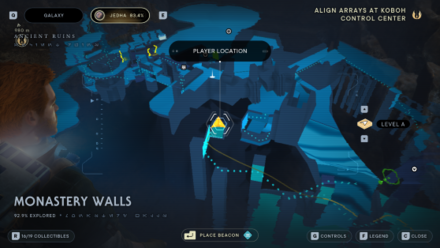
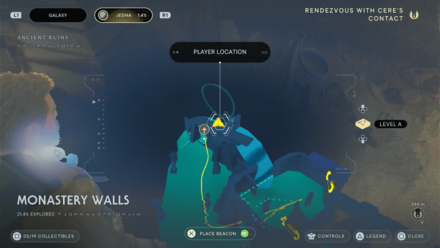
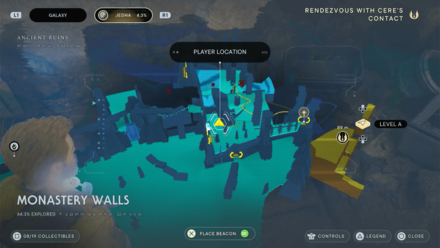
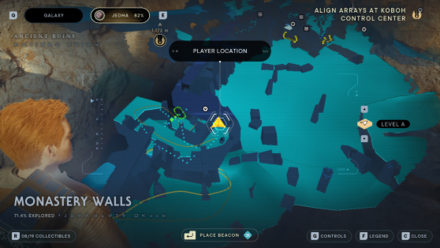
Collectible: Wanderer Type: Cal Cosmetic Area: Monastery Walls Where to Find: Past the "Pilgrims, Lost" Force Echo, slide down the platform and grapple as soon as you can. Walk across the beam and jump past the three pillars and you'll find the chest on your left by the edge. |
|
 |
 |
|
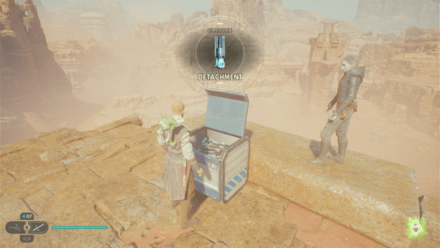
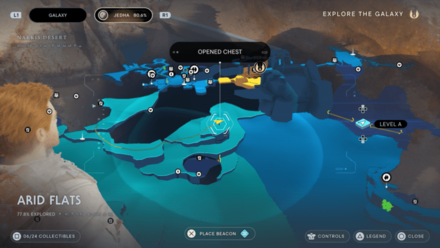
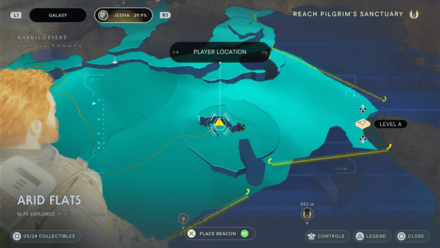
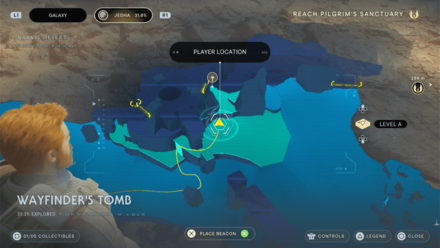
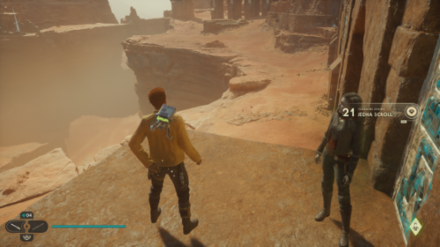
Collectible: Detachment Type: Lightsaber Cosmetic Area: Wayfinder's Tomb Where to Find: Head to the top of Wayfinder's Tomb and head for the broken bridge leading towards Arid Flats Meditation Point. You'll find the chest at the end but you'll need the Upgraded Ascension Cable. |
|
 |
 |
|
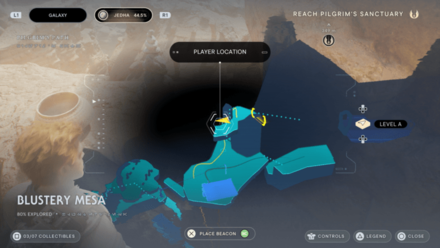
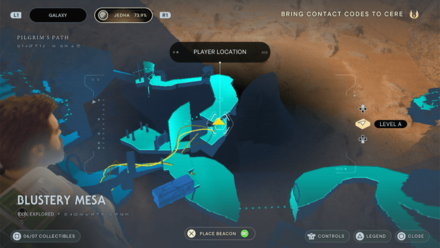
Collectible: Justice Type: Lightsaber Cosmetic Area: Blustery Mesa Where to Find: Found once you reach the windy area after hanging from and crossing the bridge. |
|
 |
 |
|
Collectible: Nocular Type: BD-1 Cosmetic Area: Monastery Walls Where to Find: Past the "Pilgrims, Lost" Force Echo, slide the down platform and grapple up as soon as you can. Walk across the beam then wall run through and you'll find the chest infront. |
|
 |
 |
|
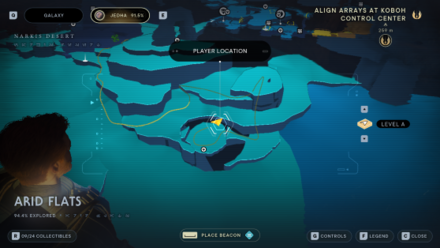
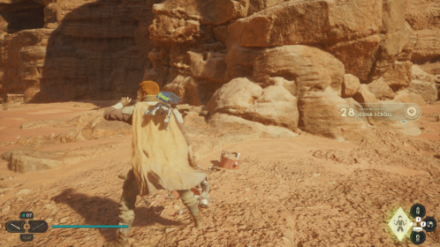
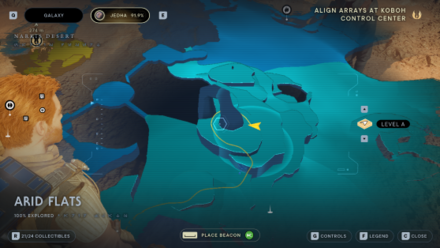
Collectible: Commander Type: Cal Cosmetic Area: Arid Flats Where to Find: Found by following the path by the rocky wall from the Anchorite Base Meditation Point. |
|
 |
 |
|
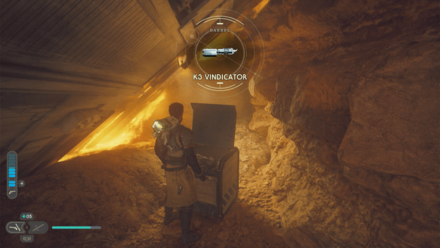
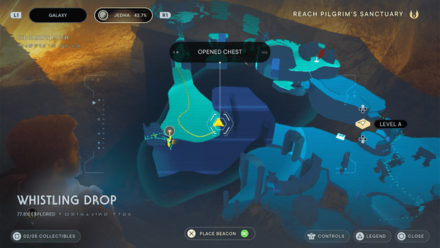
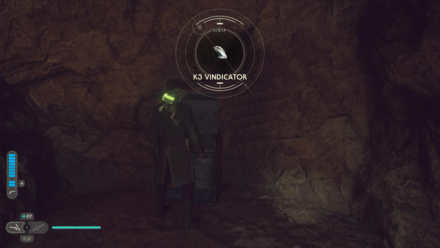
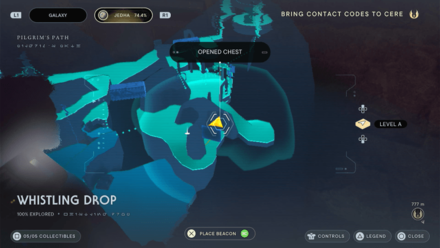
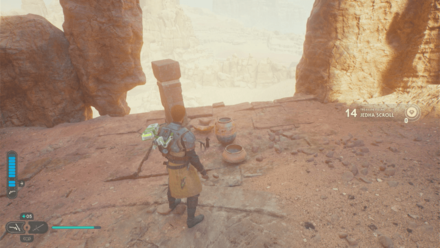
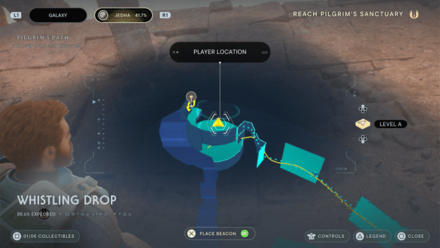
Collectible: K3 Vindicator Type: Blaster Cosmetic Area: Whistling Drop Where to Find: Found beneath a ship wreckage with a Skriton nearby. |
|
 |
 |
|
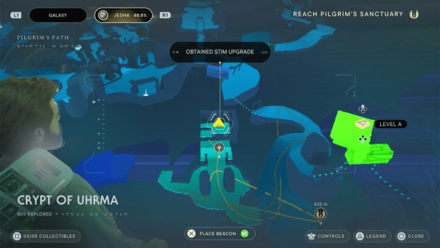
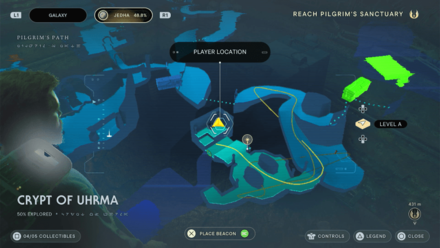
Collectible: Stim Upgrade Area: Crypt of Uhrma Where to Find: Solve the Crypt of Uhrma puzzle and you'll find the chest across. |
|
 |
 |
|
Collectible: K3 Vindicator Type: Blaster Cosmetic Area: Whistling Drop Where to Find: Found behind the Meditation Point past a green laser wall. |
|
 |
 |
|
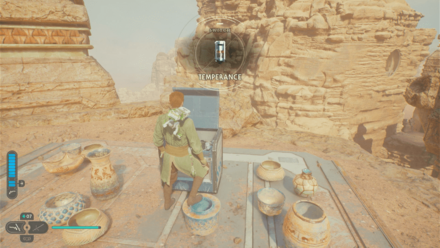
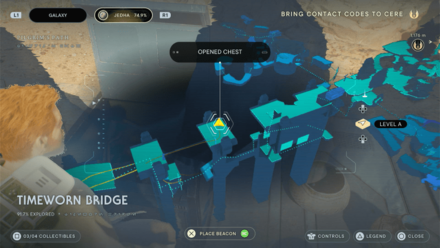
Collectible: Temperance Type: Lightsaber Cosmetic Area: Timeworn Bridge Where to Find: After unlocking the shortcut zipline at the other side of the bridge, ride it halfway and drop down. You'll find the chest on your left. |
|
 |
 |
|
Collectible: Wanderer Type: Cal Cosmetic Area: Path of Restoration Where to Find: On the platform at the bottom of the wire which connects to the top of the temple. |
|
 |
 |
|
Collectible: Wanderer Type: Cal Cosmetic Area: Monastery Walls Where to Find: First, unlock the Dash ability in Jedha Part 2 story chapter. From the spot where you get the Wanderer Shirt and Force Tear, look back where you came from to see a wall you can Dash onto. Dash to it and climb up to reach the chest. |
|
 |
 |
|
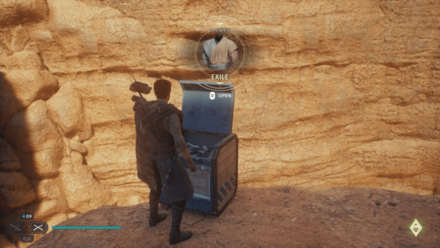
Collectible: Exile Type: Cal Cosmetic Area: Arid Flats Where to Find: From the Anchorite Base meditation point, walk forward a bit and jump up the ledge, and look to the left to see a wall that's slightly lower than those around it. Double jump to the top; you might fail a few times, but you can make it up. Follow the path to the end to find the chest. |
|
 |
 |
|
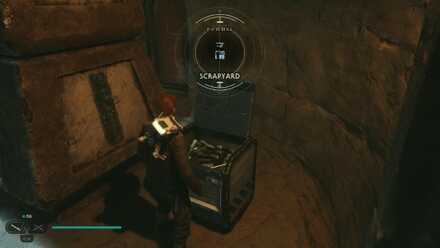
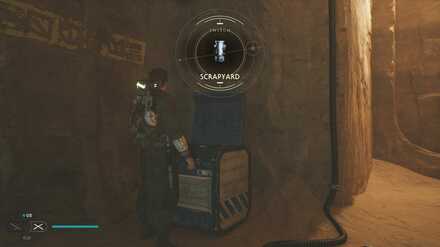
Collectible: Scrapyard Type: Lightsaber Cosmetic Area: Desert Passages Where to Find: Found in the Desert Passages. Pull the two Orbs on the second floor to unlock a room on the first floor where you'll find the chest behind the ruin that the Anchorite is studying. |
|
 |
 |
|
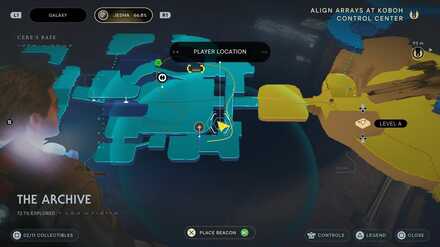
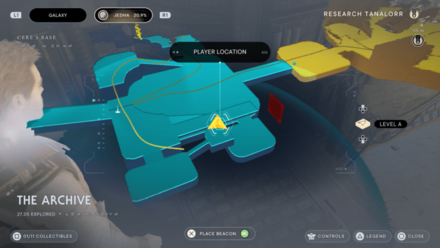
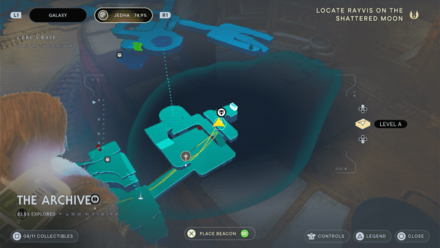
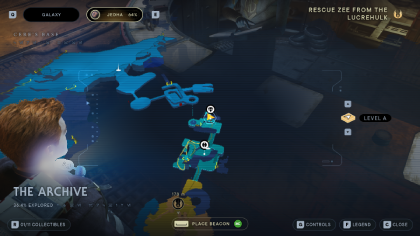
Collectible: Scrapyard Type: Lightsaber Cosmetic Area: The Archive Where to Find: Once you have the Upgraded Ascension Cable, use it to launch to the top floor of the archive. Head into the room then slide down the wall to land on the chest. |
|
 |
 |
|
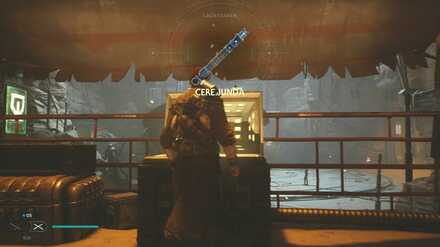
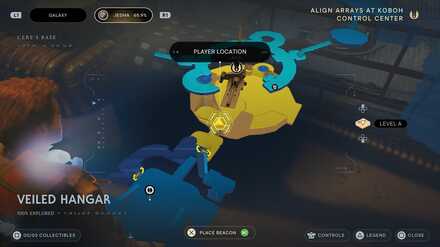
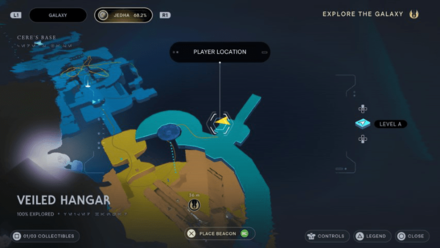
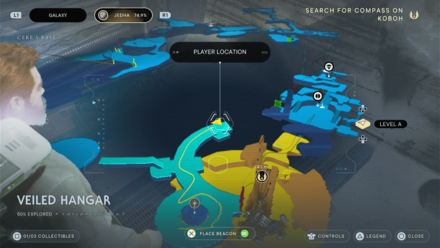
Collectible: Cere Junda Type: Lightsaber Cosmetic Area: Veiled Hangar Where to Find: Return to Jedha as Cal after the sequence where you play as Cere. The chest is found just before the entrance to the Archive. |
|
 |
 |
|
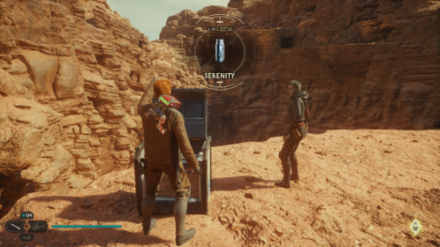
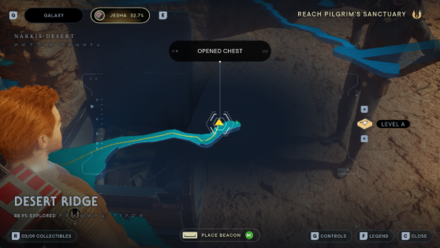
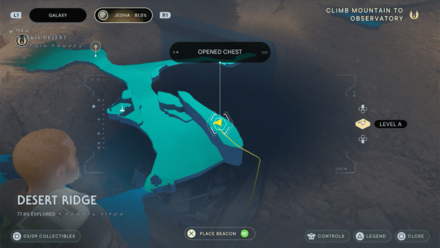
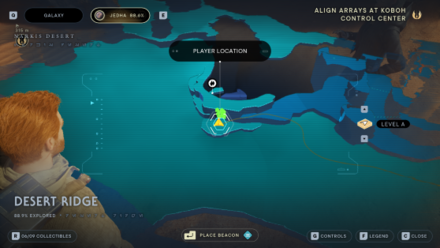
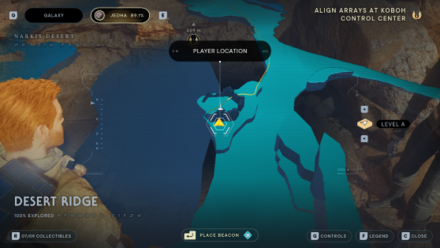
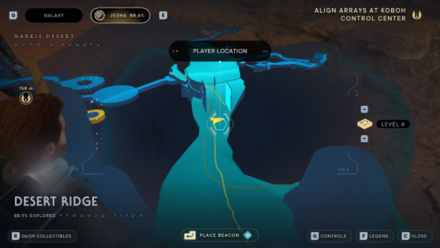
Collectible: Serenity Type: Lightsaber Cosmetic Area: Desert Ridge Where to Find: Found in a dead-end cliff in Desert Ridge next to a Zipline Shortcut |
|
 |
 |
|
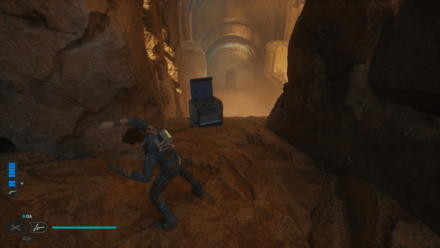
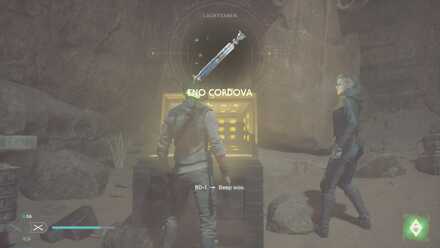
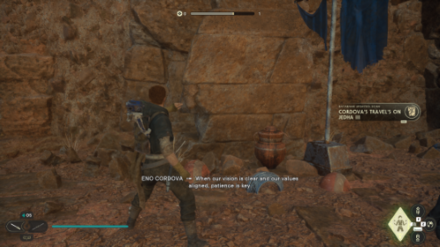
Collectible: Eno Cordova Type: Lightsaber Cosmetic Area: Wayfinder's Tomb Where to Find: Found inside the Wayfinder's Tomb after completing the three puzzles and opening the tomb. |
|
 |
 |
|
Collectible: Temperance Type: Lightsaber Cosmetic Area: Desert Ridge Where to Find: From the Desert Ridge Meditation Point, follow the path towards Arid Flats and hug to your left side until you reach 2 Ascension Cable Droids. Take the path upwards and ride the flying mount and you'll find the chest across at the high platform. |
|
 |
 |
|
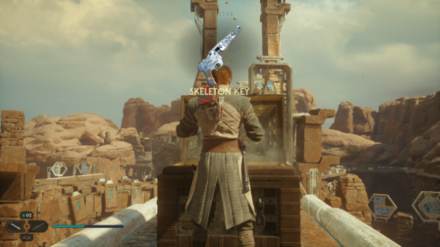
Collectible: Skeleton Key Type: Blaster Cosmetic Area: Monastery Walls Where to Find: From the area in Monastery Walls overlooking the desert, grapple to the balloon in front of you then turn right to dash to the top of the wall-runnable wall. From there turn right and jump to the broken bridge on top. |
|
 |
 |
|
Collectible: Scrapyard Type: Lightsaber Cosmetic Area: Veiled Hangar Where to Find: Take the elevator behind the training dummy and you'll find the chest on your left by the corner in the dark. |
|
 |
 |
|
Collectible: Scrapyard Type: Lightsaber Cosmetic Area: The Archive Where to Find: From the Meditation Point, face towards the Mantis and enter the door on your left. Climb up the walls, and jump across the gap and you'll find the chest at the end. |
|
 |
 |
|
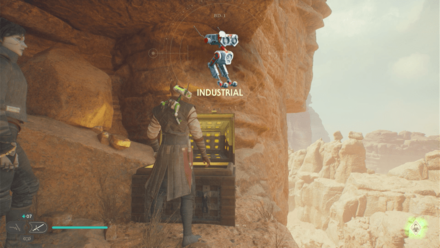
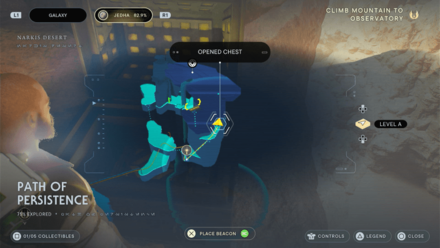
Collectible: Industrial Type: BD-1 Cosmetic Area: Path of Persistence Where to Find: From the Anchorite Base Meditation Point, head east towards the zipline at the edge and cross it. Grapple up the Ascension Cable Droid and you'll find the chest on your left by the corner. |
|
 |
 |
|
Collectible: Nocular Type: BD-1 Cosmetic Area: Penitent Chambers Where to Find: From the Meditation Point, head down the bridge below and climb the ledges on the right. Follow the path til the fork and you'll find the chest across the gap on your right. |
|
 |
 |
|
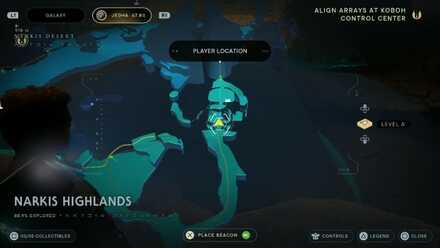
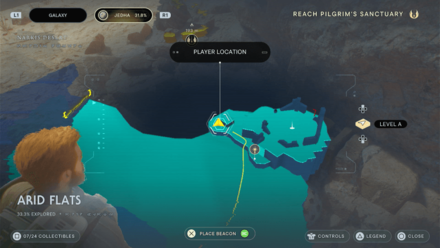
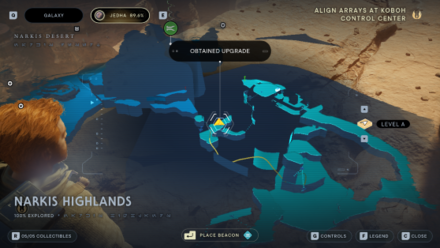
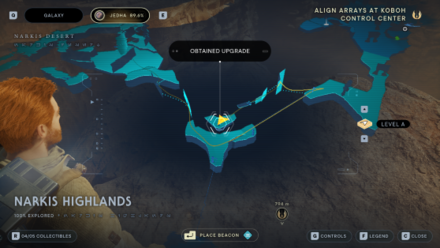
Collectible: Kaminoan Type: BD-1 Cosmetic Area: Narkis Highlands Where to Find: From the Arid Flats Meditation point, zipline down to Narkis Highlands then follow the path past the Skriton until you reach the room with the moveable wall. The chest itself is behid the moveable wall. |
|
 |
 |
|
Collectible: Nocular Type: BD-1 Cosmetic Area: Monastery Walls Where to Find: From the Meditation Point, head for the entrance on the east side below the workbench. You'll find the chest inside by the wall. |
|
 |
 |
|
Collectible: Nocular Type: BD-1 Cosmetic Area: Monastery Walls Where to Find: On a platform above the workbench. Climb the nearby pillars to reach it. |
|
 |
 |
|
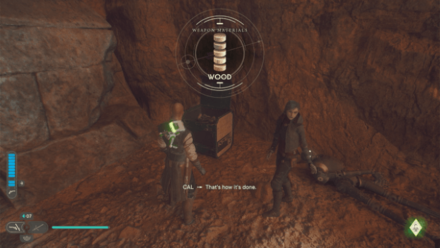
Collectible: Wood Type: Weapon Cosmetic Area: Path of Conviction Where to Find: Inside a lower platform guarded by two Droids. |
|
Stim Upgrades
| In-game Location | Map Location |
|---|---|
|
|
|
Collectible: Stim Upgrade Area: Sheltered Hollow Where to Find: From the Meditation Point, walk down the path and you'll find it on your left by the wall. |
|
|
|
|
Collectible: Stim Upgrade Area: Crypt of Uhrma Where to Find: Solve the Crypt of Uhrma puzzle and you'll find the chest across. |
|
BD-1 Scans
| In-game Location | Map Location |
|---|---|
 |
 |
|
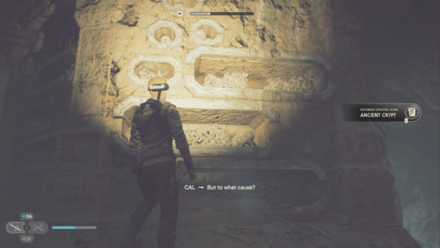
Collectible: Ancient Crypt Area: Trailhead Pantheon |
|
 |
 |
|
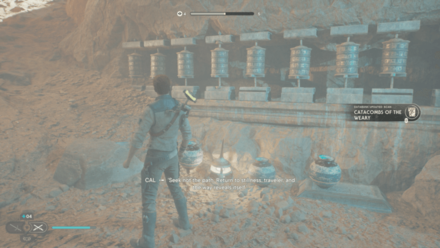
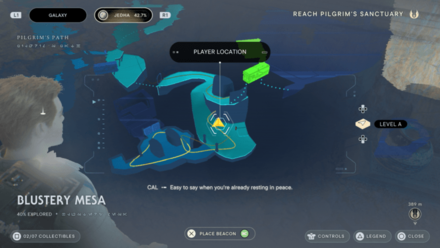
Collectible: Catacombs of the Weary Area: Blustery Mesa |
|
 |
 |
|
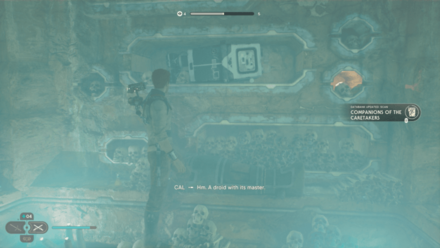
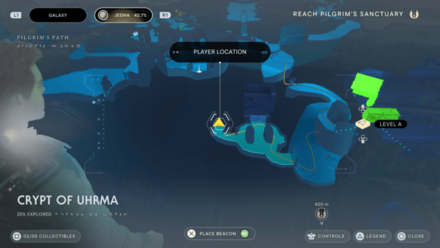
Collectible: Companions of the Caretakers Area: Crypt of Uhrma |
|
 |
 |
|
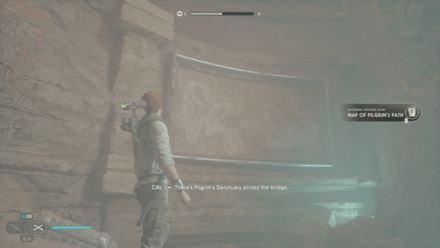
Collectible: Map of Pilgrim's Path Area: Trailhead Pantheon |
|
 |
 |
|
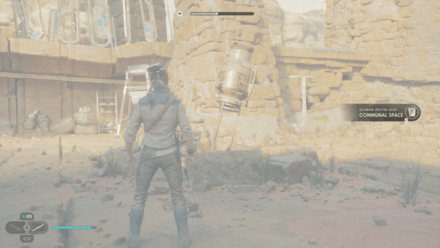
Collectible: Communal Space Area: Monastery Walls Where to Find: Past the Monastery Walls Workbench, drop down the area with a group of Hardshells. In that area scan the tilted metal pot. |
|
 |
 |
|
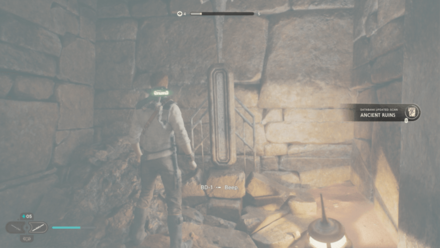
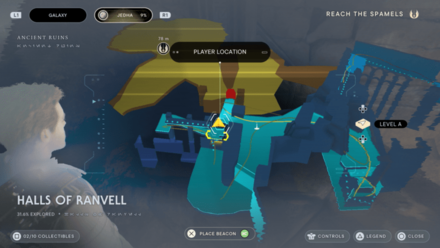
Collectible: Ancient Ruins Area: Halls of Ranvell Where to Find: From the Halls of Ranvell Meditaion point, jump down and continue along the path until you reach down the end of the staircase. Look left and scan the sculpture. |
|
 |
 |
|
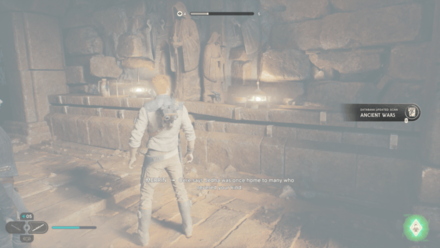
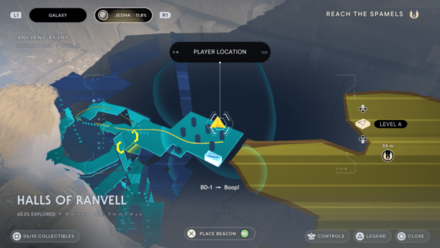
Collectible: Ancient Wars Area: Halls of Ranvell Where to Find: In the Halls of Ranvell Workbench room, scan the wall art with candles |
|
 |
 |
|
Collectible: Prayer Wheel Area: Monastery Walls Where to Find: From the Monastery Walls Meditation Point, look right to see the Prayer Wheels between two Columns Databank Entry: A tool used by pilgrims to profess their faith by spinning the wheel while repeating an invocation to the Force. |
|
 |
 |
|
Collectible: Scorch Marks Area: Halls of Ranvell Where to Find: From the room with the Workbench, drop down one level until you see a spiraling platform. Walk down to the end of it to see the Scan Databank Entry: These scars bear the hallmarks of a lightsaber. Perhaps the ancient people succeeded in inviting Jedit to their planet. |
|
 |
 |
|
Collectible: Cordova's Travel's on Jedha III Area: Arid Flats Where to Find: In the area just before the Path of Conviction, grapple to a drone on the left-hand side to access the ledge above you. Databank Entry: Eno Cordova considers Jedha's mysteries as they relate to his own personal journey. |
|
 |
 |
|
Collectible: The Path Area: Trailhead Pantheon Where to Find: Can be scanned from the second rectangular stone structure Databank Entry: An ancient script welcomes travelers to the beginning of 'The Pilgrim's Path', a long-walked route for those devoted to the worship of the Force. |
|
 |
 |
|
Collectible: Meditation Hall Area: Trailhead Pantheon Where to Find: From the Crypt of Uhrma Meditation Point, go to the circular room to find the scan on the walls Databank Entry: An invitation for travelers to find stillness along the Path. Though the journey carries Pilgrims forward, direction can only be found in taking stock of the route. |
|
 |
 |
|
Collectible: Hidden Path, Exposed Area: Buried Refuge Where to Find: Look for the skeleton at the left-hand side of the tunnel leading out of the room with water. Databank Entry: In the abrupt evacuation, all manner of personal belongings were left behind, a tableau of the lives that were lived before |
|
Force Echoes
| In-game Location | Map Location |
|---|---|
 |
 |
|
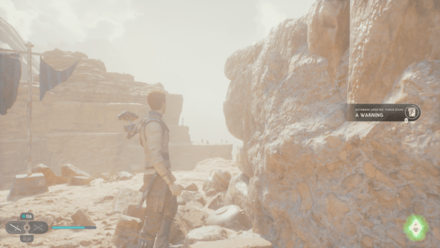
Collectible: A Warning Area: Arid Flats |
|
 |
 |
|
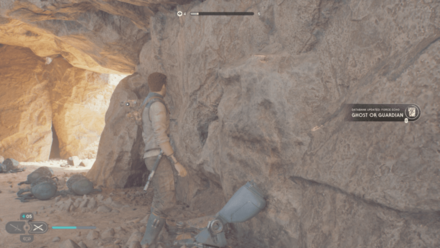
Collectible: Ghost or Guardian Area: Blustery Mesa Where to Find: Past the windy area, slide down and wall run through the path. You'll find the Force Echo inside the cave to your left. Databank Entry: The Imperial presence on Jedha is seemingly increasing, for reasons yet unknown. The Empire, however, did not account for a Dathomirian Nightsister. |
|
 |
 |
|
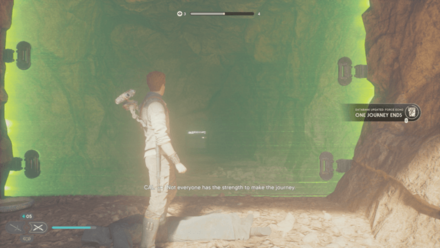
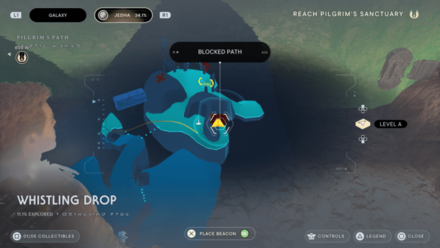
Collectible: One Journey Ends Area: Whistling Drop Where to Find: Found behind the Whistiling Drop Meditation Point infront of a green laser wall. |
|
 |
 |
|
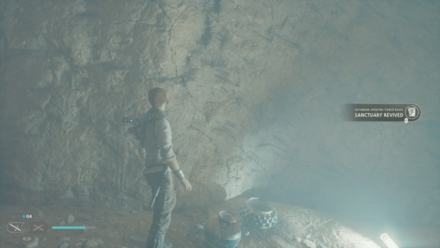
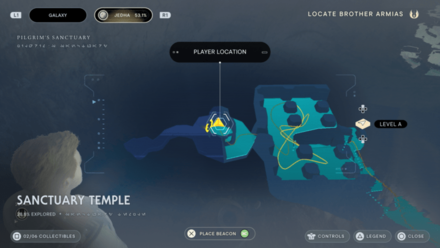
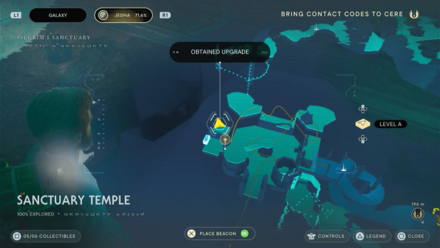
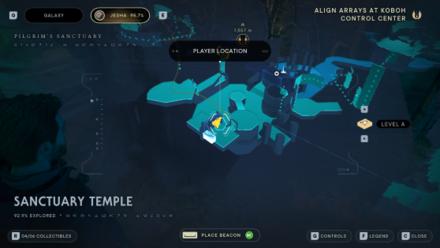
Collectible: Sanctuary Revived Area: Sanctuary Temple Where to Find: Once you've arrived at Pilgrim's Sanctuary, go left and you'll find the Force Echo in the room on your right. Databank Entry: Decades ago, Pilgrim's Sanctuary was a refuge for those seeking safe harbor. Now, Cere Junda and Eno Cordova have repurposed the space to provide a new sanctuary for associates of the Hidden Path. |
|
 |
 |
|
Collectible: The Destination and the Beginning Area: Sanctuary Temple Databank Entry: Upon crossing the temple threshold, travelers are invited to meditate upon their pilgrimage before embarking upon their next journey. |
|
 |
 |
|
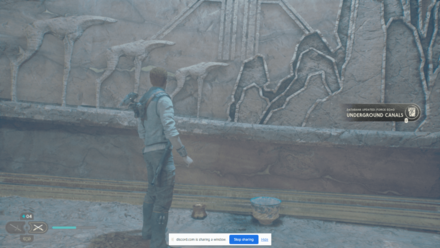
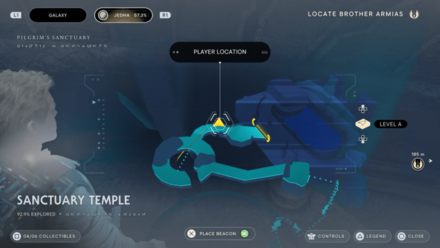
Collectible: Underground Canals Area: Sanctuary Temple Where to Find: Found along the hall past the giant droid arm stuck on the wall. Databank Entry: Some Jedha temples used ancient and intricate aqueducts to draw water up from subterranean springs. |
|
 |
 |
|
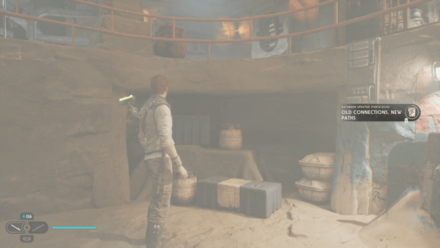
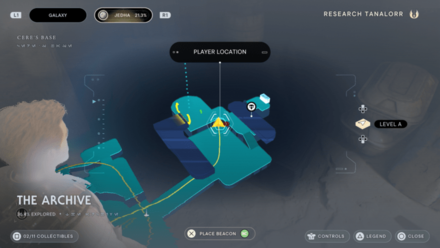
Collectible: Old Connections, New Paths Area: The Archive Where to Find: From the Meditation Point, head up the path and you'll find the Force Echo on your left by the corner. Databank Entry: After a long time apart, Cere and Merrin reconnect. A newfound sense of purpose seems to draw them together, even after much time apart. |
|
 |
 |
|
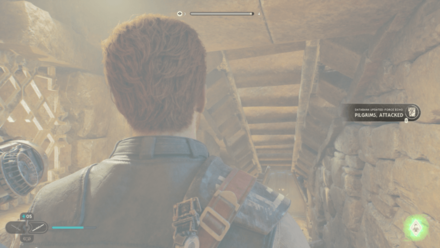
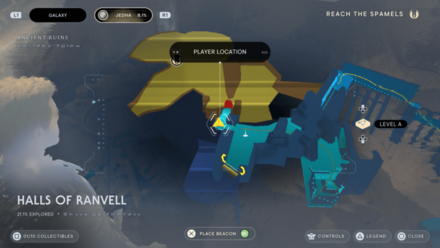
Collectible: Pilgrims, Attacked Area: Halls of Ranvell Where to Find: Found just beside the Halls of Ranvel Meditation Point. Databank Entry: A group of pilgrims are assaulted by a creature on their travels. Afterwards, they pray to the Jedi for protection. |
|
 |
 |
|
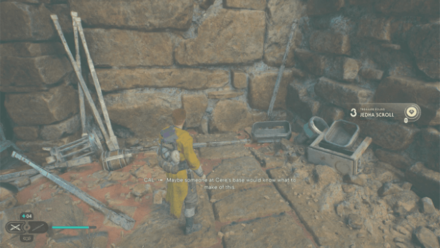
Collectible: Pilgrims, Lost Area: Monastery Walls Where to Find: Follow the path westward past the room with a Sutaban. You'll find it beside a Jedha Scroll. Databank Entry: Three pilgrims make their way dutifully, across the Jedha desert. Their provisions are low and their situation is grim. |
|
 |
 |
|
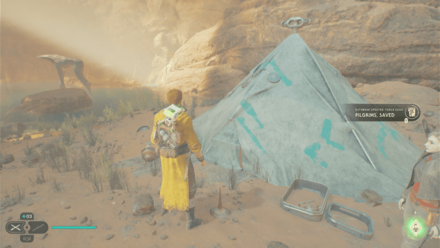
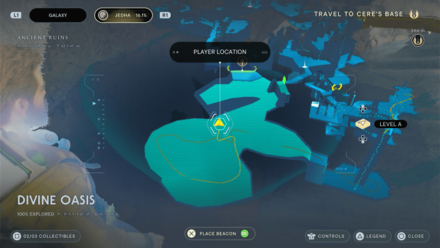
Collectible: Pilgrims, Saved Area: Divine Oasis Where to Find: After defeating the Skriton, head outside and you'll find the Force Echo by a tent. |
|
 |
 |
|
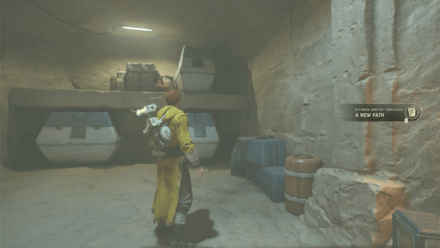
Collectible: A New Path Area: The Archive Where to Find: From the Meditation Point, head for the path up and on your left, climb the ledge that's just beside the elevator. You'll find the Force Echo at the end of the path by some crates. Databank Entry: After reuniting, Cere and Merrin discuss how the Path might find a safe place on Jedha. |
|
 |
 |
|
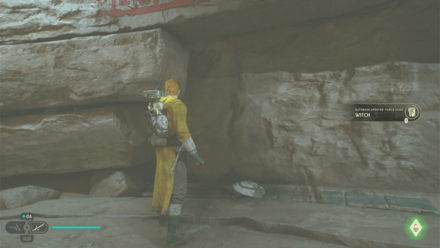
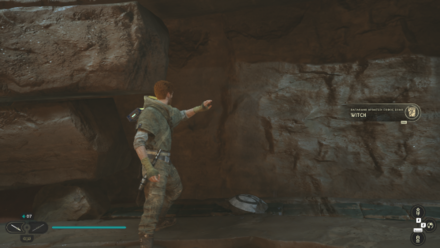
Collectible: Witch Area: Desert Passages Where to Find: After giving the research to Cordova, follow Merrin and along the way you'll find the Force Echo on your left past a door. Databank Entry: An Anchorite is eager to learn about the Nightsister Merrin. |
|
 |
 |
|
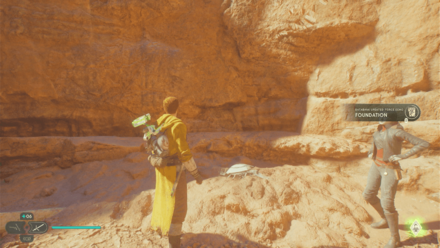
Collectible: Foundation Area: Arid Flats Where to Find: Found just outside The Archives entrance. Databank Entry: Cere and the Anchorites discover what will become their home base in the Archive. The Anchorites express that they will aid Cere, as part of their broader belief. |
|
 |
 |
|
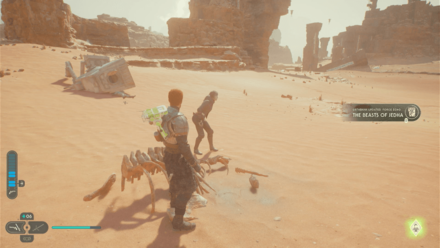
Collectible: The Beasts of Jedha Area: Arid Flats Where to Find: From the Anchorite Base Meditation Point, walk towards the middle of the desert and you'll find the Force Echo by some bones. Databank Entry: The deserts of Jedha are home to many lethal creatures. |
|
 |
 |
|
Collectible: The Desert Ghost Area: Arid Flats Where to Find: From the Anchorite Base Meditation Point, travel east and you'll find the Force Echo on top of a high platform. Databank Entry: Merrin fights against the Imperial encroachment on Jedha. |
|
 |
 |
|
Collectible: Debt Area: Arid Flats Where to Find: From the Anchorite Base Meditation Point, travel towards the middle platform of the desert infront and you'll find the Force Echo nearby. Databank Entry: The desert of Jedha was always dangerous to travelers, but it has grown more deadly with the arrival of Imperial forces. |
|
 |
 |
|
Collectible: A Warning Area: Arid Flats Where to Find: From the Arid Flats Meditation Point, facing the zipline infront, face west and move forward past the chest. You'll find the Force Echo near the square rock below. Databank Entry: Pilgrims give their perspective on the cults of Jedha. |
|
 |
 |
|
Collectible: Voices on the Wind Area: Crypt of Uhrma Where to Find: Solve the Crypt of Uhrma puzzle and you'll find the Force Echo across beside the chest. Databank Entry: Caretakers of the Path memorialized fallen pilgrims with a bell symbolizing their voice, that it may carry on the winds to be heard by all. |
|
 |
 |
|
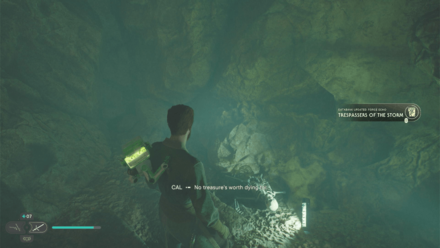
Collectible: Trespassers of the Storm Area: Singing Ruins Where to Find: Past the second narrow passageway, head for the path infront of you and you'll find the Force Echo at the end. Databank Entry: After trespassing in the Path's most sacred of chambers, looters receive their just reward. |
|
 |
 |
|
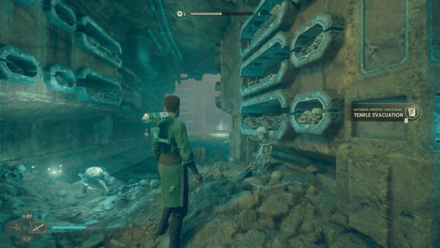
Collectible: Temple Evacuation Area: Buried Refuge Where to Find: After coming out the water, unlock the door and you'll find the Force Echo down the hall by a skeleton. Databank Entry: The temple refugees were evacuated so suddenly it's a miracle that any of them made it out alive. |
|
 |
 |
|
Collectible: A Noble Deed Area: Buried Refuge Where to Find: After coming out the water, unlock the door and you'll find the Force Echo at the end of the hall. Databank Entry: Brother Armias shepherds a group of refugees through a perilous path. In an act of noble sacrifice, he sends them ahead and insures the Empire will not follow. |
|
 |
 |
|
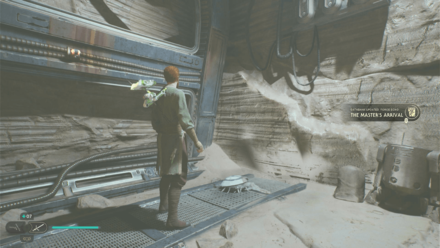
Collectible: The Master's Arrival Area: Veiled Hangar Where to Find: From the Mantis, backtrack towards the elevator and take the path past the door leading outside. You'll find the Force Echo at the end by the corner. Databank Entry: An Anchorite annouces that, through their connections on the path, someone has arrived to see Cere - Master Eno Cordova. |
|
 |
 |
|
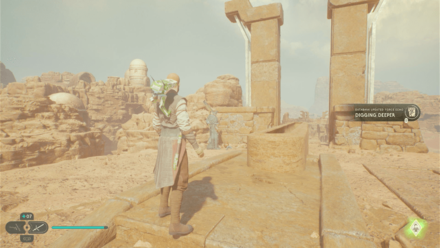
Collectible: Digging Deeper Area: Path of Conviction Where to Find: Climb up on the side and you'll find the chest on your right above the stairs. Databank Entry: Master Cordova begins to glean the larger meaning of the ruins of Jedha he has so diligently explored. |
|
 |
 |
|
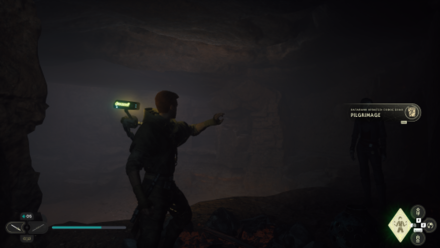
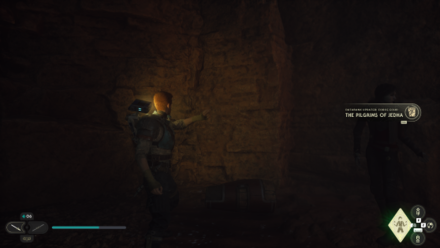
Collectible: Pilgrimage Area: Desert Ridge Where to Find: From the cave with the Green Forcefields, walk left until you see some rocks blocking another cave entrance. Force push the rocks to enter the cave Databank Entry: Pilgrims discuss why they made the long journey to Jedha |
|
 |
 |
|
Collectible: Jedha Politics Area: Desert Ridge Where to Find: Can be found just outside the walls surrounding the Desert Ridge Meditation Point, right by a skeleton Databank Entry: Two Anchorites give their perspective on the other cults-concluding best to keep to themselves and not become embroiled in wider Jedha politics. |
|
 |
 |
|
Collectible: The Pilgrims of Jedha Area: Arid Flats Where to Find: Found in the cave with the Hardshells and Sutaban |
|
 |
 |
|
Collectible: Witch Area: Desert Passages Where to Find: Found in the circular room Databank Entry: An Anchorite is eager to learn about the Nightsister Merrin. |
|
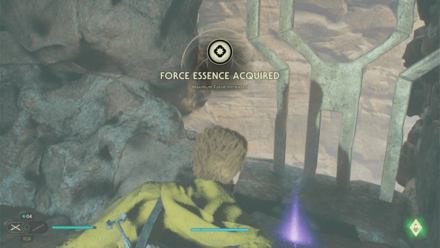
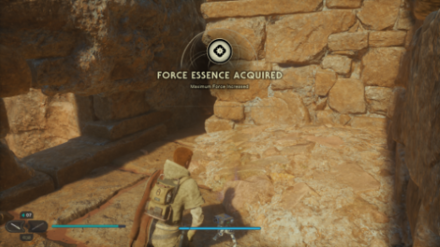
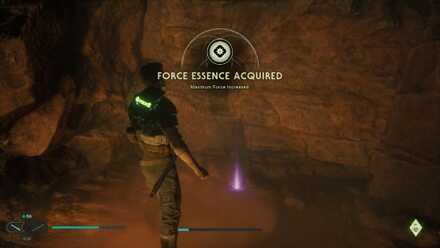
Force Essences
| Map Location | In-game Location |
|---|---|
 |
 |
|
Area: Halls of Ranvell
Where to Find: Head down the spiral staircase and you'll see an opening by the wall near some Hardshells. You'll find the Essence inside by the window. |
|
 |
 |
|
Area: Sanctuary Temple
Where to Find: Found behind the green laser wall at the second floor. |
|
 |
 |
|
Area: Penitent Chambers
Where to Find: From the Nocular Body chest, turn around and keep going forward running along the walls until you reach the end |
|
 |
 |
|
Area: Halls of Ranvell
Where to Find: From the Halls of Ranvell Meditation Point, walk forward and drop down to the ledge where the enemies are, look left to see a wall-runable wall then just follow the path |
|
 |
 |
|
Area: Narkis Highlands
Where to Find: Grapple up to the balloon above the Skriton pit then turn to the Grapple Point on the wall-runnable wall then jump towards the scalable wall and jump up until you another wall to your left, jump to that wall and double jump-dash towards the ledge with the Relter. |
|
 |
 |
|
Area: Narkis Highlands
Where to Find: From the Arid Flats Meditation Point, zipline down to Narkis Highlands then turn right into another zipline. From here turn around and double jump-dash to a set of scalable walls and climb left until you see a ledge with the Force Essence |
|
 |
 |
|
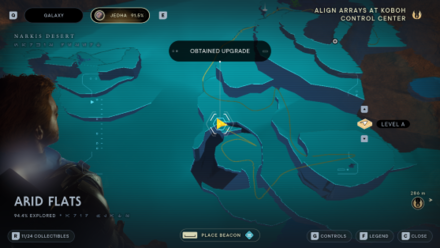
Area: Arid Flats
Where to Find: In the cave with the Hardshells and Sutaban, you will find a ledge with the Force Essence |
|
 |
 |
|
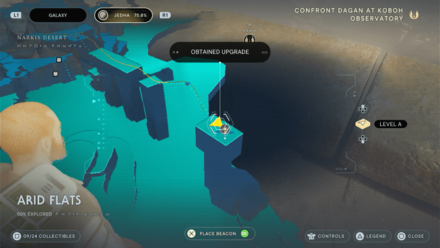
Area: Arid Flats
Where to Find: On top of the structure connecting to Wayfinder's Tomb, you will find the upgrade near an Anchorite and a Relter. Use a Mind Trick to convince the Anchorite into opening a locked door to the upgrade. |
|
Health Essences
| Map Location | In-game Location |
|---|---|
 |
 |
|
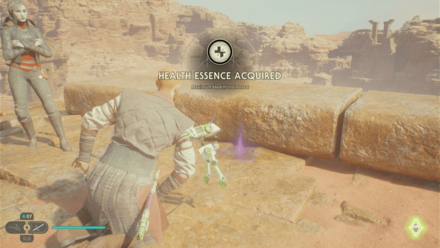
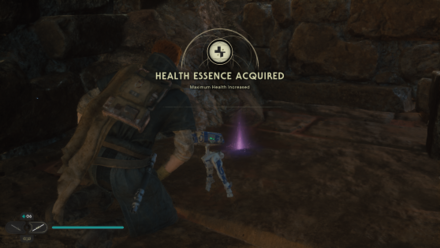
Area: Arid Flats
Where to Find: Found at the end of the broken bridge at Wayfinder's Tomb. |
|
 |
 |
|
Area: Monastery Walls
Where to Find: From the Monastery Walls Work Bench, look to the wall opening to the right and you'll see wall-climbable pillars. Jump Dash towards these pillars untill you reach the end where there'll be a hole in the wall with the Force Essence in it. |
|
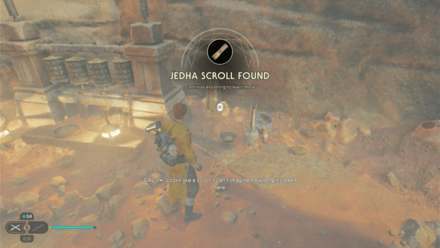
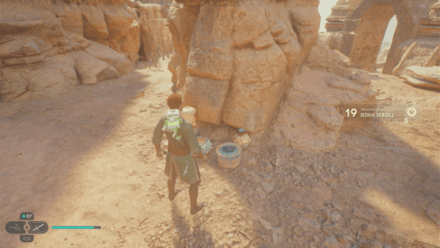
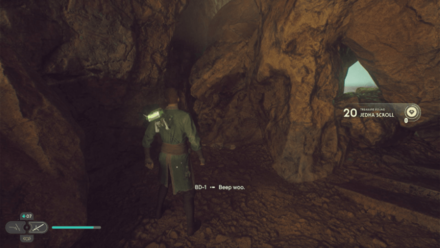
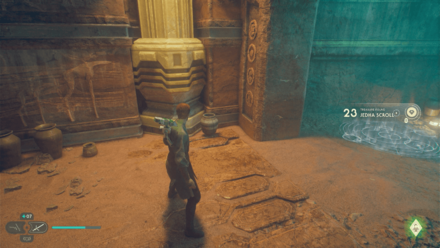
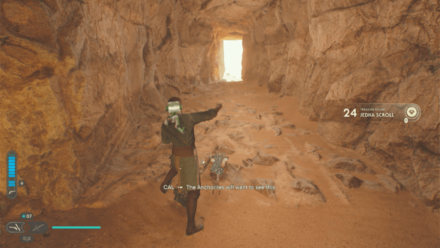
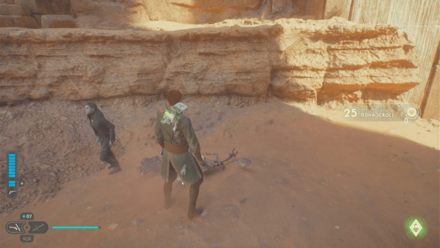
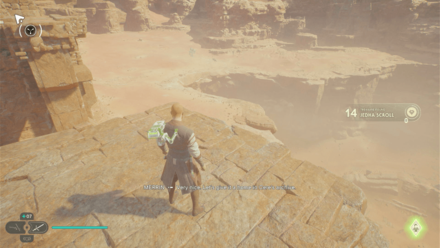
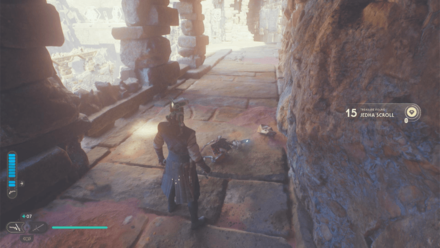
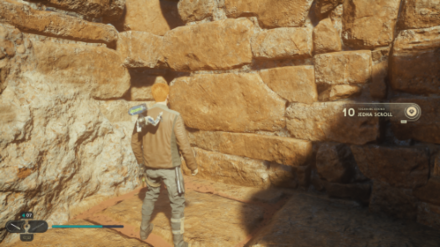
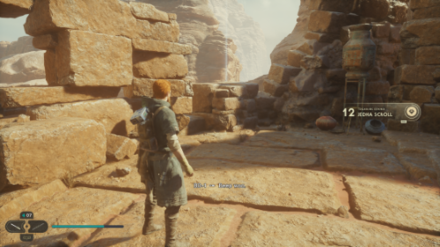
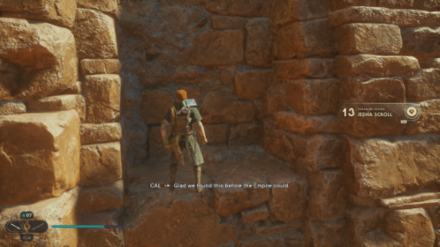
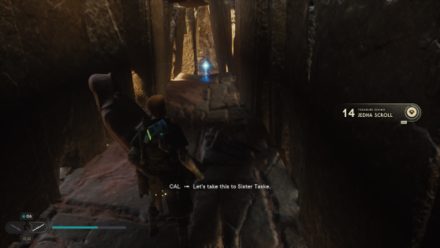
Jedha Scrolls
| In-game Location | Map Location |
|---|---|
 |
 |
|
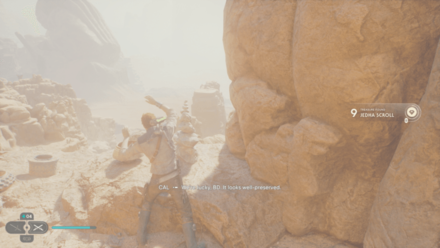
Area: Trailhead Pantheon Where to Find: Once you've brought the cube to climb the ledge, enter the cave and go down the path on the left. You'll find the Scroll at the end. |
|
 |
 |
|
Area: Trailhead Pantheon Where to Find: Found inside the building at the bottom of the spiral stairs. |
|
 |
 |
|
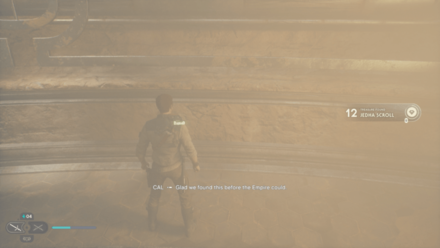
Area: Blustery Mesa Where to Find: From the Timeworn Bridge Meditation Point, backtrack down and use the wind the jump up the platform inbetween the rocks. Climb the wall on your right and you'll find the Scroll up top on your right back some stacked rocks. |
|
 |
 |
|
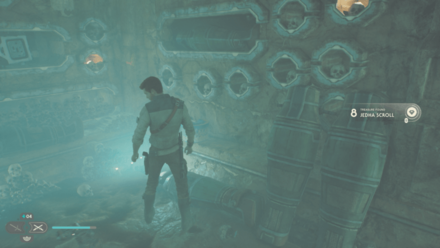
Area: Buried Refuge Where to Find: After coming out of the water, force pull the gate on the right and you'll find the Scroll by the wall. |
|
 |
 |
|
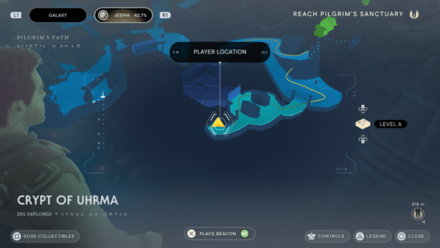
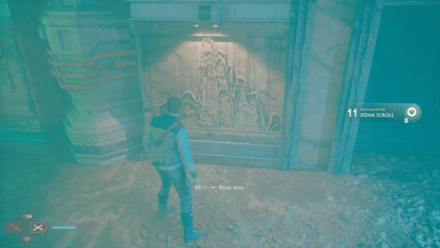
Area: Crypt of Uhrma Where to Find: Enter the crypt and hug the wall to your left. You'll find the Scroll at the end of the path. |
|
 |
 |
|
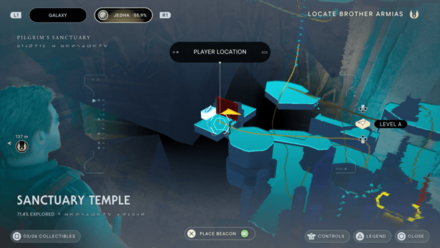
Area: Sanctuary Temple Where to Find: Infront of the green laser wall on the second floor. |
|
 |
 |
|
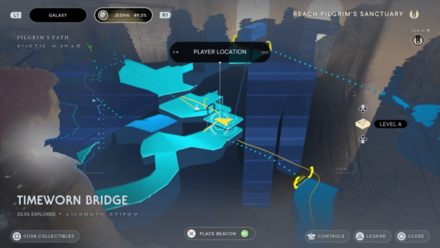
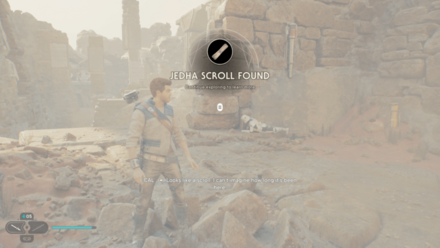
Area: Timeworn Bridge Where to Find: From the Timeworn Bridge Meditation Point, follow the path forward and you'll find the Scroll beneath the metal platform. |
|
 |
 |
|
Area: Monastery Walls Where to Find: From the Monastery Walls Meditation Point, head down the middle path into an opening you can force push. You'll find the Scroll on a dead Stormtrooper body after defeat the nearby enemies. |
|
 |
 |
|
Area: Penitent Chambers Where to Find: After meeting Merrin and defeating the group of Stormtroopers, grapple up and wall run to a ledge and you'll find the Scroll on your left by a small monument. |
|
 |
 |
|
Area: Halls of Ranvell Where to Find: After watching Merrin defeat the Stormtroopers, wall jump up and you'll find the Scroll up top by the ledge. |
|
 |
 |
|
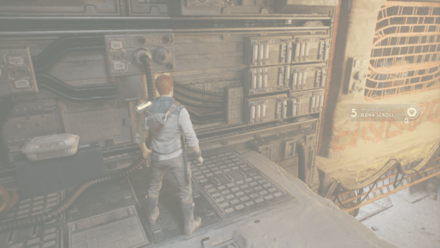
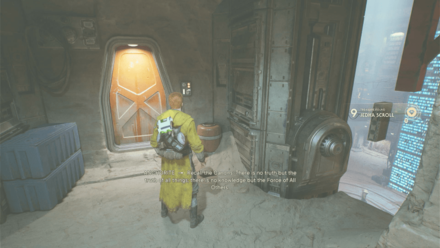
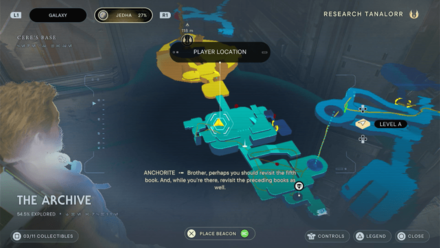
Area: The Archive Where to Find: From the Meditation Point, face where the Mantis is, walk forward a bit and enter the red door on your right. Go through the narrow passageway on your left and you'll find the Scroll on the floor to your left. |
|
 |
 |
|
Area: Monastery Walls Where to Find: Follow the path westward past the room with a Sutaban. You'll find it beside the "Pilgrims, Lost" Force Echo. |
|
 |
 |
|
Area: Monastery Walls Where to Find: From the Penitent Chambers Meditation Point, backtrack across the beam and past the Flametroopers and you'll find the Scroll just beside the workbench. |
|
 |
 |
|
Area: Halls of Ranvell Where to Find: Past the "Pilgrims, Attacked" Force Echo, head down the hall and you'll find the Scroll infront of the door. |
|
 |
 |
|
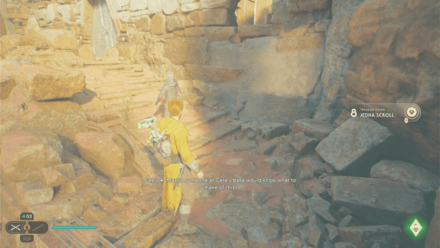
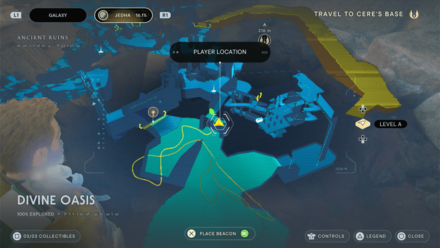
Area: Divine Oasis Where to Find: After defeating the Skriton, head outside and you'll find the Scroll behind the tent. |
|
 |
 |
|
Area: Divine Oasis Where to Find: After defeating the Skriton, head outside, tame and ride the beast, then head for the exit. You'll find the Scroll on your right on top of a high ledge that you need to jump off the beast from. |
|
 |
 |
|
Area: The Archive Where to Find: From the Meditation Point, face where the Mantis is, walk forward a bit and enter the red door on your left. Climb the wall, enter the narrow passageway, and climb another wall again. You'll find the Scroll just outside the door to your left. |
|
 |
 |
|
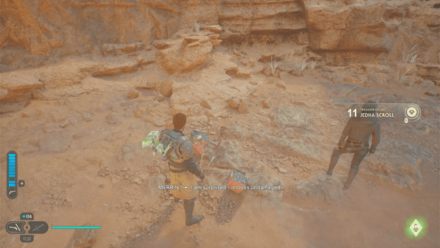
Area: Wayfinder's Tomb Where to Find: From the Arid Flats Meditation Point, head north towards some broken pillars. Once you're past them, you'll find a Scavanger Droid on your left that drops the Scroll. |
|
 |
 |
|
Area: Whistling Drop Where to Find: After crossing the series of climbable walls, defeat the group of Stormtroopers in the area and you'll find the Scroll nearby next to a small pillar. |
|
 |
 |
|
Area: Blustery Mesa Where to Find: From the Timeworn Bridge Meditation Point, backtrack down and use the wind the jump up the platform inbetween the rocks. Jump towards the platform with some pillars across and you'll find the Scroll by the edge to your left. |
|
 |
 |
|
Area: Timeworn Bridge Where to Find: From the archway, enter the building on your left, grapple up, and wall run across. You'll find the Scroll behind a rock. |
|
 |
 |
|
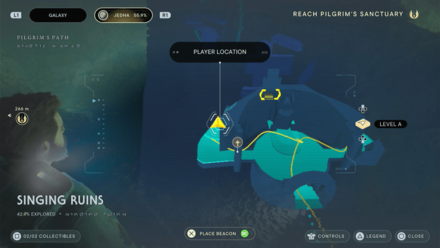
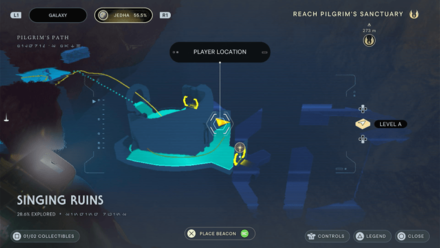
Area: Singing Ruins Where to Find: Past the narrow passageway, move forward a bit and you'll find the Scroll on a path to your left. |
|
 |
 |
|
Area: Sepulcher Pass Where to Find: Found just beside the Sepulcher Pass Meditation Point. |
|
 |
 |
|
Area: Blustery Mesa Where to Find: From the Crypt of Uhrma Meditation Point, enter the building and go up the stairs past the shortcut door. Wall run you way across the left and dash towards the cave opening. You'll find a Scavenger Droid that drops the Scroll. |
|
 |
 |
|
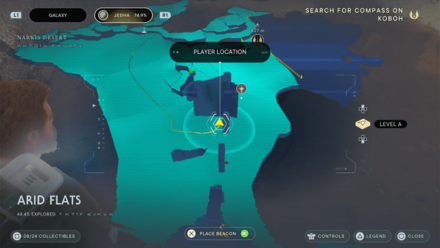
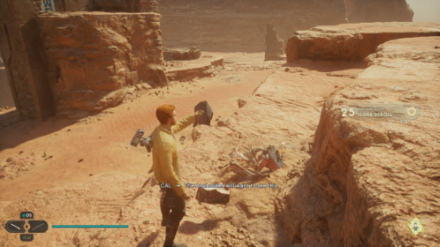
Area: Arid Flats Where to Find: Head towards the broken pillars in the middle of the desert and you'll find the Scroll nearby. |
|
 |
 |
|
Area: Arid Flats Where to Find: Found at the end of the broken bridge at Wayfinder's Tomb. |
|
 |
 |
|
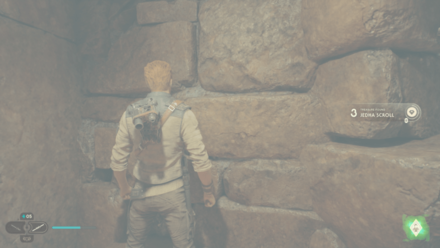
Area: Penitent Chambers Where to Find: From the Meditation Point, head down the bridge below and climb the ledges on the right. You'll find a Scavenger Droid along the path that drops the Scroll. |
|
 |
 |
|
Area: Monastery Walls Where to Find: On top of the Sutaban room by the Force Tear and Chest, you will find a scalable wall. Jump up to it and follow the path until you reach a dead end and find the Jedha Scroll next to another Chest. |
|
 |
 |
|
Area: Monastery Walls Where to Find: On the same bridge where you found the Skeleton Key Blaster Cosemetic, go to the very end of it to find the Jedha Scroll next to a cosmetics Chest |
|
 |
 |
|
Area: Monastery Walls Where to Find: From the Monastery Walls Meditation Point, run along the wall to your right past the Prayer Wheels and jump on the ledge near the dead-end |
|
 |
 |
|
Area: Monastery Walls Where to Find: From the Monastery Walls Work Bench, look to the wall opening to the right and you'll see wall-climbable pillars. Jump Dash towards the 2nd pillar then turn around until you face a broken bridge that you will need to jump on to. Walk until the end of the bridge to find an opening. |
|
 |
 |
|
Area: Desert Ridge Where to Find: From the rope Shortcut near the edge of the area connecting to the Anchorite Base Entrance, look left to see a scalable wall. Climb up to it and walk past the chest towards a scalable wall, the scroll will be on the wall itself, simply jump up to the wall and slide down to obtain it. |
|
 |
 |
|
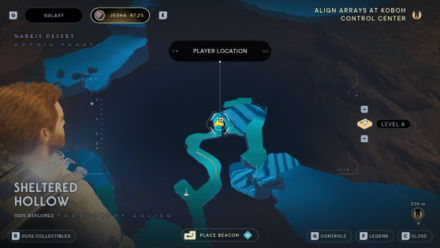
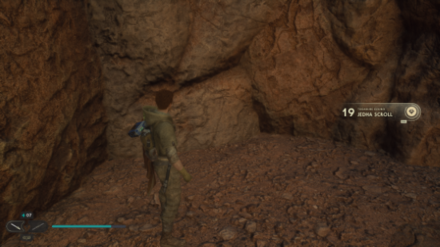
Area: Sheltered Hollow Where to Find: When you exit the Sheltered Hollow tunnels you will enter an opening with a Scavenger Droid nearby that drops a Jedha Scroll |
|
 |
 |
|
Area: Narkis Highlands Where to Find: Grapple up to the balloon above the Skriton pit then turn to the Grapple Point on the wall-runnable wall then jump towards the scalable wall and jump up until you see the ledge to your right |
|
 |
 |
|
Area: Arid Flats Where to Find: Found in the cave with the Hardshells and Sutaban |
|
 |
 |
|
Area: Arid Flats Where to Find: Cross the gap behind the Anchorite Base Meditation Point using the jump dash then keep walking forward until you find a Scavenger Droid |
|
 |
 |
|
Area: Arid Flats Where to Find: From the Anchorite Base Meditation Point, keep heading right past the pool where skoova is to find a path. Head to that path until you find a Skriton. The Scroll will be near a runnable wall. |
|
 |
 |
|
Area: Arid Flats Where to Find: At the start of the broken bridge connecting to Wayfinder's Tomb, there is a ledge by the left-hand side. Jump down to obtain the Scroll |
|
 |
 |
|
Area: Arid Flats Where to Find: A Scavenger Droid can be found at the bottom of the broken bridge connecting to Wayfinder's Tomb |
|
 |
 |
|
Area: Arid Flats Where to Find: By the platform where you can find a Force Upgrade and a Relter, drop down to obtain the Scroll |
|
 |
 |
|
Area: Arid Flats Where to Find: In the area near the broken bridge, you will find a Scavenger Droid |
|
 |
 |
|
Area: Trailhead Pantheon Where to Find: From the Crypt of Uhrma Meditation Point, go behind the right Jedi statue to find the scroll in the breakable pots |
|
 |
 |
|
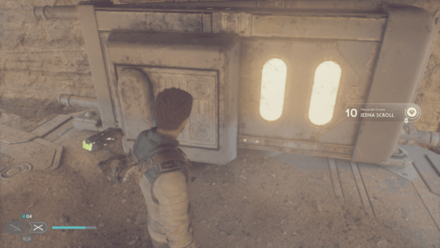
Area: Sanctuary Temple Where to Find: Head to the very right of the temple to find a small room with a workbench and a green forcefield. The Scroll can be found by the artwork on the wall. |
|
 |
 |
|
Area: Buried Refuge Where to Find: From the Buried Refuge Meditation Point, follow the tunnel into the area and go past the Green Force Field into the room with water. The Scroll can be found by some brown pots. |
|
Fish
 |
 |
| Details | |
|---|---|
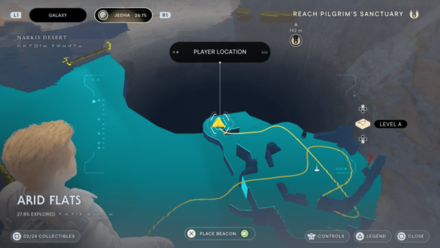
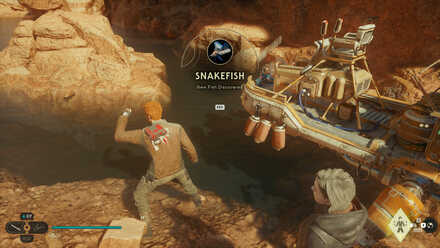
| Fish Name: Snakefish Location: Arid Flats How to Get: From the Anchorite Base Meditation Point, turn right and head to the climbable ledge |
|
|
|
| Details | |
| Fish Name: Snakefish Location: Arid Flats How to Get: From the Anchorite Base Meditation Point, turn right and head to the climbable ledge |
|
Purchasable Collectibles
| In-game Location | Map Location |
|---|---|
 |
 |
|
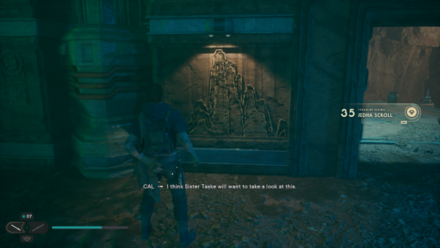
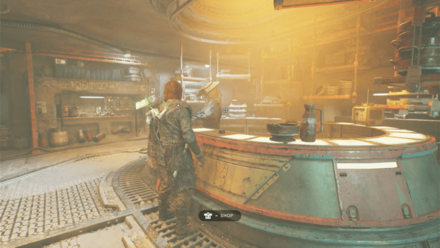
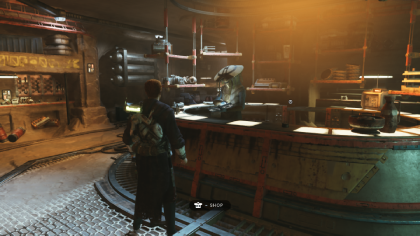
Collectible: Assembly Type: Lightsaber Cosmetic Area: The Archive Where to Find: Can be bought from Sister Taske's Shop near the elevator. |
|
|
|
|
Collectible: Assembly Type: Lightsaber Cosmetic Area: The Archive Where to Find: Can be bought from Sister Taske's Shop near the elevator. |
|
|
|
|
Collectible: Assembly Type: Lightsaber Cosmetic Area: The Archive Where to Find: Can be bought from Sister Taske's Shop near the elevator. |
|
|
|
|
Collectible: Assembly Type: Lightsaber Cosmetic Area: The Archive Where to Find: Can be bought from Sister Taske's Shop near the elevator. |
|
|
|
|
Collectible: Serenity Type: Lightsaber Cosmetic Area: The Archive Where to Find: Can be bought from Sister Taske's Shop near the elevator. |
|
|
|
|
Collectible: Justice Type: Lightsaber Cosmetic Area: The Archive Where to Find: Can be bought from Sister Taske's Shop near the elevator. |
|
|
|
|
Collectible: Detachment Type: Lightsaber Cosmetic Area: The Archive Where to Find: Can be bought from Sister Taske's Shop near the elevator. |
|
 |
 |
|
Collectible: Serenity Type: Lightsaber Cosmetic Area: The Archive Where to Find: Can be bought from Sister Taske's Shop near the elevator. |
|
|
|
|
Collectible: Justice Type: Lightsaber Cosmetic Area: The Archive Where to Find: Can be bought from Sister Taske's Shop near the elevator. |
|
|
|
|
Collectible: Temperance Type: Lightsaber Cosmetic Area: The Archive Where to Find: Can be bought from Sister Taske's Shop near the elevator. |
|
|
|
|
Collectible: Detachment Type: Lightsaber Cosmetic Area: The Archive Where to Find: Can be bought from Sister Taske's Shop near the elevator. |
|
|
|
|
Collectible: Temperance Type: Lightsaber Cosmetic Area: The Archive Where to Find: Can be bought from Sister Taske's Shop near the elevator. |
|
|
|
|
Collectible: Serenity Type: Lightsaber Cosmetic Area: The Archive Where to Find: Can be bought from Sister Taske's Shop near the elevator. |
|
|
|
|
Collectible: Imperial Type: Weapon Cosmetic Area: The Archive Where to Find: Can be bought from Sister Taske's Shop near the elevator. |
|
|
|
|
Collectible: Worn Metal Type: Weapon Cosmetic Area: The Archive Where to Find: Can be bought from Sister Taske's Shop near the elevator and Zee's Shop on the second floor. |
|
|
|
|
Collectible: Soft Leather Type: Weapon Cosmetic Area: The Archive Where to Find: Can be bought from Sister Taske's Shop near the elevator. |
|
|
|
|
Collectible: Rebel Paint Type: Weapon Cosmetic Area: The Archive Where to Find: Can be bought from Sister Taske's Shop near the elevator. |
|
|
|
|
Collectible: Hard Plastoid Type: Weapon Cosmetic Area: The Archive Where to Find: Can be bought from Sister Taske's Shop near the elevator and Zee's Shop on the second floor. |
|
|
|
|
Collectible: Jedha Paint Type: Weapon Cosmetic Area: The Archive Where to Find: Can be bought from Sister Taske's Shop near the elevator. |
|
Star Wars Jedi Survivor Related Guides

All Collectibles
Collectibles by Planet
| All Planets | |
|---|---|
| Coruscant | Koboh |
| Jedha | Shattered Moon |
| Nova Garon | Tanalorr |
Comment
Author

All Jedha Collectibles
Please participate in our site
improvement survey
03/2026
improvement survey
03/2026
Would you assist in
improving Game8's site?
improving Game8's site?

×
We are listening to our users' valuable opinions and discussing how to act on them.
The information collected through this survey will be used for the purpose of improving our services. In addition, the information will only be disclosed a part of a statistic in a format that will not allow identification of personal information.
Begin Survey
Not Now
×
Please rate each item regarding Game8.co's Advertisements.
Amount of Ads
Very Dissatisfied
Somewhat Dissatisfied
Fine
Somewhat Satisfied
Highly Satisfied
Placement of Ads
Timing of Ad Display
Ad Loading Speed
Safeness of Ads
Content of Ads
×
Please rate each item regarding Game8.co's Quality of Articles.
Amount of information
Very Dissatisfied
Somewhat Dissatisfied
Fine
Somewhat Satisfied
Highly Satisfied
Frequency of updates
Speed of new information
Accuracy of articles
Understandibility of articles
Readability of sentences
×
Please rate each item regarding Game8.co's Usability of the Site.
Ease of finding information
Very Dissatisfied
Somewhat Dissatisfied
Fine
Somewhat Satisfied
Highly Satisfied
Loading Speed
Use of Color
Font Size
Visibility of Images
Easy to Understand Layout
×
Please rate each item regarding Game8.co's Message Boards, Comments.
Ease of Writing
Very Dissatisfied
Somewhat Dissatisfied
Fine
Somewhat Satisfied
Highly Satisfied
Readability
Ease in Finding Information
Comment Quality
Comment Quantity
Admin Response
×
Please rate each item regarding Game8.co's Site's new design.
Please rate our site's new design
Very Dissatisfied
Somewhat Dissatisfied
Fine
Somewhat Satisfied
Highly Satisfied
Do you think that the website's design change makes the site easier to use?
Has the new design made it easier for you to find information on the site?
Has the new design improved the overall visual appeal of the site?
How would you rate your overall satisfaction with the new design of the site?
×
How likely are you to recommend Game8 to someone you know?
Very Unlikely
0
1
2
3
4
5
6
7
8
9
10
Very Likely
If you have other opinions regarding potential improvement to the website, please share them with us. We would appreciate your honest opinion.
Note: This is a free response section, so you can proceed without entering anything.
Note: Please be sure not to enter any kind of personal information into your response.
Note: Please be sure not to enter any kind of personal information into your response.
×
Thank You
×
Thank you for participating in our survey! Your answers will help us to improve the quality of our website and services.
We hope you continue to make use of Game8.
We hope you continue to make use of Game8.
Close
Rankings
- We could not find the message board you were looking for.
Gaming News


![Everwind Review [Early Access] | The Shaky First Step to A Very Long Journey](https://img.game8.co/4440226/ab079b1153298a042633dd1ef51e878e.png/thumb)

![Monster Hunter Stories 3 Review [First Impressions] | Simply Rejuvenating](https://img.game8.co/4438641/2a31b7702bd70e78ec8efd24661dacda.jpeg/thumb)
Popular Games

Genshin Impact Walkthrough & Guides Wiki
Honkai: Star Rail Walkthrough & Guides Wiki
Umamusume: Pretty Derby Walkthrough & Guides Wiki
Pokemon Pokopia Walkthrough & Guides Wiki
Resident Evil Requiem (RE9) Walkthrough & Guides Wiki
Monster Hunter Wilds Walkthrough & Guides Wiki
Wuthering Waves Walkthrough & Guides Wiki
Arknights: Endfield Walkthrough & Guides Wiki
Pokemon FireRed and LeafGreen (FRLG) Walkthrough & Guides Wiki
Pokemon TCG Pocket (PTCGP) Strategies & Guides Wiki


Recommended Games
Diablo 4: Vessel of Hatred Walkthrough & Guides Wiki
Fire Emblem Heroes (FEH) Walkthrough & Guides Wiki
Yu-Gi-Oh! Master Duel Walkthrough & Guides Wiki
Super Smash Bros. Ultimate Walkthrough & Guides Wiki
Pokemon Brilliant Diamond and Shining Pearl (BDSP) Walkthrough & Guides Wiki
Elden Ring Shadow of the Erdtree Walkthrough & Guides Wiki
Monster Hunter World Walkthrough & Guides Wiki
The Legend of Zelda: Tears of the Kingdom Walkthrough & Guides Wiki
Persona 3 Reload Walkthrough & Guides Wiki
Cyberpunk 2077: Ultimate Edition Walkthrough & Guides Wiki


All rights reserved
© 2023 Electronic Arts Inc.
The copyrights of videos of games used in our content and other intellectual property rights belong to the provider of the game.
The contents we provide on this site were created personally by members of the Game8 editorial department.
We refuse the right to reuse or repost content taken without our permission such as data or images to other sites.