Should You Buy Oskar Fevras?
★ All Updates for Patch 5
☆ Beginner Guides for All Starter Players
★ Simple Character Creation Guide for beginners
☆ A Full Guide to Multiclassing
★ All Side Quests and Event Points
☆ All Races and Subraces

Oskar Fevras is an artist that is captured by the Zhentarim in Baldur's Gate 3 (BG3). Read on to know if you should buy Oskar Fevras, guide to freeing him, and the benefits of buying Oskar Fevras from the Zhentarim!
List of Contents
Side Quest Details
| Journal Entry | |
|---|---|
| Free the Artist | |
| Reward | Self Portrait |
| Location | |
| Zhentarim Hideout | |
 |
|
How to Free Oskar Fevras
| How to Free Oskar Fevras Summary |
|---|
|
|
Go to Waukeen's Rest Waypoint
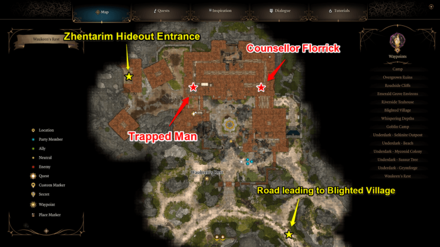
Oskar and the Zhentarim Hideout are located northwest from the Waukeen's Rest waypoint, so teleport or proceed towards this waypoint.
Players who have not yet reached this Waypoint can instead teleport to the Blighted Village waypoint and travel north until they reach a broken stone bridge.
Once at the bridge, simply jump to the otherside and follow the road north/northwest until you find the Waukeen's Rest waypoint.
Locate The Zhentarim Hideout

The entrance to the hideout is hidden in a room that is accessible through a floor hatch found in this building.
You will know you've got the correct building by looking around for a dead ox and a door barricaded by some wooden boxes.
Encounter Salazon

Upon entering the building where the Zhentarim Hideout is hidden, players will be forced into dialogue with Salazon.
| Salazon Dialogue | |
|---|---|
| Bugger. | Dialogue Options | Dialogue Results |
| [DEXTERITY (DC10)] Wait - listen! | Success:Unlocks [INTIMIDATION] and [PERSUASION] skill checks. Failure: Salazon ignites the nearby oil barrel and deals a large amount of damage to the player and any nearby creatures. |
| [DETECT THOUGHTS (DC11)] Read his mind. |
Success: Unlocks a new dialogue option: “I know the pass-phrase: 'Little serpent, long shadow'.” Selecting the new option prompts Salazon to reveal the hideout entrance and give the player a the key. |
| Prepare to attack. |
Salazon ignites the nearby oil barrel and deals a large amount of damage to the player and any nearby creatures. |
| Unlocked Dialogue [DEXTERITY] |
|
| [INTIMIDATION (DC15)] Careful. You won't kill me, but you will make me mad. | Success: Salazon reveals the location of the Zhentarim Hideout entrance and hands the player the key. Failure: Salazon ignites the nearby oil barrel and deals a large amount of damage to the player and any nearby creatures. |
| [PERSUASION (DC15)] Just calm down - I'm not here to fight. | |
Learn the Pass-Phrase
You could alternatively progress through the Missing Shipment side quest to potentially learn the pass-phrase. This will unlock a pass-phrase related dialogue option when speaking to Salazon, granting you access to the hideout without the need to pass any skill checks.
Find the Missing Shipment Guide
Enter The Zhentarim Hideout

Located in the same building you meet Salazon in is a hatch that leads to the Zhentarim Hideout. Interact with it to transition your party to what appears to be a storage area filled with various vases and crates.
The entrance to the Zhentarim Hideout is located behind a Wardrobe that can be destroyed, picked, or unlocked using the key Salazon provided.
Encounter Zarys

Walking towards the iron gate will force your character into dialogue with Zarys, the leader of the Zhentarim group.
Try to succeed in any of the following skill checks since allowing Zarys to arm the traps causes all the oil barrels in the hideout to explode.
| Zarys Dialogue | |
|---|---|
| That's far enough. What's your business down here? Answer honestly and maybe we'll kill you clean. | Dialogue Options | Dialogue Results |
| Relax - your guard at the door let me in. |
No notable results. Dialogue will continue and player is free to choose one of the following skill checks. |
| [STEALTH (DC10)] Slip back into the shadows. | Success: Zarys arms the traps in the passage leading to her hideout. Failure: Unlocks [BARBARIAN][INTIMIDATION] and [PERSUASION] skill checks. |
| [[BARBARIAN][INTIMIDATION] (DC10)] Try and I will take your skulls as trophies. | Success: Zarys disarms the traps in the passage leading to her hideout. Failure: Zarys arms the traps in the passage leading to her hideout. |
| [PERSUASION (DC10)] I don't want trouble - I just want to trade. | |
| [DETECT THOUGHTS (DC12)] Read her mind. |
Success: Unlocks a [PERSUASION] option as well as a new dialogue option: “I'm here to help you find your missing cargo.” Selecting the new option prompts Zarys to disarm the traps in the passage leading to her hideout. Failure: Zarys arms the traps in the passage leading to her hideout. |
| Unlocked Dialogue [STEALTH] |
|
| [[BARBARIAN][INTIMIDATION] (DC15)] I want you to know the face of your killer. Or you can let me in. | Success: Zarys disarms the traps in the passage leading to her hideout. Failure: Zarys arms the traps in the passage leading to her hideout. |
| [PERSUASION (DC15)] I truly don't want to fight - just to trade. | |
Encountering Zharys After Opening the Flask
If you have already opened the shipment, encountering Zarys here will show a scene with the Zhentarim punishing Rugan for giving away the Shipment. There will be a dialogue option which decides whether you end up progressing through the questline of the Shipment or ending up in a battle with the Zhentarim.
| Dialogue Options | Dialogue Results |
|---|---|
| Unlocked Dialogue | |
| [PERSUASION] (DC15)]I've already shown I've got more wits than Rugan. Let's work together. | Success: Zarys' hostility disappears and asks you to deliver the item to Baldur's Gate. Failure: Proceeds to battle with the Zhentarim. |
| [INTIMIDATION (DC20)] I'm going to walk out of here alive. Play it right and so will you. | |
| Unlocked Dialogue [STEALTH] |
|
| Can we just skip to the killing? | Immediately goes to battle with the Zhentarim. |
If you succeed in convincing Zarys, she'll have an additional request to prove your loyalty which is to kill Rugan. In summary, refusing to kill Rugan will put you on hostile terms with the Zhentarim.
| Dialogue Options | Dialogue Results |
|---|---|
| Obey - Kill Rugan. |
The questline continues, Rugan dies and you can now explore the Zhentarim hideout. |
| I won't do that. | You proceed to fight the Zhentarim. |
Rescue Oskar
Neutral Zarys
If you passed the skill checks during your dialogue with Zarys, simply open the Iron Gate and walk through the passageway until you reach the main hideout.
Once inside, Oskar can be found working amongst the paintings. Conversing with him will prompt Oskar to ask the player to buy him from a nearby NPC named Brem.
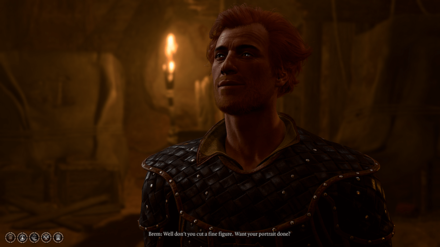
Brem can be found right beside Oskar. Speaking to him will prompt the following dialogue.
| Brem Dialogue | |
|---|---|
| If you have the gold, my pet artist will make you a most heroical likeness. | Dialogue Options | Dialogue Results |
| It's not the art I want to buy - it's the artist. | The player can pay 1,000 gold to purchase Oskar. Persuasion/Intimidate to lower his asking price to 600. |
| He's not a pet, he's a prisoner - let him go. | Player can ask how much Oskar costs, which leads to the same dialogue segment above. Intimidate/Persuade to free Oskar without paying. Failure will force the player to pay for Oskar's freedom. |
| I do cut a fine figure. I'll take one. | No notable results. Brem just tells the player to speak to Oskar, ending this dialogue. |
| No thanks - I just want to trade. | Selecting this option will initiate a trade window with Brem. Note: Brem will have a limited inventory until you're on friendlier terms with Zarys. Progress the Missing Shipment quest to see Brem's full inventory. |
Once Oskar's freedom has been secured, speak to him again to update the journal entry. He will then ask the player for 200 gold to help him on the road towards Baldur's Gate.
Whether or not the player gives Oskar the 200 he is requesting, finishing this dialogue will prompt Oskar to leave the area.
Hostile Zarys

If you failed the skill checks with Zarys, we recommend using Misty Step or jumping off the cliff towards Oskar. Make sure to use Feather Fall on your party before using the jumping method.
Once you've reached Oskar, engage in dialogue with him to have him escape the hideout and progress the Journal Entry. Oskar will then flee and stop in front of a closed gate.
We aren't certain yet if you need to open the gate for him, or if its fine to leave it closed, but the Free the Artist journal entry should have updated itself at this point. To be safe, make sure to open the gate for him if he stops in front of it.
If you decide to walk through the iron gate and through the passageway while the traps are armed, Zarys will signal her men to retreat and cause all the oil barrels scattered throughout the hideout to ignite and explode.
The multiple explosions usually kills Oskar, but if he manages to survive, he will run away. This means we cannot engage in dialogue with him, which may lead to getting locked out of his future questline.
Should You Buy Oskar Fevras?
Buying Oskar Fevras Gives you a Quest in Act III
Purchasing Oskar Fevras keeps you from getting locked out of his side quest that happens much later, during Act III of the game.
Oskar will then gift the player a portrait of themselves when you meet Oskar again in Baldur's Gate.
Baldur's Gate 3 Related Guides
Prologue Side Quests
| All Prologue Side Quests | |
|---|---|
| How to Free the Intellect Devourer | How to Free Shadowheart |
Act 1 Side Quests
Druid's Grove Quests
The Risen Road Quests
| The Risen Road Quests | |
|---|---|
| Find the Missing Shipment | How to Rescue the Grand Duke |
| Rescue the Trapped Man | How to Free Oskar Fevras |
Blighted Village Quests
Goblin Camp Quests
| Goblin Camp Quests | |
|---|---|
| How to Get Volo's Ersatz Eye | Defiled Temple Puzzle |
| Find the Nightsong | Ask the Goblin Priestess for Help |
Nautiloid Crash Region Quests
Underdark Quests
Mountain Pass Quests
| Mountain Pass Quests | ||
|---|---|---|
| Steal a Githyanki Egg | How to Beat Gremishkas | How to Access Guardian of Faith Room |
| Dawnmaster Puzzle Guide | Where to Find the Githyanki Creche | - |
This section is currently under construction. Check back later for updates!
Act 2 Side Quests
Last Light Inn Quests
Gauntlet of Shar Quests
| Gauntlet of Shar Quests | |
|---|---|
| Gauntlet of Shar: All Trials and Umbral Gems | Kill Raphael's Old Enemy |
Mind Flayer Colony Quests
| Mind Flayer Colony Quests |
|---|
| How to Solve the Necrotic Laboratory |
Act 3 Side Quests
Rivington Quests
| Rivington Quests | ||
|---|---|---|
| Investigate the Suspicious Toys | Solve the Open Hand Temple Murders | Find the Missing Letters |
| How to Get to Wyrm's Rock Fortress | How to Find Dribbles the Clown | - |
Lower City Quests
| Lower City Quests | ||
|---|---|---|
| How to Get to the House of Hope | How to Get to Cazador's Palace | Rescue Orin's Victim |
| Aid the Underduke | How to Get to the House of Grief | Investigate the Murders |
Comment
Author
Should You Buy Oskar Fevras?
Rankings
- We could not find the message board you were looking for.
Gaming News
![Neverness to Everness (NTE) Review [Beta Co-Ex Test] | Rolling the Dice on Something Special](https://img.game8.co/4414628/dd3192c8f1f074ea788451a11eb862a7.jpeg/show)


Popular Games

Genshin Impact Walkthrough & Guides Wiki
Honkai: Star Rail Walkthrough & Guides Wiki
Arknights: Endfield Walkthrough & Guides Wiki
Umamusume: Pretty Derby Walkthrough & Guides Wiki
Wuthering Waves Walkthrough & Guides Wiki
Pokemon TCG Pocket (PTCGP) Strategies & Guides Wiki
Abyss Walkthrough & Guides Wiki
Zenless Zone Zero Walkthrough & Guides Wiki
Digimon Story: Time Stranger Walkthrough & Guides Wiki
Clair Obscur: Expedition 33 Walkthrough & Guides Wiki


Recommended Games
Fire Emblem Heroes (FEH) Walkthrough & Guides Wiki
Pokemon Brilliant Diamond and Shining Pearl (BDSP) Walkthrough & Guides Wiki
Diablo 4: Vessel of Hatred Walkthrough & Guides Wiki
Super Smash Bros. Ultimate Walkthrough & Guides Wiki
Yu-Gi-Oh! Master Duel Walkthrough & Guides Wiki
Elden Ring Shadow of the Erdtree Walkthrough & Guides Wiki
Monster Hunter World Walkthrough & Guides Wiki
The Legend of Zelda: Tears of the Kingdom Walkthrough & Guides Wiki
Persona 3 Reload Walkthrough & Guides Wiki
Cyberpunk 2077: Ultimate Edition Walkthrough & Guides Wiki


All rights reserved
© 2023 Larian Studios. All rights reserved. Larian Studios is a registered trademark of arrakis nv, affiliate of Larian Studios Games ltd. All company names, brand names, trademarks and logos are the property of their respective owners. © 2020 Wizards of the coast. All rights reserved. Wizards of the coast, Baldur’s Gate, Dungeons & Dragons, D&D, and their respective logos. Are registered trademarks of wizards of the coast LLC
The copyrights of videos of games used in our content and other intellectual property rights belong to the provider of the game.
The contents we provide on this site were created personally by members of the Game8 editorial department.
We refuse the right to reuse or repost content taken without our permission such as data or images to other sites.