This survey will take about 1 minute.
Your answers will help us to improve our website.
Baldur's Gate 3 (BG3)
School of Evocation Subclass Guide and Build
★ All Updates for Patch 5
☆ Beginner Guides for All Starter Players
★ Simple Character Creation Guide for beginners
☆ A Full Guide to Multiclassing
★ All Side Quests and Event Points
☆ All Races and Subraces
The School of Evocation is a Wizard subclass in Baldur's Gate 3 (BG3). Check out our guide for how to unlock the School of Evocation subclass, its features, as well as the best build.
| Wizard Subclasses Wizard Class Guide |
|||
|---|---|---|---|
 Abjuration Abjuration
|
 Conjuration Conjuration
|
 Divination Divination
|
 Enchantment Enchantment
|
 Evocation Evocation
|
 Illusion Illusion
|
 Necromancy Necromancy
|
 Transmutation Transmutation
|
List of Contents
Evocation Subclass Overview
Evocation Basic Information
| Subclass Overview | |
|---|---|
|
|
School of Evocation Evocation spells focus elemental energy into powerful attacks and enchantments. Those who specialize in this school are known as Evokers. |
| Main Class | Wizard |
| How to Unlock | Reach Wizard Level 2. |
| Spellcasting Ability | Intelligence |
| Starting Subclass Features | |
|
・Grants Evocation Savant Passive. ・Grants Sculpt Spells Passive. ・All Wizard Class Features and Proficiencies. |
|
Evocation Wizards are powerful elemental casters that deal damage in large AoEs. Through a mastery of the arcane, they are able to spare their allies from the harmful effects of their spells, all while wielding some of the most powerful spells in Baldur's Gate 3.
How to Unlock the Evocation Subclass
Available Once Your Wizard Reaches Level 2
The School of Evocation subclass will become available once your Wizard reaches Level 2. In order to earn EXP and level up in Baldur's Gate 3, players will need to complete quests, discover new areas, or defeat enemies they find in the world.
Evocation Subclass Features
| School of Evocation Features | |
|---|---|
| Evocation Savant | Sculpt Spells |
| Potent Cantrip | Empowered Evocation |
| ▼ Subclass Level Progression Table ▼ | |
Evocation Savant
Upon unlocking the Evocation subclass at Level 2, your Wizard will get the Evocation Savant passive. With this active, learning Evocation spells from spell scrolls will only cost 25 Gold per spell level.
| Spell Level | Gold Cost |
|---|---|
| Level 1 | 25 Gold |
| Level 2 | 50 Gold |
| Level 3 | 75 Gold |
| Level 4 | 100 Gold |
| Level 5 | 125 Gold |
| Level 6 | 150 Gold |
Sculpt Spells
Upon taking the Evocation subclass at Level 2, you will unlock the Sculpt Spells passive. Instead of having to worry about positioning when casting large AoE Evocation spells like Fireball, you can now sling it without having to worry about your allies since they will automatically succeed their saving throws against it (taking no damage in the process).
Potent Cantrip
At Level 6, your Wizard cantrips become more likely to hit with the Potent Cantrip passive active. Even if they do succeed their Saving Throw against your cantrip, enemies will still take half of the damage. However, they will suffer no additional effects afterwards.
One example of this is in action is when you use the Shocking Grasp cantrip. If your enemy succeeds in evading the cantrip, they will still take half of the intended damage but they do not suffer from the Shocking Grasp condition that prevents them from taking reactions.
Empowered Evocation
Once you hit Level 10, your Evocation spells are Empowered. When casting an Evocation spell, you can add your Intelligence modifier to the damage roll. At 20 Intelligence, your damage rolls get a +5 bonus.
Evocation Level Progression
| Level | Subclass Features Unlocked |
|---|---|
| Level 2 |
・Evocation Savant (Passive) ・Sculpt Spells (Passive) |
| Level 6 | ・Potent Cantrip (Passive) |
| Level 10 | ・Empowered Evocation (Passive) |
Best Evocation Builds
Fire Wizard Build Overview
| Recommended Equipment | ||||||||||||||
|---|---|---|---|---|---|---|---|---|---|---|---|---|---|---|
| Helm | Helldusk Helmet | |||||||||||||
| Cloak | Cloak of the Weave | |||||||||||||
| Armor | Obsidian-Laced Robe | |||||||||||||
| Gloves | Thermoarcanic Gloves | |||||||||||||
| Boots | Cinder Shoes | |||||||||||||
| Recommended Weapons | ||||||||||||||
| Slot | Main Hand | Off-Hand | ||||||||||||
| Melee | Markoheshkir / Incandescent Staff |
- | ||||||||||||
| Recommended Accessories | ||||||||||||||
| Amulet | Spellcrux Amulet / Fireheart |
|||||||||||||
| Ring 1 | Ring of Fire | |||||||||||||
| Ring 2 | Player's Choice | |||||||||||||
| The Fire Wizard uses a lot of offensive Fire spells to deal large amounts of damage against big groups of enemies. The equipment above enhances the damage you deal with your fire spells, and it also helps you cast your spells more frequently. | ||||||||||||||
Equipment of Choice
Helldusk Helmet
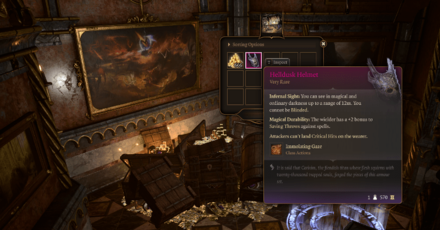
The Helldusk Helmet grants you more survivability against other spellcasters since you gain a +2 bonus on Saving Throws against spells, and enemies cannot land a Critical Hit. Additionally, you cannot be be Blinded and can see through darkness, which lets you avoid disadvantages due to range.
Helldusk Helmet: Armor Guide and How to Get
Cloak of the Weave
Cloak of the Weave is a nice item to have because of its +1 bonus to Spell Save DC and spell attack rolls which slightly boosts your offense and defense. Additionally, it also lets you absorb half the damage from elemental attacks and deal the same elemental damage on your next attack.
Cloak of the Weave: Armor Guide and How to Get
Obsidian Laced Robe
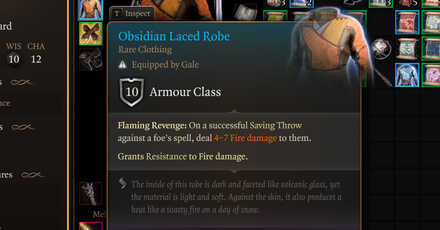
The Obsidian Laced Robe allows you to deal Fire damage whenever you succesfully pass a saving throw against an enemy spell. This is excellent as you fight against other spellcasters since it allows you to constantly deal Fire damage even when it's not your turn.
Cinder Shoes
The Cinder Shoes grants you 2 turns of Heat whenever you Burn an enemy. Since you'll be casting fire spells most of the time, you will also be burning them frequently. This is beneficial since having Heat lets you deal more damage on your next fire spell.
Cinder Shoes: Armor Guide and How to Get
Markoheshkir or Incandescent Staff
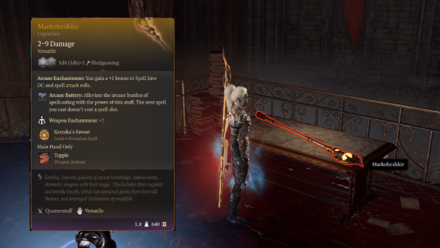
The Markoheshkir staff is the ideal weapon for this build since the next spell you cast will not use up a spell slot. This means you can use very high level spells more frequently without running out of spell slots.
Markoheshkir: Weapon Guide and How to Get
An alternative weapon you could equip is the Incandescent Staff. It gives you the Fire Bolt cantrip and Fireball spell, allowing you to cast these spells without needing to use a spell slot.
Spellcrux Amulet or Fireheart
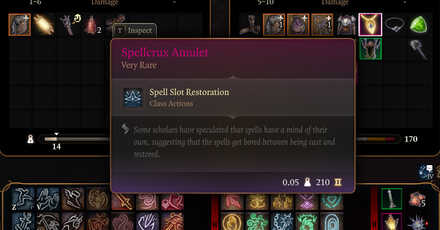
The Spellcrux Amulet grants you a Spell Slot Restoration which lets you restore any spell slot level you prefer. This is crucial when you want to use high level spells multiple times without having to take a long rest, especially when Arcane Recovery can only restore spell slots up to level 5.
Spellcrux Amulet: Accessory Guide and How to Get
Fireheart, on the other hand, allows you to gain 2 turns of Heat whenever you take Fire damage from an enemy. This allows you to stack up as much Heat as possible to boost your next Fire spell's damage.
Ring of Fire
Ring of Fire grants you an additional +1 Fire damage whenever you deal Fire damage with your spells. This is a nice little damage boost for the build since it lets adds extra damage to all the fire damage you deal.
Best Races to Use As an Evocation Wizard
Dragonborn
Dragonborns are good Evocation Wizards since they can use Elemental Breath attacks that you can add to your offensive arsenal. They are also naturally resistant to an element which lets you take less damage from your own elemental spells.
- Draconic Ancestry grants you resistance to an element associated with the color of the Dragonborn.
Dragonborn Race Guide and Best Classes
High-Elf
High-Elves can be great Evocation Wizards since they have access to another additional cantrip. This allows you to use these spells frequently without having to waste spell slots on it.
- Darkvision allows you to see an extra 12m in Dark Areas. This can be helpful for ranged classes that want to see threats and targets as soon as possible.
- Elven Weapon Training lets you use Longswords, Shortswords, Longbows, and Shortbows with proficiency.
- Fey Ancestry grants you advantage on saving throws from being Charmed, and you can't be put to sleep with magic.
High-Elf Race Guide and Best Classes
Asmodeus Tiefling
Asmodeus Tieflings are excellent Evocation Wizards since they can use the Produce Flame cantrip that lets you shine light to gain advantage whenever you are fighting in the dark. It also grants you Fire resistance which is a very common elemental damage you'll encounter in the game.
- Darkvision allows you to see an extra 12m in Dark Areas. This can be helpful for ranged classes that want to see threats and targets as soon as possible.
- Hellish Resistance halves the Fire damage you take thanks to your natural Fire resistance.
Asmodeus Tiefling Race Guide and Best Classes
Best Evocation Wizard Ability Scores
| STR | DEX | CON | INT | WIS | CHA |
|---|---|---|---|---|---|
| 8 | 14 | 15(+1) | 17(+2) | 10 | 10 |
Intelligence will be your primary ability as a Wizard. Make sure this is your highest ability score as it affects how strong your spells are.
Constitution gets the next big investment at 15 since it affects your HP. This ability also improves your Concentration Saving Throws.
Dexterity gets 14 for the +2 AC bonus. Since High Half-Elves get to equip Light Armor, the AC bonus from DEX will work wonders for your survivability.
Wisdom and Charisma both enjoy a flat 10 so that Skill Checks related to them will have no penalties.
Strength is your dump stat for the Wizard. It serves no purpose since most of your damage will come from spells and cantrips.
Best Evocation Wizard Feats
Elemental Adept
Elemental Adept allows you to ignore an enemy's resistance to an element, allowing you to deal more damage. It also ensures that you cannot roll a 1 with the element you choose. This is the most beneficial feat since most of the Evocation spells are elemental spells.
Elemental Adept Feat Guide and Effects
Spell Sniper
As an Evocation Wizard, your damage will primarily be coming from your spells. With that said, Spell Sniper allows you to land a critical hit with your spells more often, while also learning an additional cantrip to help you manage your spell slots.
Spell Sniper Feat Guide and Effects
Baldur's Gate 3 Related Guides
All Wizard Subclasses
| All Wizard Subclasses | |||||
|---|---|---|---|---|---|
|
Abjuration
|
Conjuration
|
Divination
|
|||
|
Enchantment
|
Evocation
|
Illusion
|
|||
|
Necromancy
|
Transmutation
|
||||
Comment
Author
School of Evocation Subclass Guide and Build
Please participate in our site
improvement survey
03/2026
improvement survey
03/2026
Would you assist in
improving Game8's site?
improving Game8's site?

×
We are listening to our users' valuable opinions and discussing how to act on them.
The information collected through this survey will be used for the purpose of improving our services. In addition, the information will only be disclosed a part of a statistic in a format that will not allow identification of personal information.
Begin Survey
Not Now
×
Please rate each item regarding Game8.co's Advertisements.
Amount of Ads
Very Dissatisfied
Somewhat Dissatisfied
Fine
Somewhat Satisfied
Highly Satisfied
Placement of Ads
Timing of Ad Display
Ad Loading Speed
Safeness of Ads
Content of Ads
×
Please rate each item regarding Game8.co's Quality of Articles.
Amount of information
Very Dissatisfied
Somewhat Dissatisfied
Fine
Somewhat Satisfied
Highly Satisfied
Frequency of updates
Speed of new information
Accuracy of articles
Understandibility of articles
Readability of sentences
×
Please rate each item regarding Game8.co's Usability of the Site.
Ease of finding information
Very Dissatisfied
Somewhat Dissatisfied
Fine
Somewhat Satisfied
Highly Satisfied
Loading Speed
Use of Color
Font Size
Visibility of Images
Easy to Understand Layout
×
Please rate each item regarding Game8.co's Message Boards, Comments.
Ease of Writing
Very Dissatisfied
Somewhat Dissatisfied
Fine
Somewhat Satisfied
Highly Satisfied
Readability
Ease in Finding Information
Comment Quality
Comment Quantity
Admin Response
×
Please rate each item regarding Game8.co's Site's new design.
Please rate our site's new design
Very Dissatisfied
Somewhat Dissatisfied
Fine
Somewhat Satisfied
Highly Satisfied
Do you think that the website's design change makes the site easier to use?
Has the new design made it easier for you to find information on the site?
Has the new design improved the overall visual appeal of the site?
How would you rate your overall satisfaction with the new design of the site?
×
How likely are you to recommend Game8 to someone you know?
Very Unlikely
0
1
2
3
4
5
6
7
8
9
10
Very Likely
If you have other opinions regarding potential improvement to the website, please share them with us. We would appreciate your honest opinion.
Note: This is a free response section, so you can proceed without entering anything.
Note: Please be sure not to enter any kind of personal information into your response.
Note: Please be sure not to enter any kind of personal information into your response.
×
Thank You
×
Thank you for participating in our survey! Your answers will help us to improve the quality of our website and services.
We hope you continue to make use of Game8.
We hope you continue to make use of Game8.
Close
Rankings
Gaming News


![Everwind Review [Early Access] | The Shaky First Step to A Very Long Journey](https://img.game8.co/4440226/ab079b1153298a042633dd1ef51e878e.png/thumb)

![Monster Hunter Stories 3 Review [First Impressions] | Simply Rejuvenating](https://img.game8.co/4438641/2a31b7702bd70e78ec8efd24661dacda.jpeg/thumb)
Popular Games

Genshin Impact Walkthrough & Guides Wiki
Honkai: Star Rail Walkthrough & Guides Wiki
Umamusume: Pretty Derby Walkthrough & Guides Wiki
Pokemon Pokopia Walkthrough & Guides Wiki
Resident Evil Requiem (RE9) Walkthrough & Guides Wiki
Monster Hunter Wilds Walkthrough & Guides Wiki
Wuthering Waves Walkthrough & Guides Wiki
Arknights: Endfield Walkthrough & Guides Wiki
Pokemon FireRed and LeafGreen (FRLG) Walkthrough & Guides Wiki
Pokemon TCG Pocket (PTCGP) Strategies & Guides Wiki


Recommended Games
Diablo 4: Vessel of Hatred Walkthrough & Guides Wiki
Fire Emblem Heroes (FEH) Walkthrough & Guides Wiki
Yu-Gi-Oh! Master Duel Walkthrough & Guides Wiki
Super Smash Bros. Ultimate Walkthrough & Guides Wiki
Pokemon Brilliant Diamond and Shining Pearl (BDSP) Walkthrough & Guides Wiki
Elden Ring Shadow of the Erdtree Walkthrough & Guides Wiki
Monster Hunter World Walkthrough & Guides Wiki
The Legend of Zelda: Tears of the Kingdom Walkthrough & Guides Wiki
Persona 3 Reload Walkthrough & Guides Wiki
Cyberpunk 2077: Ultimate Edition Walkthrough & Guides Wiki


All rights reserved
© 2023 Larian Studios. All rights reserved. Larian Studios is a registered trademark of arrakis nv, affiliate of Larian Studios Games ltd. All company names, brand names, trademarks and logos are the property of their respective owners. © 2020 Wizards of the coast. All rights reserved. Wizards of the coast, Baldur’s Gate, Dungeons & Dragons, D&D, and their respective logos. Are registered trademarks of wizards of the coast LLC
The copyrights of videos of games used in our content and other intellectual property rights belong to the provider of the game.
The contents we provide on this site were created personally by members of the Game8 editorial department.
We refuse the right to reuse or repost content taken without our permission such as data or images to other sites.