This survey will take about 1 minute.
Your answers will help us to improve our website.
Clair Obscur: Expedition 33
All Mime Locations and Weaknesses
★ Builds: Gustave | Lune | Maelle
┗ Sciel | Verso | Monoco
★ Popular: Missables | Puzzles | White Nevrons
┗ Best Characters | Skills | Teams | Attributes
★ Patch 1.5.0: Verso's Drafts | Root of All Evil
┗ Endless Tower Guide | All New Bosses
Here are all the Mime locations in Clair Obscur: Expedition 33. Check out where to find Mimes, how to beat them, Mime weaknesses, and their rewards in this guide!
List of Contents
All Mime Locations
| Icon | How to Use |
|---|---|
 | Show Names This button reveals the Name of every icon currently shown. |
 | Show Pins This button will toggle between showing and hiding all the pins that you have already marked as acquired. |
 | Fullscreen This button will change the map display to fill the screen. |
 | Search Mode Toggle This button will display a search bar which you can use to search for an individual pin by its name. |
 | Icon Mode Toggle In Search Mode, this button will toggle you back to Icon Mode, removing the search bar and displaying the icons again. |
 | All Pins This button is shown along with the Icons on the right when there are over 6 types of pins. Click it for a full selection of all available pin types. |
 | Counter Tracks the number of pins you have of a certain type. The pin type shown is set to the page and currently cannot be changed; however, all pin type counters can be viewed by clicking the checklist icon on the right side. |
| View All Counters This icon is found on the right side of the Counter. When a map has more than one pin type, click this icon to see Counters for all pin types. |
Interactive Map: All Locations and Areas
Where to Find Mimes
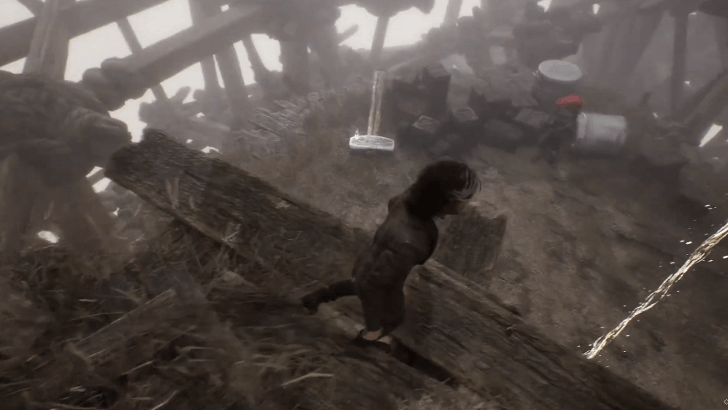
Prologue Mime
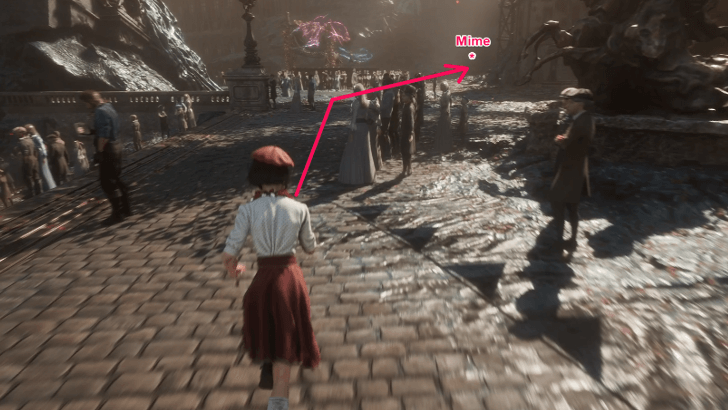
As you progress the Prologue in Lumiere, you will eventually reach the harbor with a 34 floating above. Go to the stage where children are performing and then head to the right. You will then see the game's first Mime.
Spring Meadows Mime
After reaching the abandoned
house in Act 1: Gustave and dropping down to Grand Meadow, the player must face the Expedition Flag nearby and head left in the direction of the lone Lancelier.
Follow the grapple points from there and you'll reach a platform where the mime is. Take note that this mime will follow you upon approach.
Flying Waters Mime
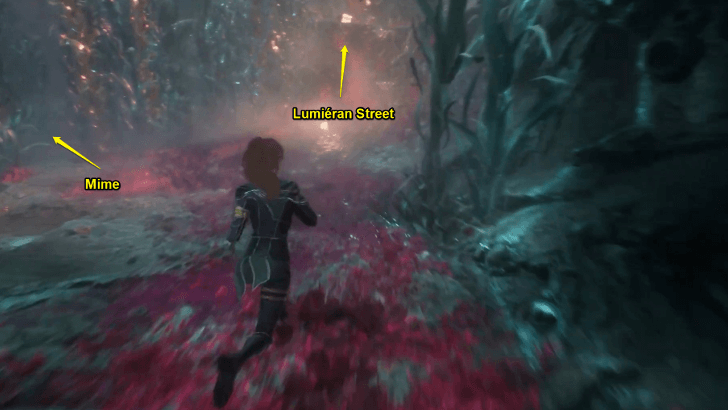
On the direction toward Lumiéran Street, east of the Gigantic Nevron view, take another left through the seaweeds instead of climbing the wall. Follow the path until you reach another climbable wall.
Ancient Sanctuary Mime
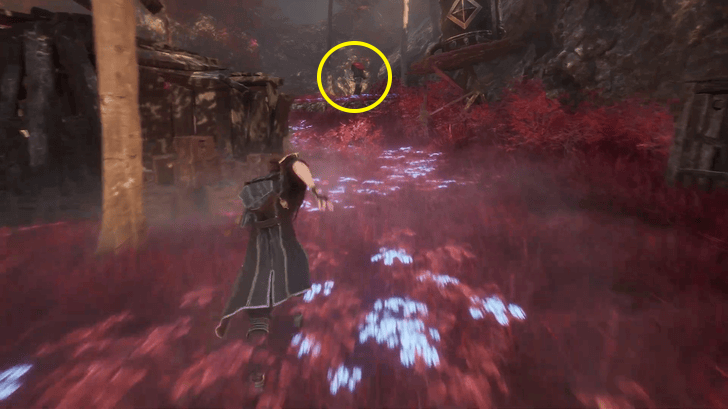
From the Expedition 63 Flag Rest Point, take the path on the right and look for a small opening under a rock. Pass through it and take a left until you reach an open area. There will be a broken hut in the middle with the mime behind the hut.
Esquie’s Nest Mime
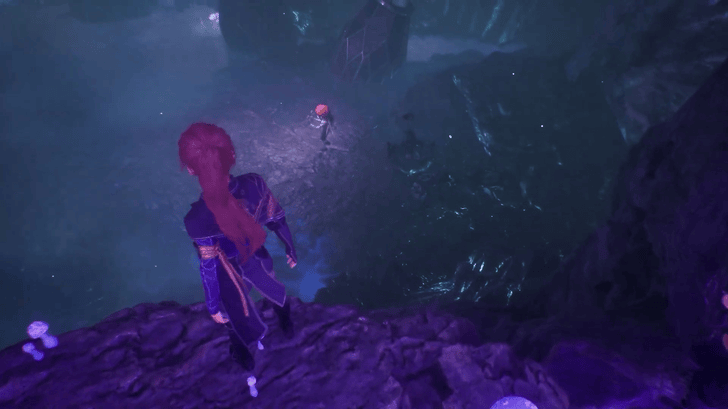
Ahead of the entrance to Esquie’s Nest, look down into the crater and you should see the mime below. You can drop down from here to challenge it as well.
Yellow Harvest Mime
From the Harvester's Hollow checkpoint, head towards the open field and go through the first path on your right to find a dead Nevron impaled with a streetlamp. Nearby, there will be a small cave you can enter. Head inside to find the mime in this area!
Yellow Harvest 100% Guide
Frozen Hearts Mime
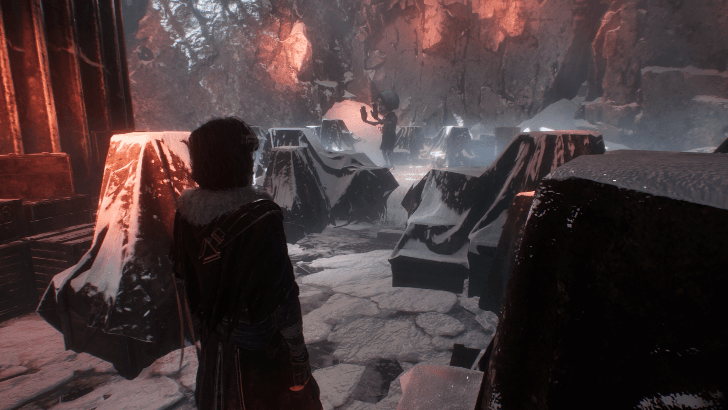
The mime in the Frozen Hearts requires more extensive traversal, as you'll need to climb up the mountain using various grapple points and pillars to reach the Iced Heart checkpoint.
From there, grapple up the frozen trains until you reach the level with the Gestral Merchant. The mime will be at the back of the area surrounded by boxes.
Old Lumiere Mime

Fast travel to the Right Street Expedition Flag and continue along the path until you reach the area with a fading man. Head right and follow the glowing marks on the ground until you reach the end of the path. From here, you can grapple up to the upper area where the mime is.
Old Lumiere 100% Guide and all Locations
The Continent Mime
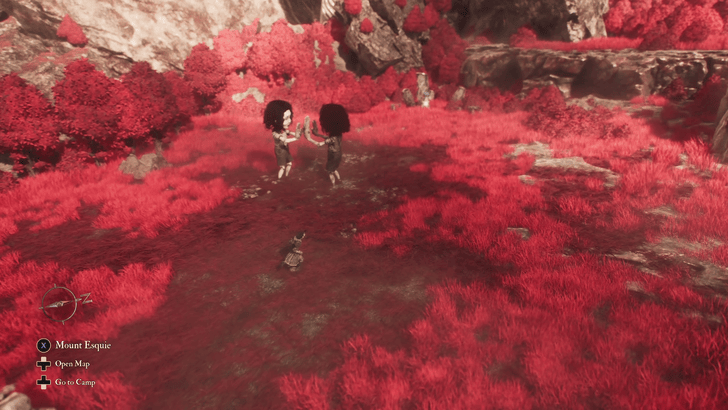
On a red island southwest of Visages in the Continent, you’ll find two mimes holding hands in the middle. They should be easy to spot if you’ve already gained access to this area.
Visages Mime
Near the middle of the open area in Visages, take a left and follow the path until you reach a tree. Behind this tree, you’ll find another mime to take down.
Sirene Mime
Before reaching Tisseur, you'll find another mime in a dark room nearby. Depending on your direction, the mime will be in one of the room's corners. If you're facing Tisseur, the room will be on the left, just before descending the stairs.
The Monolith Mime
In The Monolith, progress until you reach an area with sword-wielding enemies on the right. If you spot these enemies, head back to the main path and take the left route instead. Descend the long rope and you’ll find another mime, but it won’t be alone this time.
The Monolith 100% Guide and All Locations
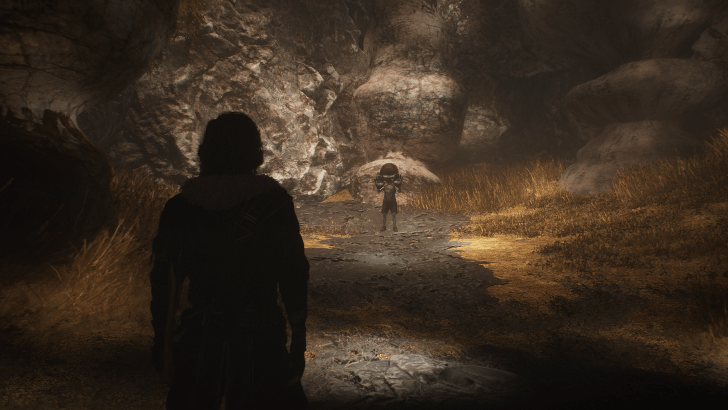
The Reacher Mime
Upon reaching the Ladder Area Expedition Flag, keep following the path and you'll eventually come across a rope leading downwards on your left. The mime will be there on the lower platform.
The Reacher 100% Guide and all Locations
Flying Manor Mime
Navigate until you reach a path that leads to an open area with two statues on each side. Approach the left one and you’ll see a rope you can use to drop down. Explore the area below and you should find the mime there.
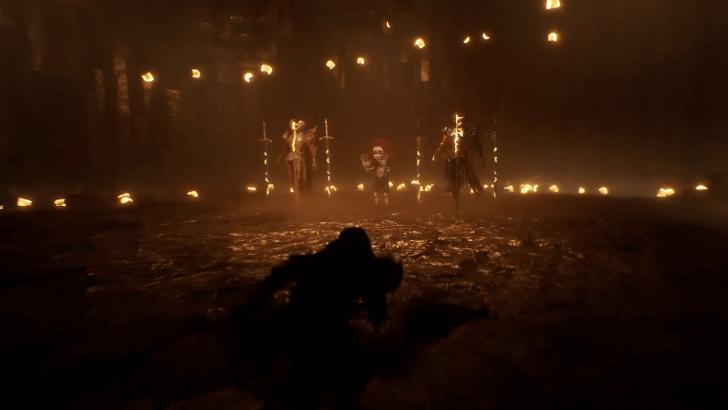
Sunless Cliffs Mime

From the entrance, follow the path on the right until you reach a cave. At the other end, interact with the large portal to face the mime. Keep in mind this is the hardest mime in the game, and you can only bring one character. Only attempt this if you're at least above level 95.
Verso's Drafts Mime
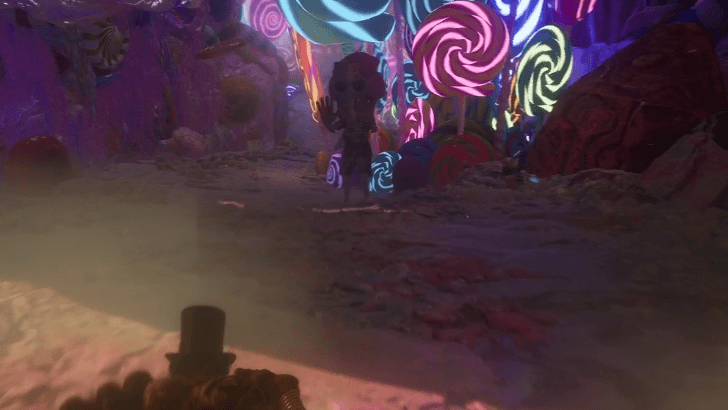
From the Candy Land flag, head toward the wall with numerous Esquie-shaped rock climbing holds. Rock climb to the left in order to reach the Mime.
All Mime Rewards
| Mime | Reward |
|---|---|
| Prologue Mime | Lumière Music Record |
| Spring Meadows Mime | Baguette Outfit Set for Gustave |
| Flying Waters Mime | Short Haircut for Maelle |
| Ancient Sanctuary Mime | Baguette Outfit Set for Lune |
| Esquie’s Nest Mime | Baguette Outfit Set for Sciel |
| Yellow Harvest Mime | Braid Haircut for Maelle |
| Frozen Hearts Mime | Short Haircut for Lune |
| Old Lumiere Mime | Braid Haircut for Sciel |
| The Continent Mime | Voluminous Haircut for Sciel and Lune |
| Visages Mime | Baguette Outfit Set for Verso |
| Sirene Mime | Sirene Haircut for Lune |
| The Monolith Mime | Voluminous Haircut for Maelle |
| The Reacher Mime | Baguette Outfit Set for Maelle |
| Flying Manor Mime | Clea Haircut for Maelle |
| Sunless Cliffs Mime | The One (Picto) Bald Haircut for whoever you completed the challenge with. You can challenge the mime again with your other characters! |
Listed above are all the rewards for defeating the Mimes in Clair Obscur: Expedition 33. Most of the rewards you will get are cosmetics!
All Cosmetics: Outfits and Haircuts
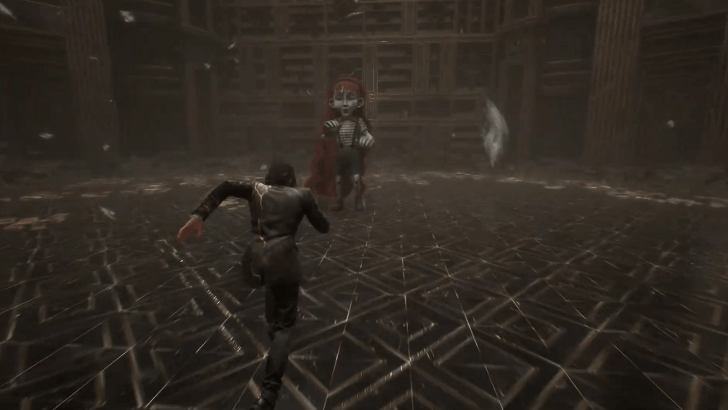
How to Beat Mimes
Fill the Break Gauge and Inflict Break
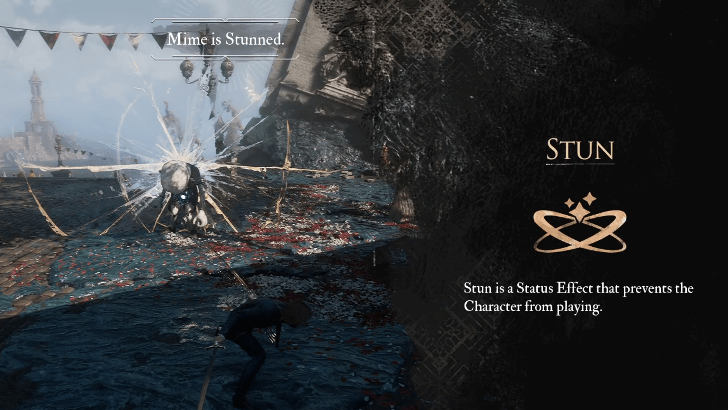
At combat start, Mimes will put up a barrier that significantly reduces the damage they take. The only way to remove this huge damage reduction is to inflict Break on the Mime.
To inflict Break, fill the Break gauge with your attacks until you see a "star" symbol at the right end of the gauge. This is an indication that using a Skill that inflicts Break will Stun the Mime. Skills like Gustave's Overcharge or Lune's Rockslide inflict Break.
Do Mimes Have Weaknesses?
No Weaknesses
Unlike the usual enemies you encounter in Clair Obscur: Expedition 33, Mimes do not have any weaknesses and the best way to beat Mimes is to inflict Break and burst them down right after!
Are Mimes Missable?
Only the Prologue Mime Is Missable
The mime in the harbor during the prologue is the only missable mime, since there's no way to return to Lumiere once you start the expedition. The rest of the mimes stay in one spot until you beat them.
All Missables and Points of No Return
Clair Obscur: Expedition 33 Related Guides
Clair Obscur: Expedition 33 Wiki
Guides by Category
| All Clair Obscur: Expedition 33 Categories | |
|---|---|
 Characters Characters |
 Walkthrough Walkthrough |
 Tips and Tricks Tips and Tricks |
 Bosses Bosses |
 Enemies Enemies |
 Pictos and Luminas Pictos and Luminas |
 Items Items |
 Weapons Weapons
|
 NPCs NPCs |
 Map and Areas Map and Areas
|
 Romance Romance |
 Latest News Latest News |
 Cosmetics Cosmetics |
 Journals Journals |
 Skills Skills |
- |
All Recommended Guides
Author

All Mime Locations and Weaknesses
Please participate in our site
improvement survey
03/2026
improvement survey
03/2026
Would you assist in
improving Game8's site?
improving Game8's site?

×
We are listening to our users' valuable opinions and discussing how to act on them.
The information collected through this survey will be used for the purpose of improving our services. In addition, the information will only be disclosed a part of a statistic in a format that will not allow identification of personal information.
Begin Survey
Not Now
×
Please rate each item regarding Game8.co's Advertisements.
Amount of Ads
Very Dissatisfied
Somewhat Dissatisfied
Fine
Somewhat Satisfied
Highly Satisfied
Placement of Ads
Timing of Ad Display
Ad Loading Speed
Safeness of Ads
Content of Ads
×
Please rate each item regarding Game8.co's Quality of Articles.
Amount of information
Very Dissatisfied
Somewhat Dissatisfied
Fine
Somewhat Satisfied
Highly Satisfied
Frequency of updates
Speed of new information
Accuracy of articles
Understandibility of articles
Readability of sentences
×
Please rate each item regarding Game8.co's Usability of the Site.
Ease of finding information
Very Dissatisfied
Somewhat Dissatisfied
Fine
Somewhat Satisfied
Highly Satisfied
Loading Speed
Use of Color
Font Size
Visibility of Images
Easy to Understand Layout
×
Please rate each item regarding Game8.co's Message Boards, Comments.
Ease of Writing
Very Dissatisfied
Somewhat Dissatisfied
Fine
Somewhat Satisfied
Highly Satisfied
Readability
Ease in Finding Information
Comment Quality
Comment Quantity
Admin Response
×
Please rate each item regarding Game8.co's Site's new design.
Please rate our site's new design
Very Dissatisfied
Somewhat Dissatisfied
Fine
Somewhat Satisfied
Highly Satisfied
Do you think that the website's design change makes the site easier to use?
Has the new design made it easier for you to find information on the site?
Has the new design improved the overall visual appeal of the site?
How would you rate your overall satisfaction with the new design of the site?
×
How likely are you to recommend Game8 to someone you know?
Very Unlikely
0
1
2
3
4
5
6
7
8
9
10
Very Likely
If you have other opinions regarding potential improvement to the website, please share them with us. We would appreciate your honest opinion.
Note: This is a free response section, so you can proceed without entering anything.
Note: Please be sure not to enter any kind of personal information into your response.
Note: Please be sure not to enter any kind of personal information into your response.
×
Thank You
×
Thank you for participating in our survey! Your answers will help us to improve the quality of our website and services.
We hope you continue to make use of Game8.
We hope you continue to make use of Game8.
Close
Rankings
- We could not find the message board you were looking for.
Gaming News


![Monster Hunter Stories 3 Review [First Impressions] | Simply Rejuvenating](https://img.game8.co/4438641/2a31b7702bd70e78ec8efd24661dacda.jpeg/thumb)
Popular Games

Genshin Impact Walkthrough & Guides Wiki
Honkai: Star Rail Walkthrough & Guides Wiki
Umamusume: Pretty Derby Walkthrough & Guides Wiki
Pokemon Pokopia Walkthrough & Guides Wiki
Resident Evil Requiem (RE9) Walkthrough & Guides Wiki
Monster Hunter Wilds Walkthrough & Guides Wiki
Wuthering Waves Walkthrough & Guides Wiki
Arknights: Endfield Walkthrough & Guides Wiki
Pokemon FireRed and LeafGreen (FRLG) Walkthrough & Guides Wiki
Pokemon TCG Pocket (PTCGP) Strategies & Guides Wiki


Recommended Games
Diablo 4: Vessel of Hatred Walkthrough & Guides Wiki
Cyberpunk 2077: Ultimate Edition Walkthrough & Guides Wiki
Fire Emblem Heroes (FEH) Walkthrough & Guides Wiki
Yu-Gi-Oh! Master Duel Walkthrough & Guides Wiki
Super Smash Bros. Ultimate Walkthrough & Guides Wiki
Pokemon Brilliant Diamond and Shining Pearl (BDSP) Walkthrough & Guides Wiki
Elden Ring Shadow of the Erdtree Walkthrough & Guides Wiki
Monster Hunter World Walkthrough & Guides Wiki
The Legend of Zelda: Tears of the Kingdom Walkthrough & Guides Wiki
Persona 3 Reload Walkthrough & Guides Wiki


All rights reserved
©2025 Sandfall Interactive SAS - Published by Kepler Interactive Limited. All rights reserved.
The copyrights of videos of games used in our content and other intellectual property rights belong to the provider of the game.
The contents we provide on this site were created personally by members of the Game8 editorial department.
We refuse the right to reuse or repost content taken without our permission such as data or images to other sites.