Bound Hero Battle: Marth & Lumera Abyssal Guide and Recommended Team
★ Latest Banners: Tiki: Everlasting Voice | Springtime Sisters
☆ New: Mythic Tiki (Adult) | Spring Thórr, Spring Dorothea, Spring Sothe, Spring Eirika
★ Free Units: Spring Bernadetta
☆ State of the Meta (February 2026)

This is a guide to clearing the Infernal and Abyssal maps for Bound Hero Battle - Marth & Lumera in Fire Emblem Heroes (FEH). To see strategy for defeating Bound Hero Battle - Marth & Lumera, enemy information, as well as the best units and party to use, read on!
| Boss Unit for This Bound Hero Battle |
|---|
|
[9.0/10] [9.0/10] |
Table of Contents
Bound Hero Battle: Marth & Lumera Strategy Overview
| Featured Hero |
|
|---|---|
| First Clear Reward | Abyssal: Gold Quality Ribbon
Infernal:
Lunatic:
Hard:
Normal:
|
| Recommended Level | Lv.40 |
| Difficulty | Abyssal Infernal Lunatic Hard |
| Conditions | Condition 1: All units must survive Condition 2: Cannot use Light's Blessing |
| Dates Active | 01/29/2024 - 02/12/2024 |
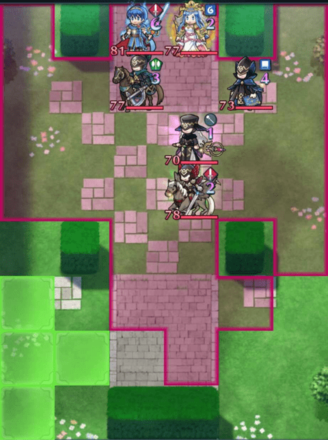
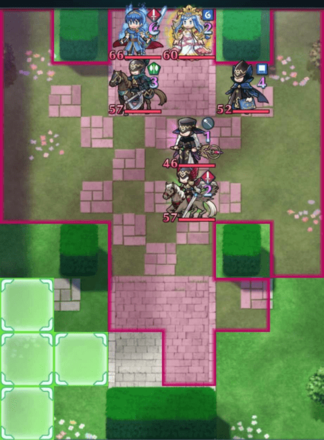
Unit Placement
| Abyssal | Infernal |
|---|---|
|
|
Abyssal Enemy Information
| A
|
HP 81 |
Atk 74 |
Spd 61 |
Def 43 |
Res 36 |
||||||
|---|---|---|---|---|---|---|---|---|---|---|---|
|
|
|
||||||||||
| B
|
HP 77 |
Atk 71 |
Spd 60 |
Def 36 |
Res 50 |
||||||
|
|
|
||||||||||
C
 Axe Cavalier Axe Cavalier
|
HP 77 |
Atk 49 |
Spd 24 |
Def 33 |
Res 35 |
||||||
|
|
|
||||||||||
D
 Blue Mage Blue Mage
|
HP 73 |
Atk 54 |
Spd 42 |
Def 24 |
Res 36 |
||||||
|
|
|
||||||||||
E
 Cleric Cleric
|
HP 70 |
Atk 53 |
Spd 37 |
Def 23 |
Res 51 |
||||||
|
|
|
||||||||||
F
 Sword Flier Sword Flier
|
HP 78 |
Atk 50 |
Spd 45 |
Def 28 |
Res 43 |
||||||
|
|
|
||||||||||
Abyssal Reinforcements
Turn 2 Reinforcements
Reinforcements 1  Red Cavalier Red Cavalier | HP 71 | Atk 59 | Spd 30 | Def 15 | Res 49 | ||||||
|---|---|---|---|---|---|---|---|---|---|---|---|
| | | ||||||||||
Reinforcements 1  Green Cavalier Green Cavalier | HP 71 | Atk 55 | Spd 30 | Def 20 | Res 41 | ||||||
| | | ||||||||||
Reinforcements 1  Bow Cavalier Bow Cavalier | HP 78 | Atk 61 | Spd 33 | Def 32 | Res 31 | ||||||
| | | ||||||||||
Turn 3 Reinforcements
Reinforcements 2  Axe Fighter Axe Fighter | HP 89 | Atk 54 | Spd 44 | Def 39 | Res 27 | ||||||
|---|---|---|---|---|---|---|---|---|---|---|---|
| | | ||||||||||
Reinforcements 2  Red Flier Red Flier | HP 72 | Atk 49 | Spd 45 | Def 19 | Res 41 | ||||||
| | | ||||||||||
Turn 4 Reinforcements
Reinforcements 3  Sword Knight Sword Knight | HP 99 | Atk 62 | Spd 19 | Def 51 | Res 27 | ||||||
|---|---|---|---|---|---|---|---|---|---|---|---|
| | | ||||||||||
Reinforcements 3  Thief Thief | HP 77 | Atk 50 | Spd 49 | Def 20 | Res 41 | ||||||
| | | ||||||||||
Infernal Enemy Information
| A
|
HP 66 |
Atk 66 |
Spd 52 |
Def 36 |
Res 29 |
||||||
|---|---|---|---|---|---|---|---|---|---|---|---|
|
|
|
||||||||||
| B
|
HP 60 |
Atk 63 |
Spd 51 |
Def 30 |
Res 43 |
||||||
|
|
|
||||||||||
C
 Axe Cavalier Axe Cavalier
|
HP 57 |
Atk 45 |
Spd 22 |
Def 31 |
Res 33 |
||||||
|
|
|
||||||||||
D
 Blue Mage Blue Mage
|
HP 52 |
Atk 50 |
Spd 38 |
Def 22 |
Res 33 |
||||||
|
|
|
||||||||||
E
 Cleric Cleric
|
HP 52 |
Atk 50 |
Spd 38 |
Def 22 |
Res 33 |
||||||
|
|
|
||||||||||
F
 Sword Flier Sword Flier
|
HP 57 |
Atk 47 |
Spd 41 |
Def 26 |
Res 39 |
||||||
|
|
|
||||||||||
Infernal Reinforcements
Turn 2 Reinforcements
Reinforcements 1  Red Cavalier Red Cavalier | HP 47 | Atk 55 | Spd 28 | Def 13 | Res 45 | ||||||
|---|---|---|---|---|---|---|---|---|---|---|---|
| | | ||||||||||
Reinforcements 1  Green Cavalier Green Cavalier | HP 47 | Atk 51 | Spd 28 | Def 18 | Res 37 | ||||||
| | | ||||||||||
Reinforcements 1  Bow Cavalier Bow Cavalier | HP 57 | Atk 57 | Spd 31 | Def 30 | Res 28 | ||||||
| | | ||||||||||
Turn 3 Reinforcements
Reinforcements 2  Axe Fighter Axe Fighter | HP 68 | Atk 50 | Spd 40 | Def 36 | Res 24 | ||||||
|---|---|---|---|---|---|---|---|---|---|---|---|
| | | ||||||||||
Reinforcements 2  Red Flier Red Flier | HP 48 | Atk 46 | Spd 41 | Def 17 | Res 38 | ||||||
| | | ||||||||||
Turn 4 Reinforcements
Reinforcements 3  Sword Knight Sword Knight | HP 81 | Atk 58 | Spd 17 | Def 47 | Res 25 | ||||||
|---|---|---|---|---|---|---|---|---|---|---|---|
| | | ||||||||||
Reinforcements 3  Thief Thief | HP 56 | Atk 47 | Spd 45 | Def 18 | Res 37 | ||||||
| | | ||||||||||
Bound Hero Battle: Marth & Lumera Strategy
Use a Player Phase strategy with Galeforce and repeated actions
In our opinion, a Hit and Run strategy is the best strategy for this map.
Emblem Marth can quickly defeat any foe he initiates on with his pre-charged Lodestar Rush and inflated boss stats, while Mythic Lumera is incredibly tanky and can make her allies sturdier with Dragon Monarch granting bonus stats in-combat and creating defensive terrain.
Instead of rushing head-on, we recommend defeating certain enemies and retreating, kiting the enemies as much as possible and avoiding receiving any attacks.
Bring a unit that can generate additional actions and a refresher unit. Use the offensive unit to defeat the Sword Flier and then retreat using the refresher unit and movement skills like Reposition.
The enemies will then advance, but remain out of range to defeat your units. Use the next turn to defeat as many enemies as possible, and repeat this strategy every turn.
On the third turn, the reinforcements will spawn on the topmost part of the map, while the reinforcements on the fourth turn will spawn at the bottom of the map. Keep this in mind when positioning your units in order to avoid leaving one in range of an enemy.
We also recommend bringing units specifically tailored to defeat both Emblem Marth and Mythic Lumera.
Emblem Marth is quite sturdy with his inflated boss stats, pre-charged Lodestar Rush, and Deflect Magic 3. However, he cannot retaliate against ranged foes. Use a ranged unit to attack him over and over again with the aid of your refresher unit to bring him down.
Mythic Lumera has Distant Counter (D) to retaliate against ranged foes and is incredibly bulky with inflated boss stats and her base kit. However, she cannot retaliate against units with sweep effects and has no source of Null Follow-Up to prevent guaranteed follow-up attacks.
Bring a unit that can prevent his/her foe's counterattacks and equip that unit with as much Atk and Spd as you can. Use that unit to wear down Mythic Lumera until she is weak enough to be defeated by your main force, but keep in mind her Miracle Special skill which will save her from death once.
One of the best units to bring to his map, if you have her, is Winter Edelgard. She can generate up to two additional actions with Raging Tempest and Galeforce, and creates 【Divine Vein (Flame)】 terrain to override Mythic Lumera's 【Divine Vein (Stone)】 terrain.
Winter Edelgard, when paired with a refresher unit, can quickly sweep through most of this map, defeating all the generic enemies while saving both Emblem Marth and Mythic Lumera for later. She will need some setup in order to defeat these two units, however.
Another great unit to bring is Valentine's Elise. She can prevent her foe's counterattacks with Dusk-Dawn Staff, and Holy Pressure inflicts 【Gravity】 onto multiple foes, allowing you to kite them easier.
Alternatively, use Savior units to tank the enemies
An enemy phase tanking strategy is possible in this map, but requires significant investment and a proper team composition in order to survive the highly potent offensive prowess of both Emblem Marth and Mythic Lumera.
In order to pull off an enemy phase tanking strategy, we recommend having a Near Save unit, a Far Save unit, a healer, and an offensive unit that can defeat Emblem Marth quickly. Emblem Marth is the most important enemy unit. Bring a ranged offensive unit along to defeat him quickly, otherwise, your dedicated tank units will fall after repeated attacks with Lodestar Rush.
The Far Save unit should have multiple sources of damage reduction, both from their own kits and ideally from the healer as well. The Far Save unit will take the brunt of the damage, which is why damage reduction is necessary. You can forego Guard effects and focus on increasing overall defensive power in order to increase your chances of surviving key attacks.
The Near Save unit has to be able to survive both Emblem Marth and Mythic Lumera, as they are the most threatening enemies on this map. Ideally, your Near Save unit is Blue, to obtain color advantage against Emblem Marth.
If they have a skill that can prevent their foe's follow-up attacks, they will be better equipped to deal with Mythic Lumera, who has no skill that negates this effect, rendering her Spd stat useless in determining follow-up attacks.
The Healer ideally can provide damage reduction to your tanks. If this isn't possible, equip them with the Close Guard 3 Sacred Seal and a similar effect on their C skill.
The offensive unit must be able to defeat Emblem Marth in one round. He has multiple sources of damage reduction together with Deflect Magic 3 to protect him against consecutive magic attacks. Ideally, your offensive unit has a way to neutralize non-Special damage reduction skills.
To begin, bait the enemies in by placing your units in range of the Sword Flier. Keep your units in a tight ball formation to ensure the Savior skills cover all your units.
Once Emblem Marth is in range, position your units so that the offensive unit kills him in one round while also being covered by the Savior units.
The generic enemies on this map are of no concern and can be ignored. Your Savior units will deal with them easily. Focus your attention on positioning to defeat both Emblem Marth and Mythic Lumera.
Recommended Units for Bound Hero Battle: Marth & Lumera
Player Phase Units With Multiple Actions
| Unit Name | |
|---|---|
|
|
Lance Armored Black Yule Lance creates 【Divine Vein (Flame)】 tiles, grants Special cooldown charges pre-combat, and cuts the effectiveness of enemy damage reduction skills. Raging Tempest grants mobility and one additional action after combat. Inheriting Galeforce can grant a third action per turn. |
|
|
Sword Armored Regal Sunshade's brave effect can quickly eliminate enemies. Raging Storm can grant one additional action after combat. Inheriting Galeforce can grant a third action per turn. |
|
|
Axe Armored Raging Storm II can grant one additional action after combat. Inheriting Galeforce can grant a third action per turn. |
|
|
Red Tome Cavalry Radiant Scrolls' brave effect can quickly defeat enemies. Duo Skill grants herself an additional action. |
|
|
Green Tome Cavalry Ninjutsu Scrolls' brave effect can quickly defeat enemies. Duo Skill grants herself an additional action. |
|
|
Blue Bow Flying Flamefrost Bow's brave effect can quickly defeat enemies. Duo Skill grants herself an additional action. |
|
|
Sword Cavalry Arcane Devourer has Special acceleration, allowing an easy Galeforce trigger. Fate Unchanged... allows a Reposition effect while inflicting 【Exposure】onto multiple foes. |
|
|
Lance Cavalry Geirdriful grants bonus stats and Special cooldown charges in combat. A Fate Changed! allows a Reposition effect while granting Brave Chrom an extra action and copies ally's bonuses, granting them to himself. |
|
|
Colorless Bow Cavalry Meisterbogen's brave effect can quickly defeat enemies. Njörun's Zeal II grants himself an additional action when triggered. |
|
|
Colorless Tome Cavalry Quietus Gullveig and Time is Light grant herself additional actions after combat. Flared Sparrow leaves behind 【Divine Vein (Flame)】 terrain, softening up enemies for future engagements. |
Savior Tank Units
|
|
Sword Armored Holy Yule Blade decays foe's Specials and grants multiple stat bonuses. Supreme Heaven deals bonus damage against dragons and beasts and also grants additional damage reduction. |
|
|
Colorless Breath Armored Multiple damage reduction effects and the 【Divine Vein (Stone)】 effect paired with high Spd allow her to survive multiple engagements. |
|
|
Lance Armored The king of blue tank units. Can counterattack at a distance, deny enemy follow-ups, and has his own follow-up attack. |
|
|
Blue Breath Armored Guaranteed follow-up attack. Weapon is comparable to Brave Hector's refined Maltet. Can neutralize penalties inflicted on her. |
|
|
Axe Armored High mobility for an armored unit. Incredibly sturdy with refined Flower Hauteclere and Black Eagle Rule granting multiple defensive effects. |
|
|
Colorless Beast Armored Refined Lion King Fang grants multiple defensive effects and guaranteed follow-up attacks on both phases. Nullifies buffs from ranged units. |
Support Units
| Unit Name | |
|---|---|
|
|
Staff Flying Grants damage reduction, healing, and can shut down "At start of turn" effects of foes in cardinal directions upon winning a Res check. |
|
|
Staff Cavalry Kitty-Cat Parasol grants Special cooldown charges, 30% damage reduction, and "neutralizes foe's bonuses to Atk" to nearby allies and can double as an offensive unit with high Atk and a guaranteed follow-up attack. |
|
|
Staff Flying Grants damage reduction and healing. |
|
|
Lance Infantry Grants bonus stats and Special acceleration to nearby allies. Can double as an offensive unit with refined Geirskögul |
|
|
Sword Infantry Grants bonus stats to his Ally Support during combat. |
|
|
Staff Flying Grants Atk+6 and Special acceleration to nearby allies during combat. |
Refresher Units
| Unit Name | |
|---|---|
|
|
Green Tome Flying Grants additional Atk to allies in similar cardinal directions. Can use her Duo Skill to grant another action to an adjacent ally. |
|
|
Blue Tome Flying Grants additional Atk and Spd to allies in similar cardinal directions. |
|
|
Blue Tome Flying Grants additional bonuses equal to highest bonus on unit and +1 movement. |
|
|
Green Tome Cavalry Grants +6 to all stats and +1 movement to target unit and all adjacent allies. Can use Harmonized Skill to grant extra actions to allies. |
List of Refresher-Assist Units
Bound Hero Battle: Marth & Lumera Abyssal Strategy Example
Currently Unavailable!
An Abyssal strategy example for Bound Hero Battle: Marth & Lumera is currently unavailable. Stay tuned!
User Submitted Parties for Dound Hero Battle: Marth & Lumera
We are looking for user submitted clears!
Let us know about your party and how you cleared the maps in the comments below, via a picture of your team and their skills.
If you have uploaded the walkthrough video on Twitter etc., please enter the URL as well!
FEH Related Guides
Mythic Hero Battle Walkthroughs
Mythic Hero Battle Walkthroughs and Schedule
List of Mythic Hero Battles
Comment
@Game8, In the support units later in the article, in the Elimine's part, you had wrongly mentioned the Lumera's weapon as Obscurite.
Author
Bound Hero Battle: Marth & Lumera Abyssal Guide and Recommended Team
improvement survey
03/2026
improving Game8's site?

Your answers will help us to improve our website.
Note: Please be sure not to enter any kind of personal information into your response.

We hope you continue to make use of Game8.
Premium Articles
Rankings
- We could not find the message board you were looking for.
Gaming News
Popular Games

Genshin Impact Walkthrough & Guides Wiki

Honkai: Star Rail Walkthrough & Guides Wiki

Umamusume: Pretty Derby Walkthrough & Guides Wiki

Pokemon Pokopia Walkthrough & Guides Wiki

Resident Evil Requiem (RE9) Walkthrough & Guides Wiki

Monster Hunter Wilds Walkthrough & Guides Wiki

Wuthering Waves Walkthrough & Guides Wiki

Arknights: Endfield Walkthrough & Guides Wiki

Pokemon FireRed and LeafGreen (FRLG) Walkthrough & Guides Wiki

Pokemon TCG Pocket (PTCGP) Strategies & Guides Wiki
Recommended Games

Diablo 4: Vessel of Hatred Walkthrough & Guides Wiki

Fire Emblem Heroes (FEH) Walkthrough & Guides Wiki

Yu-Gi-Oh! Master Duel Walkthrough & Guides Wiki

Super Smash Bros. Ultimate Walkthrough & Guides Wiki

Pokemon Brilliant Diamond and Shining Pearl (BDSP) Walkthrough & Guides Wiki

Elden Ring Shadow of the Erdtree Walkthrough & Guides Wiki

Monster Hunter World Walkthrough & Guides Wiki

The Legend of Zelda: Tears of the Kingdom Walkthrough & Guides Wiki

Persona 3 Reload Walkthrough & Guides Wiki

Cyberpunk 2077: Ultimate Edition Walkthrough & Guides Wiki
All rights reserved
© 2025 Nintendo / INTELLIGENT SYSTEMS
The copyrights of videos of games used in our content and other intellectual property rights belong to the provider of the game.
The contents we provide on this site were created personally by members of the Game8 editorial department.
We refuse the right to reuse or repost content taken without our permission such as data or images to other sites.

 Heimdallr: God of Foresight
 Baldr and Höðr
 Anniversary Marth and Elm
 Legendary Ayra and Mythic Athos
 Læraðr and Níðhöggr
 Hræsvelgr: Quieting Blade
 Heiðrún and Eikþyrnir
 Loki: Trickster God
 Gullveig and Kvasir
 Veyle: Gentle Dragon
 Freyr: Dream-King
 Nerþuz: God of the Land
 Fomortiis and Gotoh
 Veronica and Embla
 Arval: Cycle Keeper
 Askr: God of Openness
 Medeus: Earth-Dragon King
 Elimine: Scouring Saint
 Thórr and Eitri
 Ótr: Kingsbrother
 Ullr: The Bowmaster
 Ashera: Order Goddess
 Dagr: Sun's Radiance
 Seiros: Saint of Legend
 Freyja and Triandra
 Plumeria: Lewd Dream
 Hel: Death Sovereign
 Mila: Goddess of Love
 Bramimond: the Enigma
 Líf: Lethal Swordsman
 Thrasir: Omnicidal Witch
 Altina: Dawn's Trueblade
 Sothis: Girl on the Throne
 Naga: Dragon Divinity
 Yune: Chaos Goddess
 Duma: God of Strength


![Everwind Review [Early Access] | The Shaky First Step to A Very Long Journey](https://img.game8.co/4440226/ab079b1153298a042633dd1ef51e878e.png/thumb)

![Monster Hunter Stories 3 Review [First Impressions] | Simply Rejuvenating](https://img.game8.co/4438641/2a31b7702bd70e78ec8efd24661dacda.jpeg/thumb)


Thanks for pointing it out! It was copied from a previous article and wasn't replaced by accident. We have revised this article.