Binding Worlds Guide and Rewards
★ Latest Banners: Tiki: Everlasting Voice | Springtime Sisters
☆ New: Mythic Tiki (Adult) | Spring Thórr, Spring Dorothea, Spring Sothe, Spring Eirika
★ Free Units: Spring Bernadetta
☆ State of the Meta (February 2026)

This is a walkthrough to Binding Worlds event in Fire Emblem Heroes (FEH). If you would like to know how to play this event, as well as rewards, strategy, and other information about Binding Worlds, please read on.
List of Contents
What is Binding Worlds?
An event where you must battle with a select set of Heroes!

Binding Worlds is an event where you must battle using selected heroes with predetermined skillsets. Each map, or enclosure, allows the player to swap one of their current heroes for a new, higher level hero.
This new hero can be one picked out at random, a friend's hero, or even the player's own hero.
Make Use of a Special Type of Stamina

Binding Worlds uses a special kind of stamina when played. You will receive three of these stamina every day, meaning that you can challenge the event three times daily when active. Additionally, you can earn Binding Torches as a reward in this event, which can be used to refill your stamina.
Begin the event with the Askr Trio and Ash

At the start of the event, players will have a starting team of Alfonse, Sharena, Anna, and Ash, all at Level 10. They will not have any of their exclusive skills equipped; instead, they will have basic weapons and lower level skills.
Choosing Your Units
Step on the tile with the Divine Gate!

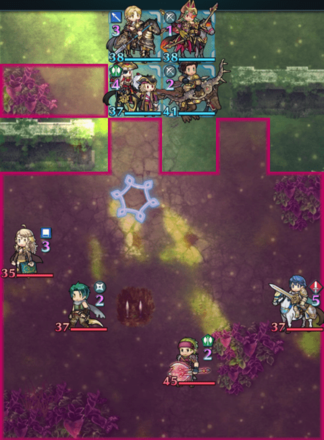
Each enclosure will have a tile with a Divine Gate. Ending a unit's action on this tile will trigger the unit swap mechanic.
Moving an ally to that tile without ending their action, such as with skills like Reposition, will not trigger the unit swap mechanic.
Additionally, the AI will not swap units if they step on the Divine Gate. Ensure that you play manually in order to swap to better units.
Newly swapped units will have their turn available, allowing them to either attack or retreat!
You can view their equipped skills before choosing!

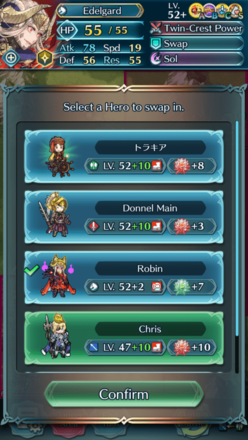
When choosing new units to swap, you will be given four options. The first three options are chosen at random among the playerbase, your friends list, or even your lead unit in your barracks. The fourth option is always the same unit that you just used; however, this option is given at a lower level compared to the other three.
You may also view their skillsets before choosing which unit to swap in! Ensure that you select the most powerful unit available to make clearing maps easier.
Bonuses on units carry over!

As shown in the image above, the Fallen Edelgard has an Atk bonus when swapping to her.
Bonuses on the unit that steps on the Divine Gate will carry over to the newly swapped unit. All bonuses apply, such as stat bonuses, movement enhancing bonuses like Move+1 and Formation/Orders from Gentle Dream, and combat enhancing bonuses like Bonus Doubler or Triangle Attack.
Lower Level Enclosures Give Low Level Units!
The lower level enclosures provide low level units when given the option to swap, as well as an option to not swap units.
We recommend playing the highest level enclosures when possible, to ensure that you receive the best units from the random draw.
Binding Worlds Rewards
Earn Rewards for Playing Daily

You will obtain a reward for your first time playing each day until all the rewards have been claimed.
List of Rewards Earned Once a Day
| Day Played | Reward |
|---|---|
| 1st Day | |
| 2nd Day | |
| 3rd Day | |
| 4th Day | |
| 5th Day | |
| 6th Day | |
| 7th Day | |
| Total | |
Rewards For Each Enclosure
In addition to the daily rewards, there are also rewards given each time you clear a new enclosure. Be sure and clear each enclosure at least once to get all of the rewards.
List of Clear Rewards
| Enclosure | Reward |
|---|---|
| Enclosure 0 | |
| Enclosure 1 | |
| Enclosure 2 | |
| Enclosure 3 | |
| Enclosure 4 | |
| Enclosure 5 | |
| Enclosure 6 | |
| Enclosure 7 | |
| Enclosure 8 | |
| Enclosure 9 | |
| Enclosure 10 | |
| Enclosure 11 | |
| Enclosure 12 | |
| Enclosure 13 | |
| Enclosure 14 | |
| Enclosure 15 | |
| Enclosure 16 | |
| Enclosure 17 | |
| Enclosure 18 | |
| Enclosure 19 | |
| Enclosure 20 | |
| Enclosure 21 | |
| Enclosure 22 | |
| Enclosure 23 | |
| Enclosure 24 | |
| Enclosure 25 | |
| Enclosure 26 | |
| Enclosure 27 | |
| Enclosure 28 | |
| Total | |
Fire Emblem Heroes - Related Guides
FEH Guide Wiki Top Page
▶︎Return to the FEH Guide Wiki Top Page
Popular Links
Author
Binding Worlds Guide and Rewards
Premium Articles
Rankings
- We could not find the message board you were looking for.
Gaming News
Popular Games

Genshin Impact Walkthrough & Guides Wiki

Umamusume: Pretty Derby Walkthrough & Guides Wiki

Pokemon Pokopia Walkthrough & Guides Wiki

Honkai: Star Rail Walkthrough & Guides Wiki

Monster Hunter Stories 3: Twisted Reflection Walkthrough & Guides Wiki

Arknights: Endfield Walkthrough & Guides Wiki

Wuthering Waves Walkthrough & Guides Wiki

Zenless Zone Zero Walkthrough & Guides Wiki

Pokemon TCG Pocket (PTCGP) Strategies & Guides Wiki

Monster Hunter Wilds Walkthrough & Guides Wiki
Recommended Games

Diablo 4: Vessel of Hatred Walkthrough & Guides Wiki

Cyberpunk 2077: Ultimate Edition Walkthrough & Guides Wiki

Fire Emblem Heroes (FEH) Walkthrough & Guides Wiki

Yu-Gi-Oh! Master Duel Walkthrough & Guides Wiki

Super Smash Bros. Ultimate Walkthrough & Guides Wiki

Pokemon Brilliant Diamond and Shining Pearl (BDSP) Walkthrough & Guides Wiki

Elden Ring Shadow of the Erdtree Walkthrough & Guides Wiki

Monster Hunter World Walkthrough & Guides Wiki

The Legend of Zelda: Tears of the Kingdom Walkthrough & Guides Wiki

Persona 3 Reload Walkthrough & Guides Wiki
All rights reserved
© 2025 Nintendo / INTELLIGENT SYSTEMS
The copyrights of videos of games used in our content and other intellectual property rights belong to the provider of the game.
The contents we provide on this site were created personally by members of the Game8 editorial department.
We refuse the right to reuse or repost content taken without our permission such as data or images to other sites.


![The Liar Princess and the Blind Prince Review [PC] | Lovely to Look at but Tedious to Play](https://img.game8.co/4442586/8d95f5faf05780f1765ce7e0938bd825.jpeg/show)
![Monster Hunter Stories 3 Review [First Impressions] | Simply Rejuvenating](https://img.game8.co/4438641/2a31b7702bd70e78ec8efd24661dacda.jpeg/thumb)

![The Seven Deadly Sins: Origin [First Impressions] | A Promising Start](https://img.game8.co/4440581/584e0bfb87908f12c4eab6e846eb1afd.png/thumb)


