Bramimond: The Enigma Abyssal Guide and Recommended Team (Mythic Hero Battle)
★ Latest Banners: Tiki: Everlasting Voice | Springtime Sisters
☆ New: Mythic Tiki (Adult) | Spring Thórr, Spring Dorothea, Spring Sothe, Spring Eirika
★ Free Units: Spring Bernadetta
☆ State of the Meta (February 2026)

This is a guide to clearing the Infernal and Abyssal maps for Bramimond: The Enigma in Fire Emblem Heroes (FEH). To see strategy for defeating Bramimond: The Enigma, enemy information, as well as the best units and party to use, read on!
| Boss Unit for This Legendary Hero Battle |
|---|
|
[8.5/10] |
Table of Contents
Bramimond: The Enigma Strategy Overview
| Featured Hero |
|
|---|---|
| First Clear Reward | Abyssal: Golden Headpiece
Infernal:
Lunatic:
Hard:
Normal:
|
| Recommended Level | Lv.40 |
| Difficulty | Abyssal Infernal Lunatic Hard |
| Conditions | Condition 1: All units must survive Condition 2: Cannot use Light's Blessing |
| Dates Active | 03/31/2020-04/10/2020 |
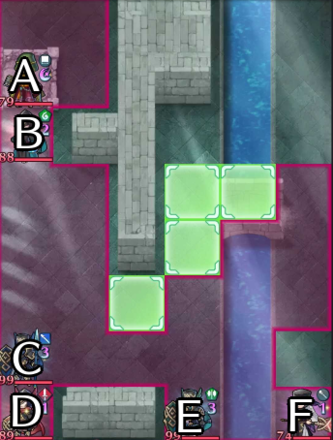
Unit Placement
| Abyssal | Infernal |
|---|---|
|
 |
Abyssal Enemy Information
| A
|
HP 79 |
Atk 69 |
Spd 36 |
Def 29 |
Res 46 |
||||||
|---|---|---|---|---|---|---|---|---|---|---|---|
|
|
|
||||||||||
B
 Green Manakete Green Manakete
|
HP 88 |
Atk 60 |
Spd 42 |
Def 40 |
Res 39 |
||||||
|
|
|
||||||||||
C
 Lance Knight Lance Knight
|
HP 99 |
Atk 62 |
Spd 19 |
Def 51 |
Res 27 |
||||||
|
|
|
||||||||||
D
 Sword Fighter Sword Fighter
|
HP 89 |
Atk 56 |
Spd 41 |
Def 39 |
Res 27 |
||||||
|
|
|
||||||||||
E
 Axe Knight Axe Knight
|
HP 99 |
Atk 62 |
Spd 19 |
Def 51 |
Res 27 |
||||||
|
|
|
||||||||||
F
 Cleric Cleric
|
HP 74 |
Atk 49 |
Spd 37 |
Def 28 |
Res 46 |
||||||
|
|
|
||||||||||
Abyssal Reinforcements
Turn 2 Reinforcements
Reinforcements 1  Thief Thief | HP 77 | Atk 50 | Spd 49 | Def 20 | Res 41 | ||||||
|---|---|---|---|---|---|---|---|---|---|---|---|
| | | ||||||||||
Reinforcements 1  Blue Thief Blue Thief | HP 77 | Atk 50 | Spd 49 | Def 20 | Res 41 | ||||||
| | | ||||||||||
Reinforcements 1  Bow Cavalier Bow Cavalier | HP 78 | Atk 57 | Spd 30 | Def 32 | Res 28 | ||||||
| | | ||||||||||
Turn 3 Reinforcements
Reinforcements 2  Axe Fighter Axe Fighter | HP 89 | Atk 57 | Spd 47 | Def 42 | Res 30 | ||||||
|---|---|---|---|---|---|---|---|---|---|---|---|
| | | ||||||||||
Reinforcements 2  Red Mage Red Mage | HP 75 | Atk 53 | Spd 44 | Def 24 | Res 36 | ||||||
| | | ||||||||||
Turn 4 Reinforcements
Reinforcements 2  Lance Flier Lance Flier | HP 73 | Atk 51 | Spd 42 | Def 28 | Res 43 | ||||||
|---|---|---|---|---|---|---|---|---|---|---|---|
| | | ||||||||||
Reinforcements 3  Blue Fáfnir Blue Fáfnir | HP 83 | Atk 51 | Spd 44 | Def 45 | Res 39 | ||||||
| | | ||||||||||
Reinforcements 3  Sword Dragon Sword Dragon | HP 77 | Atk 53 | Spd 27 | Def 43 | Res 26 | ||||||
| | | ||||||||||
Infernal Enemy Information
| A
|
HP 63 |
Atk 61 |
Spd 30 |
Def 23 |
Res 38 |
||||||
|---|---|---|---|---|---|---|---|---|---|---|---|
|
|
|
||||||||||
B
 Green Manakete Green Manakete
|
HP 67 |
Atk 56 |
Spd 39 |
Def 37 |
Res 36 |
||||||
|
|
|
||||||||||
C
 Lance Knight Lance Knight
|
HP 81 |
Atk 58 |
Spd 17 |
Def 47 |
Res 25 |
||||||
|
|
|
||||||||||
D
 Sword Fighter Sword Fighter
|
HP 68 |
Atk 52 |
Spd 37 |
Def 36 |
Res 24 |
||||||
|
|
|
||||||||||
E
 Axe Knight Axe Knight
|
HP 81 |
Atk 58 |
Spd 17 |
Def 47 |
Res 25 |
||||||
|
|
|
||||||||||
F
 Cleric Cleric
|
HP 50 |
Atk 46 |
Spd 34 |
Def 25 |
Res 42 |
||||||
|
|
|
||||||||||
Infernal Reinforcements
Turn 2 Reinforcements
Reinforcements 1  Thief Thief | HP 56 | Atk 47 | Spd 45 | Def 18 | Res 37 | ||||||
|---|---|---|---|---|---|---|---|---|---|---|---|
| | | ||||||||||
Reinforcements 1  Blue Thief Blue Thief | HP 56 | Atk 47 | Spd 45 | Def 18 | Res 37 | ||||||
| | | ||||||||||
Reinforcements 1  Bow Cavalier Bow Cavalier | HP 57 | Atk 53 | Spd 28 | Def 30 | Res 25 | ||||||
| | | ||||||||||
Turn 3 Reinforcements
Reinforcements 2  Axe Fighter Axe Fighter | HP 68 | Atk 53 | Spd 43 | Def 39 | Res 27 | ||||||
|---|---|---|---|---|---|---|---|---|---|---|---|
| | | ||||||||||
Reinforcements 2  Red Mage Red Mage | HP 54 | Atk 49 | Spd 40 | Def 22 | Res 33 | ||||||
| | | ||||||||||
Reinforcements 2  Lance Flier Lance Flier | HP 52 | Atk 48 | Spd 38 | Def 26 | Res 39 | ||||||
| | | ||||||||||
Turn 4 Reinforcements
Reinforcements 3  Blue Fáfnir Blue Fáfnir | HP 62 | Atk 48 | Spd 40 | Def 41 | Res 36 | ||||||
|---|---|---|---|---|---|---|---|---|---|---|---|
| | | ||||||||||
Reinforcements 3  Sword Dragon Sword Dragon | HP 57 | Atk 49 | Spd 25 | Def 39 | Res 23 | ||||||
| | | ||||||||||
Bramimond: The Enigma Strategy
Reinforcements Will Appear
Reinforcements will appear on this map, so using units of different attributes will greatly help so they can defeat them when they appear.
Watch Out for Bramimond's Special!
Bramimond is a very powerful unit and will have their Special charged on Turn 1.
Using a raventome mage like Robin (M) or Cecilia will help in defeating him, especially if they have Triangle Adept 3.
Use Flying Units
The map here is extremely narrow for infantry and cavalry units, so having fliers and flying dancers is recommended for more mobility.
Retreat the Right Side of the Map
In order to avoid several enemy units attacking your party all at once, it's much better to clear the right side of the map and tunnel them there.
That way, you can have an easier time picking Bramimond and his allies off one by one with some breathing room.
Recommended Units for Bramimond: The Enigma
Raven Effect Units
| Unit Name | |
|---|---|
|
|
Blue Infantry Tome Weapon refine gives allies powerful buffs. |
|
|
Red Infantry Tome Can prevent enemy unit from triggering their Special. Debuffs Atk and Res if his an enemy unit's Atk is higher. |
|
|
Green Cavalry Tome Weapon refine gives more firepower against colorless units. Easy to obtain unit. |
|
|
Green Armored Breath Reduces damage from enemy unit Specials. Can counterattack regardless of range. |
Tanky Units That Can Counterattack Regardless of Distance
| Unit Name | |
|---|---|
|
|
Sword Infantry His Special heals him. Easy to obtain unit. |
|
|
Red Infantry Breath Her Special heals her. Her Special can be charged easily due to her kit and heals her. |
|
|
Lance Infantry Her Special reduces damage from ranged units. Easy to obtain unit. |
|
|
Green Armored Breath Her Special can be charged easily due to her kit and heals her. |
|
|
Colorless Armored Breath Armored unit that can move 2 spaces. Her Special can be charged easily. |
|
|
Colorless Armored Beast Can make a guaranteed follow-up attack Nullifies buffs from ranged units. |
|
|
Axe Armored Reduces damage. High stats and firepower. |
|
|
Blue Infantry Tome Prevents follow-up attacks. Special can be triggered quite quickly. |
High Power Units
| Unit Name | |
|---|---|
|
|
Red Beast Flier Can make a guaranteed follow-up attack Can move 3 spaces when he transforms. |
|
|
Sword Flier Can attack twice with her weapon and counterattack regardless of range. |
|
|
Blue Cavalry Tome Can attack twice with his weapon. Easy to obtain unit. |
|
|
Blue Infantry Tome Her Special is easy to charge and can hit multiple units. |
|
|
Green Infantry Tome Very high firepower that can double because of her high spd. |
|
|
Green Infantry Tome Blade weapon with high firepower. Easy to obtain unit. |
|
|
Colorless Cavalry Bow Special allows him to gain another action. |
|
|
Colorless Beast Flier Can make a guaranteed follow-up attack Can move 3 spaces when he transforms. |
Recommended Dancer Units
| Unit Name | |
|---|---|
|
|
Sword Flier Grants buffs to ally that she dances. |
|
|
Blue Tome Flier Her skills grants powerful buffs. Her kit provides good mobility. |
|
|
Blue Tome Flier Extreme strong refresher skill Grants flying and infantry allies +1 movement space when she uses her Sing skill. |
|
|
Green Beast Flier Can move 3 spaces when he transforms. Easy to obtain unit. |
List of All Dancers | Heroes with Refresher Skills
Bramimond: The Enigma Abyssal Strategy Example
Currently Unavailable!
An Abyssal strategy example for Bramimond: The Enigma is currently unavailable. Stay tuned!
User Submitted Parties for Bramimond: The Enigma
We are looking for user submitted clears!
Let us know about your party and how you cleared the maps in the comments below, via a picture of your team and their skills.
If you have uploaded the walkthrough video on Twitter etc., please enter the URL as well!
FEH Related Guides
Mythic Hero Battle Walkthroughs
Mythic Hero Battle Walkthroughs and Schedule
List of Mythic Hero Battles
Comment
Author
Bramimond: The Enigma Abyssal Guide and Recommended Team (Mythic Hero Battle)
improvement survey
03/2026
improving Game8's site?

Your answers will help us to improve our website.
Note: Please be sure not to enter any kind of personal information into your response.

We hope you continue to make use of Game8.
Premium Articles
Rankings
- We could not find the message board you were looking for.
Gaming News
Popular Games

Genshin Impact Walkthrough & Guides Wiki

Honkai: Star Rail Walkthrough & Guides Wiki

Umamusume: Pretty Derby Walkthrough & Guides Wiki

Pokemon Pokopia Walkthrough & Guides Wiki

Resident Evil Requiem (RE9) Walkthrough & Guides Wiki

Monster Hunter Wilds Walkthrough & Guides Wiki

Wuthering Waves Walkthrough & Guides Wiki

Arknights: Endfield Walkthrough & Guides Wiki

Pokemon FireRed and LeafGreen (FRLG) Walkthrough & Guides Wiki

Pokemon TCG Pocket (PTCGP) Strategies & Guides Wiki
Recommended Games

Diablo 4: Vessel of Hatred Walkthrough & Guides Wiki

Fire Emblem Heroes (FEH) Walkthrough & Guides Wiki

Yu-Gi-Oh! Master Duel Walkthrough & Guides Wiki

Super Smash Bros. Ultimate Walkthrough & Guides Wiki

Pokemon Brilliant Diamond and Shining Pearl (BDSP) Walkthrough & Guides Wiki

Elden Ring Shadow of the Erdtree Walkthrough & Guides Wiki

Monster Hunter World Walkthrough & Guides Wiki

The Legend of Zelda: Tears of the Kingdom Walkthrough & Guides Wiki

Persona 3 Reload Walkthrough & Guides Wiki

Cyberpunk 2077: Ultimate Edition Walkthrough & Guides Wiki
All rights reserved
© 2025 Nintendo / INTELLIGENT SYSTEMS
The copyrights of videos of games used in our content and other intellectual property rights belong to the provider of the game.
The contents we provide on this site were created personally by members of the Game8 editorial department.
We refuse the right to reuse or repost content taken without our permission such as data or images to other sites.

 Heimdallr: God of Foresight
 Baldr and Höðr
 Anniversary Marth and Elm
 Legendary Ayra and Mythic Athos
 Læraðr and Níðhöggr
 Hræsvelgr: Quieting Blade
 Heiðrún and Eikþyrnir
 Loki: Trickster God
 Emblem Marth and Mythic Lumera
 Gullveig and Kvasir
 Veyle: Gentle Dragon
 Freyr: Dream-King
 Nerþuz: God of the Land
 Fomortiis and Gotoh
 Veronica and Embla
 Arval: Cycle Keeper
 Askr: God of Openness
 Medeus: Earth-Dragon King
 Elimine: Scouring Saint
 Thórr and Eitri
 Ótr: Kingsbrother
 Ullr: The Bowmaster
 Ashera: Order Goddess
 Dagr: Sun's Radiance
 Seiros: Saint of Legend
 Freyja and Triandra
 Plumeria: Lewd Dream
 Hel: Death Sovereign
 Mila: Goddess of Love
 Líf: Lethal Swordsman
 Thrasir: Omnicidal Witch
 Altina: Dawn's Trueblade
 Sothis: Girl on the Throne
 Naga: Dragon Divinity
 Yune: Chaos Goddess
 Duma: God of Strength


![Everwind Review [Early Access] | The Shaky First Step to A Very Long Journey](https://img.game8.co/4440226/ab079b1153298a042633dd1ef51e878e.png/thumb)

![Monster Hunter Stories 3 Review [First Impressions] | Simply Rejuvenating](https://img.game8.co/4438641/2a31b7702bd70e78ec8efd24661dacda.jpeg/thumb)


