Mythic Hero Battle: Fomortiis & Gotoh Abyssal Guide and Recommended Team
★ Latest Banners: Tiki: Everlasting Voice | Springtime Sisters
☆ New: Mythic Tiki (Adult) | Spring Thórr, Spring Dorothea, Spring Sothe, Spring Eirika
★ Free Units: Spring Bernadetta
☆ State of the Meta (February 2026)

This is a guide to clearing the Infernal and Abyssal maps for Mythic Hero Battle: Fomortiis & Gotoh in Fire Emblem Heroes (FEH). To see strategy for defeating Mythic Hero Battle: Fomortiis & Gotoh, enemy information, as well as the best units and party to use, read on!
| Boss Units for This Mythic Hero Battle | |
|---|---|
|
[8.5/10] |
[8.5/10] |
Table of Contents
- Mythic Hero Battle: Fomortiis & Gotoh Strategy Overview
- Unit Placement
- Abyssal Enemy Information
- Infernal Enemy Information
- Mythic Hero Battle: Fomortiis & Gotoh Strategy
- Recommended Units for Mythic Hero Battle: Fomortiis & Gotoh
- Mythic Hero Battle: Fomortiis & Gotoh Abyssal Strategy Example
- User Submitted Parties for Mythic Hero Battle: Fomortiis & Gotoh
- Related Guides
Mythic Hero Battle: Fomortiis & Gotoh Strategy Overview
| Featured Heroes |
|
|---|---|
| First Clear Reward | Abyssal: Gold Heart Charm
Infernal:
Lunatic:
Hard:
Normal:
|
| Recommended Level | Lv.40 |
| Difficulty | Abyssal Infernal Lunatic Hard |
| Conditions | Condition 1: All units must survive Condition 2: Cannot use Light's Blessing |
| Dates Active | 01/27/2023 - 02/10/2023 |
Unit Placement
| Abyssal | Infernal |
|---|---|
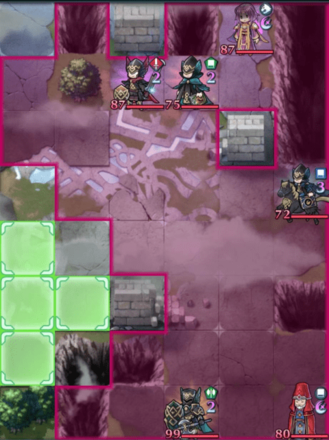
|
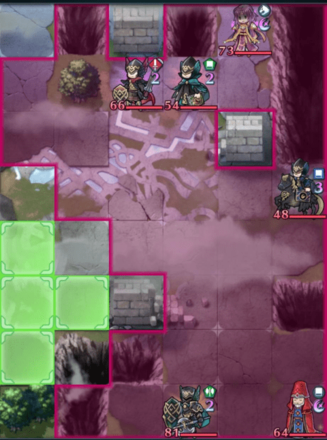
|
Abyssal Enemy Information
| A
|
HP 87 |
Atk 70 |
Spd 22 |
Def 60 |
Res 57 |
||||||
|---|---|---|---|---|---|---|---|---|---|---|---|
|
|
|
||||||||||
B
 Sword Fighter Sword Fighter
|
HP 87 |
Atk 54 |
Spd 41 |
Def 39 |
Res 27 |
||||||
|
|
|
||||||||||
C
 Green Mage Green Mage
|
HP 75 |
Atk 61 |
Spd 49 |
Def 19 |
Res 31 |
||||||
|
|
|
||||||||||
D
 Blue Flier Blue Flier
|
HP 72 |
Atk 53 |
Spd 49 |
Def 23 |
Res 45 |
||||||
|
|
|
||||||||||
E
 Axe Knight Axe Knight
|
HP 99 |
Atk 62 |
Spd 19 |
Def 55 |
Res 23 |
||||||
|
|
|
||||||||||
| F
|
HP 80 |
Atk 68 |
Spd 21 |
Def 50 |
Res 54 |
||||||
|
|
|
||||||||||
Abyssal Reinforcements
Turn 2 Reinforcements
Reinforcements 1  Lance Flier Lance Flier | HP 73 | Atk 56 | Spd 47 | Def 23 | Res 38 | ||||||
|---|---|---|---|---|---|---|---|---|---|---|---|
| | | ||||||||||
Reinforcements 1  Lance Dragon Lance Dragon | HP 77 | Atk 60 | Spd 27 | Def 50 | Res 21 | ||||||
| | | ||||||||||
Reinforcements 1  Red Thief Red Thief | HP 77 | Atk 50 | Spd 49 | Def 20 | Res 41 | ||||||
| | | ||||||||||
Turn 3 Reinforcements
Reinforcements 2  Red Cavalier Red Cavalier | HP 71 | Atk 55 | Spd 30 | Def 20 | Res 41 | ||||||
|---|---|---|---|---|---|---|---|---|---|---|---|
| | | ||||||||||
Reinforcements 2  Sword Knight Sword Knight | HP 99 | Atk 64 | Spd 19 | Def 51 | Res 23 | ||||||
| | | ||||||||||
Reinforcements 2  Lance Knight Lance Knight | HP 97 | Atk 62 | Spd 19 | Def 51 | Res 23 | ||||||
| | | ||||||||||
Turn 4 Reinforcements
Reinforcements 3  Green Fáfnir Green Fáfnir | HP 83 | Atk 52 | Spd 44 | Def 45 | Res 35 | ||||||
|---|---|---|---|---|---|---|---|---|---|---|---|
| | | ||||||||||
Reinforcements 3  Blue Fáfnir Blue Fáfnir | HP 83 | Atk 52 | Spd 44 | Def 41 | Res 39 | ||||||
| | | ||||||||||
Infernal Enemy Information
| A
|
HP 73 |
Atk 62 |
Spd 17 |
Def 51 |
Res 49 |
||||||
|---|---|---|---|---|---|---|---|---|---|---|---|
|
|
|
||||||||||
B
 Sword Fighter Sword Fighter
|
HP 66 |
Atk 50 |
Spd 37 |
Def 36 |
Res 24 |
||||||
|
|
|
||||||||||
C
 Green Mage Green Mage
|
HP 54 |
Atk 57 |
Spd 45 |
Def 17 |
Res 28 |
||||||
|
|
|
||||||||||
D
 Blue Flier Blue Flier
|
HP 48 |
Atk 50 |
Spd 45 |
Def 21 |
Res 42 |
||||||
|
|
|
||||||||||
E
 Axe Knight Axe Knight
|
HP 81 |
Atk 58 |
Spd 17 |
Def 51 |
Res 21 |
||||||
|
|
|
||||||||||
| F
|
HP 64 |
Atk 50 |
Spd 16 |
Def 42 |
Res 46 |
||||||
|
|
|
||||||||||
Infernal Reinforcements
Turn 2 Reinforcements
Reinforcements 1  Lance Flier Lance Flier | HP 52 | Atk 53 | Spd 43 | Def 21 | Res 34 | ||||||
|---|---|---|---|---|---|---|---|---|---|---|---|
| | | ||||||||||
Reinforcements 1  Lance Dragon Lance Dragon | HP 57 | Atk 56 | Spd 25 | Def 46 | Res 18 | ||||||
| | | ||||||||||
Reinforcements 1  Red Thief Red Thief | HP 56 | Atk 47 | Spd 45 | Def 18 | Res 37 | ||||||
| | | ||||||||||
Turn 3 Reinforcements
Reinforcements 2  Red Cavalier Red Cavalier | HP 47 | Atk 51 | Spd 28 | Def 18 | Res 37 | ||||||
|---|---|---|---|---|---|---|---|---|---|---|---|
| | | ||||||||||
Reinforcements 2  Sword Knight Sword Knight | HP 81 | Atk 60 | Spd 17 | Def 47 | Res 21 | ||||||
| | | ||||||||||
Reinforcements 2  Lance Knight Lance Knight | HP 79 | Atk 58 | Spd 17 | Def 47 | Res 21 | ||||||
| | | ||||||||||
Turn 4 Reinforcements
Reinforcements 3  Green Fáfnir Green Fáfnir | HP 62 | Atk 49 | Spd 40 | Def 41 | Res 32 | ||||||
|---|---|---|---|---|---|---|---|---|---|---|---|
| | | ||||||||||
Reinforcements 3  Blue Fáfnir Blue Fáfnir | HP 62 | Atk 49 | Spd 40 | Def 37 | Res 36 | ||||||
| | | ||||||||||
Mythic Hero Battle: Fomortiis & Gotoh Strategy
Use Player Phase Units!
If your barracks has units with multiple actions, it is possible to mount an offensive on turn one and clear the top half of the map.
On your turn one, before the enemies act, Fomortiis is still untransformed and thus does not have access to his Special cooldown accceleration and Distant Counter effects. Armed with this knowledge, you can target his allies with a ranged unit, which will force Fomortiis to trigger his Savior but be unable to retaliate. If you have powerful enough units, or attack multiple times, you can defeat him on turn one!
Using these units with multiple actions, clear the top half of the map, since both the Axe Knight and Gotoh are unable to reach your units on the first turn.
Use the following turns to implement a Hit and Run strategy, defeating foes in range and then retreating to safety.
Use a Savior strategy!
A 【Savior】 strategy is also possible on this map with properly built Save tanks and support units.
Using this strategy, Fomortiis is rendered immobile and can be safely ignored until the end.
Position your team ball in the middle of the map, taking caution when Gotoh approaches.
If you have a unit that can pierce non-Special damage reduction through skills like Lethality, Deadeye, or exclusive skills like Legendary Veronica's Enclosure, field them and use them to defeat Gotoh.
Alternatively, equip a unit with the Hardy Bearing 3 Sacred Seal to dodge Gotoh's massive damage reduction on consecutive hits. Hardy Bearing also provides additional utility against the Blue Flier with Spd Preempt 3!
Take note of notable generic enemies
The following generic enemies on this map have notable skills that need to be kept in mind:
- The Blue Flier on turn one has Spd Preempt 3 and Phantom Spd 3, allowing for an instant retaliation against ranged foes.
- The Lance Dragon on turn two has Odd Tempest 3, which can surprise you on turn three. Keep the extended threat range in mind.
- Both the Sword Knight and the Lance Knight on turn three have Assault Troop 3, which allows them to move up to three spaces in cardinal directions.
Recommended Units for Mythic Hero Battle: Fomortiis & Gotoh
[Player Phase Units]
| Unit Name | |
|---|---|
|
|
Sword Armored Regal Sunshade's brave effect can quickly eliminate enemies. Raging Storm can grant one additional action after combat. Inheriting Galeforce can grant a third action per turn. |
|
|
Blue Bow Flying Flamefrost Bow's brave effect can quickly defeat enemies. Duo Skill grants herself an additional action. |
|
|
Green Tome Cavalry Ninjutsu Scrolls' brave effect can quickly defeat enemies. Duo Skill grants herself an additional action. |
|
|
Colorless Dagger Flying Tailwind Shuriken's brave effect can quickly defeat enemies. Duo Skill grants herself an additional action. |
|
|
Lance Cavalry A Fate Changed! allows a Reposition effect while granting another action to himself and copying any bonuses on target ally. |
|
|
Lance Infantry Murderous Lion prevents counterattacks and grants Canto to allow post-combat mobility. Inheriting Flashing Blade 4 and Ninja Yari+ from a Ninja Navarre combat manual along with Galeforce allows multiple actions. |
|
|
Sword Cavalry Lands Sword grants Atk/Spd bonuses and disables non-Special damage reduction effects. Hoðr's Zeal grants bonus damage and Canto allowing Nanna to retreat to safety after combat. |
|
|
Red Tome Cavalry Enclosing Dark grants Atk/Spd bonuses, inflicts Spd/Res penalties, and can prevent foes from making a counterattack. Enclosure neutralizes non-Special damage reduction and Guard effects. |
|
|
Colorless Bow Infantry Bow of Frelia disables non-Special damage reduction when his Special is triggered. |
[Savior Tank Units]
| Unit Name | |
|---|---|
|
|
Lance Armored The king of blue tank units. Can counterattack at a distance, deny enemy follow-ups, and have his own follow-up attack. |
|
|
Blue Breath Armored A Brave Hector that attacks with magic damage and has higher base stats. |
|
|
Axe Armored Can heal post-combat with Nifl's Bite and mitigate damage with Ice Mirror and Hardy Fighter 3. Nifl's Bite allows a counterattack against sweep effects. |
|
|
Blue Breath Armored Deals magic damage and can protect allies using With Everyone II. Divine Mist deals effective damage against dragon foes. |
[Support Units]
| Unit Name | |
|---|---|
|
|
Staff Flying Grants damage reduction, healing, and can shut down "At start of turn" effects of foes in cardinal directions. |
|
|
Staff Flying Grants damage reduction and healing. |
|
|
Lance Infantry Grants bonus stats and Special acceleration to nearby allies. Can double as an offensive unit with refined Geirskögul dealing effective damage against dragon foes. |
|
|
Sword Infantry Grants bonus stats to his Ally Support during combat. |
|
|
Staff Flying Grants Atk+6 and Special acceleration to nearby allies during combat. |
[Refresher Unit]
| Unit Name | |
|---|---|
|
|
Green Tome Flying Grants additional Atk to allies in similar cardinal directions Can use her Duo Skill to grant another action to an adjacent ally. |
|
|
Blue Tome Flying Grants additional Atk and Spd to allies in similar cardinal directions. |
|
|
Blue Tome Flying Grants additional bonuses equal to highest bonus on unit and +1 movement. |
|
|
Green Tome Cavalry Grants +6 to all stats and +1 movement to target unit and all adjacent allies Can use Harmonized Skill to grant extra actions to allies. |
List of Refresher-Assist Units
Mythic Hero Battle: Fomortiis & Gotoh Abyssal Strategy Example
Currently Unavailable!
An Abyssal strategy example for Mythic Hero Battle: Fomortiis & Gotoh is currently unavailable. Stay tuned!
User Submitted Parties for Mythic Hero Battle: Fomortiis & Gotoh
We are looking for user submitted clears!
Let us know about your party and how you cleared the maps in the comments below, via a picture of your team and their skills.
If you have uploaded the walkthrough video on Twitter etc., please enter the URL as well!
FEH Related Guides
Mythic Hero Battle Walkthroughs
Mythic Hero Battle Walkthroughs and Schedule
List of Mythic Hero Battles
Comment
I've only been playing the game a few months now so I'm not an expert or anything, but after a lot of trials with different teams, this is the one that finally got me that Abyssal win:
Author
Mythic Hero Battle: Fomortiis & Gotoh Abyssal Guide and Recommended Team
improvement survey
03/2026
improving Game8's site?

Your answers will help us to improve our website.
Note: Please be sure not to enter any kind of personal information into your response.

We hope you continue to make use of Game8.
Premium Articles
Rankings
- We could not find the message board you were looking for.
Gaming News
Popular Games

Genshin Impact Walkthrough & Guides Wiki

Honkai: Star Rail Walkthrough & Guides Wiki

Umamusume: Pretty Derby Walkthrough & Guides Wiki

Pokemon Pokopia Walkthrough & Guides Wiki

Resident Evil Requiem (RE9) Walkthrough & Guides Wiki

Monster Hunter Wilds Walkthrough & Guides Wiki

Wuthering Waves Walkthrough & Guides Wiki

Arknights: Endfield Walkthrough & Guides Wiki

Pokemon FireRed and LeafGreen (FRLG) Walkthrough & Guides Wiki

Pokemon TCG Pocket (PTCGP) Strategies & Guides Wiki
Recommended Games

Diablo 4: Vessel of Hatred Walkthrough & Guides Wiki

Fire Emblem Heroes (FEH) Walkthrough & Guides Wiki

Yu-Gi-Oh! Master Duel Walkthrough & Guides Wiki

Super Smash Bros. Ultimate Walkthrough & Guides Wiki

Pokemon Brilliant Diamond and Shining Pearl (BDSP) Walkthrough & Guides Wiki

Elden Ring Shadow of the Erdtree Walkthrough & Guides Wiki

Monster Hunter World Walkthrough & Guides Wiki

The Legend of Zelda: Tears of the Kingdom Walkthrough & Guides Wiki

Persona 3 Reload Walkthrough & Guides Wiki

Cyberpunk 2077: Ultimate Edition Walkthrough & Guides Wiki
All rights reserved
© 2025 Nintendo / INTELLIGENT SYSTEMS
The copyrights of videos of games used in our content and other intellectual property rights belong to the provider of the game.
The contents we provide on this site were created personally by members of the Game8 editorial department.
We refuse the right to reuse or repost content taken without our permission such as data or images to other sites.
 Heimdallr: God of Foresight
 Baldr and Höðr
 Anniversary Marth and Elm
 Legendary Ayra and Mythic Athos
 Læraðr and Níðhöggr
 Hræsvelgr: Quieting Blade
 Heiðrún and Eikþyrnir
 Loki: Trickster God
 Emblem Marth and Mythic Lumera
 Gullveig and Kvasir
 Veyle: Gentle Dragon
 Freyr: Dream-King
 Nerþuz: God of the Land
 Veronica and Embla
 Arval: Cycle Keeper
 Askr: God of Openness
 Medeus: Earth-Dragon King
 Elimine: Scouring Saint
 Thórr and Eitri
 Ótr: Kingsbrother
 Ullr: The Bowmaster
 Ashera: Order Goddess
 Dagr: Sun's Radiance
 Seiros: Saint of Legend
 Freyja and Triandra
 Plumeria: Lewd Dream
 Hel: Death Sovereign
 Mila: Goddess of Love
 Bramimond: the Enigma
 Líf: Lethal Swordsman
 Thrasir: Omnicidal Witch
 Altina: Dawn's Trueblade
 Sothis: Girl on the Throne
 Naga: Dragon Divinity
 Yune: Chaos Goddess
 Duma: God of Strength


![Everwind Review [Early Access] | The Shaky First Step to A Very Long Journey](https://img.game8.co/4440226/ab079b1153298a042633dd1ef51e878e.png/thumb)

![Monster Hunter Stories 3 Review [First Impressions] | Simply Rejuvenating](https://img.game8.co/4438641/2a31b7702bd70e78ec8efd24661dacda.jpeg/thumb)


Basically I went heavy defense + a pocket healer. I tried this same team but with Fomortiis in place of Winter Knight, and Fomortiis just couldn't take the hits that my Winter Knight can, so he had to be swapped out. I unfortunately don't have most of the suggested teammates in this article so like I said, I had to mess around until I found something that worked. These folks mostly just stood in the middle and rarely attacked units that were close enough. Mostly they killed via defense.